Overview
Users may build their own custom Form controls with JavaScript (JS) to use within the platform. Similar to built-in controls, JS controls may contain inputs and outputs.
Each type of JS control is configured similarly. Below is a brief explanation of the different control types.
| Control Type | Function |
|---|---|
| Action Control | Action Controls are Form controls to trigger actions i.e. Button, Link. |
| Data Control | This is a Form control that allows users to work with Data like JS Data Grids or Text Boxes |
| Page Control | These are Page controls which are custom JS controls that are used in the Dashboard/Page Designer |
| Scripts | This feature allows users to include Custom Scripts to uploaded JS controls |
| Styles | This feature allows users to include Custom Styles (CSS) to uploaded JS controls |
For Action, Data, and Page controls, users must upload a JS file and have the control's Class name declared within Decisions.
Scripts and Style JS controls only need to upload the JS file(s).
Troubleshooting JS Controls
Chrome developer tools are necessary to troubleshoot JS controls.To access Chrome developer tools, press F12 on the keyboard and navigate to the 'Network' tab to verify the JS control is running. Alternatively, emptying the cache then reloading the platform may solve JS control related issues.
Creating An JS Action Control
The following example JS action control creates three Buttons with their own outcome paths from the Form. Save this file as ListButtonControl.js.
  function ListButtonControl() { };

  ListButtonControl.prototype.initialize = function(host, component) {
    // Keep track of the host; we'll need it later.
    this.host = host;
    // Initialize our count data:
    this.currentCount = 0;
    this.totalCount = 0;
    // This one is important when we have input data. See 'consumeData' for details.
    this.lastConsumed = null;

    // We're going to put both buttons in a div, then append the div to the host:
    var control = document.createElement('div');

	// Loop through all possible outcome names.
	for (var outcome of component.PossibleOutcomeNames) {
		// create button element
		var button = document.createElement('button');
		// add class
		button.classList.add('myControlButton');
		button.type = 'button';
		// set the text same as outcome name
		button.textContent = outcome;

		var thisControl = this; // To avoid 'this' problems inside the onclick event.

		button.onclick = function(e){
			// to submit the form when button is clicked, selectPath should be called with correct outcome name
			// the outcome here should be from possibleOutcome names that we define while creating the JS action control
			// otherwise the flow will throw an error.
			component.selectPath(this.textContent);
		};

		control.appendChild(button);
	}

    host.append(control);

    // The two buttons appear too close together unless we add some css:
    var style = document.createElement('style');
    style.type = 'text/css';
    style.innerHTML = '.myControlButton{ margin: 5px; height: 30px; color: #fff;background-color: #007bff;border-color: #007bff;border: 1px solid transparent;padding: .375rem .75rem;font-size: 1rem;line-height: 1.5; }';
    document.head.appendChild(style);
  };

  ListButtonControl.prototype.resize = function(height, width) {
    if (this.host && height && width && (height > 0) && (width > 0)) {
      this.host.css({ width: width, height: height });
    }
  };
Uploading the JS File
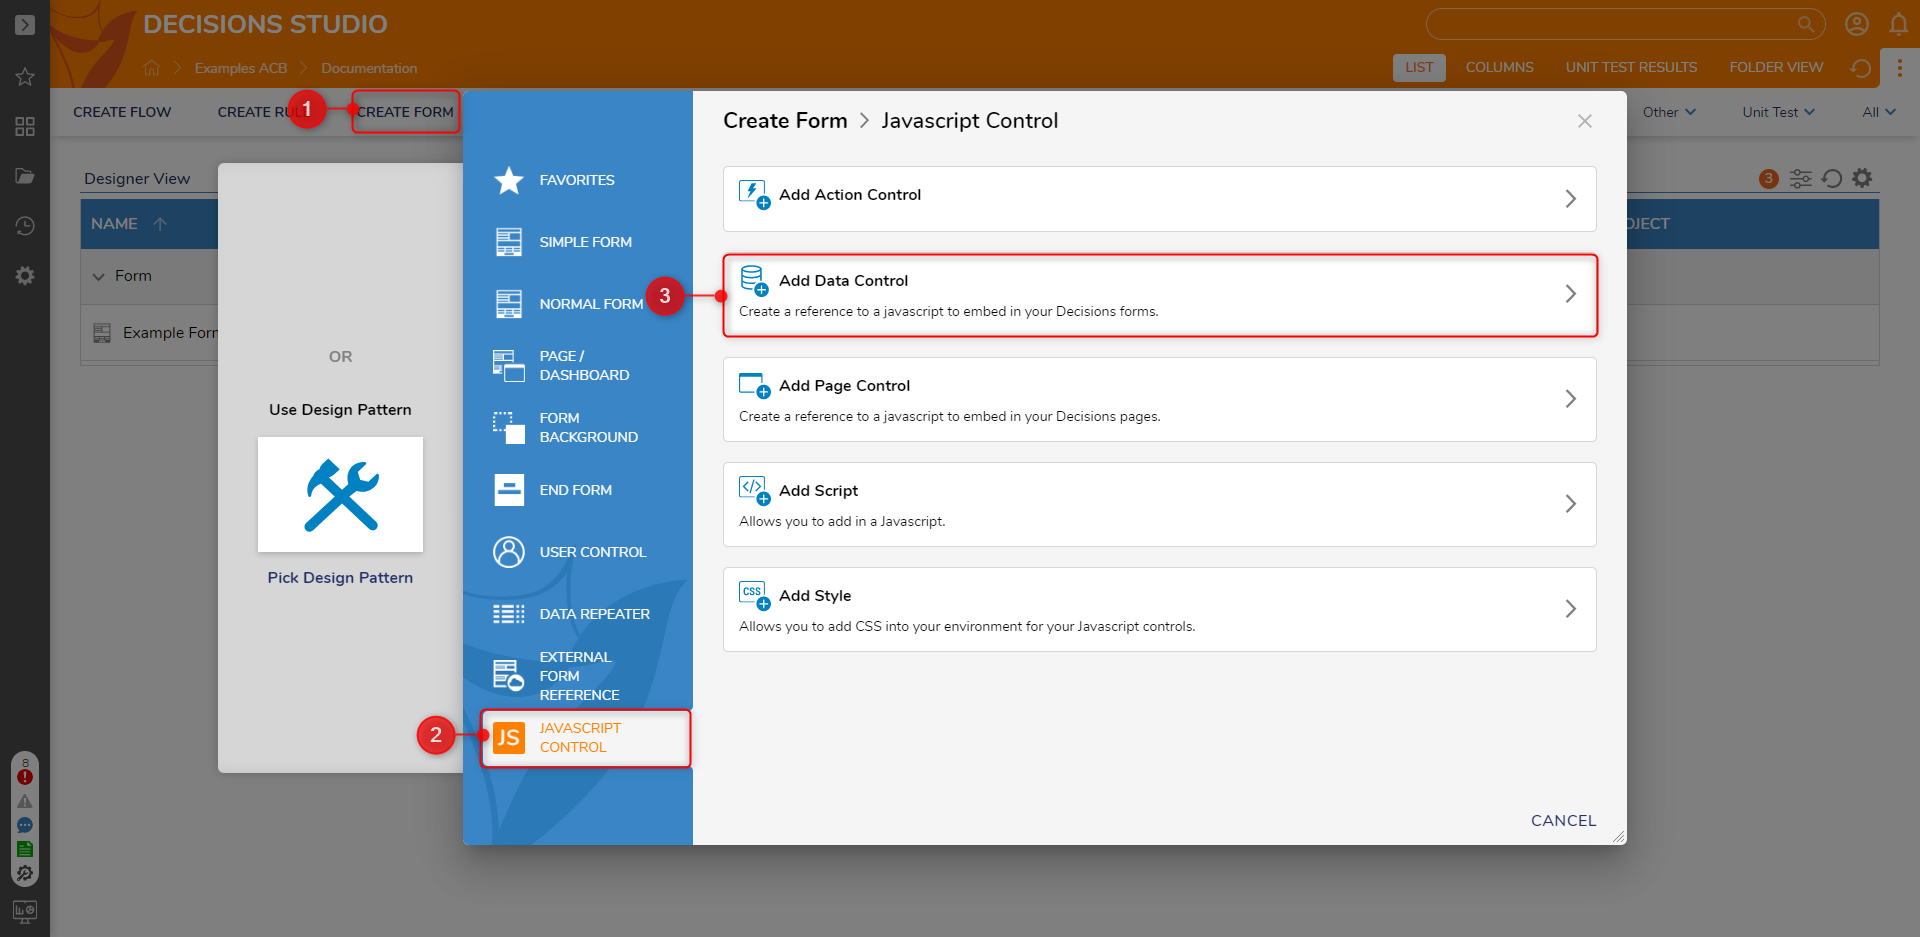
- Navigate to a Designer Folder. Select CREATE FORM.
- In the Create Form dialog, choose the JavaScript Control menu, and select Add Action Control.
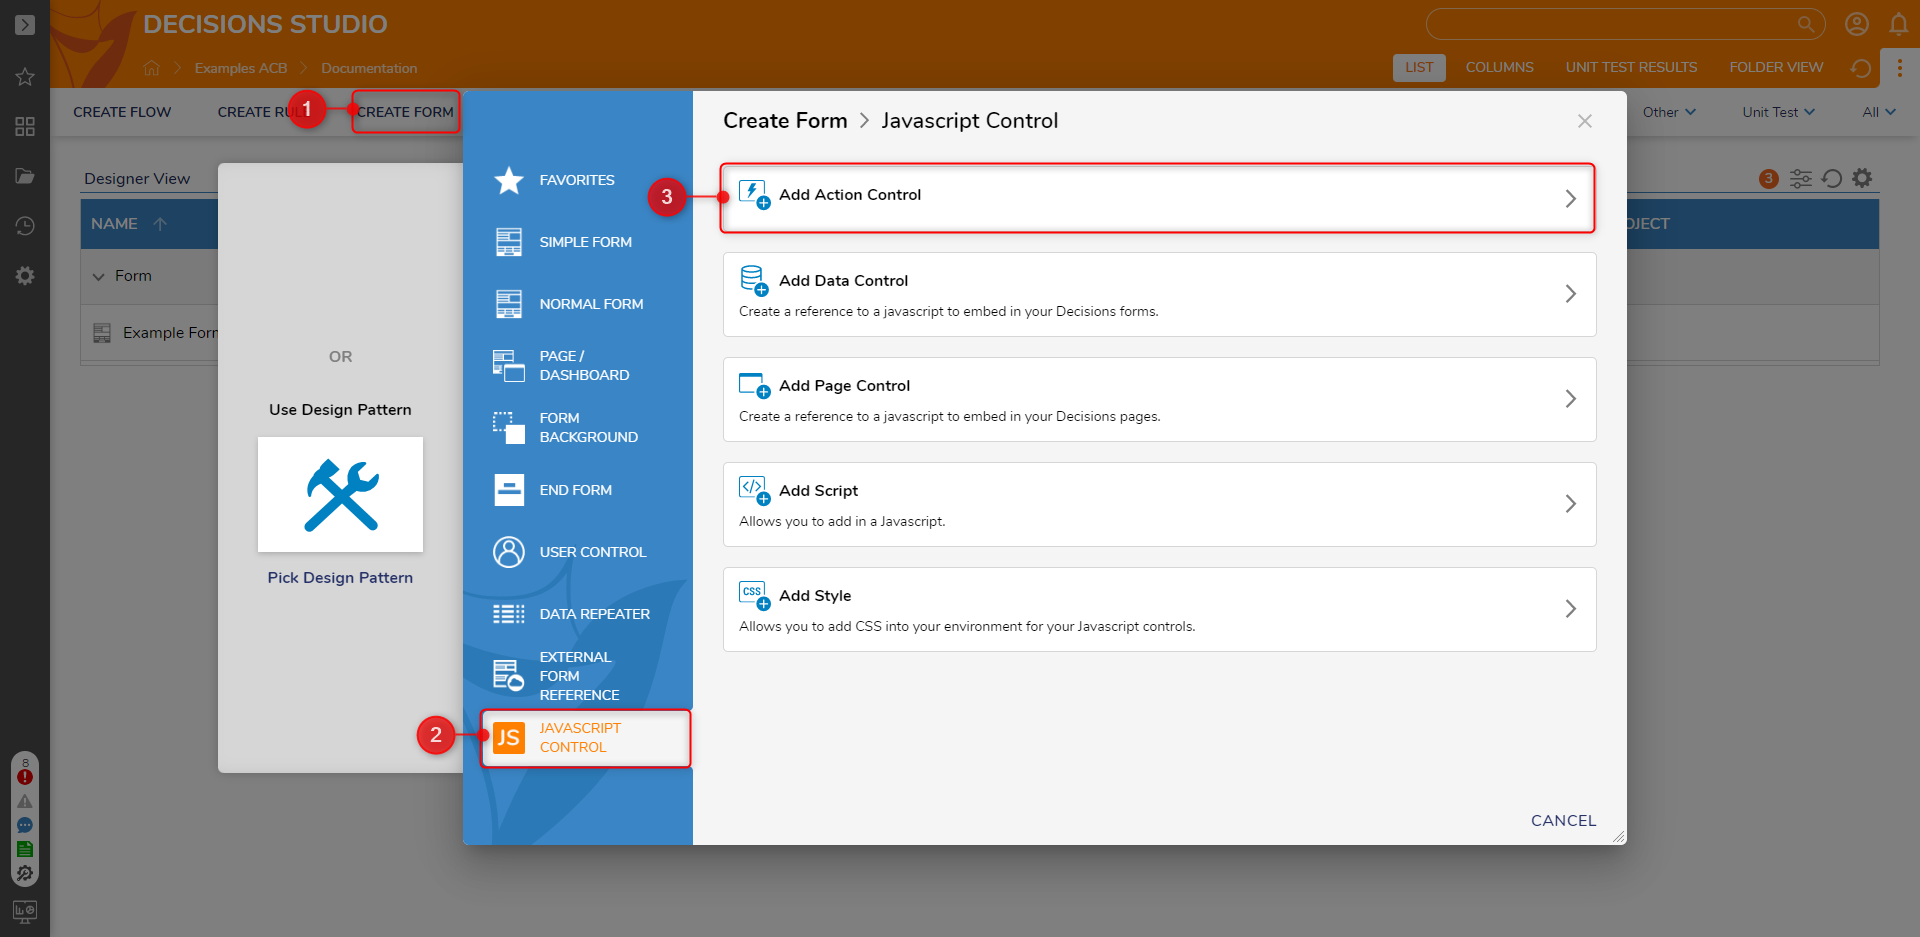
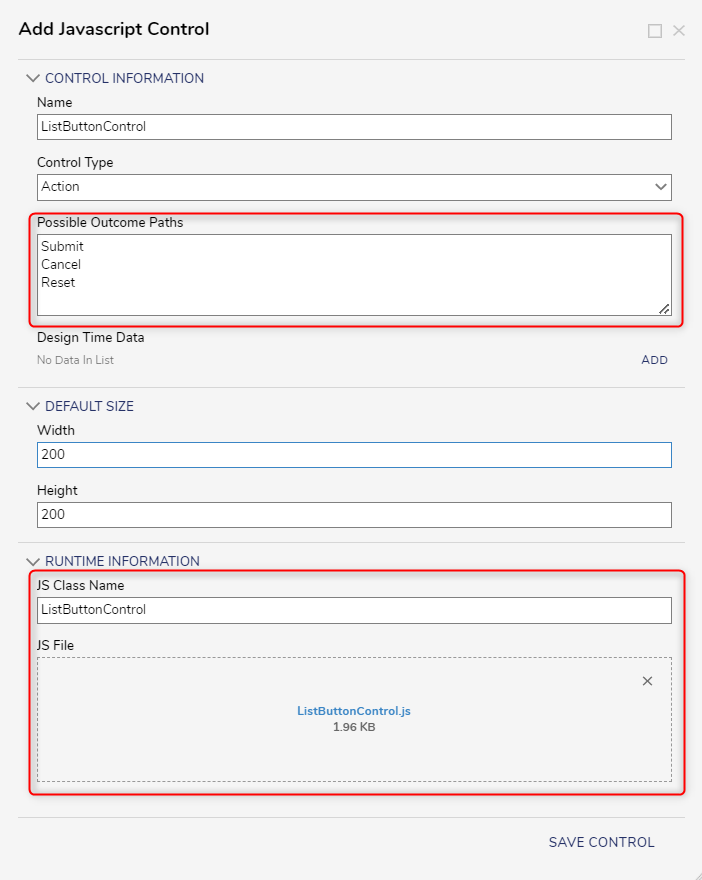
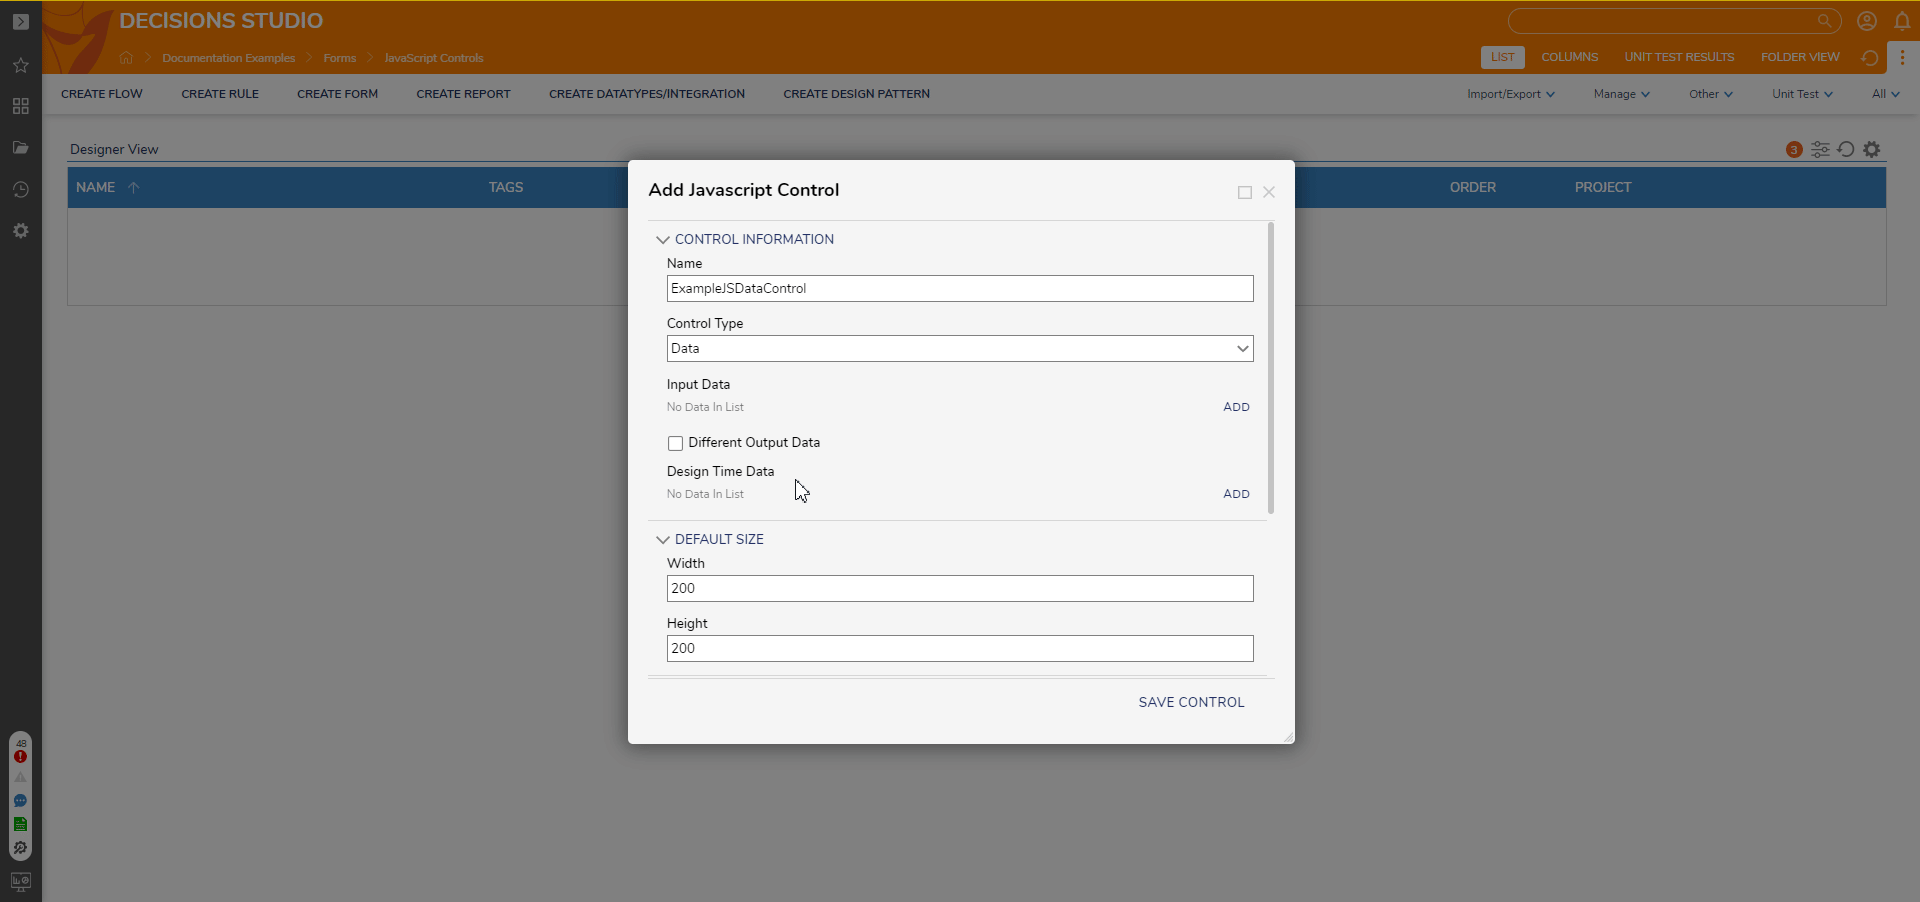
- In the Add Javascript Control window, name the control. Ensure the Control Type is set to Action. This control has no input data; therefore, nothing needs to be added to the Input Data section.
- Create the list of Buttons the JS control will create in the Possible Outcome Paths setting. Enter 'Submit', 'Cancel', and 'Reset'.
- Declare the JS Class name to "ListButtonControl".
- Select SAVE CONTROL to confirm creation. It will now appear in the Designer Folder as JavaScriptDataControl.
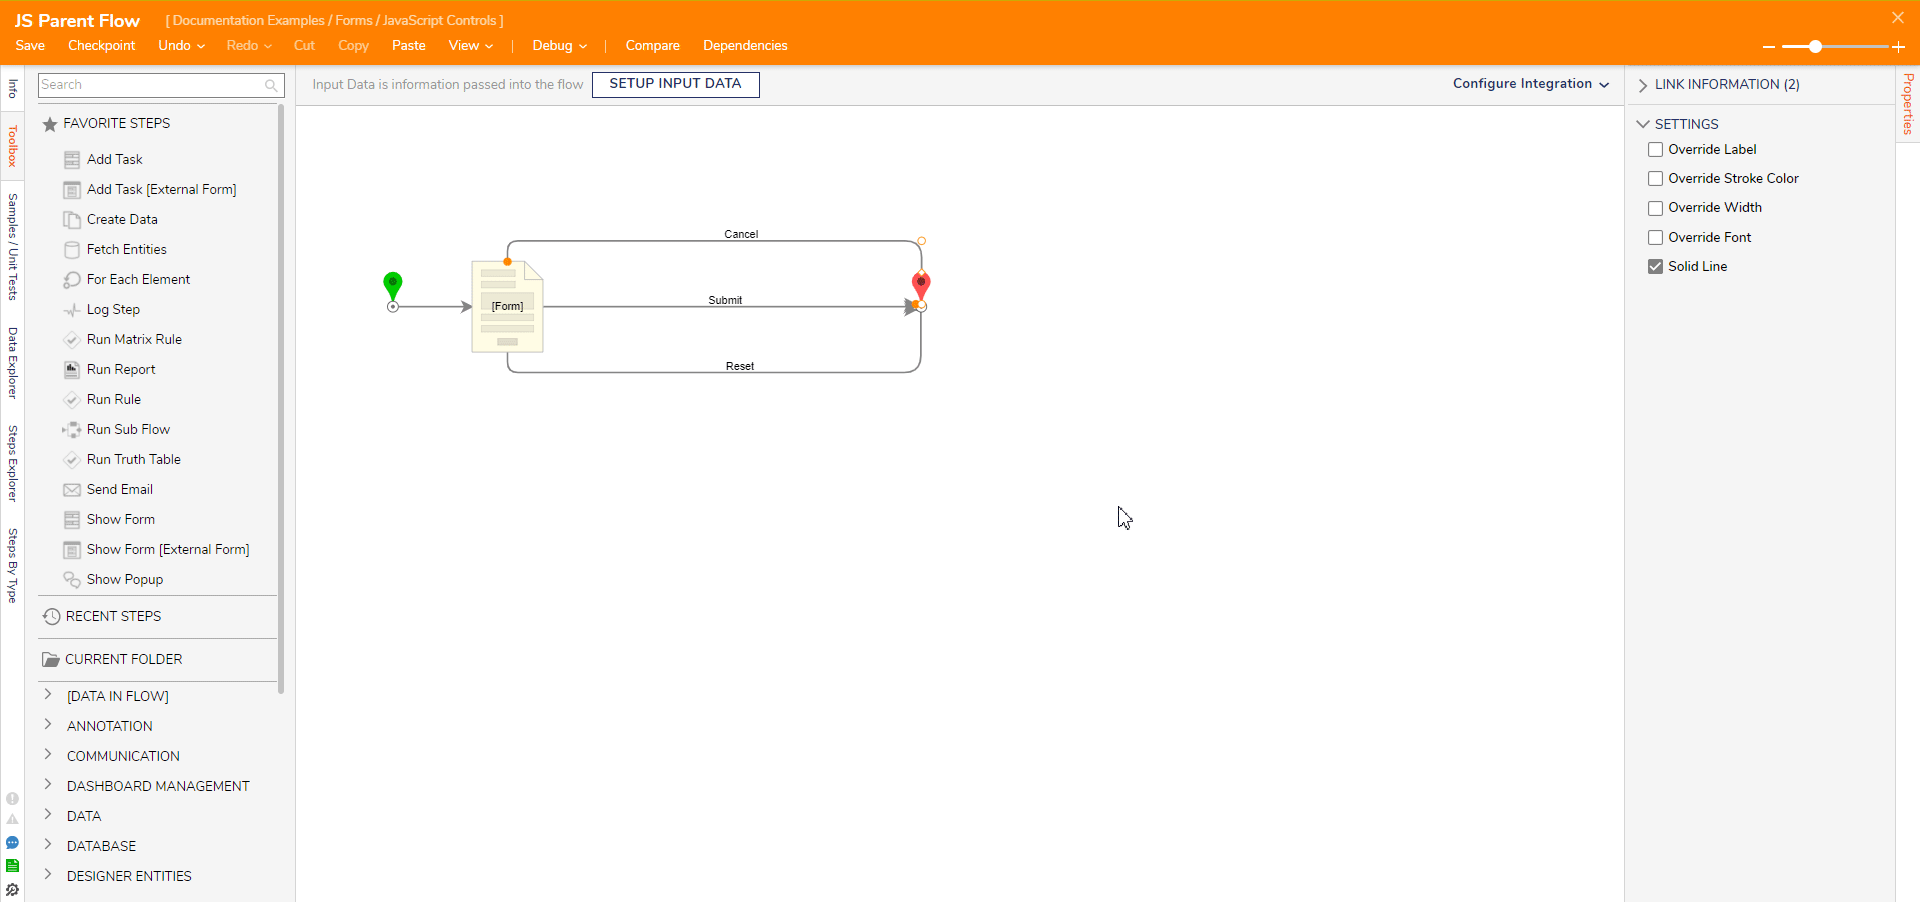
Adding the JS Control into a Form
- In a Designer Folder, create a new Flow and open it in Flow Designer.
- Add a Show Form step to create a new Form. It will automatically open in the Form Designer.
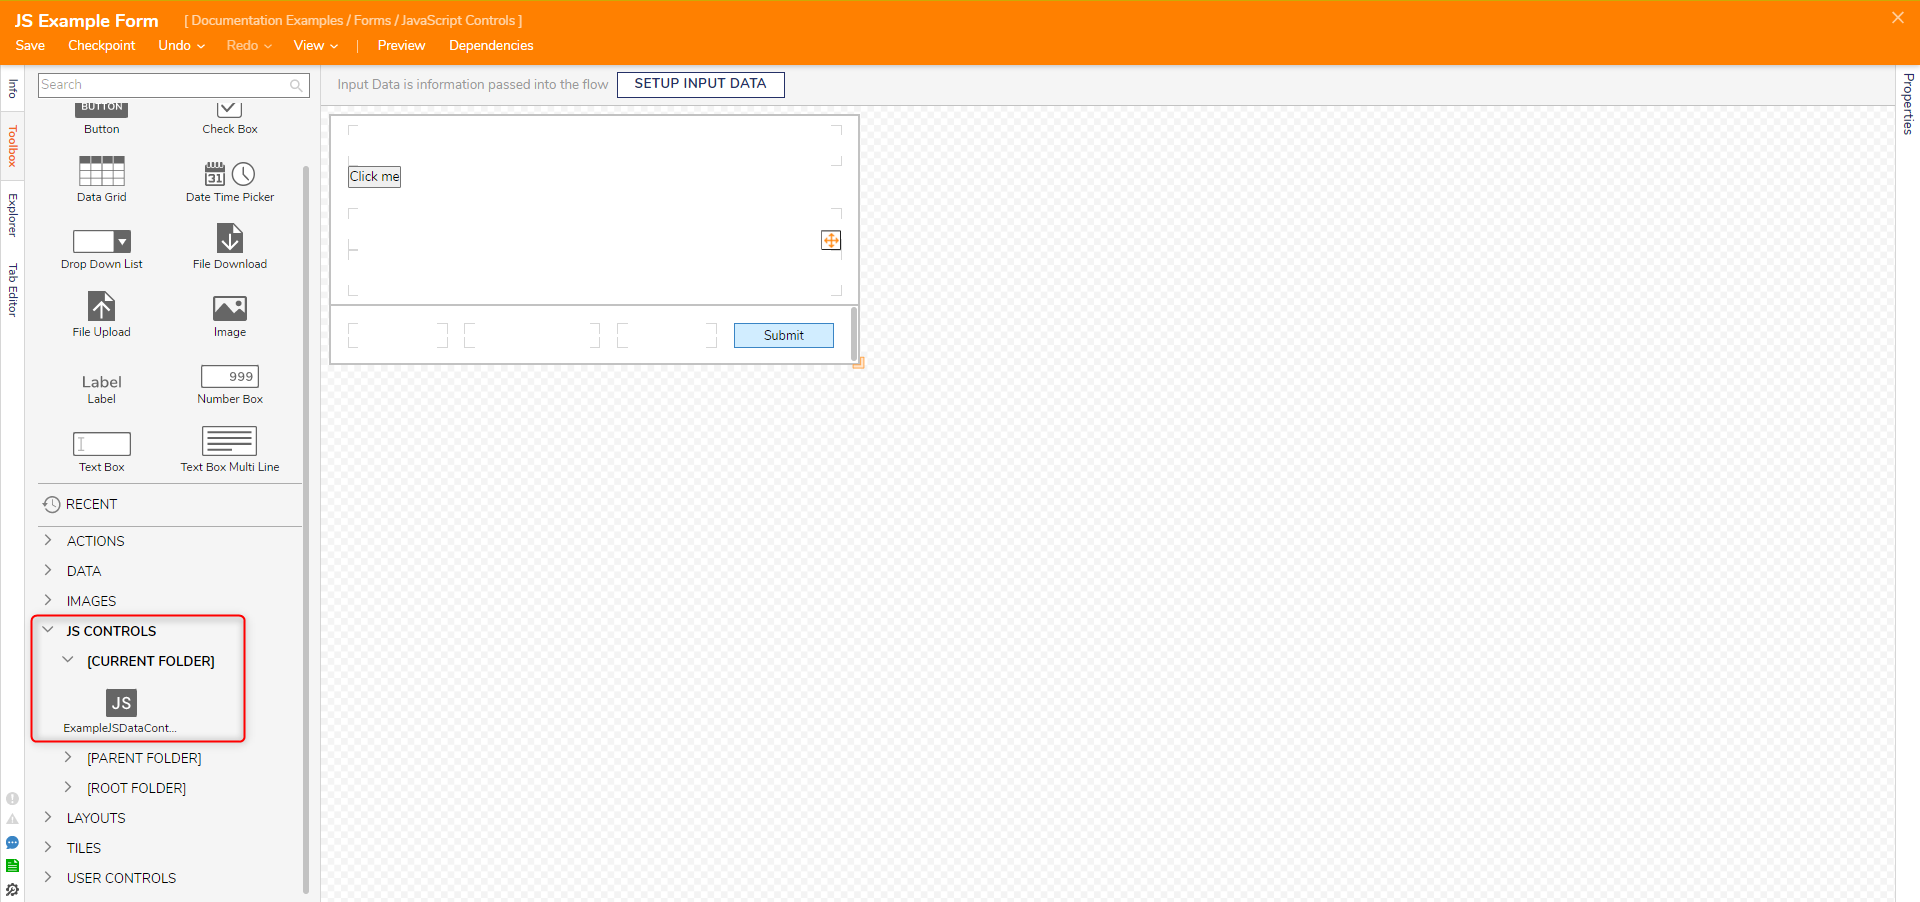
- Expand JS Controls >[Current Folder] drag the ListButtonControl to the Form.

- Save and close the Form Designer. Connect the Show Form step to the End step.
Debug
- Select the Debug Action from the Flow Designer.
- Click START DEBUGGING.
- Select a Button to follow its outcome path. Select CREATE NEW SESSION to try each path.
Creating a JS Data Control
This following example JS data control consists of a Button with an the output counting the number of times it has been clicked. The control does not require input data.
All JavaScript data controls will have these 4 specific functions:
 interface JSBasedComponentInterface {
    initialize(host: JQuery, component: any): void;
    resize(height: number, width: number): void;
    setValue?(data: any): void;
    getValue?(): any;
  }
| Functions | Purpose |
|---|---|
| initialize | This function will be called one time when the control is being created. |
| This function can be used to handle special resizing rules, but most controls will not need to modify this - copying and pasting this 'resize' function should suffice when necessary. | |
| setValue | This function is used when a control takes input data. For an example that includes input data, see the Creating JavaScript Controls (Advanced) for this feature. |
| getValue | This is where the output will be returned. |
The completed JavaScript control for this example will look like the code block below. Save this as MyControl.js,
 function MyControl() { };

 MyControl.prototype.initialize = function(host, component){
  // Here we assign 'host' to a variable on this control,
    //   so that we can access it later:
  this.host = host;
  // Our counter starts at 0:
  this.timesClicked = 0;

  // Create and configure the button:
  var button = document.createElement('button');
  button.type = 'button';
  button.textContent = 'Click me';

  var thisControl = this; // To avoid 'this' problems inside the onclick event.

  // When the button is clicked, increment our counter:
  button.onclick = function(e){
   thisControl.timesClicked++;
  };

  // Add the button to the 'host' jquery object:
  host.append(button);
 };

 MyControl.prototype.resize = function(height, width) {
  if (this.host && height && width && (height > 0) && (width > 0)) {
   this.host.css({ width: width, height: height });
  }
 };

 MyControl.prototype.setValue = function(data){
  // This control has no inputs, so no code is necessary here.
 };

 MyControl.prototype.getValue = function() {
  // Output data should be an object with properties that match the
    //   names of our outputs. In this case, our output is named 'TimesClicked'.
  return {
   TimesClicked: this.timesClicked
  };
 };
Uploading the JS File
- Navigate to a Designer Folder. Select CREATE FORM.
- In the Create Form dialog, choose the JavaScript Control menu, and select Add Data Control.
- In the Add Javascript Control window, name the control. For Control Type, ensure this is set to Data. This control has no input data; therefore, nothing needs to be added to the Input Data section.
- Enable the Different Output Data checkbox to show the Output Data section.
- Select ADD under the Output Data section. The control has a numerical output named "TimesClicked". In the Name field type "TimesClicked", and pick Int32 [Number] for the Type field, then select 'Ok'.
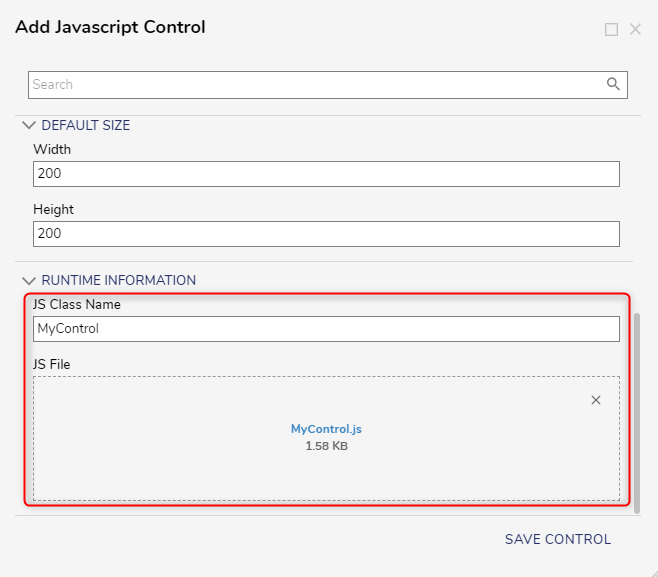
- In the Runtime Information section, the JS Class Name must match the class name inside the .js file. The class name is 'MyControl', type MyControl in the JS Class Name field. Select Choose File to upload the MyJsControl.js file.JS Class Name Must MatchUnder the 'Runtime Information' the 'JS Class Name' must match the class name in the JavaScript file. If they do not match, the JS control will not function in the Form.
- Select SAVE CONTROL to create the new Form Control. It will now appear in the Designer Folder as JavaScriptDataControl.
- Repeat steps in the Adding the JS Control into a Form subsection to add the JS data control to the new Form.
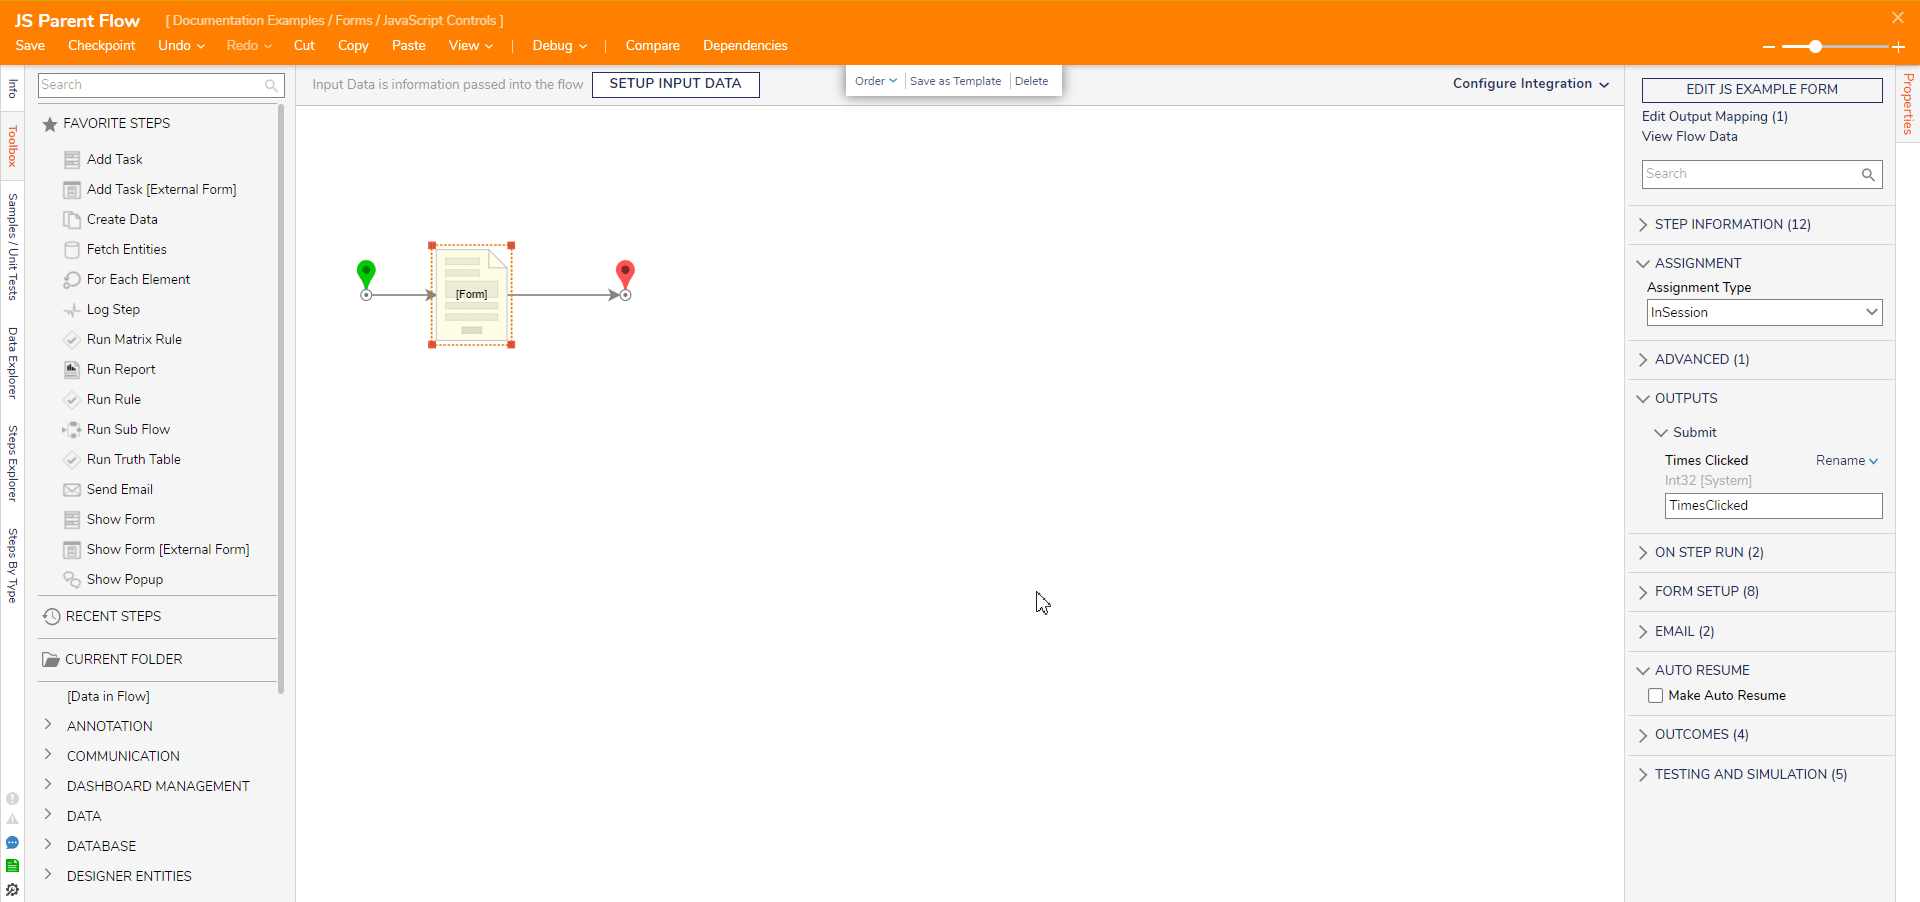
Debug
- Select Debug in the top action panel of the Flow Designer.
- Select the 'Click me' button multiple times, then select Submit.
- Select the Show Form step, and then select View Output Data. Notice that the output from the Form includes the TimesClicked.