Overview
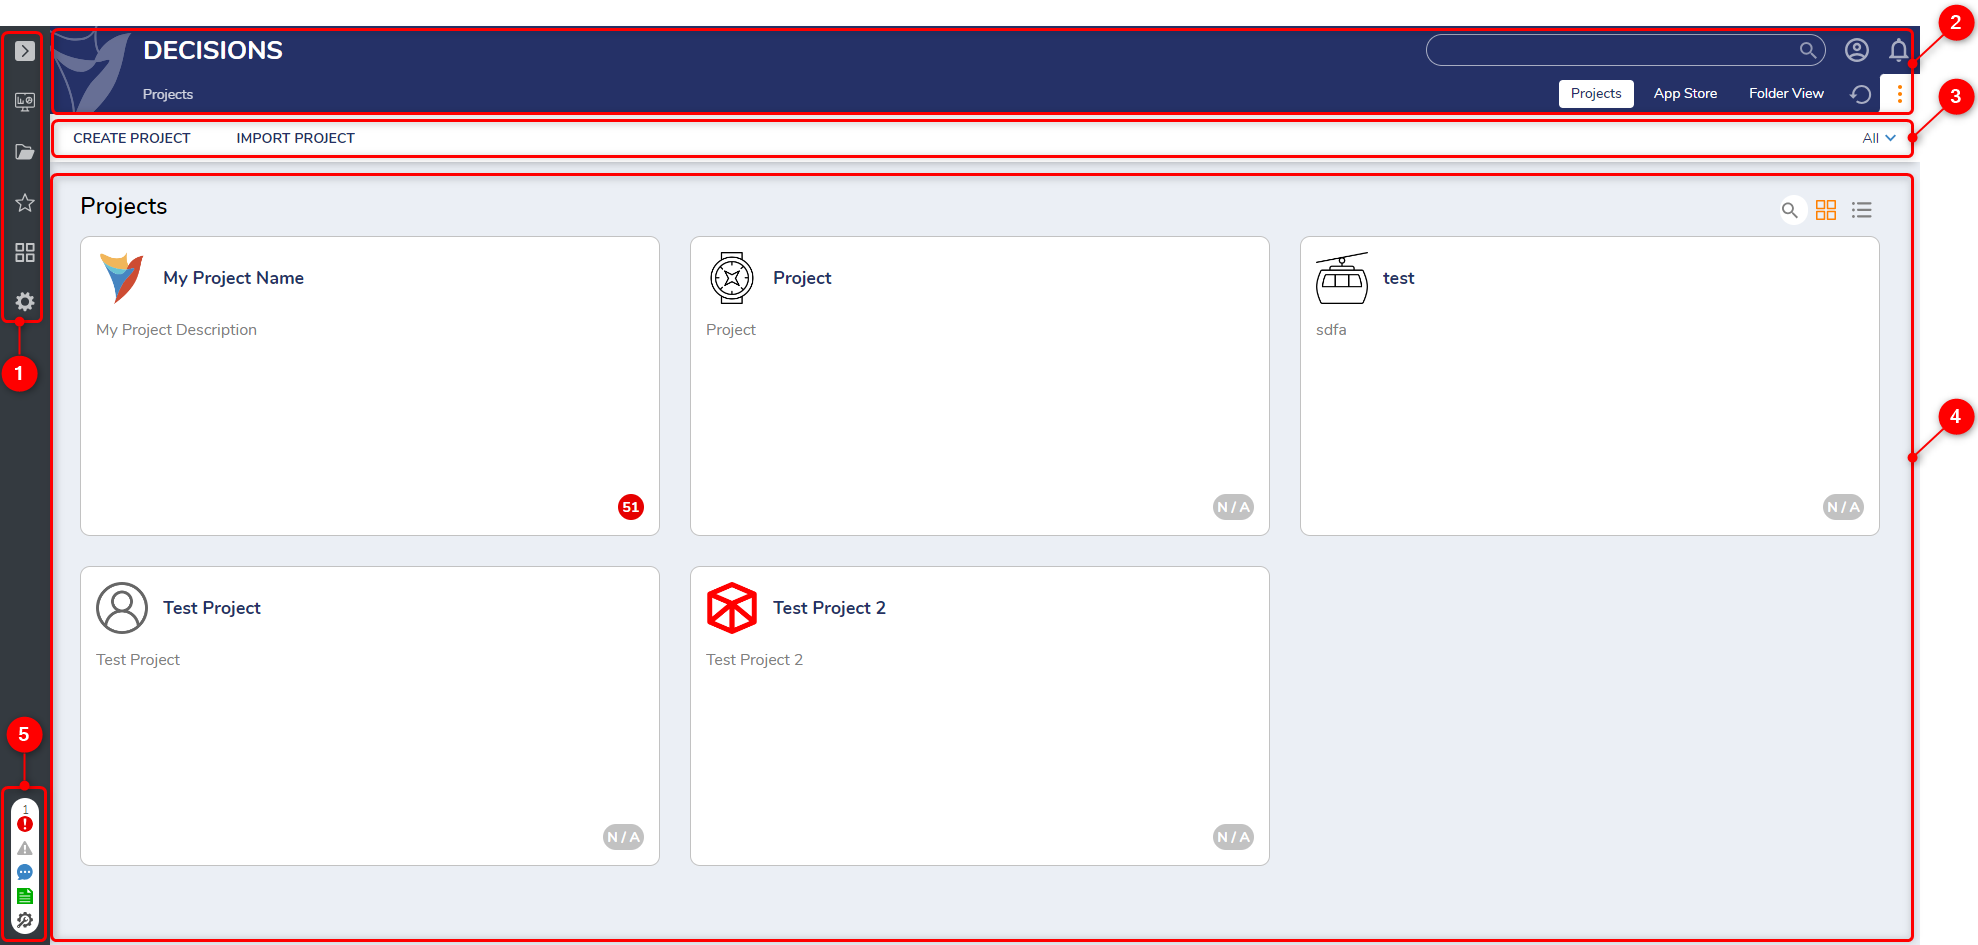
This article explores the platform's interface, navigating through its various elements and functionalities within five core sections: Sidebar, Header, Action Bar, Page Contents, and Help Center. Users, contingent upon their permissions, gain access to initiate Designer Elements, create new ones using Visual Designers, and navigate System Settings via these interfaces. Additionally, this article covers account actions and the Help Center's tools, offering users a holistic understanding of platform navigation.
Platform Tour

| Identifier | Name | Description | ||
|---|---|---|---|---|
| 1 | Sidebar | This expandable bar contains icons that navigate users to certain areas of the platform. Selecting the topmost icon collapses and expands the sidebar. | ||
 | Projects* | This folder contains a tile view of all accessible Projects. | ||
 | Folders | This menu contains the Folder Tree, which houses all Public Folders for Projects; these Public Folders will only show for Users and Groups if the proper permissions are enabled. This Folder contains all legacy Projects, Designer Elements, and Folders that have not been converted to the new Project Hub. | ||
 | Favorites | This menu lists favorite shortcuts to places such as a Designer Folder or a Page. Favorites may be account-specific or global. | ||
 | Workflow Catalog* | This menu contains a list of shortcuts to access and initiate processes. | ||
| System* | This menu contains a list of system folders that only administrators may access and edit. Folders for system settings, account management, modules, etc., are located here. | |||
| 2 | Header | The left side of the Header contains a Home Icon that enables Users to navigate to a default folder for the current account. Users also can set a Folder as a Default Folder using the Make this My Home Page Action. On the right side of the Home Icon is a path of the selected location below. Administrators may alter the Slogan via the Designer Studio settings or Portal settings. Administrators may use the Theme Editor to edit the header's logo and appearance to meet branding needs. The bottom right of the Header lists the selected locations available View tabs, the App Store, a refresh icon affecting the Page Contents, and a vertical ellipses icon to open/close the Action Bar. | ||
| 3 | Action Bar | The Actions Bar is located beneath the Header and contains actions a user may take in the selected location. For example, the Projects folder contains actions such as Create Project and Import Project, while a Configuration Folder would contain different actions such as User Actions, State Triggers, etc. | ||
| 4 | Page Contents | This contains information dependent on the selected location. This may contain other Folders and Designer Elements or a Page for users to view and manipulate data. | ||
| 5 | Help Center* | The Help Center contains information about any errors detected in the instance, links to a live support chat, the Documentation site, and the Global Debugger. | ||
Asterisks (*) identify what is unavailable by default unless proper permissions are enabled.
Account Actions
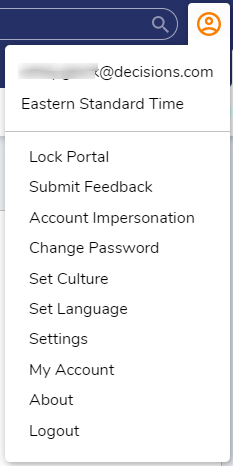
Clicking the Account Actions icon displays the email of the current account and the following list of available actions:
| Account Action Name | Description | |
|---|---|---|
| Login As...* | Quickly switch to an account set up as an allowed Account Impersonation. This is beneficial for quickly testing permissions. This action will not be available for accounts in the All Users group. |  |
| Lock Portal | A security feature that allows the user to lock the Portal. It can be unlocked by entering the account's password. It is a best practice to lock the Portal when stepping away from the computer, especially when logged into an account with Administrator access. | |
| Submit Feedback | Allows the user to submit feedback to Decisions. Attachments may be added if you wish to add screenshots and/or project files relevant to the feedback. | |
| Account Impersonation | Establish an account to impersonate either permanently or temporarily; this allows the user to take account permissions/access levels of another account without manually switching accounts. | |
| Change Password | Allows the user to change their account password based on password policy settings. | |
| Set Culture | Changing the Account Culture automatically translates DateTimes to reflect their own local values instead of the System's default values. Furthermore, changing the account culture may change the presentation of data in Reports, Pages, and Forms. | |
| Set Language | Individual accounts may select a language different than the system default. | |
| Settings | Manage all Settings across the platform, including Active Directory Settings, Auditing Settings, Assignment Settings, etc. | |
| My Account | Navigate to the user's home page. | |
| About | Displays System Information for the environment. | |
| Logout | Logs the user out of the environment and redirects the browser to the login screen. | |
Asterisks (*) identify what is unavailable by default unless proper permissions are enabled.
Notifications
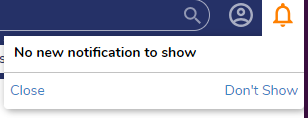
The Notifications icon is located on the far right of the Header next to the Account Actions icon. All new notifications will be found here. If there are no new notifications, the window will look like the image below.

Help Center
Located at the bottom of the Sidebar, the Help Center toolbar provides information and links to the following resources listed from top to bottom:
| Help Center Icon | Description | |
|---|---|---|
 | Errors | Displays alongside the count of all global processes blocking exception/validation and import errors. Clicking this opens the SYSTEM VALIDATION menu. If no errors are found, then this icon is grayed out. |
 | Warnings | Displays alongside the count of all global process warnings in the instance, such as an upcoming license expiration. Clicking this opens the SYSTEM WARNINGS menu. If no warnings are found, then this icon is grayed out. |
.png) | Support Chat | Clicking this opens a support chat window with a Decisions Support member. Use this to get live help troubleshooting any issues or answer any questions. File sharing is allowed. If all Support members are occupied, the chat will request the user submit a support ticket to support@decisions.com for a later follow-up. Once a support chat opens, the icon's colors invert until the chat closes. |
 | Documentation | Clicking this opens a new browser tab directing to the Documentation site. |
.png) | Tools | Clicking this opens a menu to open the Global Debugger or the Profiler. The selected tool then opens in a new browser tab. |