Overview
Upgrading directly from version 7 (or older) directly to version 9 is not supported. Instead, upgrade to version 8 first and then upgrade to version 9.
The rest of this article provides instructions for upgrading from version 7 to 8 and upgrading version 6 to 8. If you are on a version lower than v6, please contact the Support team at support@decisions.com for assistance.
Upgrading v7 to v8
Backing up the Previous Installation
It is highly recommended to back up the v7 installation and its affiliated database before upgrading.
While it cannot be used as a substitute for v8's Settings.xml, the v7 Settings.xml is a valuable reference to ensure the necessary variable match when upgrading.
- Back up the Database noting the DB Server and DB name (or Connection String).
- Navigate to C:\Program Files\Decisions\Decisions Server, and copy and paste the Settings.xml file into the desired location.
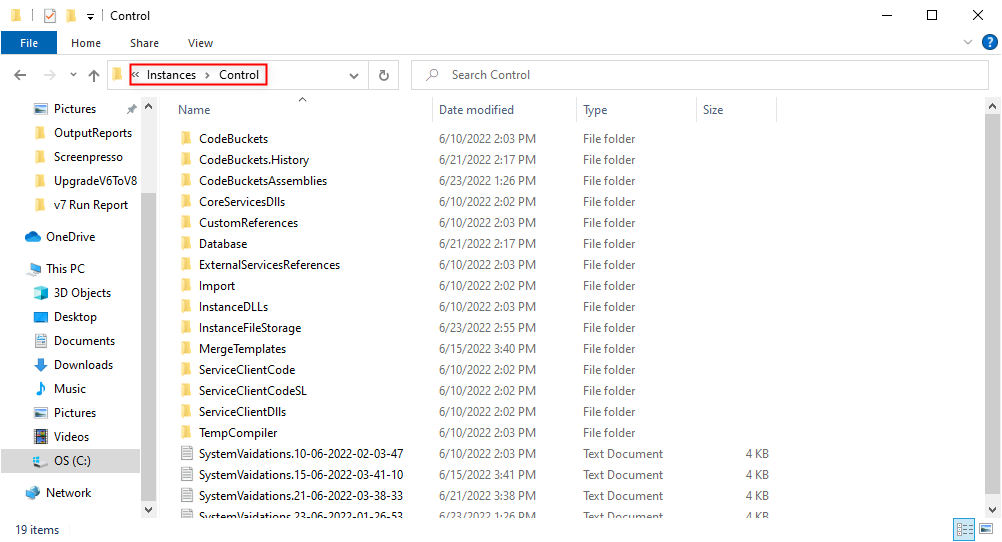
- Navigate to C:\Program Files\Decisions\Decisions Server\Instances\Control.
- Copy and paste the Keys.dat file to the desired location.
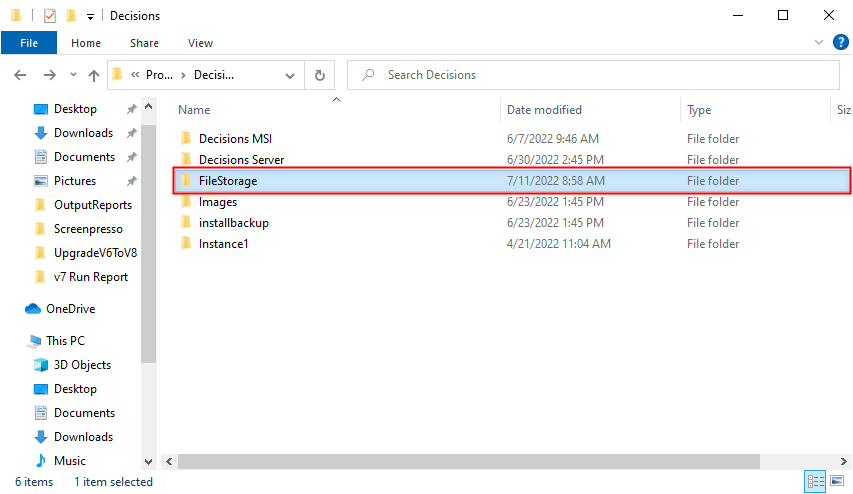
- Navigate to C:\Program Files\Decisions\FileStorage.
- Back up the FileStorage Folder and reference the v7 Settings.xml file, copied above, to re-configure the exact path later in the v8 Installer.
Downloads, Selecting Installation Type, and Database Setup
- Fulfill all v8 Prerequisites before beginning installation.
- Download the Decisions 8 Installer from Download Decisions webpage.
- Right-click the installer, then select Run as Administrator.
- From the Decisions Installer, enable Change Settings on Update, then click UPDATE.
- Review the terms, check the I accept the terms of the License Agreement box, and then click Next to proceed.
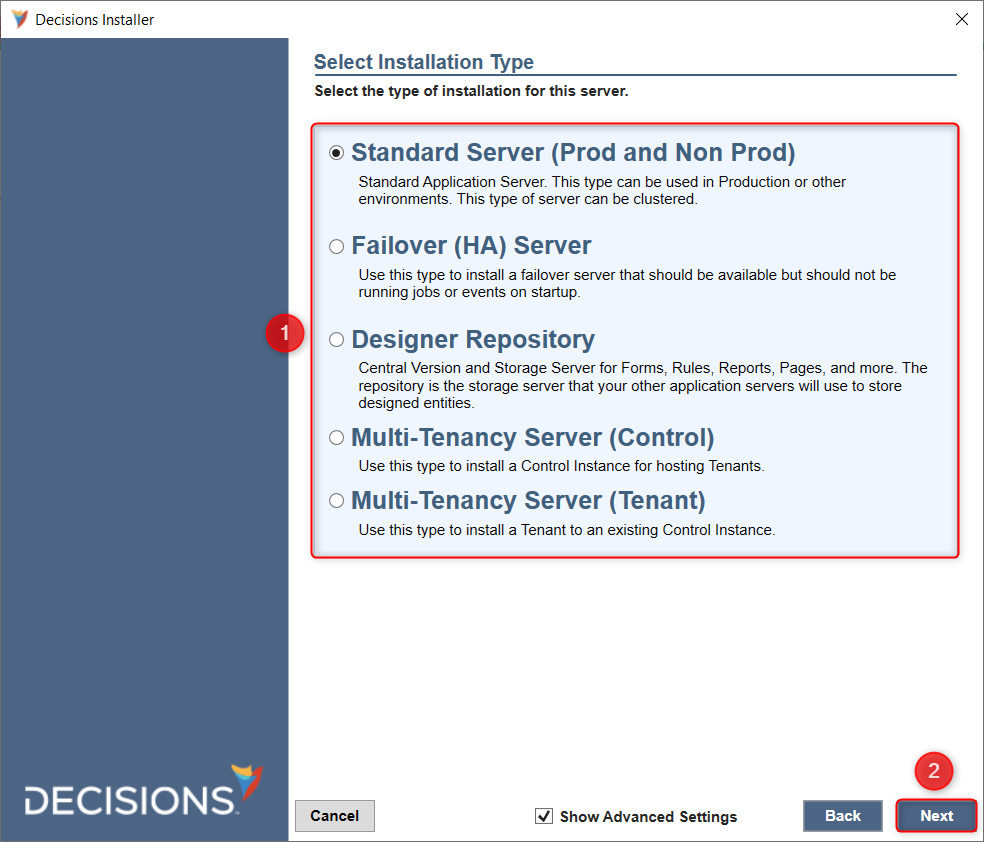
- For the installation type, select the desired server type. This example chooses a Standard server. Select Next to continue.
- Upon reaching the Settings screen, click Next.
- On the Database Setup screen, select the appropriate Database Type, and match the Connection Type and Connection Settings for the new v8 database. Click Next.

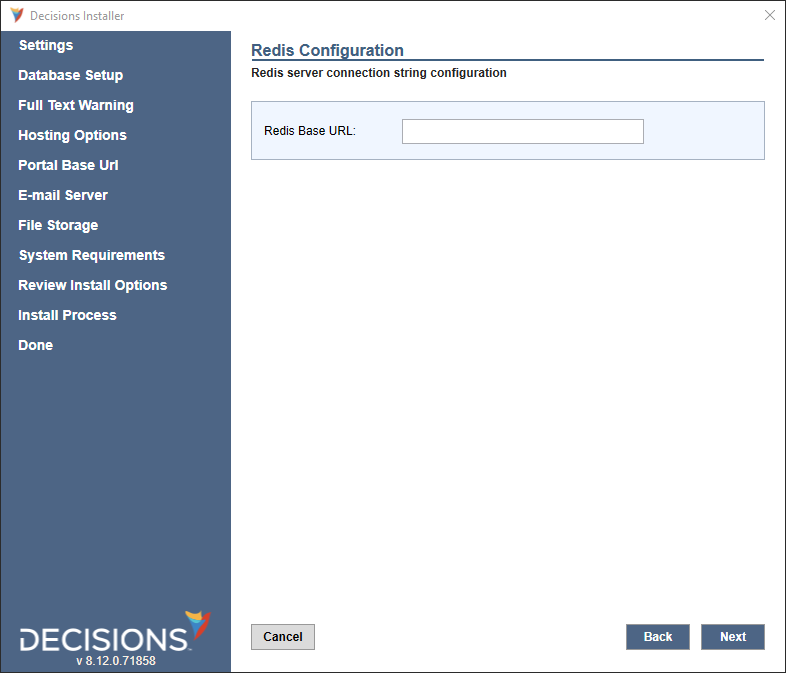
- If upgrading a clustered environment, the installer will prompt users to enter the Redis Base URL. Enter the Redis Base URL for the clustered environment. For more information, refer to Setting Up Redis External Caching.
- Continue past the Full-Text Warning screen.
Portal Base URL
Set up the Portal Base URL based on the chosen Hosting Option. It is recommended to maintain the same URL in the prior version if possible.
To ensure previously emailed v7 task links resolve correctly, reference the v7 Settings.xml file to configure the matching values during the v8 installation.
Email Server, Encryption Keys, and File Storage,
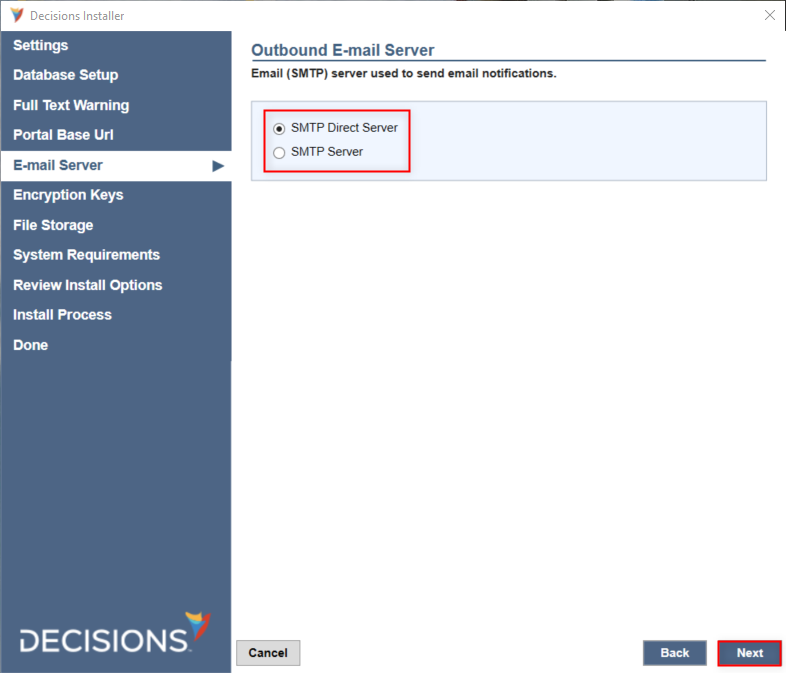
- Select the Outbound E-mail Server option previously used in v7, then click Next.
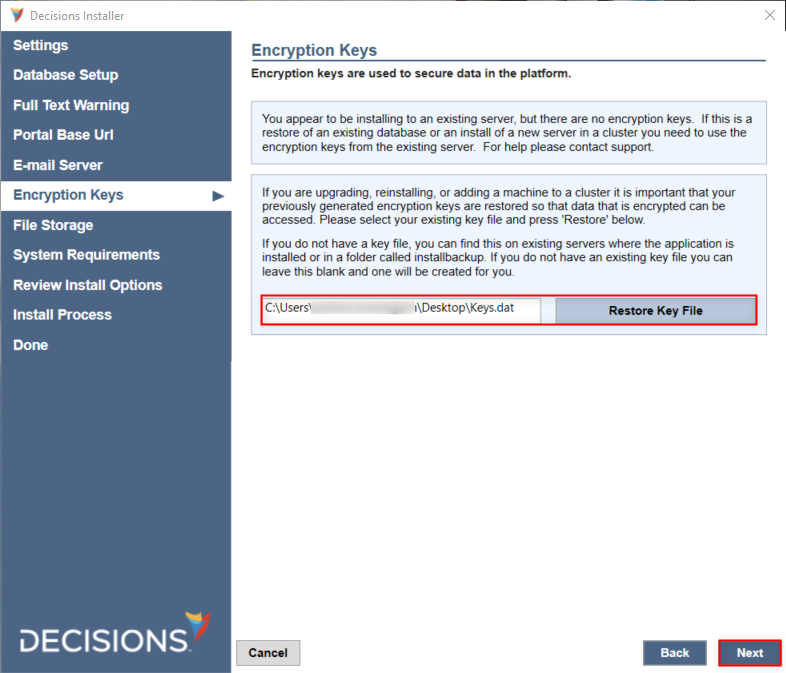
- If database encryption was used, click Restore Key File to upload the copied v7 Keys.dat, then click Next.
- Define a new v8File Storage location or select the original one. Then, click Next.

- This ends any upgrade-specific changes from the standard installation. Proceed with the installation as detailed in the Installation Guide.
Manually edited .LESS Conflicts
Direct edits to the custom .less files made outside the Theme Editor may cause errors in the Portal UI.
Upgrading from v7 automatically overrides the .less files, but a conflict file is generated once this error occurs. The conflict file contains the old .less file's information.
To resolve this issue:
- Open the provided conflict file named e.g. "theme.portal.less.conflict" found in the same folder as the .less files.
- Open the .less file associated with the conflict file. Matching the example above, this would be the "theme.portal.less" file.
- Replace each changed value in the .less file with the value shown in the conflict file.
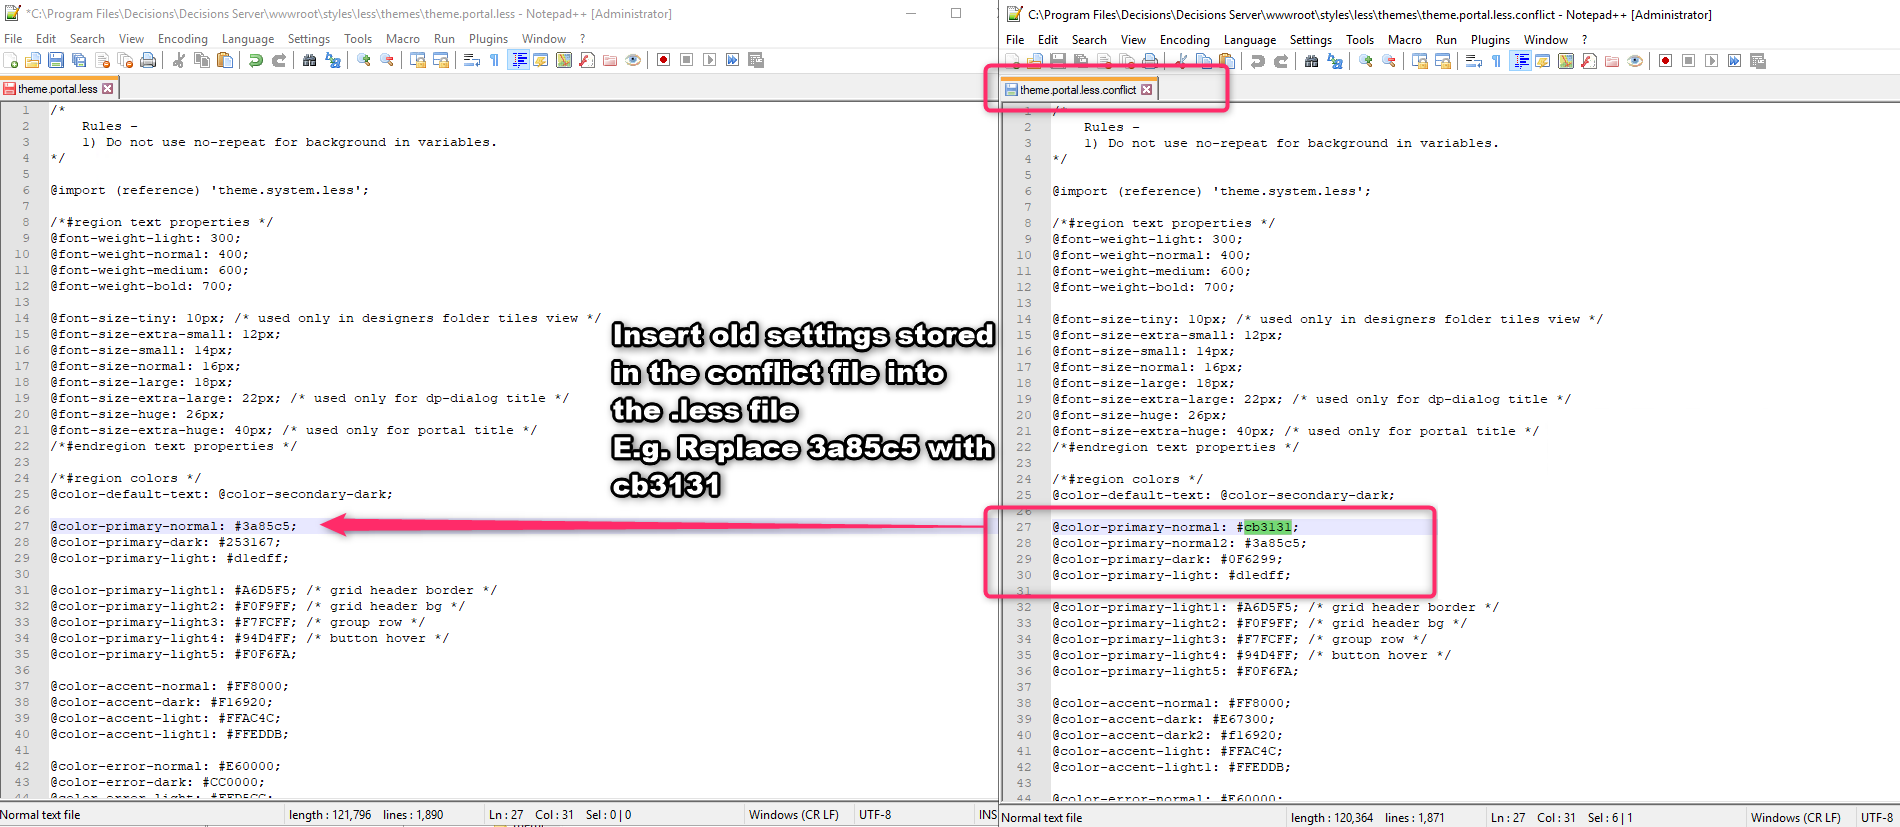
- Restart the Decisions server to apply changes.
Upgrading Multiple Servers
It is recommended to update servers in the following order:
- Development Server
- Repository and Test
- Production
Once Development has been upgraded, projects cannot be deployed to Repository or Test servers until they have been upgraded. It is possible to upgrade Development, Repository, and Test at the same time. Deploying to Production is also blocked until it has been upgraded.
Upgrading from v6 to v8
Important Notes
- Changing to .NET Core architecture requires an "uninstall" of v6 before installing v8.
- Running v6 and v8 on the same database is NOT supported.
- Upon upgrading to v8, downgrading back to v6 is NOT supported.
- Projects using XML/XSD Data Structures may require remapping on upgrade.
- v6 custom Less files are not supported for use in v8.
- v8 Web Service Integrations requires the installation of the .NET Core 6.0 SDK and a machine restart for proper configuration.
- Label components that use HTML will break when upgrading due to changes included in DT-029205. To resolve this, use the HTML Display component.
- SSO endpoints were modified between v6 and v8. While v6 endpoints still function, the recommended endpoints have changed.
- Upgrading clustered environments requires deploying a Redis server for external caching. Refer to Redis External Caching for more information on deploying and configuring a Redis Server.
- HTML Templates may need to be updated.
- External Service References have been removed in v8; External Web References are utilized instead. Flows using these steps will need to be updated.
- Agents will need to be reinstalled to be compatible with version 8. For more information, refer to Agent Setup and Testing. If the Agent is used for Active Directory, you will not be able to log in with AD accounts until the Agent is reinstalled for version 8. Once the new Agent is created, edit Active Directory settings and select the new Agent and save.
- Single Sign-On with Active Directory is not supported in v8.
- The HTML to PDF step will not create PDFs that have links that work due to a library change. The step will need to be deleted and replaced.
- The ID system for identifying design elements changed from GUIDs to ULIDs. This may cause issues in places that reference GUIDs specifically.
- As part of the change included for the DT-035693, the storage location for LESS files will be moved. This will cause custom LESS files to be lost upon upgrading. It is recommended that users create a backup of any custom LESS files.
- Changes that were made using the Theme Editor will persist upon upgrading.
- After upgrading from v6.14 and above to newer versions, Customers using special characters in Flow Prefix for the Setup Process Folder might cause an error running the Flow. Contact Support@decisions.com for prompt assistance.
- The v6 Settings.xml file will be a reference point for various parameters while installing v8 but cannot be used between versions.
- v6 supported MySQL Connector version 8.0.18, but for v8.9, download and install the latest MySQL connector version 8.0.33, and the recommended .dll file to be used for the MySQL connector is from .NET 7.0. For more information, refer to Connect to MySQL.
- For upgrading v6 Multi-Tenancies, refer to Upgrading a v6 Mult-Tenancy to v8.
Installation Requirements
Requirements (based off v8.22):
SQL Server 2017 or newer
The latest ASP.NET Core Runtime 7.0.1 (x64)
The latest .NET Desktop Runtime 7.0.1 (x64)
The latest ASP.NET Core Runtime 7.0.1 (Hosting Bundle)
Pre Installation Backups
- Back up the Database (DB), noting the DB Server and DB name (or connection string).
- Navigate to C:\Program Files\Decisions\Decisions Service Manager.
- Copy and paste the Settings.xml file to the Desktop.
- Navigate to C:\Program Files\Decisions\Decisions Service Manager\Instances\Control. Copy and paste the Keys.dat and databaseid.txt file to the Desktop for future reference.
- Navigate to and backup C:\Program Files\Decisions\FileStorage.
Then reference the v6 Settings.xml file, copied above, to re-configure the exact path later in the v8 Installer.
Version 6 Removal
- Delete all the logs related to the SSO (SAML/OpenID) located at
C:\Program Files\Decisions\Decisions Services Manager\Logs\{SSO Folder}. - Visit Download Decisions; select the Decisions 6 Installer that matches the current version (ex: 6.10.0)
- Run DecisionsServerInstaller.exe. Then, click REMOVE.
- After Uninstalling all the instances. Open Services.exe and confirm that the Service Host Manager is successfully removed.
Version 8 Downloads, Select Installation Type, and Database Setup
After removing v6:
- Download and install .NET 6 Runtime (x64), .NET Core Hosting Bundle and .NET Desktop Runtime.
- Download the desired Decisions 8 Installer from the Download Decisions webpage.
- Right-click the newly downloaded installer and select Run as administrator.
- Click INSTALL.
- Review the terms, check the I accept the terms of the License Agreement box, then click Next to proceed.
- On the Select Installation Type window, choose the appropriate server type, then click Next.Additional OptionsTo further customize all installation options, check the Show Advanced Settings box.
- Upon reaching the Settings screen, click Next.
On the resulting Database Setup screen, select the appropriate Database Type, match the Connection Type and Connection Settings used for v6, then click Next.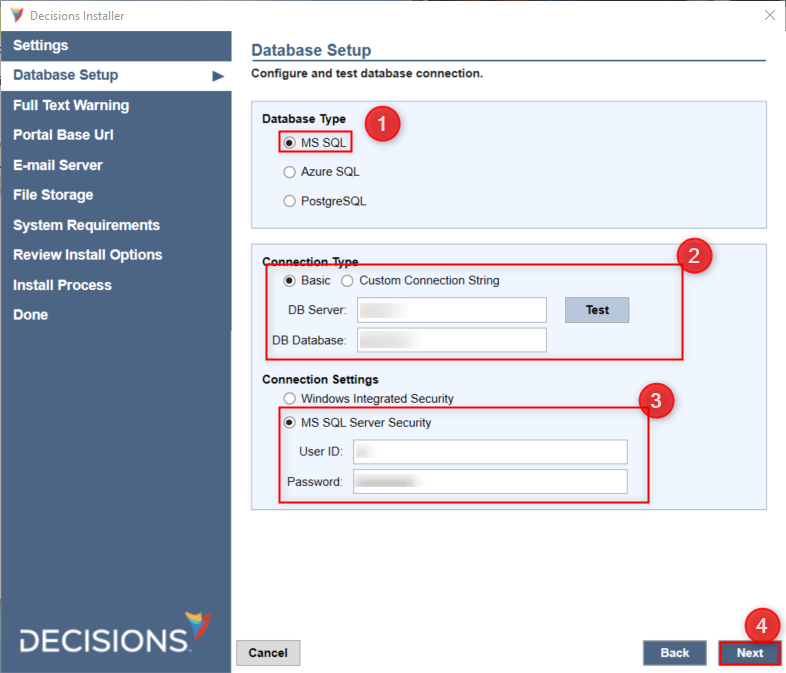
- If upgrading the clustered environment, the installer will prompt users to enter the Redis Base URL. Enter the Redis Base URL for the clustered environment. For more information, refer to Setting Up Redis External Caching.
- Select the appropriate Installer Hosting Option, then click Next.
Typically the recommended option is Self Hosting..png)
Portal Base URL
The following section demonstrates how to set up the Portal Base URL for the Decisions environment for both Hosting Options.
Self Hosting
- By default, v6 was installed on IIS, which was using port 80. However, to install Decisions on this port, users must first release it from IIS. Refer to the following steps.
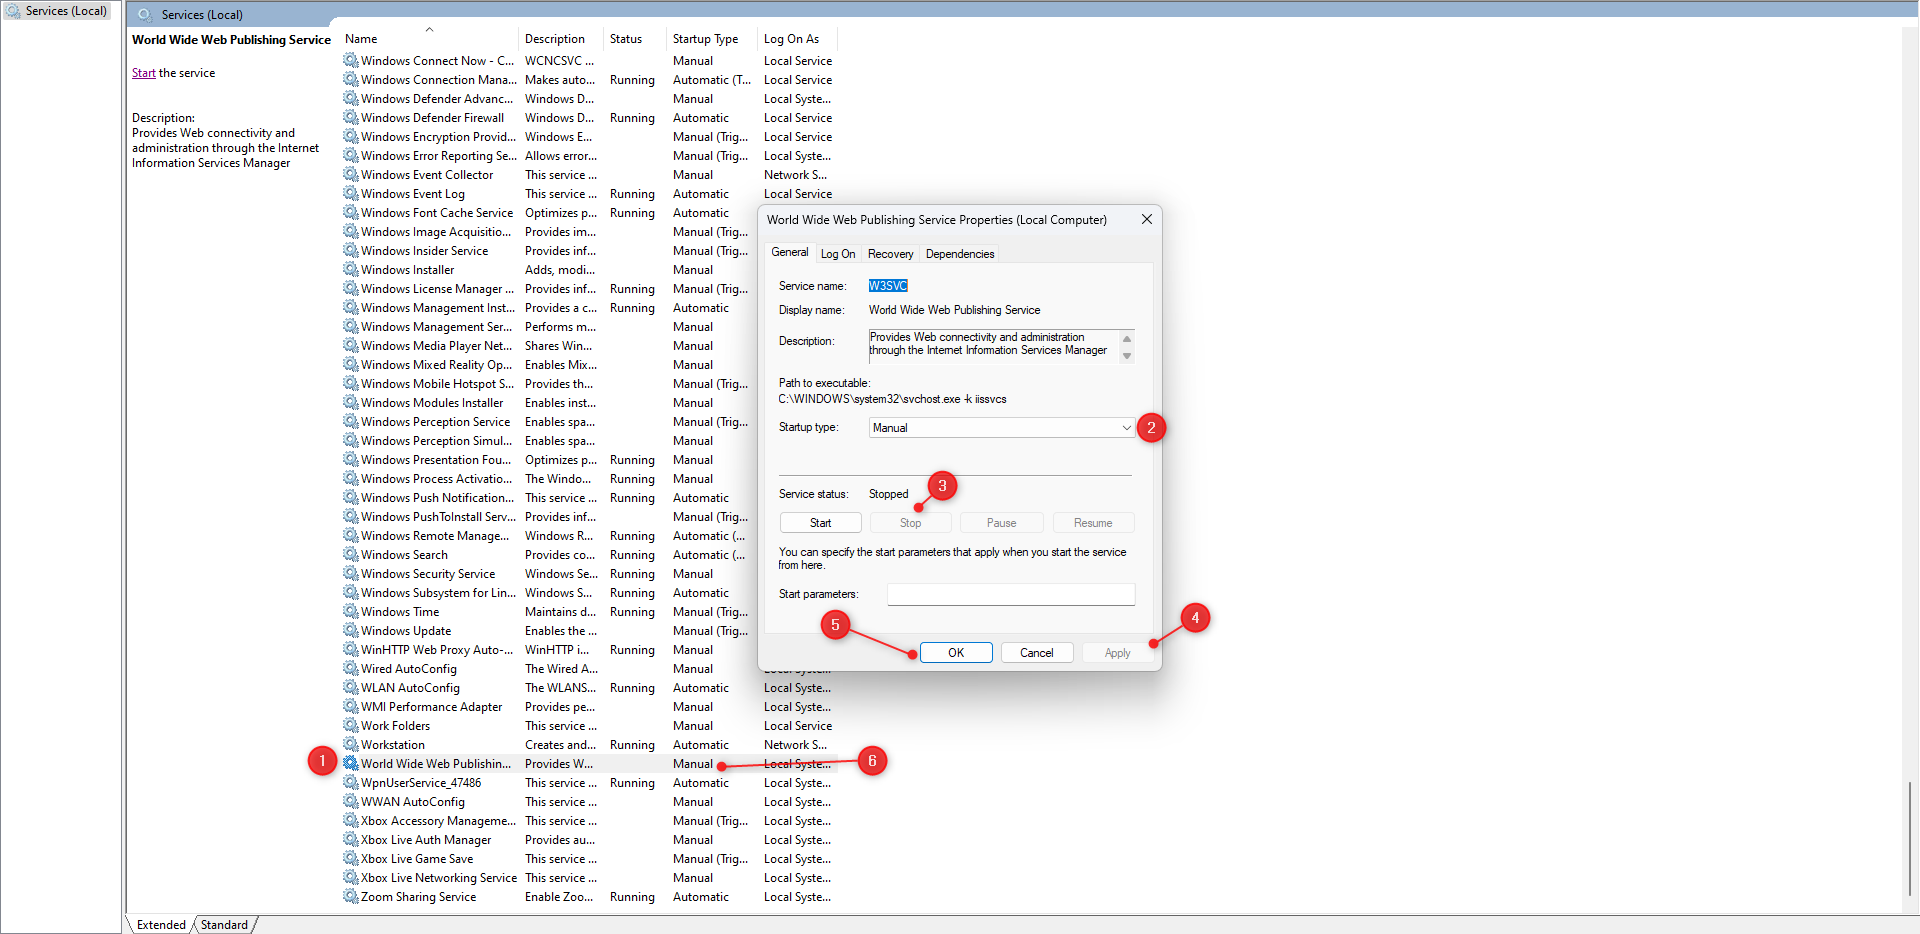
- Navigate to Windows Services > World Wide Web Publishing Service > Properties.
- Set Startup Type to Manual
- Set Service Status to Stop
- Click on Apply and OK.
- Specify the Portal Base URL used in v6 within the Domain Name (ex: example.com) field.
- Select the desired HTTP/HTTPS configuration, along with the Certificate path and Password if applicable, then click Next.Default Port Values and CertificateNote that Local installations default to localhost with HTTP (Port: 80) or HTTPS (Port: 443).
Certificates may be selected via Physical File Path or Certificate Store.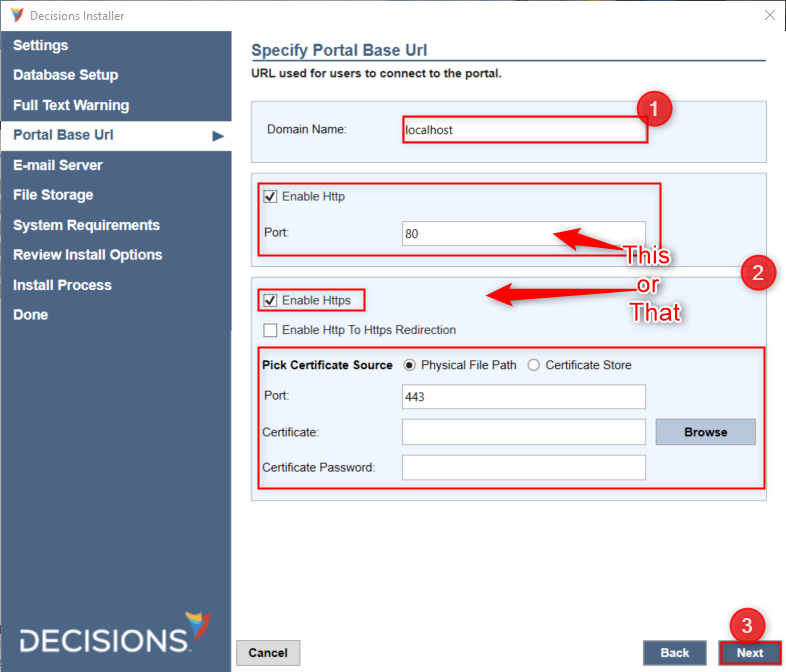
IIS Hosting
The following section details setting up Decisions via IIS Hosting using the Default Web Site.
- Provide the Portal Base URL used in v6, then click Next.
.png)
- From the Web Application window, under Application Pool, click Create new. Then, click Next. Preexisting App PoolIf an Application Pool with the same name already exists, use IIS Manager to change the .NET CLR version No Managed Code.
.png)
Finish Installation
- Select the Outbound E-mail Server option previously used in v6, then click Next.
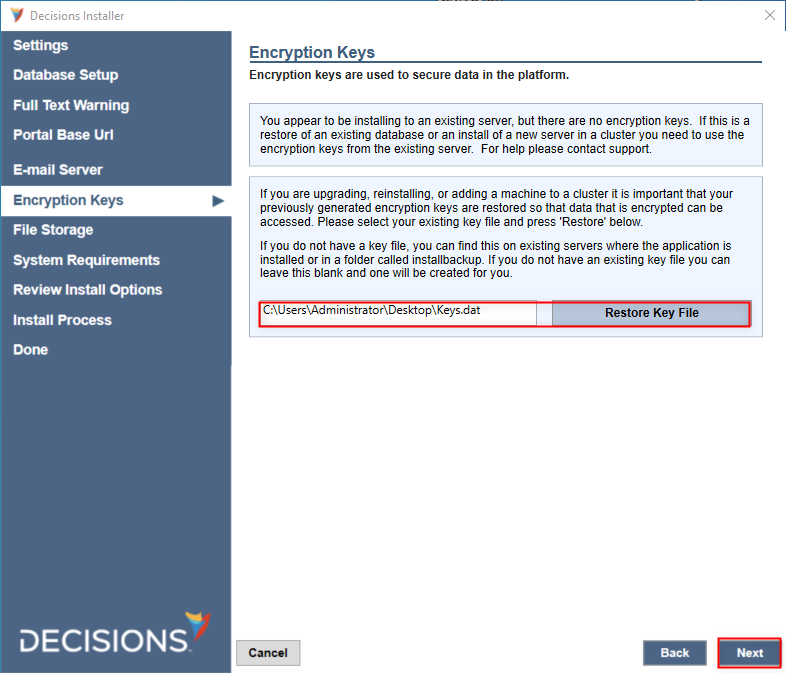
- If database encryption was previously used, click Restore Key File to upload the copied v6 Keys.dat, then click Next.
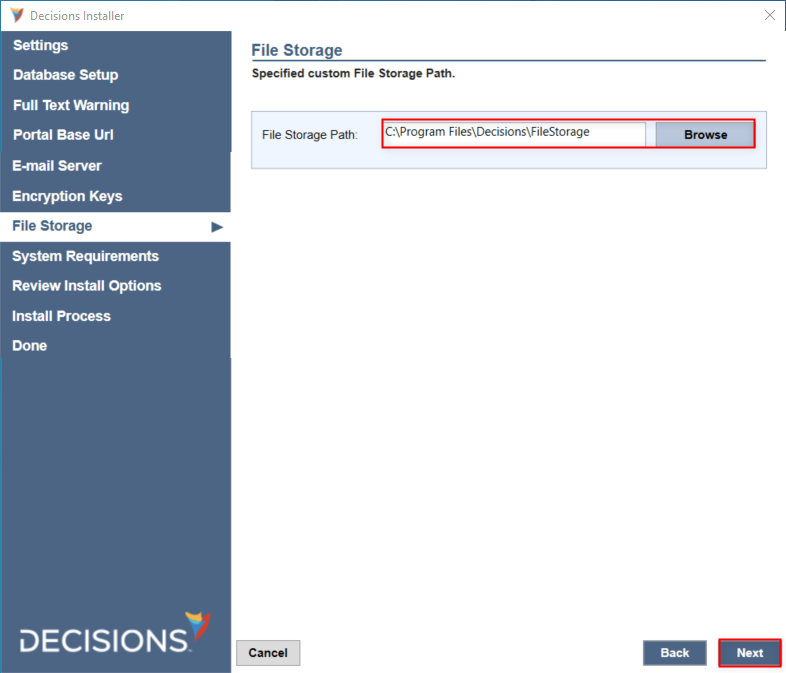
- Define the v8File Storage location, then click Next.
- Review and correct any System Requirements warnings before clicking Next.
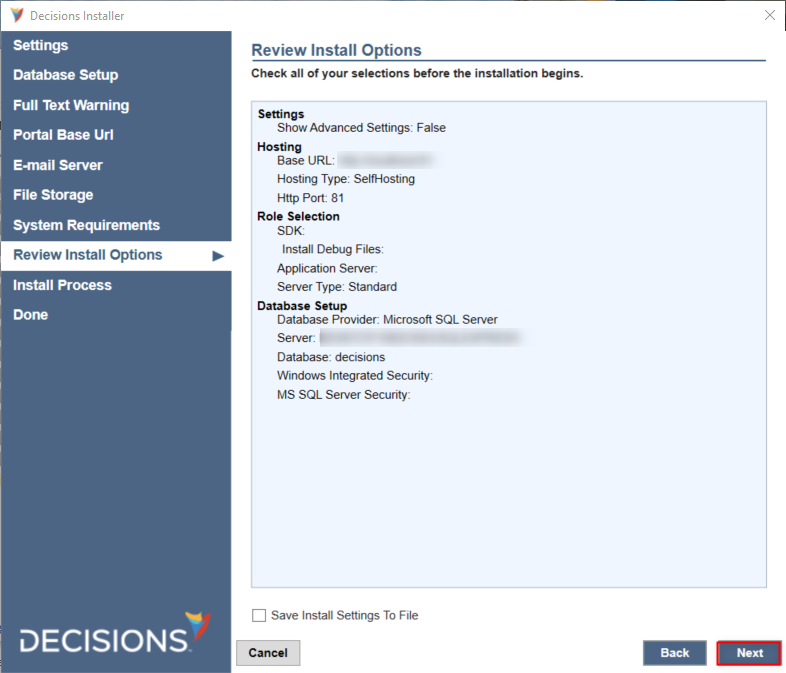
- Via the Review Install Options screen, confirm the expected installation summary details, then click Next.
- Installation of v8 is underway.
- Click Show Details to see the installation progress.
- When the upgrade completes, click Finish to close the Installation Finished window.
- Attempt to login into the new upgrade Decisions environment using the admin Username and Password.
Post Installation Process
System Validations
Users might face System Validations when they log in to decisions after upgrading successfully. Refer to the following Post Installation Process to resolve the system validation.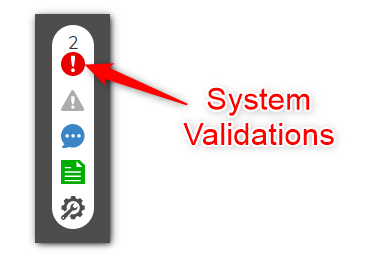
Validation: Database "database_ID" was moved from another system. Jobs and background work will be suspended by disabling Job Server capability on this server. Please check system validations and clear this issue.
When Decisions is installed using a database backup file, it fetches the databaseid.txt file at a specific location. If the file is not present, users may encounter a validation message that prevents the Decisions server from being used as a Job Server. Refer to the following points to resolve this Validation.
Paste the already copied databaseid.txt file at the following location,
C:\Program Files\Decisions\FileStorage\Primary\Settings.If somehow the databaseid.txt file is misplaced. Run the query in the database,
select * from platform_version, copy the value fromdbsettings_idand paste it within databaseid.txt and place the file at the above-mentioned location.Login to the Decisions Server. Navigate to System Validation > Select the validation message > Resolve. This will resolve the issue and clear the validation message from the server.
Navigate to System > Administration > Servers. Right-click on the Server Name > Edit Server. Enable Can be a Job Server.
Restart the Decisions service.
Setting Inbound Rule to Port 80/443
To access the server from an external machine, admin users must open ports 80 and 443 and configure them for inbound traffic. One can configure this Rule in the Windows Firewall settings on the server or can execute the following PowerShell script by running it as administrator.
New-NetFirewallRule -DisplayName 'Decisions' -Profile 'ANY' -Direction Inbound -Action Allow -Protocol TCP -LocalPort 80, 443After applying the inbound rules, ensure that you can hit the URL from an external machine. If unable to access the server, contact support@decisions.com.
Objects with allow_restapicalls Property
Any objects with the allow_restapicalls property (Flows, Rules, and Reports) will be marked as modified following the upgrade to v8. This has to do with an API layer, but otherwise will not change the objects and they will continue to work normally after the upgrade.