The Wire Transfer Approval Accelerator connects with central banking systems and OFAC to simplify the approval procedure. It gets rid of the need for manual asset verification and compliance checks and guarantees the timely dispatch of outgoing foreign and domestic wire transfers by notifying and assigning tasks. The program can be tailored to conform to different banking policies while complying with BSA and AML regulations. Financial institutions can implement precise management of user access and permissions to make sure that only authorized users with the proper credentials can initiate, approve, reject, and transmit wire transactions.
Prerequisites
- Users should have the Error Handling Accelerator installed before utilizing this Accelerator.
Glossary of Terms
| Term | Description |
|---|---|
| Authority Limits | Authority limit truth tables are created where different personas have different limits for wire amount transfer |
| Authority Assignments | Based on the wire amount wire request will send to a particular account group. |
| Domestic Escalation Time | This represents the cutoff time for Domestic Wires. A Critical Notification will be sent 1 hour prior to the set time for Domestic Wires. |
| International Escalation Time | This represents the cutoff time for International Wires. A Critical Notification will be sent 1 hour prior to the set time for International Wires. |
Configuration
Once installed, navigate to the Wire Details dashboard and set up the settings. Additionally, the OFAC API key will need to be saved.
Embedding the Form
The Form can be used on an external page. Follow the article on Embed a Form in a Web App to achieve this implementation on the Main Flow: Wire Transfer Request Approval.
Run the Flow from a URL
Flows can be run using a URL. This can be accomplished on the Primary Flow, Wire Transfer Request Approval, or on the sub-Flow, Wire Request Logic. Follow the Running a Flow from a URL article to achieve this.
Configuration
Groups
A separate folder is created in Decisions called "Wire Transfers Approval Groups". Add the appropriate users to their corresponding Groups to be able to initiate the process.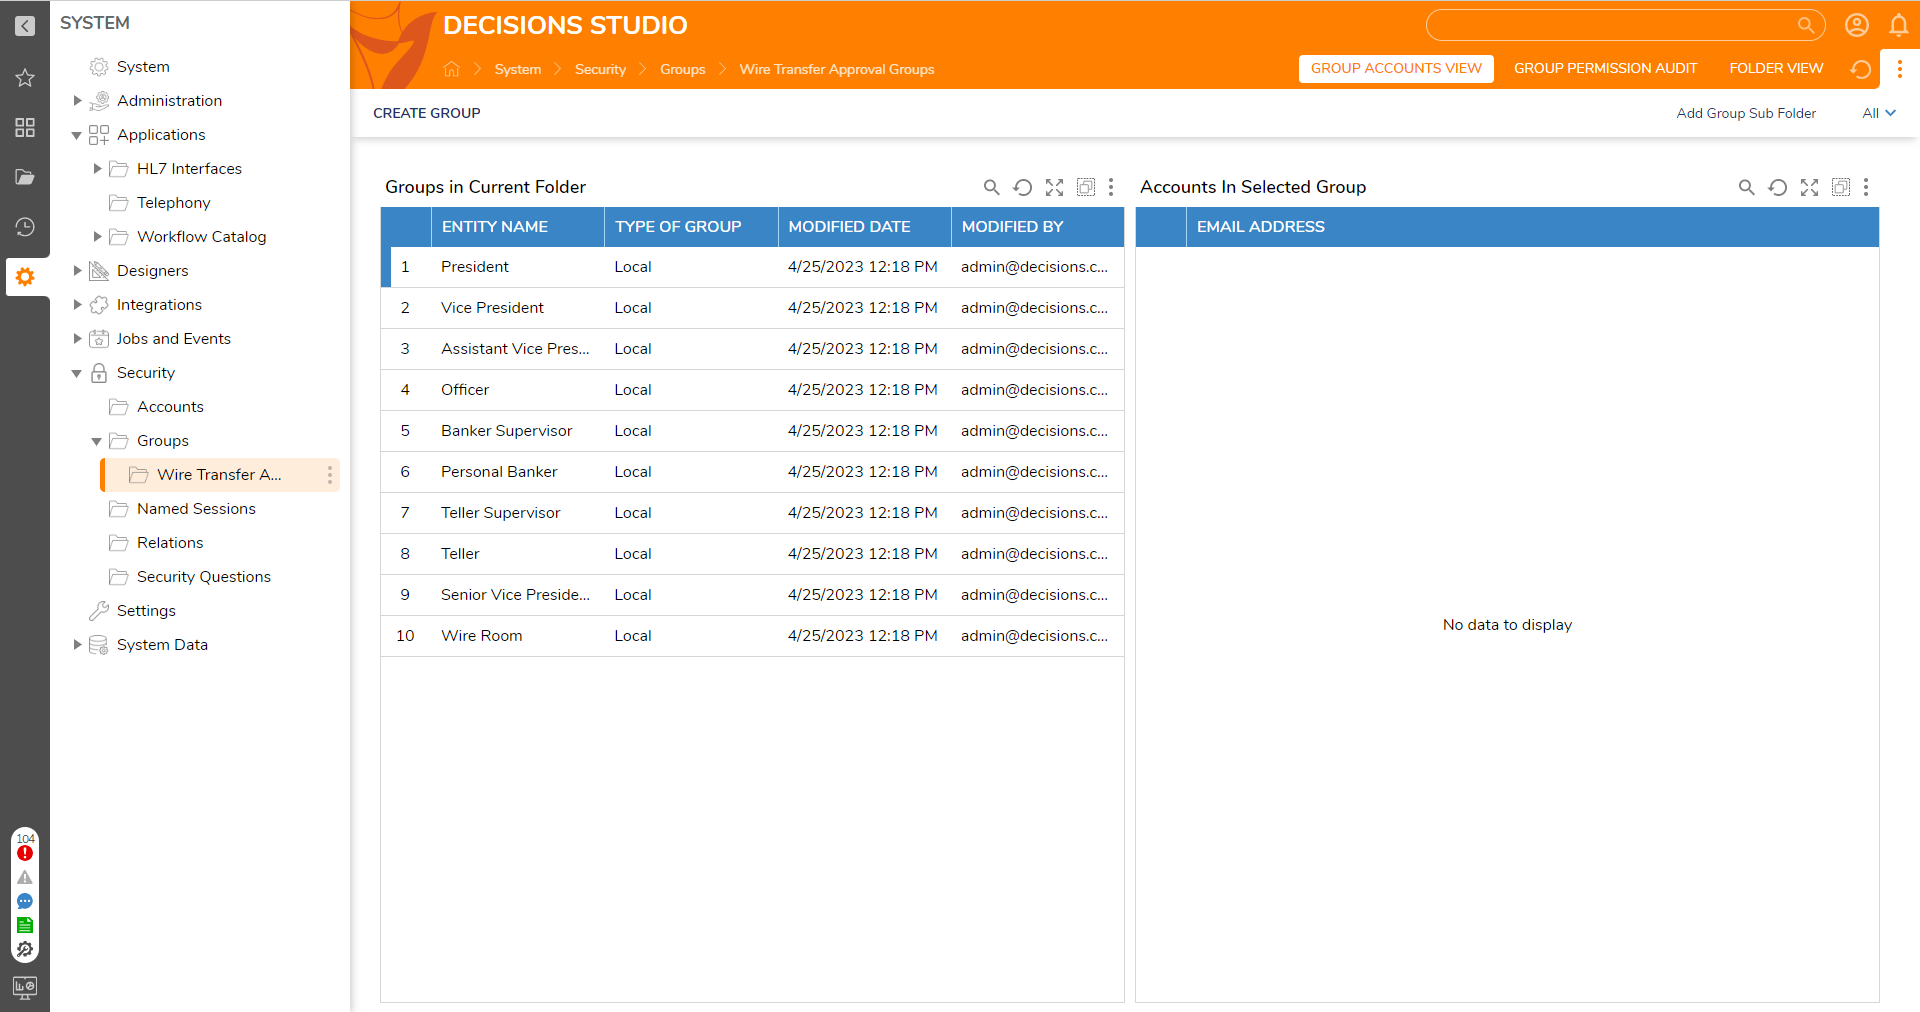
OFAC API
OFAC API is a developer-friendly AML & KYC screening API.
Sign up for the OFAC Trial Account to receive an API Key through the email provided. Update the System Constant "OFAC ApiKey" by navigating to System > Designers > Lookup List and Constants. Select and edit the OFAC ApiKey and paste the API Key that was retrieved in the email.
Setup Rest Service
| # | Step Instructions | Screenshot |
|---|---|---|
| 1 | Create a Rest Service for OFAC and then add a Service Method. In the New REST Service Method dialog, enter a Name for the method and type "v3" in the URL (Relative to Base) field. Click the drop-down list for HTTP Method and select POST. Select JSON for the Content-Type field and Request Body Format field as Get String from Flow and Output Type as Raw. | 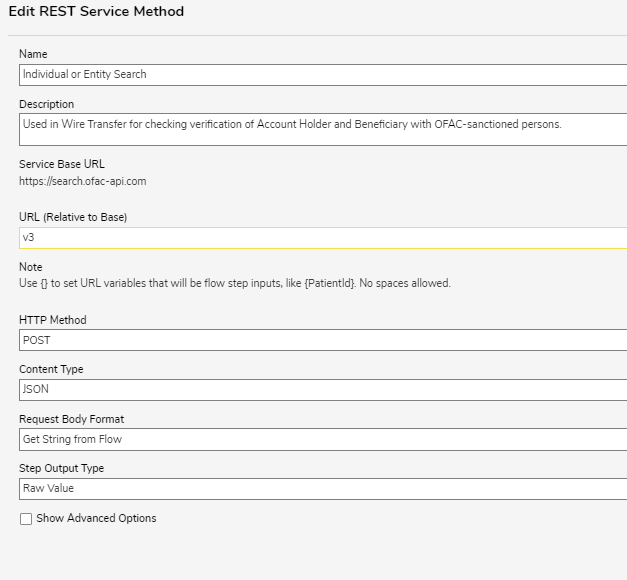 |
| 2 | Create a Type from JSON. Provide a Name and Namespace, and set it to Allow Nullable Values. Paste the JSON Structure in the JSON Structure textbox. | 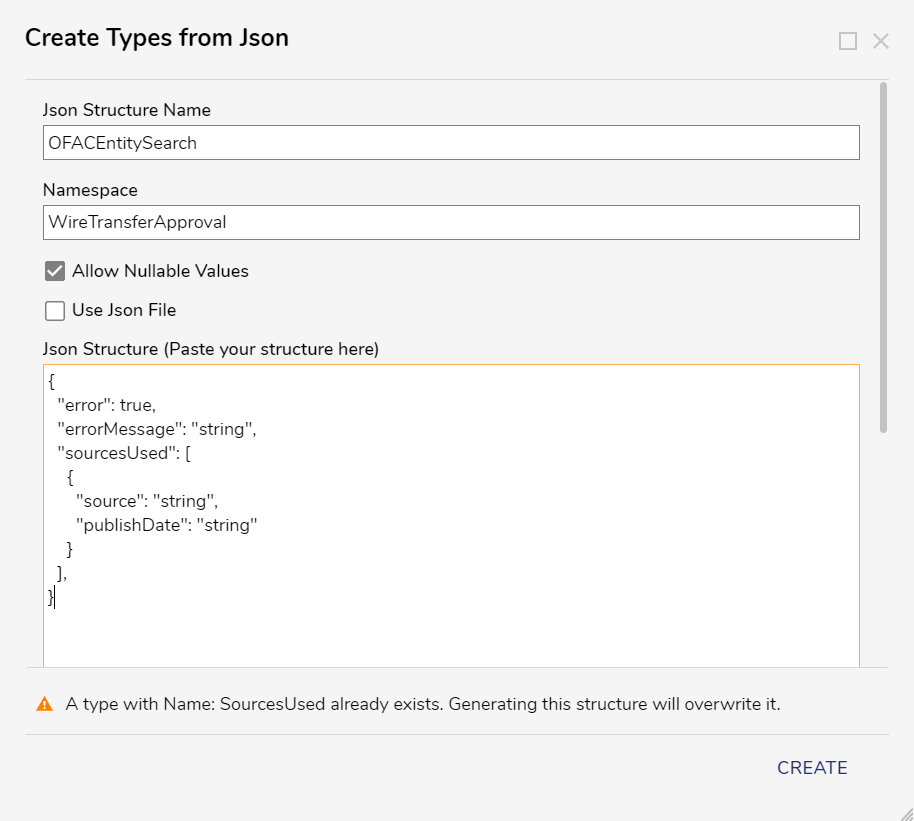 |
| 3 | Once the JSON Data Structure is created, all child structures are created automatically. | 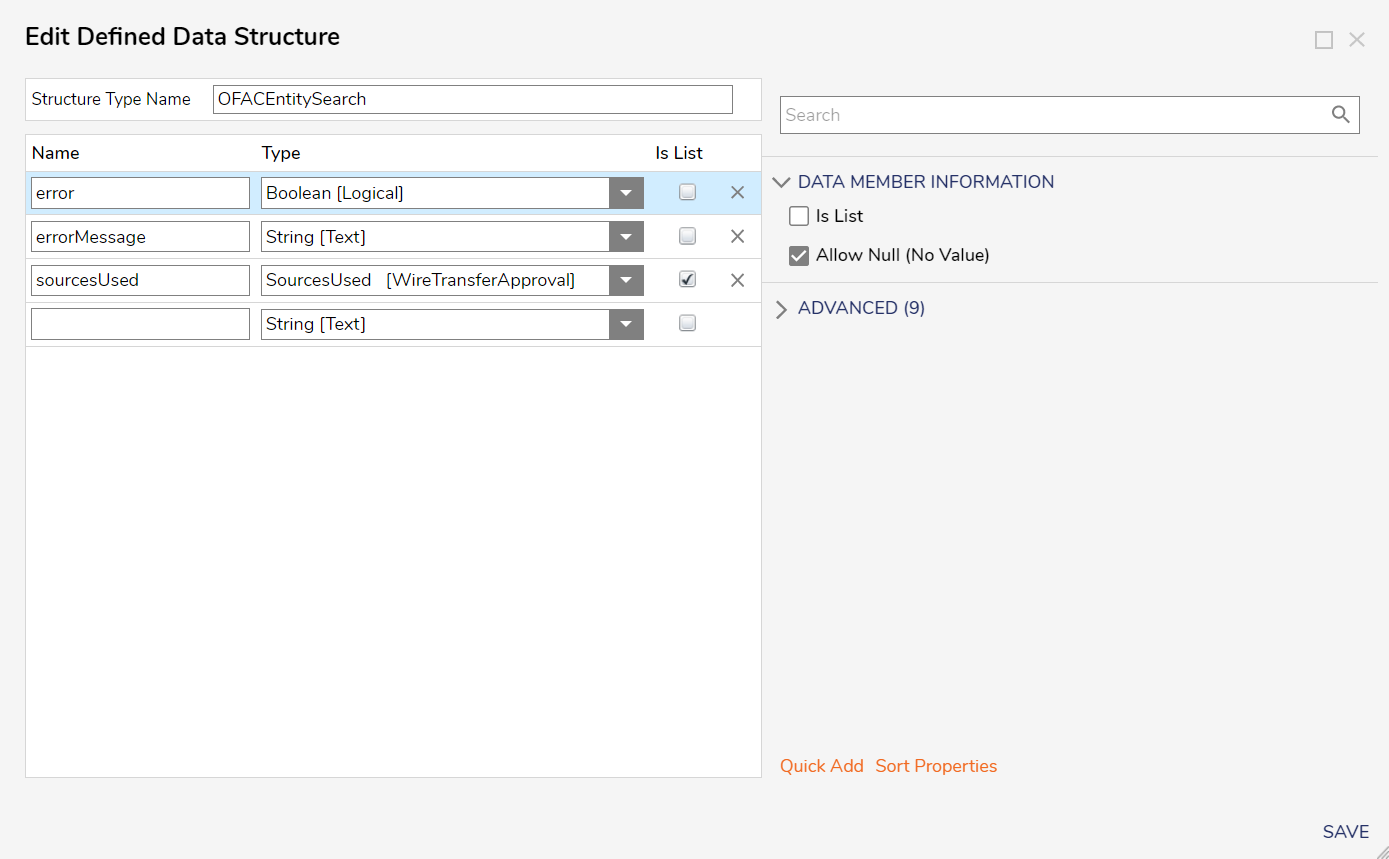 |
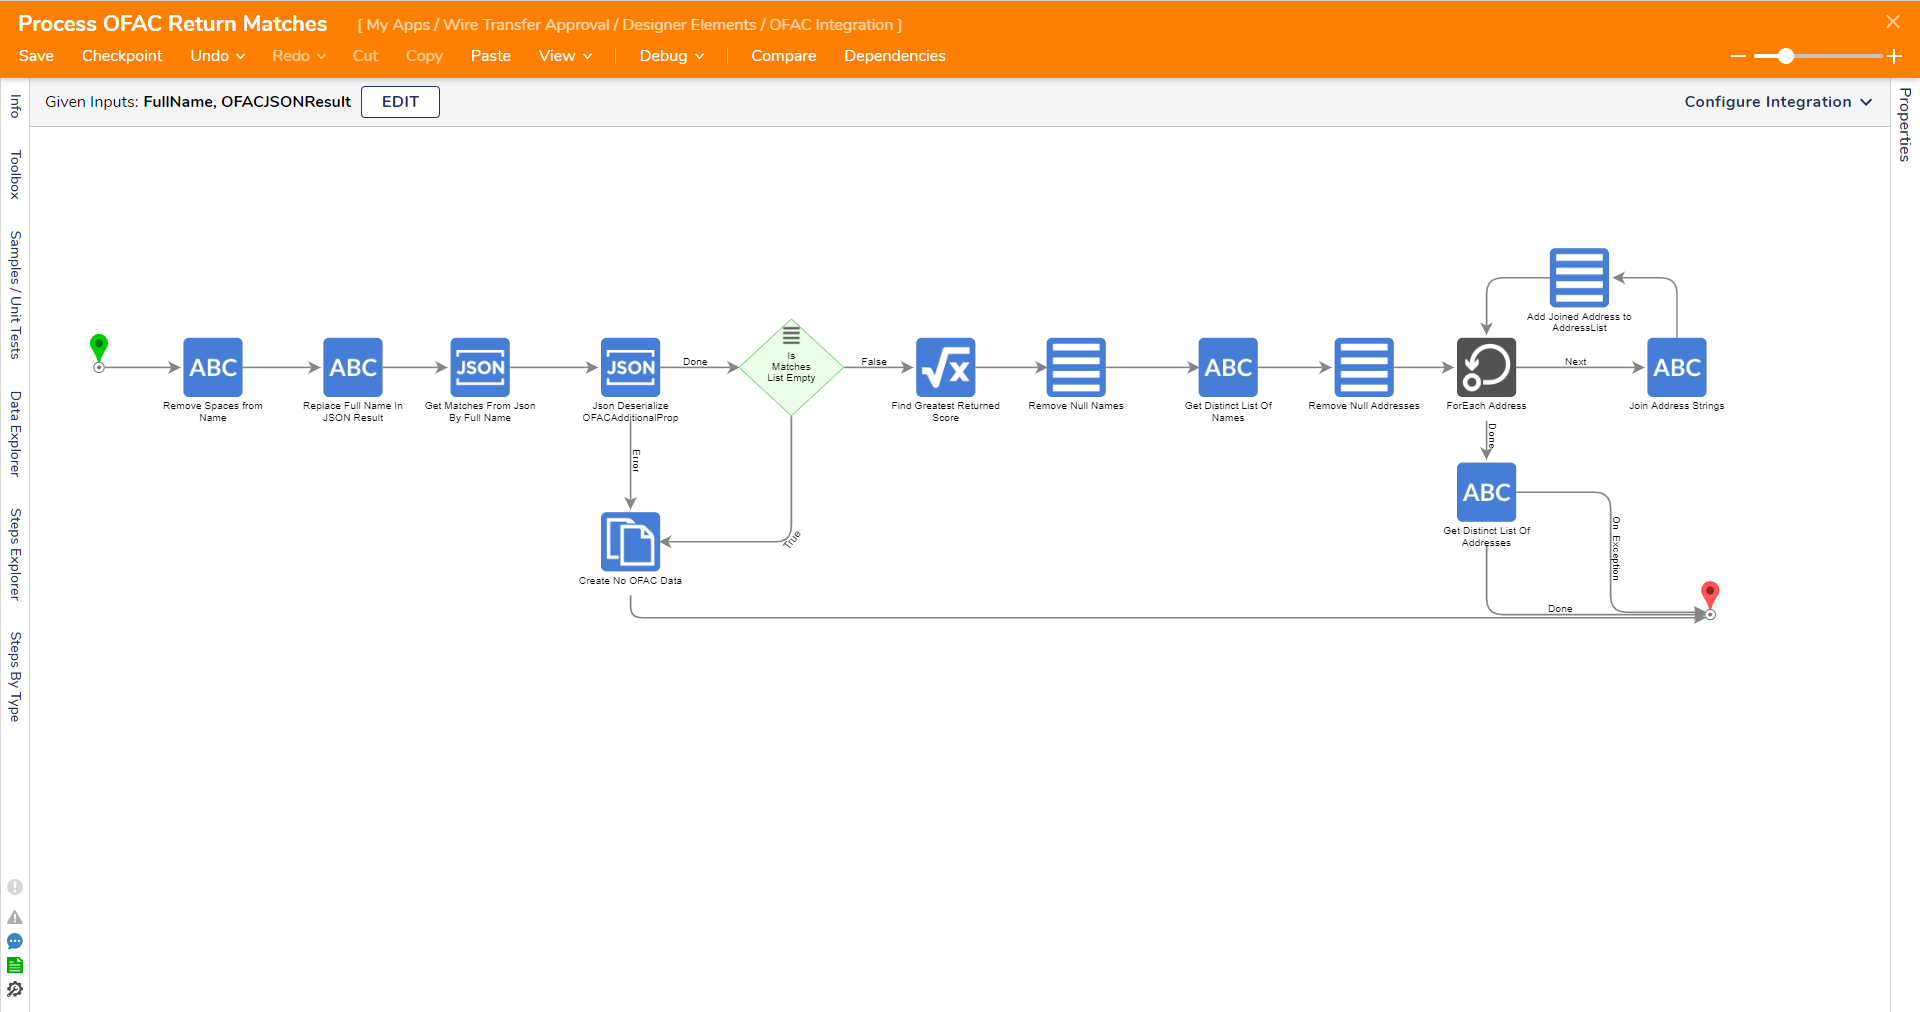
The OFAC API is used with the OFAC Verify Account Holder and Beneficiary Flow and the Process OFAC Return Matches Truth Table.
| Flow Name | Description | Screenshot |
|---|---|---|
| Verify Account Holder and Beneficiary Flow | This Flow captures OFAC responses based on photo ID type. The options are passport and driver's license, each with a separate case list. The Flow checks the ID type, filters passport cases based on conditions, and deserializes the response from the OFAC Integration in the Form for JSON using an API Key. SubFlows send the user the response and deserialize it for the account holder and beneficiary properties. The Flow also removes null addresses and displays an error message. Finally, the user takes the max score from the case list for Account Holder and Beneficiary properties, and these values are stored in the OFAC response data structure. | 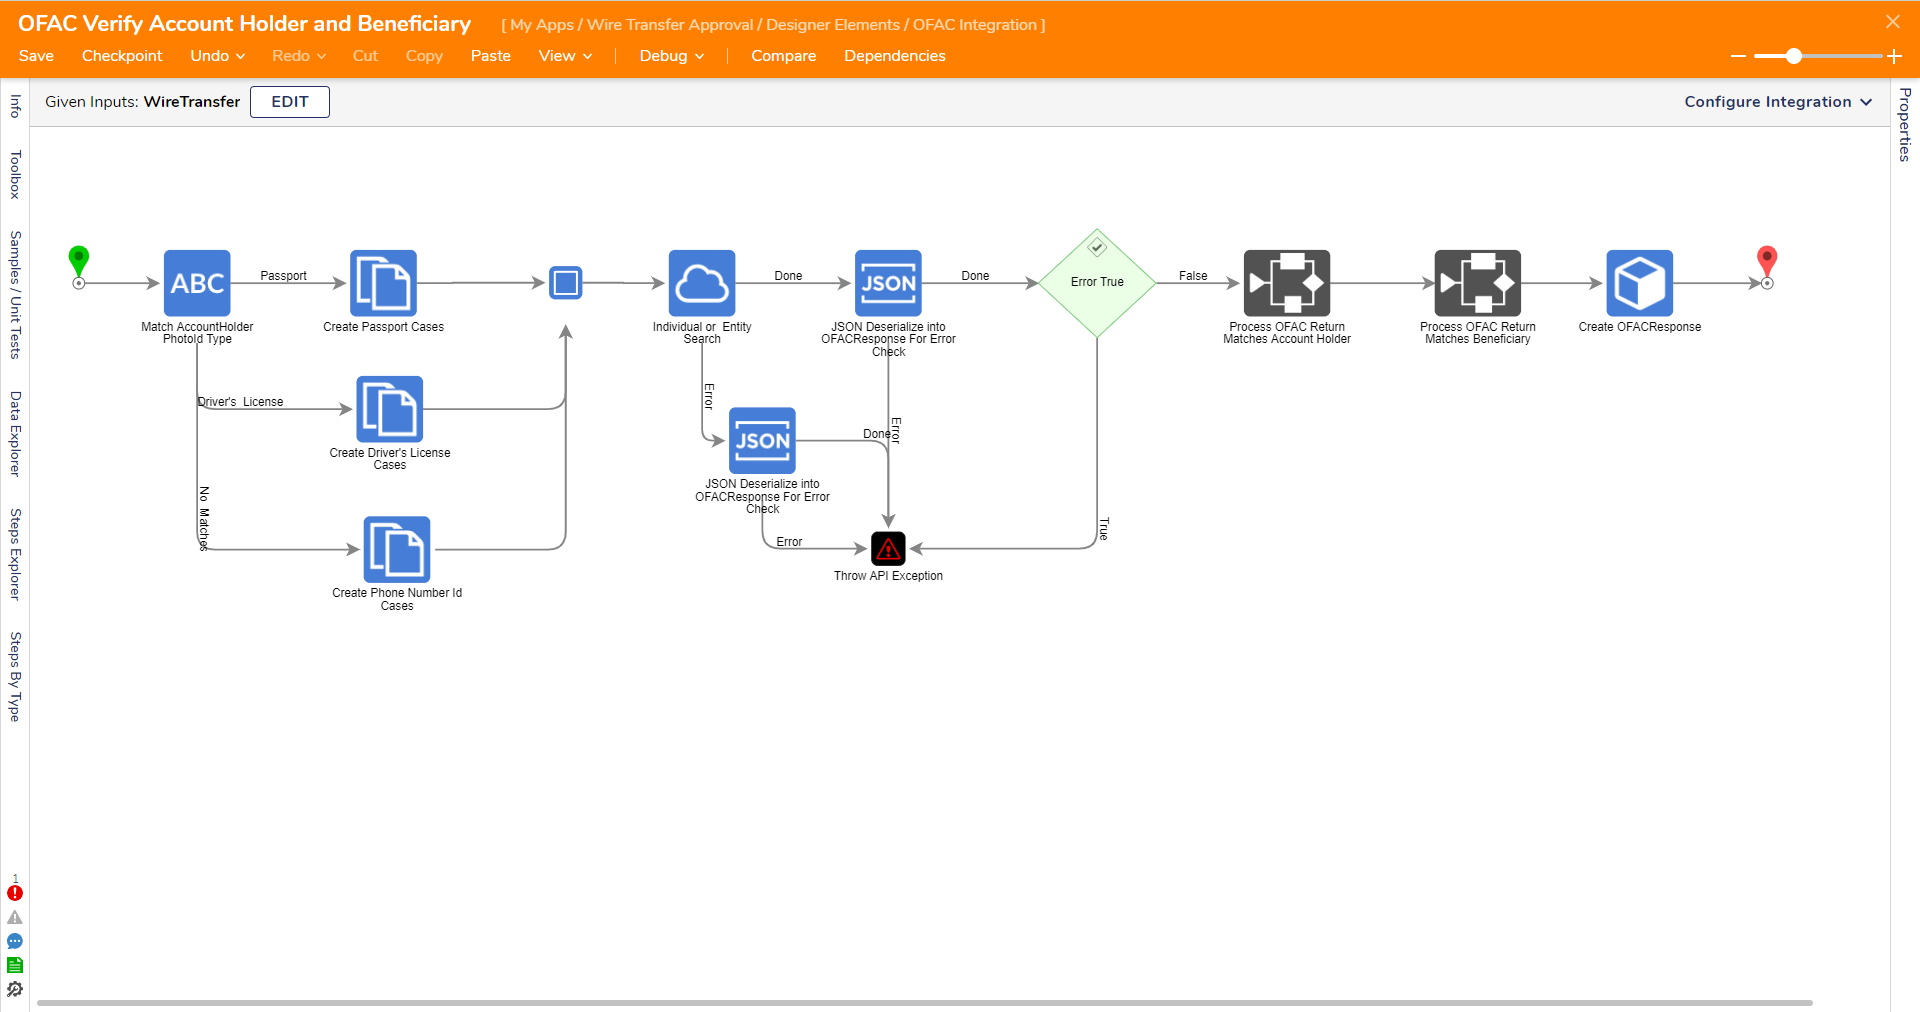 |
| Process OFAC Return Matches Truth Table | A truth table is created to get failed reasons from OFAC based on different requirements.
|  |
Configure Wire Approval Settings
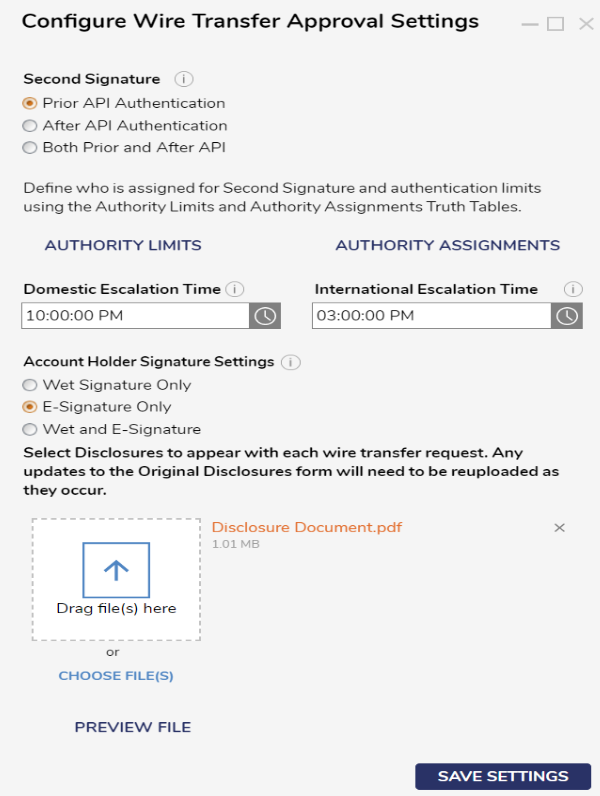
This Form configures the settings for a Wire Transfer Approval. Adjust the settings based on the Project needs and then select SAVE SETTINGS to create the data in the Database for Configuration Settings.
| Action | Description | ||
|---|---|---|---|
| Second Signature | An Authority Limit Truth Table defines where different personas have different limits for wire amount transfer. A Second Signature is needed if the transferred amount is greater than or equal to the given amount in the truth table. | 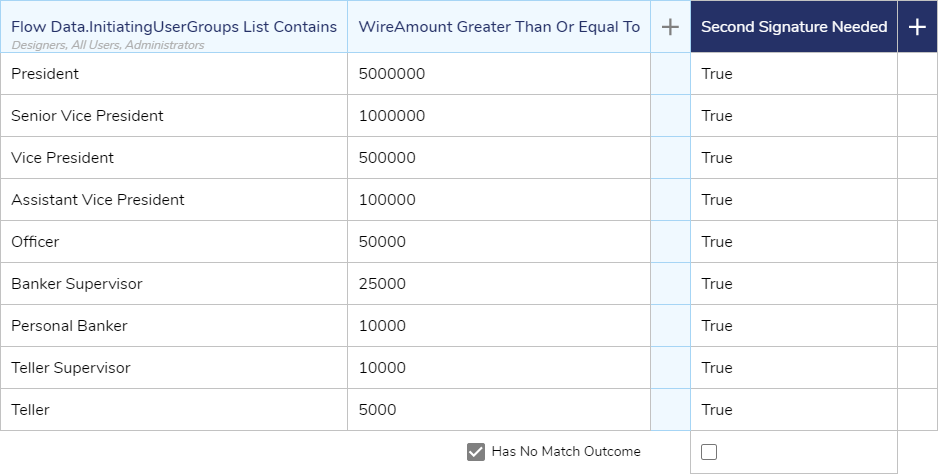 | |
| Prior API Authentication | When a user initiates a wire request, it is sent to a reviewer for second signature approval or rejection. If the request is approved, it then undergoes API authentication. | ||
| After API Authentication | Before a wire request undergoes second signature approval, it first undergoes API authentication. If the request fails this authentication process, the initiator will receive an email listing the possible reasons for rejection. | ||
| Both Prior and After API Authentication | After a user initiates a wire request, it is sent to a reviewer for second signature approval. If the reviewer approves the request, it then undergoes API authentication. If the request is rejected at any point, the initiator will receive an email detailing the possible reasons for the rejection. | ||
| Authority Limits | Navigates to the Authority Limits Truth Table. Here user can modify the data. | ||
| Authority Assignments | Navigates to Authority Assignments Truth Table. Here user can modify the data. | 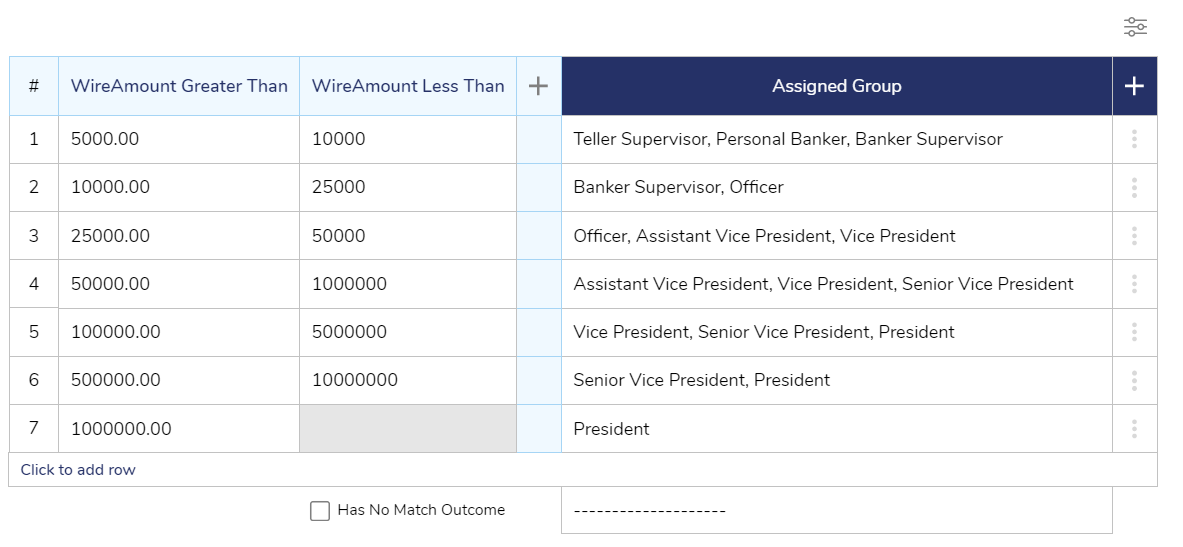 | |
| Domestic Escalation Time | This represents the cutoff time for Domestic Wires. A Critical Notification will be sent 1 hour prior to the set time for Domestic Wires. | ||
| International Escalation Time | This represents the cutoff time for International Wires. A Critical Notification will be sent 1 hour prior to the set time for International Wires. | ||
| Account Holder Signature | |||
| Wet Signature Only | A physical signature is made on a paper document. | ||
| E-Signature Only | A digital signature made using electronic means. | ||
| Wet and E-Signature Only | Will require both Wet and E-Signatures from the account holder. | ||
| Disclosure File Upload | Upload a file to use as a Disclosure to send with each wire transfer request. | ||
Workflow Catalog: Wire Request
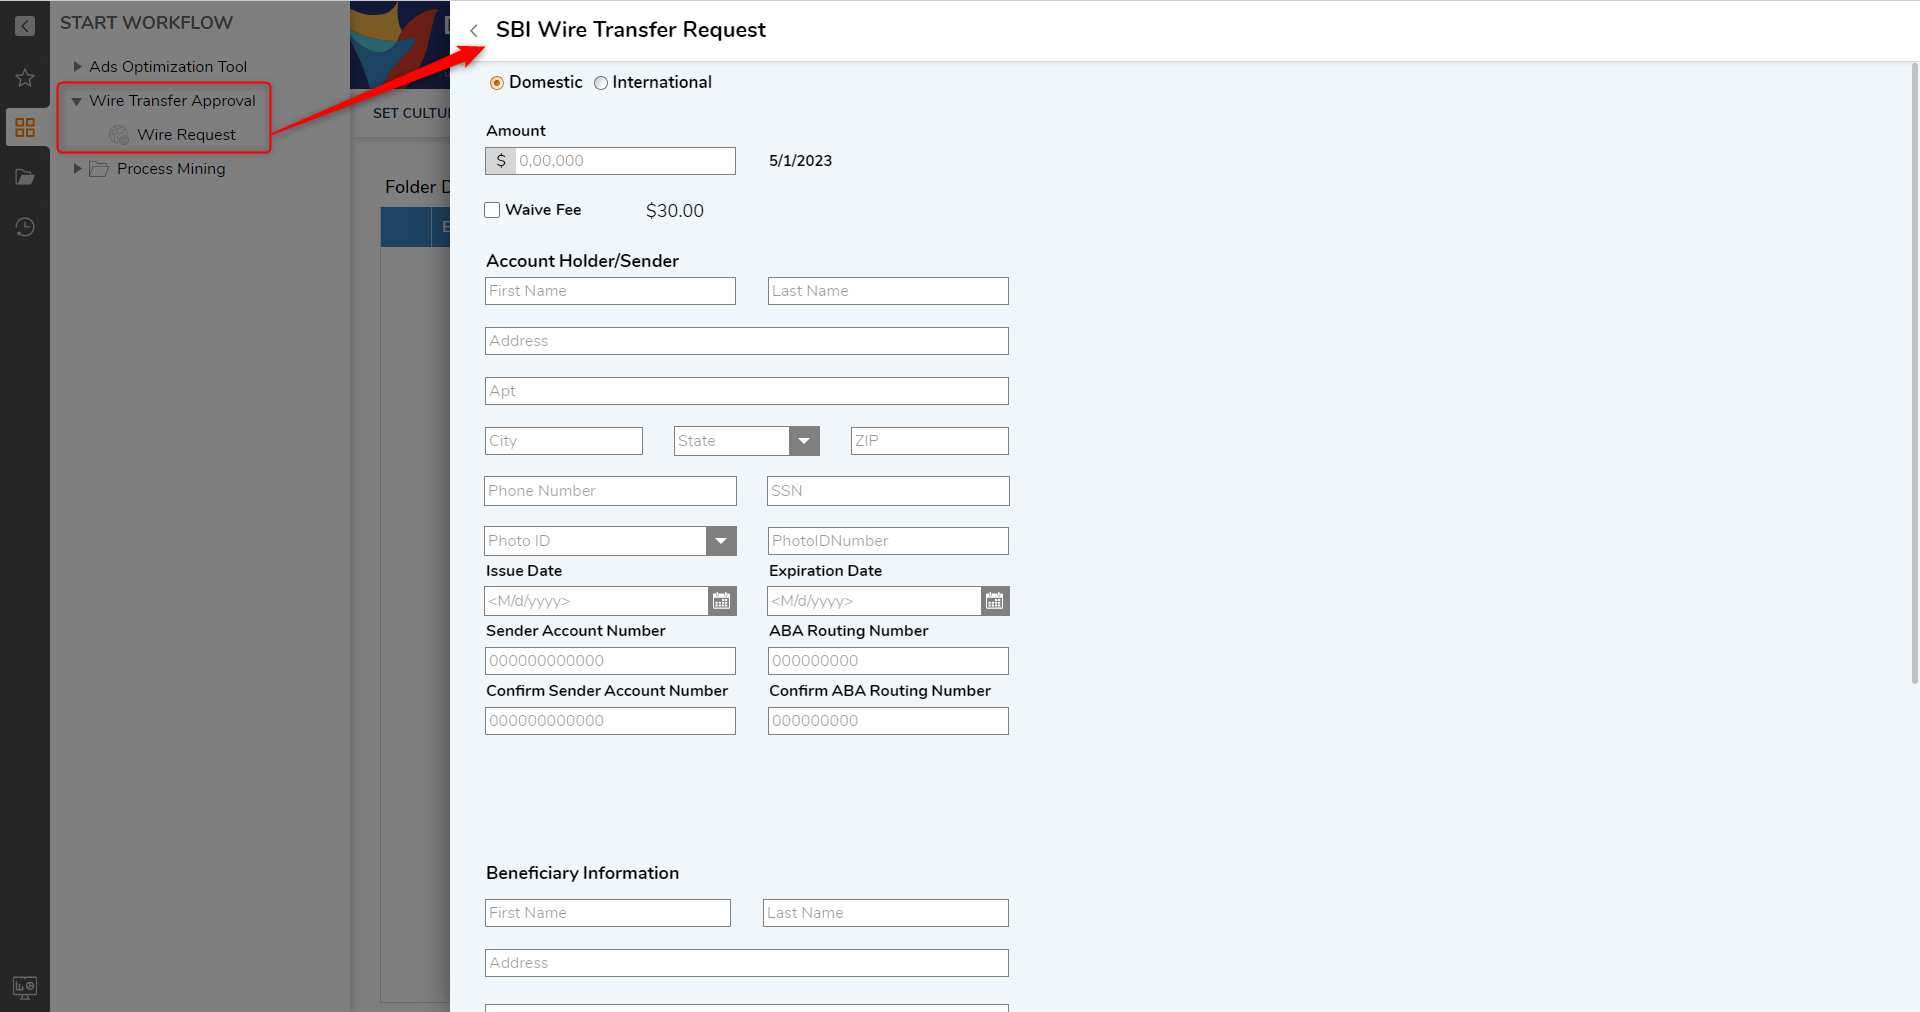
The Wire Request process is started by navigating to the Workflow Catalog, expanding Wire Transfer Approval, and selecting Wire Request. This Flow will display the Wire Transfer Request Form that allows an end-user to provide details regarding the Wire Transfer.
The Form collects information for wire transfer requests, with options for Domestic or International transfers. The Form adapts to show/hide certain fields depending on the user's choice. Domestic transfers have a fee of $25. International transfers have a fee of $35 and require the intermediate bank checkbox and swift code box. Validation errors occur if required fields are left blank or if the entered information does not match. If an amount exceeds the Authority Limits table, a second signature will be required. The user confirms submission before submitting the Form.
Once the Form is submitted, it is available to view on the My Wire Requests Page.
Wire Details Dashboard
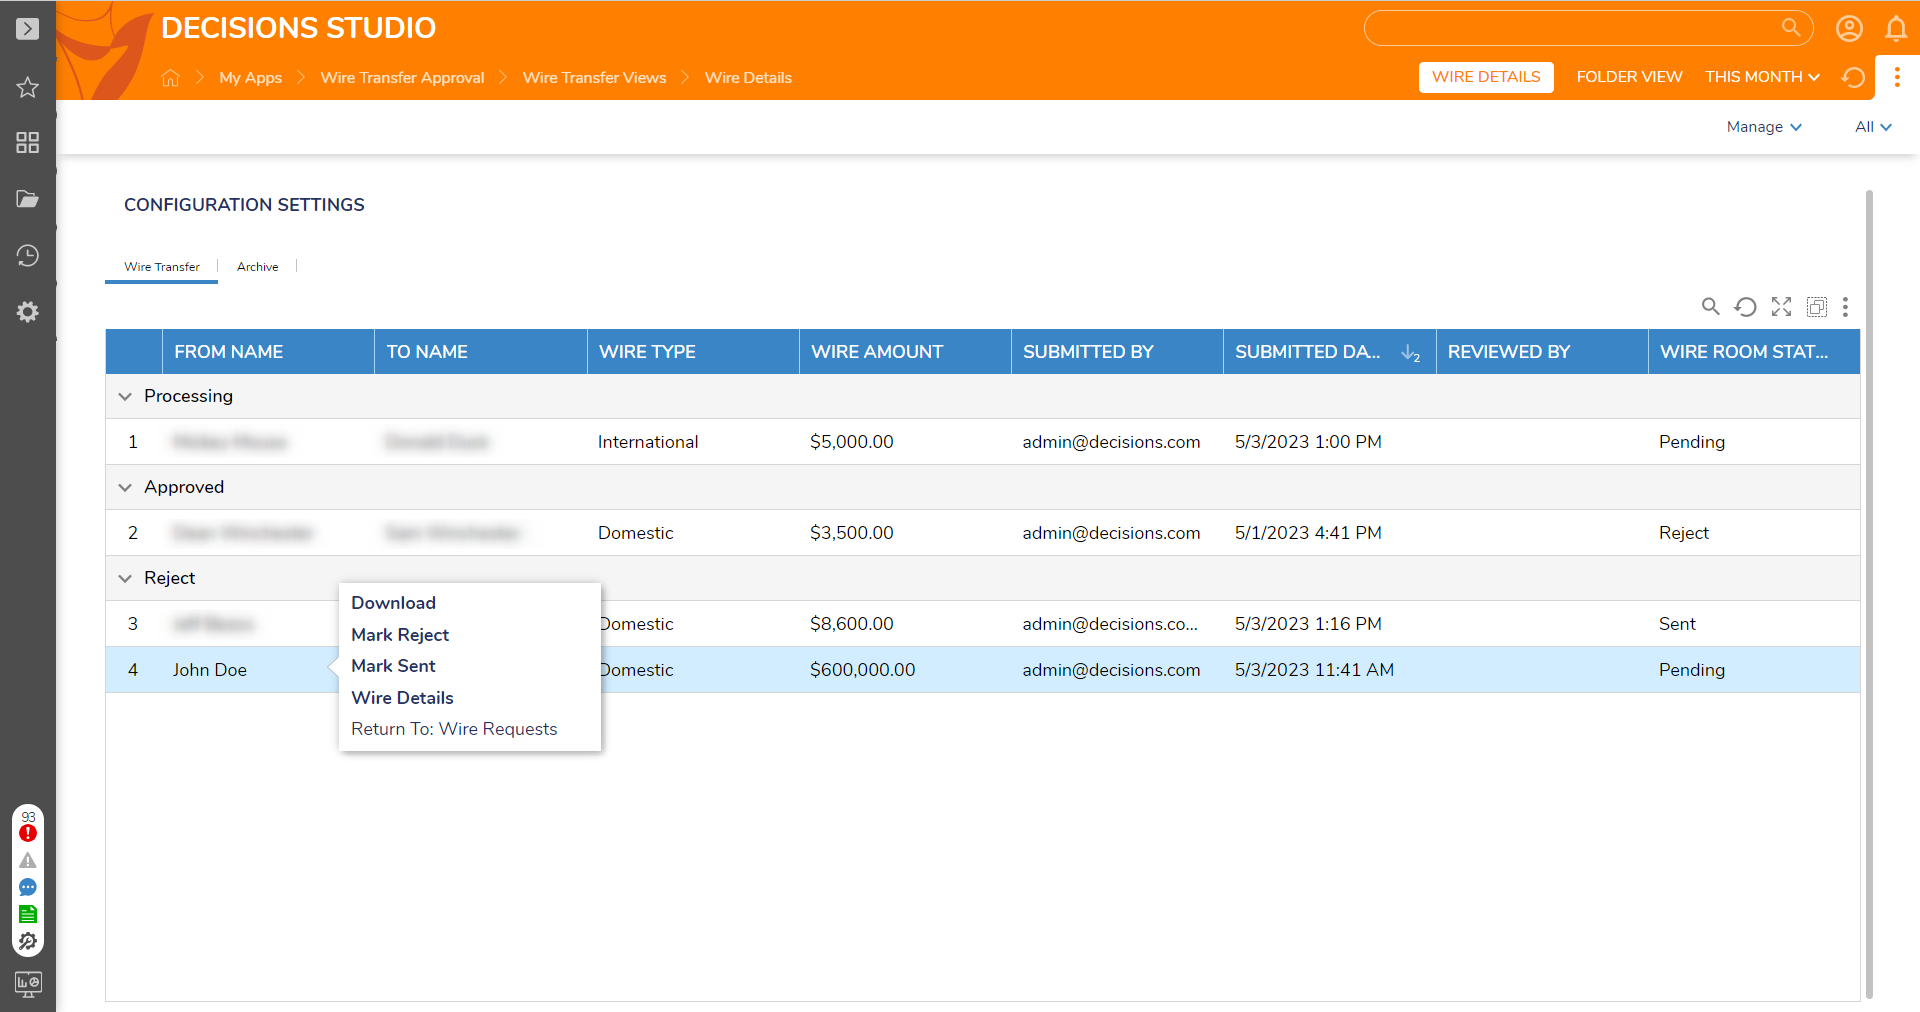
This Dashboard consists of two tabs Wire Transfer and Archive. On the Top of the Dashboard, it has a Date range filter that can sort the Wire Transfer Report according to the submitted date.
| Tab and Actions | Description | |
|---|---|---|
| Wire Transfer | The Wire Transfers tab displays details of wire transfers and contains three status types: Pending, Sent, and Reject, which are saved in the wire room status column. Whenever a new wire request is made, the status is always set to Pending. Right-click an entity to reveal the Action menu and select from one of the following actions:
| |
| Download | When the user selects the Download user action, a PDF file with the wire details and disclosure document will open. The user can provide and update the signature by signing and selecting UPDATE PREVIEW, and then they can send the PDF to the intended recipient. | |
| Wire Details | When the user clicks on "Wire Details", the wire details property wizard will show up. After checking the records, the user can close the Form by clicking on the close button on the Form. | |
Mark Sent | When a user initiates a wire transfer request, an email is sent to the wire room group users to review and update the request on the wire room dashboard.Right-click an entity to open the action menu. To mark a wire transfer as "Mark Sent," the user can update the wire room status to "Sent," and to reject it, select "Mark Reject". The wire room group users will notify the user when the wire transfer is successfully verified and requires action. The email also includes a link to the wire room dashboard.If the user right-clicks on the user action and selects "Mark Sent" while the status is Pending, an email is generated indicating that the wire request is complete. The email is sent to both the initiator and reviewer of that particular wire transfer process. | |
| Mark Reject | ||
| Archive | Contains Archive Wire Transfer Report, which contains the information regarding Archived Wire transfer details. | |
| Configuration Settings | Displays the Configure Wire Approval Settings Form. | |
WTA Exceptional Handling Dashboard
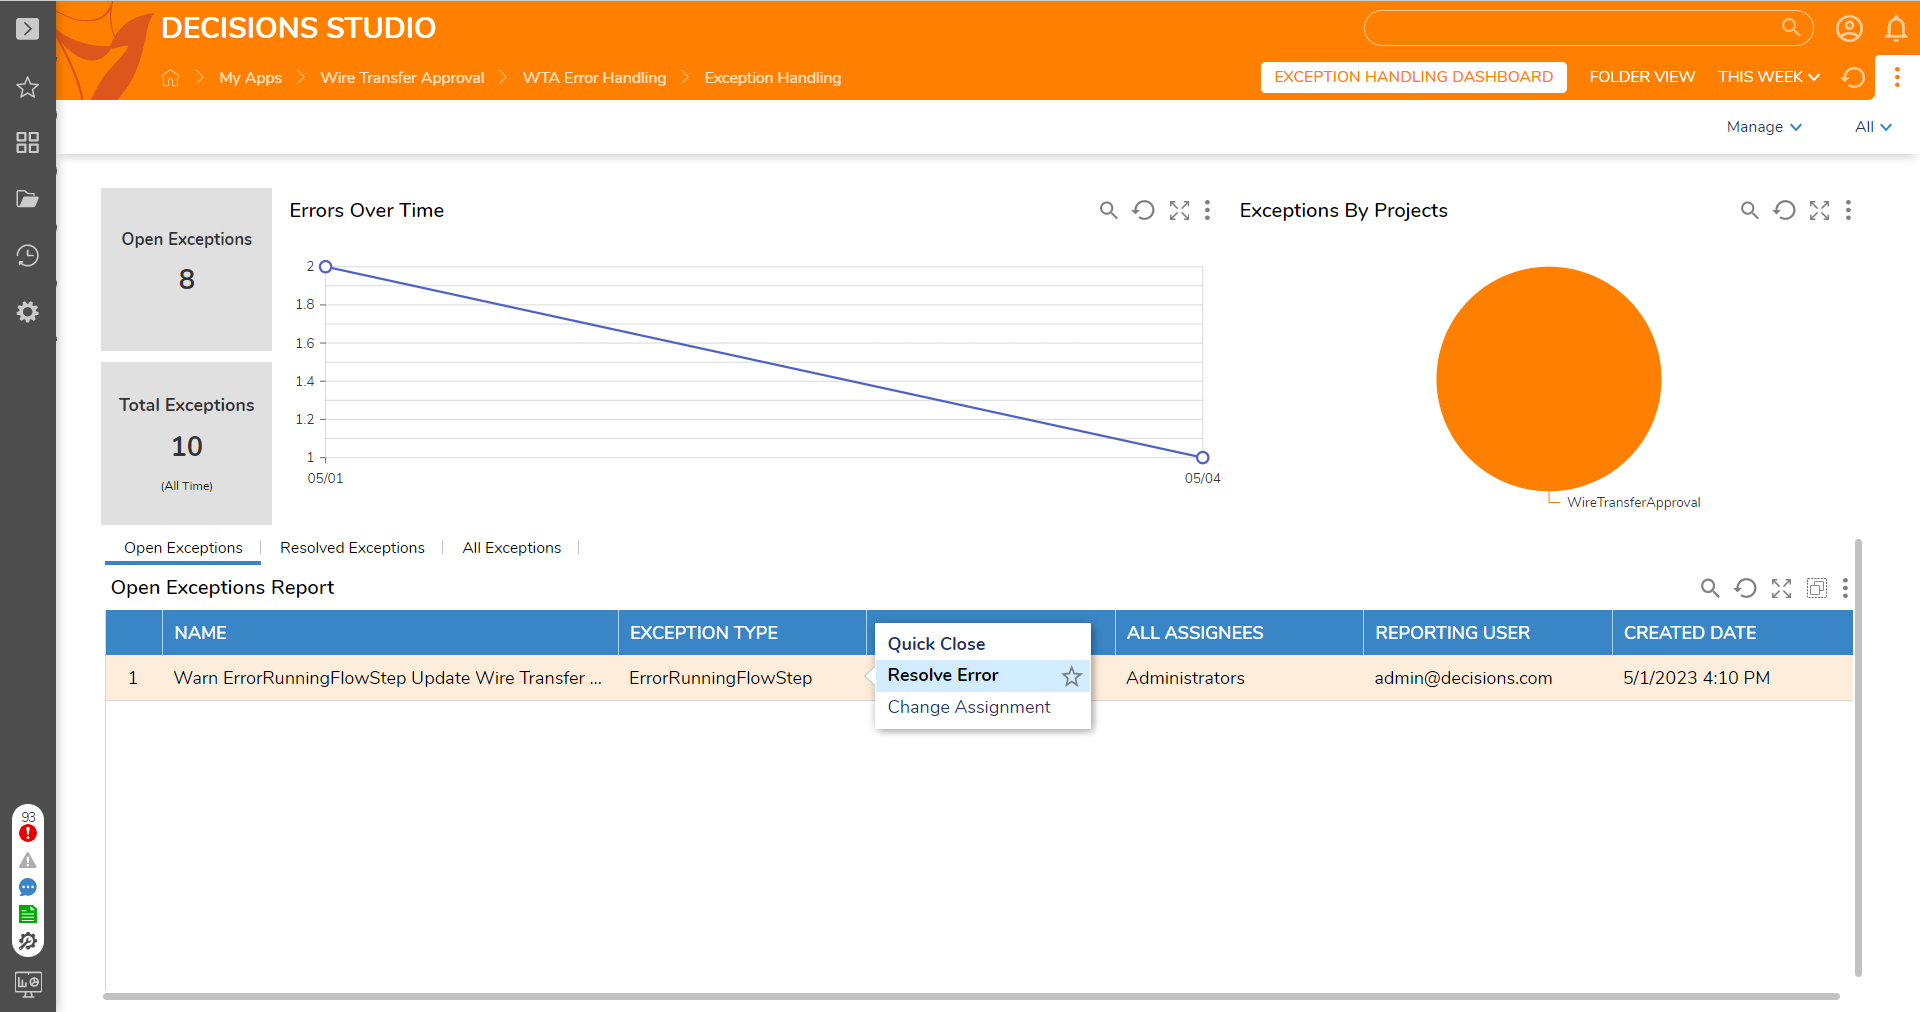
The dashboard tracks exceptions for the project and is part of the user's workflow catalog, allowing the user to take action through the portal. It includes counts of open and total exceptions and displays this information through graphs and a pie chart showing exceptions by the project.
| Tab and Actions | Description | |
|---|---|---|
| Open Exceptions Tab | Displays all Open Exceptions. Right-click an Exception to reveal the Action menu and select from one of the following actions:
| |
| Quick Close | Automatically moves the exception to the Resolved Exceptions tab and closes the exception. | |
| Resolve Error | When the user selects the Resolve Error action, they are taken to a Form where they can fix the Flow and provide comments. If no resolution type is selected, it will appear as a validation. Once the issue is resolved, the record is moved to the Resolve Exceptions Report, and a pop-up message appears on the screen to indicate that the issue has been resolved. | |
| Resolved Exceptions Tab | The dashboard has a tab where users can view records of resolved exceptions. The Report includes the name, project name, resolution type, resolved comments, and created date. | |
| All Exceptions Tab | The All Exceptions Report displays the following information for the user: Name, Project Name, Exception Type, All Assignees, Reporting user, and Created date. | |
Core System: Jack Henry
Jack Henry helps in advocating and innovating integrations for the financial institutions and their account holders, which helps in deepening the relationship between the people and financial institutions. View Jack Henry Documentation for more information on the API.
A Test Account should be created in Jack Henry. In the Test User dashboard, gather test information related to Username, Email, SSN, CIF, Checking Account, Savings Account, Client ID, Client Secret, and Primary Redirect URL.
Garden is also available to connect to for further testing. The same credentials should also be applied in the Garden to make the account accessible.
.png)
Below is some of the information of the end users, which is beneficial for the financial institutions that will help in conducting Wire Transfer Approval and also help in storing wire details information.
- Matching Funds Available in Account X Amount of Days
- Account Holder matches the wire requestor
- Initiator Identification
- Requestor Phone Number
- 9 Digits Routing Number
- Receivers Bank Address
- Receiving Bank Name
- Receiving Bank Account Number
- Receiving Bank Address
- Recipient Name
List of APIs to Retrieve the Above Information
- User Search to gather account information
- Institution Routing Number Details to gather Routing Number.
- Institution Details to gather the Phone Number of the user.
- External Transfer Accounts to gather the Receivers Account Number.