Overview
The following article demonstrates how to set up an Azure Kubernetes Service (AKS) cluster in an Azure Cloud. For more information, refer to About Clustering.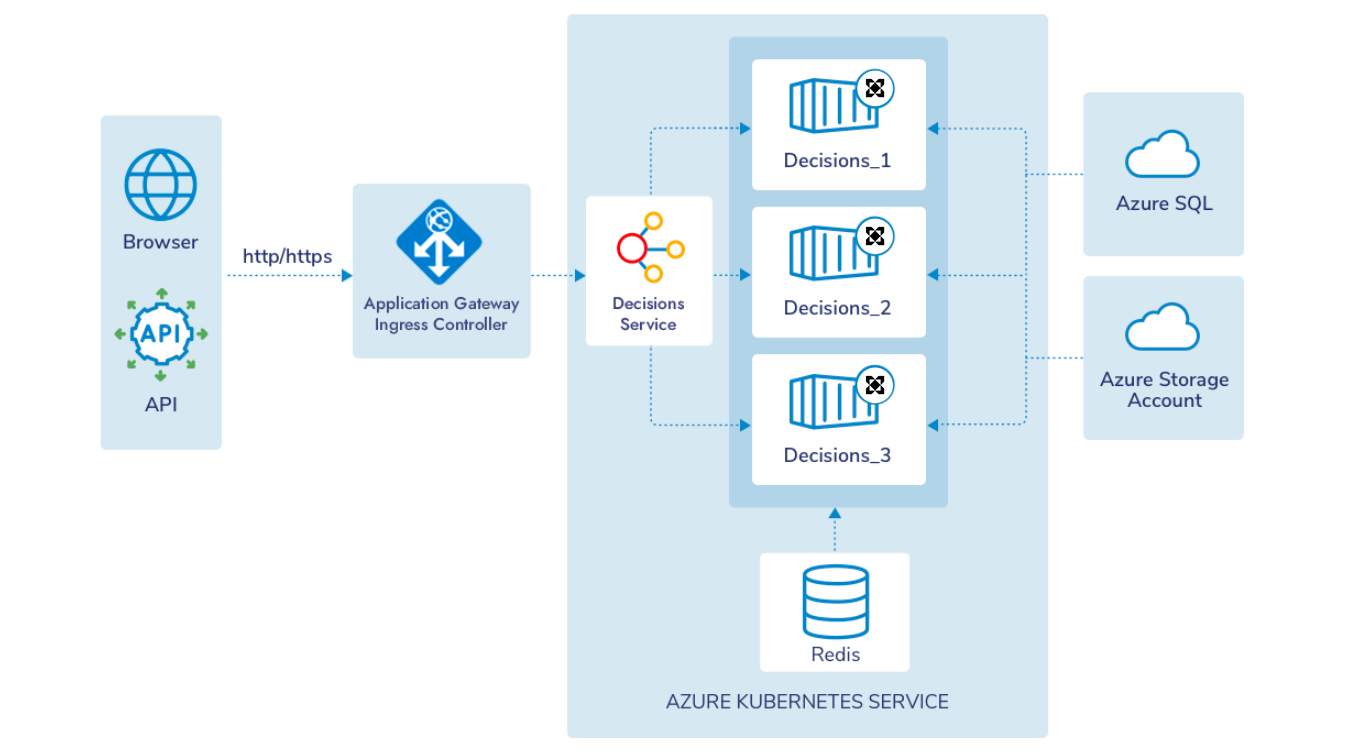
Prerequisites
An active Azure Account.
A Database Server. Refer to the installation requirements to know the supported Databases.
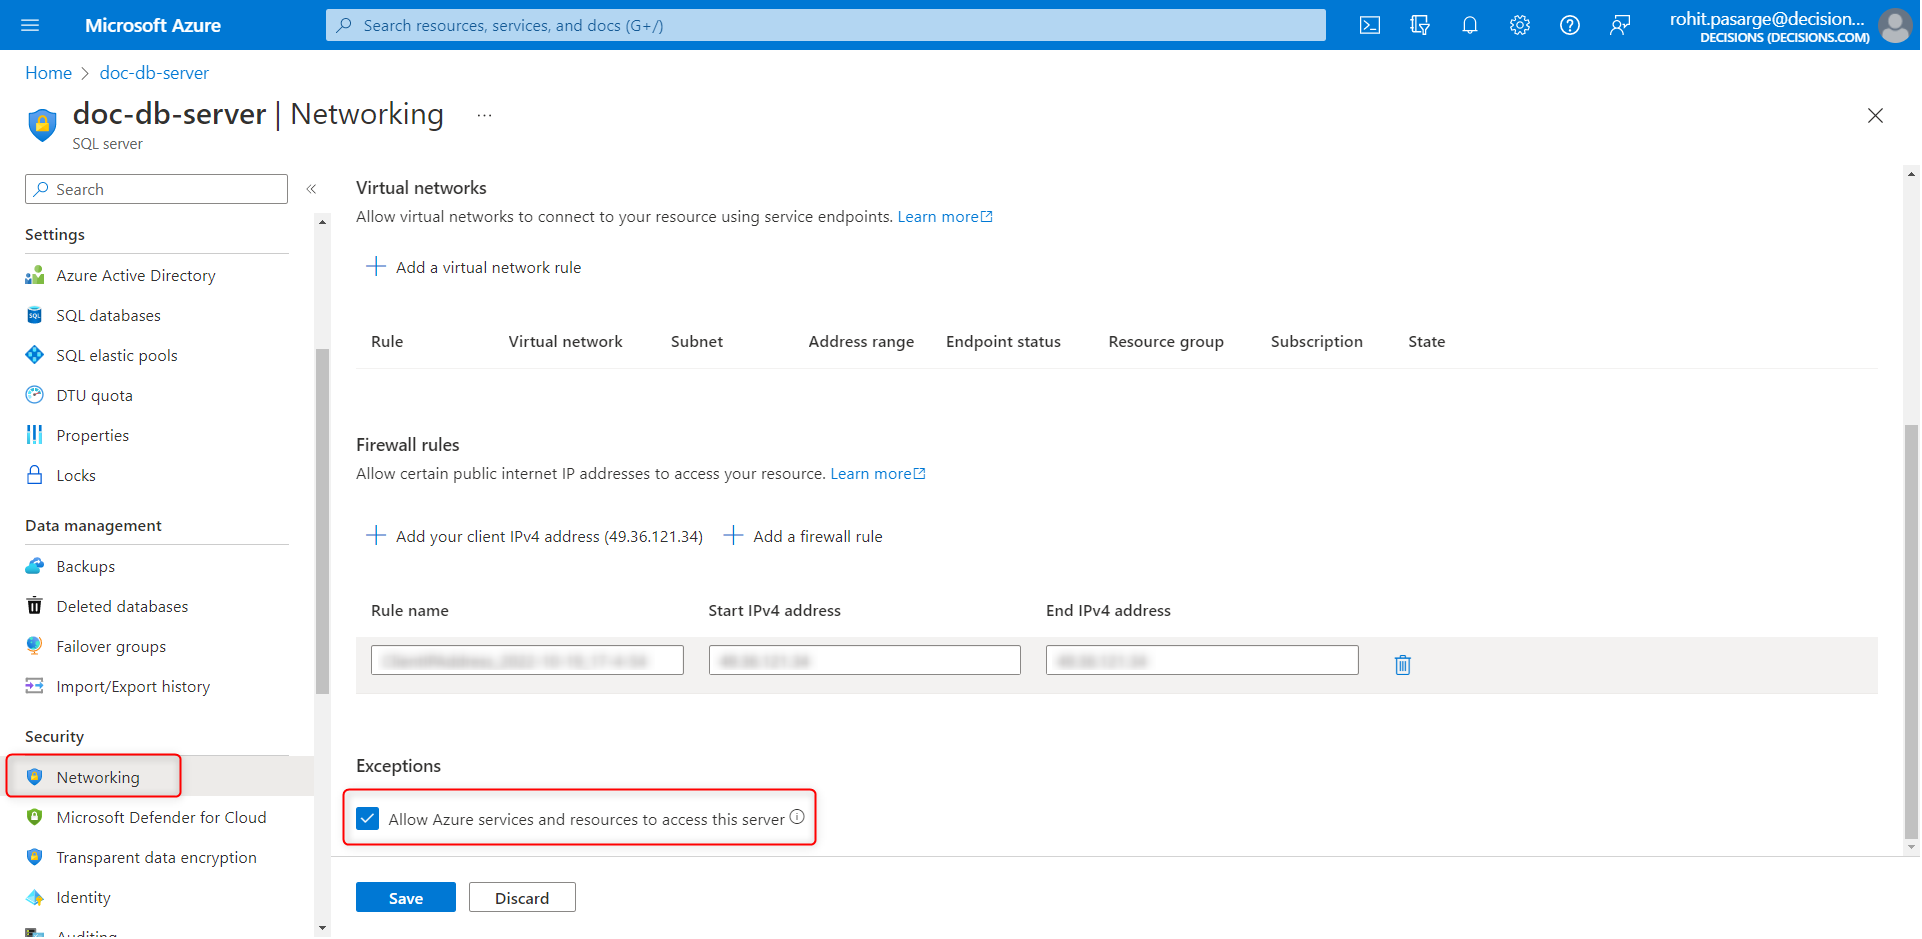
If using an Azure Database Server, navigate to Security > Networking and enable Allow Azure services and resources to access this server. This action will allow the Kubernetes pods to access the DBs inside the DB server. Refer to the following image.
An Azure storage account. Refer to Create a storage account.
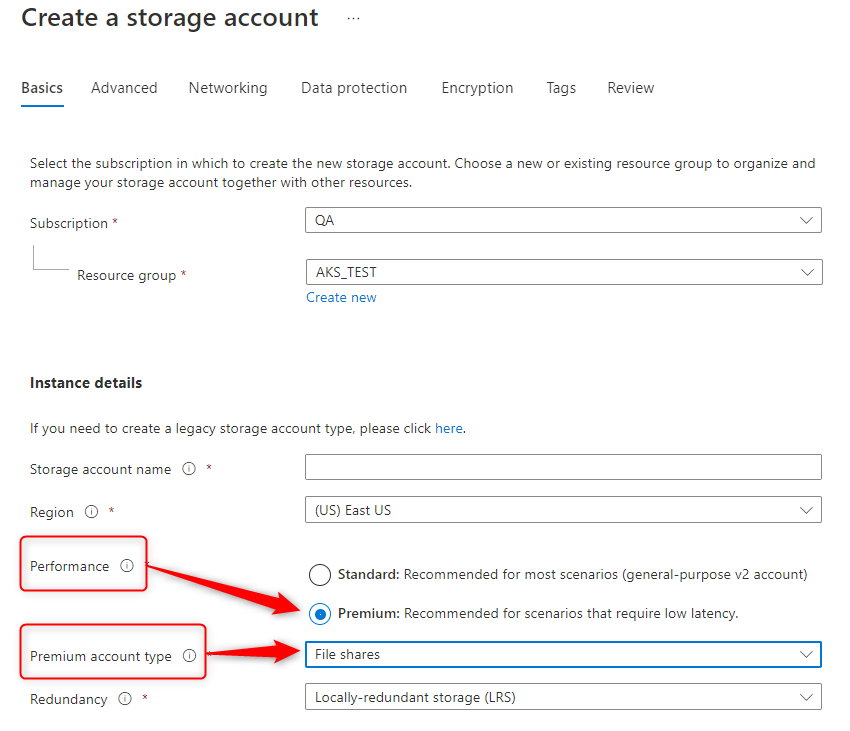
While creating a new Azure storage account, ensure Performance is set to Premiu m and the Premium account type is set to File Shares; refer to the following image.
Create a File share under this Azure storage account. This file share will be used to maintain the persistent storage of the container. Further in this article, we have used a File Share named filestorage.
Note:
It is mandatory to create a File share. File share created under the Azure Storage Account will be mapped as the persistent storage volume to the containers.
Steps to deploy the Kubernetes cluster in Azure
Each of these steps is explained further in this article.
Creating Kubernetes Service with Azure CLI
Open the Azure CLI by clicking the command prompt icon to the right of the search bar. Change the CLI interface to Bash Language.
Review and edit the commands from the following YAML file using the reference table.
export SUBSCRIPTION=$Azure_Subscription_Name
export RESOURCE_GROUP=$Resource_Group_Name
export CLUSTER_NAME=$Prefered_Cluster_Name
export LOCATION=$Region_set_to_the_Resource_Group
export AKS_PERS_STORAGE_ACCOUNT_NAME=$Storage_Account_Name
export STORAGE_KEY=$Storage_Account_Key

az account set --subscription $Subscription_Name

az aks create\
    --resource-group $Resource_Group_Name\
    --name $Given_Cluster_Name\
    --node-count $Required_Node_count\
    --generate-ssh-keys\
    --node-vm-size Standard_D8s_v3\
    --network-plugin azure

az aks get-credentials --name $Given_Cluster_Name --resource-group $Given_Group_Name

kubectl create secret generic azure-secret --from-literal=azurestorageaccountname=$Storage_Account_Name  --from-literal=azurestorageaccountkey=$Storage_Account_Key
Variable Name
Description
Azure_Subscription_NameEnter the Azure subscription name.
Resource_Group_NameEnter the Resource Group that falls under the same subscription.
Prefered_Cluster_NameEnter desired cluster name.
Region_set_to_the_Resource_GroupEnter the same region used during setup.
Storage_Account_NameEnter the name of the created storage account.
Storage_Account_KeyEnter the storage key from the above storage account. Refer to View account access keys.
Standard_D8s_v3The
Standard_D8s_v3contains the minimum specification to handle the Decisions deployment in AKS.
Please use larger node sizes if planning to run multiple replicas per node. Refer to Azure VM sizes.Once added, this will create Azure Kubernetes service in the Resource group.

Deploying a Decisions Service
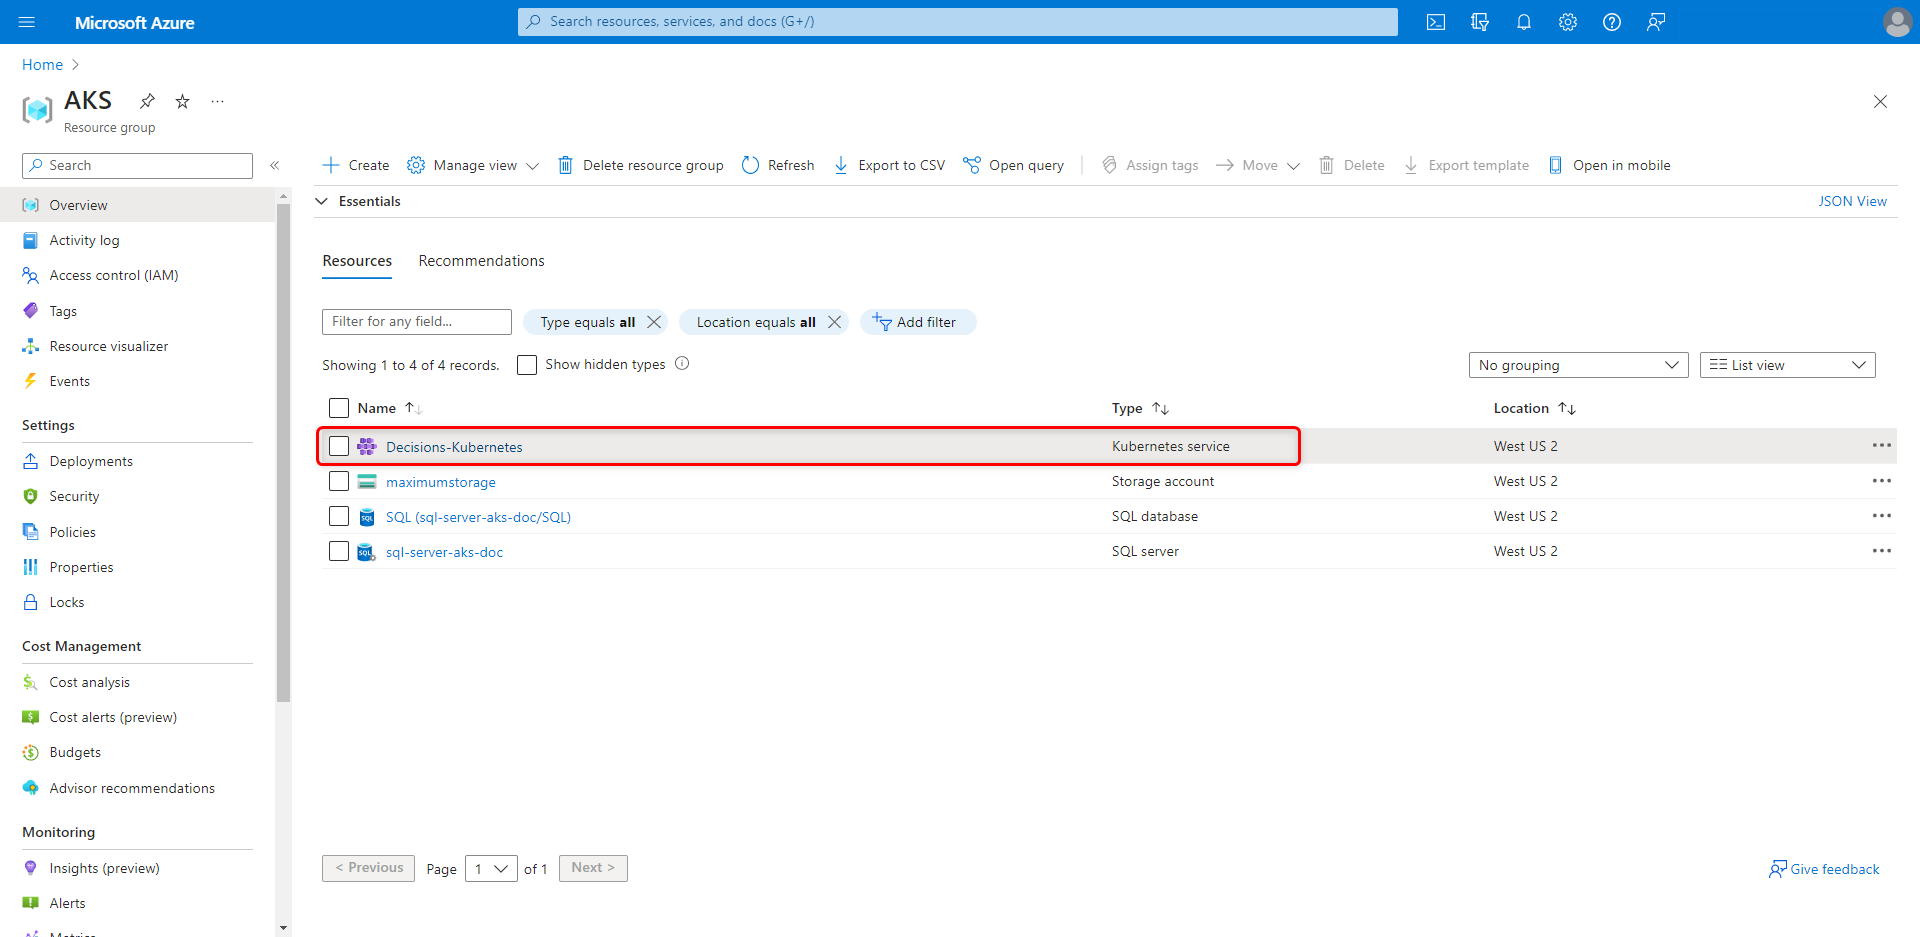
From the Resource Group. Select the newly created Kubernetes service.
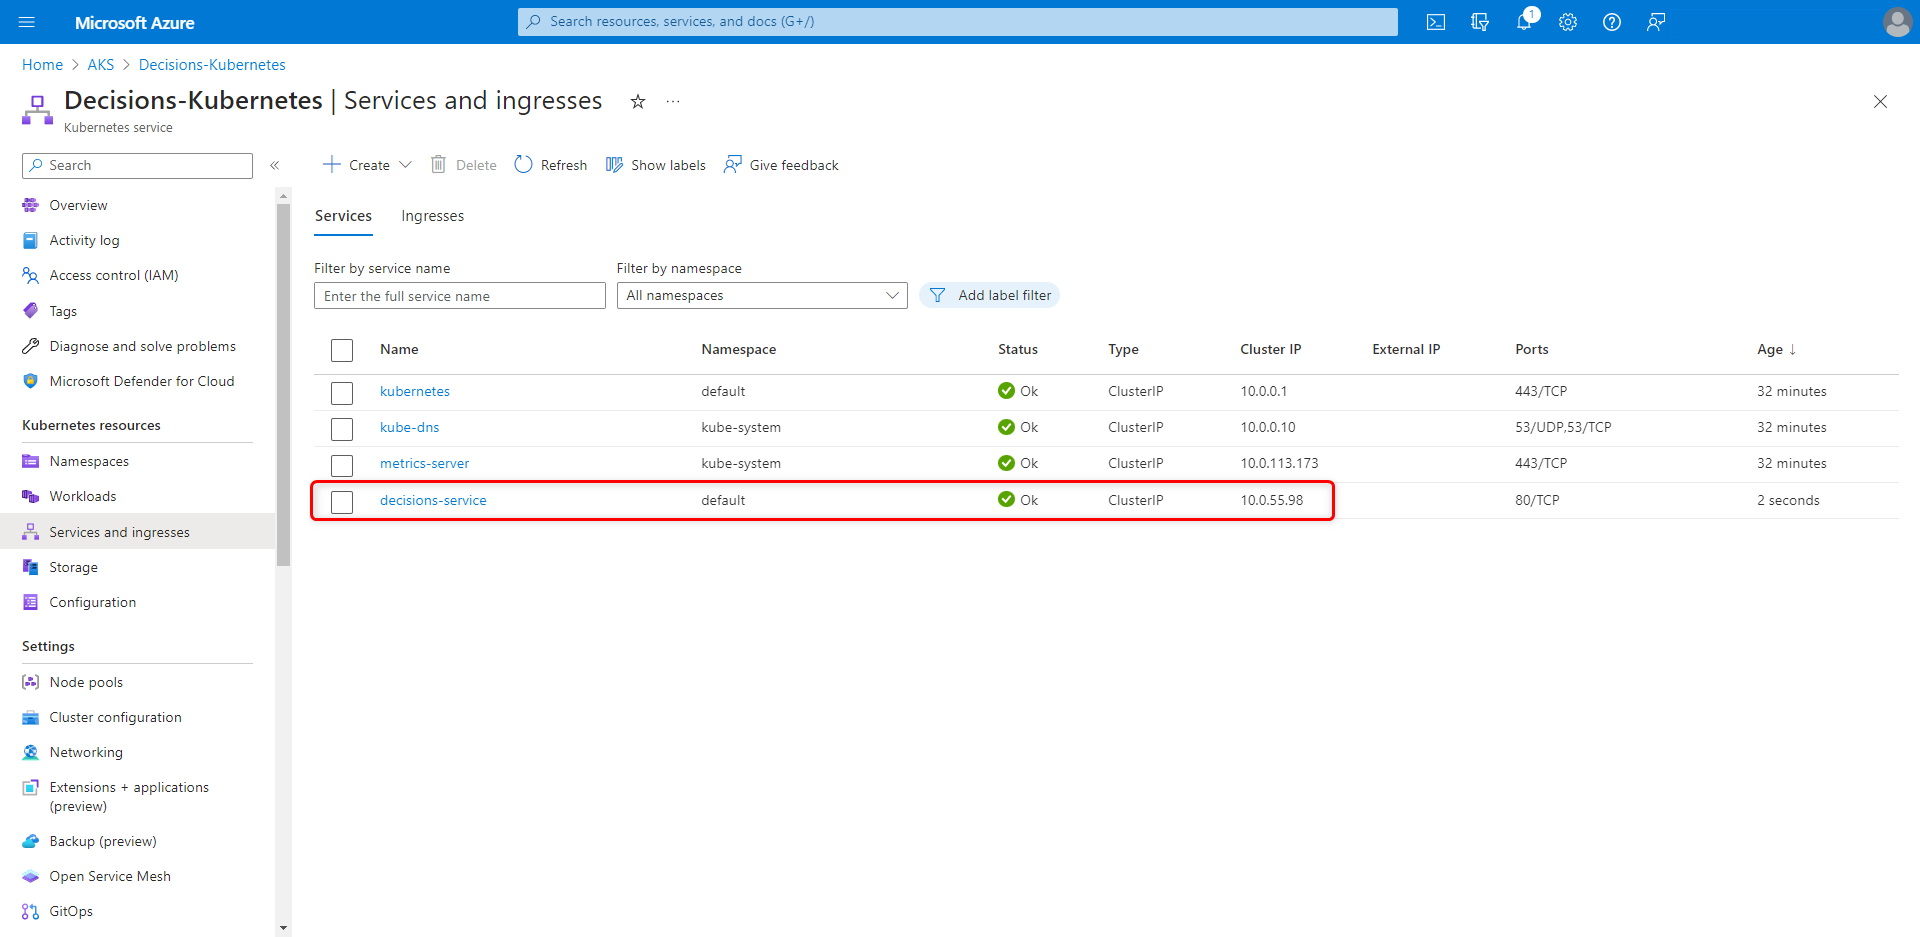
From the left configuration panel, navigate to Kubernetes resources > Services and ingresses. From the Top action bar, click on Create > Apply a YAML.

Enter the following YAML. The name of the service can be changed by editing the
namevariable on line 4.- apiVersion: v1 kind: Service metadata: name: decisions-service spec: type: ClusterIP ports: - targetPort: 80 name: port80 port: 80 protocol: TCP selector: app: decisionsAfter deploying the YAML, the Services Page will populate with the 'decisions-service'.
Enabling AGIC (Application Gateway Ingress Controller)
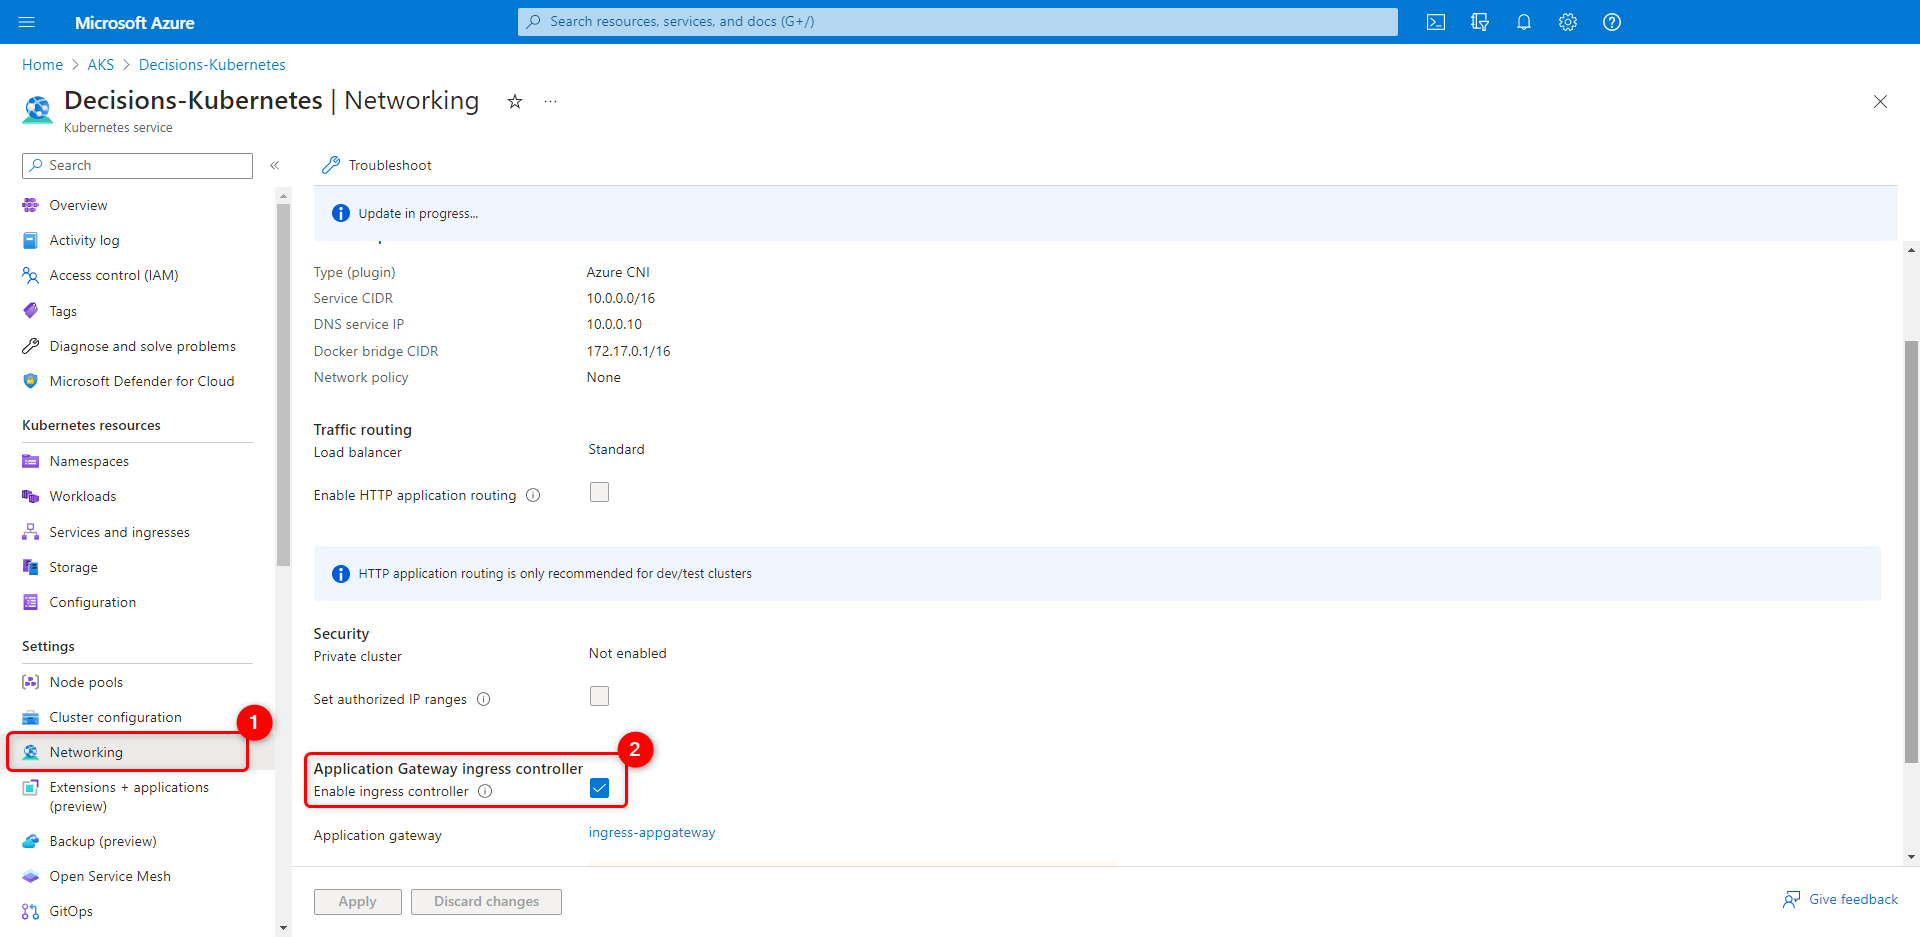
Navigate to the Kubernetes Service > Settings > Networking. Scroll down and enable the Application Gateway ingress controller, and click on Apply. For more information, refer to Microsoft's documentation.
Deploying Application Gateway
From the Kubernetes resources > Services and ingresses, add the following YAML.
Update the following values from the YAML file.YOURAZURECERTHERE- Enter the name of the certificate. The certificate should be in the PFX format. Follow the section to add a certificate manually to the application gateway.YOURDECISIONS.HOSTNAME.COM- This will be the Decisions Portal base URL.apiVersion: networking.k8s.io/v1 kind: Ingress metadata: name: agingress annotations: kubernetes.io/ingress.class: azure/application-gateway appgw.ingress.kubernetes.io/ssl-redirect: "true" appgw.ingress.kubernetes.io/appgw-ssl-certificate: "$PFX_CERT_NAME" appgw.ingress.kubernetes.io/cookie-based-affinity: "true" appgw.ingress.kubernetes.io/health-probe-path: "/home/healthcheck" appgw.ingress.kubernetes.io/backend-hostname: "YOURDECISIONS.HOSTNAME.COM" spec: rules: - http: paths: - path: / backend: service: name: decisions-service port: number: 80 pathType: Exact
This will create the ingress at Kubernetes > Services and ingresses > Ingresses. Users will be able to hit the Decisions Pods through the application gateway's external IP address. In our example, the address is
20.112.53.29.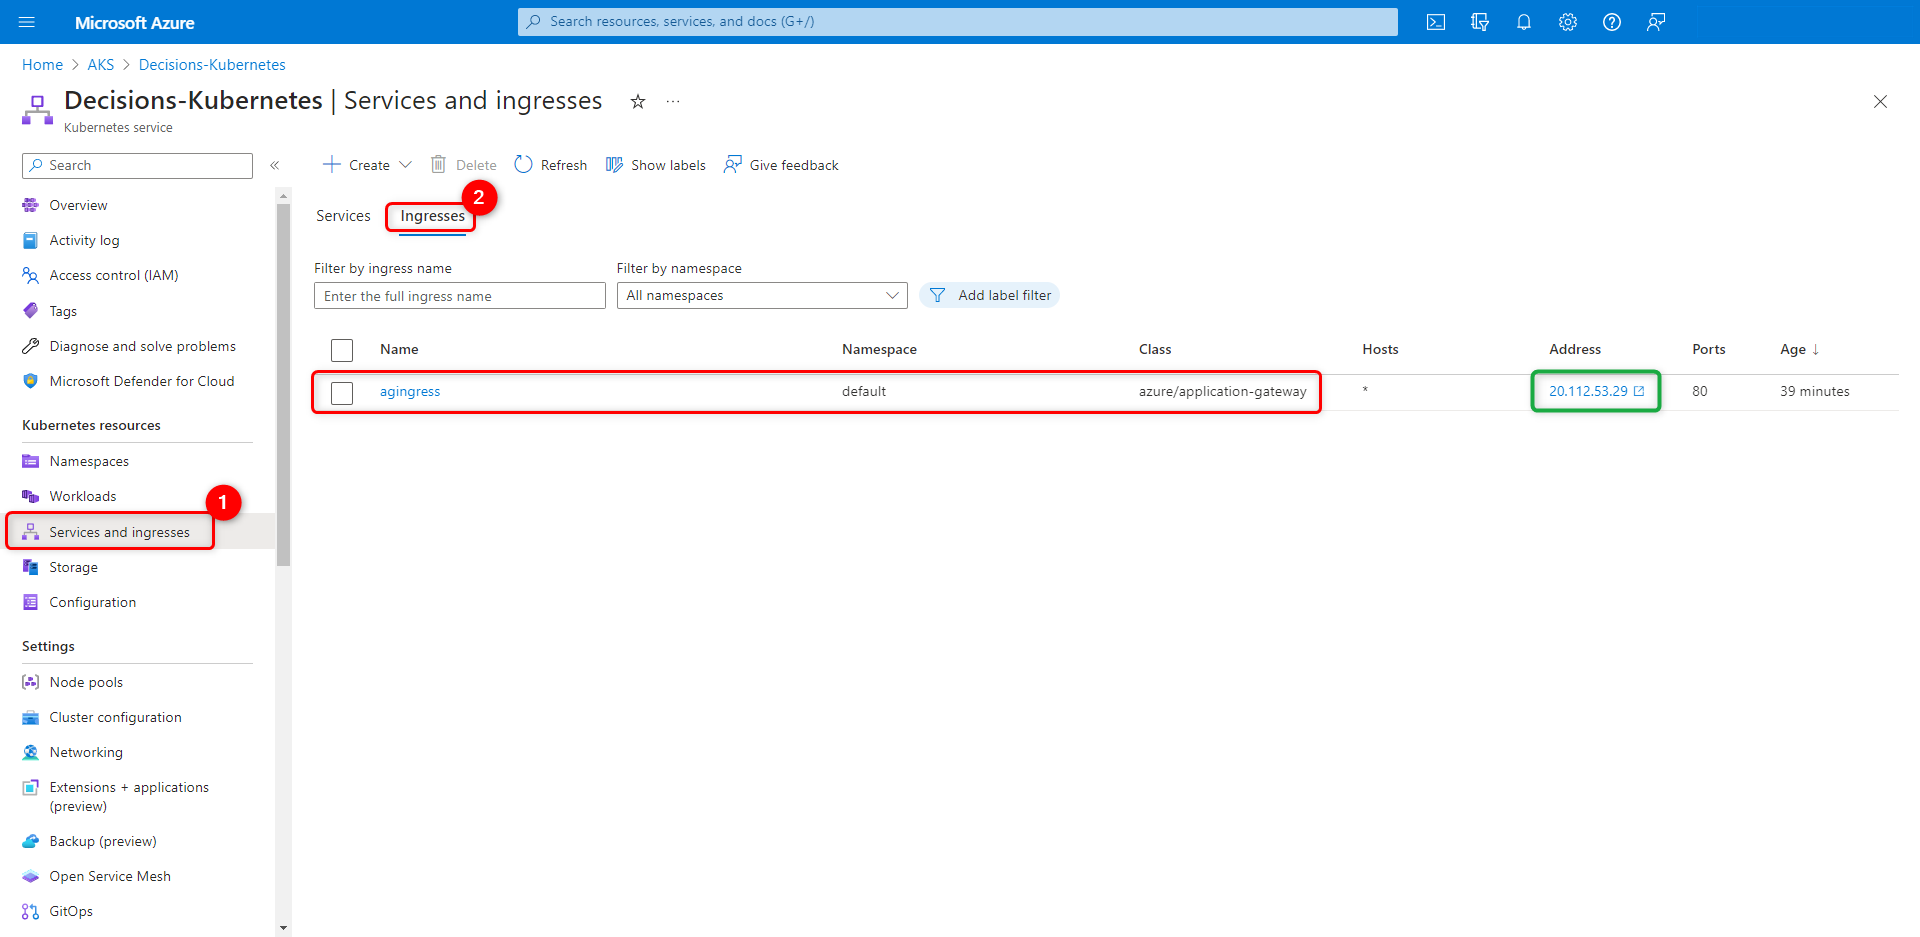
Add an SSL certificate to the Application Gateway
Search for “Application Gatewayas” in the Azure search bar. Open the “Application Gateways” service from the search options.
Open the newly created ingress:
agingressfrom the list.From the left panel, navigate to “Listeners”.
Click on “Add Listener”. A new panel to add all the details for Listeners will open.
Listener Name: Enter the Listener's Name.
Frontend IP: Set to Public
Protocol: Set the Protocol to HTTPS
Port: Set the Port to 443
Choose a Certificate: Select “Create New” if you want to upload a new certificate, or click “Select Existing” to pick the existing certificate.
HTTPS Settings: Select “Upload a Certificate”
Cert Name: Enter the certificate name similar to the one given in the above YAML file (
$PFX_CERT_NAME) while deploying the Application Gateway.PFX certificate file: Upload the PFX cert file.
Pasword: Enter the PFX cert password
Click on Add.
Deploying a Redis Service
Redis is used for external memory caching between all pods within the cluster. Only one Redis pod is needed per cluster. For more information on Redis, refer to Setting Up Redis External Caching.
Open the Kubernetes service > Kubernetes Resources > Workloads and create another YAML via the plus icon.
Enter the following YAML into the text box.
apiVersion: apps/v1
kind: Deployment
metadata:
  name: redis
spec:
  replicas: 1
  selector:
    matchLabels:
      app: redis
  template:
    metadata:
      labels:
        app: redis
    spec:
      containers:
        - image: redis:latest
          name: redis
          resources:
            requests:
              cpu: 4
              memory: 16G
            limits:
              cpu: 4
              memory: 16G
          ports:
            - containerPort: 6379
              name: redis
---
apiVersion: v1
kind: Service
metadata:
  name: redis-service
spec:
  selector:
    app: redis
  ports:
    - protocol: TCP
      port: 6379
      targetPort: 6379
It might take a few minutes to deploy the Redis service. Navigate to Kubernetes Service > Kubernetes resources > Workloads. It will populate as 'redis-service'.
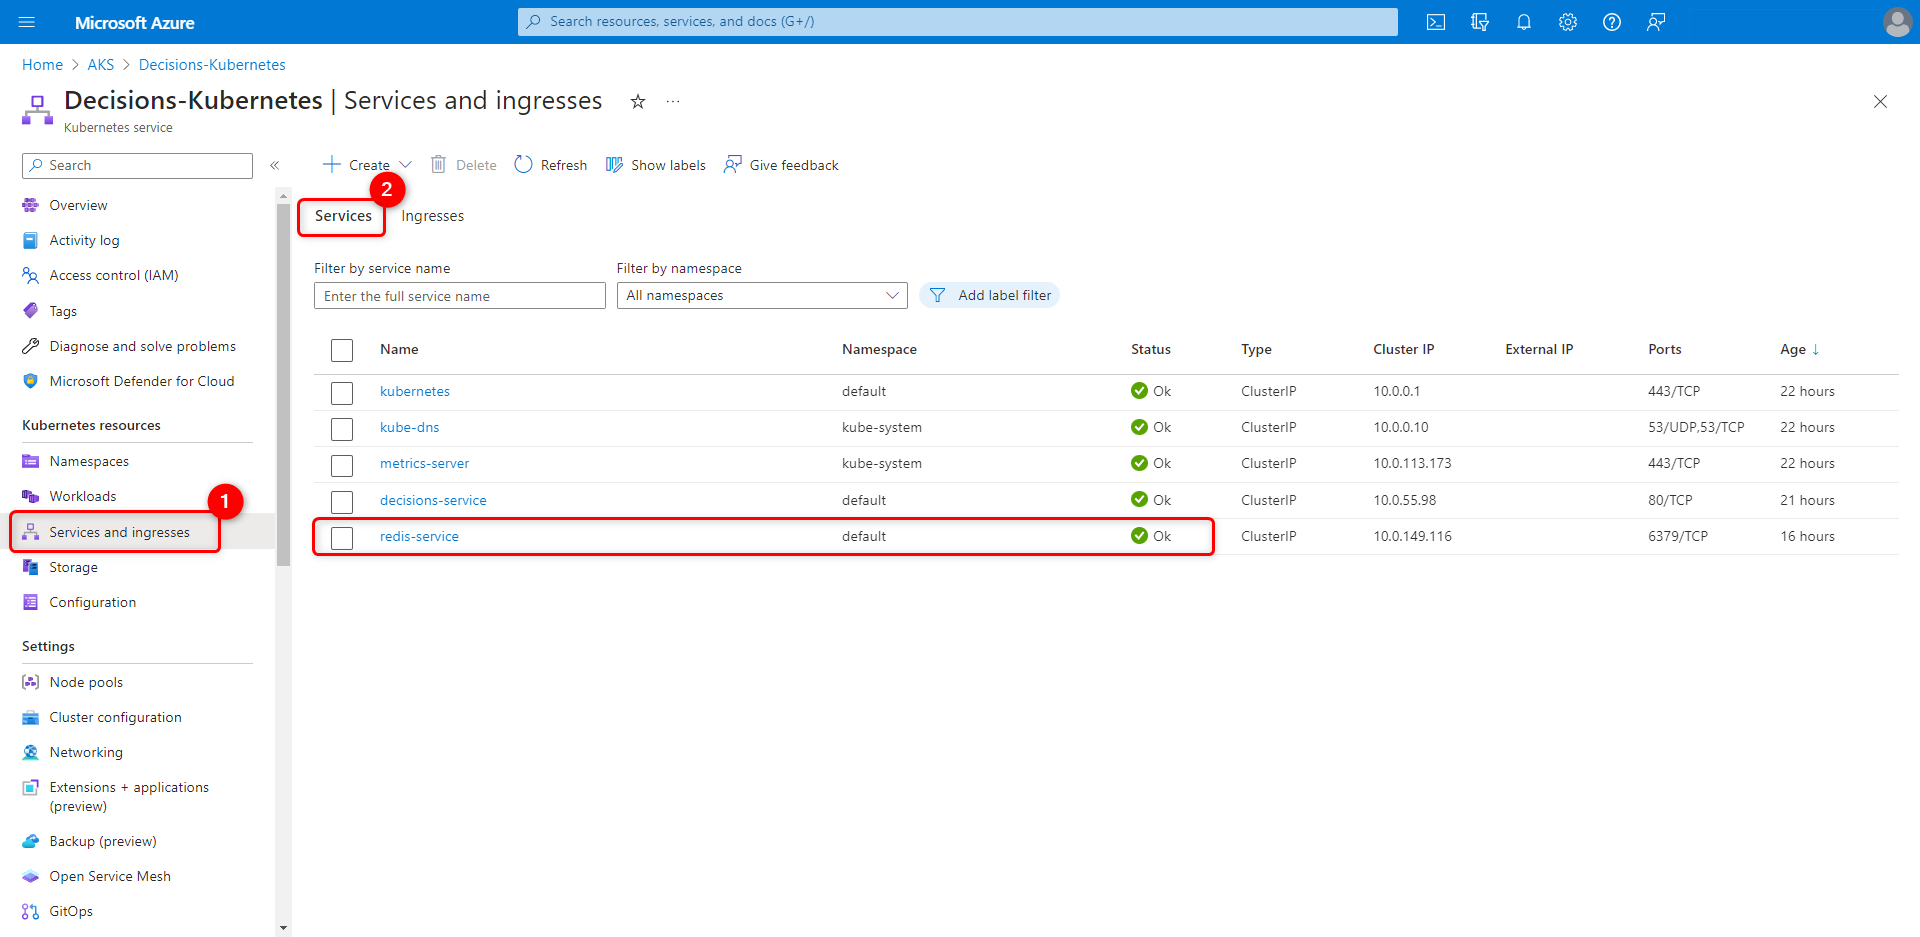
Select the newly created Redis service. It will open the Overview page. Copy the IP listed under Endpoints. Refer to the following image.

Deploying Decisions Pod
In the Kubernetes service, navigate to Kubernetes resources > Workloads from the left configuration panel and create another YAML via the plus icon. For all the details on the environment variables, refer to Creating Environment List Files (env.list).
Check the Table Below and Modify Variables as Needed
- apiVersion: apps/v1
  kind: Deployment
  metadata:
    name: decisions
  spec:
    replicas: 2
    selector:
      matchLabels:
        app: decisions
    template:
      metadata:
        labels:
          app: decisions
      spec:
        nodeSelector:
          kubernetes.io/os: linux
        containers:
          - image: decisionscore/platform:latest
            name: decisions
            env:
              - name: DECISIONS_FORCEBASEURI
                value: "https://your.domain.com"
              - name: DECISIONS_PORTALBASEURL
                value: "https://your.domain.com"
              - name: DECISIONS_FILESTORAGELOCATION
                value: "/opt/decisions/data"
              - name: DECISIONS_DATABASETYPE
                value: "AZURE"
              - name: DECISIONS_DATABASECONNECTSTRING
                value: "Server=tcp:[YOURDATABASE].database.windows.net,1433;Initial Catalog=decisions;Persist Security Info=False;User ID=[ADMINUSER];Password=[YOURADMINPASSWORD];MultipleActiveResultSets=False;Encrypt=False;Connection Timeout=30;"
              - name: DECISIONS_CLUSTERING_TURNONCLUSTERING
                value: "True"
              - name: DECISIONS_CLUSTERING_REDISBASEURL
                value: "redis-service.default.svc.cluster.local:6379"
              - name: DECISIONS_LICENSECOMPANYID
                value: "12345abc-67de-89fg-1011-121314151617"
              - name: DECISIONS_LICENSECOMPANYNAME
                value: "Decisions Customer"
              - name: DECISIONS_LICENSECONTACTEMAIL
                value: "exampleemail@decisions.com"
              - name: DECISIONS_ENVIRONMENTNAME
                value: "Decisions"
              - name: DECISIONS_LICENSETYPE
                value: "EnterpriseNonProduction"
              - name: DECISIONS_ADMINISTRATOR_EMAIL
                value: "name@email.com"
              - name: DECISIONS_ADMINISTRATOR_PASSWORD
                value: "your_password"
            resources:
              requests:
                cpu: 4
                memory: 16G
              limits:
                cpu: 4
                memory: 16G
            volumeMounts:
              - name: filestorage
                mountPath: /opt/decisions/data
            ports:
              - containerPort: 80
                name: http
        volumes:
          - name: filestorage
            csi:
              driver: file.csi.azure.com
              volumeAttributes:
                secretName: azure-secret
                shareName: filestorage
                mountOptions: "dir_mode=0777,file_mode=0777,cache=strict,actimeo=30"
Variable Name
Default Value
New Value
spec > replicas
2
Enter the number of pods to create; minimum is 2.
containers > image
decisionscore/platform:latest
Ensure that the latest version is not used for the production environment.
Container images for all Decisions version 8.0 and further have been published to Docker Hub and are publicly available. Just change the version number as per requirement.
DECISIONS_FORCEBASEURI
http://localhost
Enter the force base URI of the clustered environment.
DECISIONS_DATABASECONNECTSTRING
Example connection string
Enter the connection string of the SQL server created during setup.
DECISIONS_CLUSTERING_TURNONCLUSTERING
True
This will enable the containers to run in a cluster.
DECISIONS_CLUSTERING_REDISBASEURL
redis-service.default.svc.cluster.local:6379
This is the CoreDNS, a fully qualified domain name for the Redis service.
ports > containerport
80
Enter the port number declared in the previous step when creating the load balancer service.
DECISIONS_PORTALBASEURL
http://localhost
Enter the Portal base URL of the clustered environment. Enter the external IP of the LoadBalancer.
DECISIONS_LICENSECOMPANYID
12345abc-67de-89fg-1011-121314151617
Enter the Customer ID for the container's instance.
DECISIONS_LICENSECOMPANYNAME
Decisions Customer
Enter the Customer Name.
DECISIONS_LICENSECONTACTEMAIL
email@decisions.com
Enter a contact email for the provided license.
DECISIONS_ENVIRONMENTNAME
Decisions
Enter the name of the clustering Environment. This name will be stored to run all the containers under the clustering environment.
DECISIONS_LICENSETYPE
EnterpriseNonProduction
Enter the license type of the container. This will likely be either 'Enterprise Production' or 'EnterpriseNonProduction'.
DECISIONS_ADMINISTRATOR_EMAIL
name@email.com
Allows the creation of an administrator account that will be used to log in to the Portal after completing the hosting process.
Note: This email address will be set as the default email address for sending notification emails. This default email address can be modified in the Portal settings.
DECISIONS_ADMINISTRATOR_PASSWORD
your_password
Provide the password to the admin email.
resources > requests > cpu
4
Mention the number of CPU cores.
resources > requests > memory
16G
Mention the memory to be allocated to the container. environment.
resources > limits > cpu
4
Mention the maximum number of CPU cores.
resources > limits > memory
16G
Mention the maximum memory to be allocated to the container environment.
volumeMounts > name
filestorage
Enter the name of the File share created in the Azure Storage account.
Volumes > name
Volumes > name > csi > driver > volumeAttributes > shareName
filestorage
Enter the name of the File share created in the Azure Storage account. This should match the storage names given in volumeMounts.
After editing the values from the YAML file. Click Add to confirm.
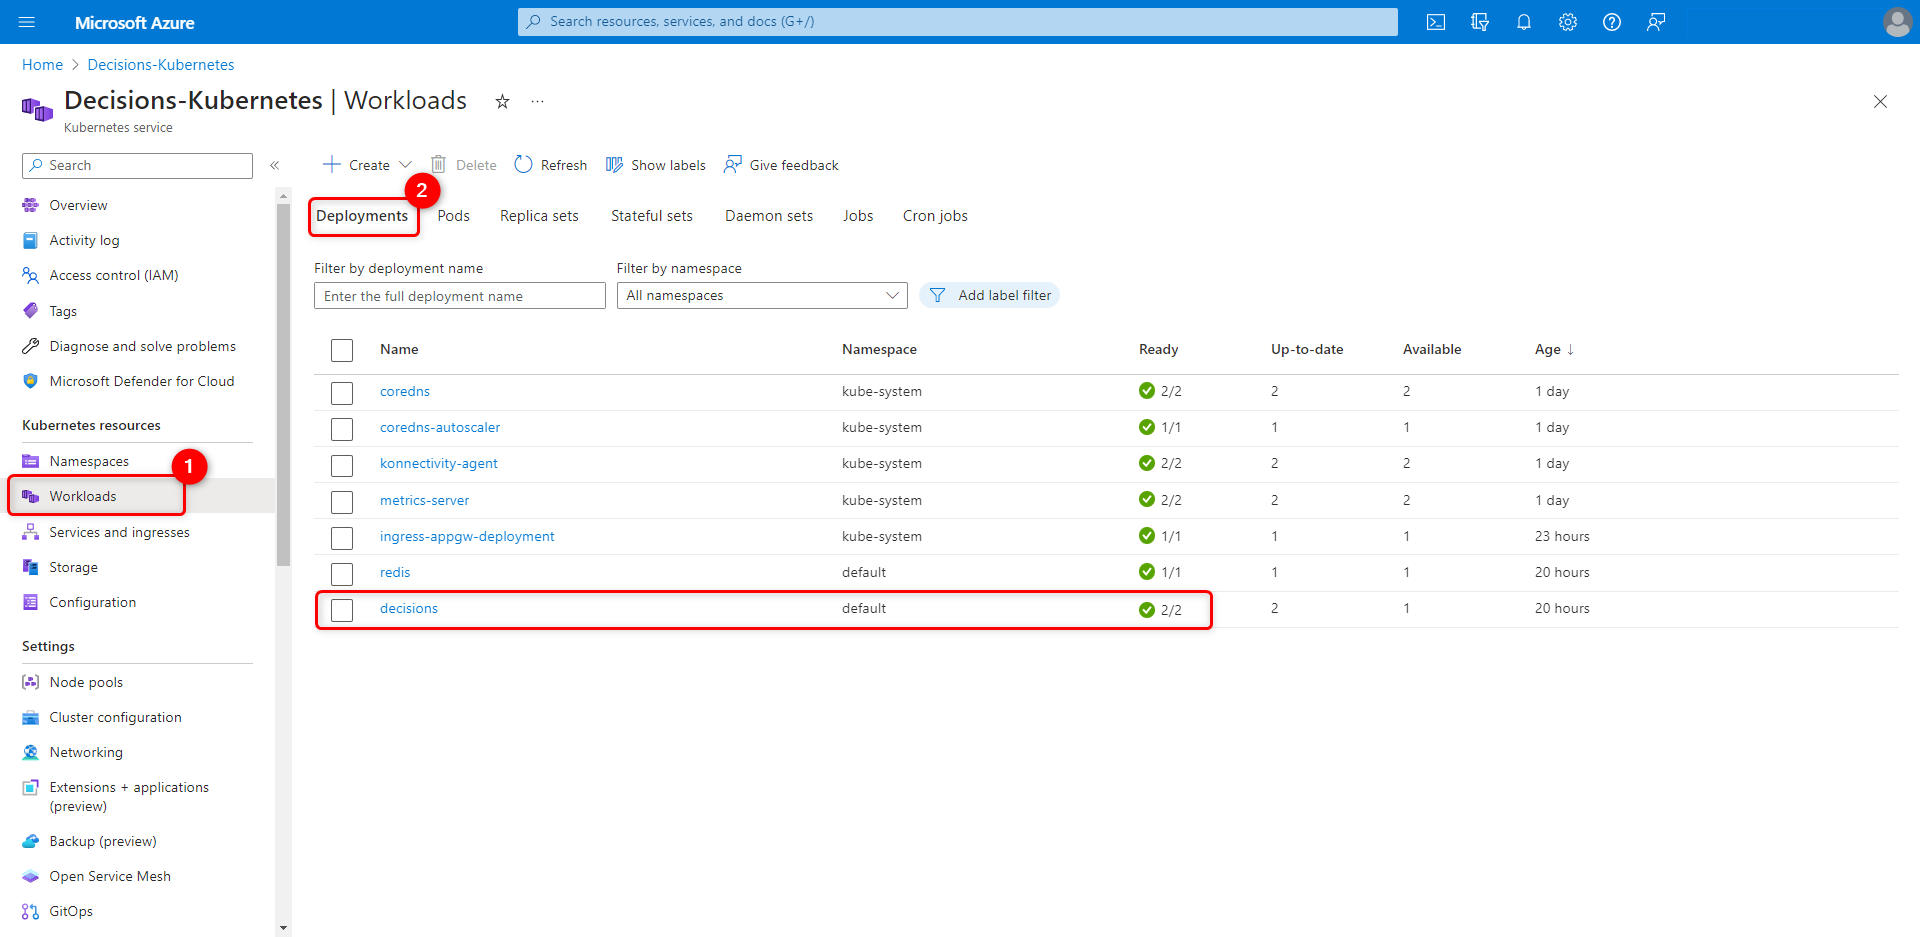
This will deploy the pods. This may take several minutes. To check the status of the pods, enter
kubectl get podsin the Azure CLI.
Once complete, the Ready column for the new Deployment will verify all pods running with a green checkmark.
Optional Settings in YAML
Note:
The configurations listed under this category are not mandatory for deploying the pods in AKS. These are additional configurations.
Loading Windows fonts in Decisions containers
Warning:
Not having TrueType Windows font might throw an Exception Error if you have a business use case of Document to PDF Steps and WordToPdf module.
Decisions containers try to load the font from
/customfontfolder. To use the Windows font in containers, we need to volume map the/customfontfolder.Windows font can be found at C:\Windows\Fonts, and an easy and quick way to get TrueType fonts on containers is to copy .TTF and .TTC files from the C:\Windows\Fonts to a new File Share in the Azure Storage Account.
Add the following attributes under the
volumesfrom the above-listed YAML.volumeMounts: - name: $File Share name for custom fonts mountPath: /customfontvolumes: - name: $File Share name for custom fonts csi: driver: file.csi.azure.com volumeAttributes: secretName: azure-secret shareName: $File_Share_Name mountOptions: "dir_mode=0777,file_mode=0777,cache=strict,actimeo=30"Custom Modules
To use the Custom Module in the AKS. Users need to keep the Custom Module in the Custom Module folder, which gets created inside the file storage of the container. Custom Modules must be kept at the following location created under the Azure Storage Account.
https://[Storage_Account_Name].file.core.windows.net/[File_Share_name]/CustomModules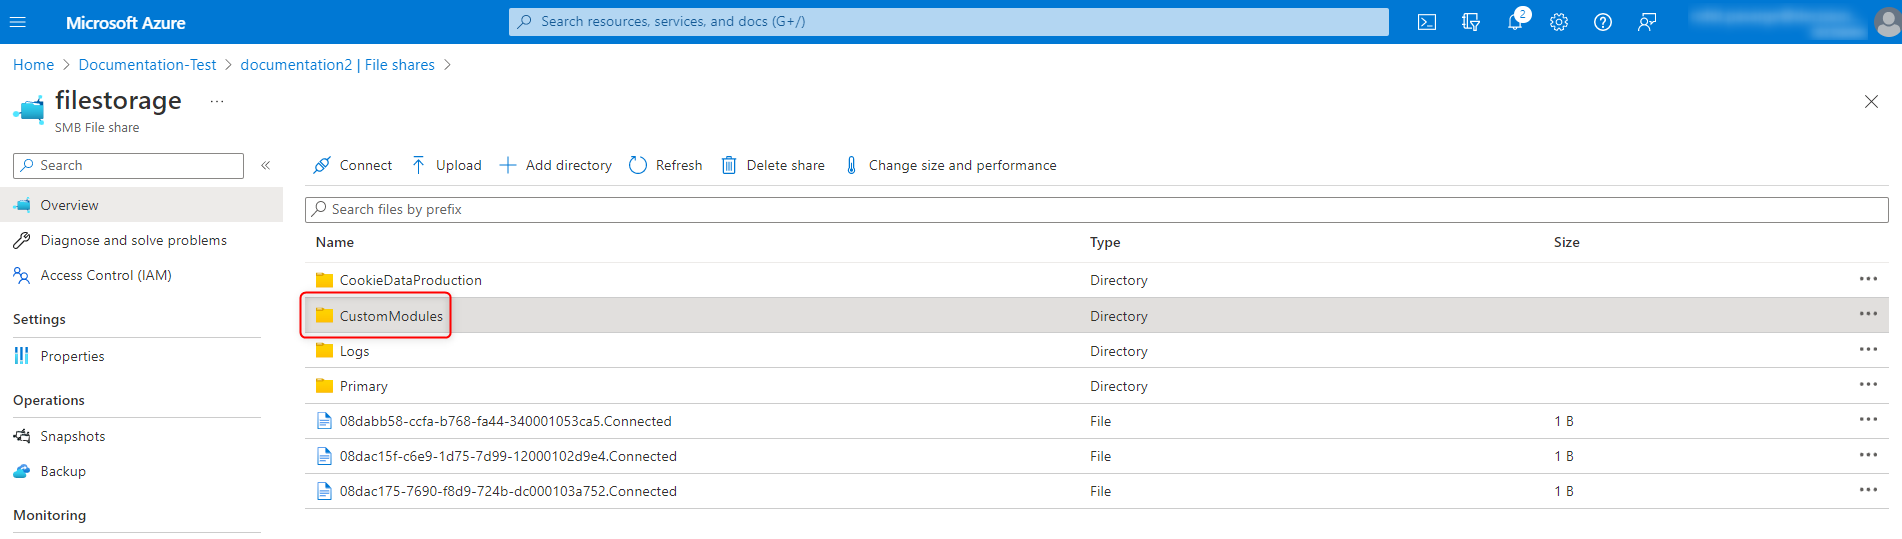
Verifying the Cluster
Open the Decisions container instance by hitting on the External IP of the Application Gateway Ingress Controller.
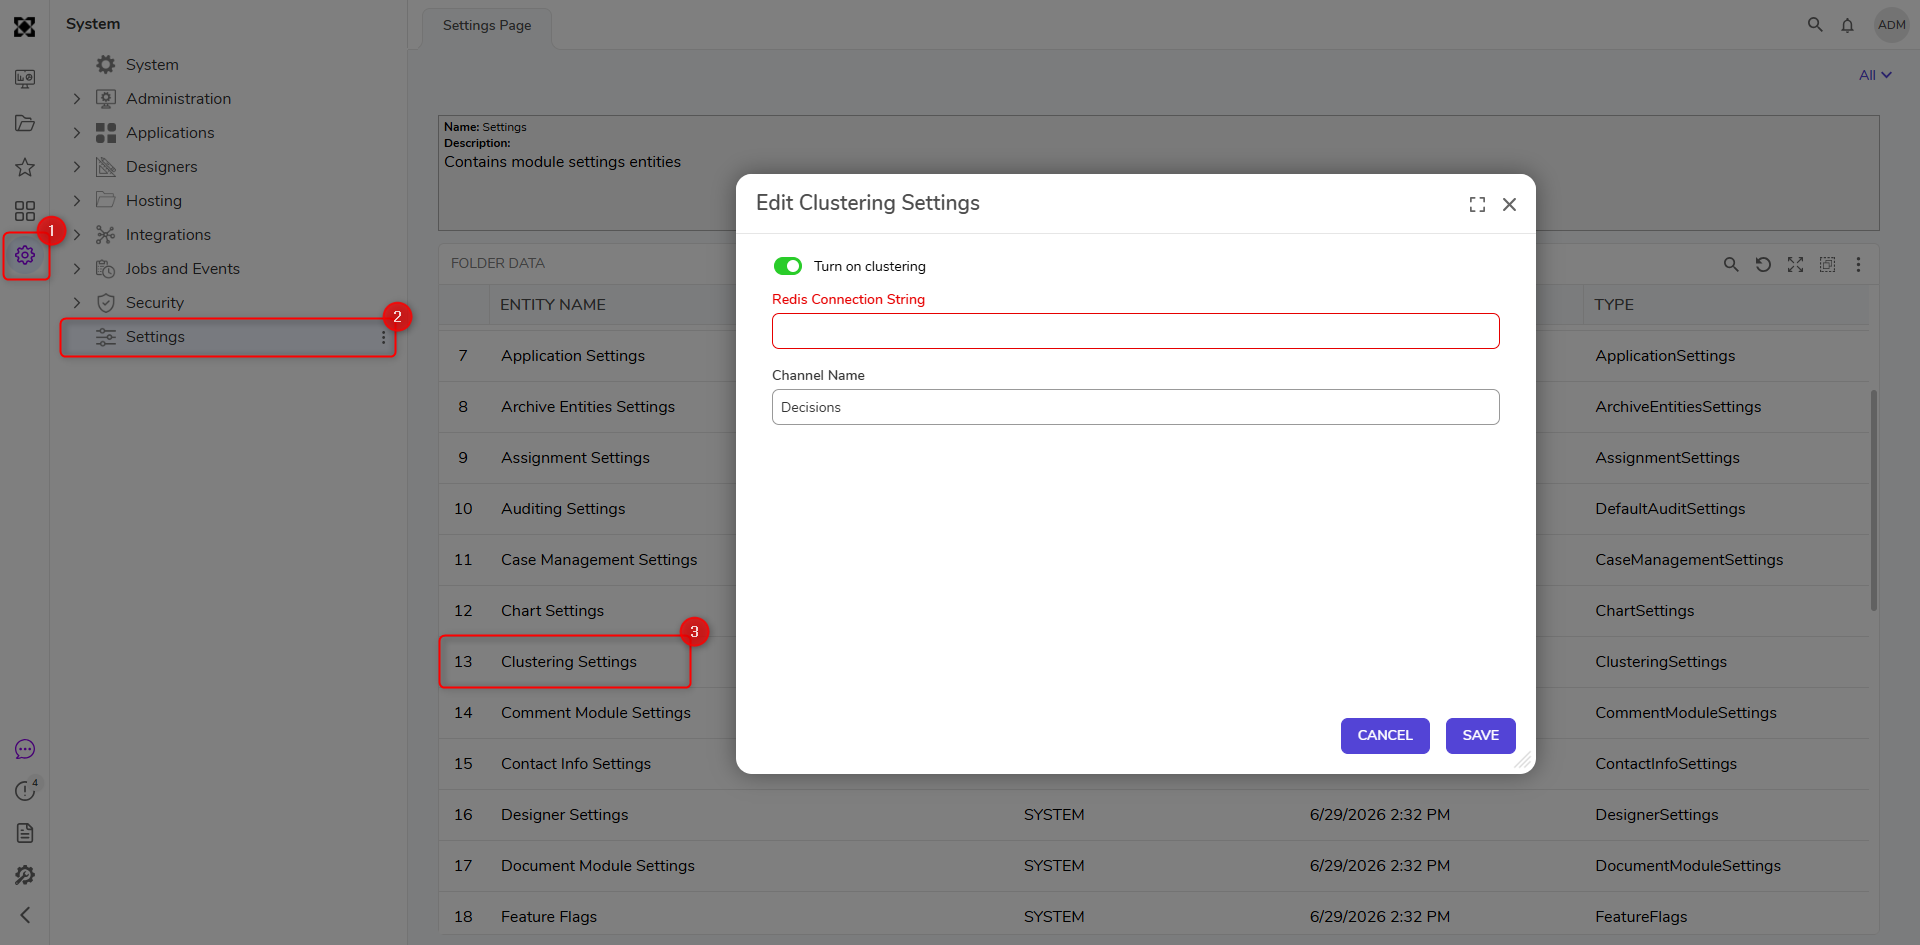
In the Decisions instance, navigate to System (gear icon) > Settings > Clustering Settings.
In the Edit Clustering Settings window, Enable Turn on clustering, and in the Redis Address field, enter the Redis Endpoint copied earlier in the article.
To verify the cluster, Navigate to System > Administration > Services. All the information related to the Decisions containers created in Azure will populate in this folder.