The Cortex Accelerator gives users that ability to quickly train and create a chatbot for implementation in any platform.
Cortex includes a user-friendly interface that assists Administrators and Managers in creating and editing questions and responses, securely storing associated data. Users have the opportunity to connect a Vector Database and submit questions by uploading an Excel spreadsheet or by manually inserting questions.
Users can organize and configure questions and responses using the built-in Workflows and Dashboards, enabling users to improve how AI generates responses within the Project. Records of questions and responses are then able to be reviewed and edited, ultimately being added to the Vector Database and powering the chatbot's responses.
Cortex is only available in v9.8 and above.
Glossary
| Term | Definition |
|---|---|
| Vector Database Table | The Vector Database Table stores all records of questions and answers. These can come from a bulk insert and when end users ask questions to the chatbot. |
| Vector Database | A Vector Database is a specialized Database that indexes vector embeddings, maximizing efficiency for retrieval and similarity search. |
| Vector Embedding | A list of numbers that represents unstructured Data so that computers can process the information. |
Permissions and Access
| Name | Have access to | Users in Group |
|---|---|---|
| Administrators |
| Cortex Admin |
| Cortex Manager |
| Cortex Managers |
| Users |
| Cortex Callers |
Considerations and Prerequisites
- After importing this Accelerator, users must install the Error Handling Accelerator and AI Common Module. AI Common is installed automatically with any other AI related module. The Error Handling Accelerator can be installed on the Decisions Marketplace or through the Appstore.
- Users must have access to an AI service such as ChatGPT.
- A Vector database is required. PostgreSQL databases are the only supported type for Vector Databases.
- Users must add desired accounts to the Cortex Admin and Cortex Managers Groups to ensure Users have appropriate Project permissions.
- These Groups will be generated automatically after installation.
- To add created accounts to the proper Groups, navigate to System > Security > Groups > Cortex Admin, Cortex Managers.
- Right-click on the desired Group (Cortex Callers, Cortex Admin, or Cortex Managers) and select Add/Remove Accounts.
- If the desired account has not been created, navigate to System > Security > Accounts to create it, then add it to the appropriate Group.
Main Flows and Descriptions
The following is a list of the main Flows that make up the Cortex Accelerator.
| Flow Name | Description | Image |
|---|---|---|
| Create Team | This Flow displays a Form for Users to submit details required to create a team. | 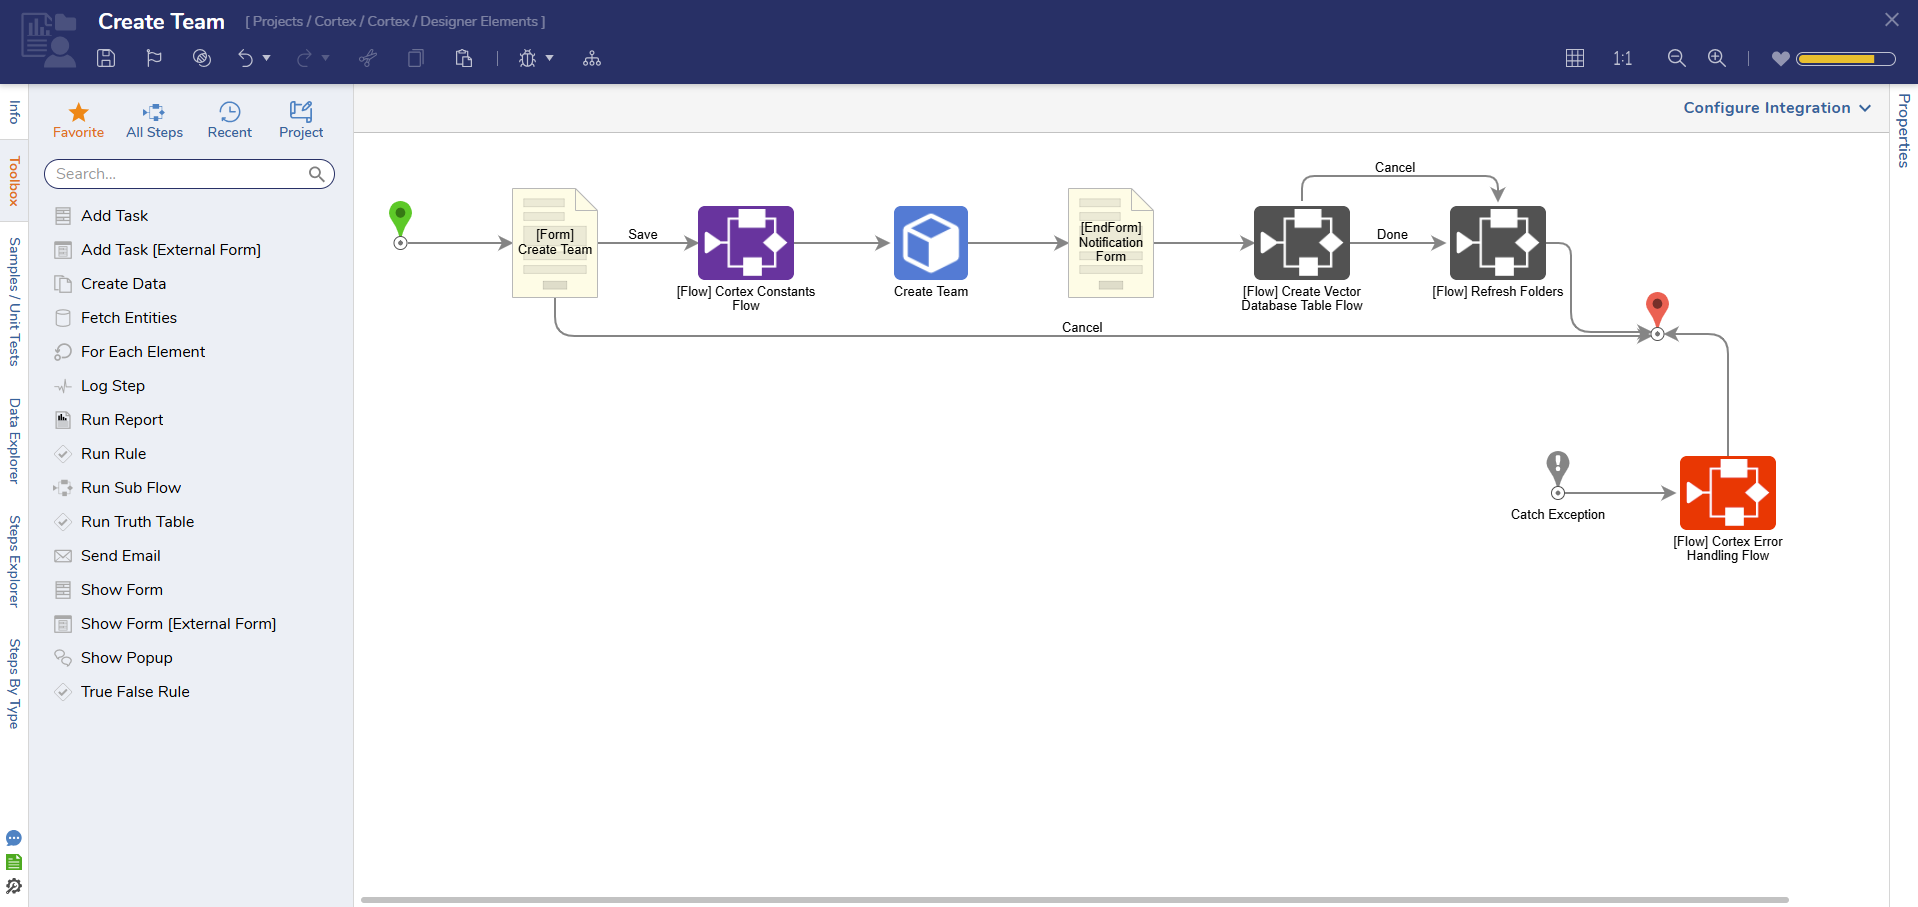 |
| Create Vector Table | This Flow determines whether a Vector Database Table exists within the Project. If a table does not exist, the Flow will retrieve the Vector Database ID and Table Name to create a new table. | 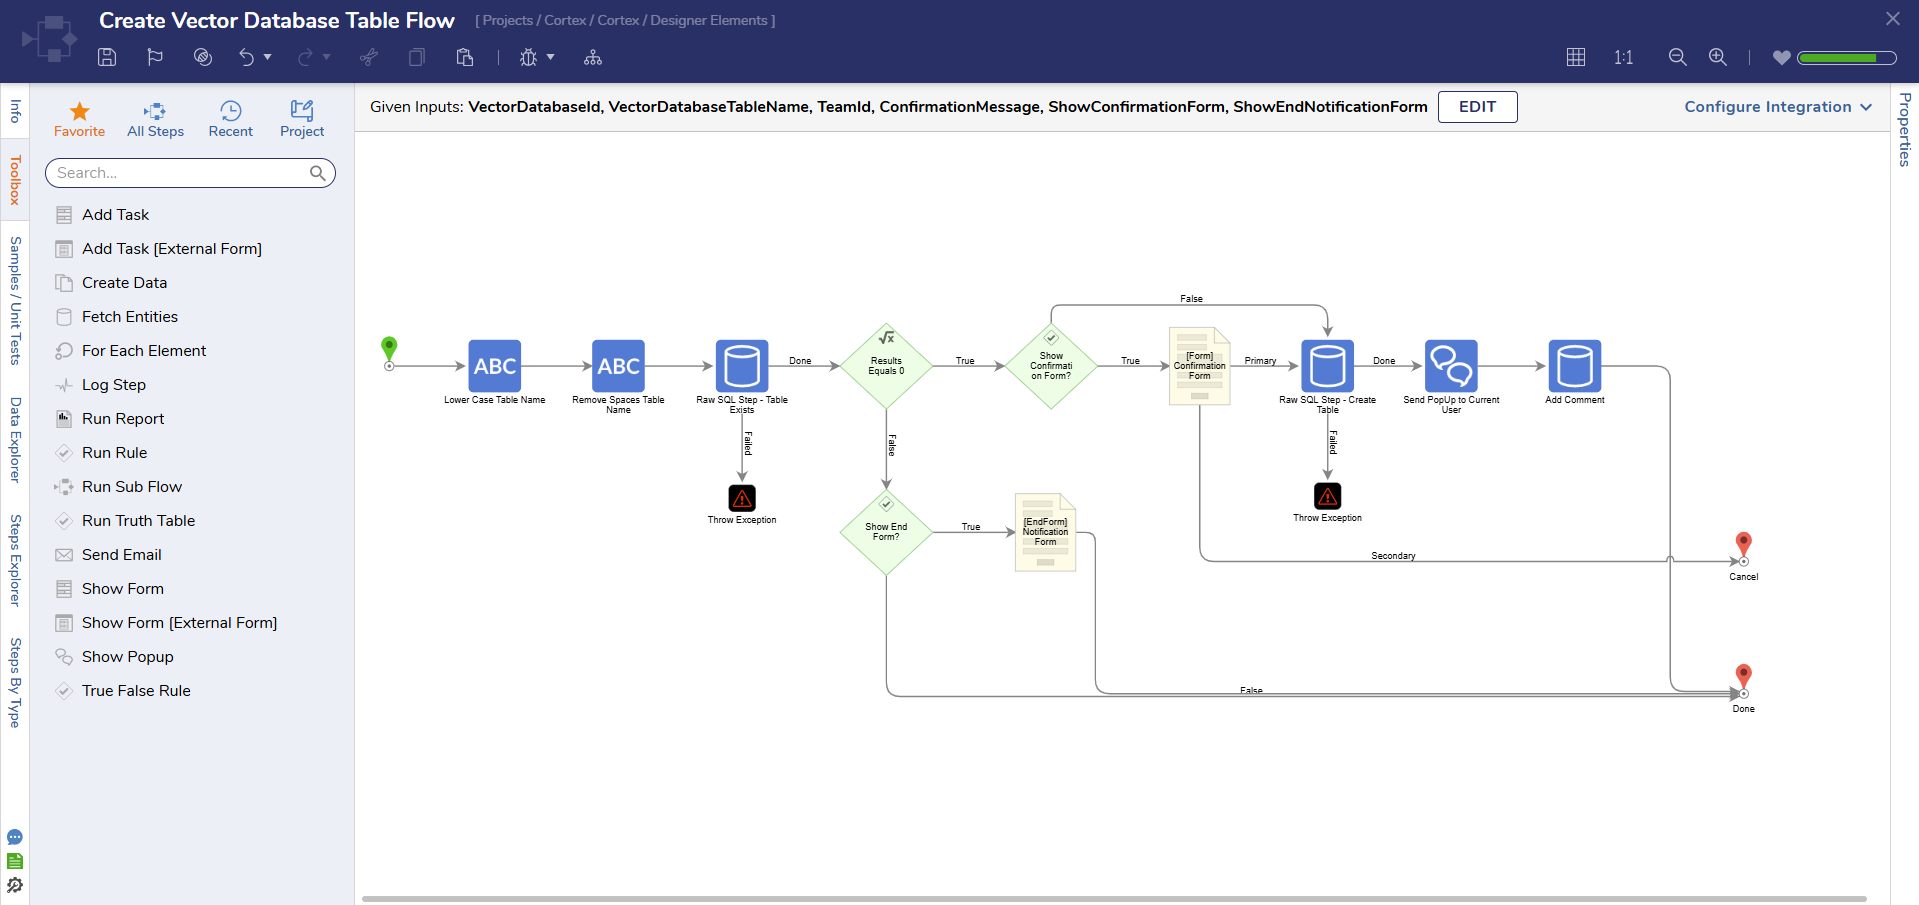 |
| Bulk Insert Content With Spreadsheets | This Flow uploads an Excel Sheet with questions and answers and bulk inserts the information into the database. This is accomplished by checking whether a Database Table exists and, if one does not exist, will generate one. Then the Flow will begin inserting questions into the Vector Database Table. | 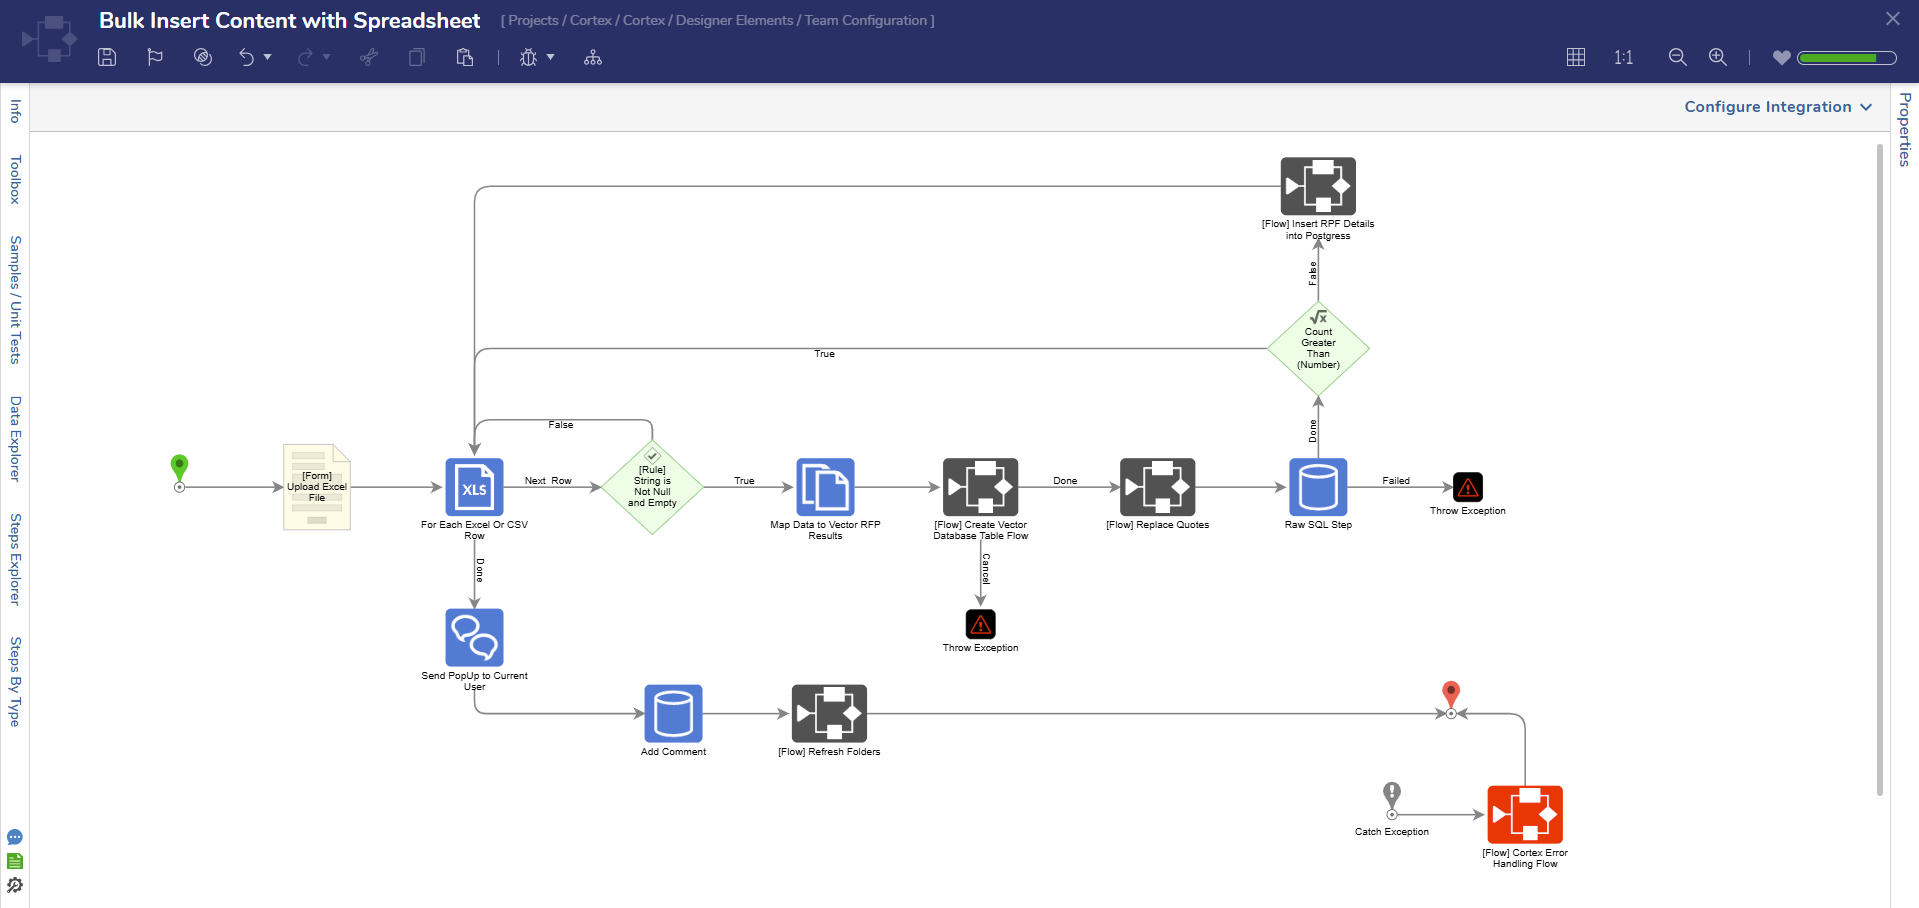 |
| Bulk Insert Content with PDFs | This action is used to bulk insert data into the vector database using a series of PDFs. This process will extract the text from each PDF and save the content to the vector database as new records. | 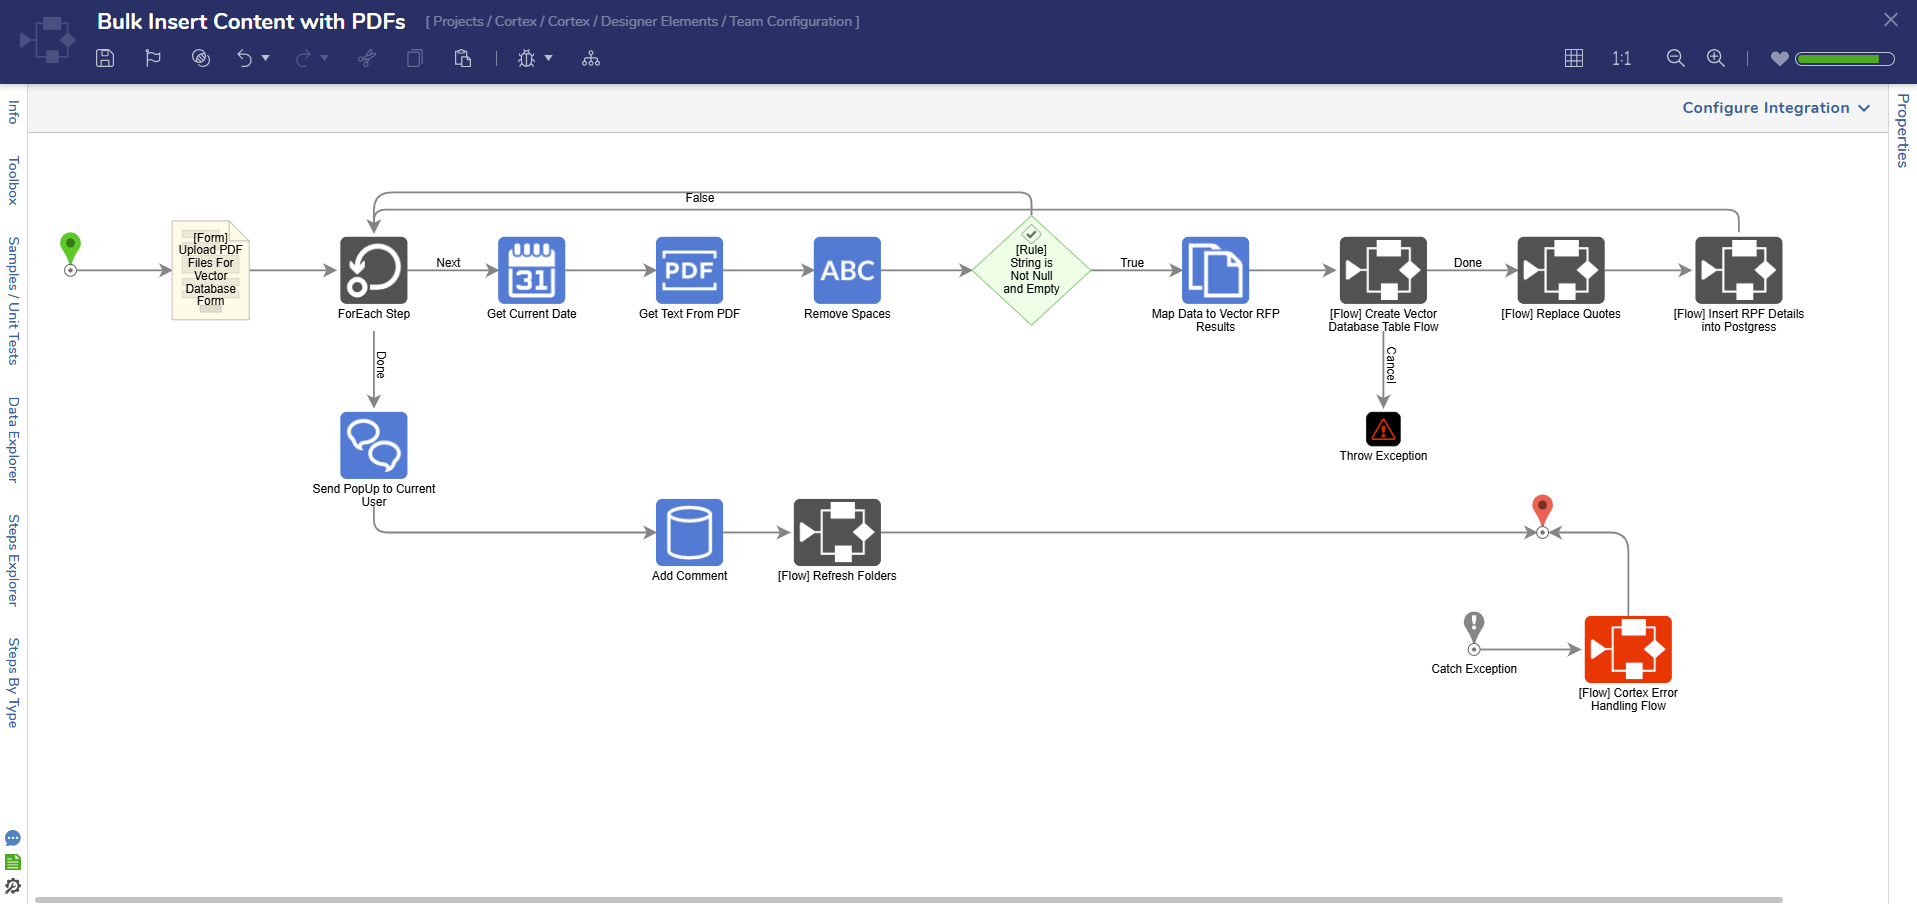 |
| Edit Record from Vector Database | This action appears in the External Data Report and will allow users to modify the content for the selected record in the database. | 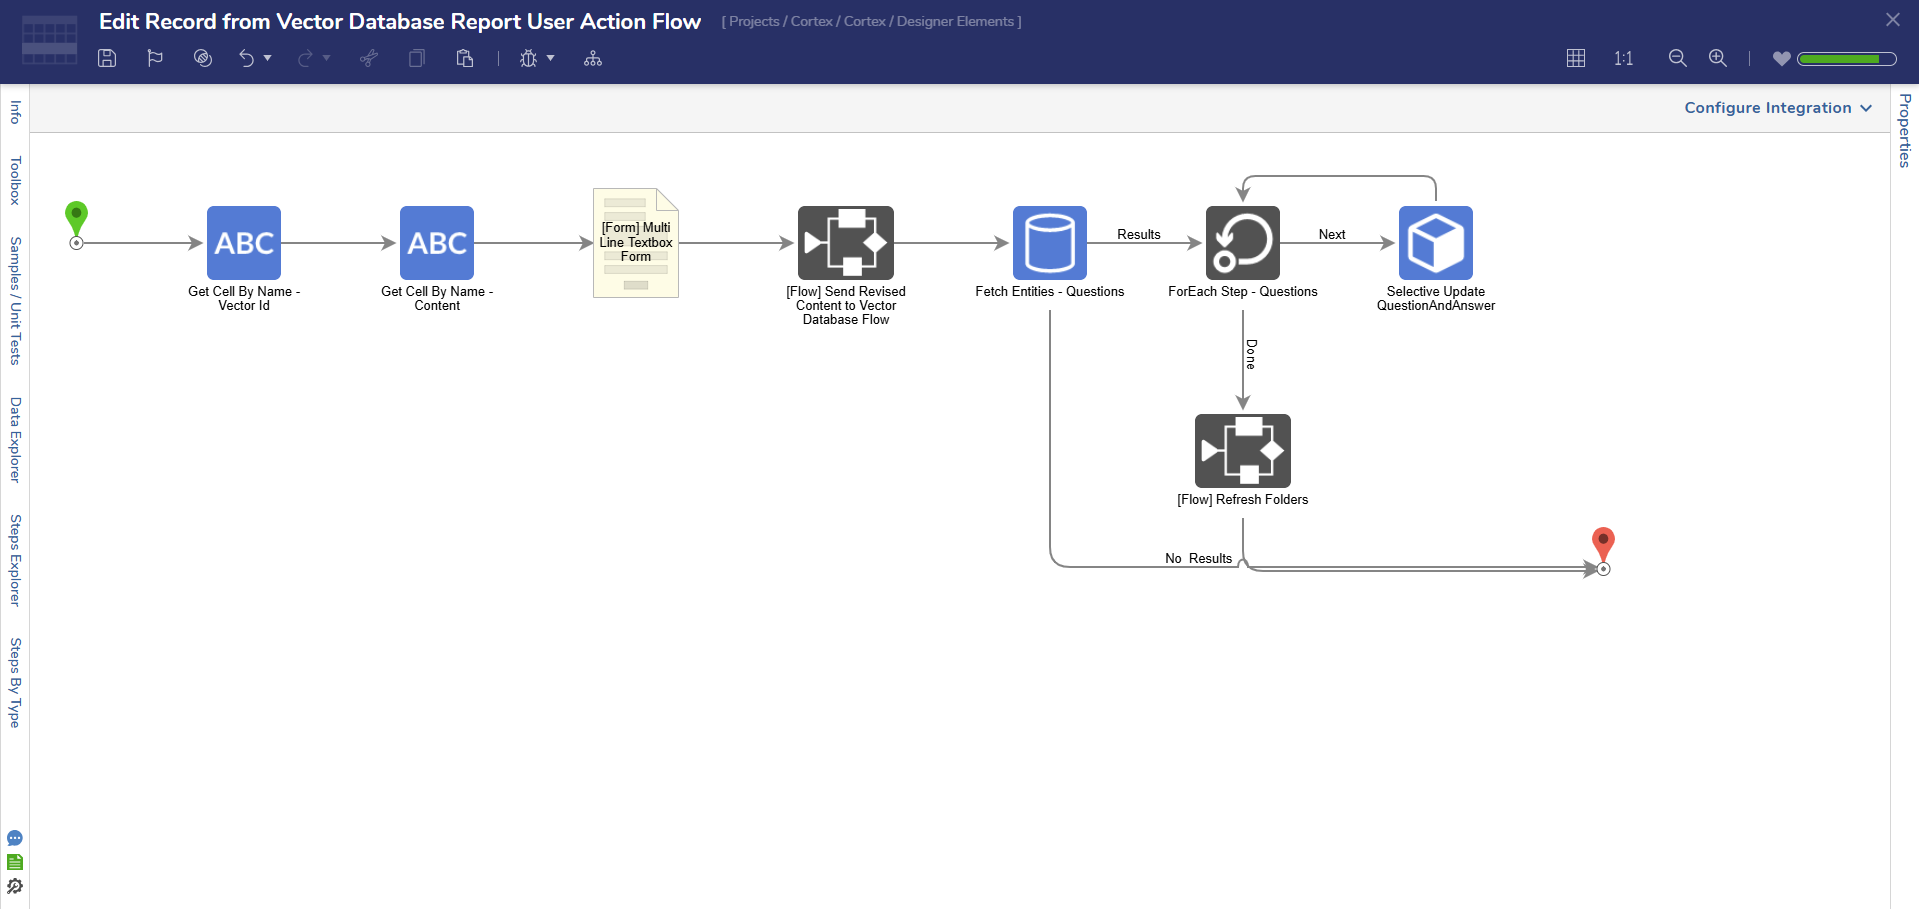 |
| Delete Record from Vector Database | This Flow is a Group User Action Flow that when deployed, will remove selected questions from the Vector Database Table. | 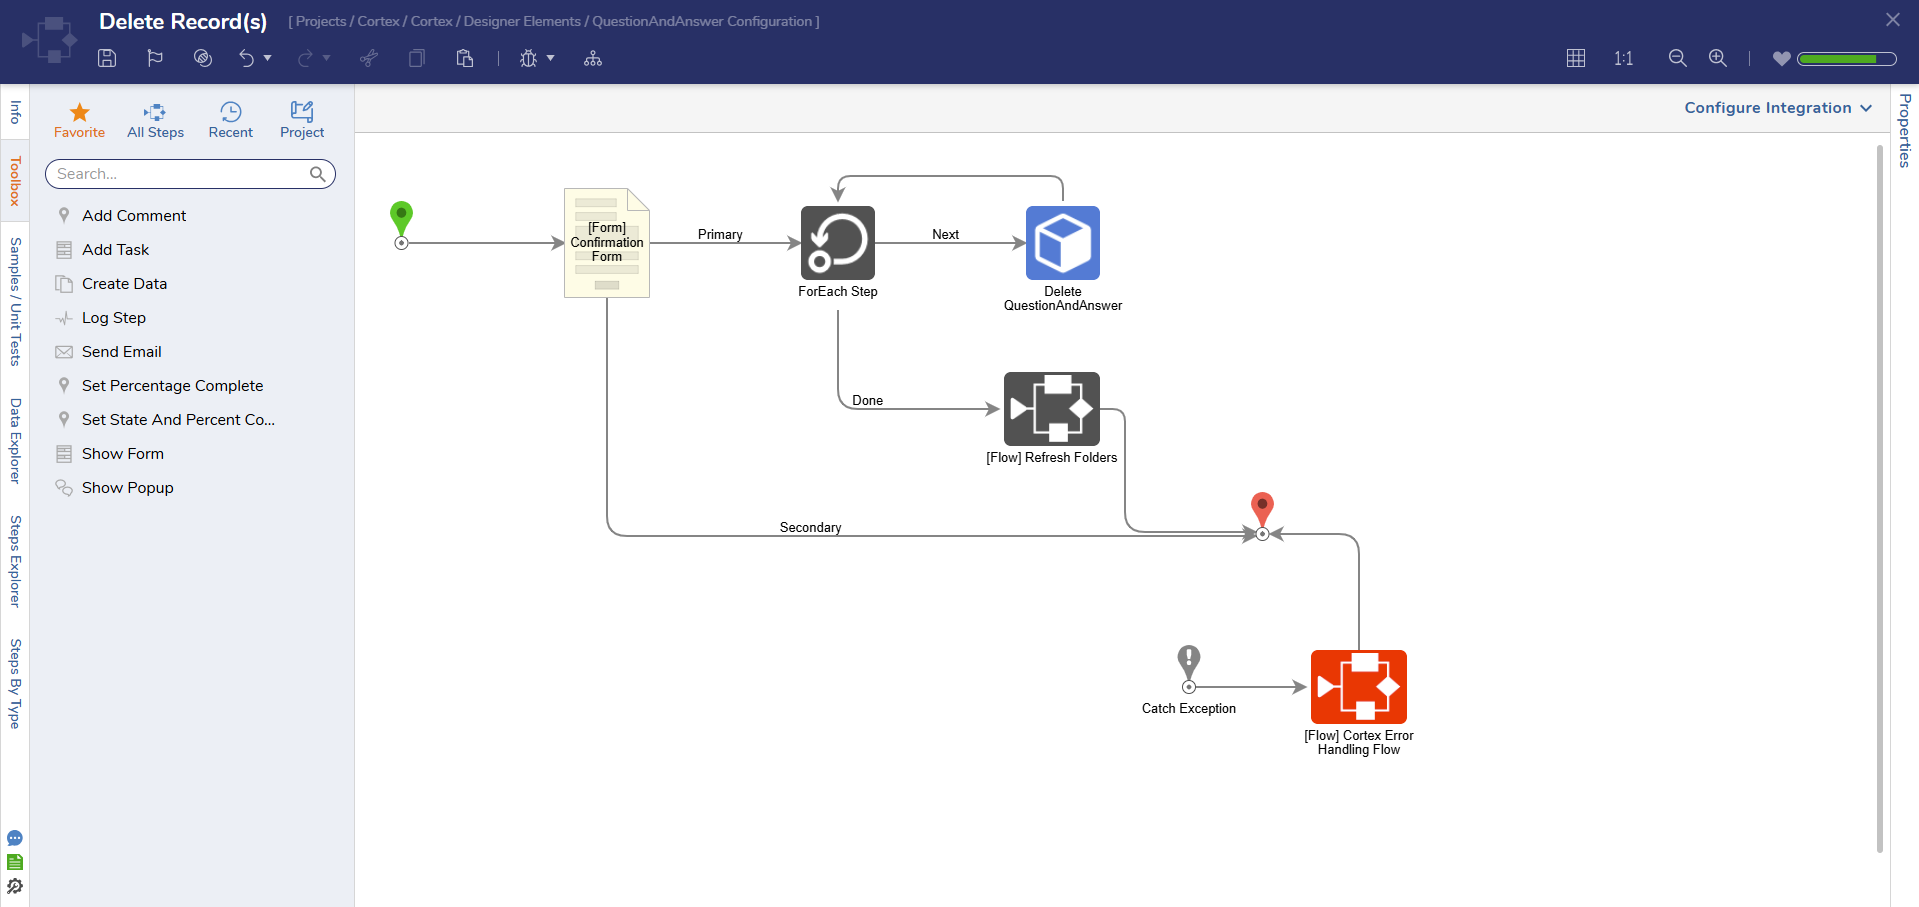 |
| Review Record | This action appears in the Team's chat history and allows managers and administrators to review an individual record. After reviewing and modifying the record as needed, users can mark the question as reviewed and send its contents to the Vector Database. | 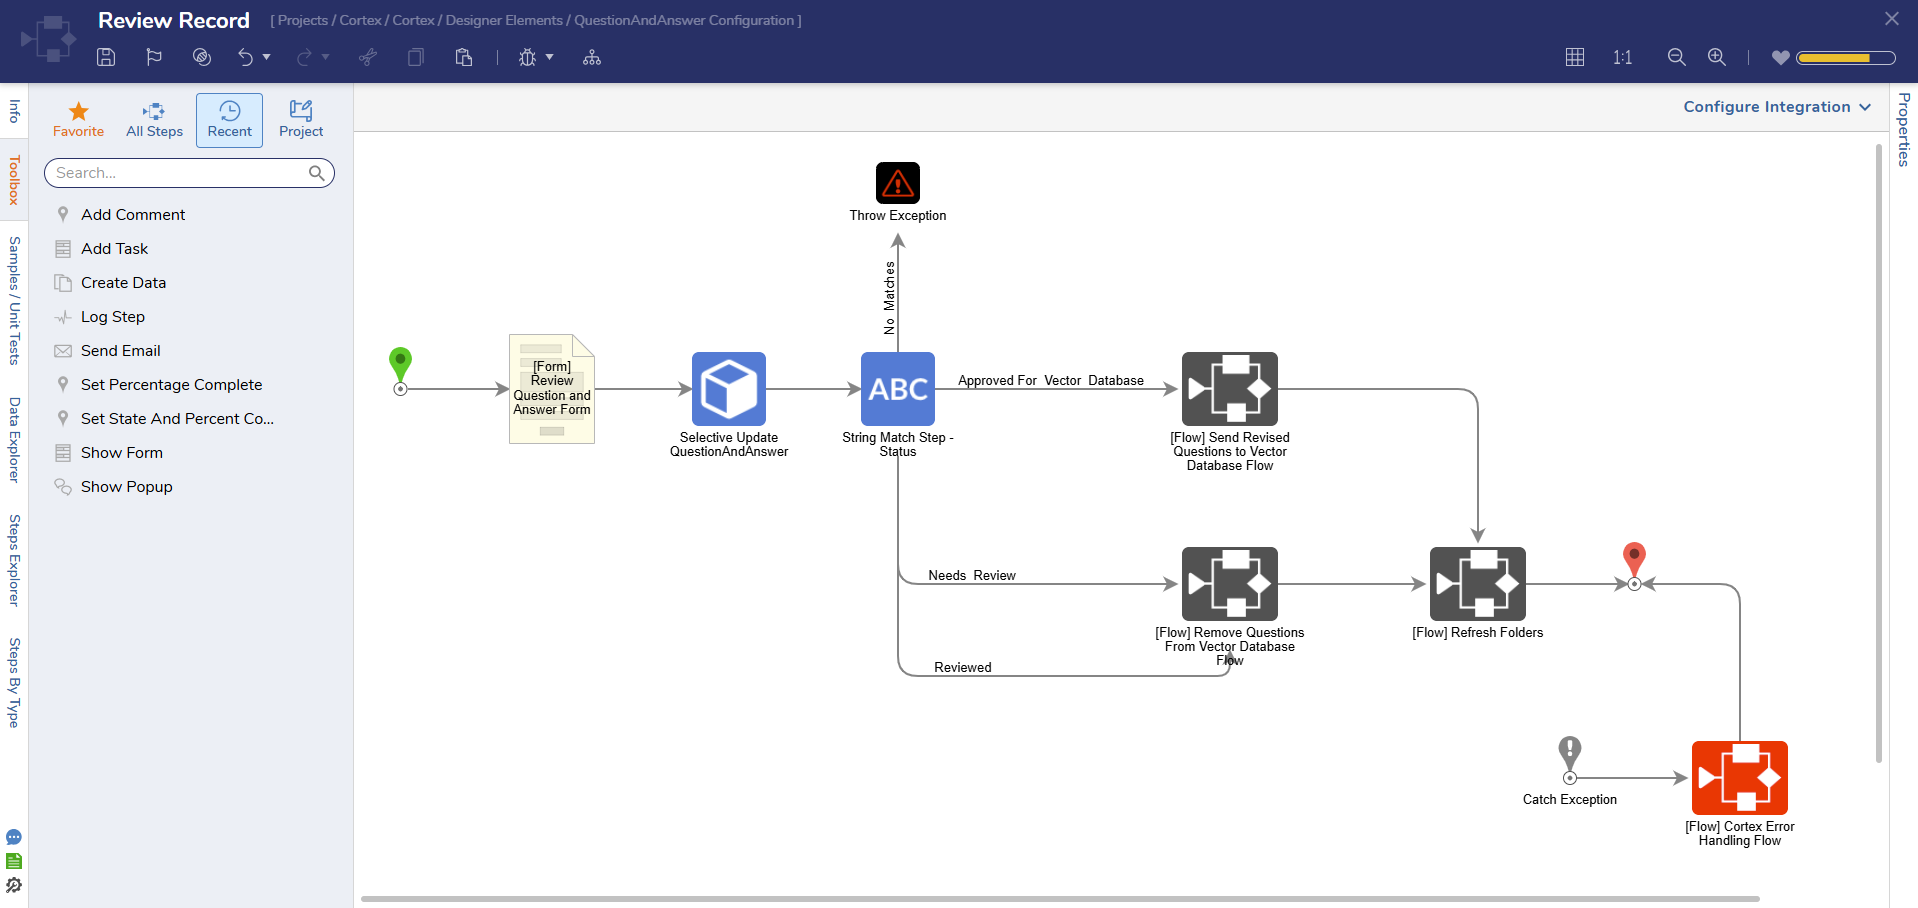 |
| Get REST Call URL | This action generated the URL a user will need to call this process externally. | 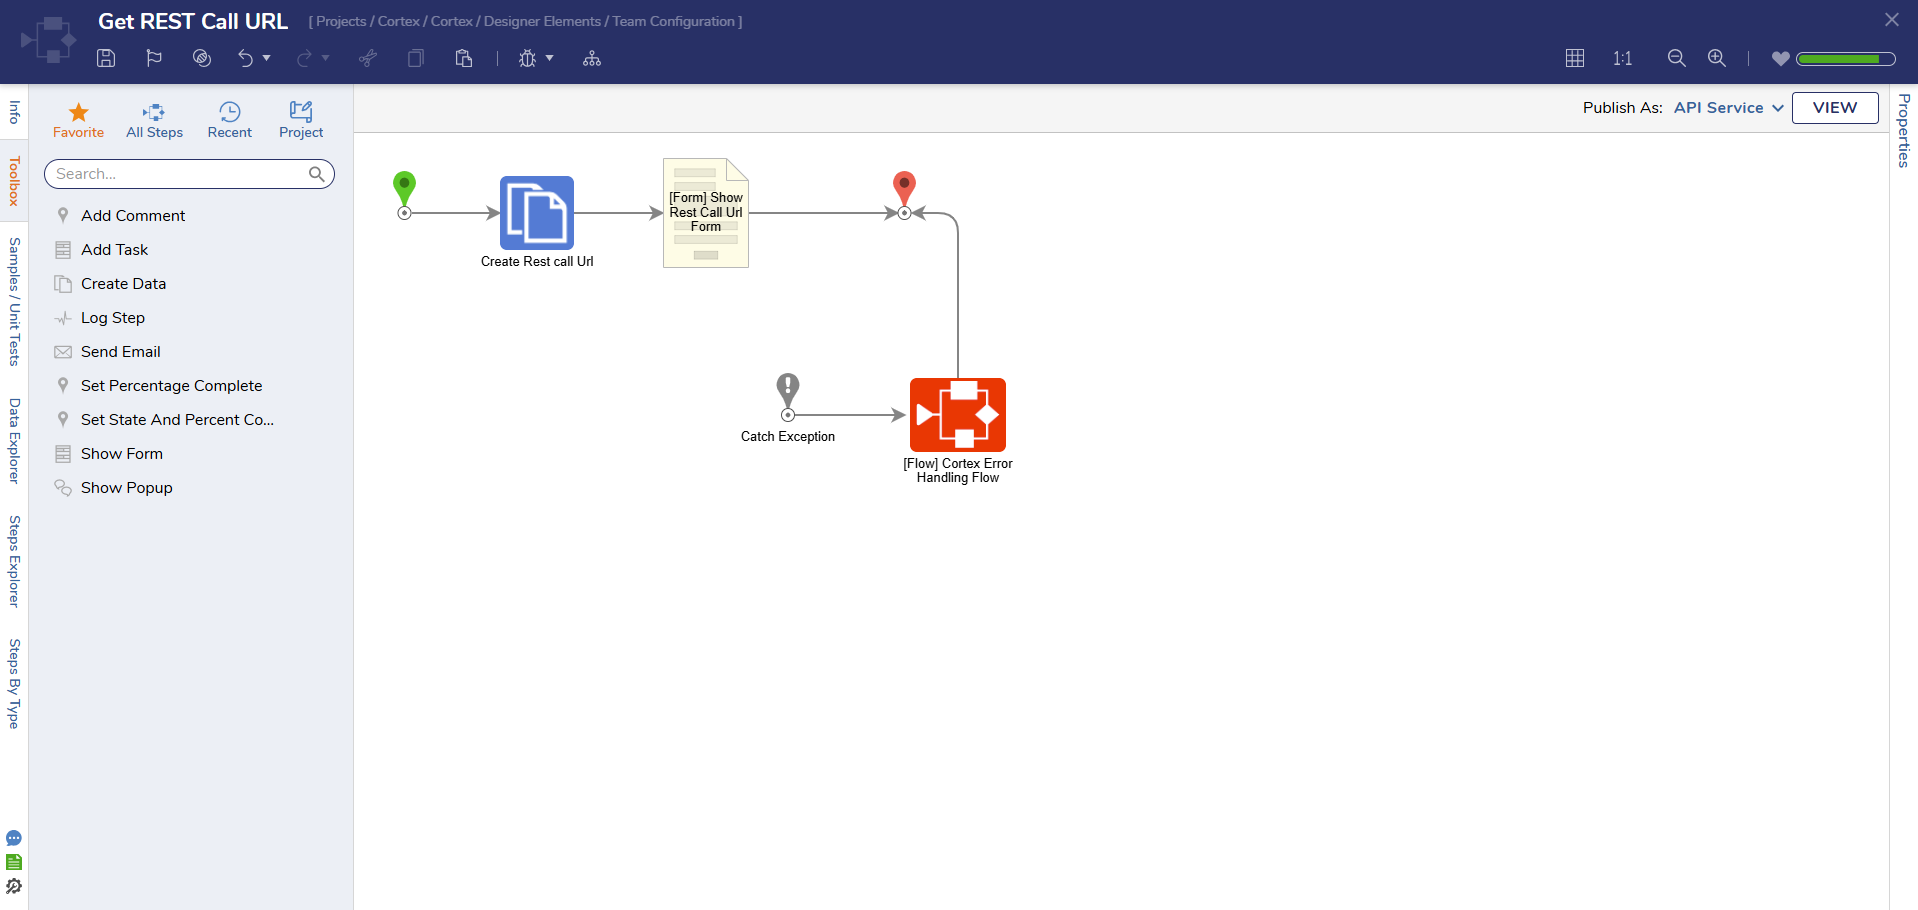 |
Using Cortex
Creating a Team
Teams are how data is organized within the Vector Database for specific use cases.
- To create a team, navigate to the Cortex Manager Dashboard and select Create Team.
- From here, a Form will populate enabling Users to enter a Team Name, Manager Email, Vector Database ID, and Table Name.
- After all the required fields are completed, select Save.
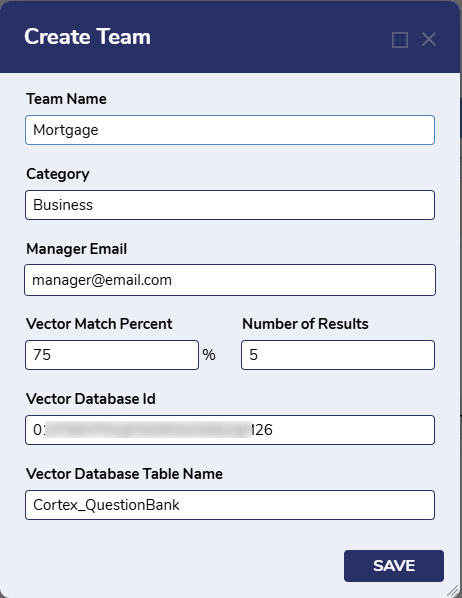
| Setting | Description |
|---|---|
| Team Name | The name of the team for the group of questions. |
| Category | A description of what the content is for a group of questions and answers. |
| Manager Email | Email of the team's manager. |
| Vector Match Percent | The Vector Database will create a number of different responses and assign them an accuracy rating. The Match Percent set here will determine which of those responses is returned. In the picture above, only responses that have a 95% or greater accuracy match will be returned. |
| Number of Results | This is the total number of results that will be returned. |
| Vector Database Id | This is the FolderID of the external database integration that connects to the Vector Database. |
| Vector Database Table Name | This is the table that will be created on the Vector Database to house data related to Q/A pairs for the team. |
Bulk Inserting Questions
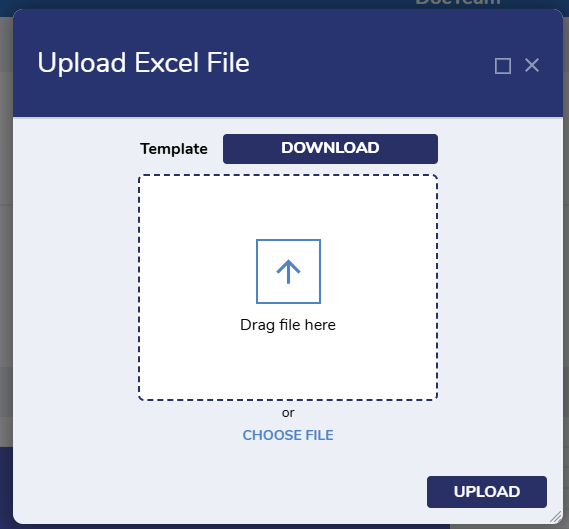
- To bulk insert questions into the Vector Database, right-click on the desired Team and select ADMINISTRATORS > Bulk Insert from the Cortex Manager Dashboard. Only Cortex Administrators have access to this action.
- From here, select Bulk Insert Content with PDFs or Bulk Insert Content with Spreadsheet. This action will populate a Form allowing users to submit an Excel Sheet with questions and answers.
- The spreadsheet must adhere to a specific format. A template file is supplied on the Form.
- After uploading the file, click Submit.
- This action will trigger the Bulk Insert Question Flow which will insert information from the uploaded Excel Sheet and transfer it to the Vector Database.
Reviewing a Record
Records need to be reviewed before they will be added to the vector database and used by the chatbot.
Each record has an icon to identify its review status.
| Icon | Status |
|---|---|
 | Not yet reviewed. |
 | Reviewed, but not approved for the vector database. |
 | Reviewed and approved for the vector database. |
To review a record, right-click a record under Chat History and select Review Record.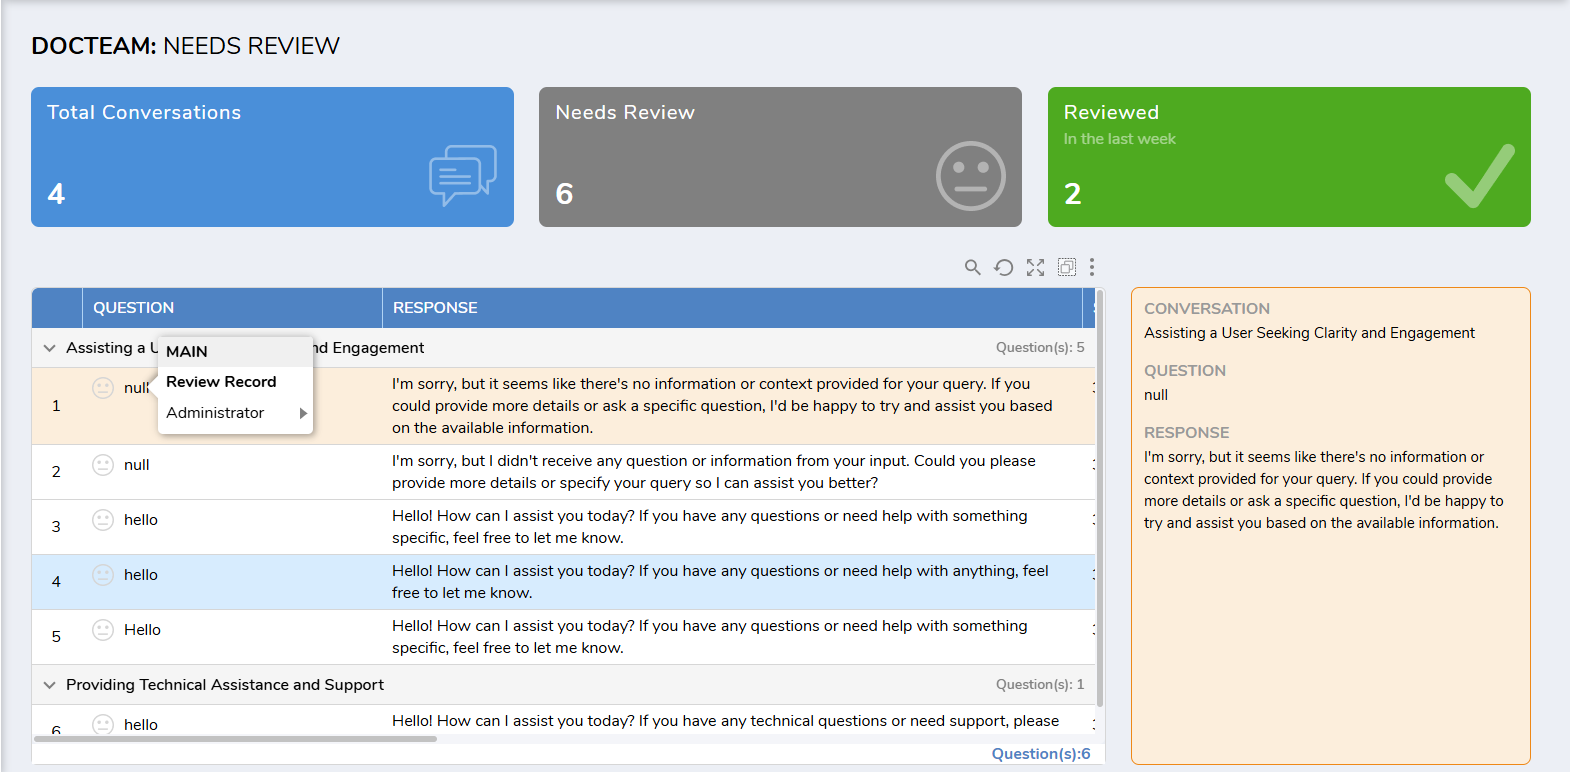
- This action will bring up the Review Form. If there are issues with the original response the model provided, changes can be made to the Revised Response section. Under the Status option, use the drop-down list to pick the action needed. A record can be set to Needs Review, Reviewed, or Approved for Vector Database. If there are any additional comments about a record, those can be added to the Feedback box.
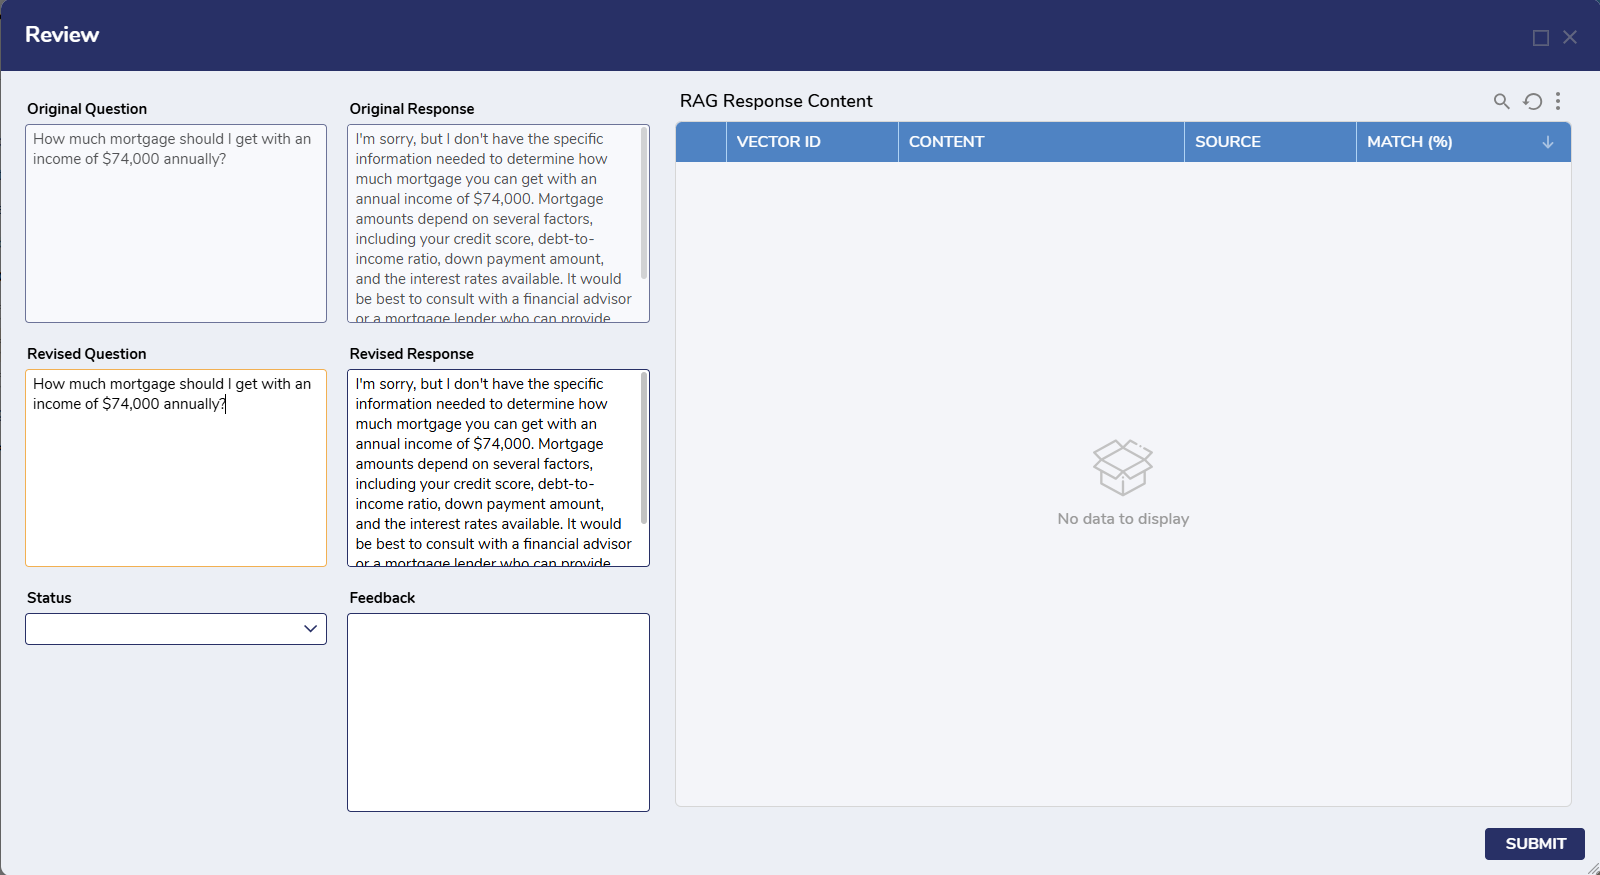
Records marked as Need Review can be found under the Needs Review Page. Records that are marked as Reviewed appear under the Reviewed Page. Any records in either location still have the Review Record action. Once the selected questions have been approved, the icon will be updated and the questions will be stored in the associated Vector Database Table.
Approved records can be found in the External Data Page.

Removing Records from the Vector Database
- To remove records from the Vector Database, select desired questions and click Delete.
- A dialogue will appear asking for confirmation. Click DELETE to continue. This is irreversible.
Building a Chatbot with Cortex
- A Named Session must be established. This is required for any REST calls to work. For this set-up REST calls will be necessary for the chatbot to function.
- Under the Named Sessions section is Cortex Engine Caller. Add an account to this session.
- Under Security > Groups add that same account to the Cortex Caller group.
- Add the named session account to the Cortex Caller group.
- Establish a database connection with the Vector Database.
- Once the connection is created, view the URL in the browser and copy the FolderID that appears. That is also the Vector Database ID that is needed for the next step.
- Set up an integration and Project dependency with your AI vendor.
- Create a Team. Team is just a term for categorizing the conversations that will be associated together. Use whatever terminology works best for the use case.
- The Vector Match Precent setting handles how close to accurate the returned answer will be.
- Number of results is the number of returned answers that will be collected for a prompt. These are ranked in order by accuracy. So entering '10' will get ten returns starting at the most accurate and decreasing in accuracy.
- Vector Database ID is the Folder ID of the Database connection. The only way to get this is to go to the Database connection and then copy the Folder ID from the URL.
- Upload the content specific data. Go to the External Data Page, then under ADMINISTRATOR choose "Bulk Insert Content with Spreadsheet".
- REST Call URL - this is the actual chat bot. Change the question and change the user email address, and give it a conversation ID.
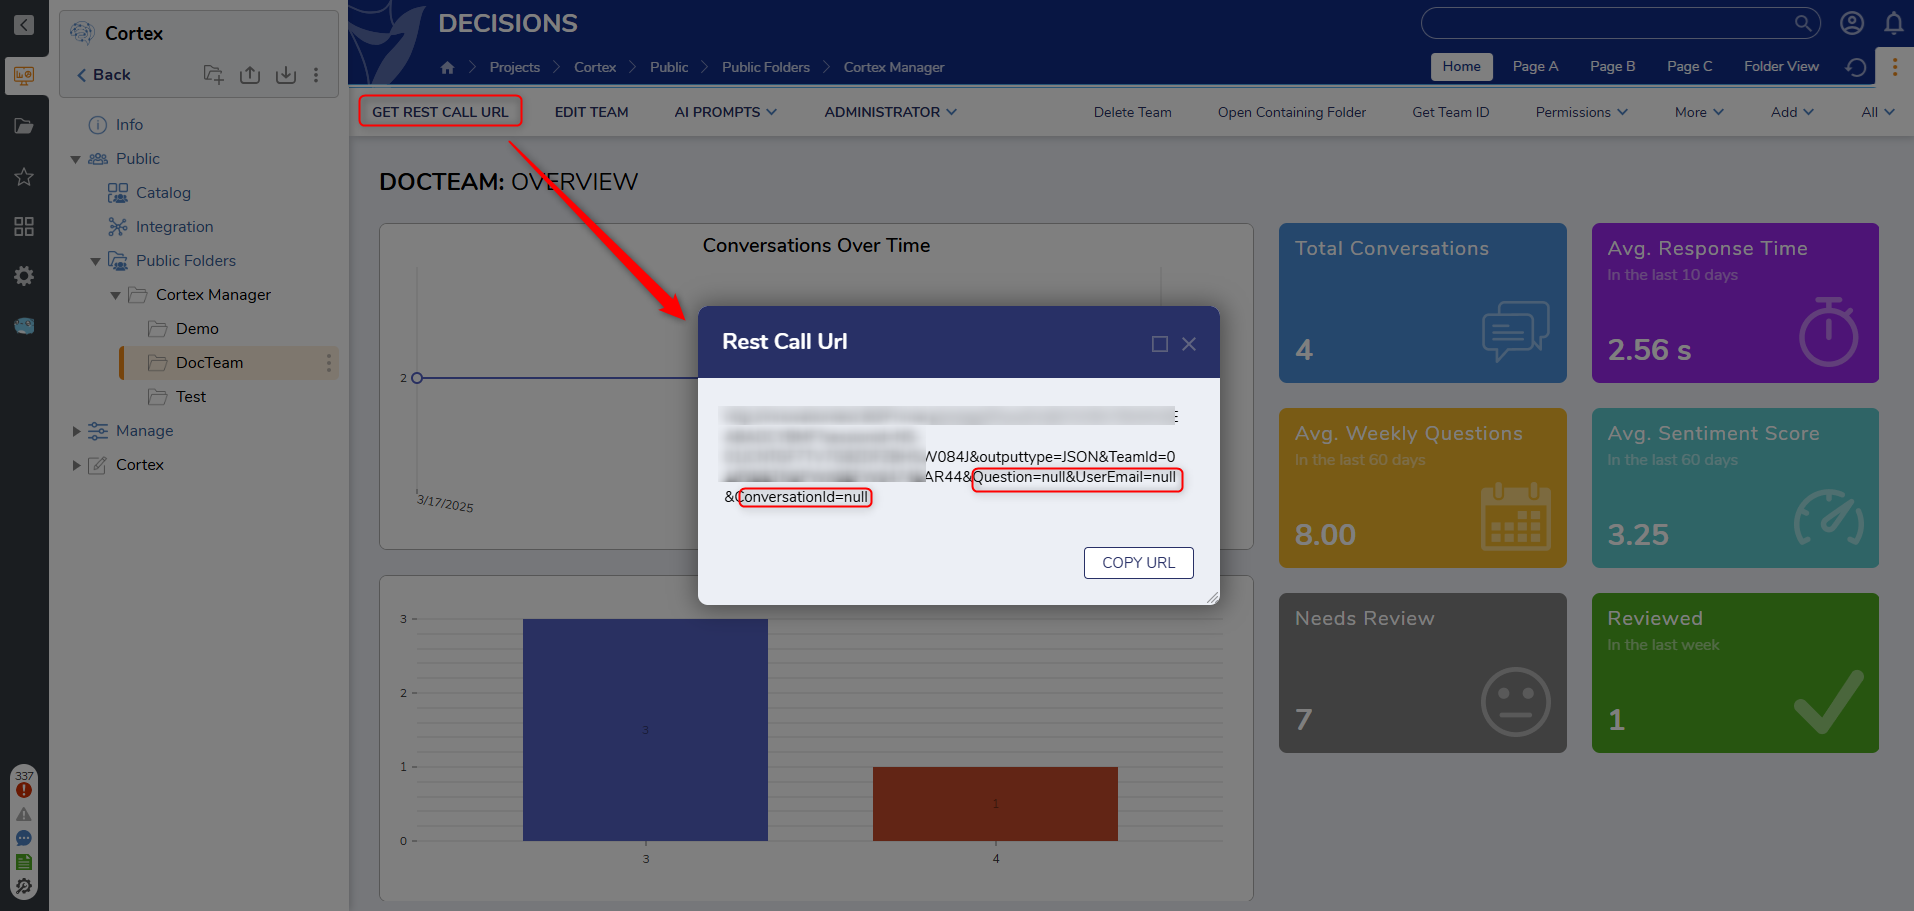
Question is the question being asked to the chatbot. User Email is the email of the person asking the question - this is important when viewing the data within Decisions. The Conversation ID is also used within Decisions to track questions that are asked to the chatbot.
Making the changes to the URL and pasting it into a browser will give results like this image:
Going to the Conversations Page will show the new question, the chatbot's response, and statistics on how the bot is being used.
Building a UI for a Chatbot
Now that the 'brains' of the chatbot is functioning, how does an end user actually interact with it? This next section describes how to build the UI that a chatbot needs to be easily useable.
There are many ways to build the UI, but all of them require being able to call the REST Call URL.
- Create an REST Service integration. Give the service the name of the chatbot. For the service URL, use the base of the REST URL. Do not include any of the variables here.
- Set it to No Authentication.
- Save the integration.
- Next add a method.
- For URL Relative to Base, use the remainder of the REST Call URL that was not used in the initial REST Service integration in step 1.
- The variables Question=null, UserEmail=null, and conversationid=null need to be updated. Replace the =null with {Question}, {UserEmail}, and {Convoid}. Using the {} turns that into an input that will be sourced from a Flow later on. The exact input name can be anything, but be sure to keep track of it as it must match.
- Set the method to GET.
- The URL will need to be callable. Make sure that See the CORS article for more details.
Now there needs to build a way to call the REST method.
- Build a Flow. This Flow is only for calling the REST method to get a response. It will need to be used as a Subflow in the Flow that will provide the actual front end experience.
- Edit Flow Inputs and add Question as a String data type and Convoid as a String data type.

- Under Integration > Rest Services find the step for the method created earlier and add it to the Flow.
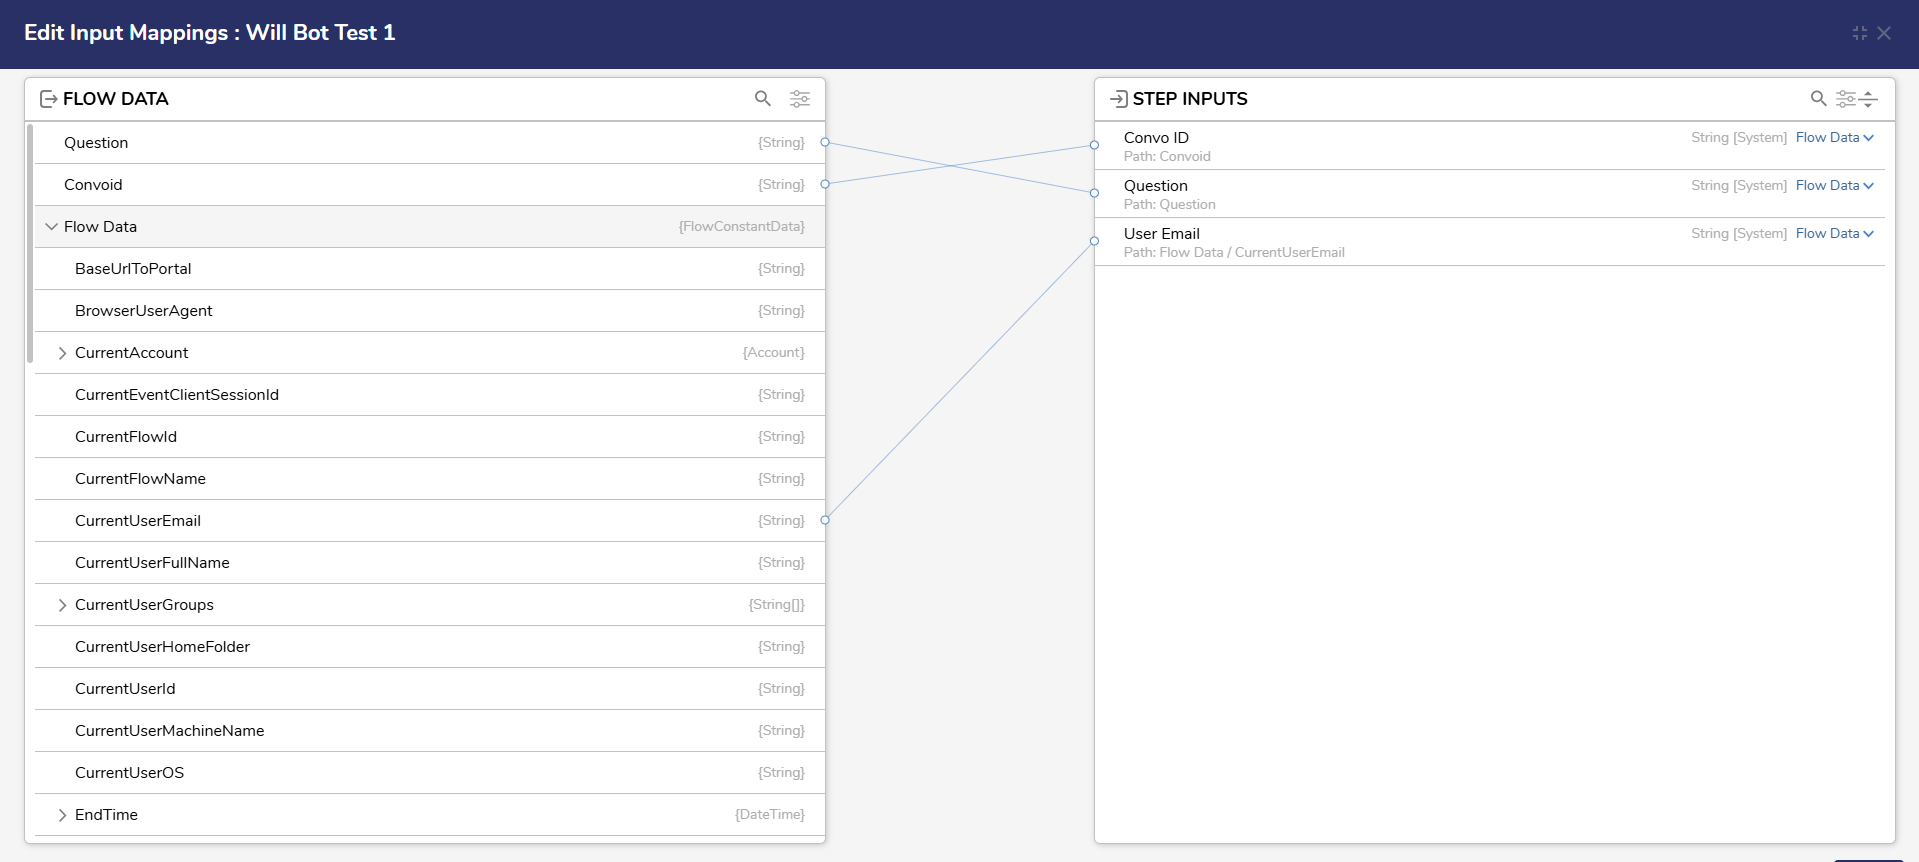
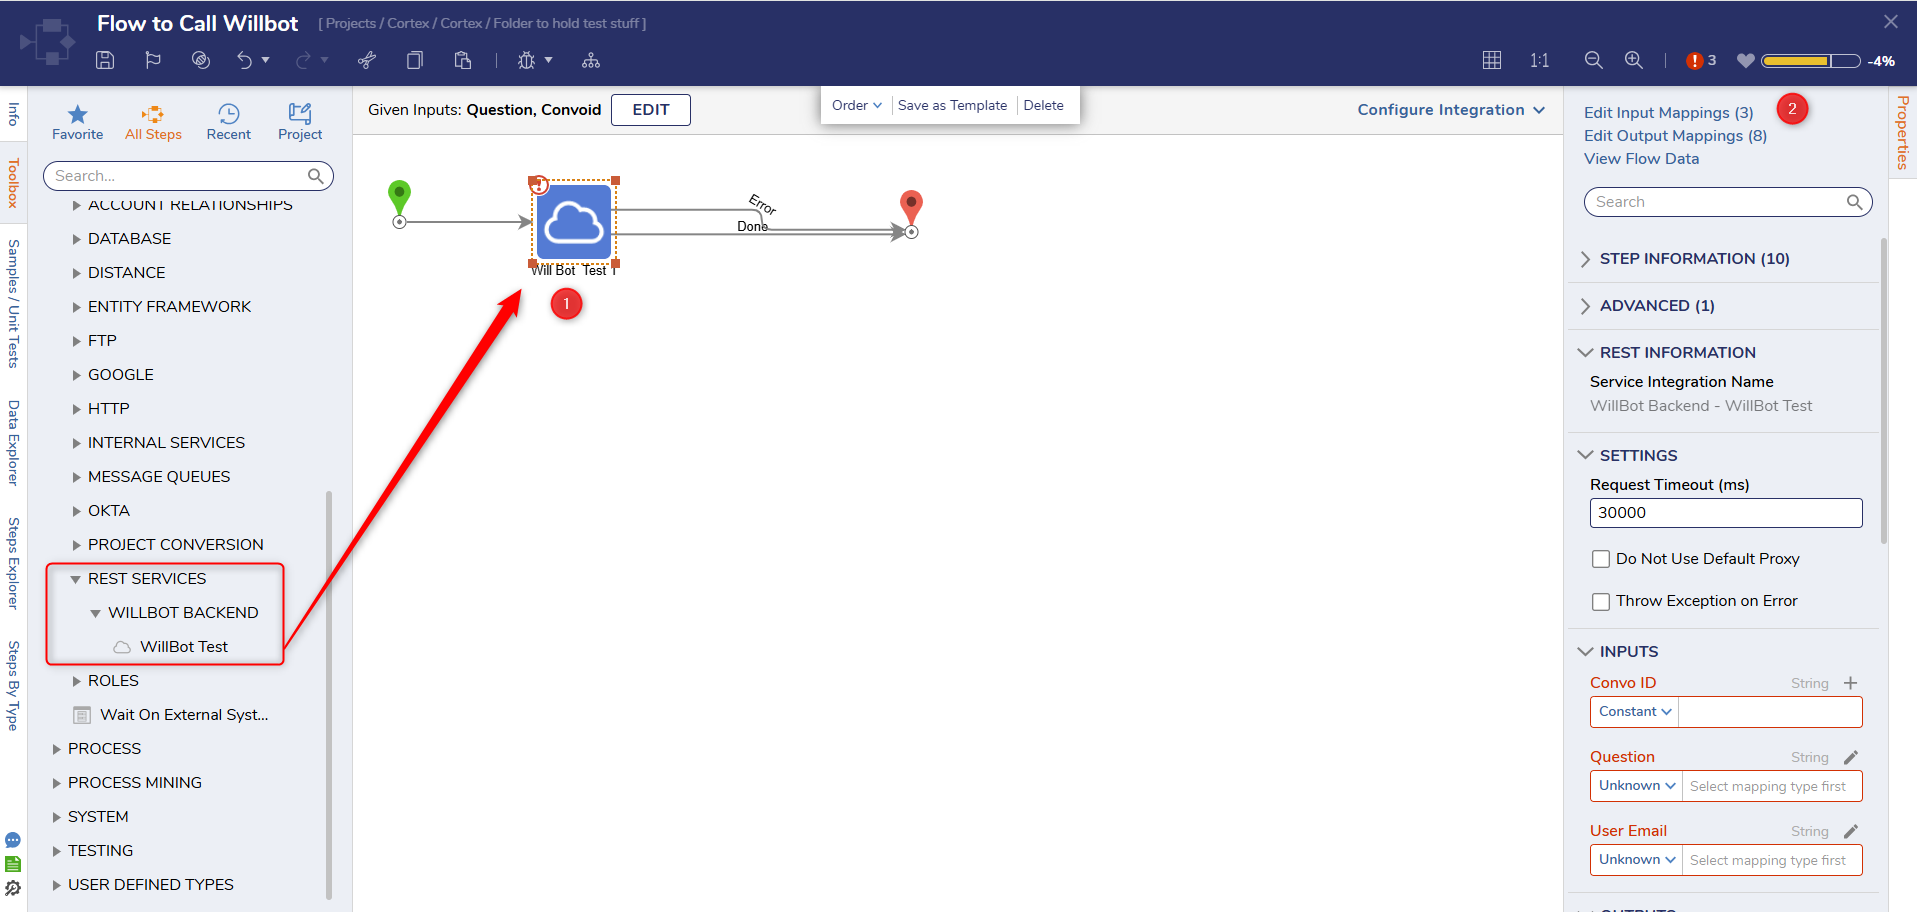 Edit the Input Mappings. From the Flow Data on the left side, map Question to Question, Convoid to Convo ID, and under Flow Data map CurrentUserEmail to User Email. Press OK and close the window.
- Debug the Flow to see the bot respond.
The front end UI that uses this Flow can be built in several ways.
- A Form built in Decisions that is made available to end users.
- Custom code that calls the Flow.
- Pre-built UIs that are purchased from 3rd party vendors.