The Accelerator offers a User-friendly interface for effortlessly creating, sending, and tracking Questionnaire responses. With the provided project, Users can easily create, update, remove, and reorder questions to customize the Questionnaire according to their requirements. The project utilizes a mixed-type repeater and Rules, enabling question dependencies and facilitating real-time adjustments to the questions being asked. This functionality enhances the overall flexibility and adaptability of the Questionnaire, providing a seamless user experience.
Prerequisites
- Users should have the Error Handling Accelerator installed before utilizing this Accelerator.
Groups & Permissions
A separate folder is created in System > Security > Groups called Dynamic Questionnaire Groups. Add the appropriate users to their corresponding groups to initiate the process.
| Groups | Description | Permissions |
|---|---|---|
| Dynamic Questionnaire Admin | Users with all the access of Managers, along with the ability to delete unused Questionnaire templates and close live Questionnaires. | Questionnaire Views |
| Dynamic Questionnaire Managers | Users to create, edit, and launch Questionnaire templates and live Questionnaires. Being a designer is not needed, but is recommended for some features to be available. | Questionnaire Views |
| Dynamic Questionnaire Responder | Users receive the survey via email or a direct link to fill in the questions of the Questionnaire. They do not need an account and will always be asked to provide an email if using an unassigned Live Questionnaire. | Live Questionnaire |
Dashboards
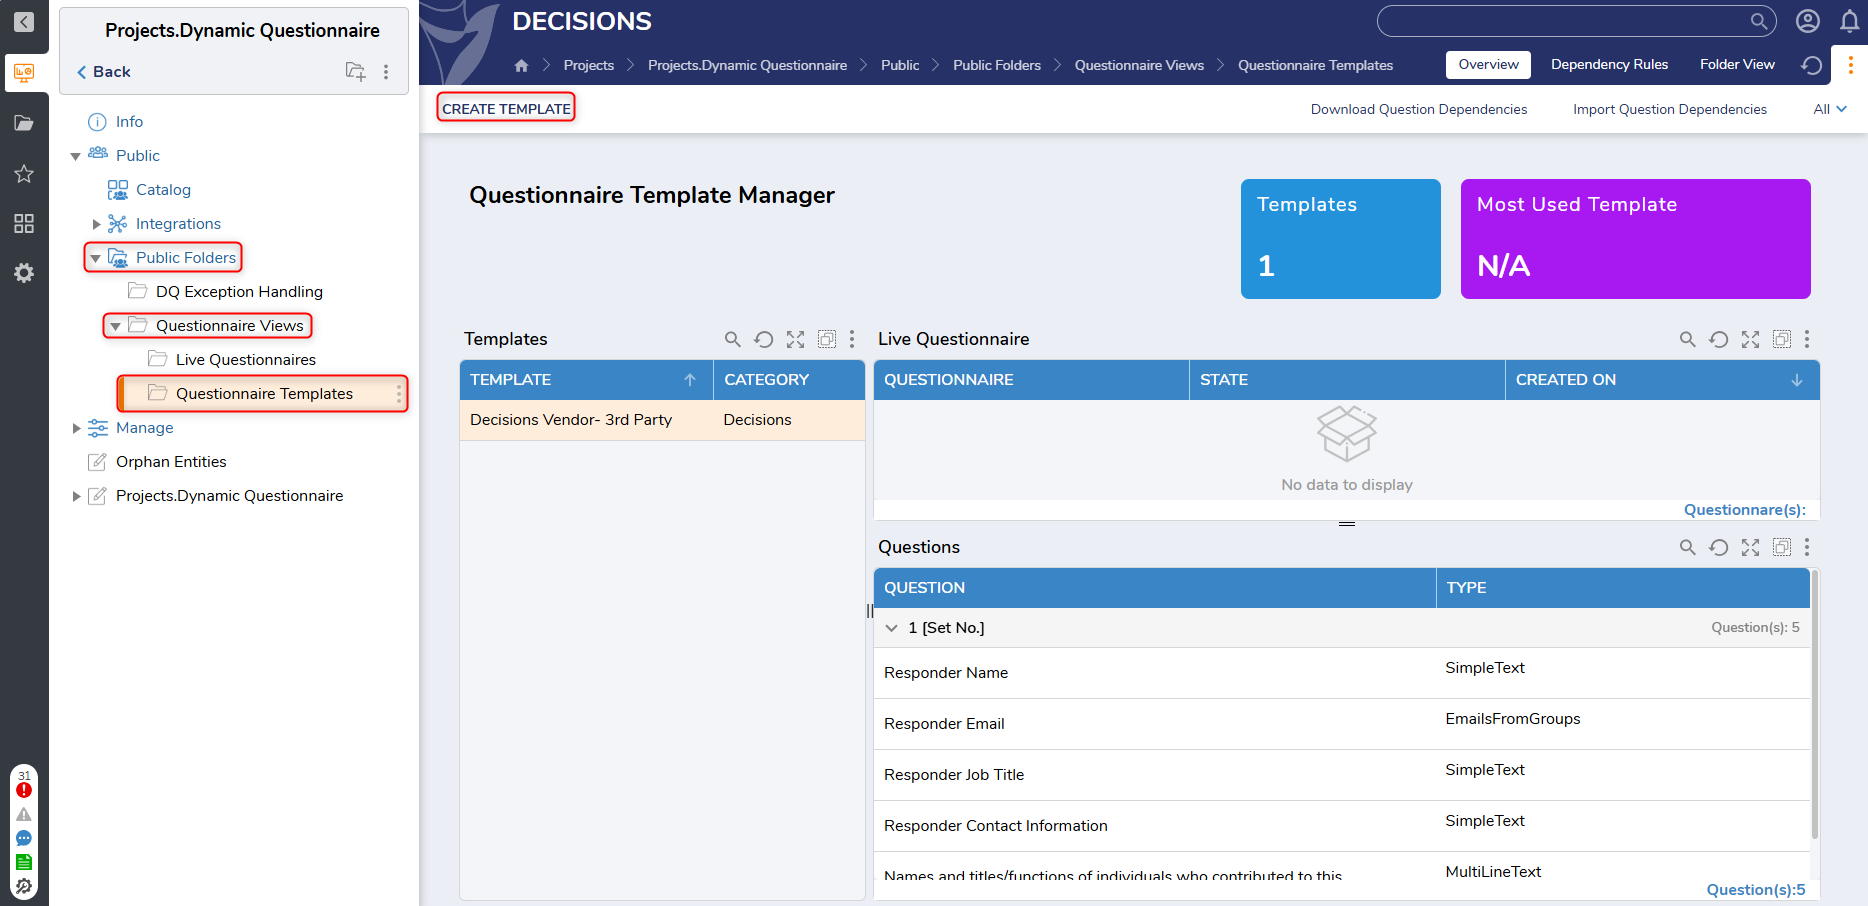
Questionnaire Template Manager
The Questionnaire Template Manager Dashboard provides a comprehensive overview of template management. It presents the total count of created templates and the associated questions used within those templates. There are various actions available for each template, including adding questions, reordering them, creating live Questionnaires, and editing template details such as name, category, description, and progress data. Additionally, the dashboard offers the option to make copies of templates, facilitating easy duplication and customization. This comprehensive set of features empowers users to efficiently manage and customize their Questionnaire templates according to their specific needs.
- To access this Dashboard, open the Public Folders, expand Questionnaire Views, and select Questionnaire Templates.
- Select Create Template to create a new Questionnaire.
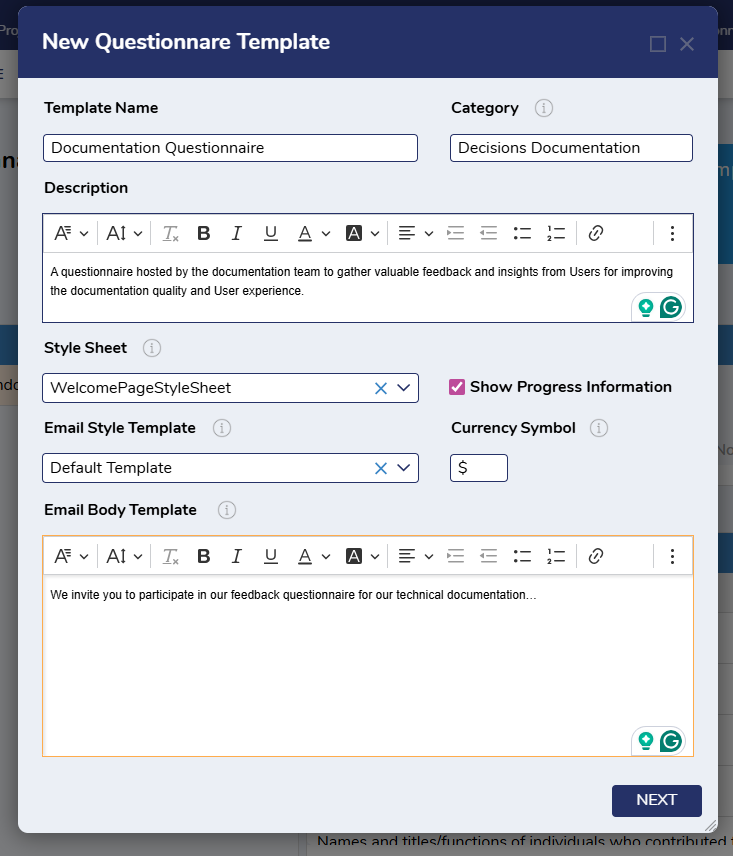
- This action displays the New Questionnaire Template Form, which allows Users to create a new Questionnaire Template and shows relevant details such as the Questionnaire's name, category, and description. The drop-down menu for the Style Sheet allows the selection of an uploaded CSS file to be applied to the Questionnaire. If a custom Email Template has been uploaded, it can be chosen from the options available on this Form. In the absence of a custom template, a Default Template can be selected instead. The Form also includes a field to enter the email body, which will inform recipients about the Questionnaire.
- Click the Next button to add questions.
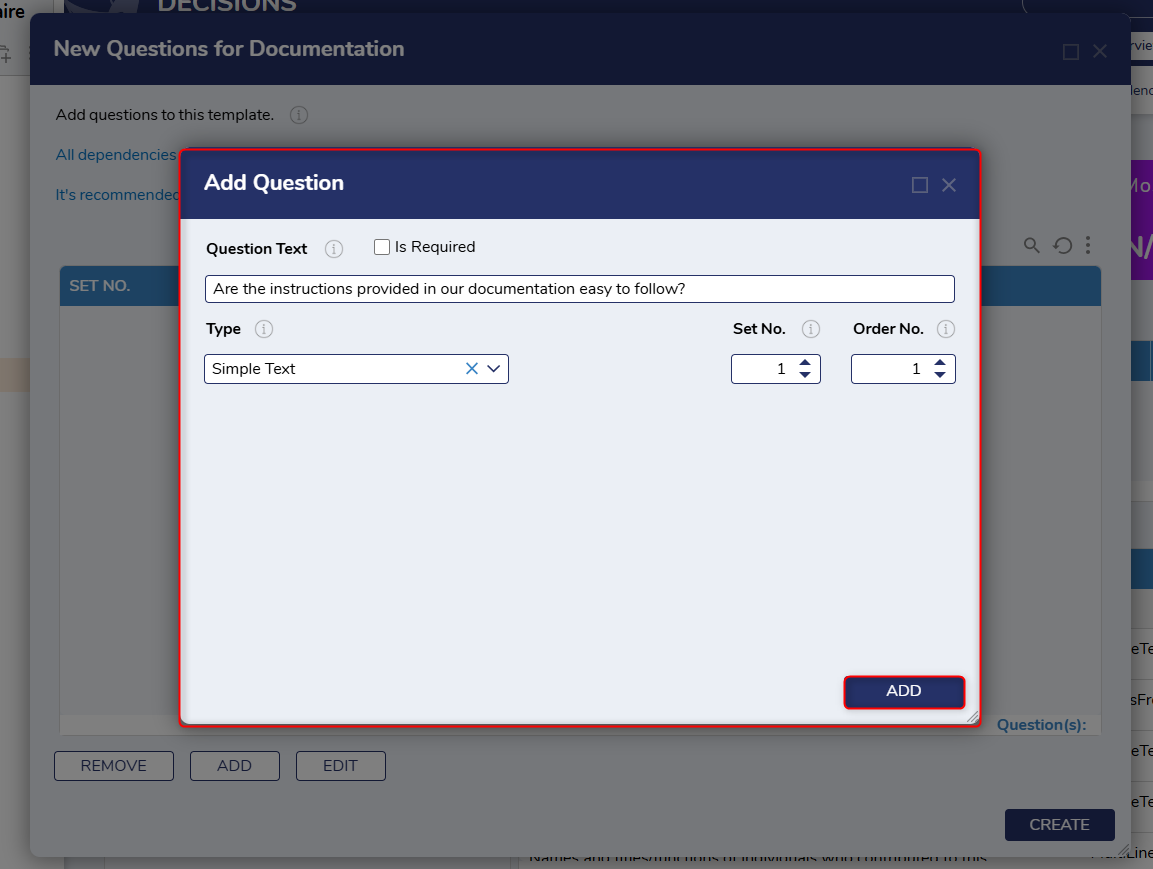
- Click on the ADD Button and type the question in the Text field. Select the Typedrop-down based on the given question.
- Users who wish to create multiple sets of questions can select a Set No. and Order No.
- Users who wish to create multiple sets of questions can select a Set No. and Order No.
- Select CREATE in the New Questionnaire dialog. This will create the Template with the provided questions.

- The new Questionnaire will now be available in the Dashboard.
Questionnaire Actions
Right-clicking on a selected template will display the following User actions:
| Action | Description |
|---|---|
| Add Questions | The Template Name Form provides options to modify, add, or delete questions and create new ones. Users can generate new questions within the same or a different set and sequence by selecting the Add button. Once the questions have been added, clicking on the Create button will incorporate them into the template. Users can edit or remove any question. |
| Reorder Questions | Users can rearrange questions at any time by right-clicking on the desired template and selecting Reorder Questions. Users can also adjust the Set No by double-clicking on Selected Set No. The modified order will be saved within the selected template. |
| Create Live Questionnaire | This action allows Users to add a Live Questionnaire for a selected Template. |
| Edit Template | Users can edit a questionnaire template by right-clicking on a desired template and selecting Edit Template. After clicking the button, Users will be able to edit the questionnaire template through the Edit Questionnaire Template. The Form includes a drop-down menu for selecting the Style Sheet, enabling the user to choose a CSS style format that assists in creating a modified version of the Questionnaire. |
| Copy Template | This action creates a new template with the same settings and questions and enables Users to provide a new name for the template. |
Question Actions
Each question has the following set of User actions:
| Action | Description |
|---|---|
| Associate Question(s) | This action allows Users to add multiple dependencies to the selected question. |
| Edit Question | This action enables Users to edit details about the selected question. |
| Update Required Status(es) | This action enables Users to update whether or not questions are required. |
| Remove Question(s) | This action deletes the selected question. |
Utilizing Dynamic Questionnaire
Create Live Questionnaire
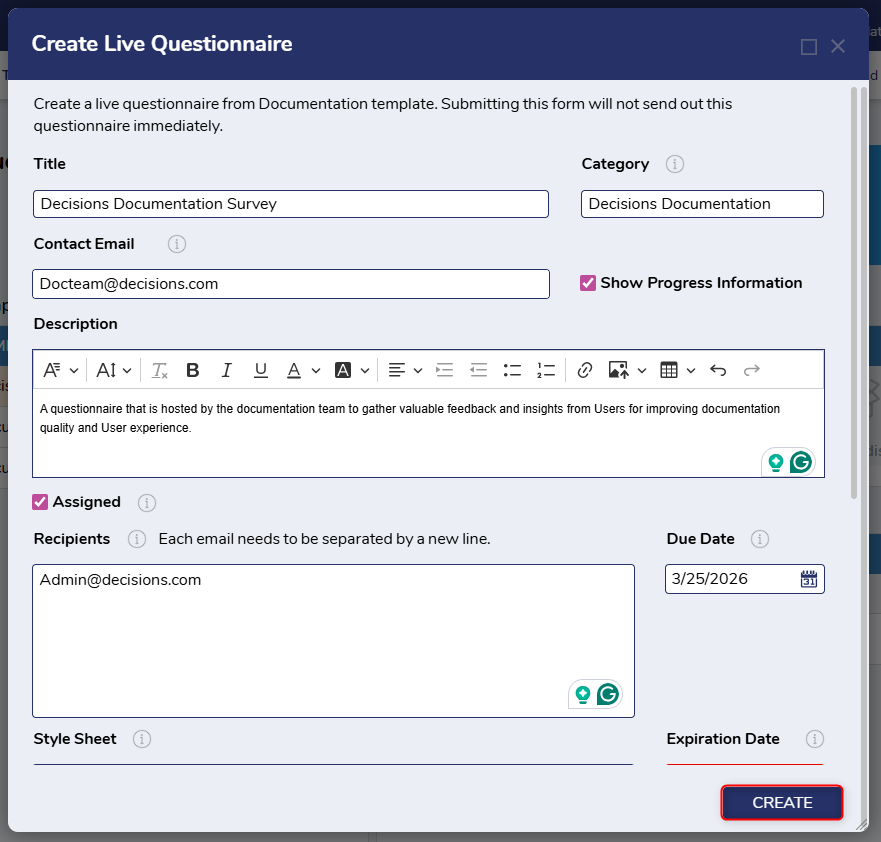
The Create Live Questionnaire Form creates a questionnaire based on a selected template and makes it available to be sent to recipients.
- To create a Live Questionnaire, right-click on a desired template and select Create Live Questionnaire.
- This action will display the Create Live Questionnaire Form.
- From here, Users can provide a Title and Contact Email. The category field will automatically populate with the name of the category from the selected template, but can be changed. The Show Progress Information checkbox will display Progress data on the Live Questionnaire Manager Dashboard.
- To add recipients, setting the Assigned checkbox to true will enable the Recipients text box. Users can then add each recipient's email address, separated by a new line. Users can also set a Due Date for the questionnaire to be completed. This date will be included in the initial email sent to recipients. Questionnaires can still be opened and submitted past the due date.
- Set an Expiration date. Once this date has passed, no responses will be accepted.
- The following fields, also available when creating a template, can be filled out: Style Sheet, Email Style, Email Subject, Email Body, and Currency Symbol.
- Select CREATE to set the Questionnaire as Under Construction. This status is assigned to questionnaires that have not been launched.
- Once the Live Questionnaire is created, the platform will navigate to the associated questionnaire Folder, which displays information about the questionnaire, like Status, Assigned, Expiration Date, Days left untilExpiration, and Completeness.
- The following User actions are available:
Action Description Launch Questionnaire Enables Users to launch a questionnaire. Users can confirm the Questionnaire's Category, Email, Description, and Dates, before clicking LAUNCH to send the associated recipients an Email with the Questionnaire link. Recipients can then open the questionnaire to begin receiving responses.Edit Questionnaire Enables Users to edit a questionnaire. Users can adjust the previously set Category, Email, Description, and dates. Select SAVE to update the questionnaire.Go To Template This action navigates Users to the Overview page of the Questionnaire Template. This page displays all associated questions and a preview of the questionnaire. Users have the ability to add and reorder questions, edit the template, copy the template, and download and import dependencies from this page.Test Questionnaire This action sends a test email or opens and evaluates the Questionnaire Form in the Portal to assess if anything needs to be changed.Manager Actions> Delete Live Questionnaires This action deletes a Live Questionnaire. A confirmation window will appear before the questionnaire is deleted.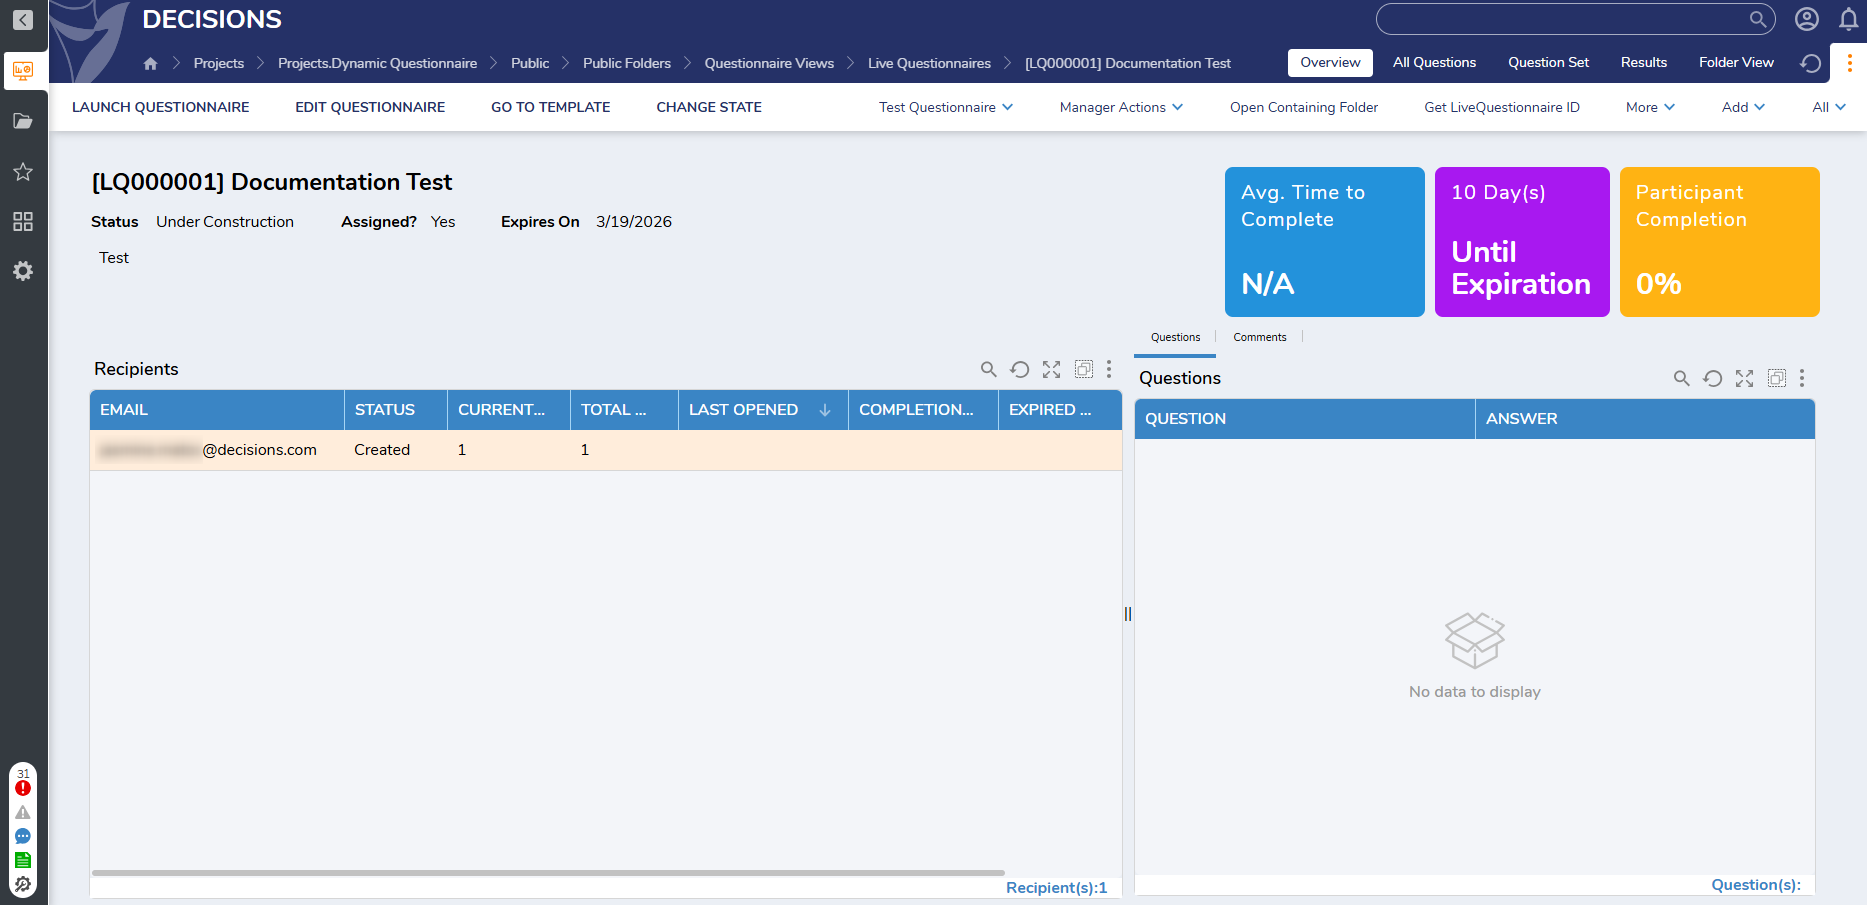
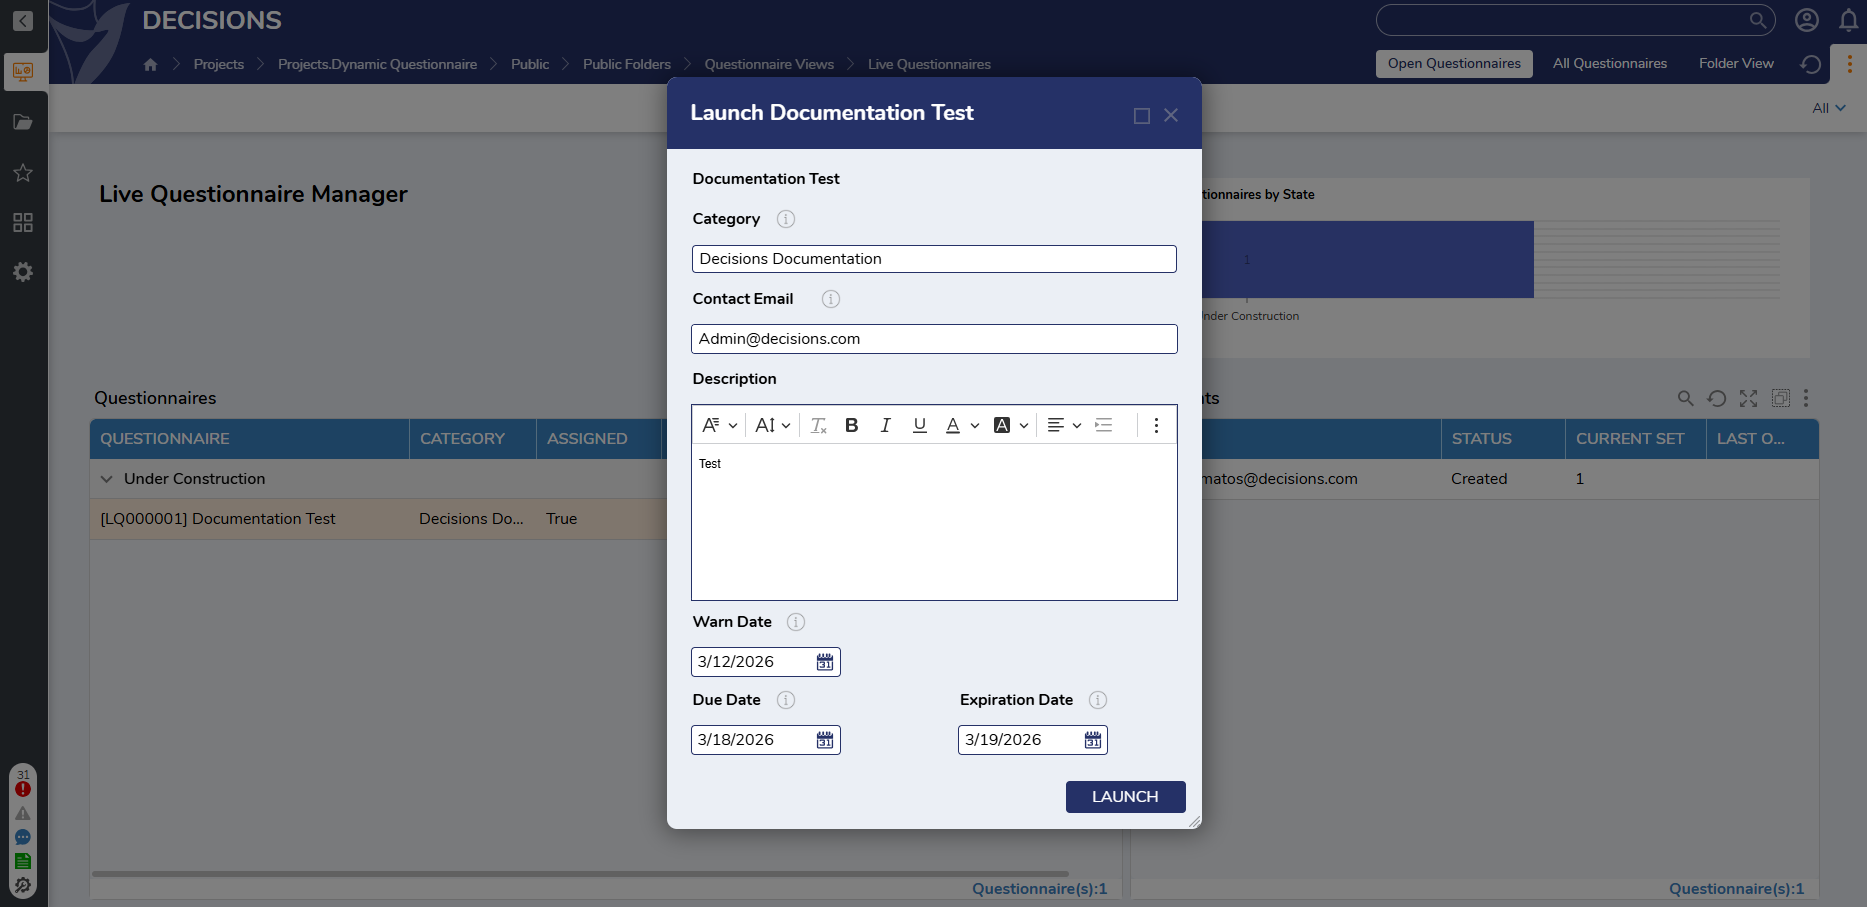
Launch Questionnaire
- To launch a questionnaire, select LAUNCH QUESTIONNAIRE.
- From here, confirm the Category, Email, Description, and dates.
- Select LAUNCH to send associated recipients an Email with a link to the questionnaire.
| Example Screenshots | ||
|---|---|---|
| Launch Questionnaire Dialog | Recipient Email | Sample Questionnaire |
 | .png) | .png) |
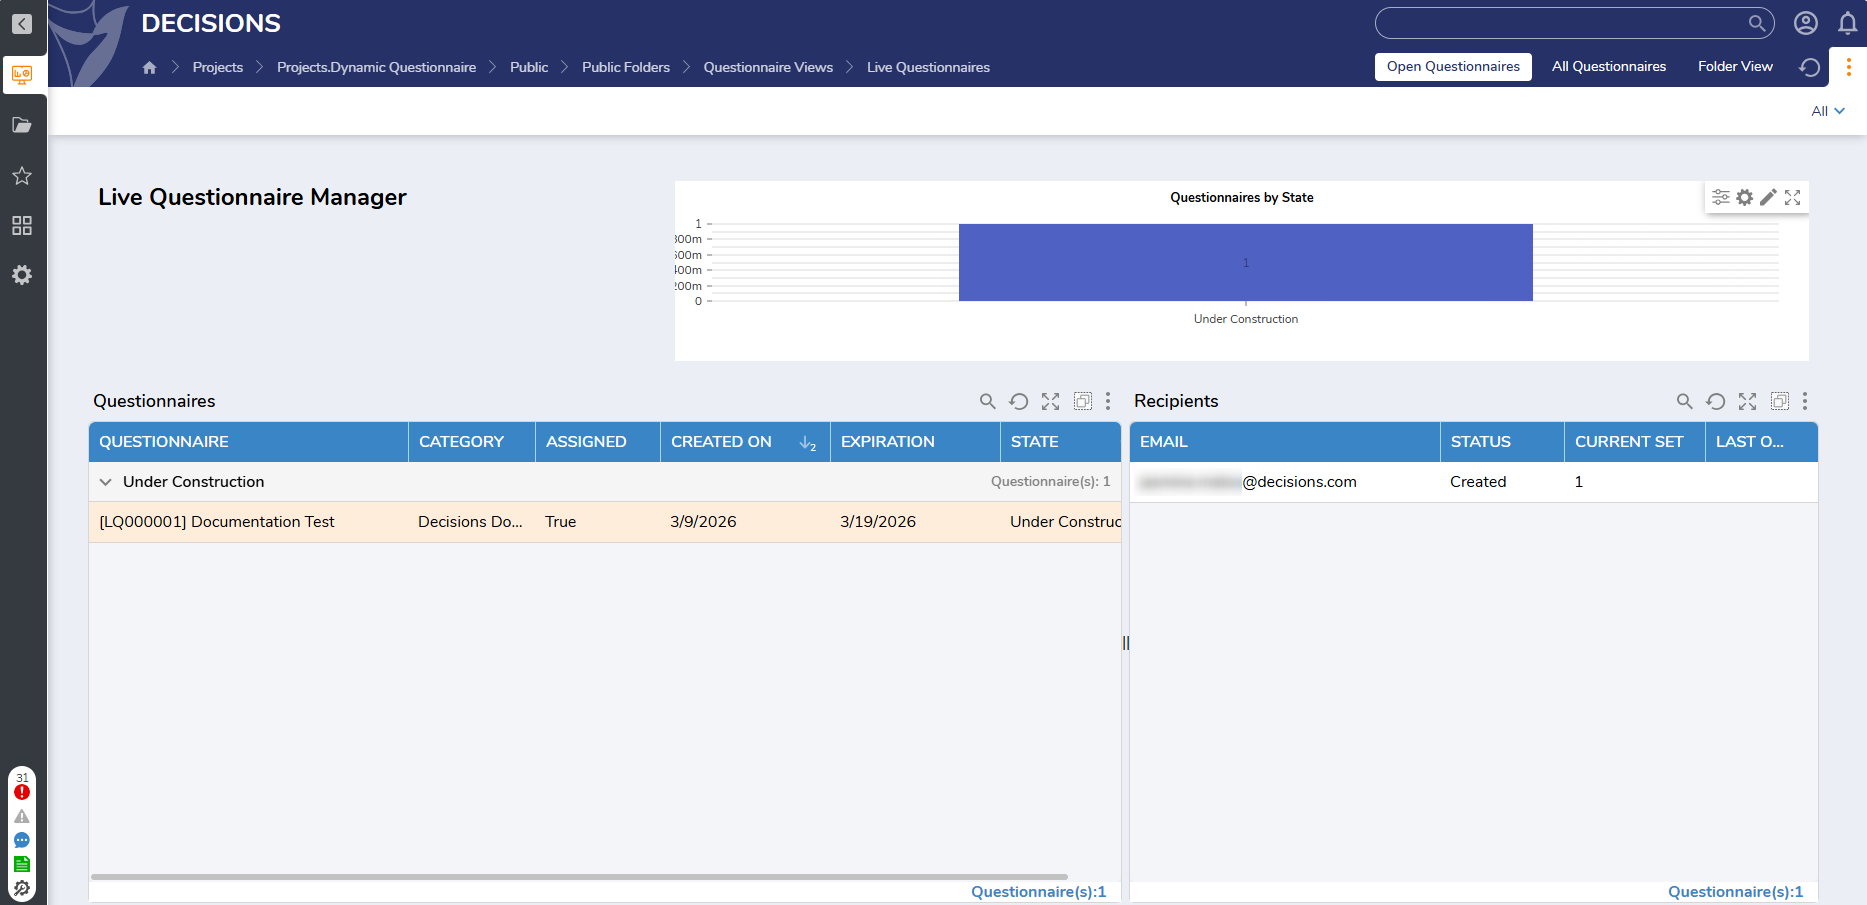
Live Questionnaire Manager Dashboard
The Live Questionnaire Manager Dashboard provides a high-level view of the questionnaire management process. It also provides a comprehensive overview of all live Questionnaires, including their respective states and detailed information. Users can access the same set of User Actions (Launch, Edit, Go to Template, Test, Manager Actions) available in the Live Questionnaire Folders. These options enable Users to perform various operations and tasks related to the questionnaires, ensuring efficient management and control over the Live Questionnaire System.
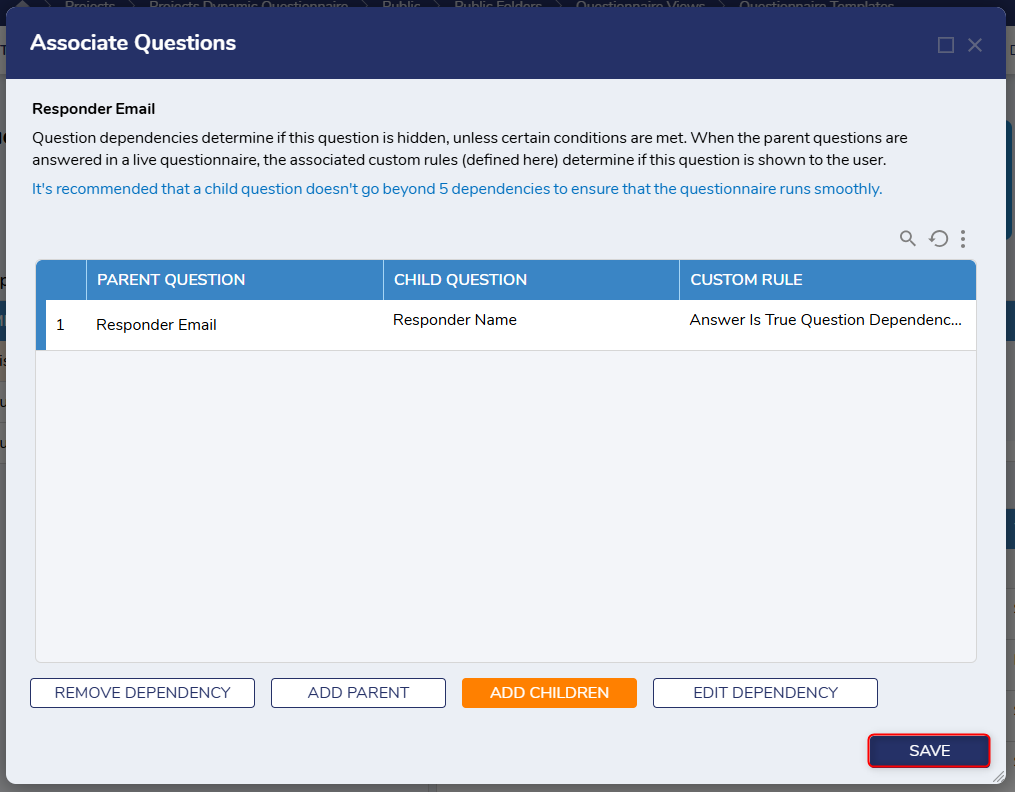
Associate Questions
Question dependencies attached to associated questions determine whether a question remains hidden until specific conditions are met. When Users respond to parent questions in a live Questionnaire, custom Rules can determine whether a question becomes visible.
- Navigate to the Questionnaire Template Dashboard, right-click on a question, and select Associate Question(s).
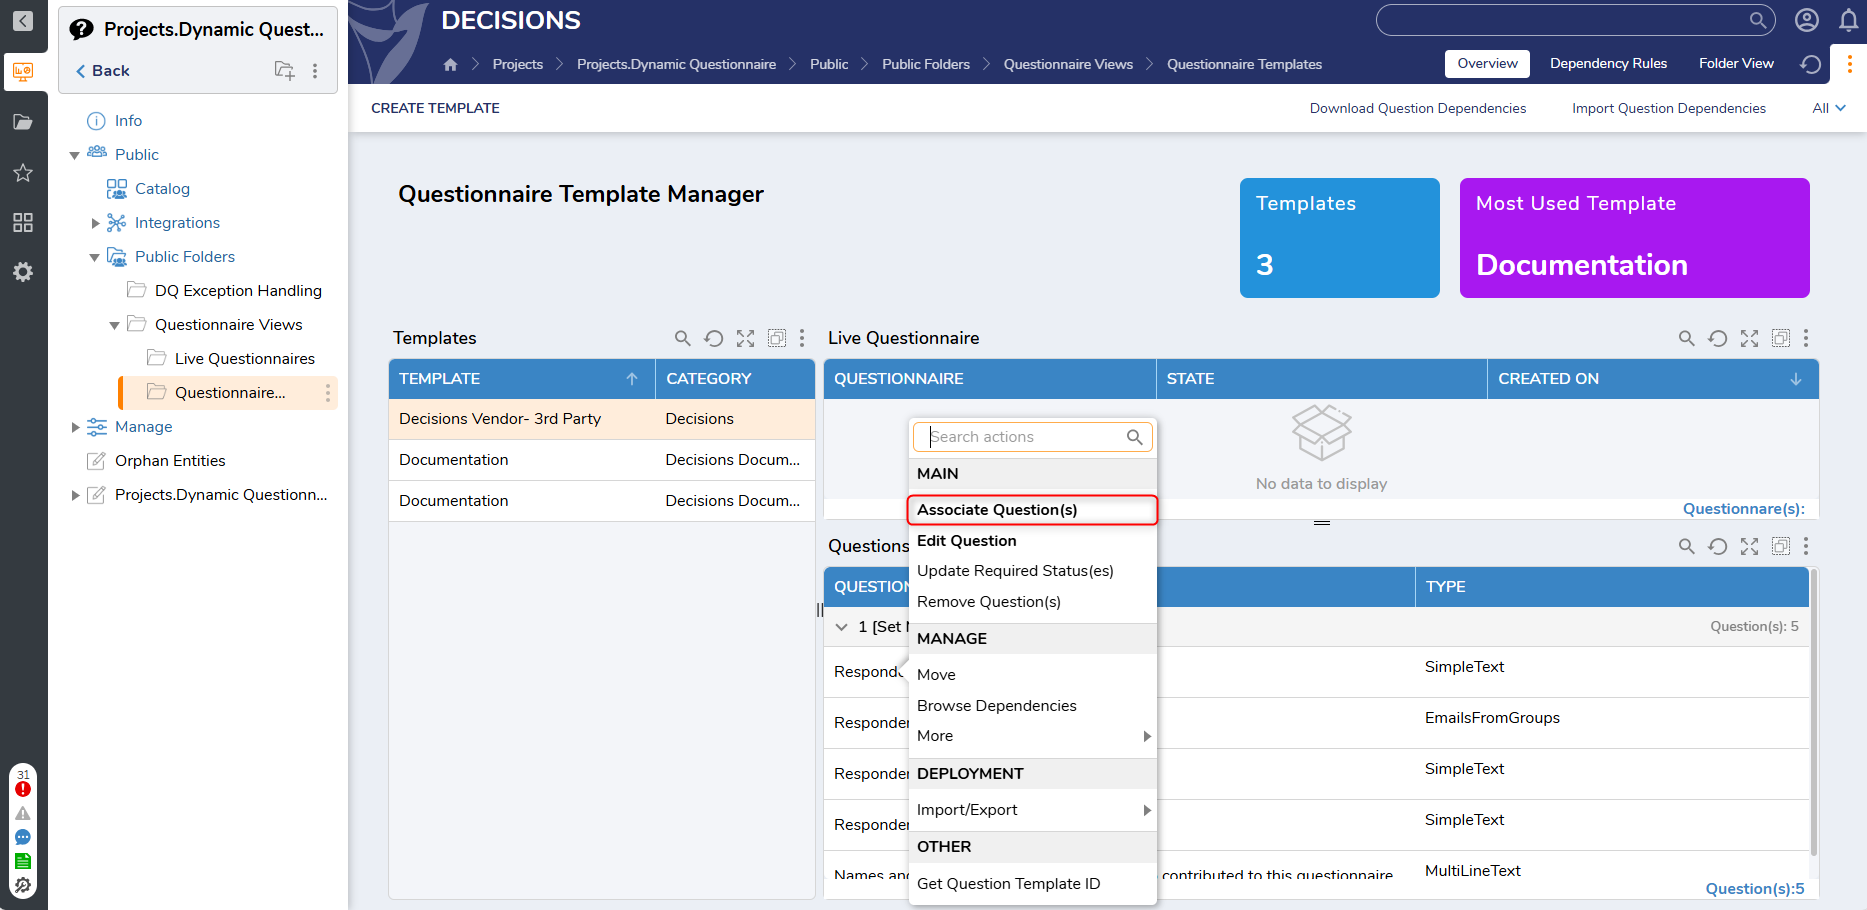
- This action displays the Associate Questions Form, where Users can establish one or more dependencies for the selected question. The Form also offers options to add or remove parent or child questions and edit existing ones.
- Once a Child question has been added, the Form will display the selected parent question to confirm the correct question. In the "For" Drop-down, select the parent or child questions to link with the selected question.
- Select a Custom Rule from the following options: Answer Is Other Dependency Rule, Answer Is Yes Dependency Rule, Answer Is True Dependency Rule, and Answer Is Not Empty Dependency Rule. Editing Default Rules is possible, but generally not recommended. Alternatively, Users can design a new Rule to customize dependencies further. An image representing the selected Rule will appear at the bottom of the Form. Confirm the details and click Add.
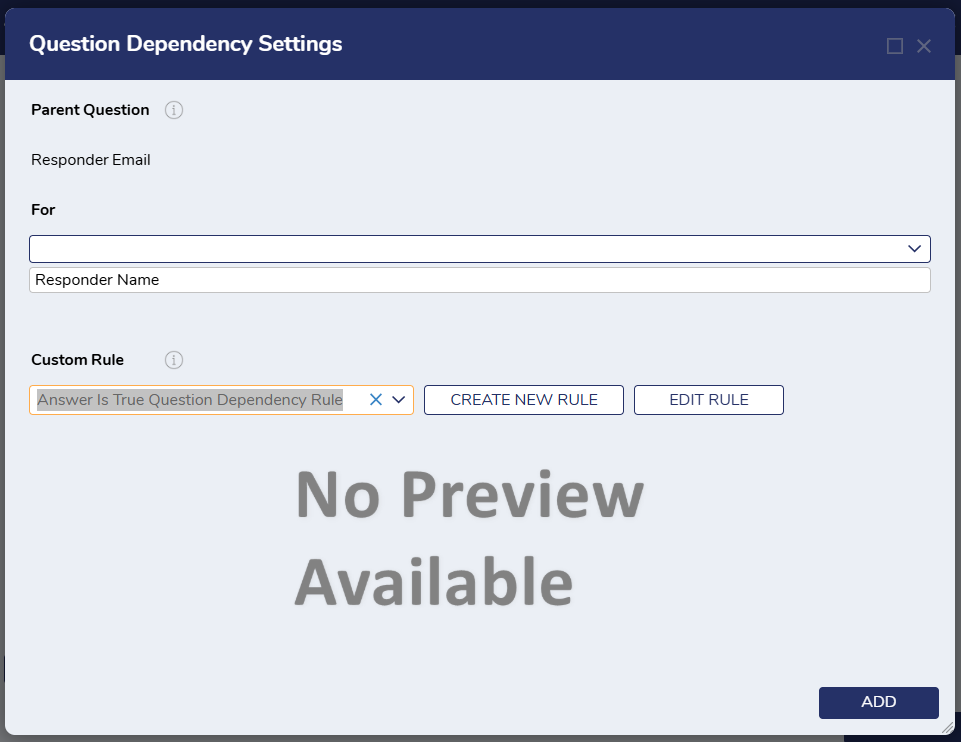
- When all details on the Form have been completed, select Save.
Adding a New User Control for Custom Question Types
- Go to "My Apps/Dynamic Questionnaire/Designer Elements/Question Type Conversions/Question Type Formats".
- Right-click on "[Template] Question Format". Select "Copy Designer Project".
- Create a Folder Name for the new user control.
- Click Use Existing Type.
- Edit "Change Name To".
- Click COPY.
.png)
- Click "[USC] Question Type Format User Defined Control", then select Edit.
.png)
- Edit the Question Details Field and ensure it is set to the new Flow Structure. Click Save.
- Modify your User Control as needed, and make sure the User Control is set to Optional.
- Set the User Control's elements to the desired fields. Click Save.
.png)
- Open [From Object] Convert Documentation Sample Dropdown Object to Live Question Flow.
- Select the Cast Object to Type Step. Edit "Type To Try" and set it to the created Flow Structure.
- Click the Create Data step. Change the mapping type from Constant to Select From Flow.
- Choose the newly created Flow Structure > Answer [String]. Click DONE, then save and close.
.png)
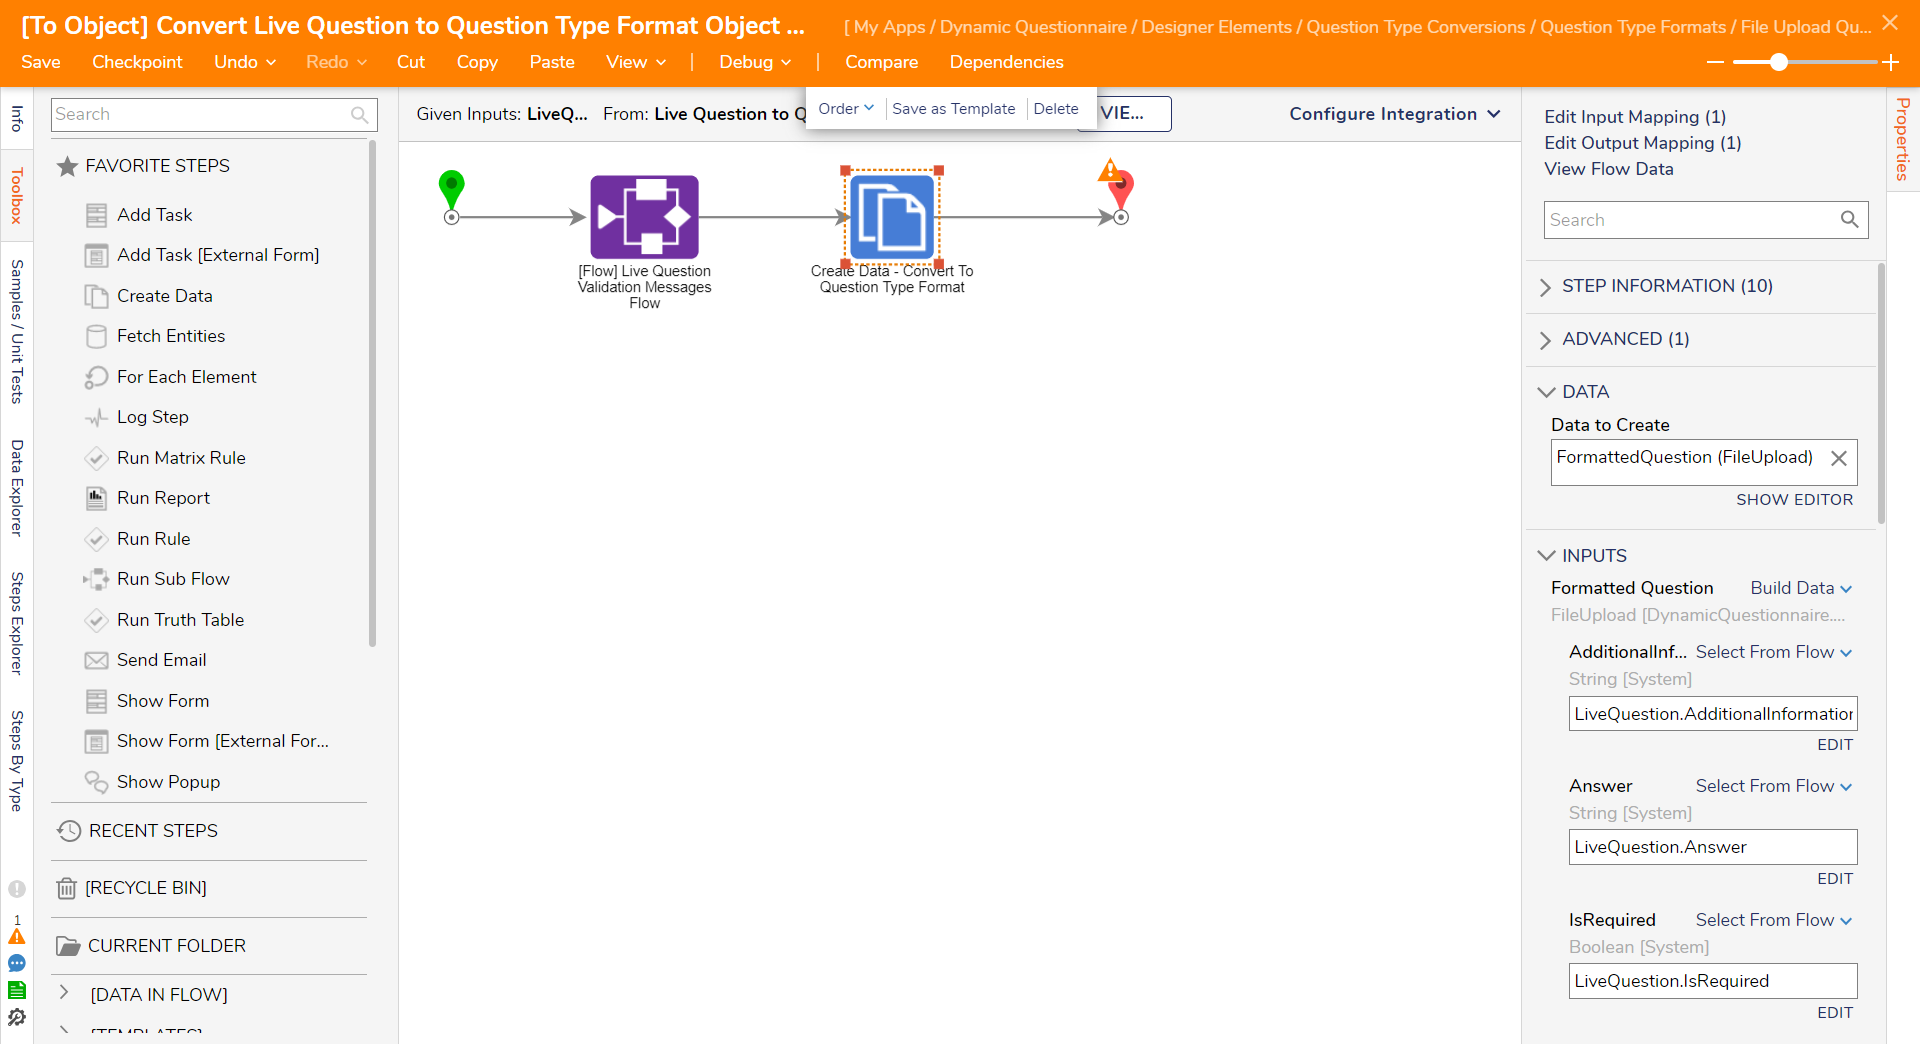
- Edit "[To Object] Convert Live Question to Documentation Sample Dropdown Object Flow".
- Select the Create Data step. Click SHOW EDITOR.
- Set FormattedQuestion to the new Flow Structure. Set the field to "Build Data".
- Map LiveQuestion to FormattedQuestion.
- Click the End Step, and change the mapping type from Unknown to Select From Flow.
- Map Formatted Question to the End Step Object.
- Click DONE, then Save and close the Flow.
- Navigate to "Question Type Conversions".
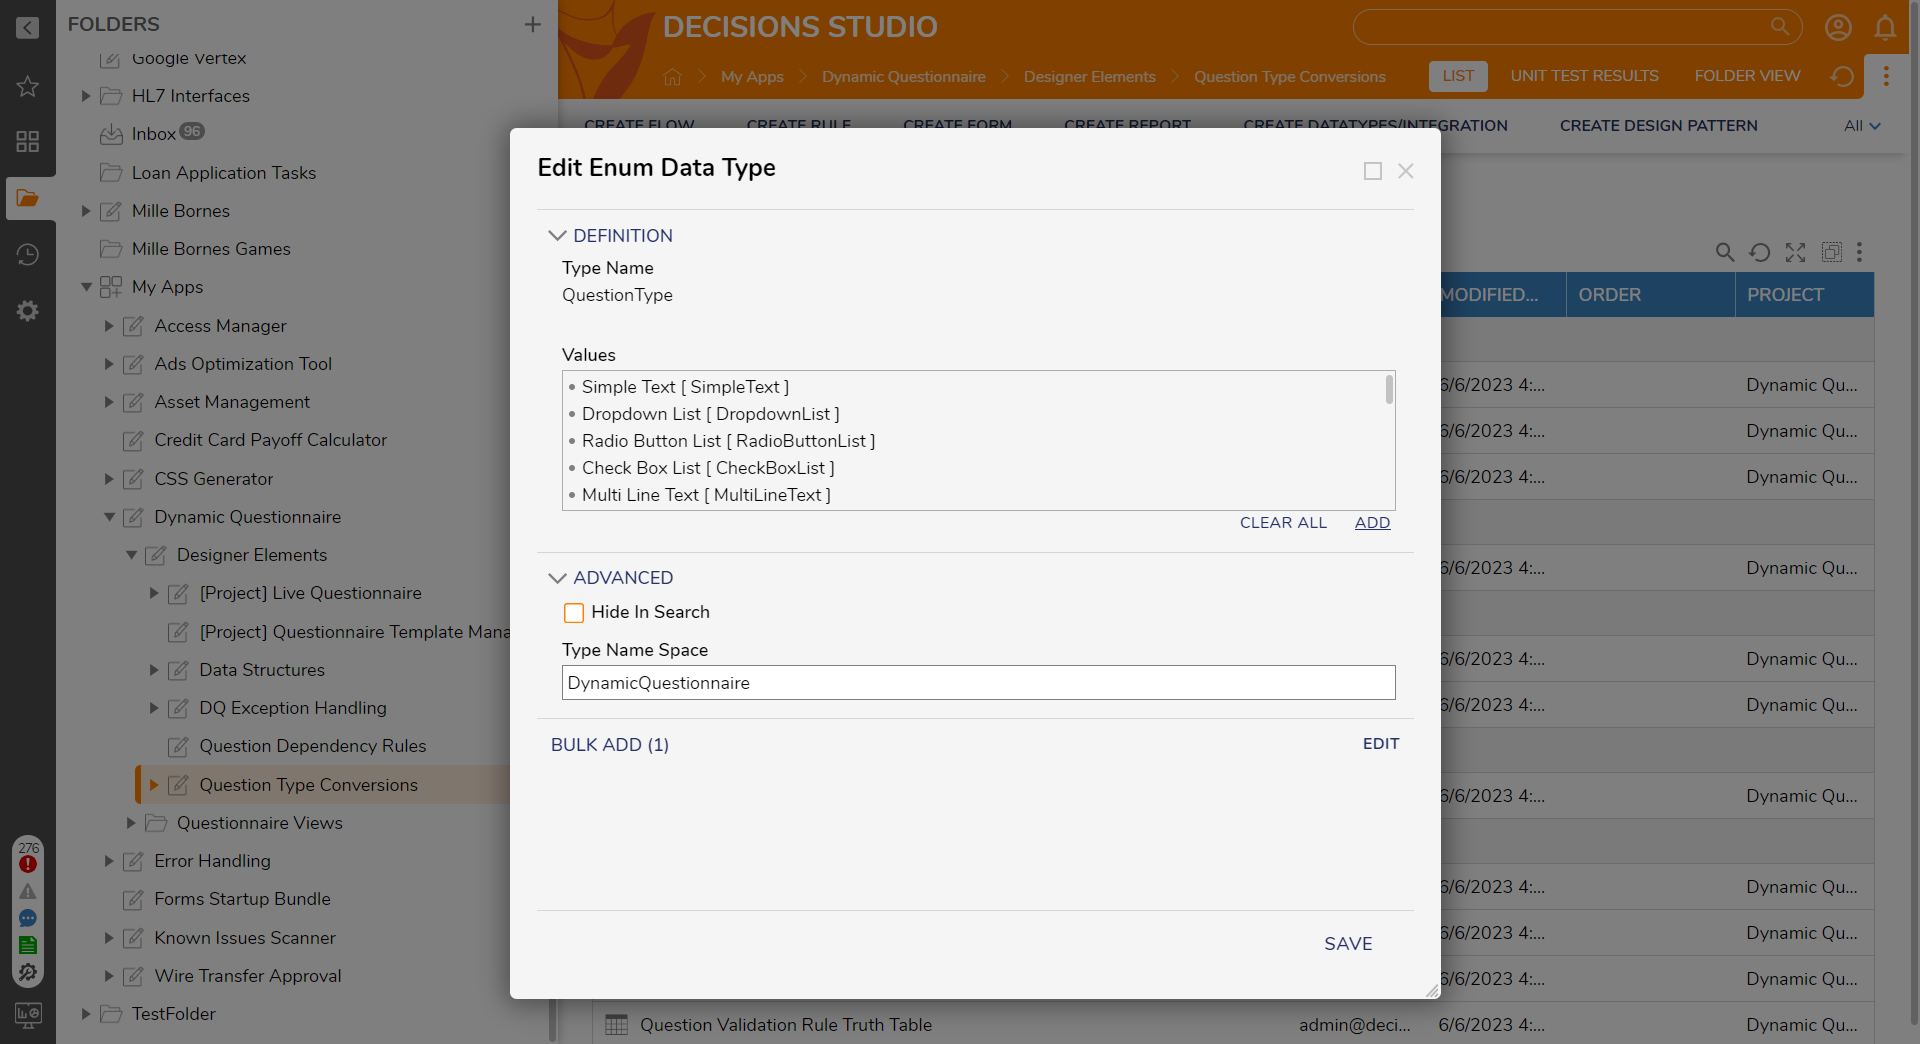
- Right-click "QuestionType \[DynamicQuestionnaire\]". Click Edit Value List and select ADD.
- Right-click the Value field and set a Control Name.
- Click OK, then select SAVE.
- Edit the "Question Type Format Conversion Truth Table".
- Click "Click to add row". The Edit QuestionType is set to the newest Value List item.
- Set Question to Object Flow Id to [To Object] Convert Live Question to Documentation Sample Dropdown Object Flow's Flow Id.
- Set Object to Question Flow Id to \[From Object\] Convert Documentation Sample Dropdown Object to Live Question Flow's Flow Id.
- Click Save and close the Truth Table.

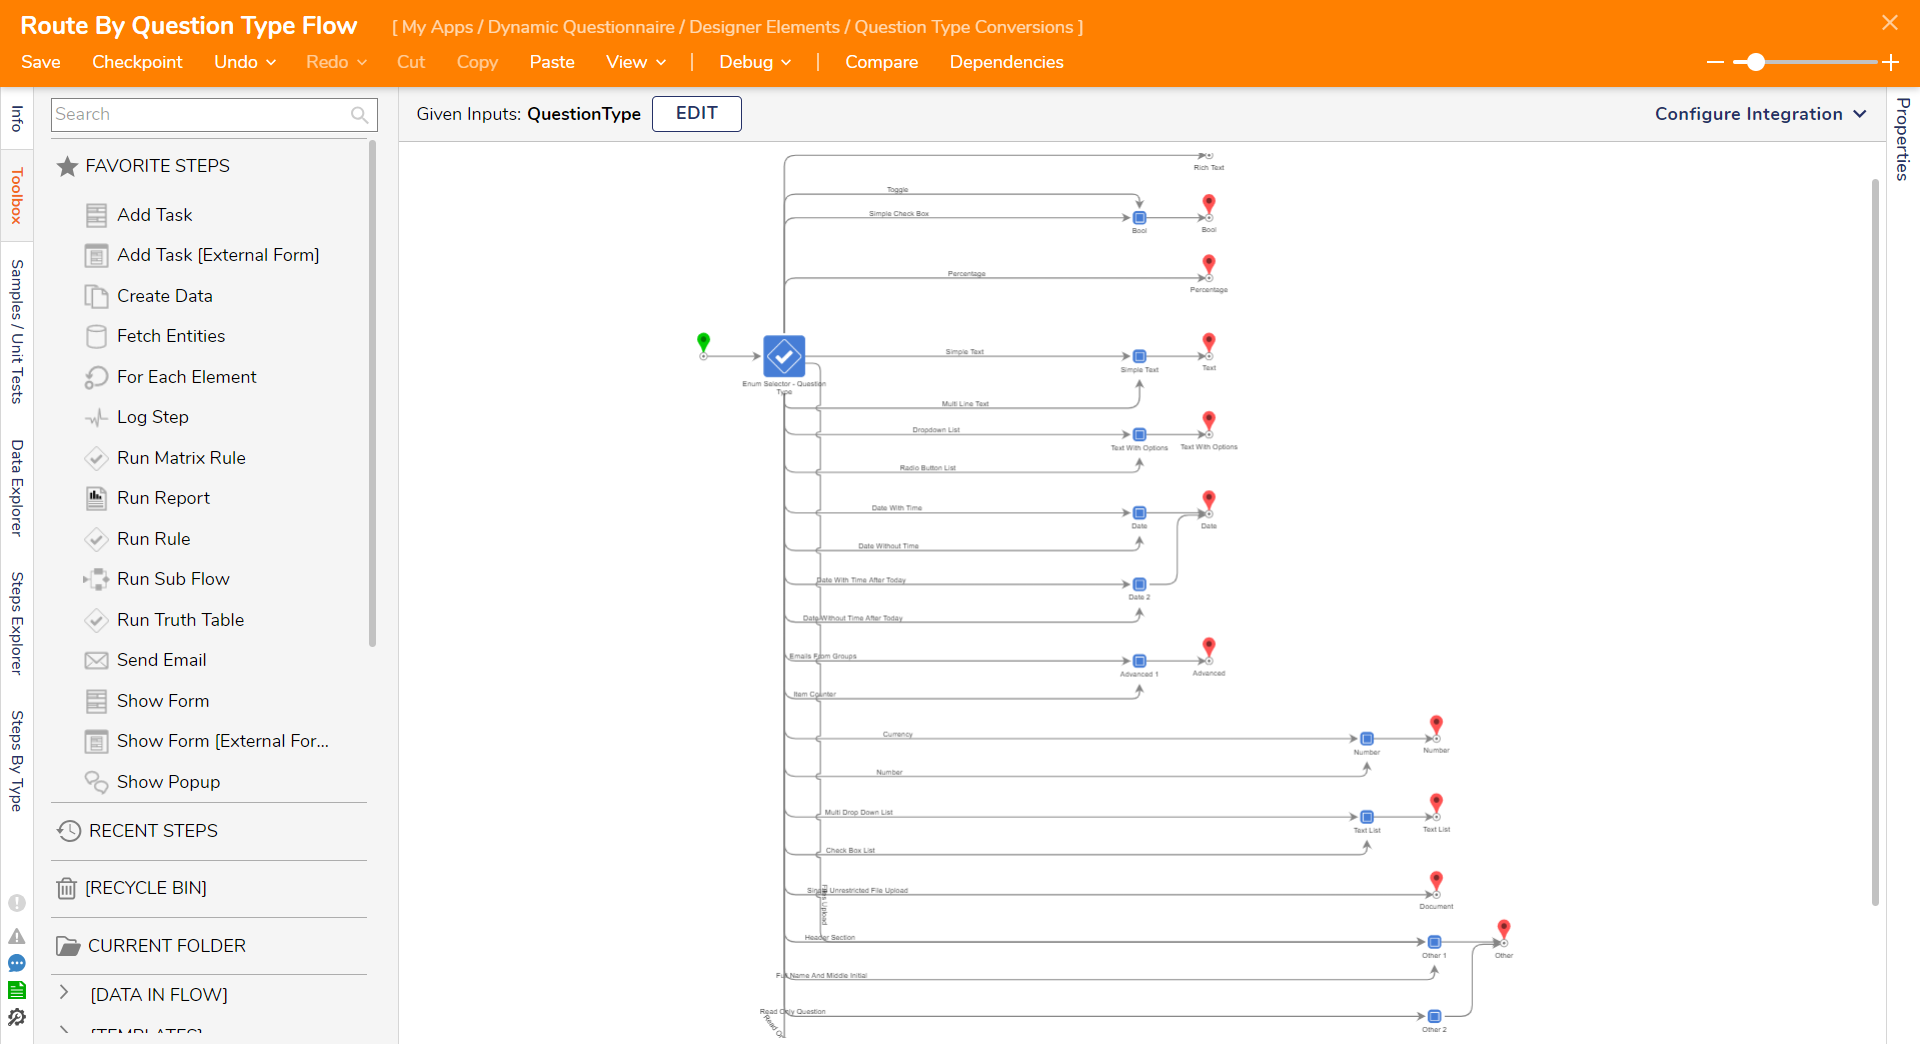
- Edit the "Route By Question Type Flow".
- Map the new outcome path as needed. Click Save and close the Flow.
Additional Optional User Control Settings
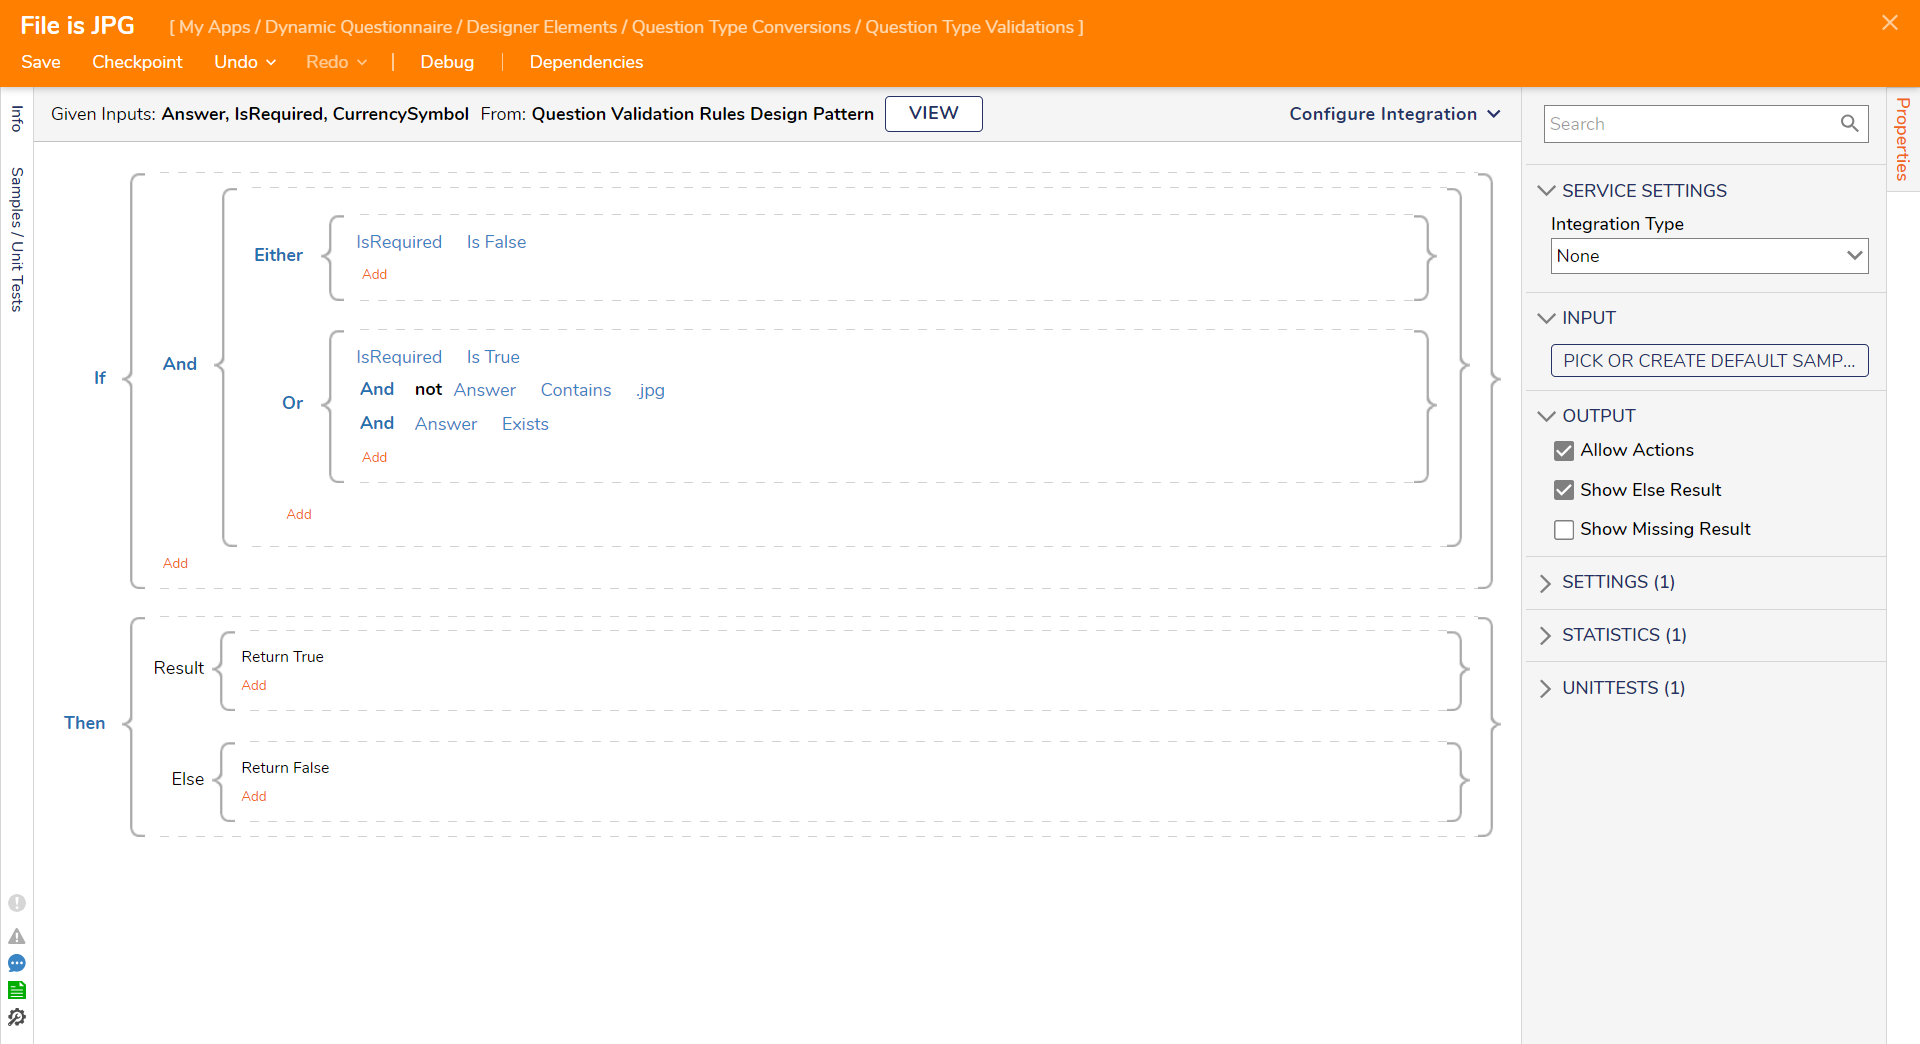
- Open Question Type Validations and select Answer is Required Validation Rule > Copy Rule.
- Set a new name for the validation. Click CREATE COPY.
- Modify the new validation rule as needed under "IsRequired Is True".
- Save and close the Rule.
- Get the Rule ID of the newly created Rule.
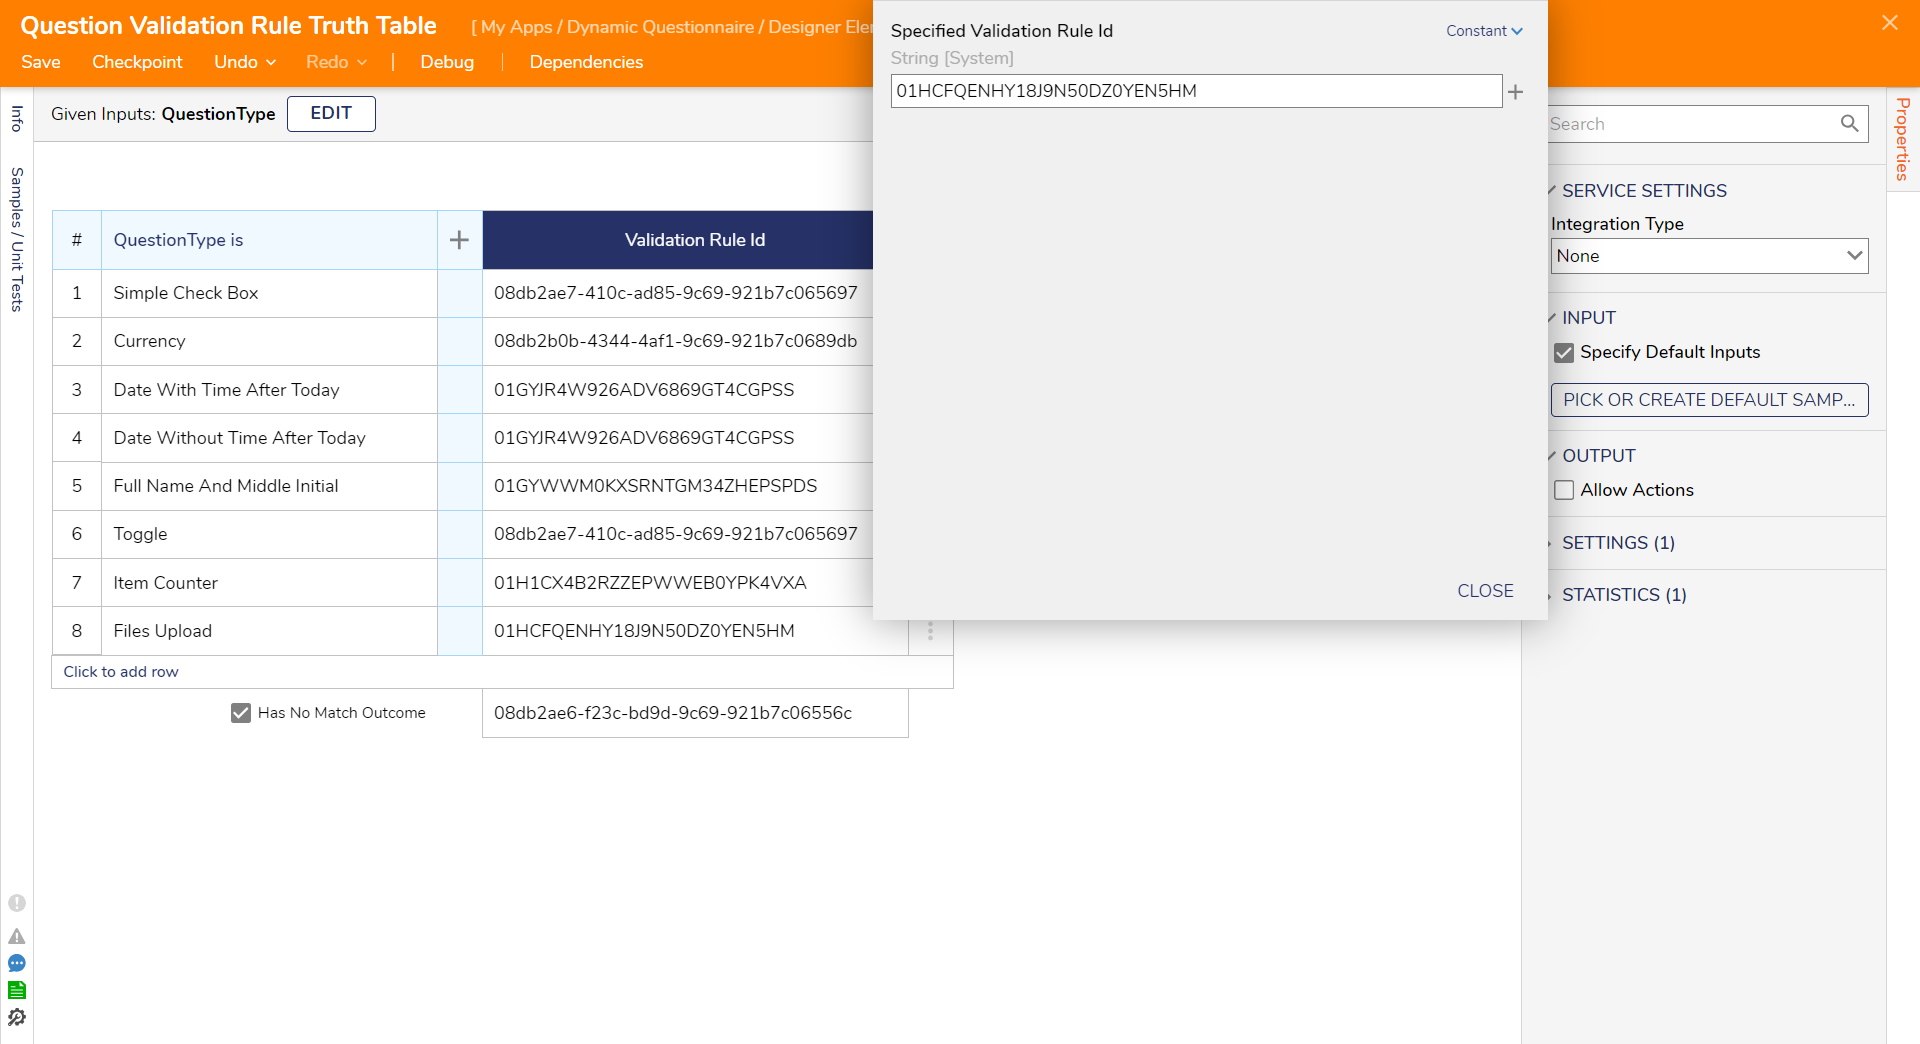
- In the "Question Type Conversions" folder, edit the "Question Validation Rule Truth Table".
- Click "Click to add row" and edit "QuestionType is" then set it to the newest Value List item. Select CLOSE.
- Edit Validation Rule Id. Paste the new Rule Id. Save and close the Truth Table.
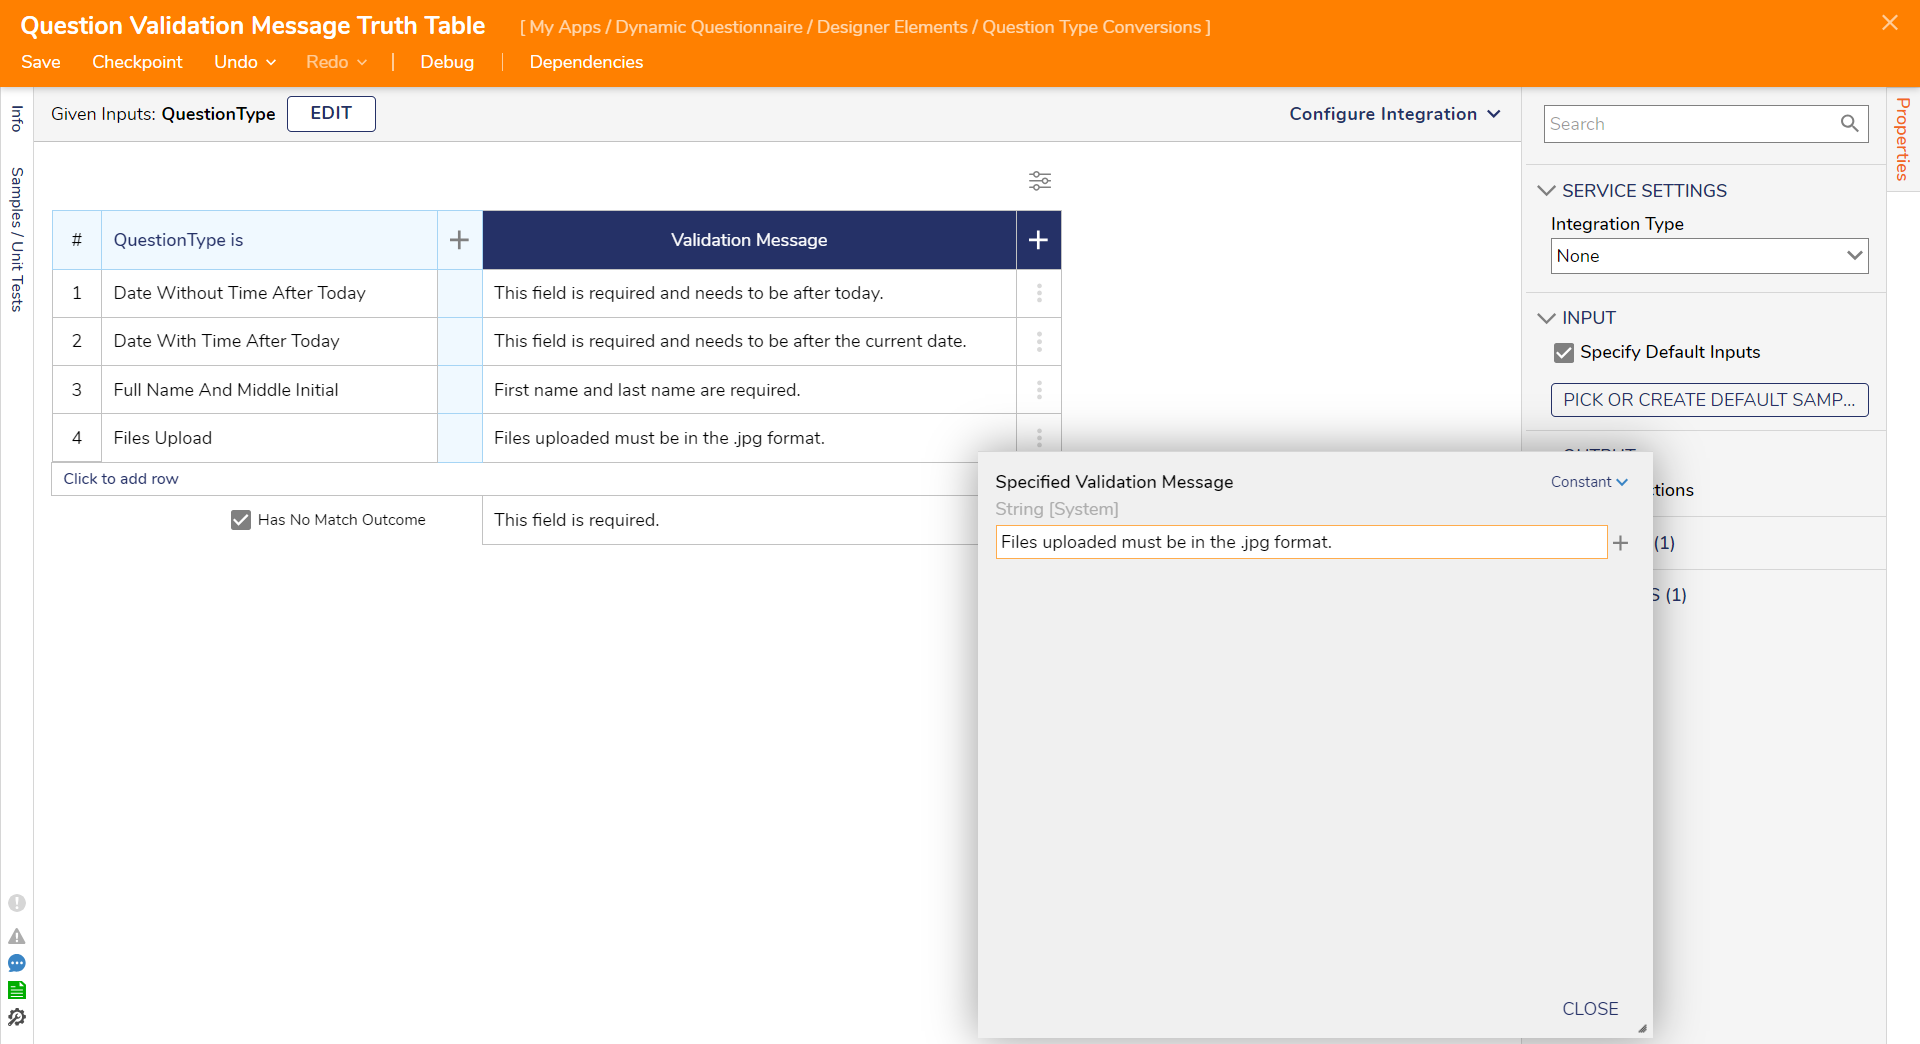
- Edit the "Question Validation Message Truth Table".
- Add a custom validation message for this User Control. Otherwise, leave it as is for a generic message. Save and close the Truth Table.
Advanced Settings for User Control
These more complex settings can be turned on for a question type that needs to save or use additional information to operate.
For example, to have a question that shows a drop-down of accounts in a certain group, use advanced settings to pass in more information to the converter Flow. So the answer is still stored as a string, but the information is stored in a format that is expected of right to and from Object flows for that question type. This is an example that is included in the DQ build-out-of-the-box and can be referenced as an example.
- Edit the Question Advanced Settings Truth Table.

- Each question that uses advanced settings will have a row on the table, and other information that is collected for the question created can be toggled to true if needed. If true, those elements will show when a user is editing or creating a question of that type.
- The main section of importance here is the first output column, the Advanced Setting Format.
- In this text, save the format that the From and To Object converter flows will use to pass information from the question type into the live question and follow how that information is resultingly stored as the answer string of that question.
- For example, the Email From Groups Advanced Setting Format is the following:C#
{
    "GetAllAccounts": true,
    "GroupIds": ["Group_Id_A", "Group_Id_B", "etc."]
}
Read Previous Question Settings
This complex setting allows a user to read the questions and answers from previously answered questions in a Questionnaire. This can be configured in the User Control by fetching the Live Question IDs in the User Control's [To Object Flow].
To enable this setting on a User Control, the Show Read Previous Questions Settings Rule needs to be updated in a Questionnaire Template. Add a new "Or" condition in this Rule and set QuestionType as {New Question Type}.
Examples of setting up this setting include Read Only Question & Read Only Question List, which is included with this project. This information cannot be used in the Questionnaire Template Preview at this time, but it can be previewed in a Live Questionnaire that is Under Construction.
Comparing Question Responses
Although this Accelerator does not currently have a feature for comparing responses, Users can use the following steps to manually fetch responses and compare them alongside responses on an external Excel sheet.
To access responses from a Questionnaire and compare them to desired responses in an Excel sheet:
- Generate the Recipients and Questions in Live Questionnaire Report.
- Utilize the Fetch EntitiesStep to retrieve questions with specified criteria.
Generate the Recipients and Questions in Live Questionnaire Report
- Users can access the All Questions Report by navigating to the Live Questionnaires Dashboard and selecting the All QuestionsPage.
- From here, select the pencil icon to generate the Report.
.png)
- Once the Report has been generated, Users can access the responses from the selected Questionnaire, grouped by Email.
.png)
Utilizing the Fetch Entities Step with Specified Criteria
- Open a new Flow within the Project and select the Fetch Entities Step.
- From here, select LiveQuestion from the Type Name Dropdown Menu.
- Select _Answer IsNotNull and _LiveQuestionnaireID Equals as Fetch Criteria.
- Retrieve the Live Questionnaire ID from the desired Questionnaire and add it as a constant on the LiveQuestionnaire ID field.
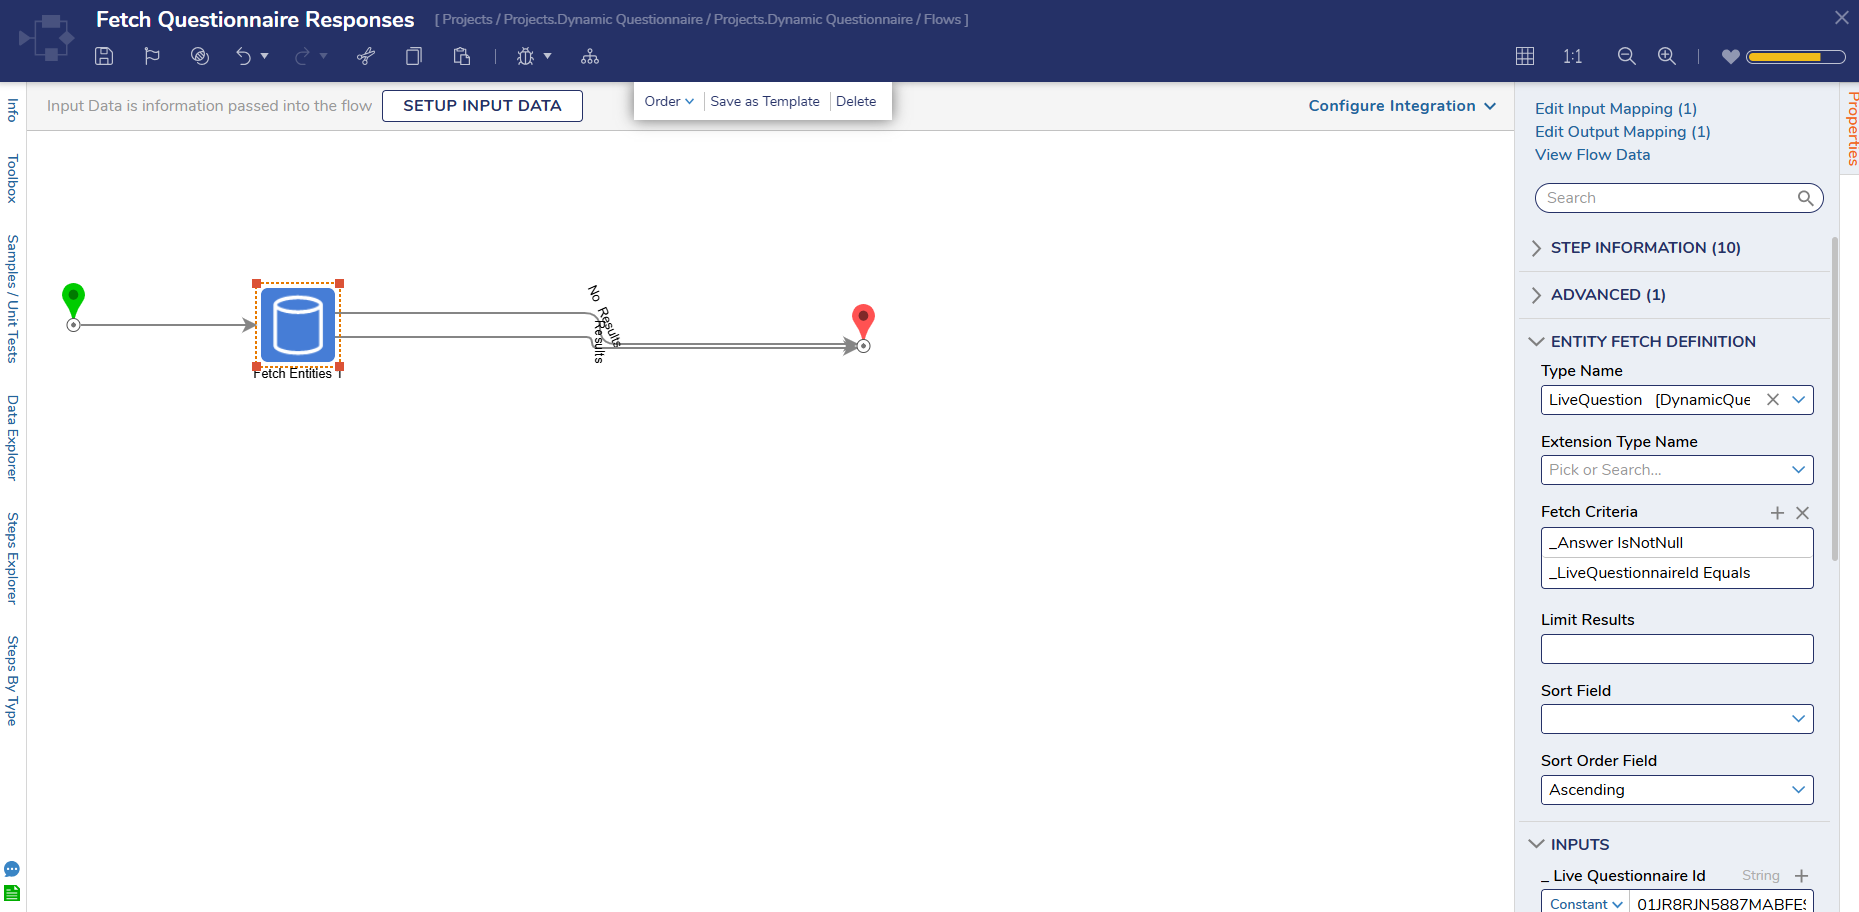
- Select Debug.
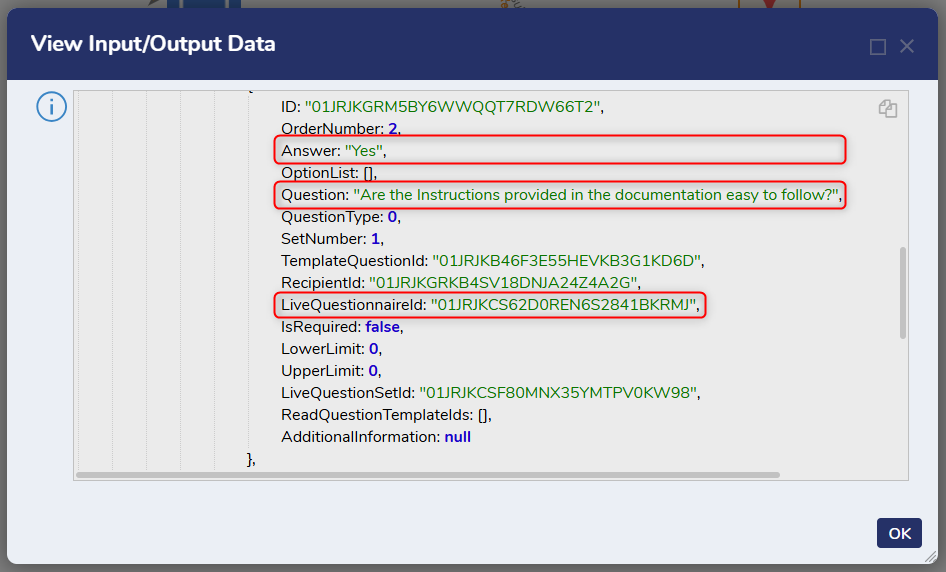
- Right-click on the Fetch Entities Step and select Output Data.
- The Flow should first output all responses (that are not null) with their corresponding questions.
Comparing Responses to an External Excel Sheet
- Users can take then take the response information from the Report or Flow Debugger Output Data and compare it alongside an external Excel sheet.
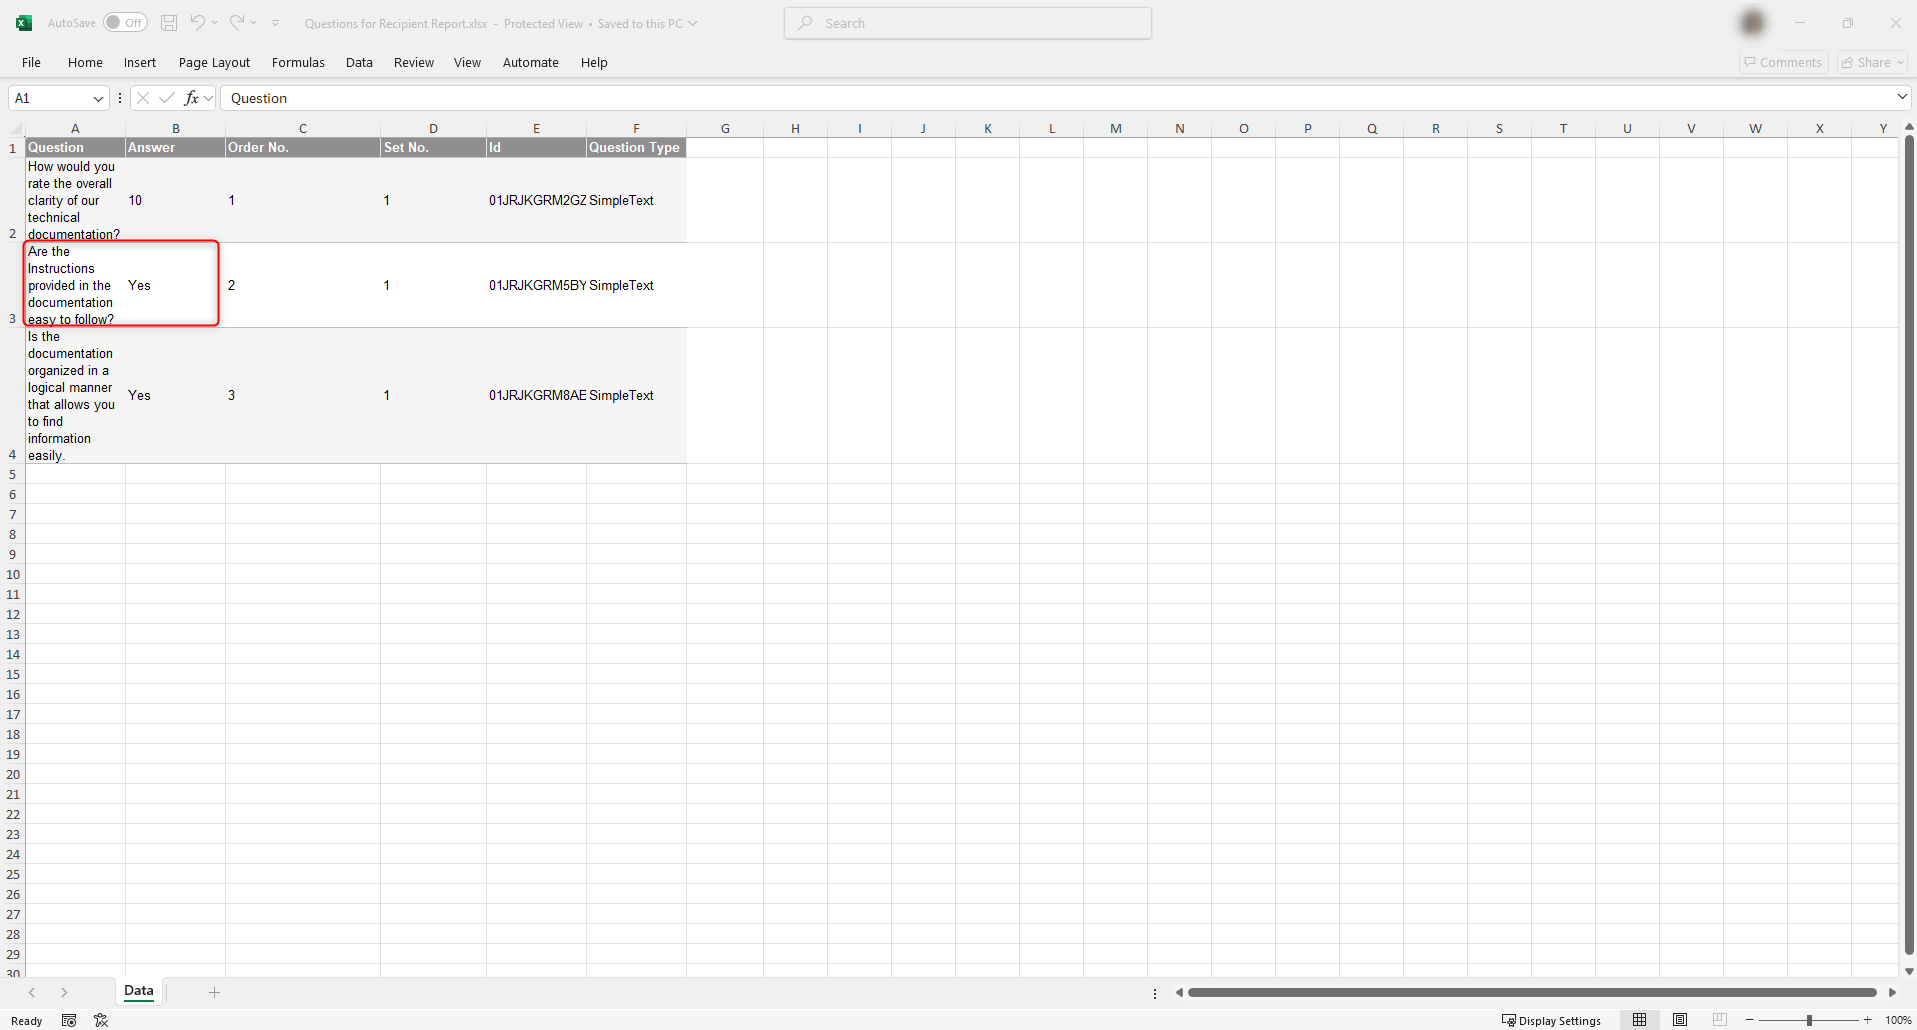 External Excel Sheet