The Email Campaign Accelerator enables Users to create and manage Email Campaigns that can be delivered regularly (weekly or monthly).
The Project includes Dashboards, Flows, and Forms that assist with adding and managing Email Campaigns and associated events. This is accomplished through pre-built Flows such as Create an Email Flow or Add a Campaign Event.
The Email Campaign Accelerator is ideal for teams across industries seeking a responsive system to generate and organize Email Campaigns.
Key Features
- Email Recipients can opt out of an email campaign and provide a reason.
- Users in the Email Campaign Admin Group can create, update, and delete an Email Campaign.
- Emails created within the Campaign are automatically delivered based on a set schedule.
Considerations & Prerequisites
- Users should have the Error Handling Accelerator installed before utilizing this Accelerator.
- After installing the Project, Users must create an admin account and add it to the Email Campaign Admin Group. Users who are a part of this group will have access to the Dashboard and associated User actions. To make an account:
- Navigate to System > Security > Accounts.
- On the top action bar, Users will have an option to create an account. From here, enter the User's Email Address and Password.
- Next, scroll down to the Select Group section.
- Select Add New and search for Email Campaign Admin. After selecting this option, click Pick.
- Select Create Account. Once this action is completed, a new account will be created and added to the Email Campaign Admin Group.
- Users must link an existing or new account to the named session. To link an account to a named session:
- Navigate within the Project folder to Email Campaign > Designer Elements > Flows.
- Right-click on the Linking New Session Flow and then click Run Flow.
- From here, a Form with a drop-down will populate. Users can select any of the accounts from the list and select Link. This action will link the selected account with a Named Session.
- The only responses collected are from recipients who opt out of a campaign. These can be found on the Opted Out Campaigns Report.
Main Flows
| Flow Name | Description | Image |
|---|---|---|
| Create Email Campaign | This Flow triggers a Form that Users can enter details regarding the new Email Campaign. After the required information has been entered a new Email Campaign will be generated. | 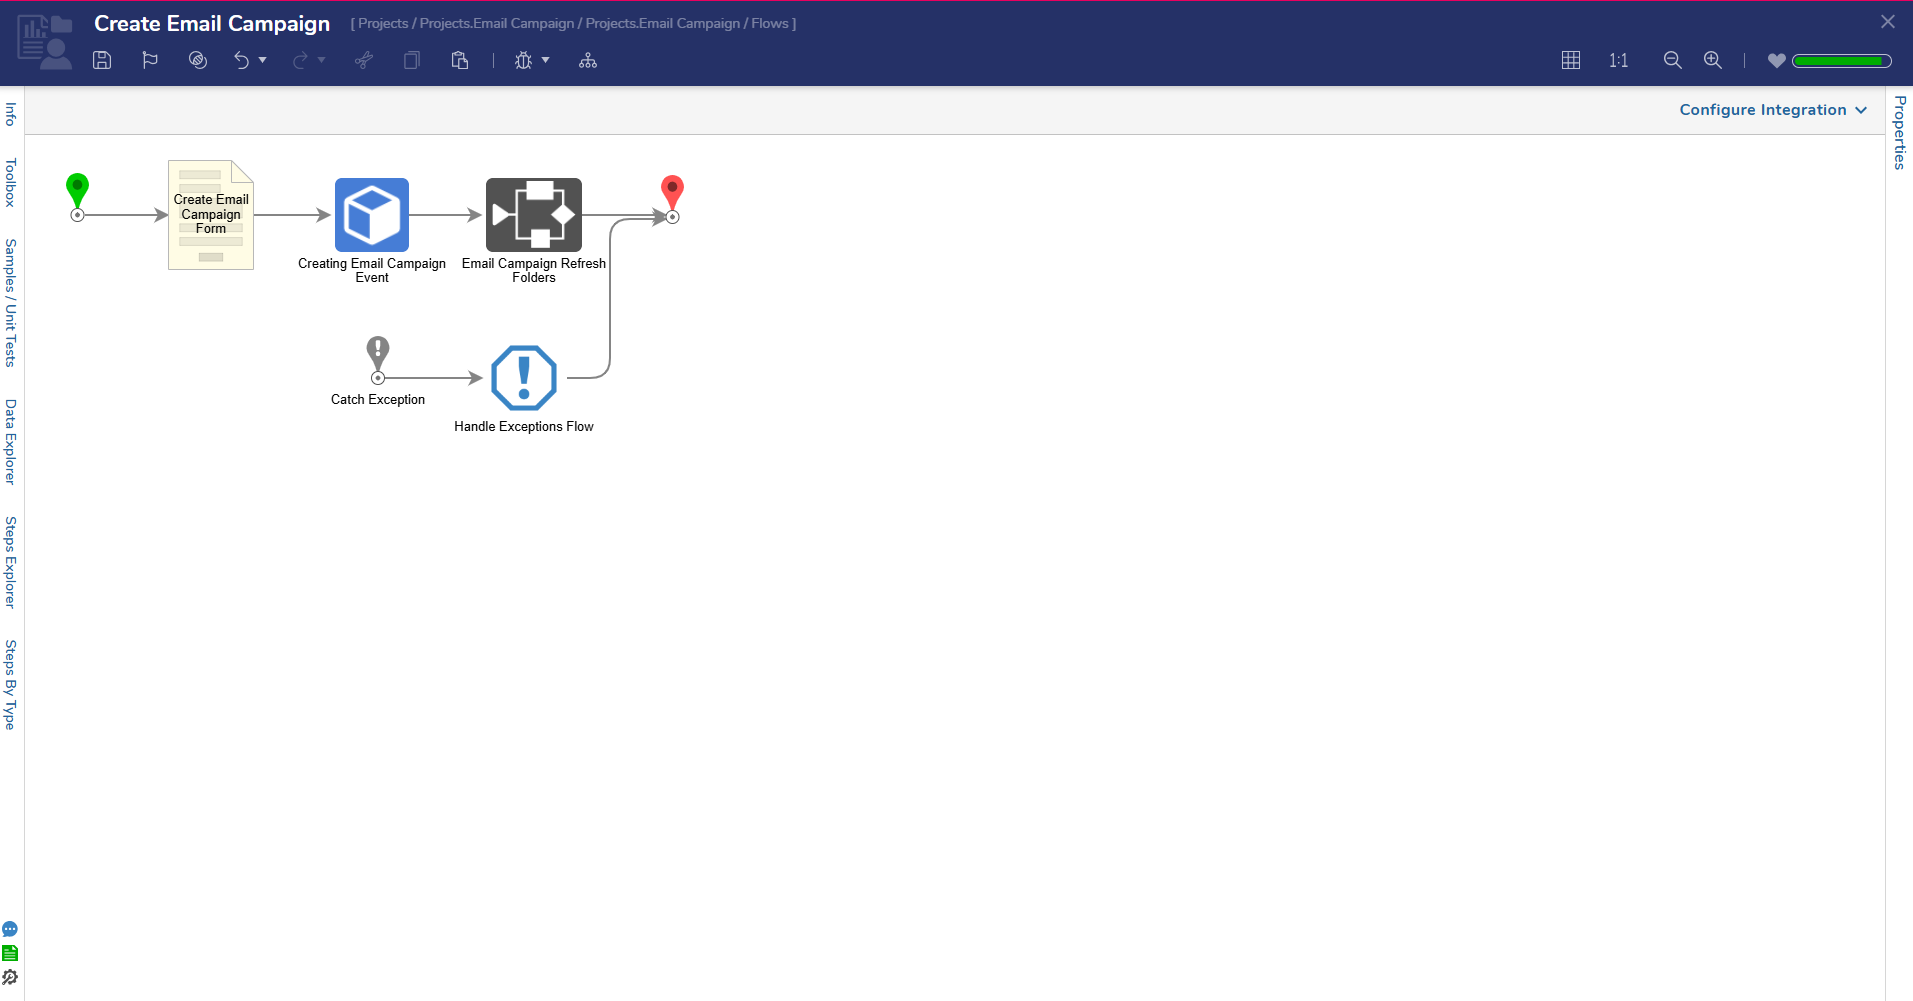 |
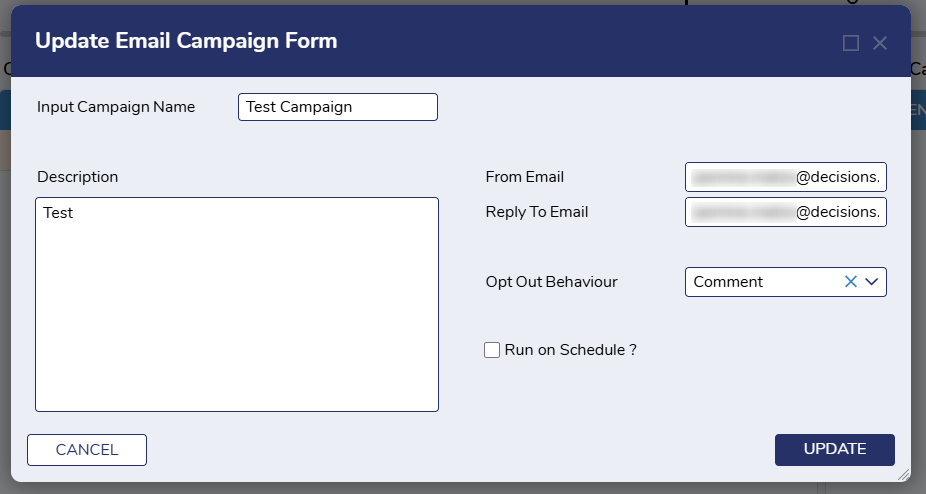
| Update Email Campaign | This Flow is a User Action Flow that populates a Form that presents details from a previously entered Email Campaign. From here, Users can edit any details to update the Email Campaign. |  |
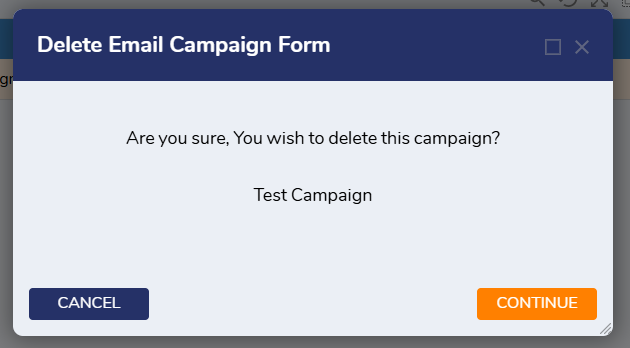
| Delete Email Campaign | This Flow is a User Action Flow that prompts Users with a message confirming if the selected Email Campaign should be deleted. |  |
| Add Campaign Event | This User action flow presents a Form enabling Users to enter details needed to create a new Campaign event. This is also where Users will set the email that the Campaign will send. |  |
| Update Event | The Update Event Flow is a User action that triggers a Form allowing Users to review previously entered details regarding an Email Campaign. From here, Users will be able to update desired details and save the information by clicking the Campaign Event. |  |
| Delete Event | The Delete Event Flow is a User action that presents a Form asking Users to confirm whether the desired Email Campaign should be deleted. | 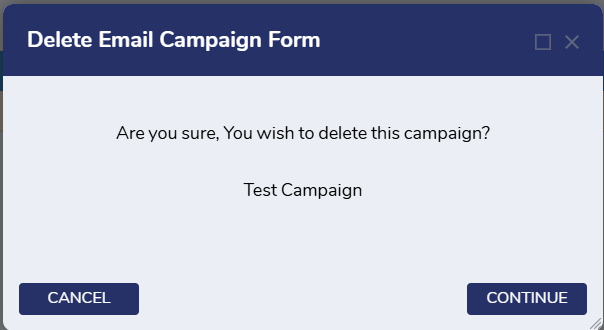 |
| Weekly Campaign Scheduled Job | The Weekly Campaign Scheduled Job Flow runs daily. This Flow fetches all Email Campaigns that have a weekly schedule, cycles through each one, and determines whether or not it has been seven or more days from the last run date. If this is true, the Flow will launch an assignment and deliver it to Users in the Email Campaign User Group. Once an Admin completes the assignment, an Active Campaign will be launched, and emails will be delivered. | 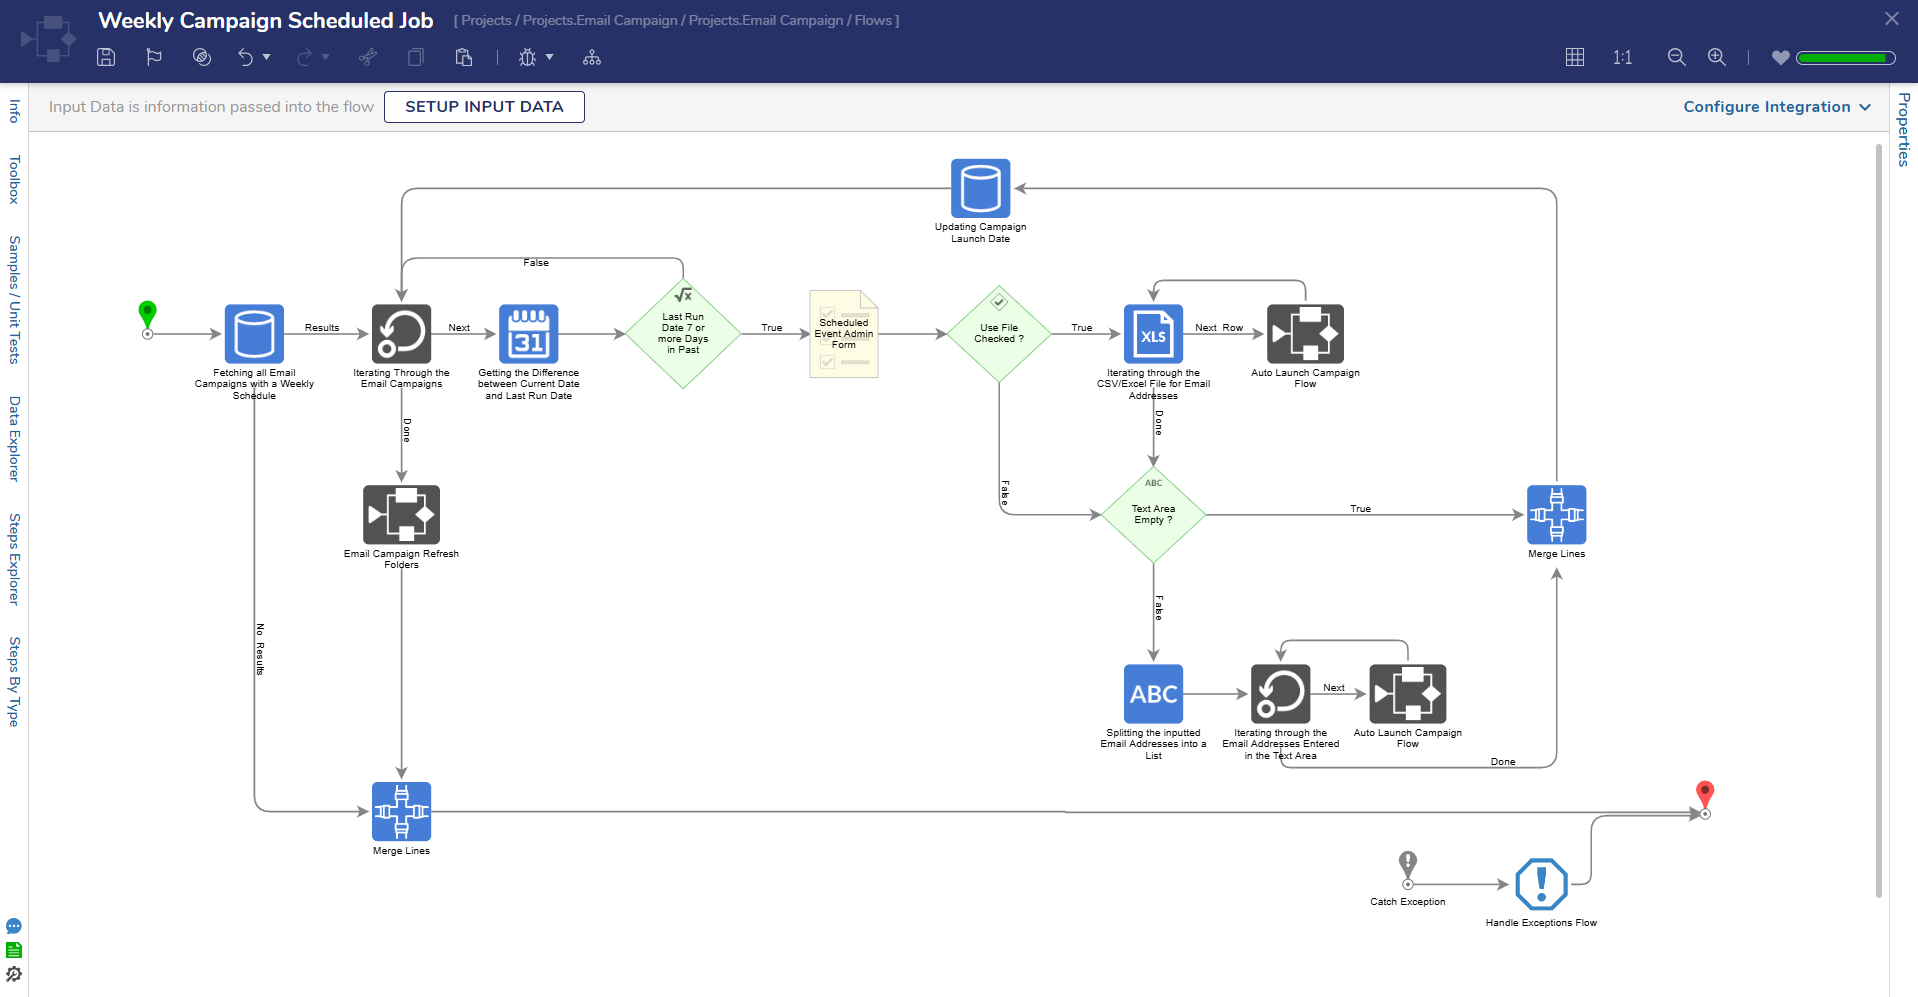 |
| Monthly Campaign Scheduled Job | This Flow is a Scheduled Job that runs daily. The Scheduled Job fetches all Email Campaigns that have a monthly schedule, cycles through them, and then checks whether it has been 30 or more days from the last run date. If this is confirmed, it will launch an assignment that is delivered to Users in the Email Campaign Admin Group. Once the assignment is completed by an Admin an Active Campaign will be launched and emails will be sent. | 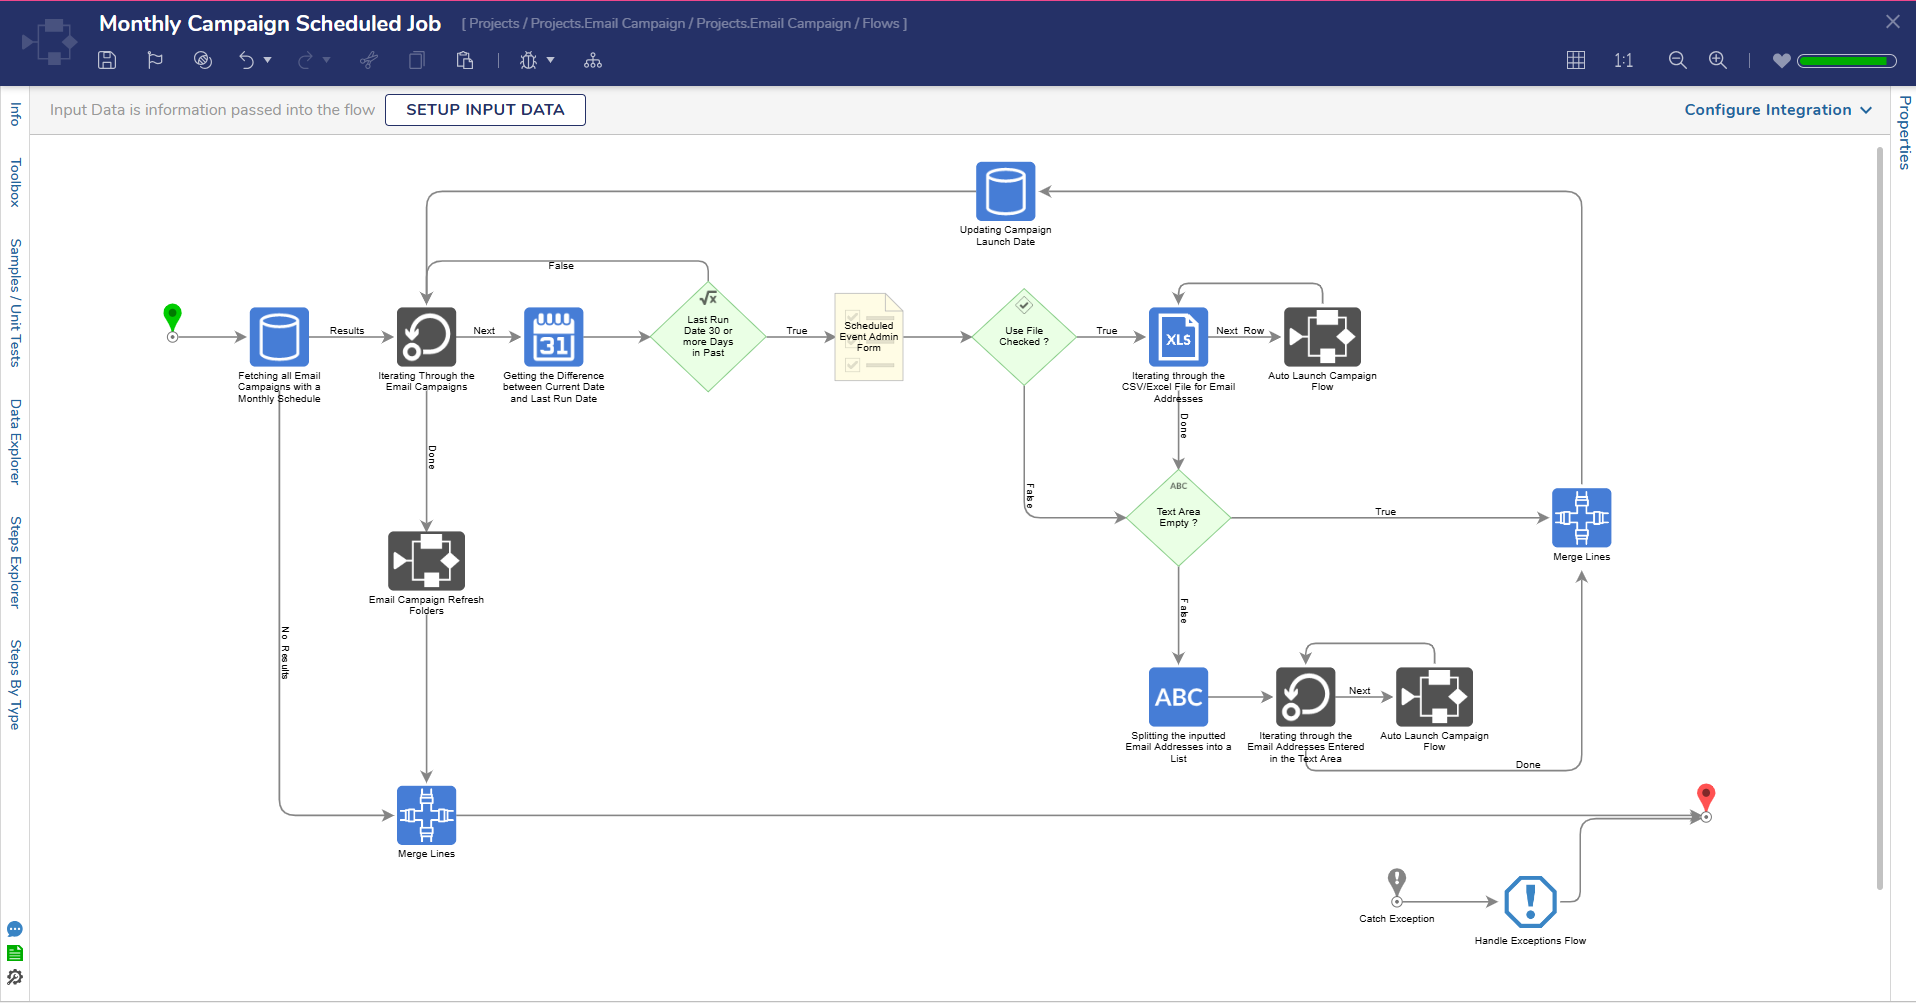 |
| Event Reminder Scheduled Job | This Flow is a Scheduled Job that runs daily. The Scheduled Job fetches all Active Campaigns that have not been closed, cycles through them, and then checks whether associated Users have opted out of the Campaign. If this is true, the Flow will fetch the Current Event Details of the Active Campaign and check whether a reminder email needs to be sent to the User. The Active Campaign will then be updated. | 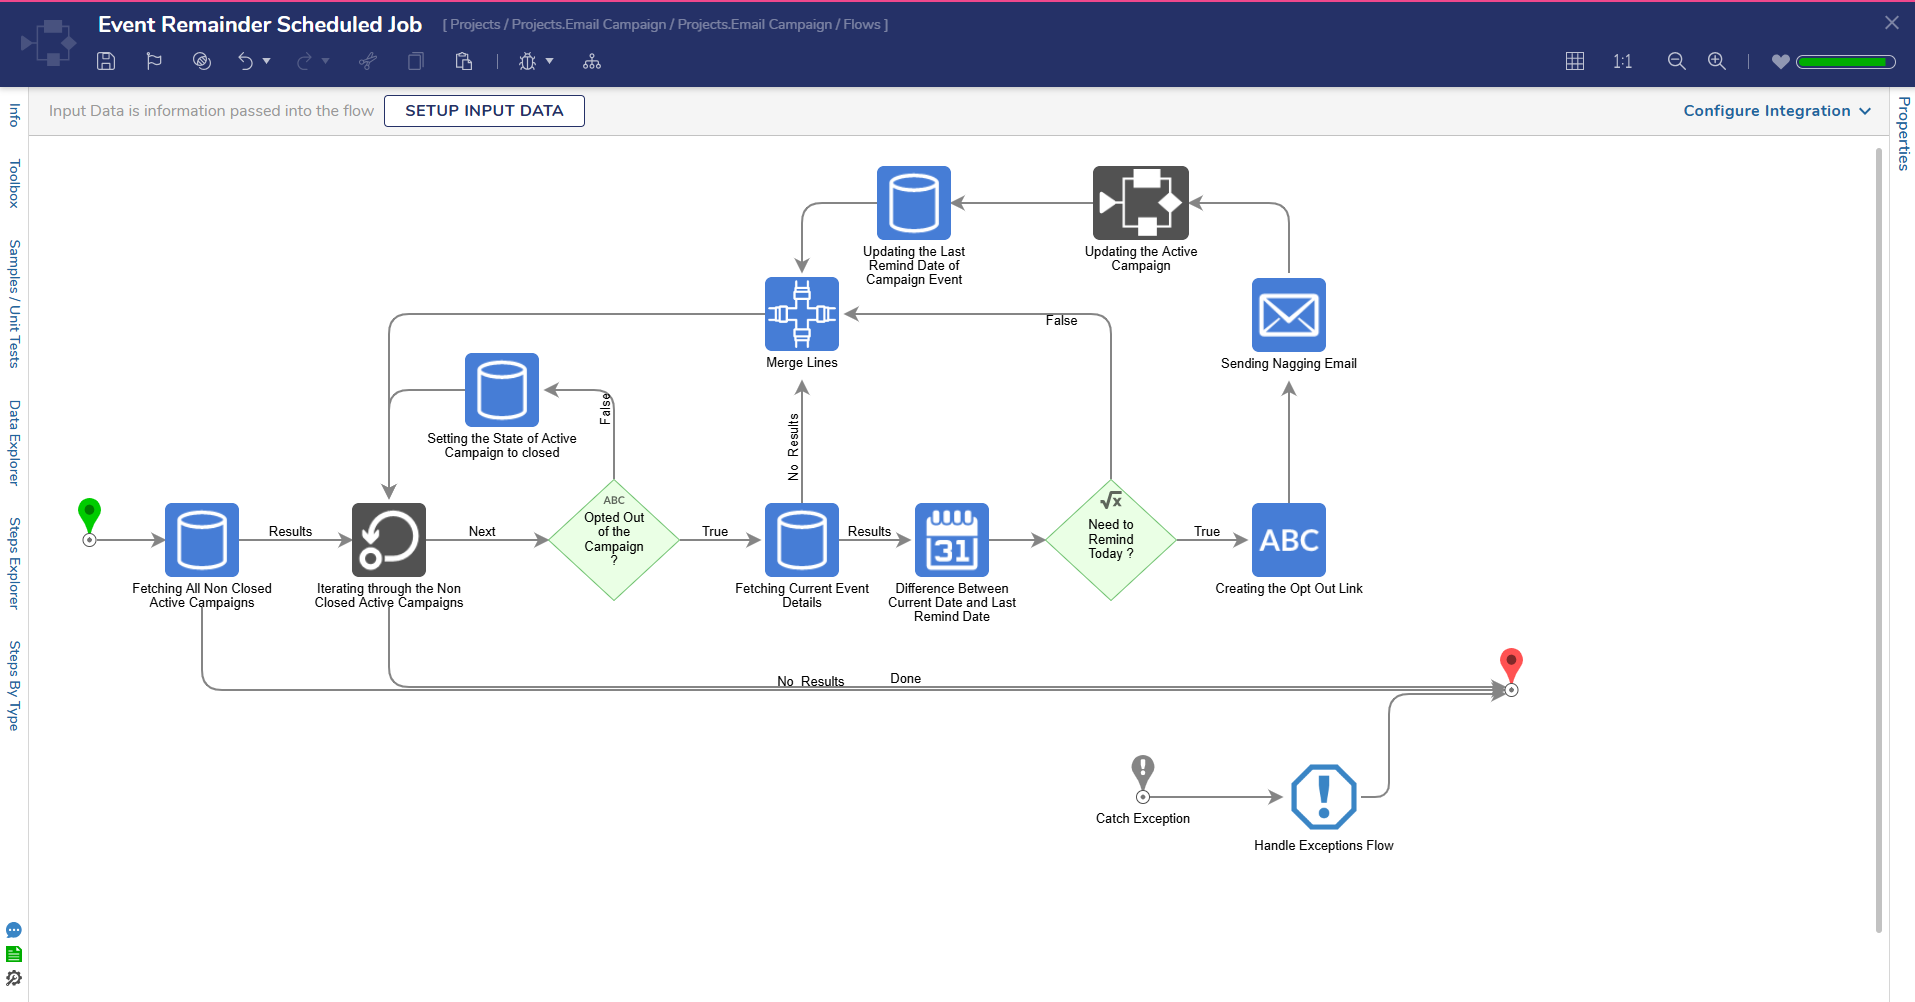 |
Key Flows
| Flow Name | Description | Image |
|---|---|---|
| Auto Launch Campaign Flow | This Flow enables Users to quickly launch a Campaign by taking in the Campaign ID and email address for one recipient. | 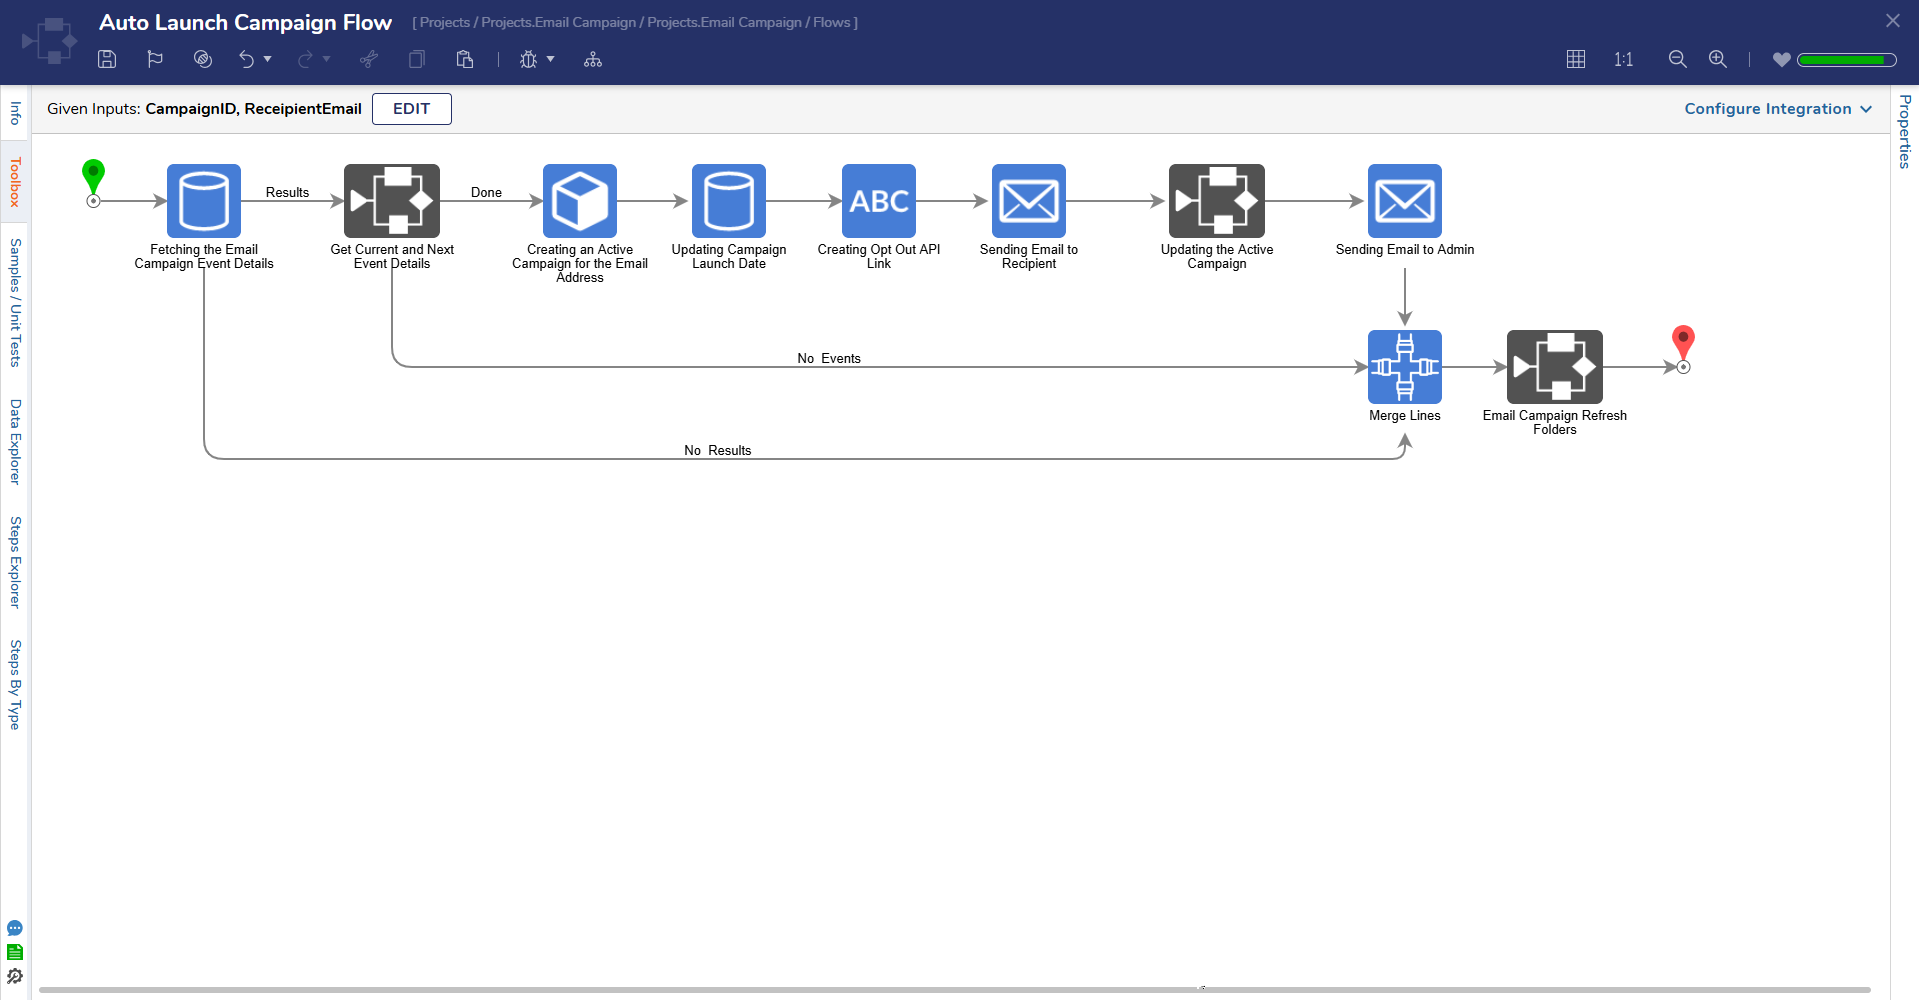 |
| Launch Campaign | This Flow triggers the Launch Campaign Form, enabling Users to select a created Email Campaign, add email recipients, and choose the Event start date. Once the required details have been added, Users can then launch the Campaign. | 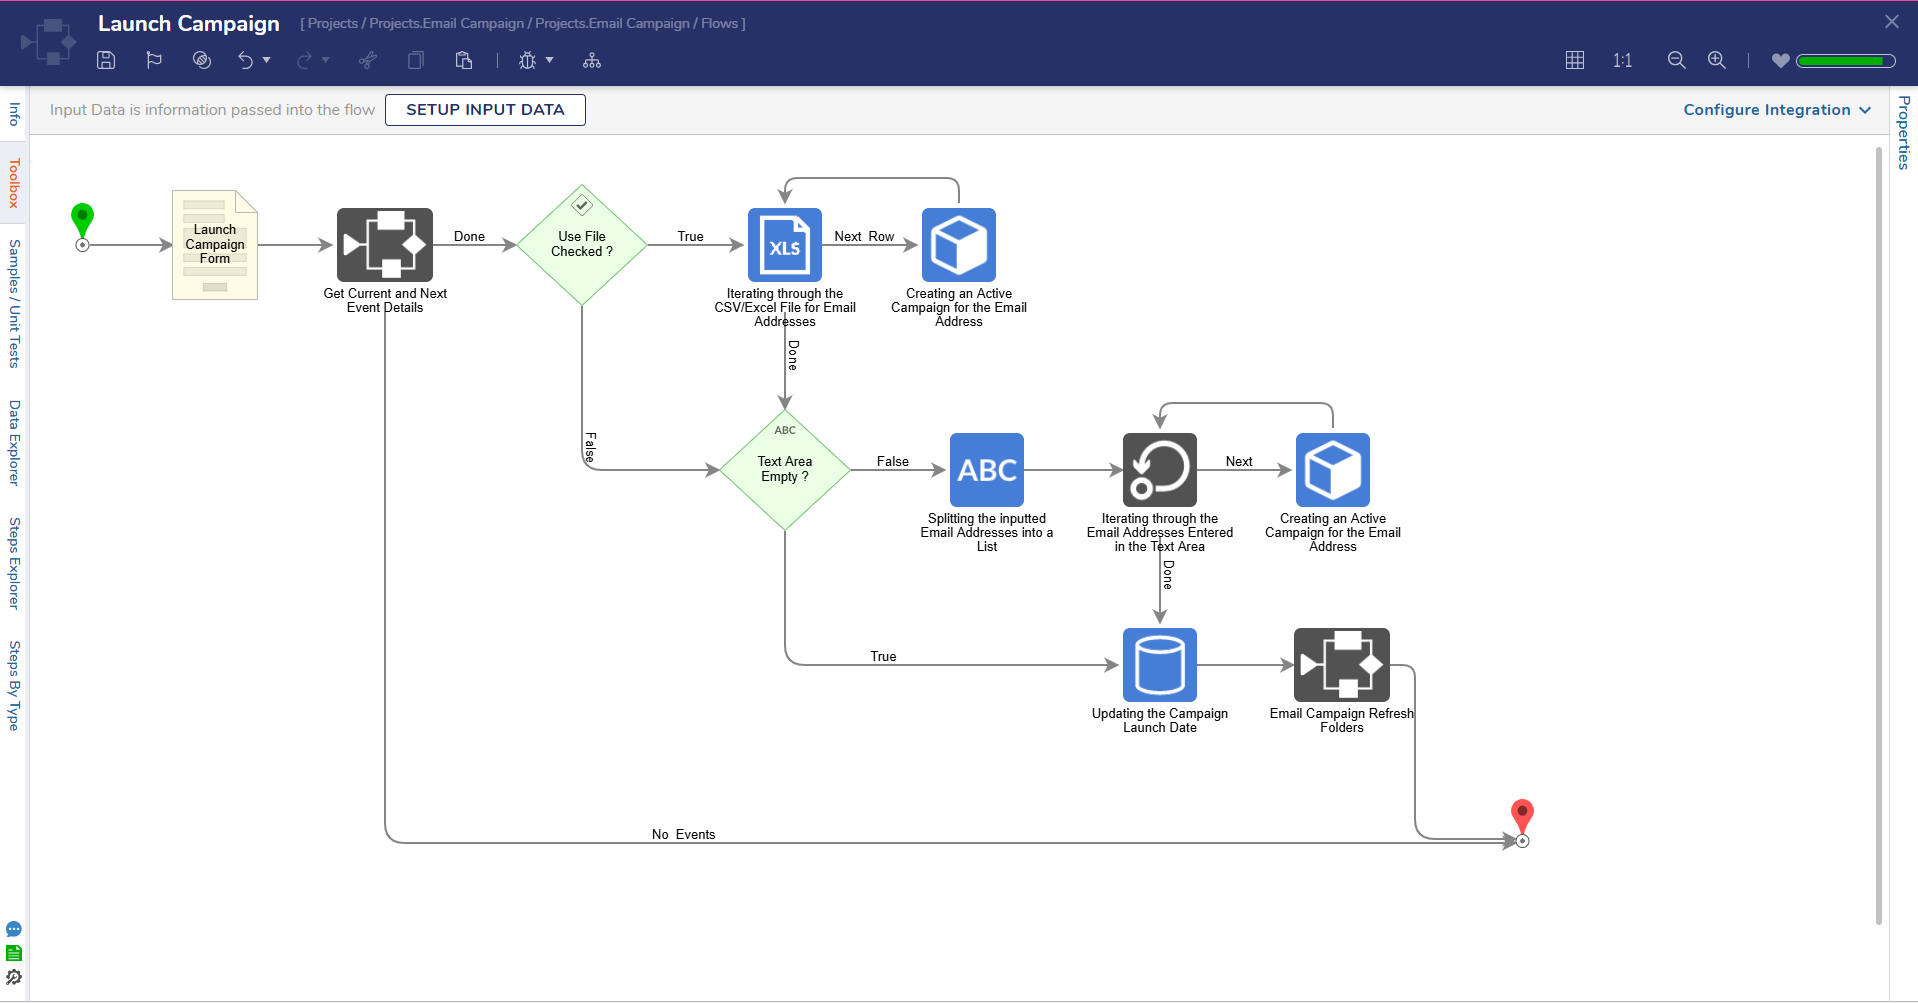 |
Dashboards and Pages
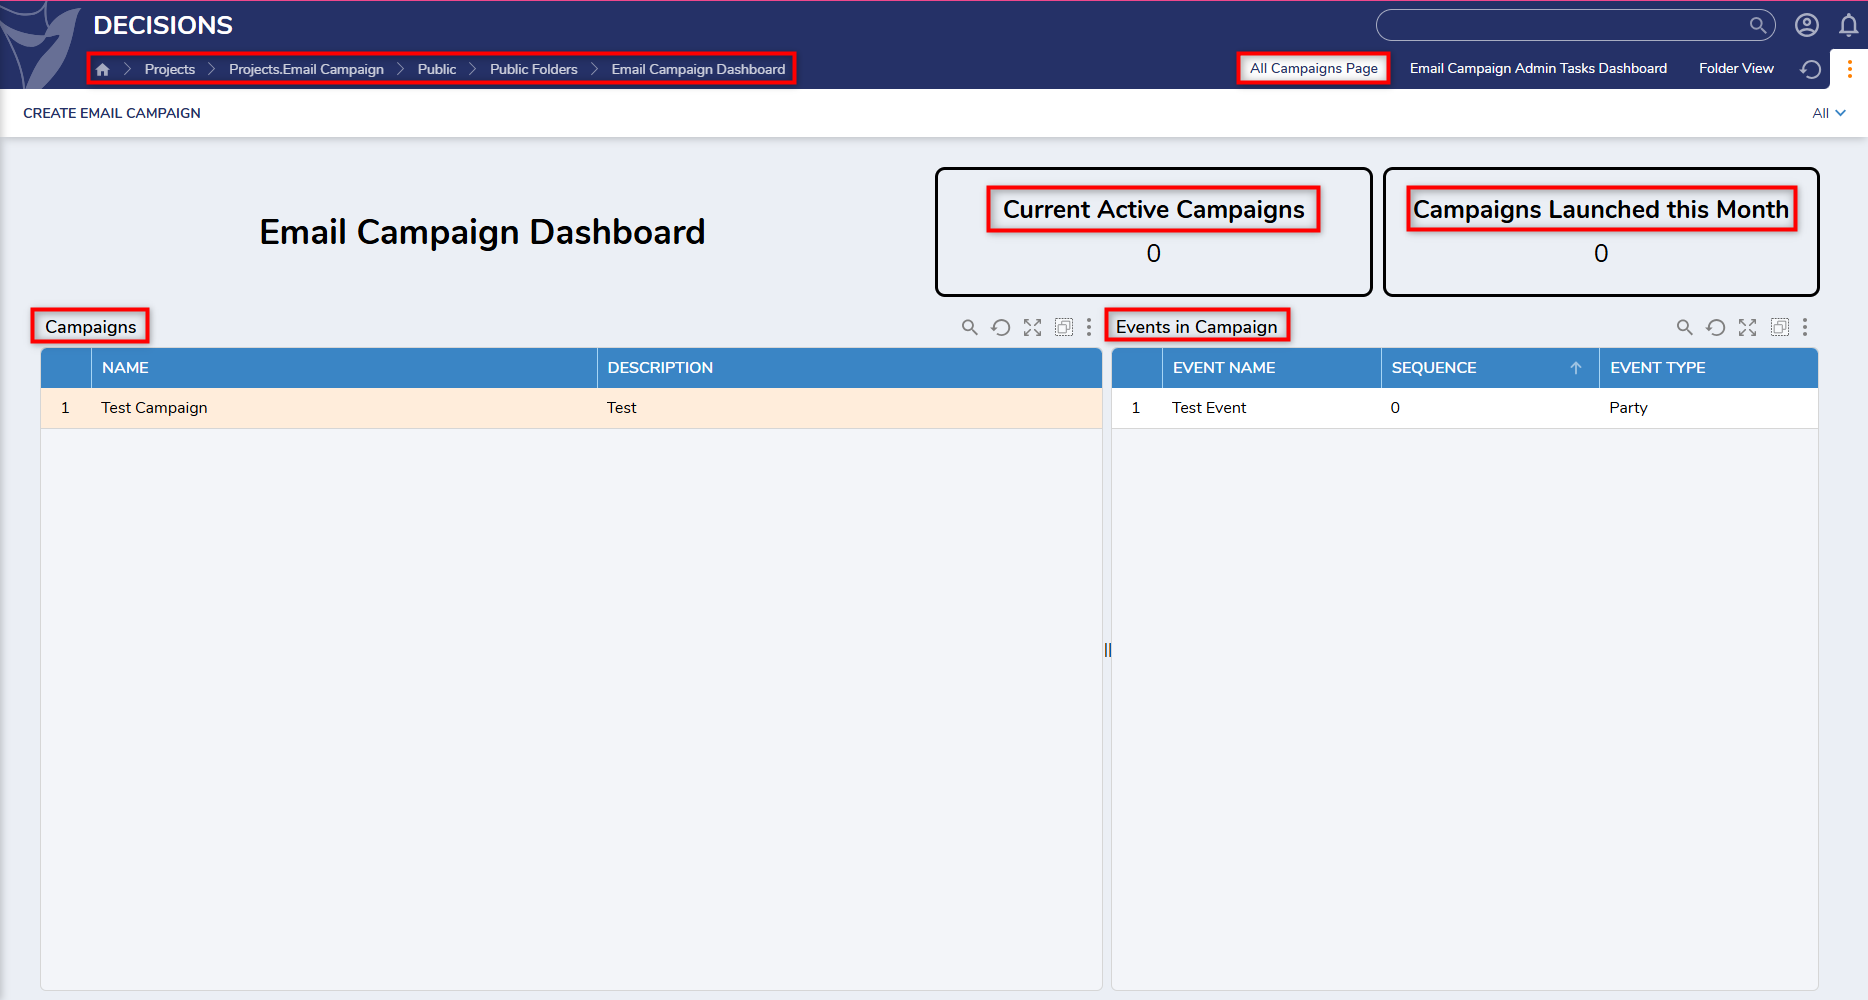
All Campaigns Page
This Dashboard displays a Report of campaigns, with the Campaign Name and Description, and a tile that displays the current number of Active Campaigns and Campaigns Launched This Month. The Dashboard also displays an Events in Campaign Report, with the Event Name, Sequence, and Event Type.
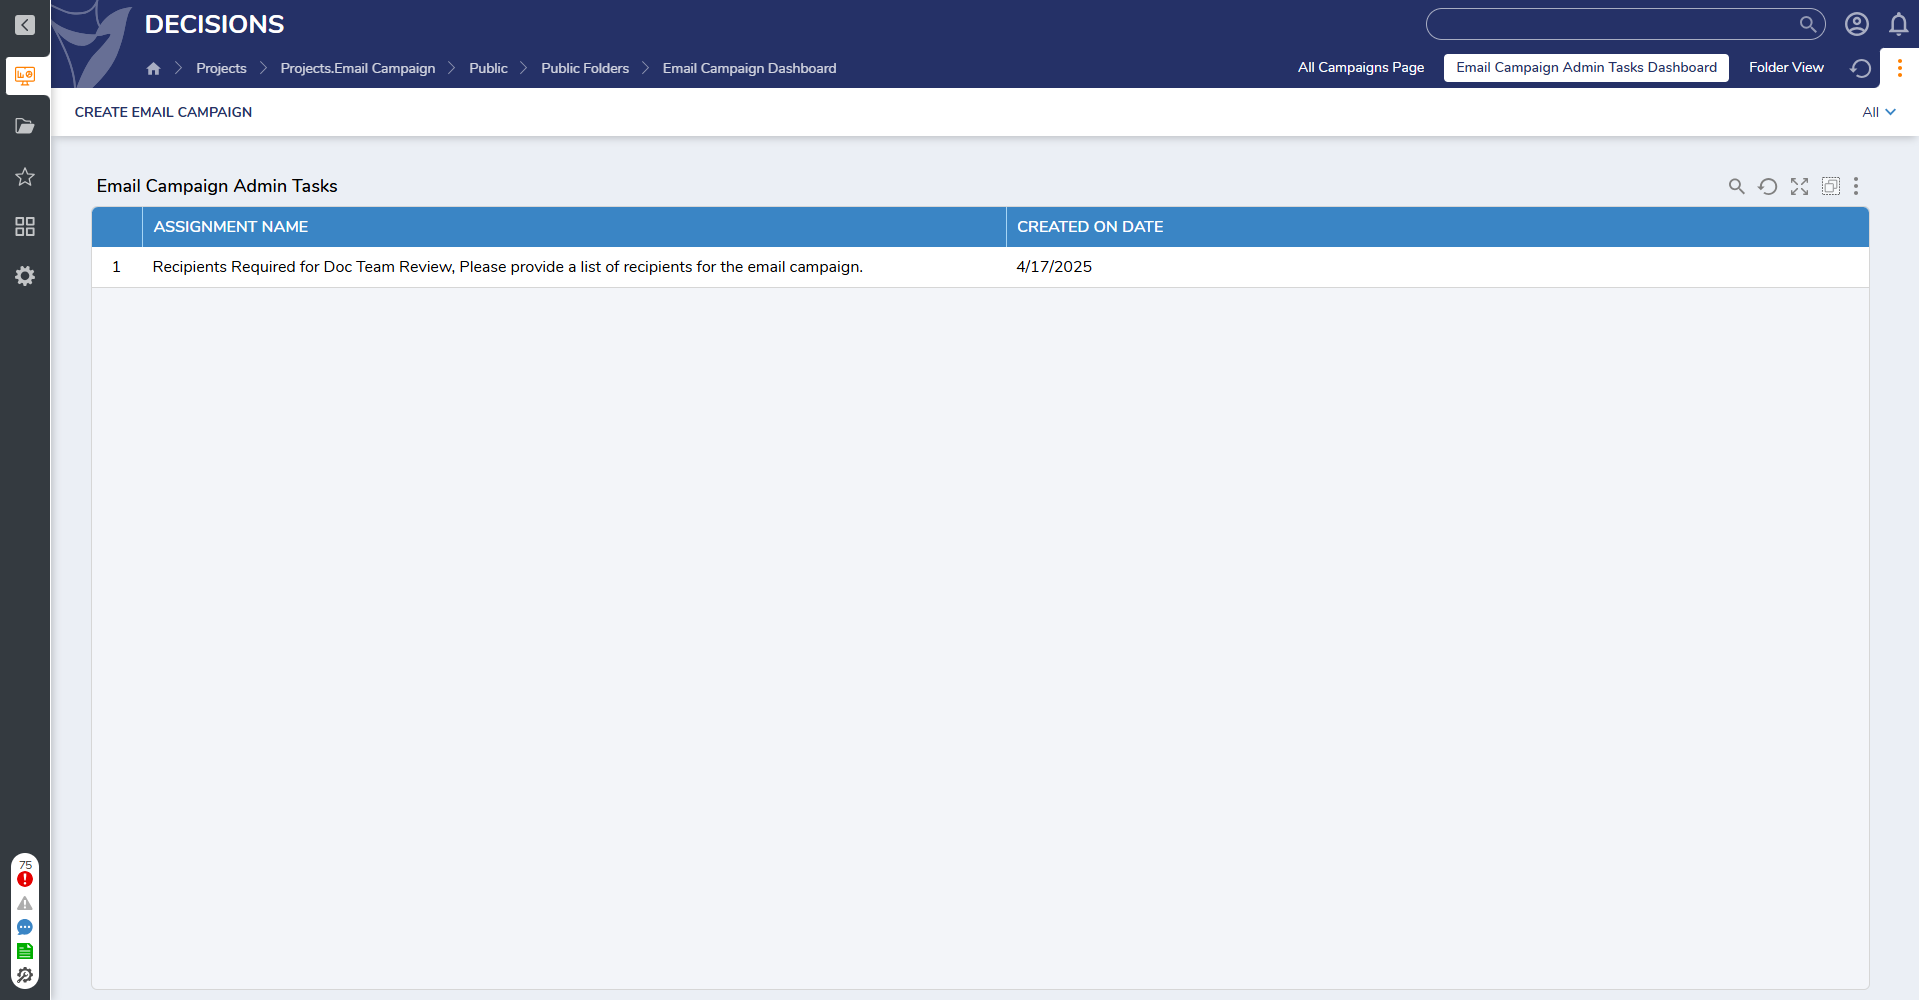
Email Campaign Admin Tasks Dashboard
This Dashboard displays assignments created for Users in the Email Campaign Admin Group to provide a list of email recipients for Active Email Campaigns. This Report contains assignments that have not been completed yet.
.png)
How to Use Email Campaign
Creating an Email Campaign
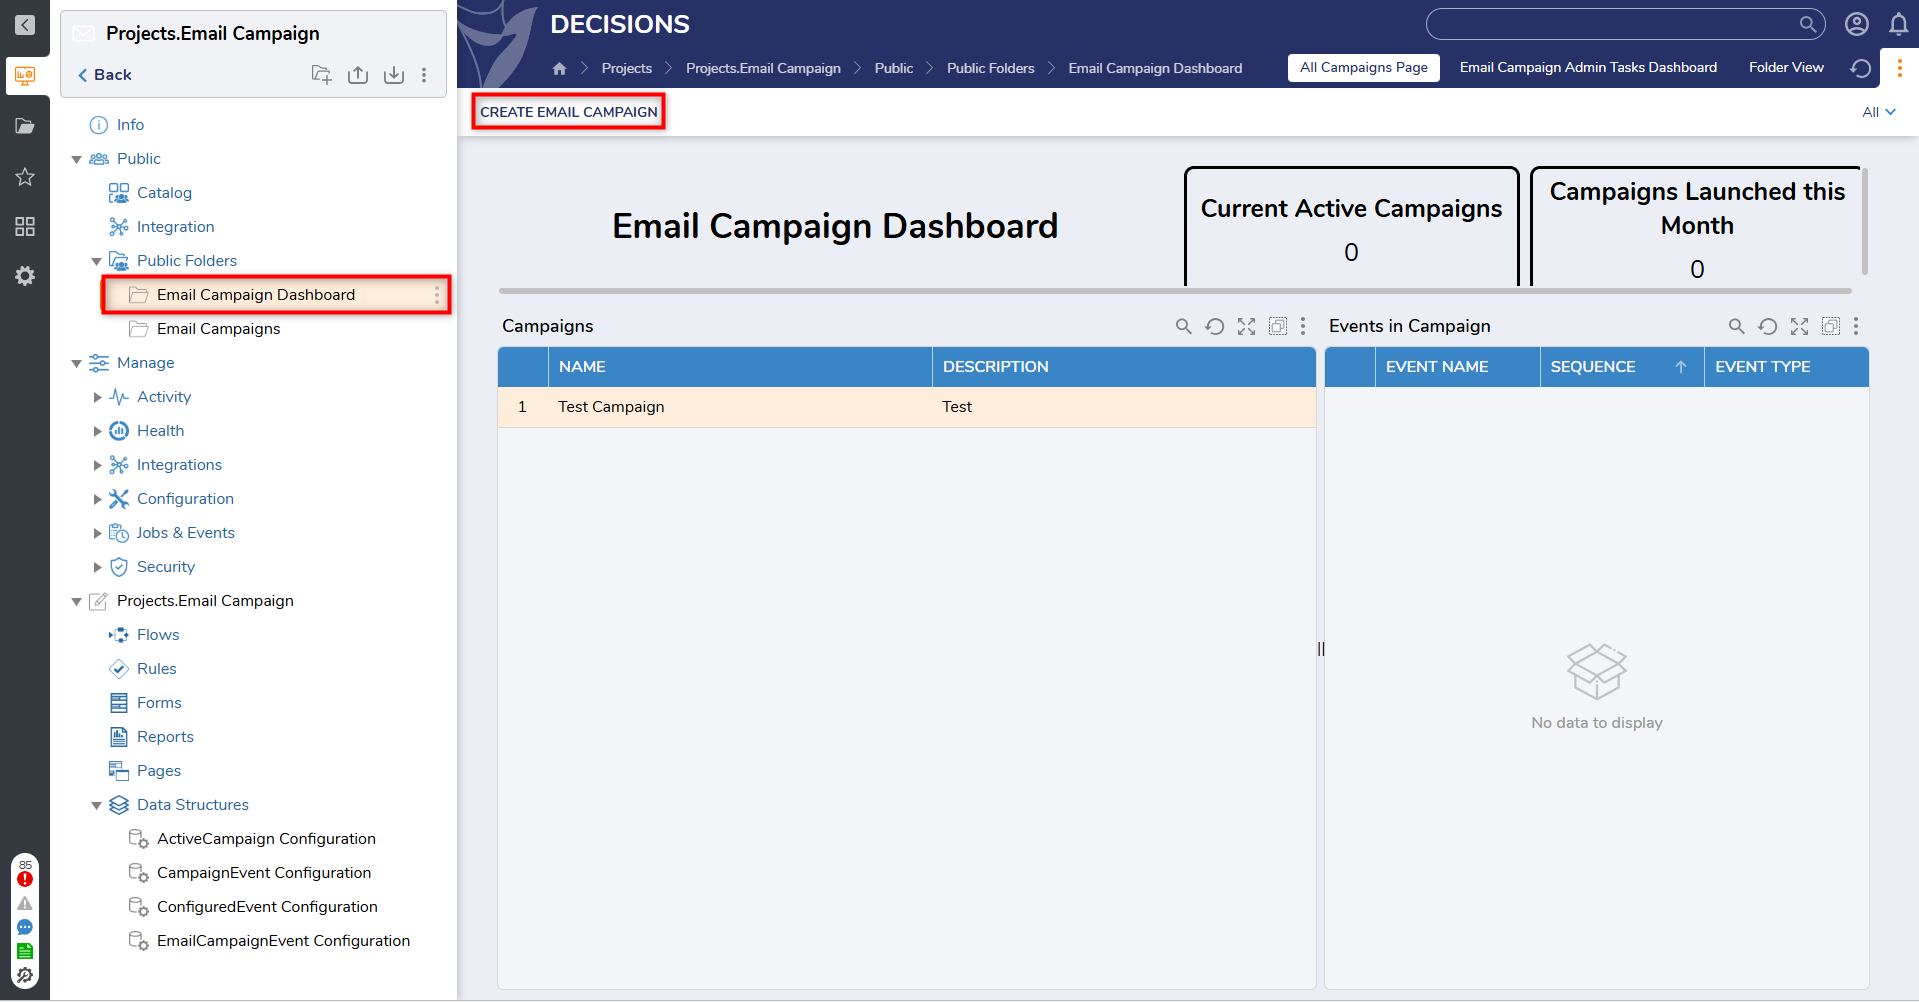
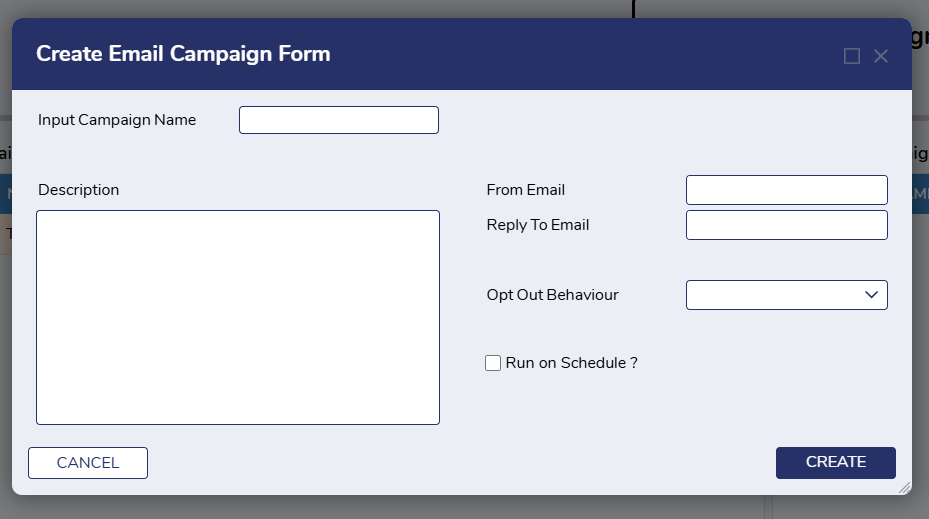
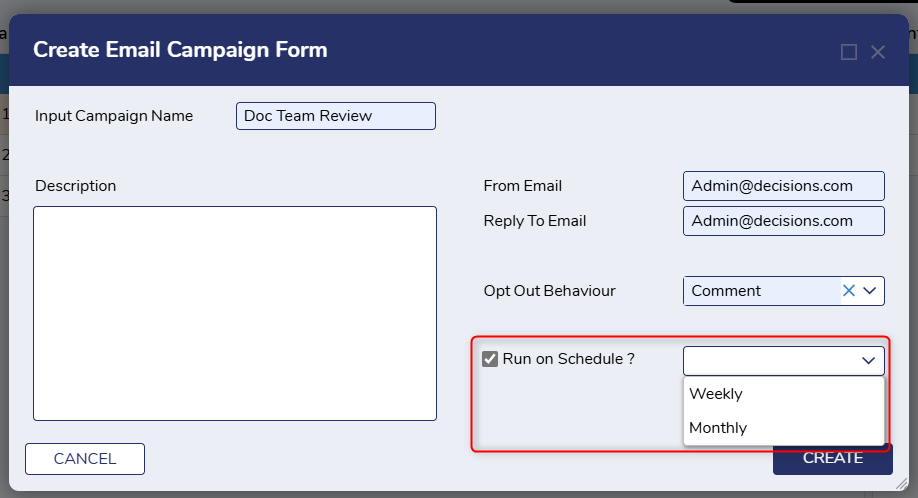
- To create an Email Campaign, navigate to the Email Campaign Dashboard and select Create Email Campaign.
- From here, fill out the required details and select Create to save the information.
- Users can set the email that delivers the Email Campaign and the recipient's email within this Form.
- The Email Campaign will now be visible in the Campaigns Report on the Dashboard.
Update Email Campaign
- To update an Email Campaign, right-click on the desired Email Campaign in the Campaigns Report and select Update Email Campaign.
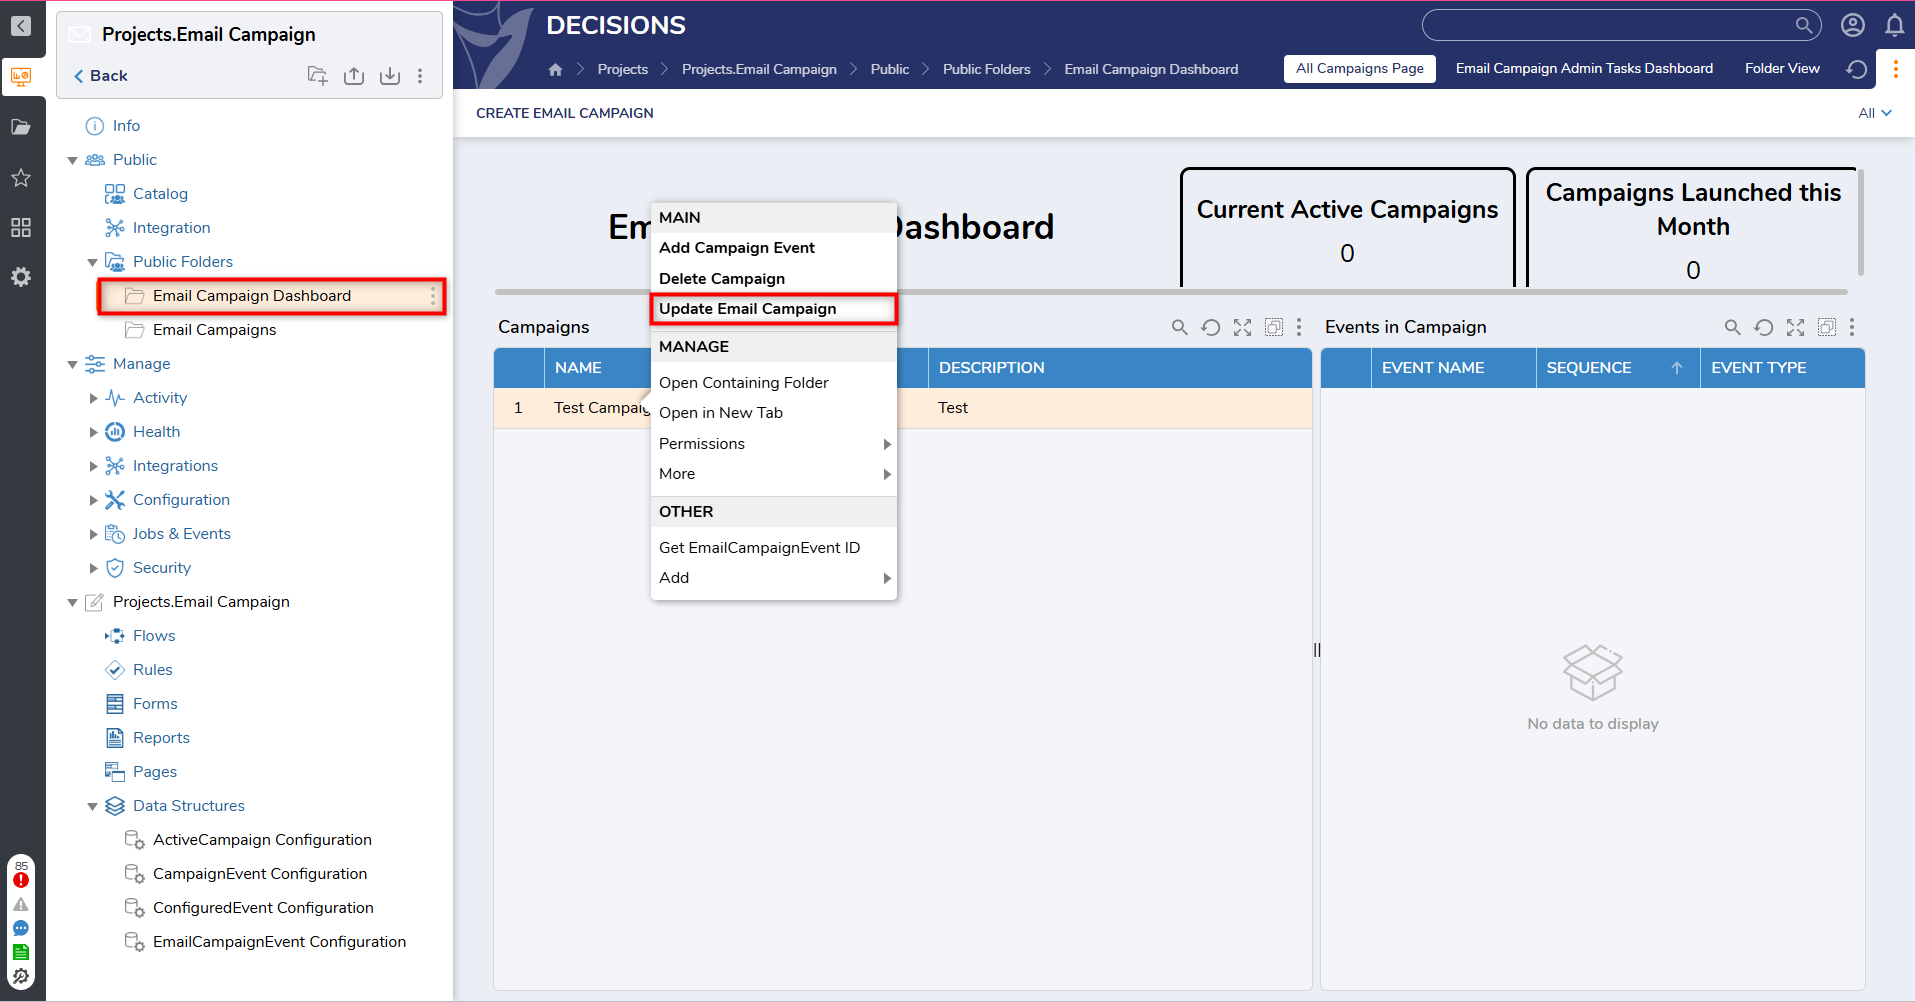
- From here, a Form will populate with previously entered details about the selected Email Campaign. Make any desired changes to the fields and select Update to save the changes.
Deleting an Email Campaign
- To delete an Email Campaign, right-click on the desired Email Campaign from the Campaigns Report.
- This action will trigger a confirmation message, enabling Users to delete the selected Email Campaign.
- Select continue to proceed with deleting the selected Email Campaign.
- This will delete the selected Email Campaign as well as any associated Campaign Events.
- Select continue to proceed with deleting the selected Email Campaign.
Add Campaign Event
- To add a Campaign Event within an Email Campaign, right-click on the Email Campaign in which you would like to add a Campaign Event.
- Select Add Campaign Event.
- From here, a Form will populate enabling Users to add details for the Campaign Event.
- Select Create to save entered information as a new Campaign Event.
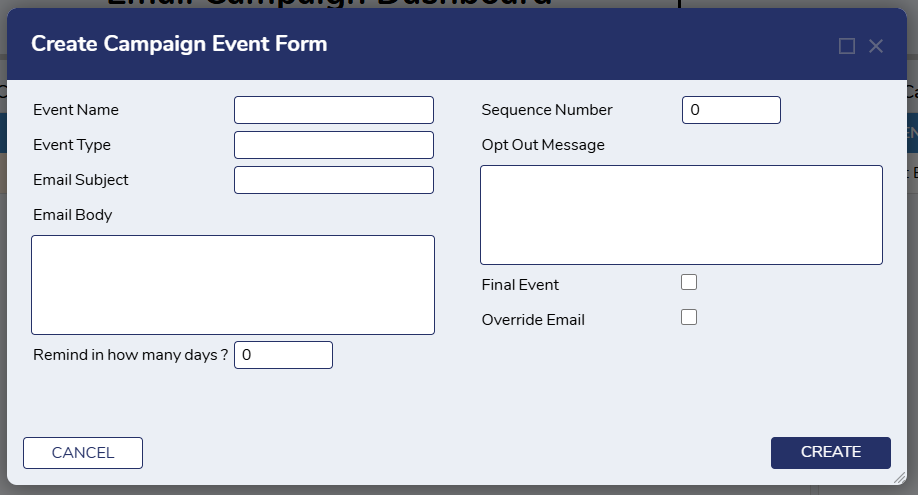
- Users can view all created Campaign Events by navigating to the Events in Campaign Report.
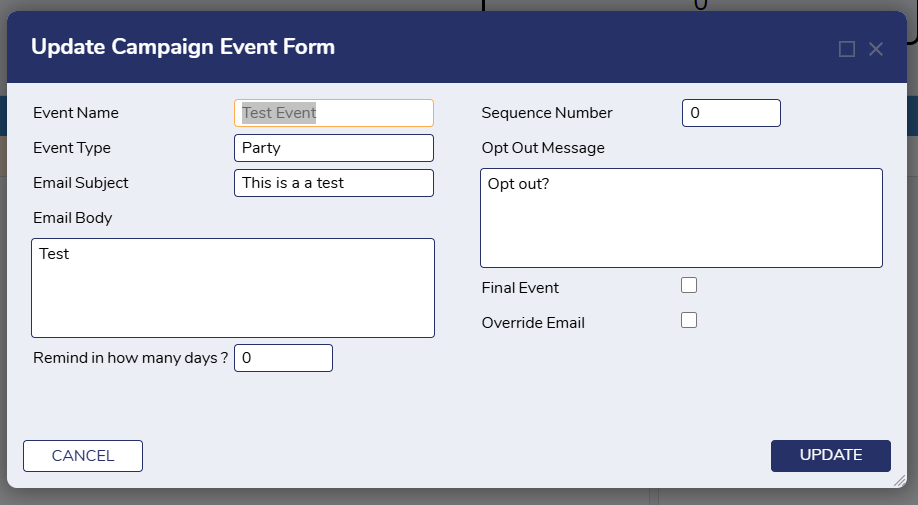
Updating an Event
- To update a Campaign Event, right-click on a desired Campaign Event within the Campaign Report and select Update Event.
- This action will populate a Form enabling Users to review previously submitted details and make any desired changes. Once the desired fields have been updated, select Update to save any changes.
Deleting an Event
- To delete a Campaign Event, right-click on a desired Campaign Event within the Campaign Report and select Delete Event.
- A confirmation message will appear asking Users if the desired event should be deleted.
- Select Continue to move forward with the action or select Cancel.
Launching a Campaign Event
- Users can launch a Campaign Event by running the Auto Launch Campaign Flow, the Launch Campaign Flow, or through the Email Campaign Dashboard.
- This is where Users will set the recipients and their respective emails for the Campaign Event.
Utilizing the Auto Launch Campaign Flow to Launch a Campaign Event
- To launch a Campaign Event through the Auto Launch Campaign Flow, copy the Campaign ID from the Campaign that will be launched and enter an email address for the Recipient.
.png)
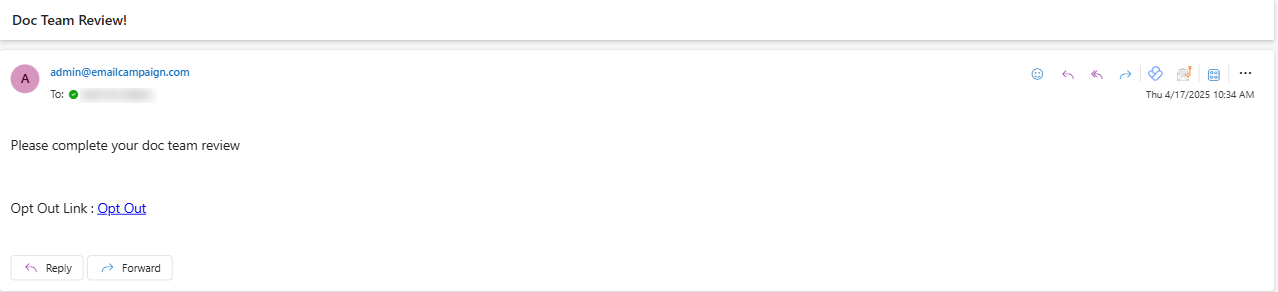
- This action will launch the Campaign and notify the selected recipient via email.
- After the email is sent to the recipient, a confirmation email will also be sent to associated users in the Admin Group.
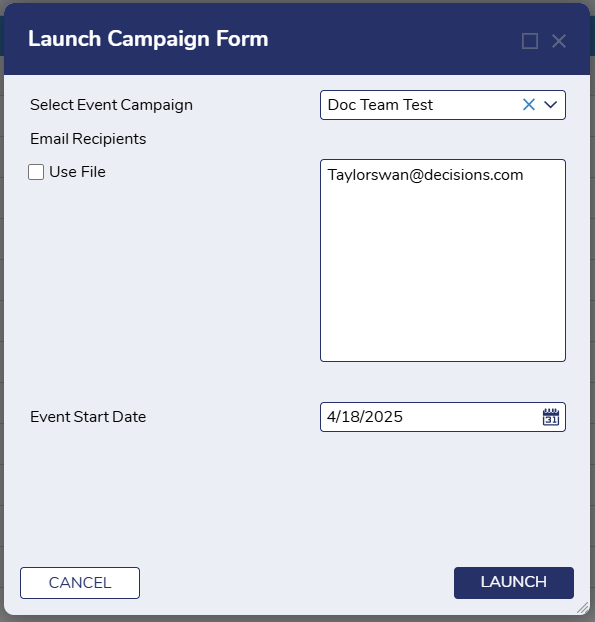
Utilizing the Launch Campaign Flow to Launch a Campaign Event
- Users can launch a Campaign Event by running the Launch Campaign Flow.
- From here, select the desired Campaign Event from the Dropdown Menu, add Recipients, and choose the Event start date.
- This method allows multiple email recipients to be entered manually or by uploading a file.
- Only XLSX and CSV Files can be uploaded.
- Select Launch once the required fields have been updated.
- The Flow will deliver notifications to selected recipients and send a confirmation message to the Admin.
- This method allows multiple email recipients to be entered manually or by uploading a file.
- From here, select the desired Campaign Event from the Dropdown Menu, add Recipients, and choose the Event start date.
Launching a Campaign Event with the Email Campaign Dashboard
- To launch a Campaign Event through the Email Campaign Dashboard, navigate to the Email Campaign Admin Tasks Dashboard.
- This method assumes a Campaign Event has been created with the Run on Schedule box checked. Users can choose to run the event on either a weekly or monthly schedule.
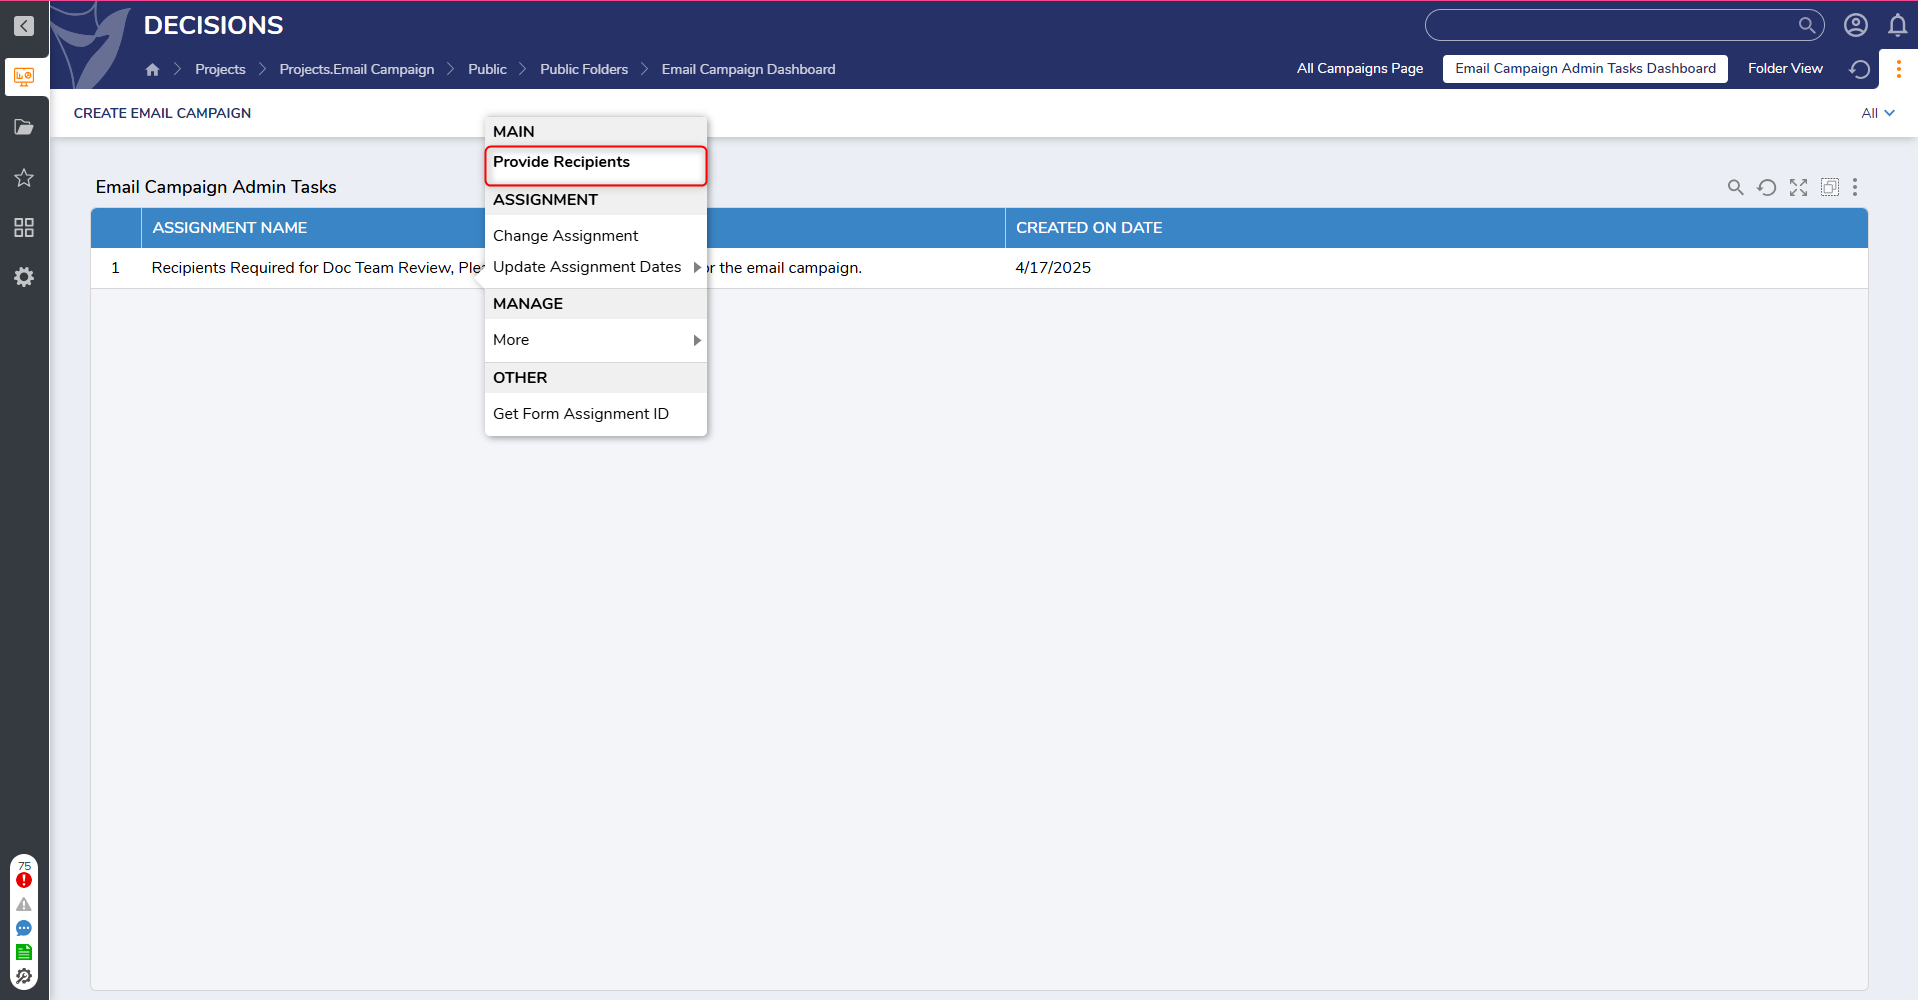
- To launch a Campaign Event through the Email Campaign Dashboard, navigate to the Email Campaign Admin Tasks Page.
- From here, right-click on the Assignment for the Campaign Event that will be launched and select Provide Recipients.
- This action will populate the Launch Campaign Form.
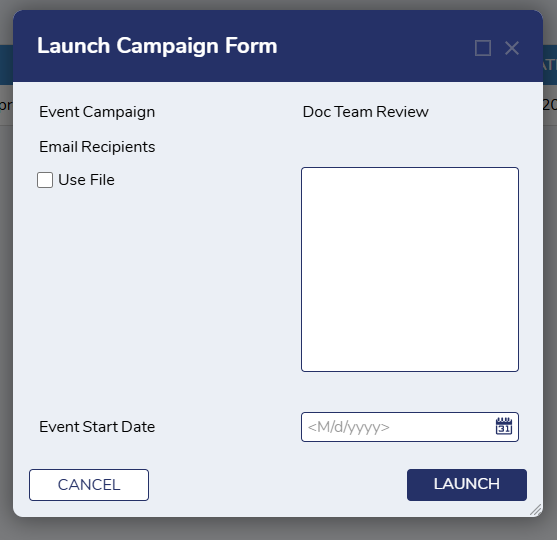
- Verify that the Event Campaign name is correct before manually adding email addresses for recipients or uploading a file.
- Please note that only XLSX or CSV files can be uploaded here.
- Choose an Event start date and select Launch to launch the Campaign Event.
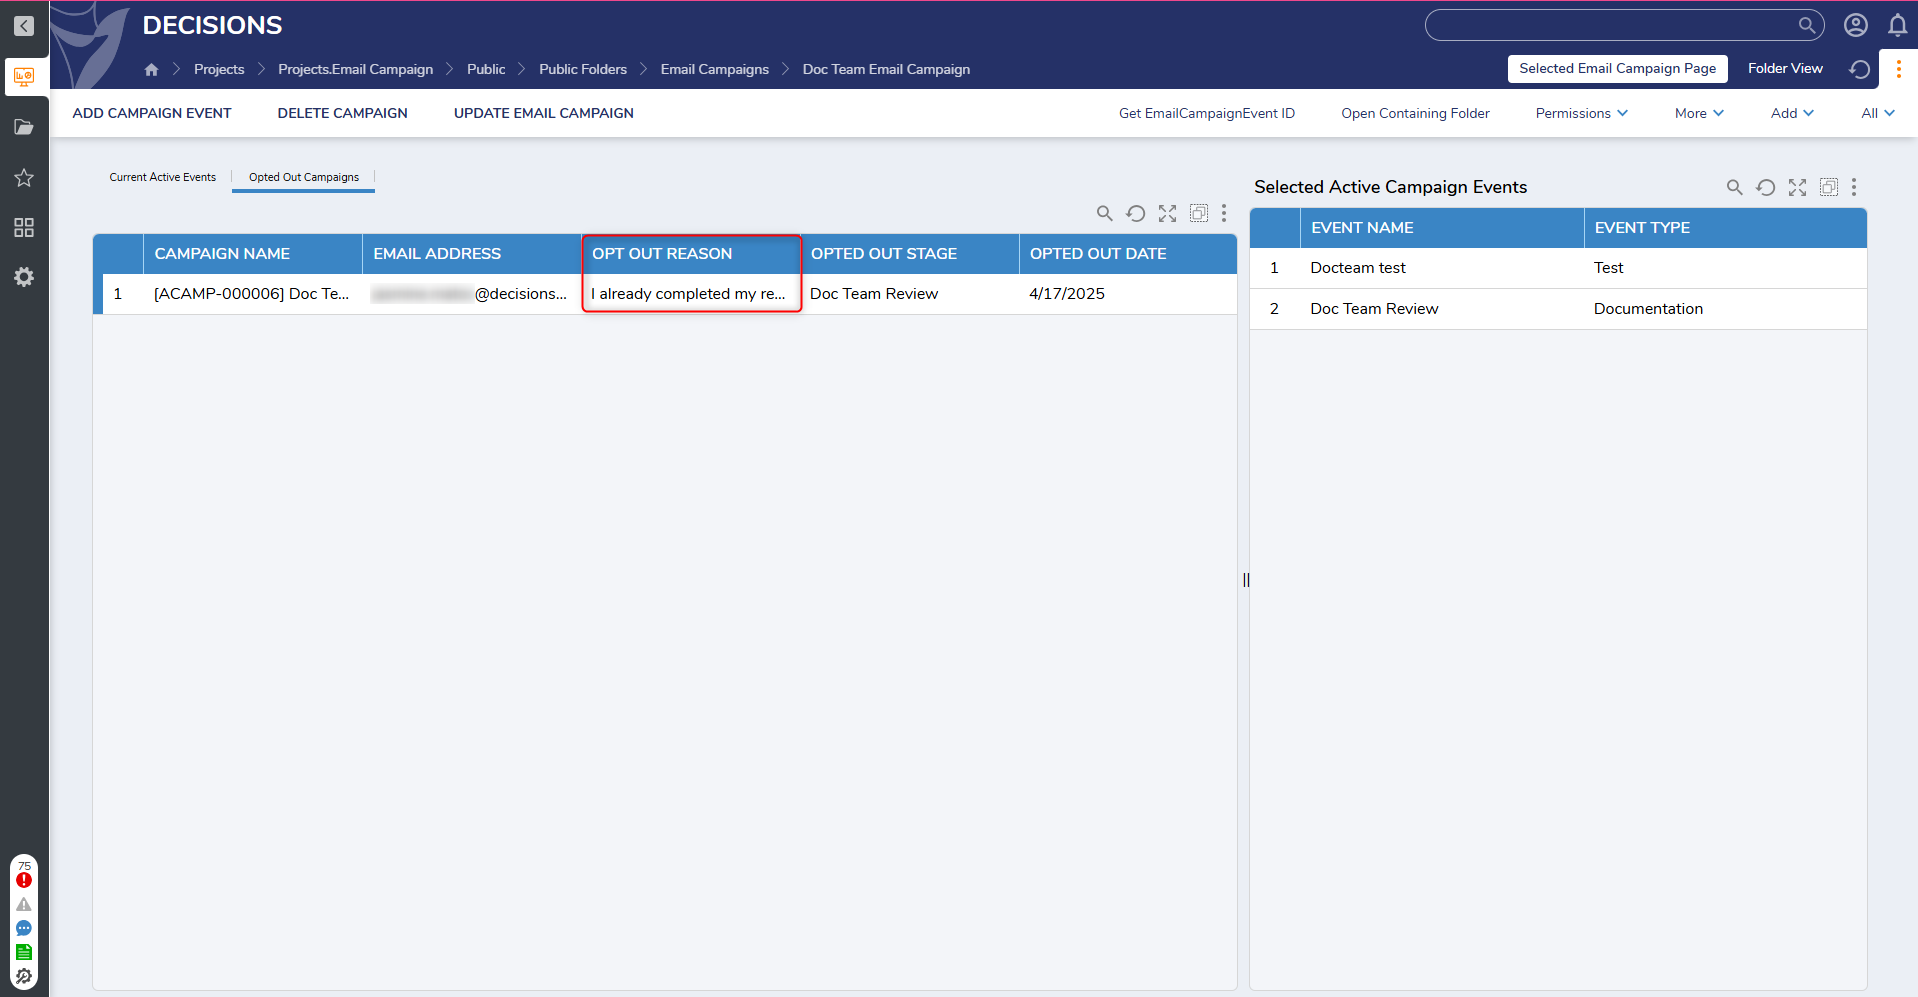
Viewing Opted Out Campaign Responses
- To view responses from Users who opt out of a Campaign, navigate to the Email Campaigns Dashboard and select Opted Out Campaigns.
- From here, select the pencil icon to edit the Opted Out Users Report.
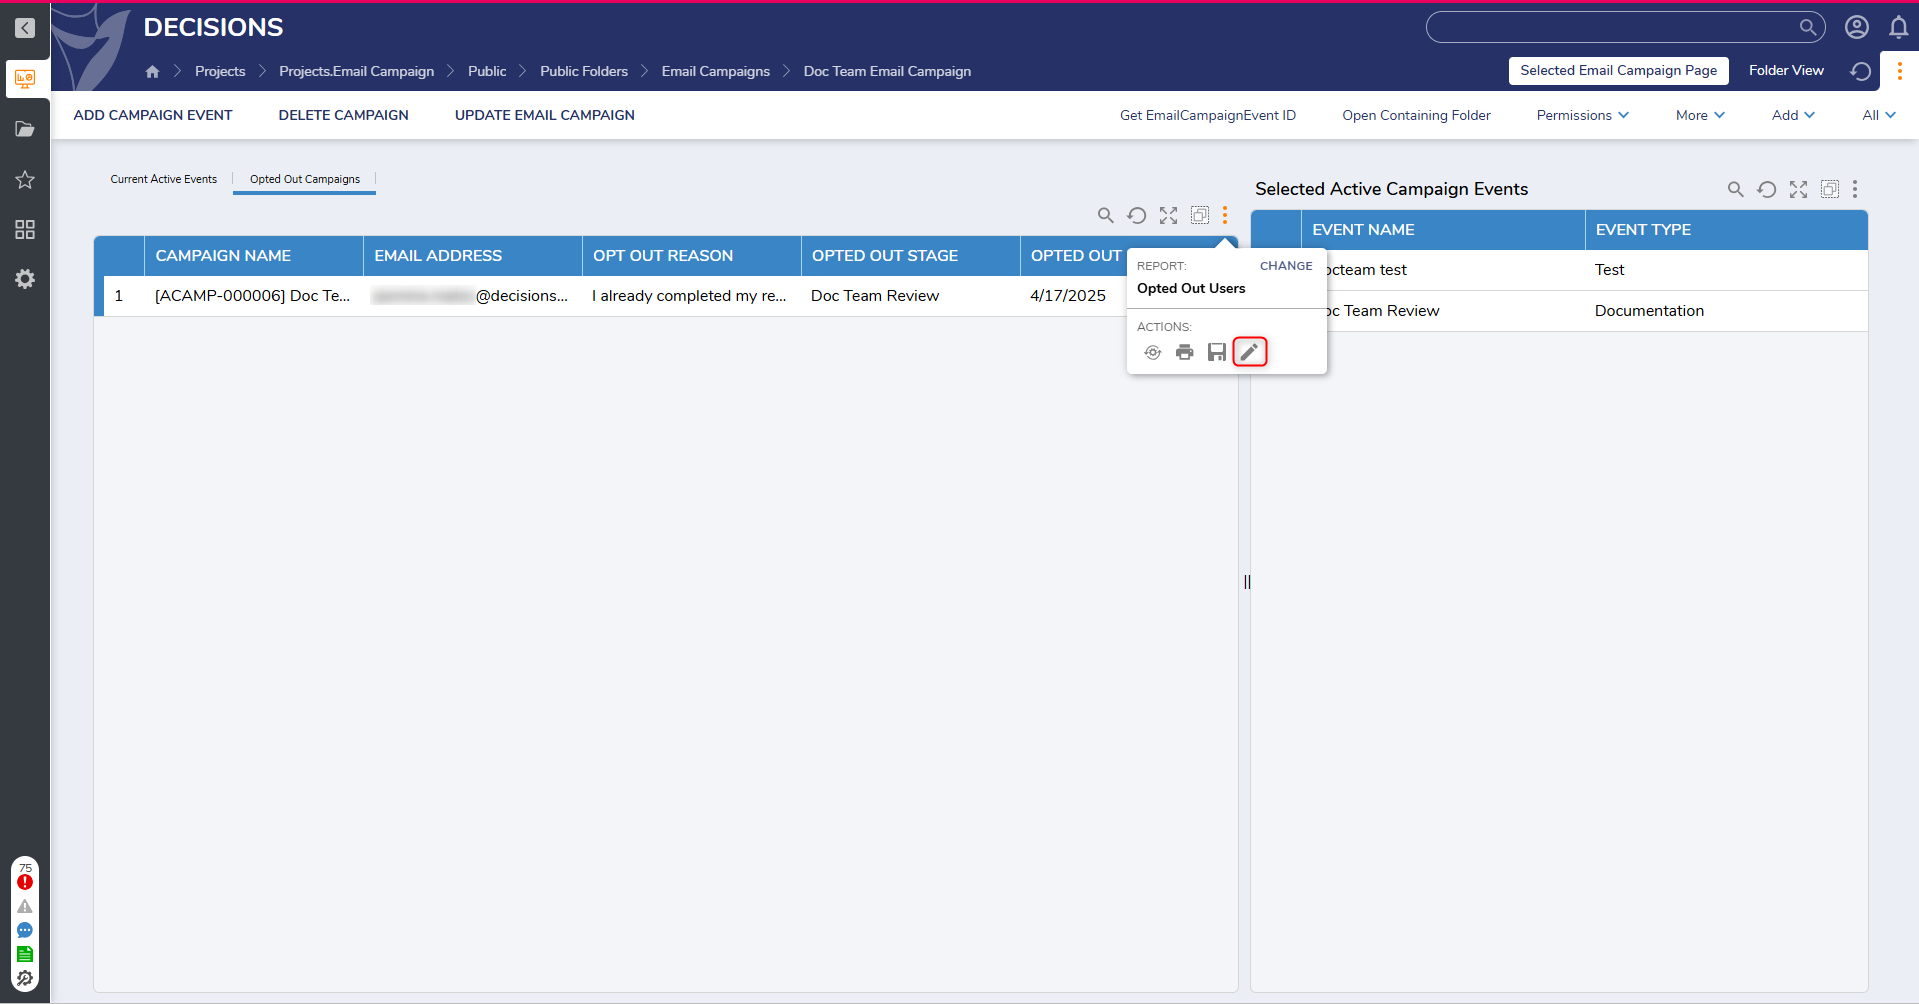
- Once the Report is opened, add Opt Out Reason as a Data Field and save the Report.
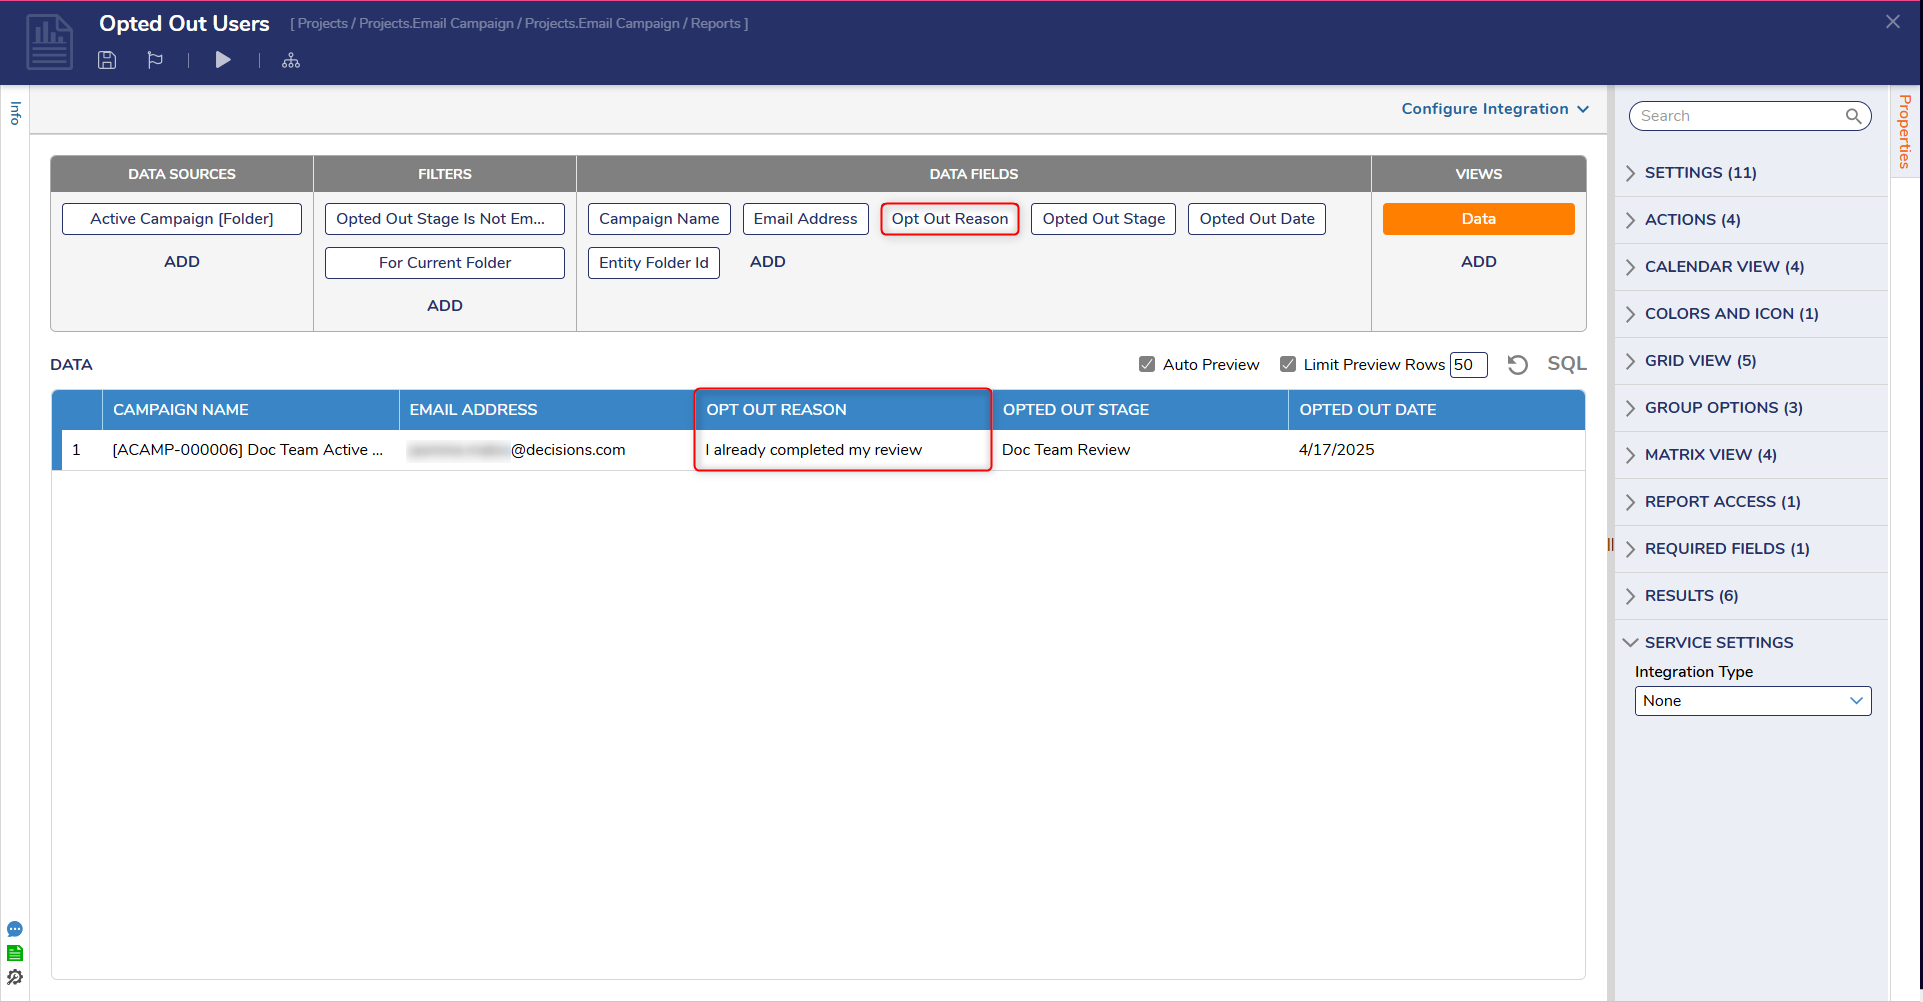 The Report will now display Opt Out Reason as a field on the Opted Out Campaigns Report.