The Ads Optimization Tool is an Accelerator that demonstrates how to connect a CRM with a digital ads vendor to optimize leads using rules in Decisions.
Connecting Google Ads and Salesforce Leads to have a streamlined process of validating leads and pushing them to Google.
Prerequisites
- Users should have the Error Handling Accelerator installed before utilizing this Accelerator.
Setup
The following setup steps will need to be completed before using the Ads Optimization Tool.
Salesforce Module
The Salesforce Module must be installed.
- In the Decisions Studio, navigate to the My Apps Folder.
- Select the Modules Page and search for Salesforce under the Not Installed Section.
- Click to Install if it is not yet installed.
Salesforce OAuth Credentials
OAuth credentials will need to be created to share information between Salesforce and Decisions.
- In the Decisions Studio, navigate to the System Folder.
- Under Integrations > OAuth, create Providers and Tokens.
Providers and Tokens
For each Salesforce environment integrated with this tool, an OAuth Provider and Token need to be created in Decisions.
When creating an OAuth token in Decisions, specify the same scope(s) selected when creating the connected app in Salesforce. The specified scope should, at minimum, allow Decisions to retrieve Leads from Salesforce and to request refresh tokens.
Google Ads
A Google Ads account is required to use the tool.
Google Ads OAuth Credentials
OAuth credentials will need to be created to share information between Google Ads and Decisions.
- In the Decisions Studio, navigate to the System Folder.
- Under Integrations > OAuth, create Providers and Tokens.
Providers and Tokens
The Ads Optimization Tool utilizes only one Google Ads Provider and Token and requires that an OAuth Provider and Token be created in Decisions. These authenticate Decisions, allowing the REST calls to be made to Google Ads successfully. The Google Ads integration also requires a Customer ID and a Developer Token. This can be applied from Google and may take several days before being approved and provided. Once this information is obtained, set it on the Configuration Settings Dashboard.
Scopes and Additional Fields for Google Ads
Additional information must be provided in the Scope and Additional Values textboxes when setting up the Google Ads OAuth token.
Scope: https://www.googleapis.com/auth/adwords
Additional Values: access_type=offline&approval_prompt=force
Editing REST Services
After creating the Google Ads OAuth token, edit the Google Ads REST services and provide the new OAuth token. The Ads Optimization Tool will not be able to receive or retrieve data from Google Ads if the REST services are not properly configured.
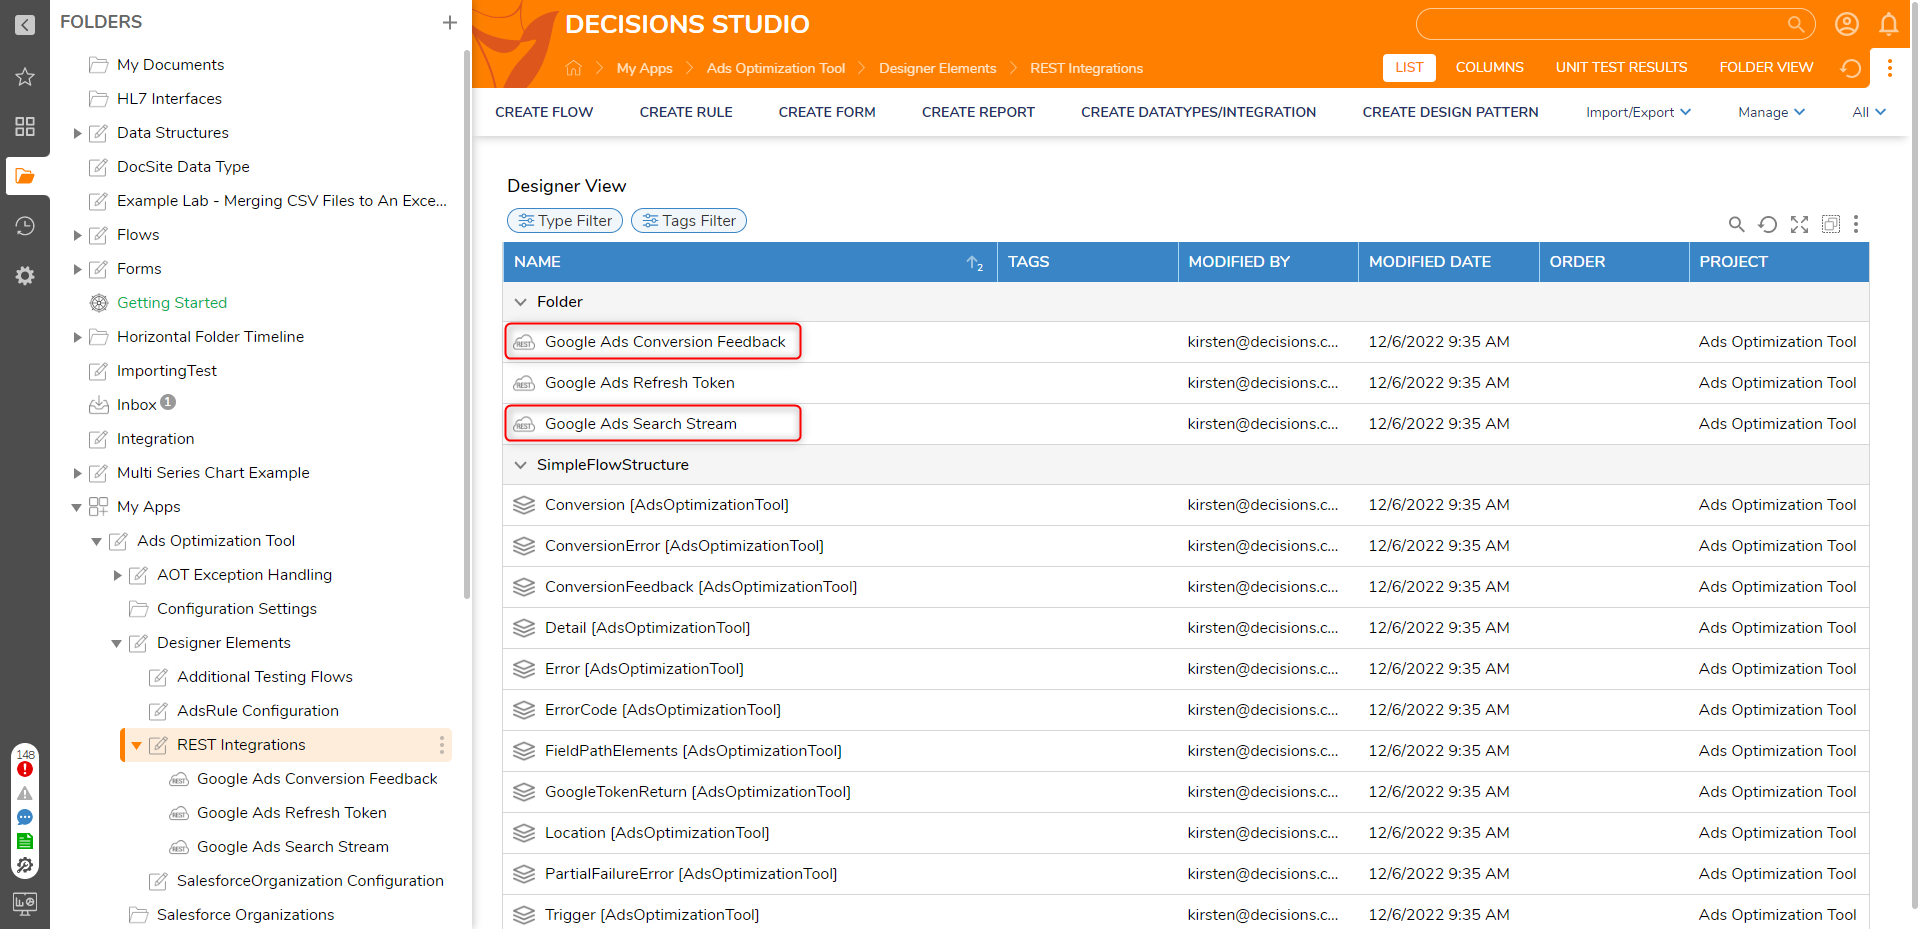
- In the Decisions Studio, navigate to the Designer Elements folder in the Ads Optimization Tool project.
- Next, open up the REST Integrations folder.
- Right-click on the Google Ads Conversion Feedback folder and select Edit Service.
- Scroll down to the OAuth category. Click the OAuth Token drop-down list.
- Select your Google Ads OAuth token. Click the Save Integration button.
- Repeat this process for the Google Ads Search Stream folder.
Configuration
After creating OAuth Providers and Tokens for Salesforce and Google Ads, navigate to the Configuration Settings Page within the Ads Optimization Tool. From this dashboard, provide the Google Ads integration credentials and create at least one active Salesforce Organization.
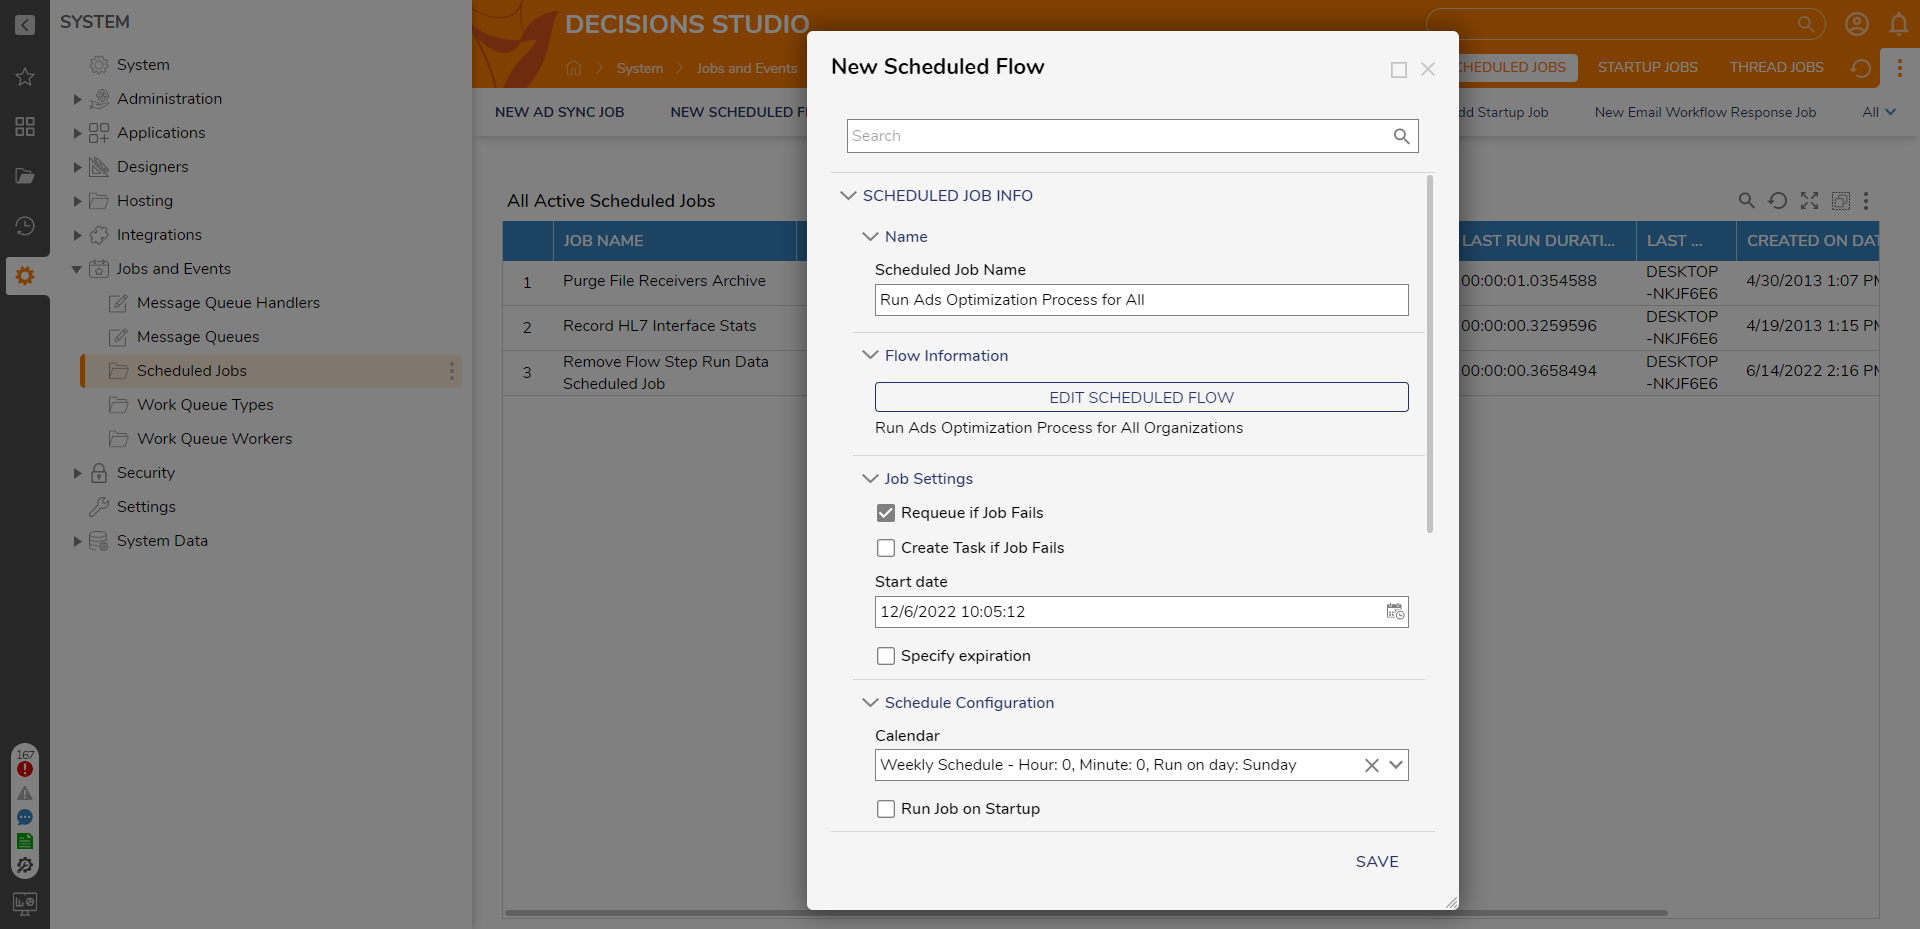
Scheduled Job Setup
Creating a Scheduled Job to execute the Ads Optimization Process daily or nightly is recommended. Before creating the scheduled job, provide the Google Ads credentials and create at least one Salesforce Organization. Both of these actions can be performed from the Configuration Settings Dashboard.
Scheduled Jobs can be modified or disabled by right-clicking on the Job in the All Active Scheduled Jobs Report.
- In the Decisions Studio, navigate to the System Folder.
- Under Jobs and Events, open the Scheduled Jobs folder, and click New Scheduled Flow on the top action bar. Provide a name for the new scheduled job.
- Click the Pick or Create Scheduled Flow button. Select PICK EXISTING, then navigate to the ALL tab.
- In the Search bar, type "Run Ads Optimization Process for All Organizations." Select the Flow and click PICK.
- Select the date and time for the scheduled job to begin running in the Job Settings section. By default, the current date and time will be selected.
- To specify an end date for the scheduled job, click the Specify Expiration checkbox and select a date and time in the field that appears.
- Under the Schedule Configuration section, click the Calendar drop-down list. Here, select how frequently to run the Ads Optimization Process.
- Scroll down to the Calendar Information section. Enter the time to run the scheduled job by entering a value in the Hour and Minute fields. Note that these fields use a 24-hour clock. For example, to have the job run at 1:30 PM, enter 13 in the Hour field and 30 in the Minute field.
- Select which days of the week to run the scheduled job. Click Save.
Glossary of Terms
| Term | Description |
|---|---|
| Ads | Digital Advertisements that are used to promote and track Leads for a sales and marketing process. |
| GCLID | Google Click ID is the unique ID tracked and created using Google Ads. |
| Conversion Action | A specified customer action that has been identified as valuable for business. |
| Conversion | An action that's counted when a customer interacts with the Ad. Conversions are occurrences of a Conversion Action. |
| Google Ads Customer ID | A unique string of numbers that is used to identify the Google Ads account. |
| Google Ads Developer Token | A unique string of characters that provides access to the Google Ads API. |
Configuration Settings Dashboard
This dashboard allows users to add or change their Google Ads credentials, create a Salesforce Organization, and view, edit, and delete existing Organizations. The dashboard features a Report of all existing Salesforce Organizations, their status, and the CREATE ORG button, allowing the user to create new Organizations.
Deleting Organizations from the Salesforce Organizations Report will delete the Salesforce Organization folder and any Ads Rules and Lead Upload History associated with the Organization. A popup will be displayed confirming that the organization has been deleted. The Configuration Settings dashboard will refresh to reflect that the organization no longer exists within Decisions.
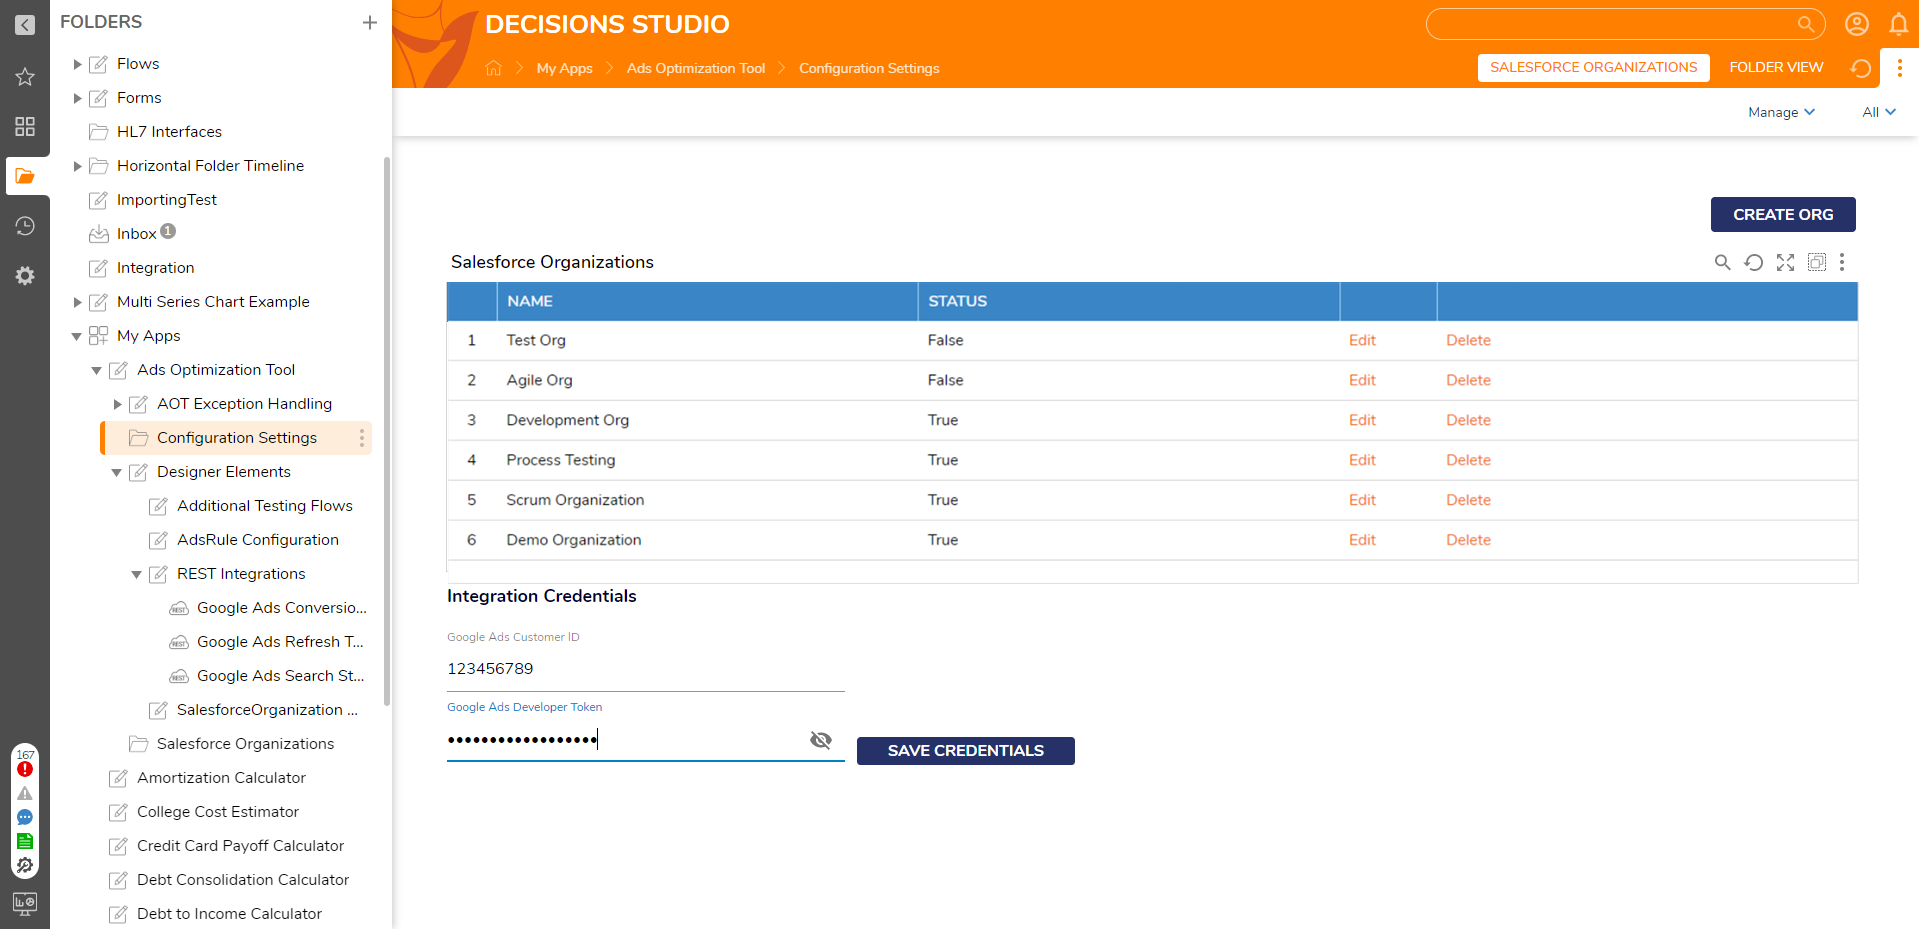
Google Ads Integration Credentials
Add or modify the Google Ads Integration Credentials from the Configuration Settings Dashboard. These fields will be prepopulated with the most recently provided credentials if credentials have already been provided. Upon initial installment, both fields will be empty.
To create or update credentials:
- Enter the Customer ID in the Google Ads Customer ID textbox. The Customer ID can be found in the Google Ads account.
- Enter the Developer Token in the Google Ads Developer Token masked textbox. The Developer Token can be found in the Google Ads user interface.
- Click the Save Credentials button.
- Upon refreshing the dashboard, the newly provided credentials will be displayed in the Integration Credentials fields.
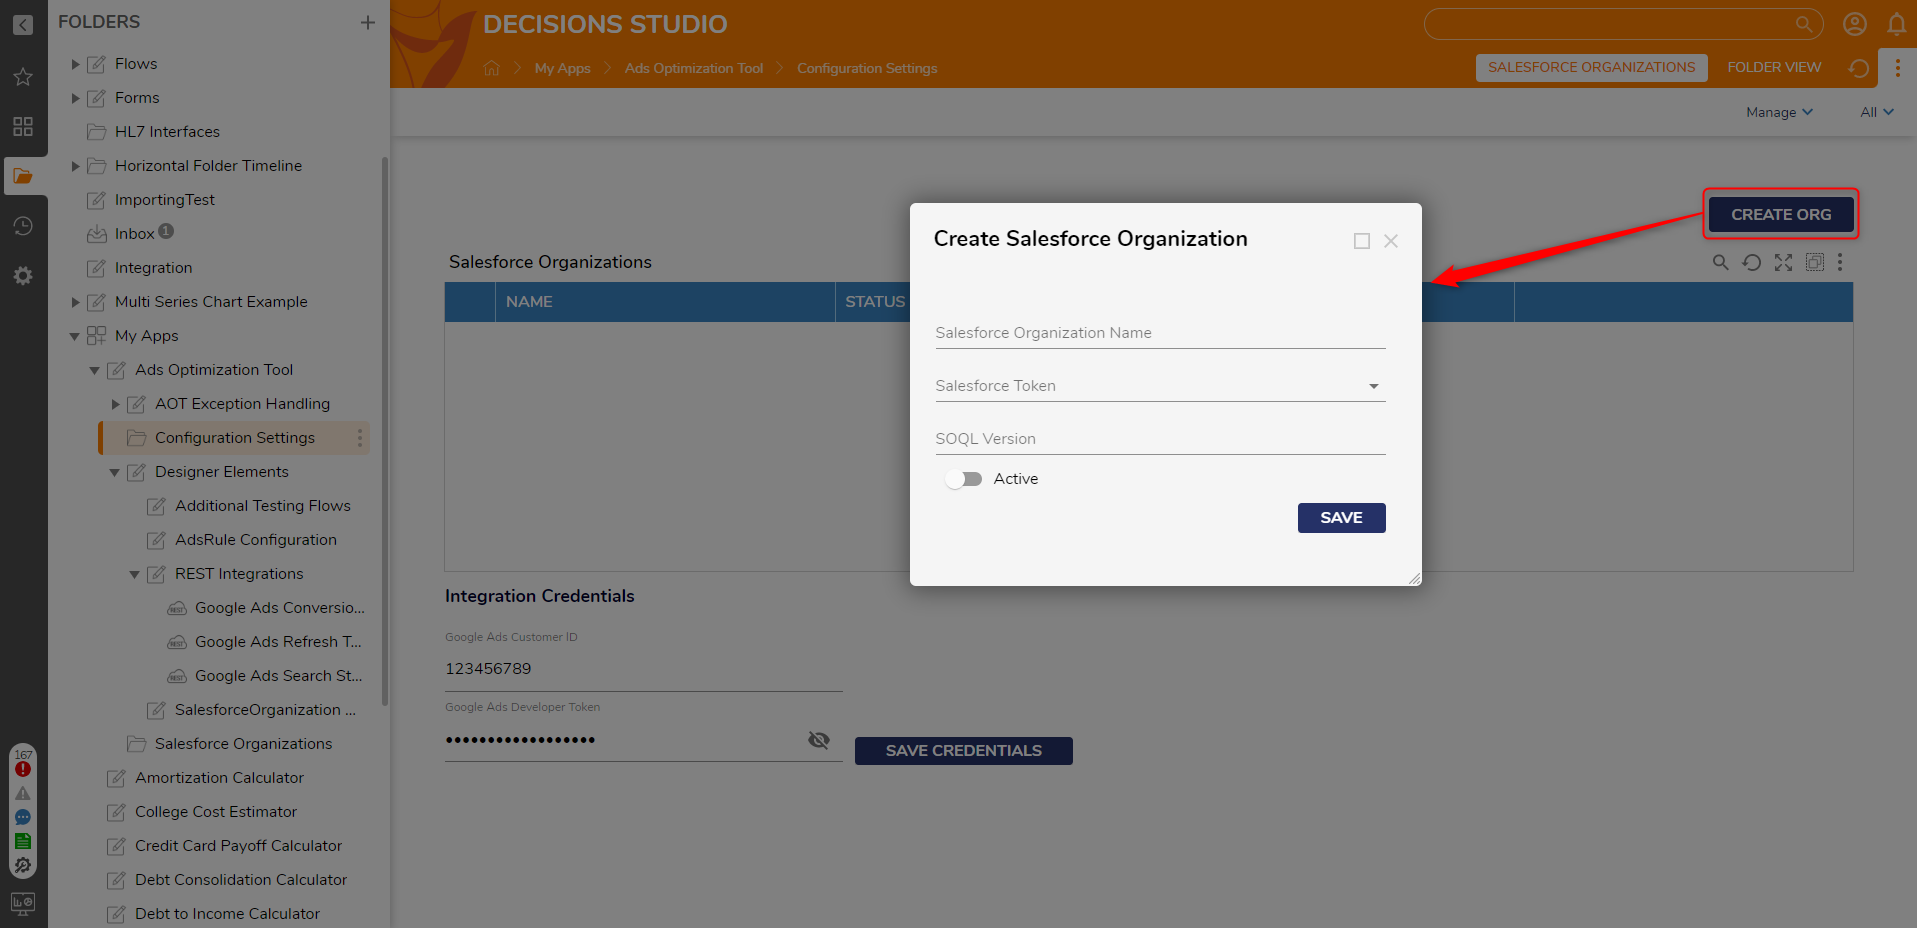
Create Organization
This button allows the user to create a new Organization by filling out the Create Salesforce Organization Form. It is located on the upper right-hand side of the dashboard.
After clicking on the Create Org button:
- The Create Salesforce Organization Form is displayed.
- Enter the desired name for the Organization in the Salesforce Organization Name text field.
- Provide the SOQL Version being used in the Salesforce environment. This field is a decimal value.
- Select the Salesforce Token ID corresponding to the Salesforce OAuth token created during setup.
- Click the Active toggle to indicate whether the Organization is active or inactive.
- By default, the Ads Optimization Process is only executed on active Organizations.
- Upon clicking the SAVE button, a new Salesforce Organization folder extension is created.
- A popup is displayed, confirming that the organization has been successfully created.
- The Configuration Settings dashboard is refreshed, and the new Organization is visible in the Report.
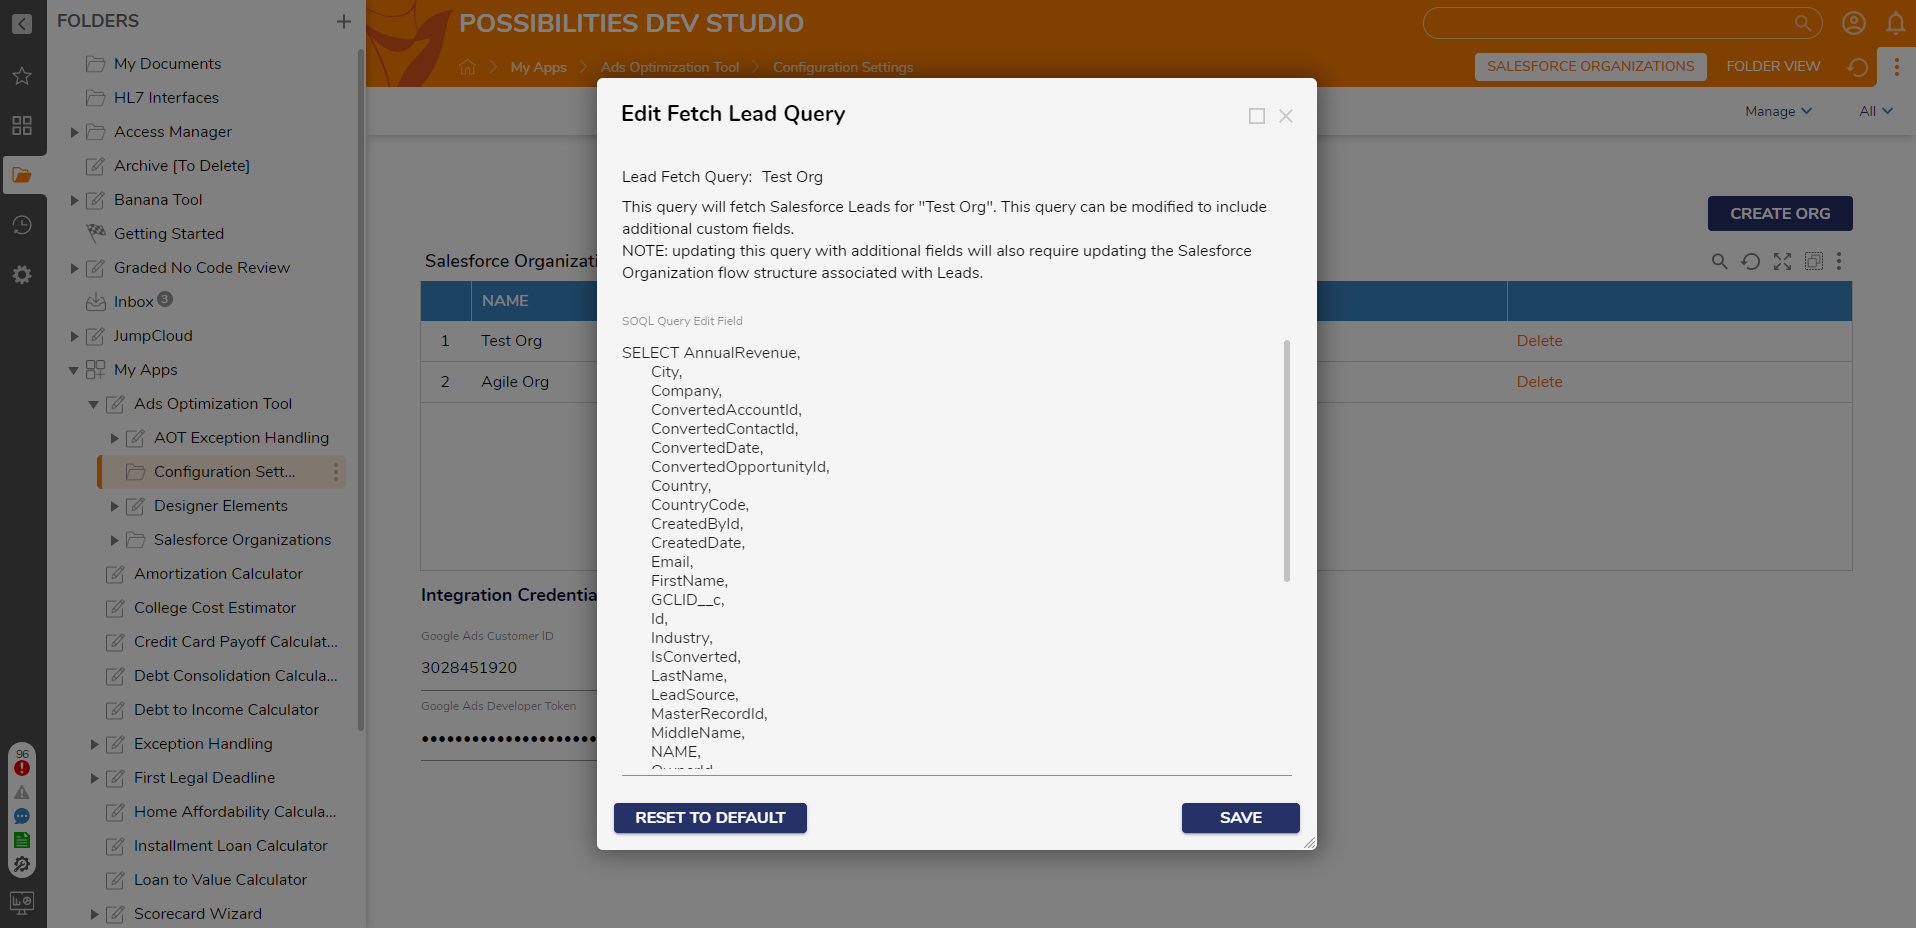
Edit Fetch Lead Query
When a Salesforce Organization is created, a default SOQL query is associated with it. This query is used for Leads from Salesforce during the Ads Optimization Process. Modify this query by right-clicking an Organization in the Report and selecting the Edit Fetch Lead Query user action. This will open a Form allowing users to add or remove fields from the query. These changes will only apply to the selected Salesforce Organization.
To edit the SOQL query for an organization:
- Navigate to the Configuration Settings dashboard. Right-click on the Organization to modify, and select Edit Fetch Lead Query.
- The Edit Query Form is displayed. Make the desired changes to the query.
- To return to the default SOQL query, click the RESET TO DEFAULT button.
- Click SAVE to update the Organization's SOQL query.
.png)
Edit Fetch Lead Query Form
This Form allows the user to modify the SOQL query used to fetch Leads for a Salesforce Organization. When the Form is first displayed, the SOQL query text field is automatically populated with the current query used for that Organization. Add or remove fields and change the fetch criteria within the text field.
The Ads Optimization Tool requires that certain fields be present in the SOQL query. Omitting these fields will result in an error, and the query will not be saved until the error is corrected.
Clicking the RESET TO DEFAULT button will display the default query in the text field. Clicking SAVE will update the query with the text field's contents, provided there are no validation errors.
Salesforce Lead Rules Dashboard
Each Salesforce Organization has an associated Lead Rules Dashboard which displays the Ads Rules for that Organization. Rule Authors can create new Rules and edit, rename, and delete existing Rules from this dashboard.
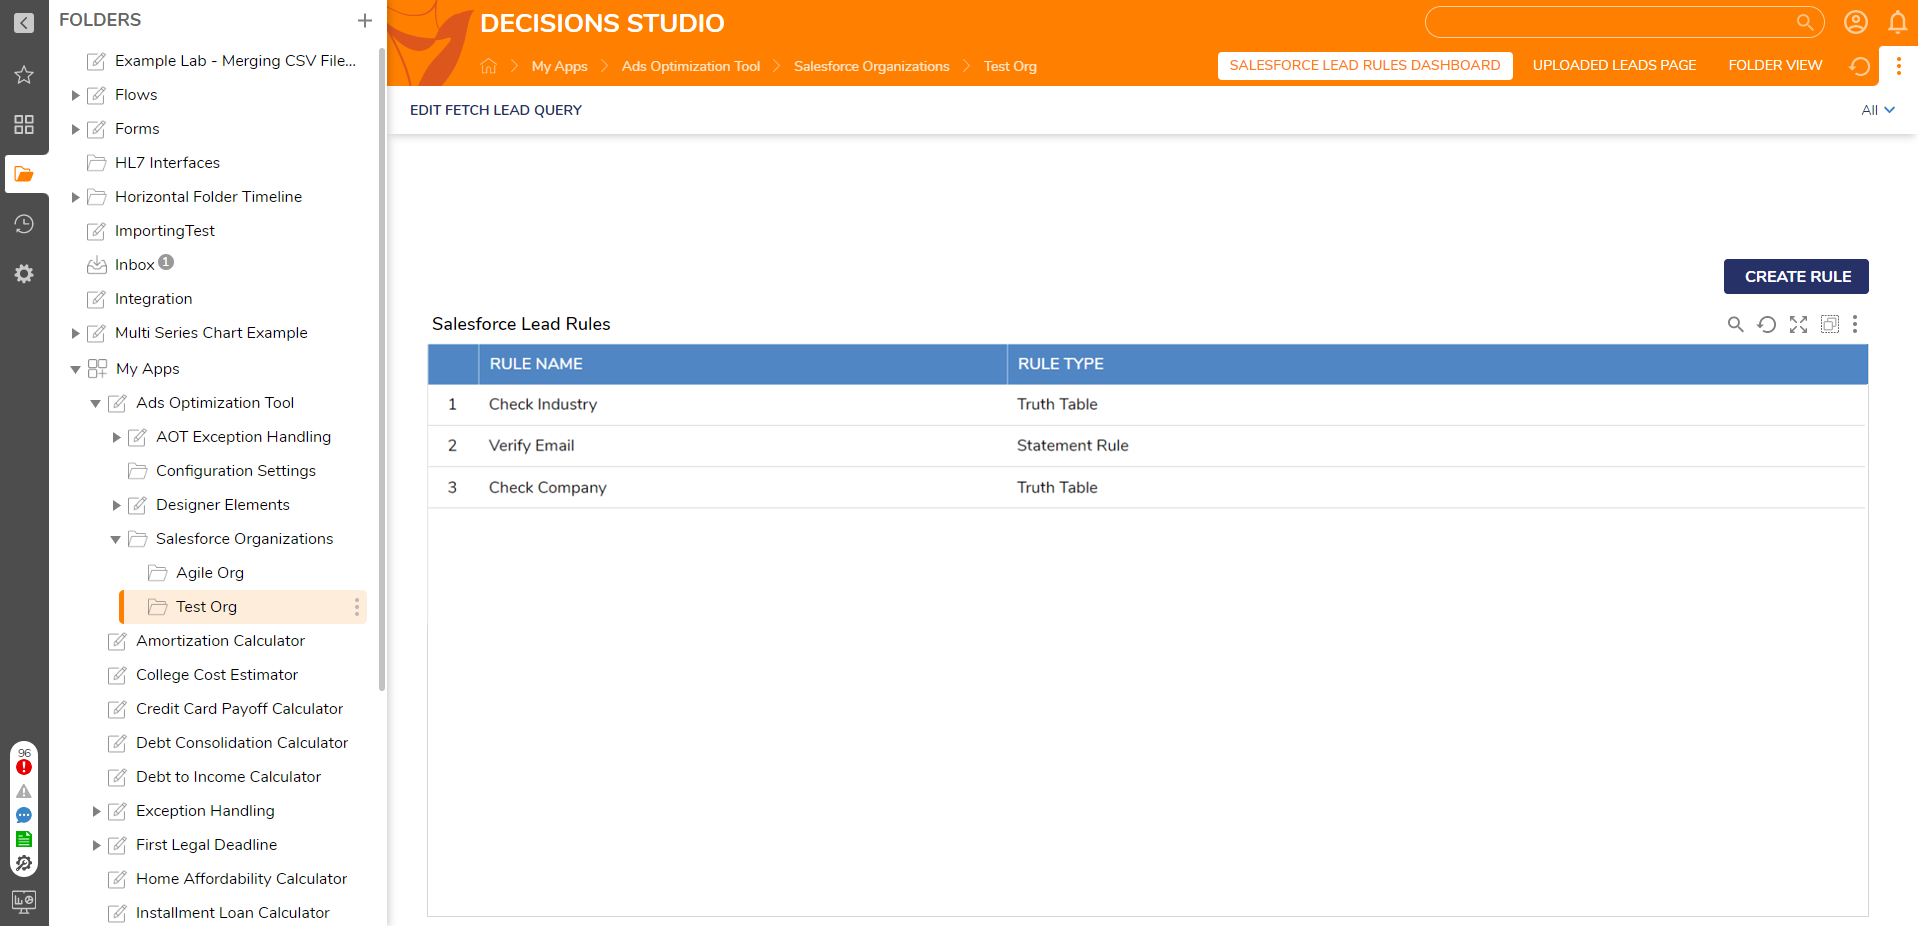
Create Rule
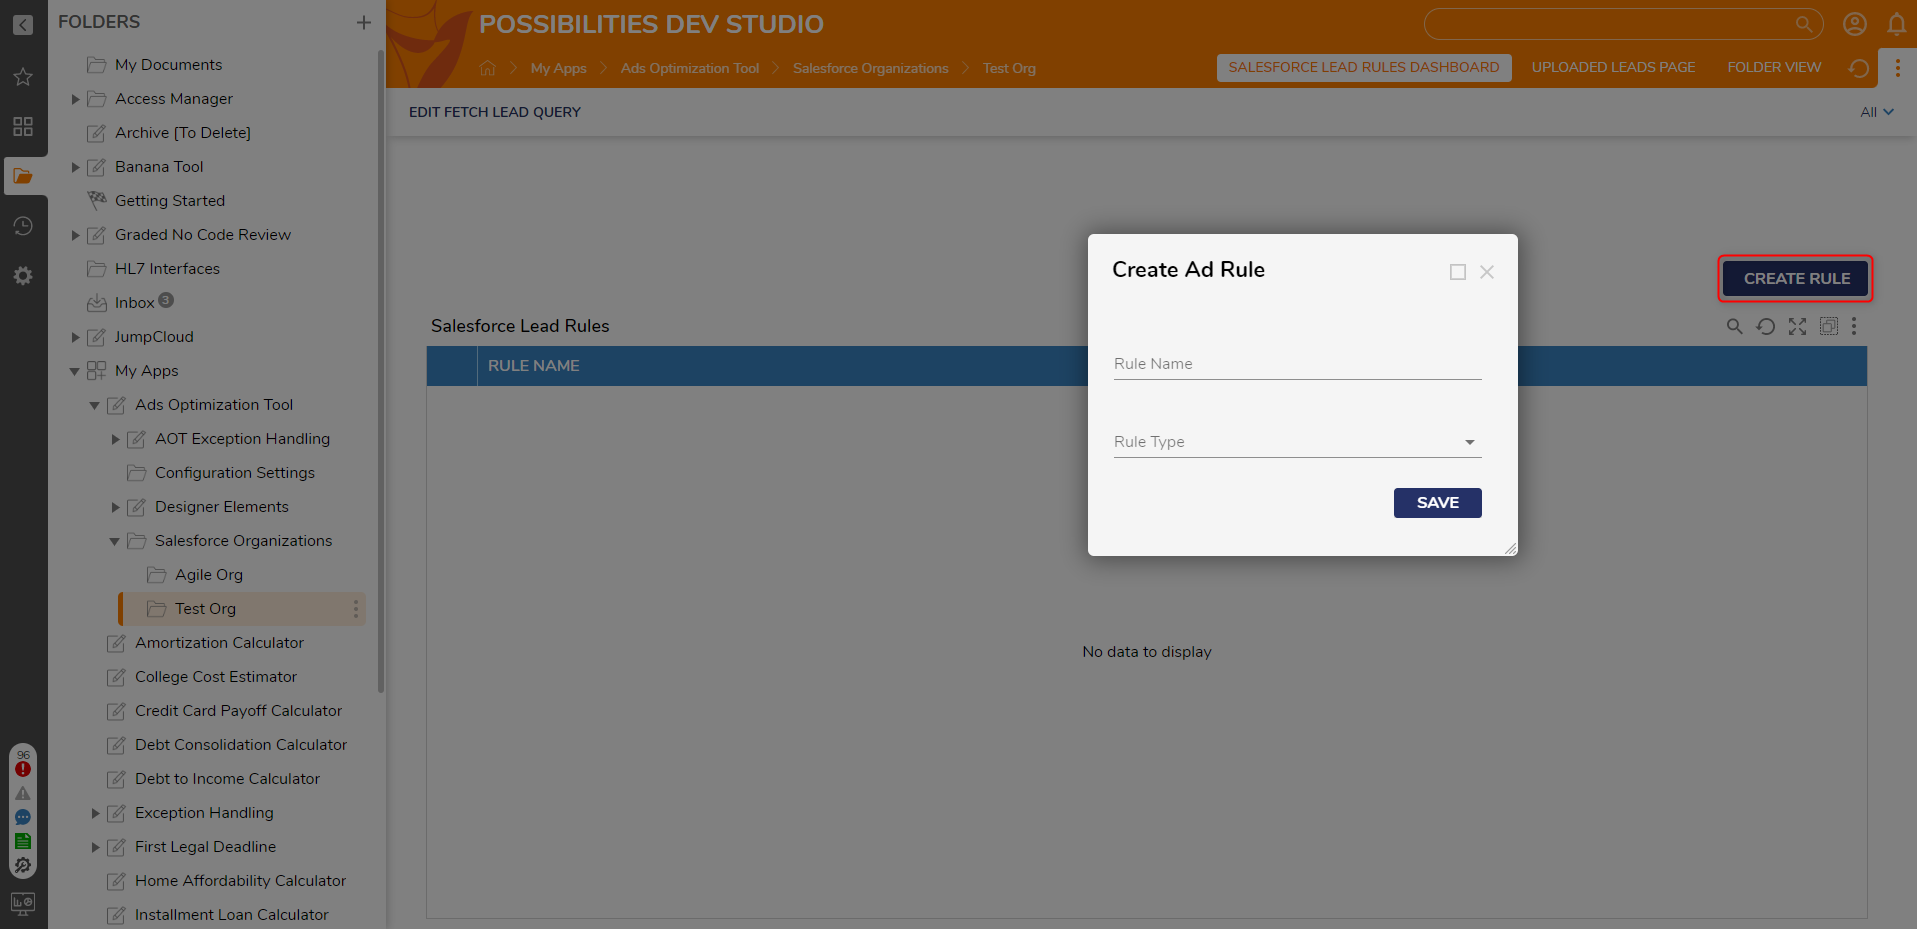
The Create Rule button allows the user to create an Ads Rule that determines whether a Salesforce Lead meets the criteria for Conversion Action. These rules can be either Statement Rules or Truth Tables.
After clicking the Create Rule button:
- The Create Ad Rule Form is displayed.
- Provide a Rule Name and select the desired Rule Type (either a Statement Rule or a Truth Table). Rule Type cannot be changed once the Rule is created.
- The Decisions Rule Designer is opened in a new window upon clicking the SAVE button. In the Rule Designer, specify the criteria for the Rule using fields from the Salesforce Lead Flow Structure and determine what Conversion details should be output by the Rule.
- Clicking Save within the Rule Designer will save any changes to the Rule.
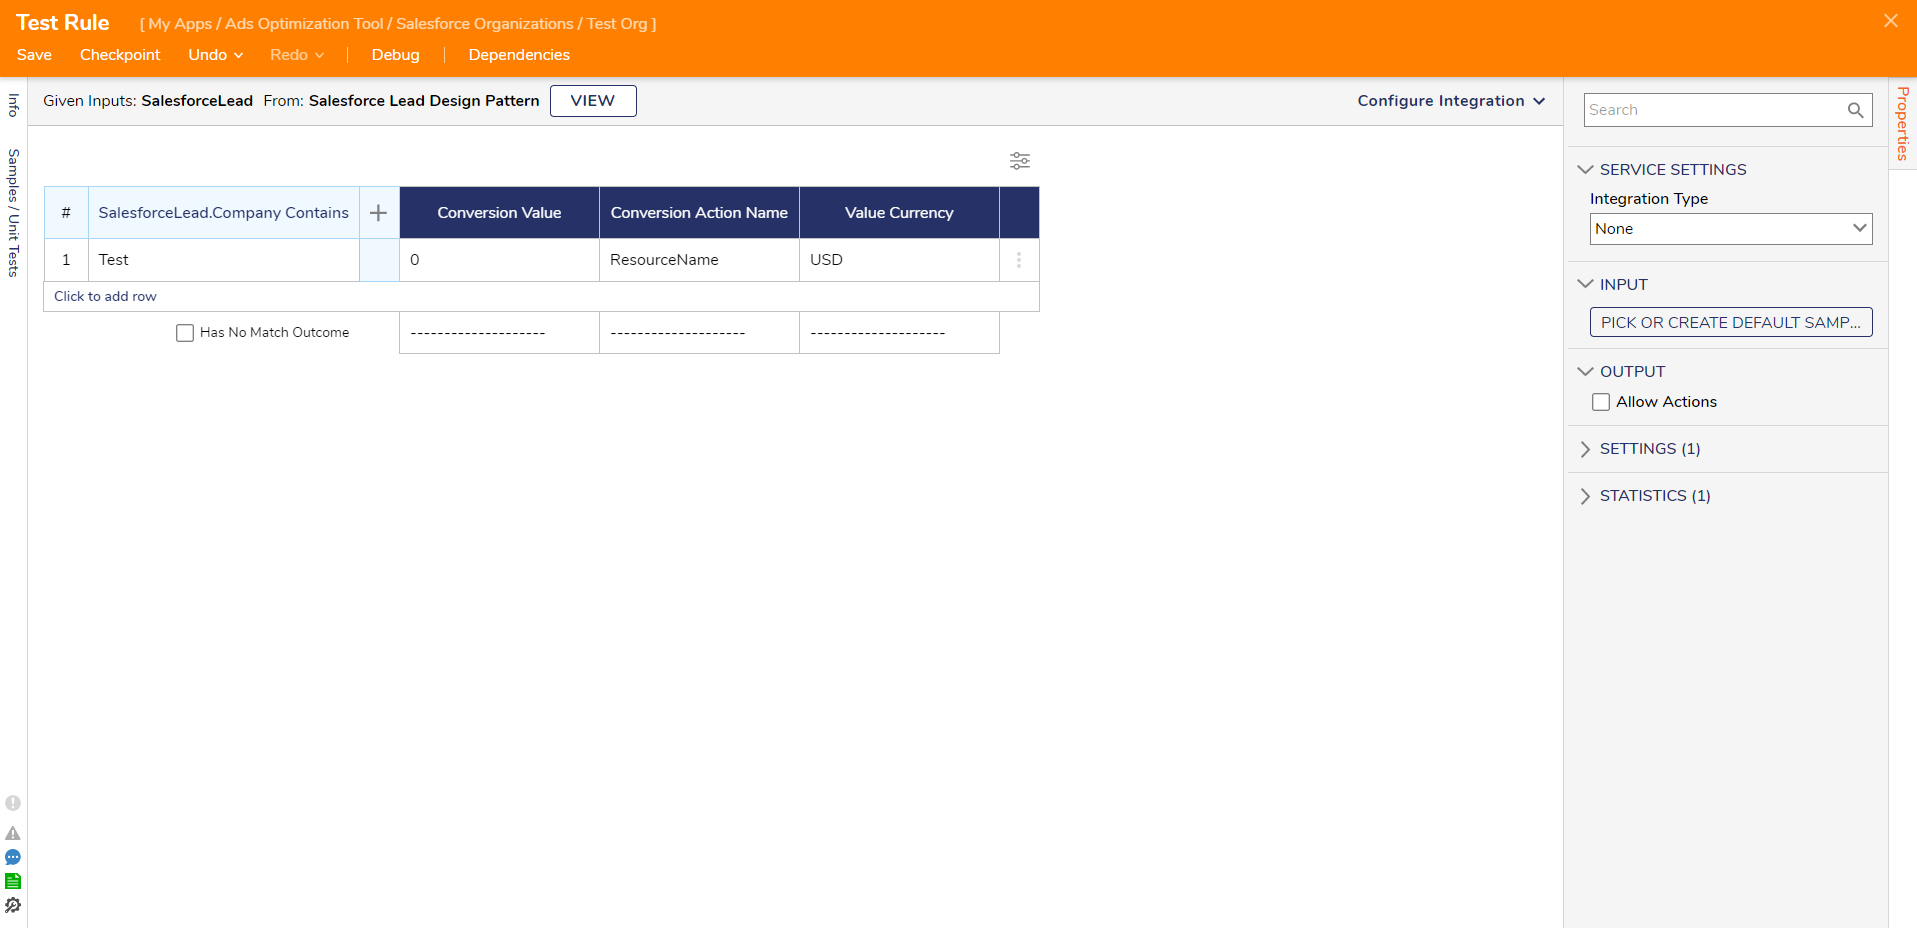
Within the Rule Designer:
- Ads Rules are created using a template and are already preconfigured to accept a Salesforce Lead as their input. No additional inputs need to be defined.
- The Salesforce Lead Flow Structure features many of the default fields defined by Salesforce. To add additional or custom fields, edit the Salesforce Lead Flow Structure before creating Rules for your Organization.
- First, click the Select Data Element drop-down button.
- Click Salesforce Lead to view the fields associated with a Lead. Select your desired field.
- Click Next, then pick a verb that will determine how the Rule will evaluate.
- If applicable, enter some data that the field will be evaluated against. Click Done.
- If desired, additional fields can be evaluated.
- In the Results section of the Statement Rule or Truth Table, specify the details of the Conversion(s):
- Conversion Value is a currency value that acts as a measurement of business impact. This field takes a decimal value with no currency symbols.
- Conversion Action Name corresponds to the resource name of the associated Conversion Action. These values can be found in your Google Ads environment and have the Form:
customers/{customer_id}/conversionActions/{conversion_action_id} - Value Currency is the currency associated with the Conversion Value (for example, USD, EUR, etc.)
- Click Save and exit the Rule Designer.To upload Leads to Google Ads, the associated Conversion Action must be enabled before uploading. Uploading with a Conversion Action that has a status of Hidden, Removed, Unknown, or Unspecified may result in a validation error.
Edit, Rename, or Delete Rules
The Salesforce Organization Dashboard features a Report of all Rules created for the selected Organization. The Rule Names can be modified by right-clicking on a Rule and selecting the Rename user action. This opens a Form that will allow the user to change the name of the AdsRule object and the Truth Table or Statement Rule itself.
A Rule's criteria, logic, and outputs can be changed from the Salesforce Organization Dashboard. This is done by right clicking on the Rule and selecting the Edit Rule user action.
Rules can also be deleted by right-clicking on a Rule in the Lead Rules Report and selecting the Delete Rule user action. This opens a Form that asks the user to confirm that they would like to delete the selected Rule. Clicking on the DELETE button will delete both the AdsRule object and the associated Truth Table or Statement Rule..png)
Salesforce Lead Upload History Dashboard
Once a Salesforce Lead has been validated and uploaded to Google Ads as a Conversion, the Ads Optimization Tool will create a record of this. The Salesforce Lead Upload History Data Structure stores this record. Each Salesforce Organization has an associated Uploaded Leads Dashboard, which features reports, charts, and metrics concerning the Lead Upload History records associated with that Organization.
By default, the Report shows Leads uploaded within the current week. However, the Dashboard utilizes a Date Range Filter, allowing users to view Leads uploaded within a specific month, day, week, or over a custom time frame.
This Report is visible by default after the Page is first loaded or after the Uploaded Leads dashboard is refreshed. Swap between the Uploaded Leads Report and the Failed Leads Report by clicking the corresponding tab.
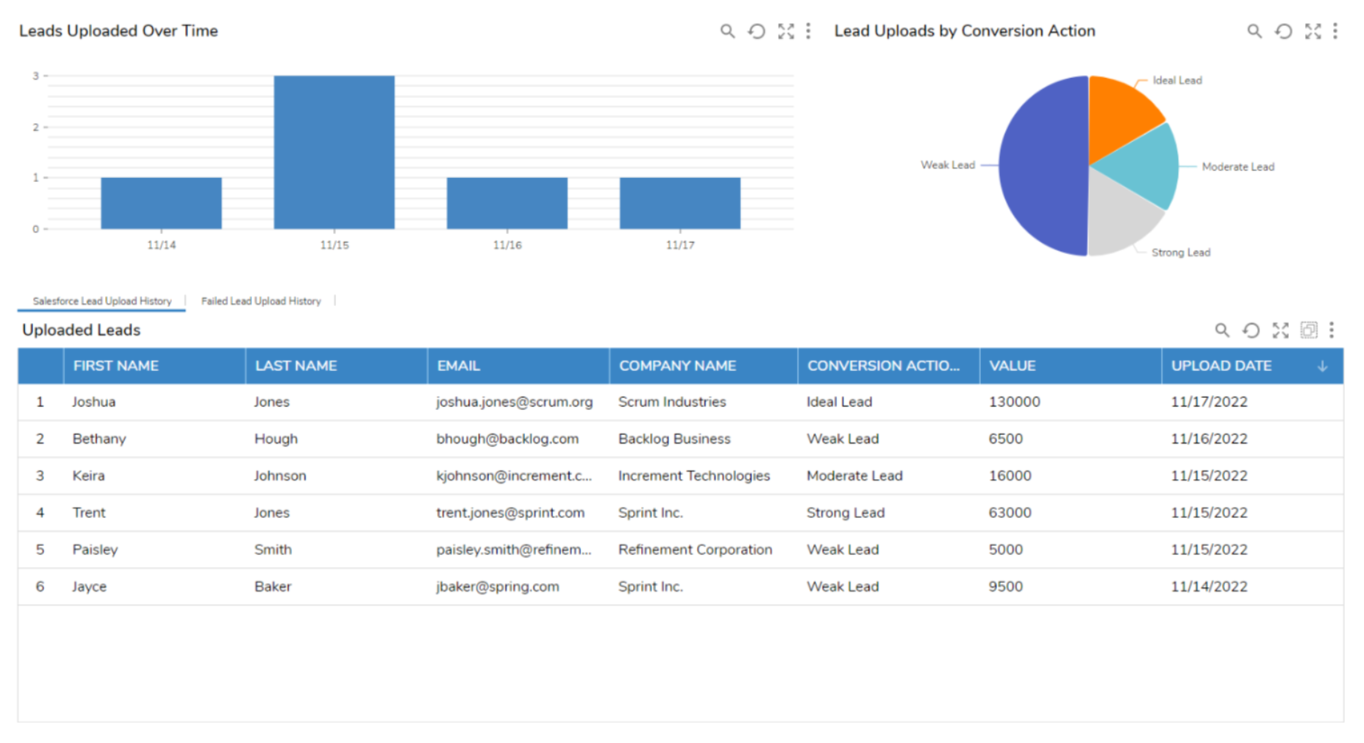
Salesforce Lead Upload History
The Uploaded Leads Report displays the Lead Upload History data for the selected Salesforce Organization. Each row in the Report corresponds to a single uploaded Lead and displays the following information:
- First Name: The first name of the primary contact associated with the Lead.
- Last Name: The primary contact's last name associated with the Lead.
- Email: The email address of the primary contact associated with the Lead.
- Company: The name of the company, institution, or organization with which the Lead is associated.
- Conversion Action Name: The name of the Lead's associated Conversion Action. This field is retrieved from Google Ads.
- Value: The Lead's associated Conversion Value.
- Upload Date: The date that the Conversion was uploaded to Google Ads.
Failed Lead Upload History
The Failed Leads Report displays all Leads that could not be successfully uploaded to Google Ads. During the Ads Optimization Process, some Conversions may result in a validation error that cannot be resolved by the tool. These Conversions are not uploaded to Google Ads, and their associated Leads are considered Failed Leads.
Currently, the Ads Optimization Tool only stores the Failed Reason for request and conversion upload errors. If Conversion was not uploaded due to another validation error, this field will be null for the associated Salesforce Lead.
Like the Uploaded Leads Report, the Failed Leads Report displays the contact's name, company, email address, Conversion Action Name, and Value. It also features:
- Failed Reason: The name of the error that occurred during the validation process. This field corresponds to the ErrorCode field in the Google Ads validation error response.
- Attempt Date: The date the Ads Optimization Tool attempted to upload the Conversion to Google Ads.
Lead Uploaded Over Time Column Chart
The Lead Upload History dashboard features a column chart that displays the daily number of Leads uploaded to Google Ads. Each column corresponds to a specific date. Hovering the cursor over a column will display the number of uploaded Leads and the associate date.
Utilizing the Date Range Filter, located in the upper right corner of the dashboard, you can filter the column chart to show the number of Leads uploaded over a certain period of time. You can filter by a specific date, week, month, or a custom range of dates.
Lead Uploads by Conversion Action
The pie chart presents a graphical representation of the number of Leads uploaded based on their associated Conversion Action. The chart is grouped by Conversion Action Name, with each slice denoting the percentage of Leads uploaded with that specific Conversion Action. Hovering your cursor over a specific pie chart slice will display the total number of Leads uploaded with that Conversion Action.
Like the other reports and metrics featured on this dashboard, the pie chart can be filtered according to the Date Range Filter. By default, it shows the number of Leads uploaded within the current week.
Ads Optimization Process
This section details the full Ads Optimization process, which fetches Salesforce Leads, runs them against your specified Ads Rules to generate Conversions and uploads those Conversions to Google Ads. This process is executed via the Run Ads Optimization Process for All Organizations Flow, which performs the following steps for each active Organization:
- Refreshes the Organization's OAuth token.
- Fetches Salesforce Leads associated with the current organization.
- Runs the organization's Ads Rules against all Leads, resulting in a list of Conversions.
- Removes any duplicate Conversions from the list.
- Validates the Google Ads Conversion Feedback and corrects errors where appropriate.
- Uploads the validated Conversions to Google Ads.
- Creates a Salesforce Lead History for both uploaded and failed Conversions, which can be viewed on an organization's Uploaded Leads dashboard.
Executing the Flow daily or nightly is recommended by creating a scheduled job. For more information on creating a scheduled job, see Scheduled Job Setup.
Fetching Salesforce Leads
Using the SOQL Query associated with the Salesforce Organization, the Ads Optimization Tool will refresh the associated OAuth token and fetch Leads from your Salesforce Environment. By default, the Tool utilizes a query that will retrieve all Leads created on the previous day. Additionally, it will retrieve certain default fields from the Salesforce Lead. This default query is associated with all newly created Organizations. See the Edit Fetch Lead Query section to update or modify the default query.
Upon retrieving these Leads, the Ads Optimization Tool will format them into a SalesforceLead Flow Structure, allowing you to run your specific AdsRules on the Leads.
Run AdsRules and Create Conversions
Salesforce Leads are evaluated against the AdsRules created for each Organization, and a Conversion is created for all Leads that meet the specified criteria. This process results in a list of Conversions that will be validated and uploaded to Google Ads. Each Conversion consists of the following fields:
- GCLID: The Google Click ID associated with the Lead. This field is pulled from Salesforce during the Fetch Leads process.
- Conversion Date Time: The date-time at which the Conversion occurred. This corresponds to the Lead's CreatedDate and includes a time offset. The Conversion Date Time should occur after the time of the click. This field is formatted as:
YYYY-MM-dd hh:mm:ss+|-hh:mm - Conversion Action: The resource name associated with the Conversion Action.
- Conversion Value: The currency value associated with the Conversion.
- Currency Code: The currency type associated with the Conversion.
The Conversion Action Name, Conversion Value, and Value Currency are assigned based on the Rule's specified outcomes. The GCLID and Conversion Date Time are retrieved from the Salesforce Lead.
For additional information on creating AdsRules, see the Create Rule section.
Remove Duplicate Leads
Before validating and uploading Leads, the Ads Optimization Tool will remove any duplicate Conversions. Two Conversions are considered duplicates if they have the same Conversion Action and the same GCLID. If multiple Conversions have the same Conversion Action and GCLID, the superfluous Conversions are deleted, so only unique Conversions exist. These unique Conversions will be validated and uploaded to Google Ads.
Validating and Uploading Conversions
Before uploading to Google Ads, Conversions are validated. The Ads Optimization Tool includes functionality to address some common Conversion Errors that may occur. The tool will either attempt to correct the error, or the Conversion will not be uploaded.
Conversions will not be uploaded to Google Ads if:
- The Converted Date precedes the date of the click.
- The associated GCLID is expired.
- The associated click is too old to be imported.
This is not a comprehensive list, and other validation errors may result in a Conversion not being uploaded.
Suppose the Converted Date occurs in the future (in particular, after the date that the Ads Optimization Process is currently executing). In that case, the tool will attempt to correct this by updating the Converted Date to 60 seconds later. After the Converted Date has been updated, it will attempt revalidation.
Once the Conversions have been validated, all error-free Conversions will be uploaded to Google Ads.
Creating the Lead Upload History
As part of the validation and uploading process, the Ads Optimization Tool creates records of all successfully uploaded and failed Leads. Each record is stored in the Salesforce Lead Upload History database table. Salesforce Lead Upload History consists of the following fields:
- First Name: The first name of the Lead's primary contact.
- Last Name: The last name of the Lead’s primary contact.
- Email: The email address of the Lead’s primary contact.
- Company: The name of the company, institution, or organization that the Lead is associated with.
- Conversion Action Name: The resource name of the Lead’s associated Conversion Action.
- Display Name: The name of the Lead’s associated Conversion Action.
- Value: The Lead’s associated Conversion Value.
- Upload Date: The date that the Conversion was uploaded to Google Ads.
- Failed: A Boolean that denotes whether the associated Conversion was uploaded to Google Ads. This field is True for all Failed Leads. Otherwise, it is false.
- Failed Reason: The validation error code associated with a Failed Lead. This field will describe either a request error or a conversion upload error. It is null, if the Conversion was uploaded or if the Conversion resulted in a different validation error.
- GCLID: The Google Click ID associated with the Lead.
- Salesforce Org Folder ID: The folder ID of the Lead's associated Salesforce Organization.
The entire Lead Upload History for an Organization can be viewed from its Uploaded Leads Dashboard.
Additional Testing Flows
The Ads Optimization Tools also feature additional flows that can be utilized for testing purposes. These flows can provide the following functionality:
- Creating and Inserting Leads into Salesforce using randomly generated data
- Deleting the Configuration Settings
- Deleting all Salesforce Lead Upload History records for a specified organization
These test flows can be found in the Additional Testing Flows Designer Folder.
Adding Salesforce Leads Test Flow
This Flow will generate data for three new Leads and insert them into the Salesforce environment associated with the first active Organization. This will allow you to test the Ads Optimization Process with simulated data first. These newly created Leads will be visible in your Salesforce environment under the Leads tab.
The Flow generates data for the following fields:
- First Name: A randomly generated first name for the Lead's contact.
- Last Name: A randomly generated last name for the Lead's contact.
- Email: An email address for the contact, created using the generated first name and last name.
- Industry: An industry for the contact, randomly selected from a list.
- City: A city for the contact, randomly selected from a list.
- Company: A company/organization with which the contact is associated, randomly selected from a list.
- GCLID: A Google Click ID randomly selected from a list.
- Annual Revenue: A random annual revenue from the company, a randomly generated value between 1 and 2,000,000.
Delete Config Settings
The Google Ads Integration Credentials can be deleted from the server using this Flow. The Flow requires no inputs or outputs. Running it will delete any stored Configuration Settings.
Delete Lead History Record for Specific Salesforce Org
This Flow will delete all Salesforce Lead Upload History records for the organization. Records will be deleted for both uploaded and failed Leads.
The Flow accepts a single input:
- Salesforce Org Folder ID: The folder ID of the Salesforce Organization that you would like to delete records for.
All records associated with this Organization will be deleted from the server. Deleted records will not be visible on the Uploaded Leads dashboard.