After referring to the Installation Requirements, follow the walkthrough below to install Decisions on an Application Server or PC.
Prerequisites
- Download the current v9.x version.
- Connection to a supported database.
- Download the appropriate .NET Versions.
Selecting an Installation Type
- Right-click the downloaded DecisionsServerInstaller.exe and select Run as administrator.
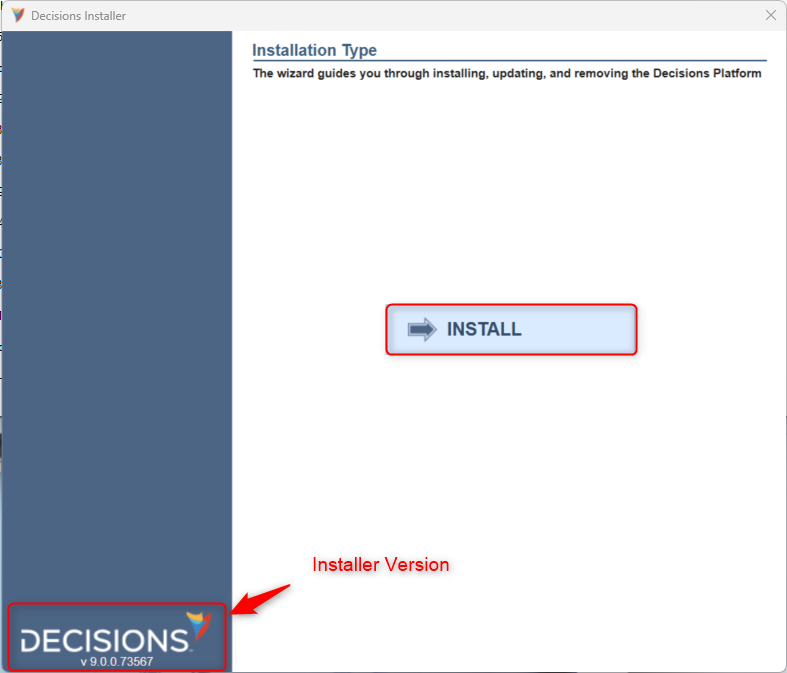
- Click INSTALL to begin.
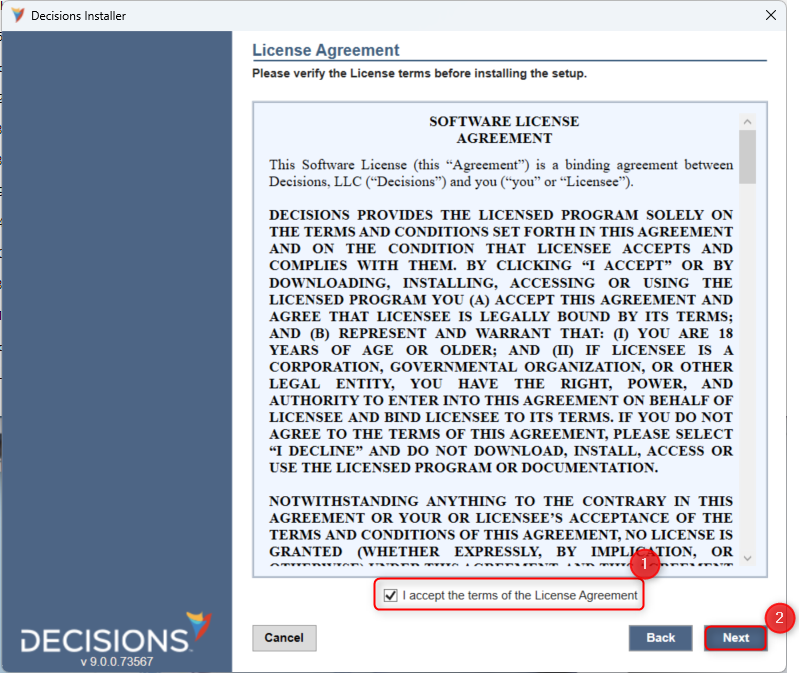
- Review the terms, check the I accept the terms of the License Agreement box, then click Next.
- In the Select Installation Type window, choose the appropriate type.
Refer to the chart below for further information on each installation type:Type Description Standard Server (Prod and Non-Prod) The most common Server Installation type.
Installs an instance for both Production (live) and Non-Production (development) purposes. Allow other machines to access the server.Failover (HA) Server Installs an instance that only lives once triggered after the primary instance shuts down.
Once installed, it will be available but will not run jobs or events on startup.Designer Repository Installs an instance for storing entities and managing version builds and releases.
It does not run live applications.Multi-Tenancy Server (Control) Installs a Control instance for hosting Tenants. Use this if utilizing multi-tenancy. Multi-Tenancy Server (Tenant) Installs a Tenant to an existing Control instance. Use this if utilizing multi-tenancy. 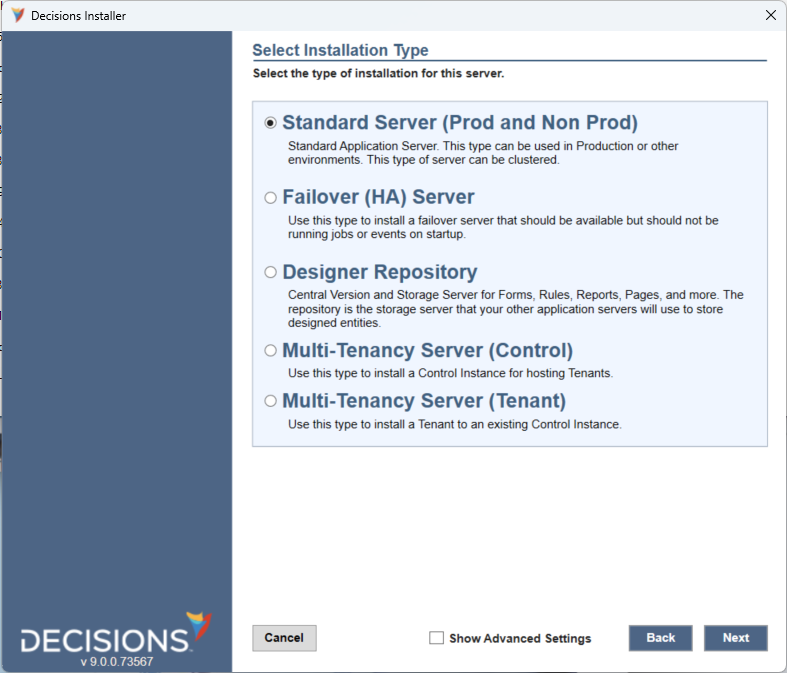
- If desired, enable Show Advanced Settings, then click Next. If Advanced Settings is not enabled, Hosting Options will not be displayed, and the Hosting Type will default to Self-Hosted.
Setting Description Use Settings File Enables a field to select a previously saved Settings file. Initial User Setup screen The Initial User Setup screen allows you to create an administrator account that will be used to log in to the portal after completing the installation process.
Change the Destination Folder for Installation Diverts installation from the default install folder, "C:\Program Files\Decisions". Pick Alternate Source Select an alternate installation file source via URL or file directory. Show the Service Settings Customize the Service account username and password. Skip DB Connection Testing - Not Recommended Skips the database connection test at the end of the installation wizard. .png)
Database Setup
The app server and the Database Server must be set to the same time zone.
MSSQL Connection
Warning
- When installing on MSSQL, the maximum table limit for a user-defined type is 128 characters.
Setup
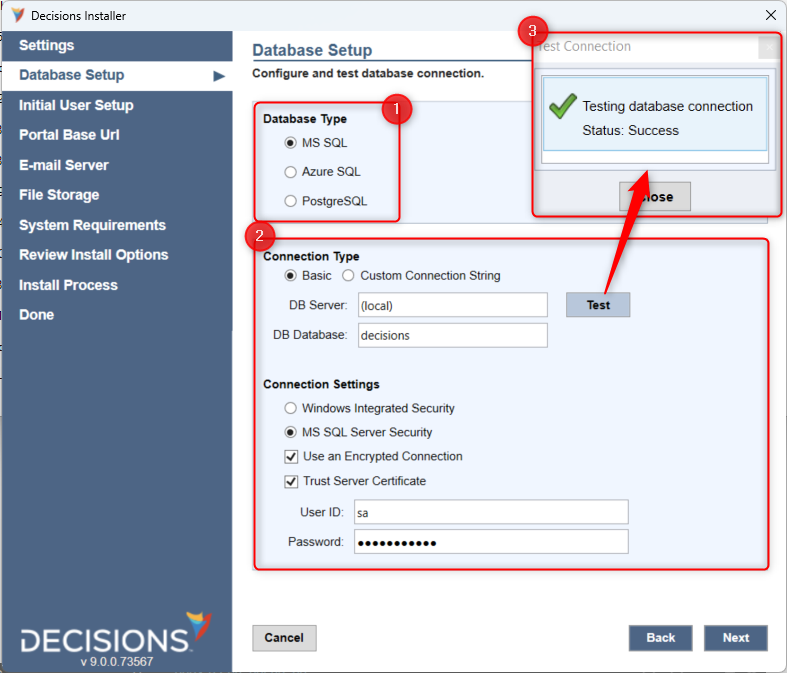
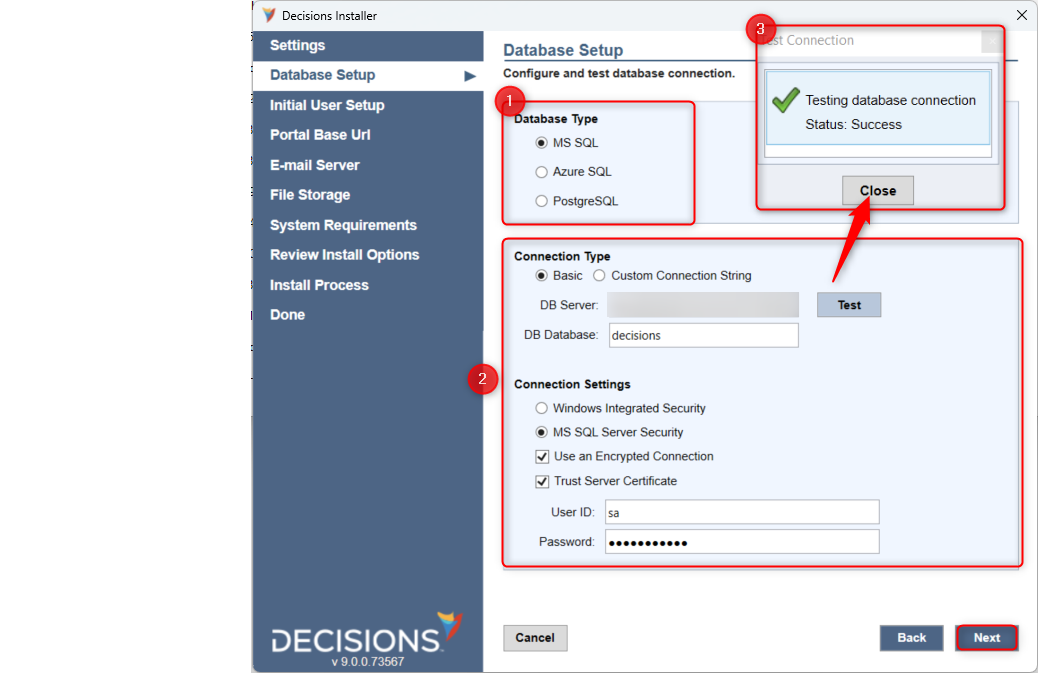
- Select MS SQL for the Database Type.
- Under Connection Type, select Basic and enter the corresponding database server and name in DB Server and DB Database, respectively.
If the database server does not exist, the platform installer will attempt to create it for MSSQL connections. - Under Connection Settings, select MS SQL Server Security and enter the appropriate User ID and Password.
- Use an Encrypted Connection - When enabled, the connection between the client and server will be encrypted only if the Root SSL certificate is installed. For more information, refer to Microsoft's official document.
- Trust Server Connection - When enabled, the transport layer will use SSL to encrypt the channel and bypass the certificate chain to validate trust. For more information, refer to Microsoft's official document.
- Click Test to verify a successful database connection.
Alternatively, MSSQL installations may use Windows Integrated Security for added security. - Click Next to proceed.
AWS Connection
Prerequisites
- Create an AWS RDS Database for Microsoft SQL Server. Select either a SQL Server SE or SQL Server EE engine. Refer to Installation Requirements for specifications.
- Launch an EC2 instance.
- Configure the RDS Security Groups and/or VPC to allow SQL connections from the internal IP address of the EC2 application server. Add an inbound Rule for the security group to allow MSSQL from the EC2 instance's internal IP address.
Setup
- Select MS SQL for the Database Type.
- Under Connection Type, select Basic. For DB Server, enter the endpoint address of the RDS instance. And DB Database, respectively. For the DB Database, enter the desired name, e.g., "decisions".
- Under Connection Settings, select MS SQL Server Security. Enter the specified master Username and Password for the created RDS database in UserID and Password, respectively.
- Click Next to proceed.
Azure Connection
Prerequisites
- Create and Configure a SQL Database. The SQL that Decisions generates/executes does not use any recent additions to T-SQL or any of the SQL Server-only functionality.
- Create an Azure VM (any version). Refer to Installation Requirements for specifications.
- After provisioning the Azure VM, install IIS and .NET 8.0.
SQL Specifications
DB level of at least DTU S4 or P1 should be used since the lower levels greatly restrict transactions per minute, causing timeouts for Decisions SQL queries, especially during installation. Some workloads may require higher throughput, which can be achieved with higher Premium Azure SQL tiers.
| Specification | Production Server | Non-Production Server | Repository Server |
|---|---|---|---|
| D-Series | D4s v3 | D4s v3 | D4s v3 |
| VCPU | 4 or 8 for Advanced Specifications | 4 | 4 |
| Memory | 16 GB or 32 GB for Advanced Specifications | 16 GB | 16 GB |
| HDD Storage | 150 GB | 100 GB | 100 GB |
Setup
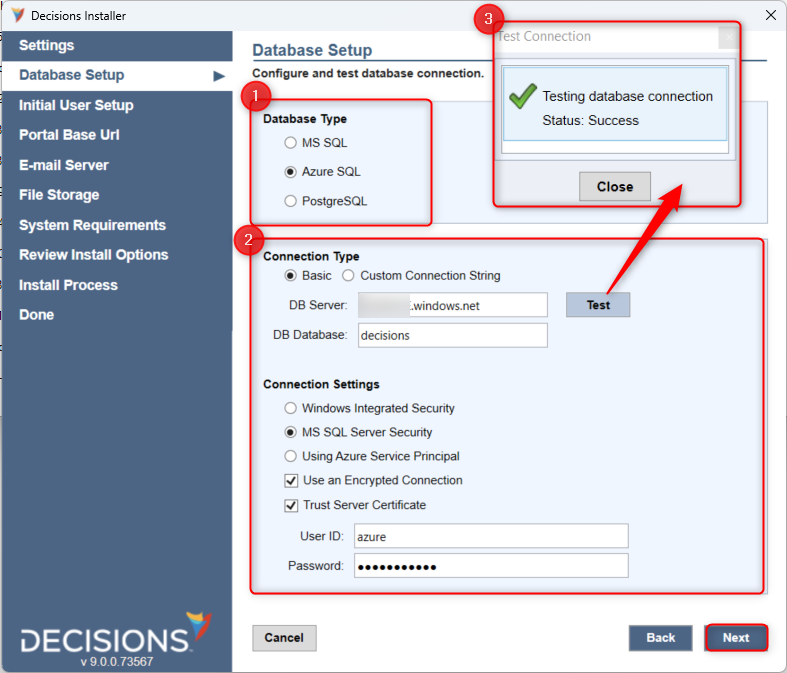
- Select Azure SQL for Database Type.
- Under Connection Type, select Basic and then provide the Azure DB Server's Public Address and the database server's name in DB Server and DB Database, respectively.
- Under Connection Settings, select MS SQL Server Security, then provide the appropriate User ID and Password for the Azure Admin.
- Use an Encrypted Connection - When enabled, the connection between the client and server will be encrypted only if the Root SSL certificate is installed. For more information, refer to Microsoft's official document.
- Trust Server Connection - When enabled, the transport layer will use SSL to encrypt the channel and bypass the certificate chain to validate trust. For more information, refer to Microsoft's official document.
- Click Test to verify a successful connection.
- Click Next to proceed.
To install using Azure Service Principal, refer to Installing Decisions Using Azure Service Principal.
PostgreSQL Connection
Warning
- When installing on PostgreSQL, the maximum table limit for a user-defined type is 64 characters.
Prerequisites
- Download the appropriate PostgreSQL version. Keep the default UserID/Username, aka "Postgres," for Decisions to query PostgreSQL properly.
- In PostgreSQL, create a new database for Decisions. Upgrading from SQL is not supported, so a new database is required.
- Non-admin super users installing on Azure may run into issues. Please see Non-Admin Users in Azure PostgreSQL.
Setup
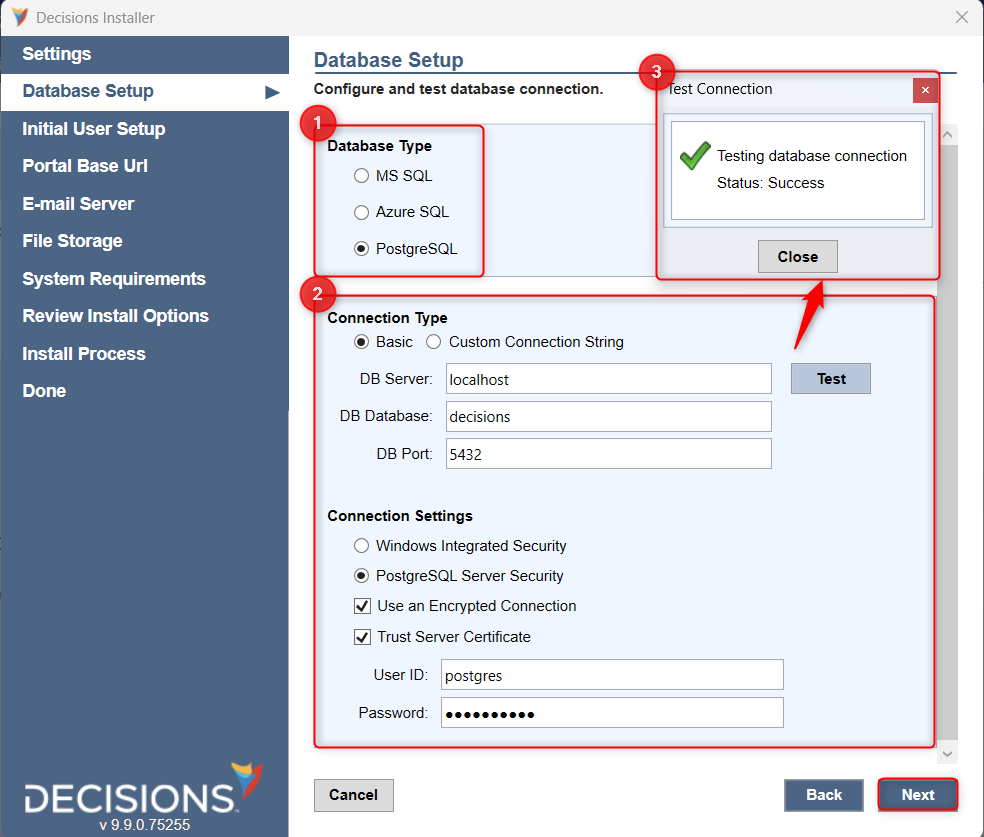
- Select PostgreSQL for Database Type.
- Under Connection Type, choose Basic and enter "localhost" for the DB server, the created Postgres database for DB Database, and "5432" for DB Port. This is the default port number for PostgreSQL databases.
- Under Connection Settings, select PostgreSQL Server Security. Click Test to verify a successful connection.
- Click Next to proceed.
If you are using a database schema that option is available under Custom Connection String Connection Type.
For platforms hosted on AWS some PostgreSQL configurations require a custom connection string which includes the "Root Certificate" field. Without this, the installation will fail due to a timeout. An example of the connection string would be as follows:
Host=hostname;Database=databasename;Port=5432;Username=insert_username;Password=password;SslMode=Require;TrustServerCertificate=true;Pooling=false;Timeout=300;Root Certificate=c:/path/to/certificateSQL Full Text Warning
The installer will check for the SQL Full-Text Warning. For more information, refer to the article Full Text Search. Click Next.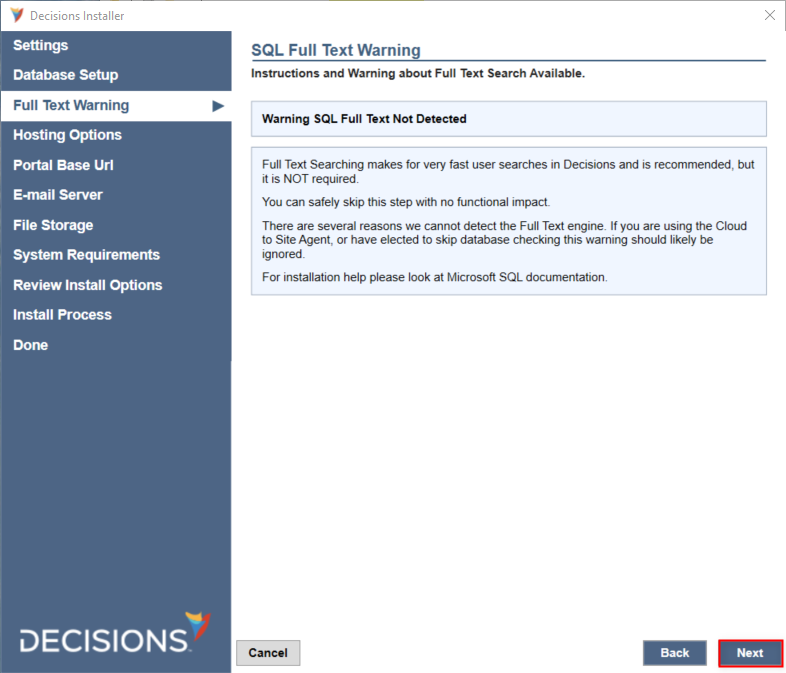
Initial User Setup
The Initial User Setup screen allows you to create an administrator account that will be used to log in to the portal after completing the installation process.
This email address will be the default email address for sending notification emails. You can modify this default email address in the Portal settings.
Provide an Email and Password. Ensure to retain these credentials. Click Next.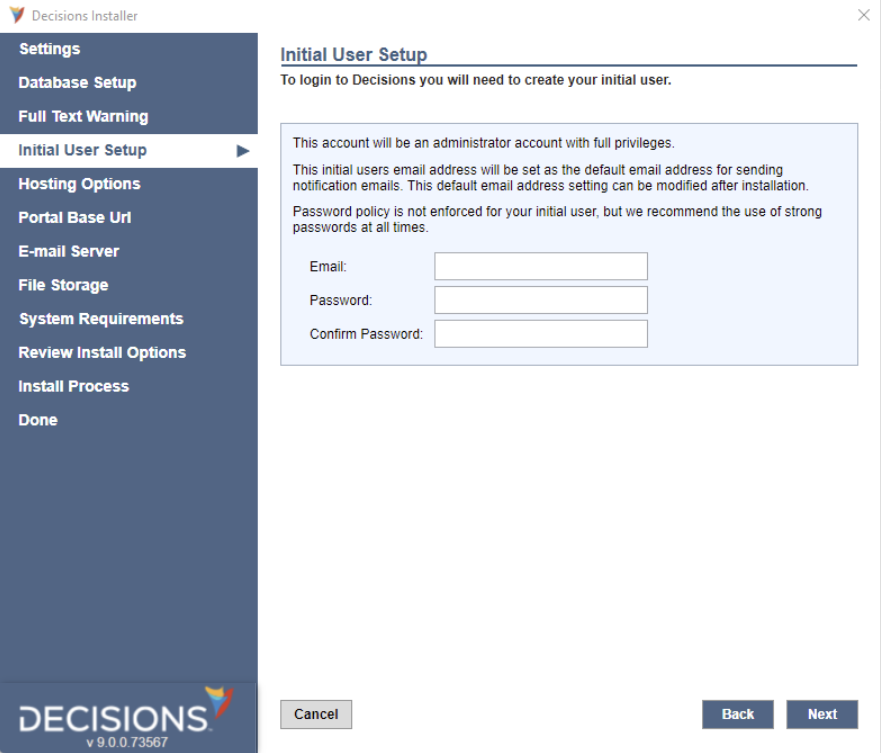
Hosting Options
- Select the appropriate Installer Hosting Option. This example selects Self Hosting. Click Next.
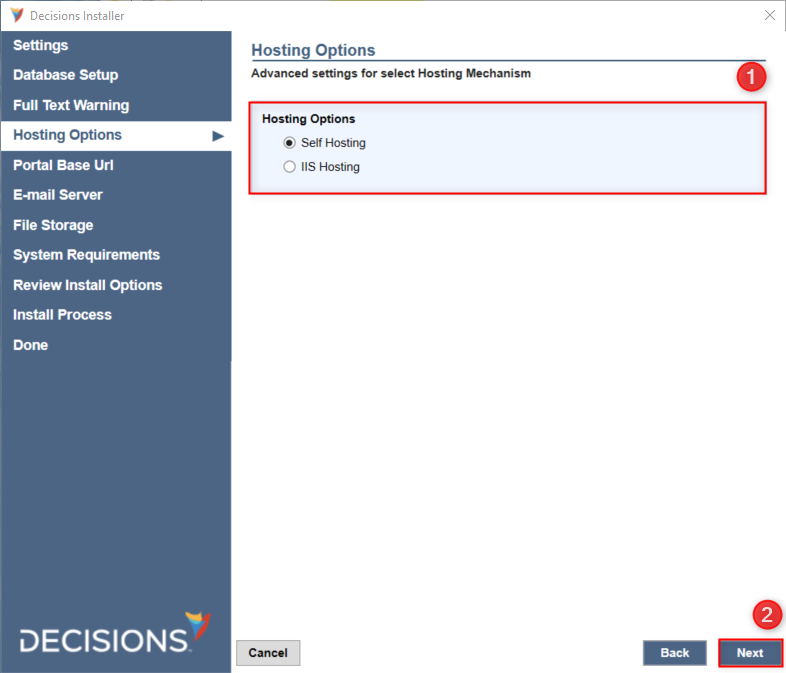
Before moving ahead, ensure to add the host entry in the Windows host file or in the host entry of the Domain provider.
- If your host URL is https://example.com, ensure to add the host entry in the host file at
C:\Windows\System32\drivers\etc\hosts.
127.0.0.1 example.comSelf Hosting
- From the Portal Base Url window, select the desired Http/Https configuration with Certificate path and Password if applicable, and specify the desired Port that Decisions will install to.
Afterward, leave the Override Portal Base URL unchecked to allow the installer to create a Portal Base URL using "localhost" as the domain, with the input Port value and either Http or Https as chosen. Otherwise, enable Override Portal Base URL to provide a custom Portal Base UR or Fully Qualified Domain Name.
This example keeps the default values (http://localhost:80). Different ports must be opened via Windows Firewall first. Click Next.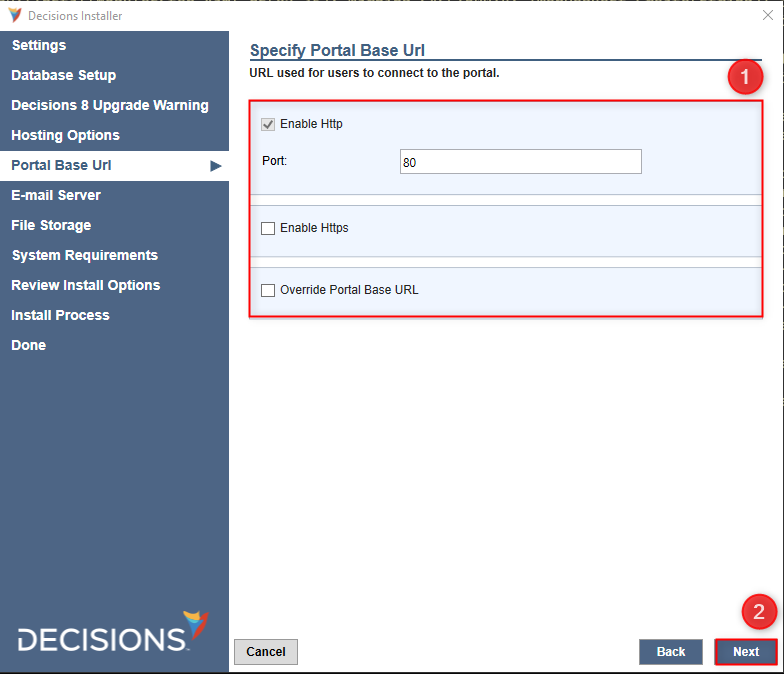
IIS Hosting
- Provide the Portal Base URL, then click Next.
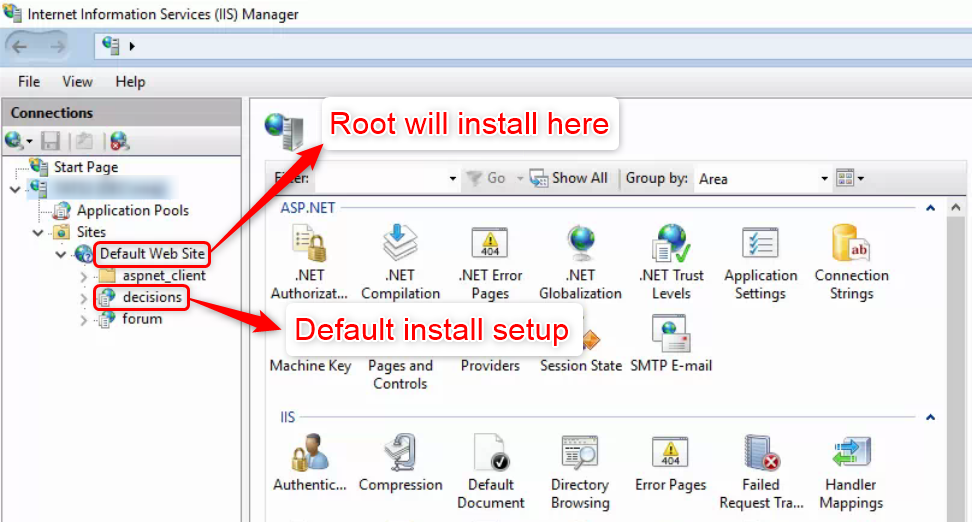
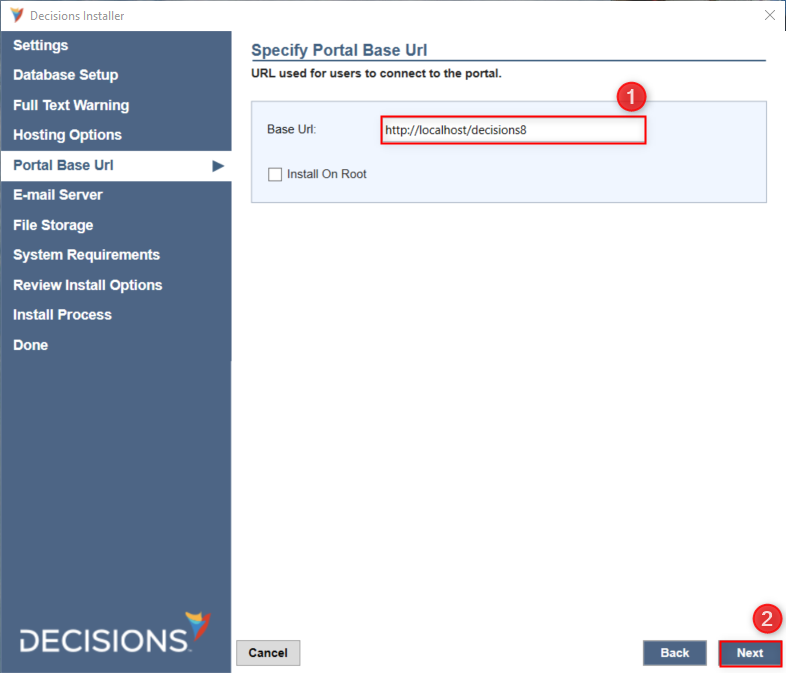 Install On RootThe benefit of installing on Root is that the user will not have a "/decisions" at the end of the Base URL. Instead, it will be a stand-alone web address.
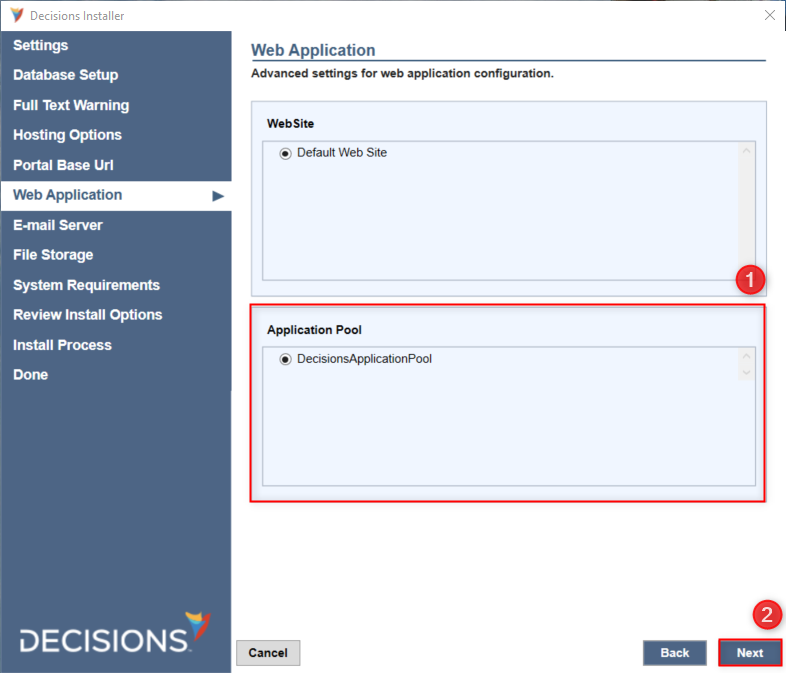
- Set a required Application (App) Pool or click Create New. Click Next.
Email Server, Encryption Keys, and File Storage
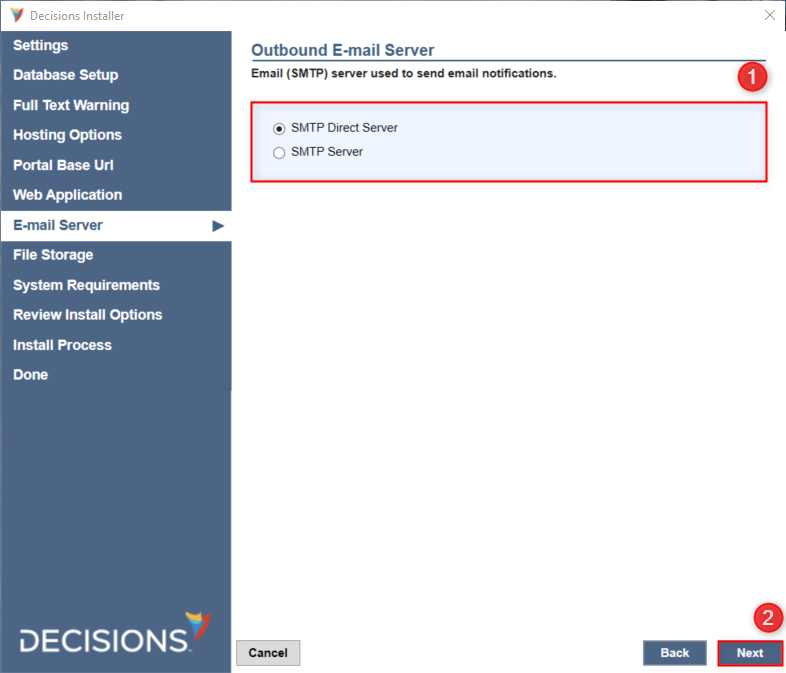
- Select an Outbound Email Server option. For local installs, select SMTP Direct Server. To specify a mail server address, select SMTP Server. Click Next once done.
In the Encryption Keys window, the installer will detect any existing encryption keys on the connected database. A prior key and its data can be restored via the Restore Key File by entering its key value.
For a fresh installation and if not wishing to restore any existing keys, select Next to continue. Even if keys are found, restoring is optional.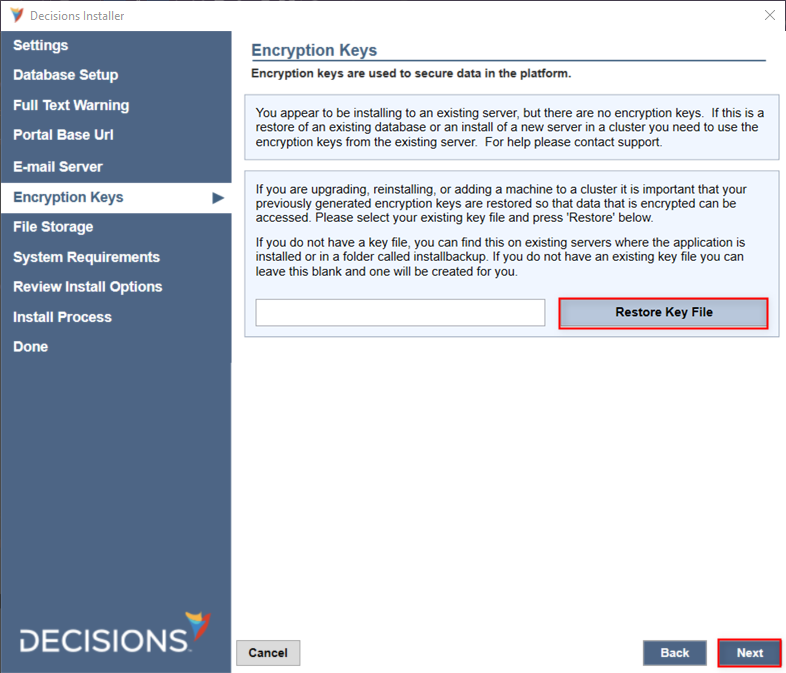
- Confirm the File Storage Path where Decisions will reside. The default path is
C:\Program Files\Decisions\FileStorage. Click Next once done.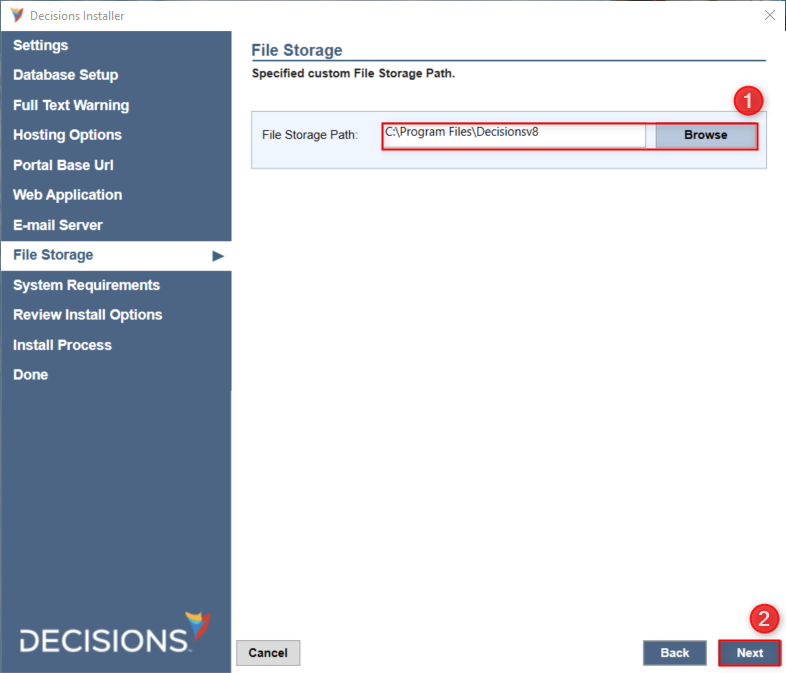
- Review any warnings in the System Requirements Check before clicking Next to proceed.
Local PC installations will likely run into an OS warning due to production environments requiring Windows Server OS. This does not prevent successful installation, so installation may proceed if this occurs.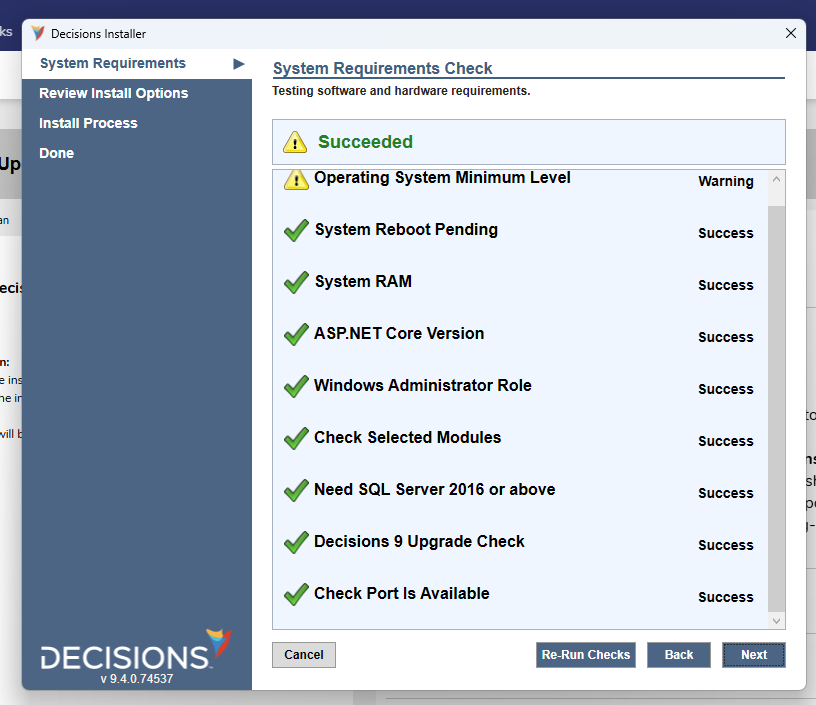
- The Review Install Options panel is the installation's configuration. Check these settings for accuracy.
To save these settings for future reference or recovery, click the Save Install Settings To File checkbox before clicking Next.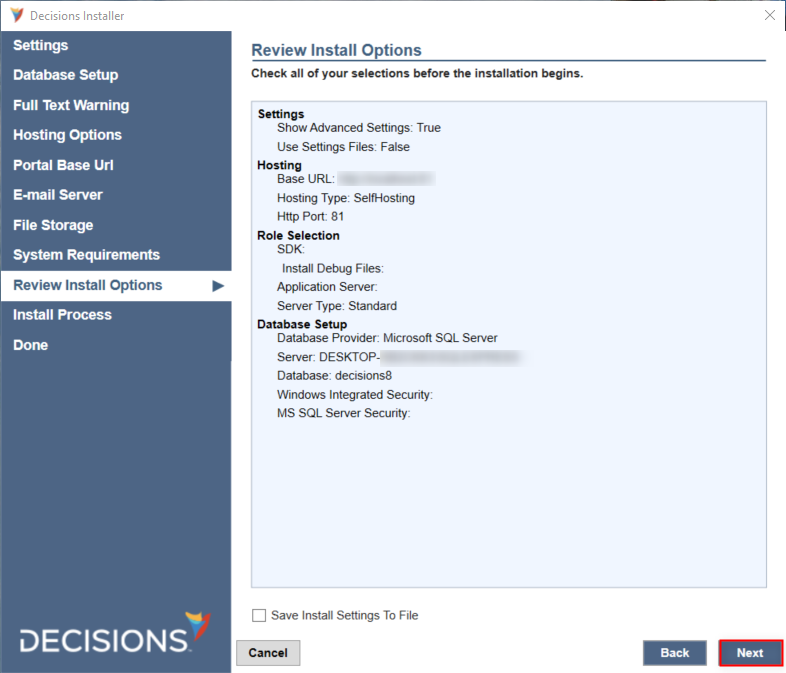
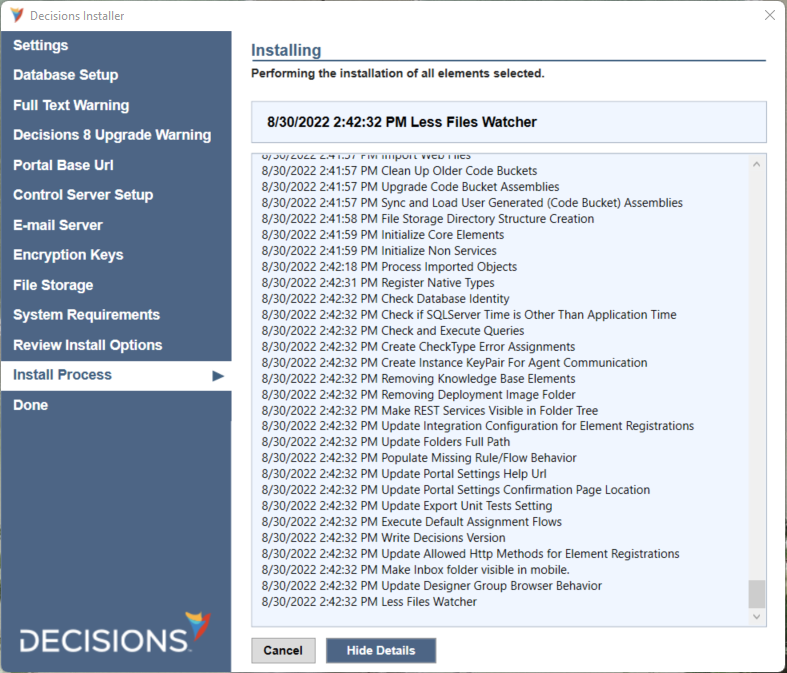
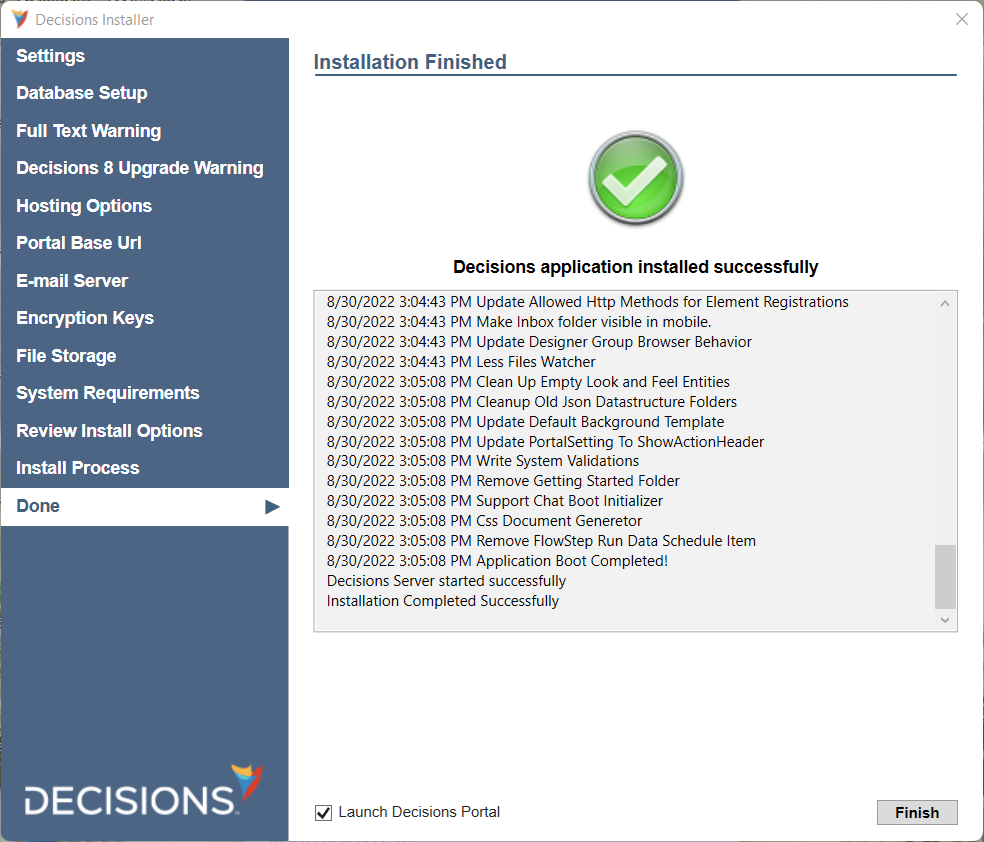
- Installation automatically begins. Click Show Details to see the installation's progress step-by-step.
- After installation completes, enable the Launch Decisions Portal checkbox, then select Finish.
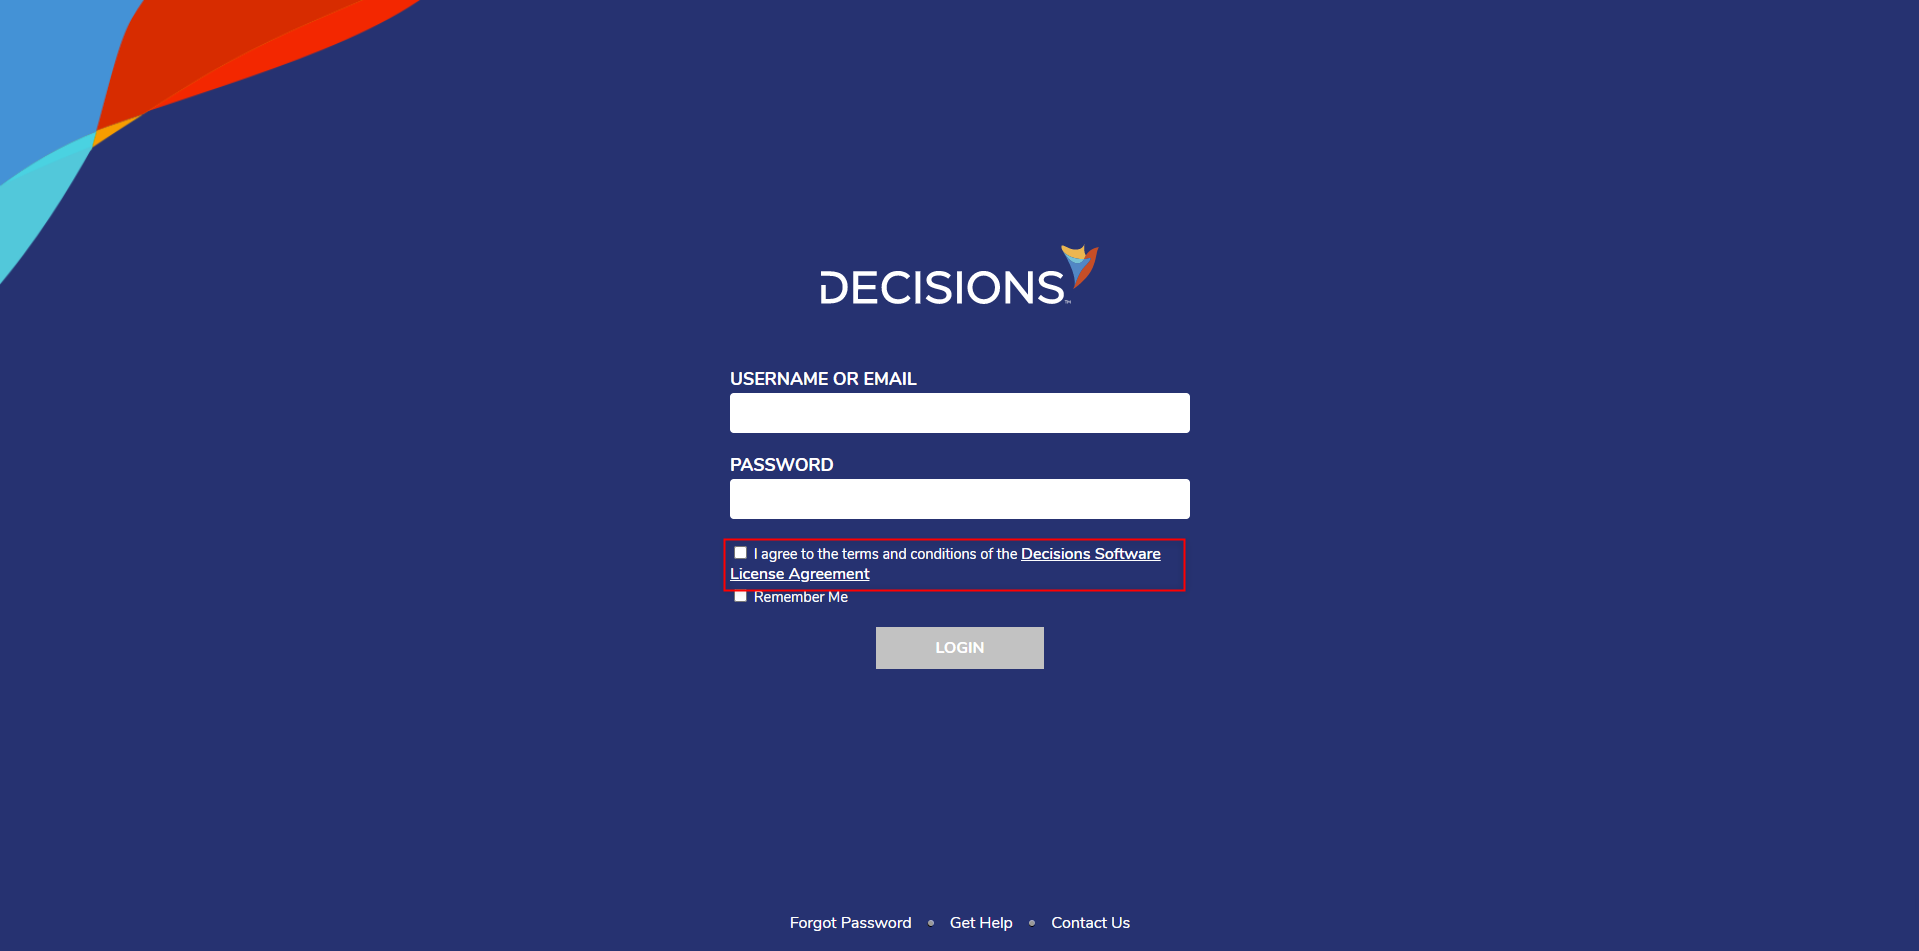
- Click the I agree to the terms and conditions... checkbox, then log in to the platform by providing the admin Username and Password and clicking the LOGIN button.
Decisions License
When a Decisions instance is newly installed, a trial Enterprise-level license is active for seven days. After seven days, the trial license will be automatically revoked, and a personal license will be applied to the instance. A personal license is a non-expiry license that is limited to a single instance and cannot be used as a production server. For more information, refer to Decisions License.
Feature Changes
| Description | Version | Date | Developer Task |
|---|---|---|---|
| Moved DB Schema for PostgreSQL installs to Custom Connection String section. | 9.2 | August 2024 | [DT-041731] |
| Changed an error message when clicking on the Edit Settings button to "Unable to read settings, it could be due to a version mismatch. Please use the correct version". | 9.5 | November 2024 | [DT-042987] |