Overview
Setting up Multi-Tenancy on a Local File System/machine provides a testing environment capable of distributing resources across multiple environments without the use of VMs.
This allows Control Instance Administrators to access multiple Tenant Instances without the additional cost and resource demand of setting up another machine or VM.
The following document demonstrates how to establish one such environment for Self-Hosted and IIS installations.
Prerequisites
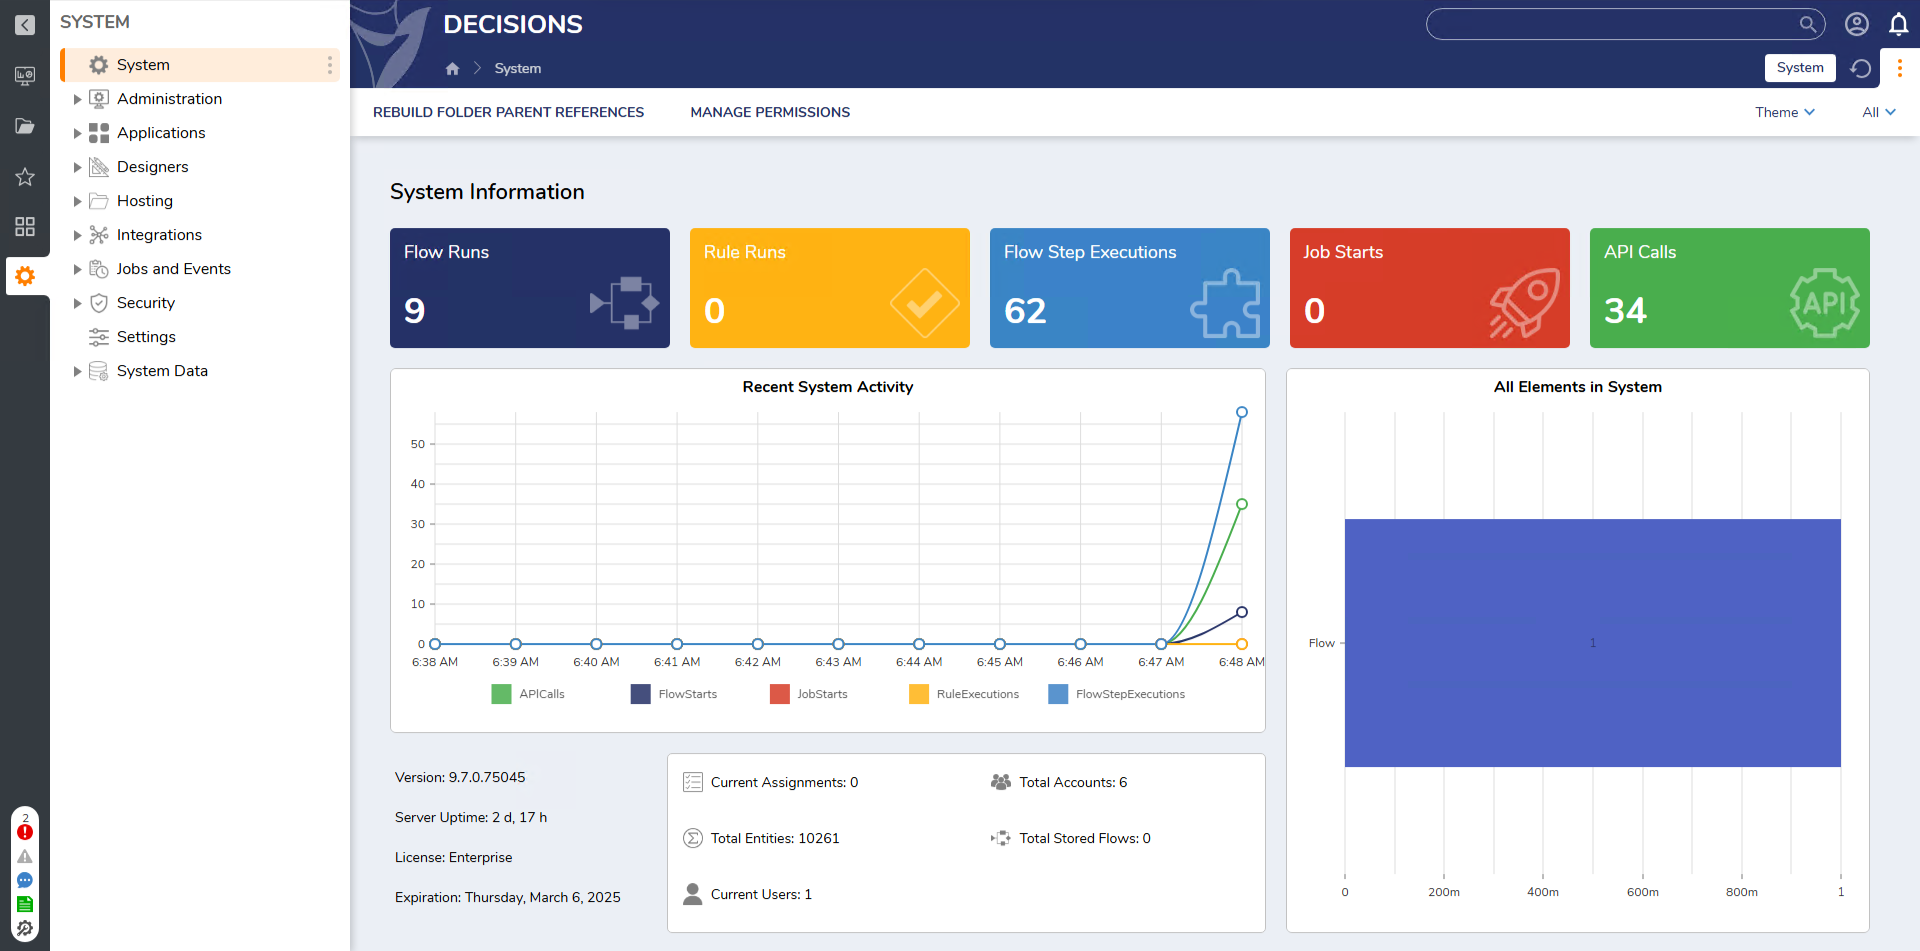
- Establish a Control Instance
- Create an Account on the Control Instance for use as the Tenant Admin
Example
Copying and Modifying the Control Instance
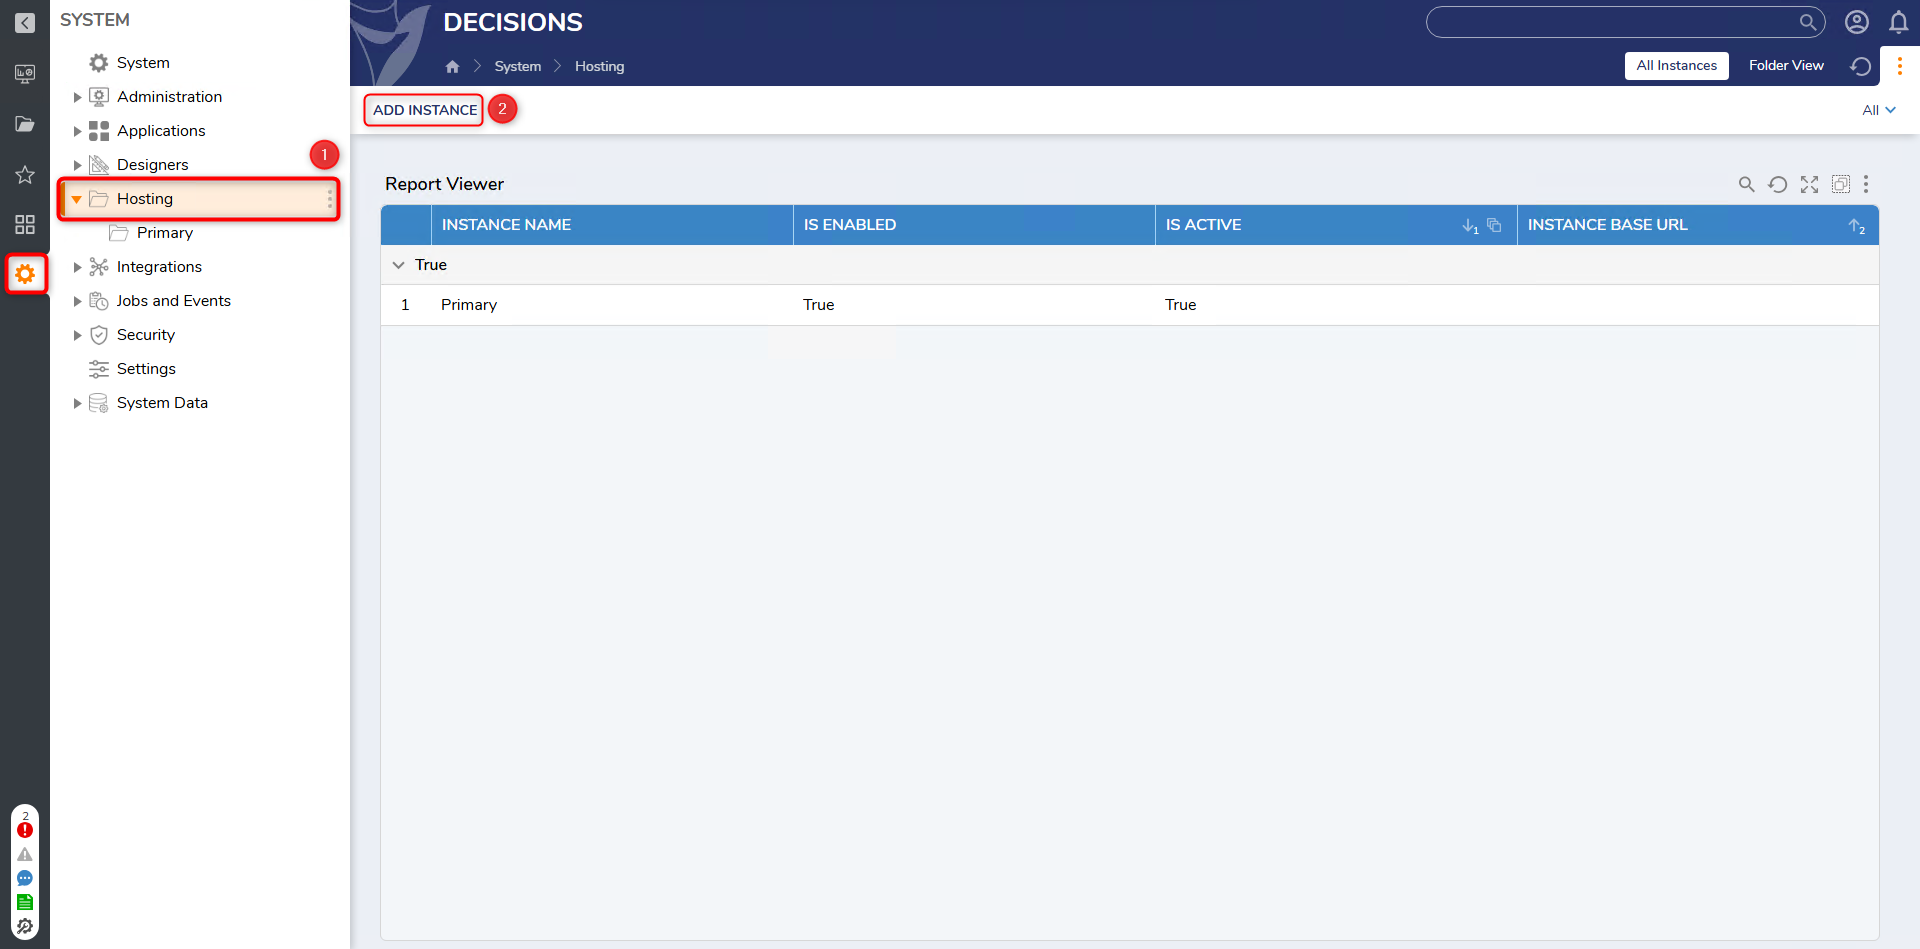
- From the Decisions Studio of the Control Instance, navigate to System > Hosting. Then, click ADD INSTANCE.
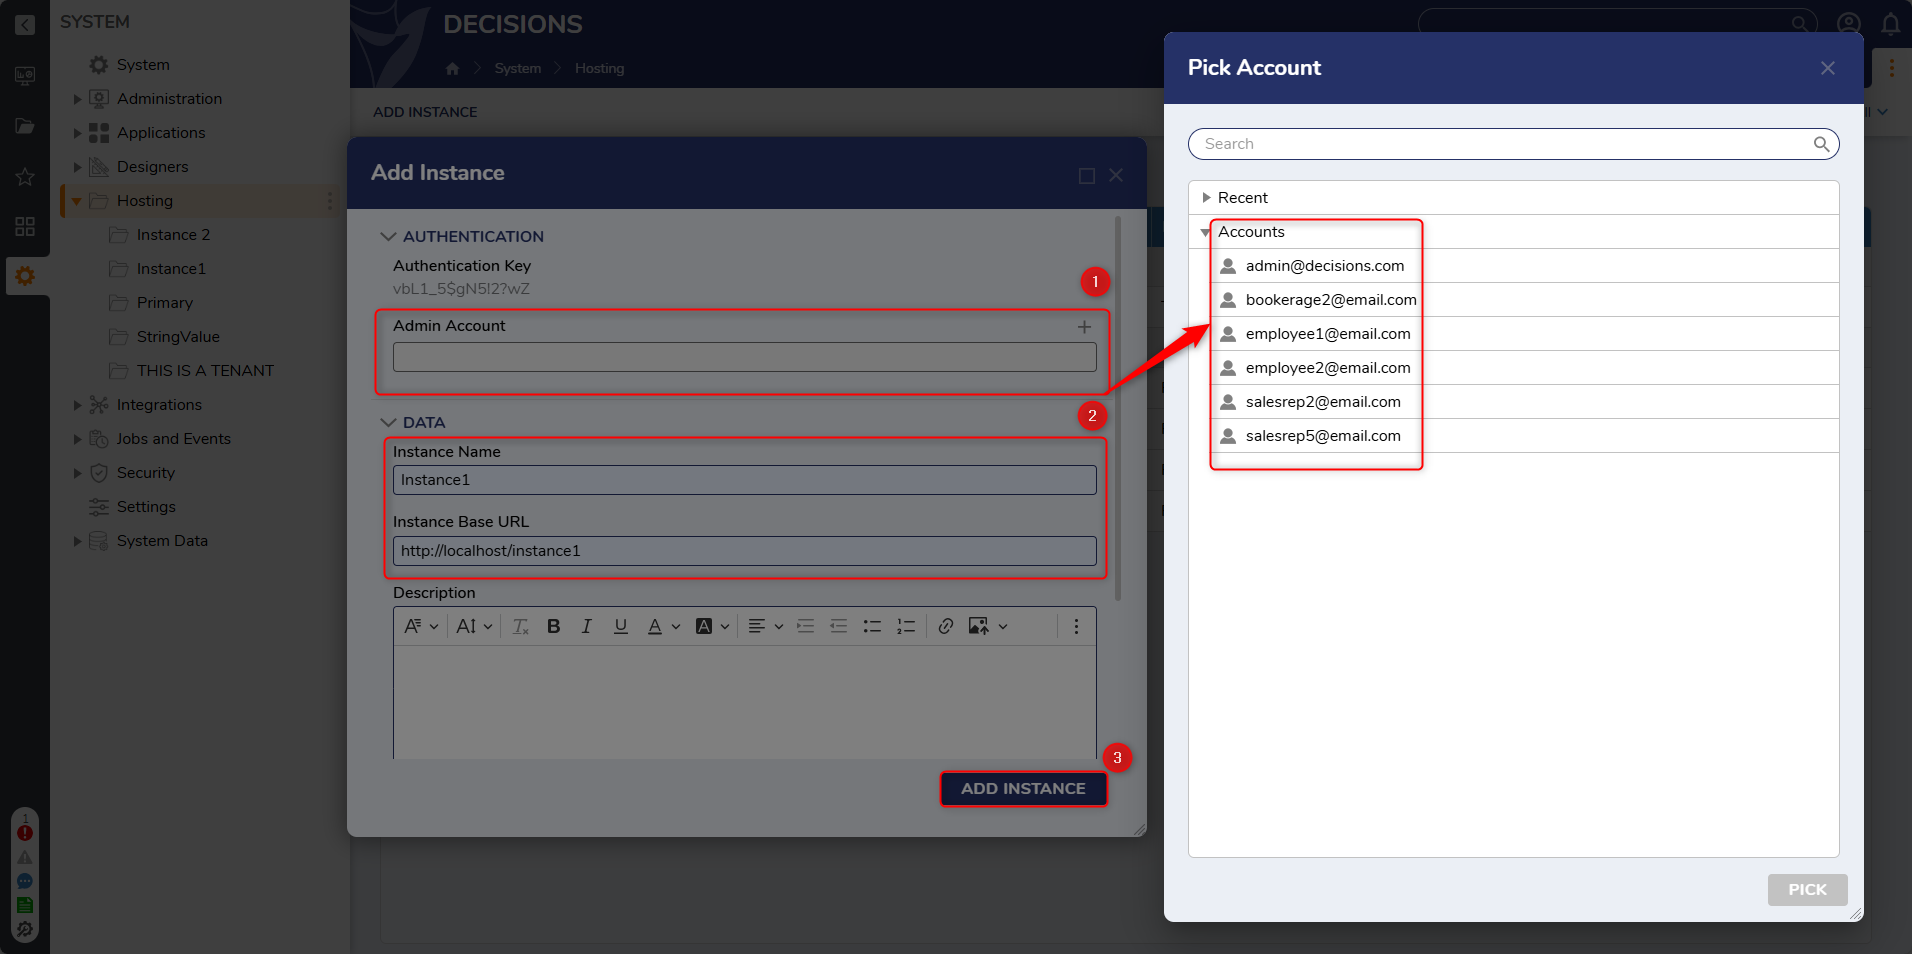
- From the Add Instance window, copy and paste the Authentication Key into an empty text editor.
- Under Admin Account, PICK the Account that was created for this Instance. Then provide the desired InstanceName and Instance URL, and click ADD INSTANCE.Instance URL ConfigurationFor ease of use follow the below format when defining the Instance URL:
- For IIS: Provide an Instance URL that references the IP Address of the Control InstanceURL, but a unique indicator afterward, typically one that references the name of the database used for the Instance. For example: "http://(IP ADDRESS HERE)/instance1"
- For Self Hosted: Provide an Instance URL that references the Domain of the Control Instance URL, followed by a unique Port number. For example "http://localhost:8083".
Navigate to the installation location. By default, this is C:\Program Files\Decisions in the Control Instance. Copy the Decisions Server folder.
Then, Paste the copied folder into the same location. Rename the folder to match the name of the second Instance.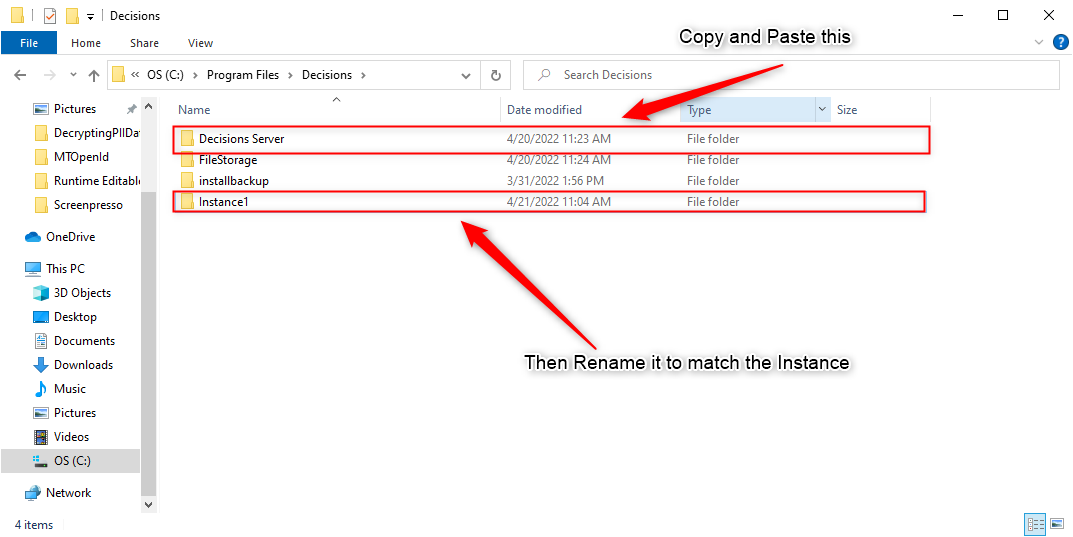
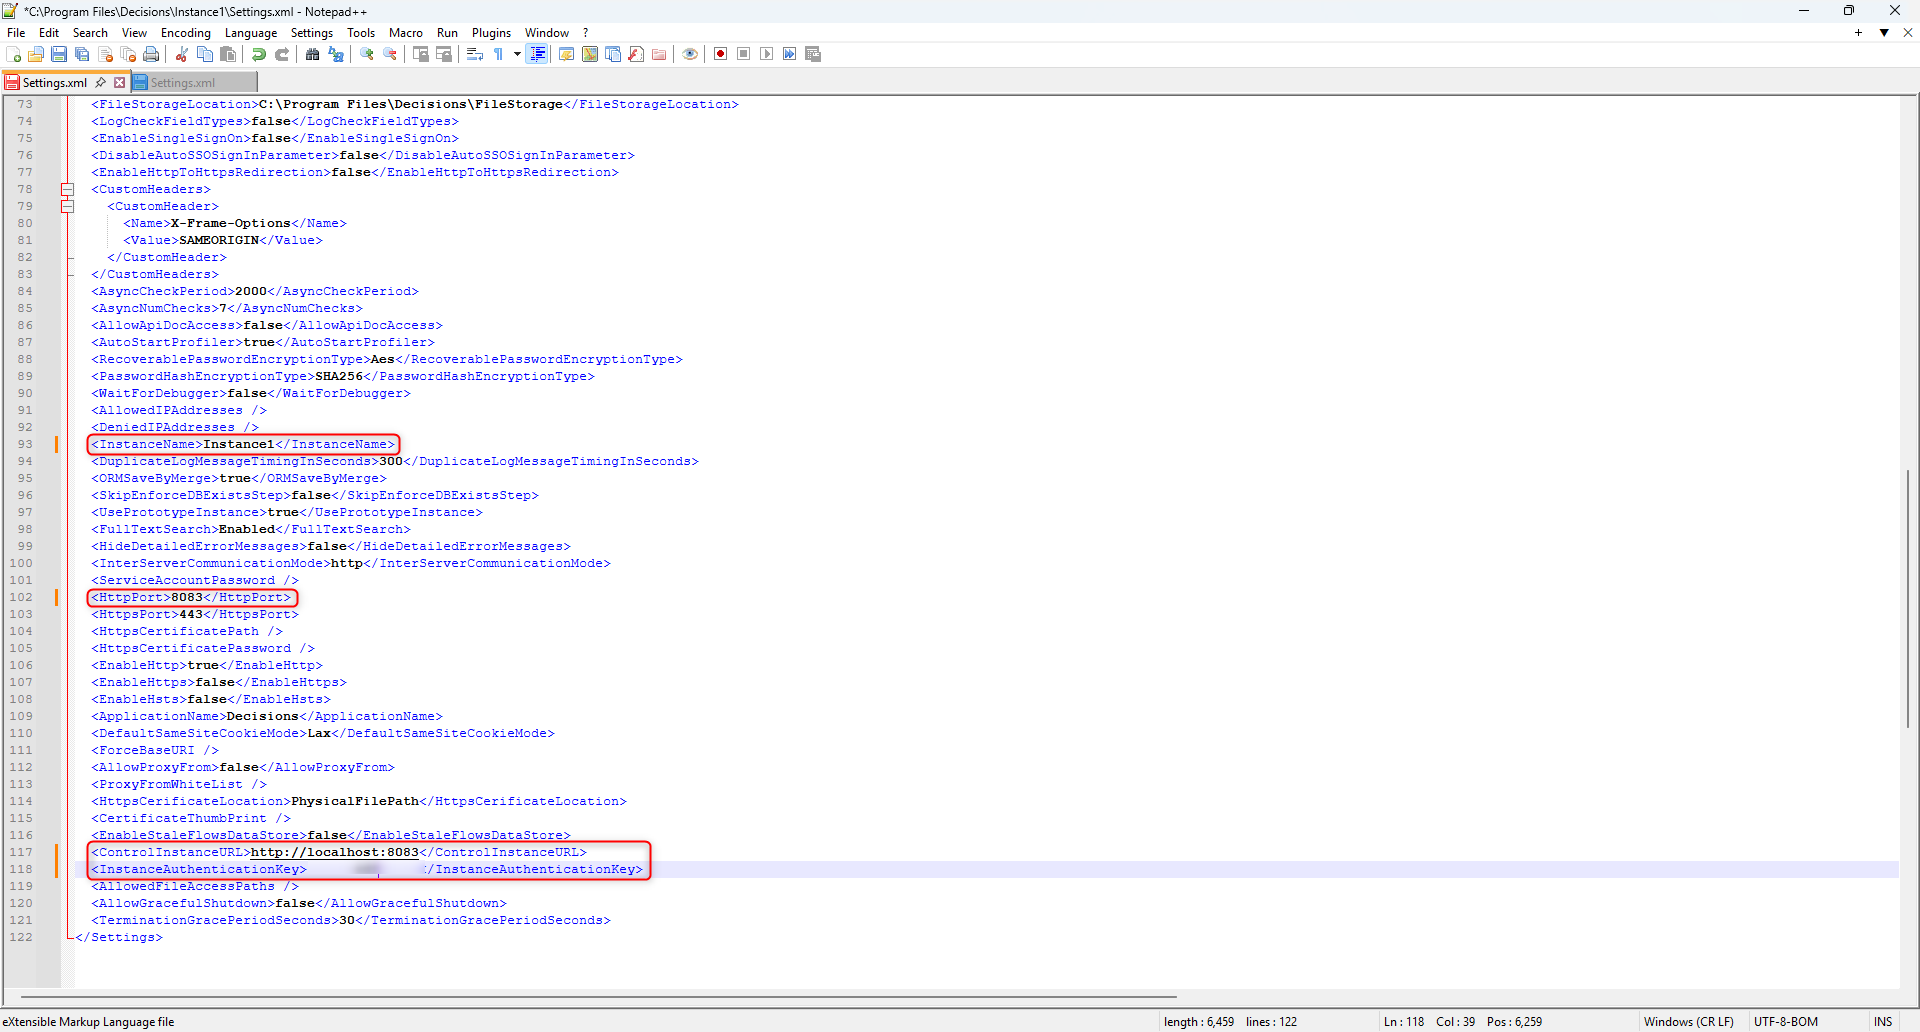
Within the newly renamed Instance folder, open the Settings.xml in a text editor. Change the following configurations as follows. Once done, save and close the file.
ServerType: Change to Tenant
InstanceName: Change this to the defined Instance Name
PortalBaseURL: Match this to the provided Instance URL
DatabaseConnectString: Copy the following text in between the tag and adjust accordingly.
If using MSSQL:
<DatabaseConnectString>Data Source=[SERVER NAME] ;Initial Catalog=[DATABASE NAME];User ID=[ADMIN USER ID FOR DATABASE];Password=[PASSWORD OF ADMIN ACCOUNT];DatabaseConnectString>

Note that the format of the Server Name/Data Source is dependent upon the version of MSSQL that is used.

If a Developer Server is being used this will be written as (local); if SQL Express used it will be written as (local)\SQLEXPRESS.


If using Postgres:
<DatabaseConnectString>Server=localhost;Port=5432;Database=[DATABASE NAME];User Id=[ADMIN USER ID FOR DATABASE];Password=[PASSWORD OF ADMIN ACCOUNT];DatabaseConnectString>
ServerType: Change from Hosted to Tenant
ControlInstanceURL: Provide the URL for the Control Instance.
InstanceAuthenticationKey: Paste in the previously copied Authentication Key.
HttpPort: Provide a unique value for each respective Instance. Note; changing the Portal number is not required for an IIS installation.
Hosting Specific Configurations
This portion of the example is dependent upon the type of installation used for the Control Instance.
Self Hosted
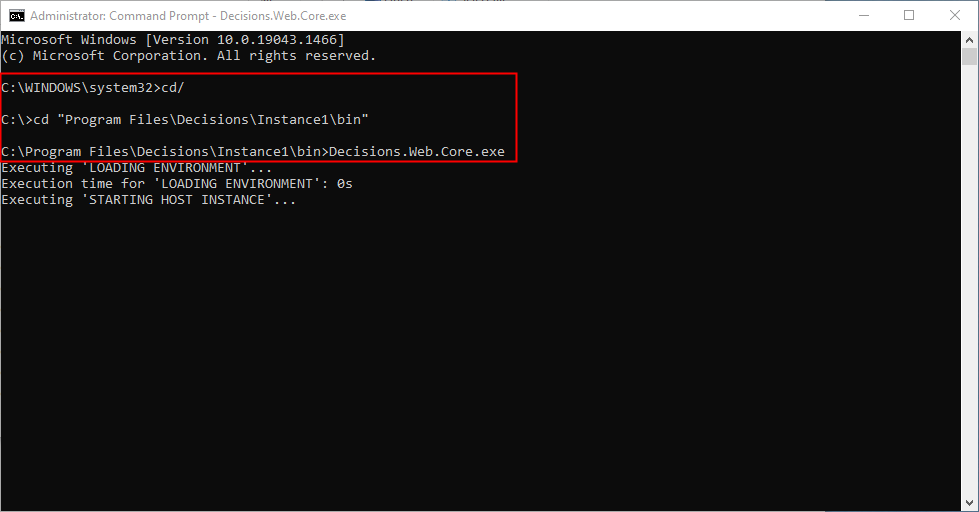
- From the Local File System, open a Command Prompt window as an administrator.
- From the Command Prompt, type cd\, then press the Enter key.
- In quotation marks, type the file path of the Instance bin folder e.g. "Program Files\Decisions\Instance1\bin" then press Enter.
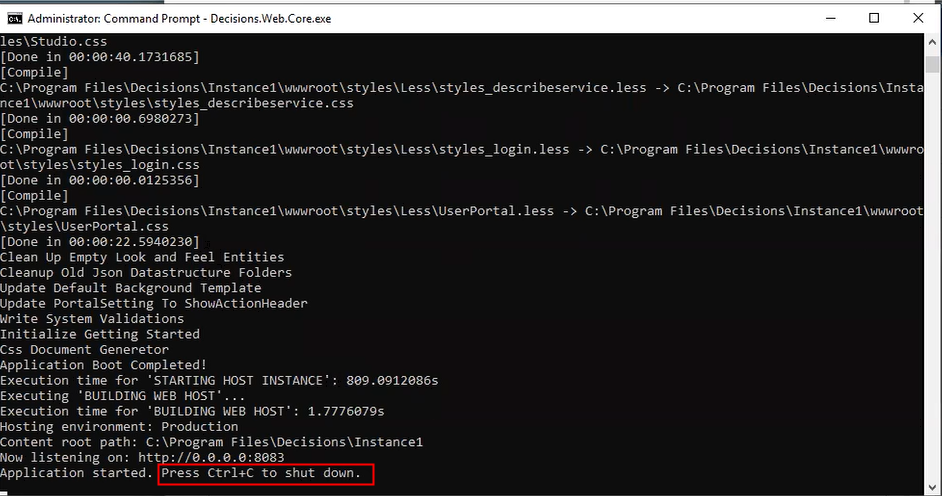
- Input Decisions.Web.Core.exe, then press Enter.Command Prompt ConfigurationsProviding path to the bin folder and the Web.Core.exe file will allow the Command Prompt to run the DecisionsServerInstaller.
- After installation concludes, press Ctrl+C as prompted to shut down the Control Prompt.
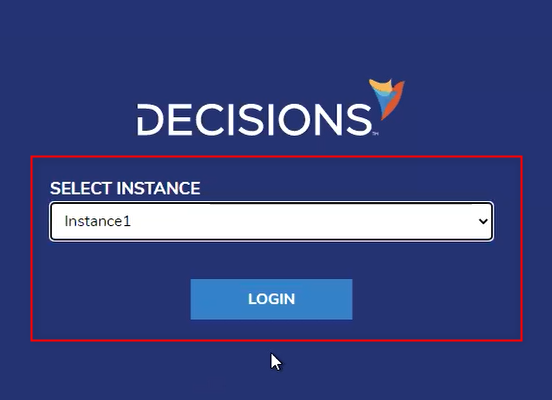
- Attempt to log into the newly added Instance from an incognito window with the defined Admin account.
IIS
- From the Local File System, open IIS Manager.
- From IIS Manager, under the Application Pools for the primary server, select Add Application Pool.
- From the Add Application Pool window, provide a unique Name.
Then change the .NETCLR version to No Managed Code and click OK.Application Pools and Localized IISNote each Instance on the same machine for a Localized IIS Multi-Tenancy will require its own separate Application Pool.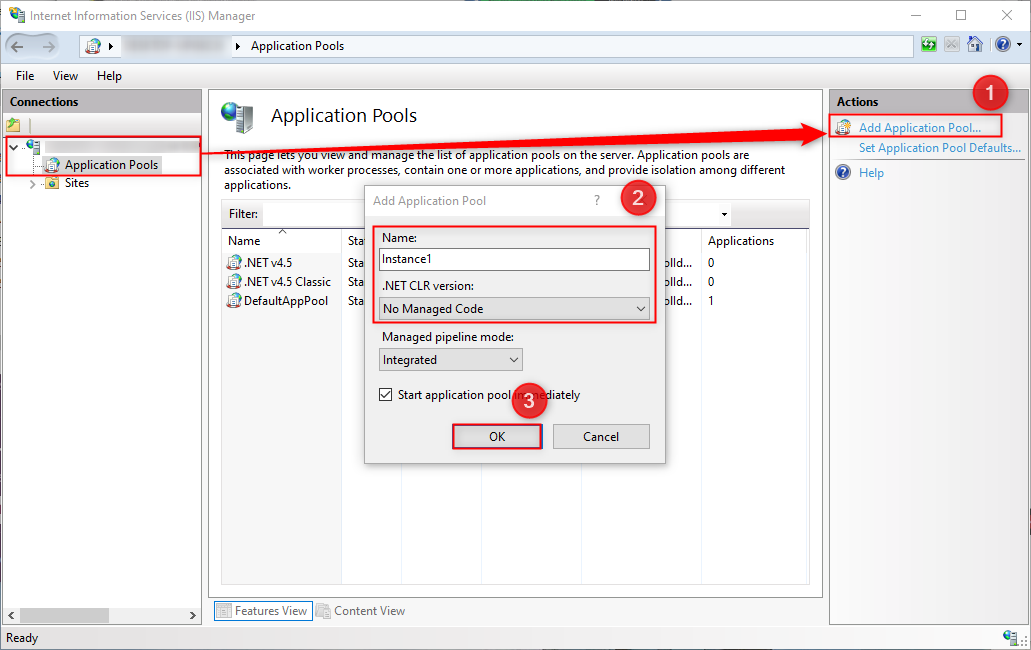
From the Connections Tree on the left, right-click the Default Web Site, then select Add Application.
From the Add Application window, provide a unique Alias that matches the Instance Name. Next to the Application pool, click the Select button and choose the newly created Application Pool. Click OK.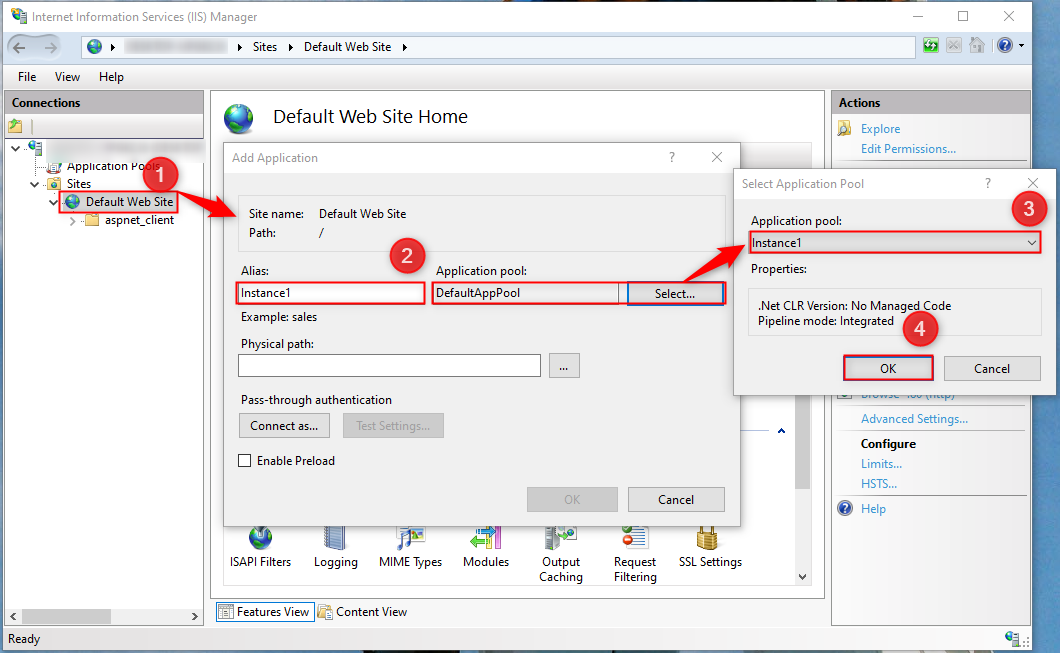
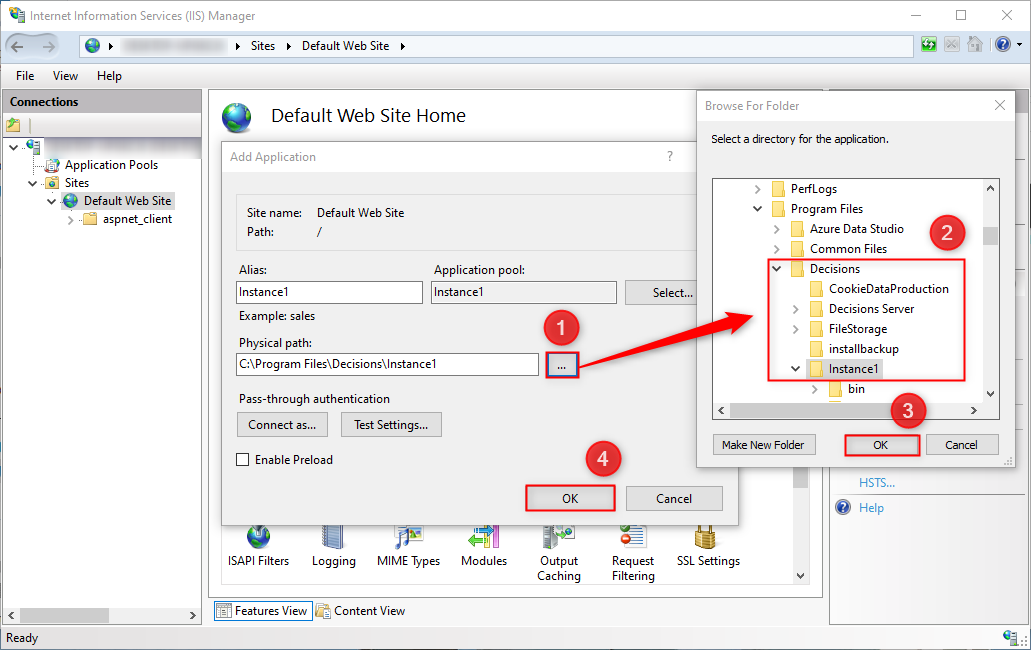
- Click the ellipses button next to the Physical Path textbox. Select the folder containing the Tenant Instance, then click OK. Select OK once more to exit the primary Add Application window.
- Verify that the Instance displays in the list of Connections under the Default Web Site.
Under [Instance Name] > Manage Application, click Browse *:80.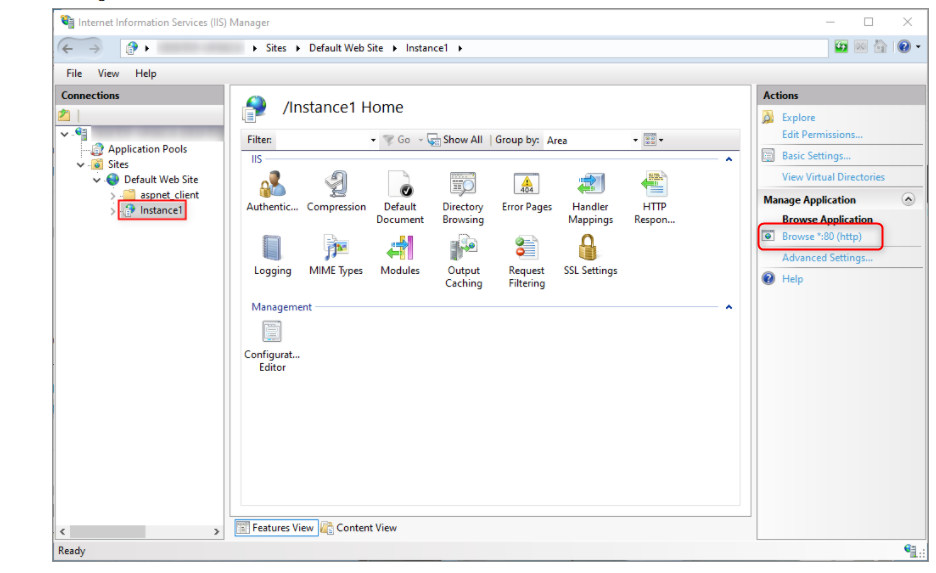
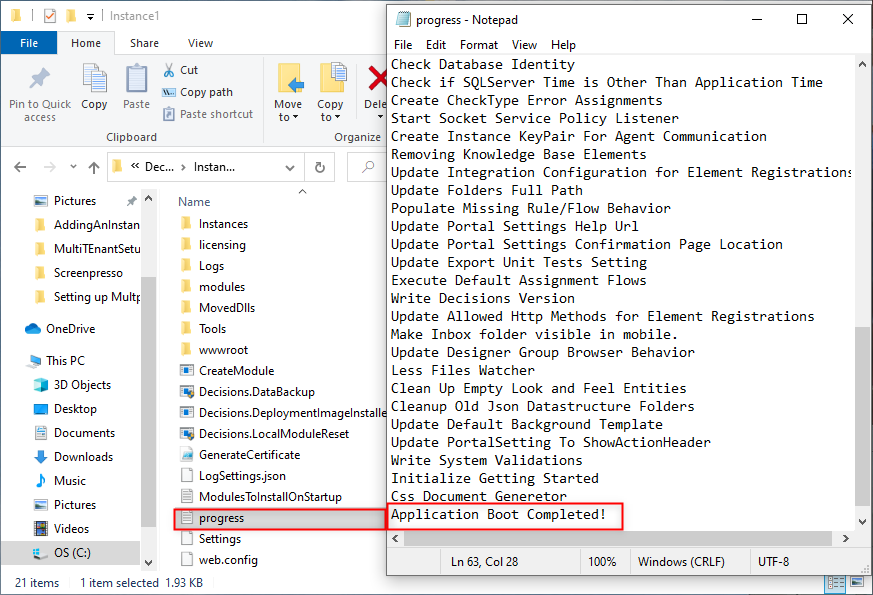
- Navigate to the folder of the Instance and open progress.txt; verify that the installation has concluded by observing the "Application Boot Completed!" text.
- Attempt to login to the BasePortalURL of the Instance from the designated Admin account.
.png)
- Navigate to the System Folder to verify that the correct License type displays. For this example, "Enterprise".