Legacy Projects in v9 Overview
Overview
There are many things to consider when upgrading to v9. Chief among them is what happens to the current Projects and how they can take advantage of all the features of ProjectHub without causing disruption. This article will discuss the best ways of handling moving Projects from an older environment to v9.
Upgrade Order
The recommended approach to upgrading environments and importing Legacy Projects is as follows:

1. Upgrade the Development Environment. The existing Projects will be accessible as Legacy Projects.
2. Convert the Legacy Projects into ProjectHub. If the Legacy Project has Subprojects, convert those first, then the main Legacy Project.
3. Upgrade the Repository Environment.
4. Check in the newly converted Projects to the Repository.
5. Upgrade the Production Environment.
6. Deploy the Converted Projects from Repository to Production.
Following this path will remove the need from converting Legacy Projects in each environment.
Legacy Projects
What happens to Legacy Projects after they are now in the newly upgraded v9 environment?
In many ways Legacy Projects behave the same way that they did in v8 or lower versions. The Project will still run normally, so there is no risk of business loss in the Production environment while the Legacy Project remains in an unconverted state.
Permissions also function exactly the same. However, end users are limited to the Public Folders of a Project. Your Folder tree may need to be modified and moved to the Public Folders for those users to access Assignments, Dashboards, etc.
The biggest limitation of a Legacy Project is that it cannot be deployed to another environment. So any work that is done to a Legacy Project on a Development Environment will not be able to move to a QA environment or to Production, until that Legacy Project has been converted to ProjectHub.
Once a Legacy Project is converted to ProjectHub it is removed from the Legacy Folder.
There are no longer System Defaults for many elements. These are configured at the Project level. If you are using any kind of default settings, variable, etc, that impacts multiple Legacy Projects, it is strongly encouraged to make a separate ProjectHub that contains all of those elements. Then that ProjectHub can be used as a Dependency by other Projects.
Converting a Legacy Project to ProjectHub
Please see Projects Conversion article for more detail.
If you were unhappy with your Legacy Project name, the conversion process is the time to change it.
The ProjectHub name cannot be changed in the future. Keep in mind that if there are a large number of Projects, naming them may be the best way of keeping them organized on the side Project menu.There are two methods for converting Projects.
Convert Legacy Project to New Project: This action is only available on the folders that are part of existing legacy Projects. This will convert the Legacy Project to the new Project, incorporating all associated entities into the new Project. The Project name cannot be changed with this method.
Move Folder to Project This action is available on all folders. This will move the folder to the specific Project.
Importing Legacy Projects
Because of the changes to Projects in v9, Projects from older versions that were exported as .decobj files (usually in .zip files) cannot be used directly to create a Project (such as by dragging them onto the Decisions screen). A Project must be created first and then the file can be imported through the menu options.
Projects created in v9 can be exported as .decobj and imported by dragging them onto the screen.
More Information:
For a hands-on demonstration, please view the following video:
Other Issues
Workflow Catalogs
All Workflow Catalog folders will be available after upgrade to v9. However they cannot be moved to a Project. The catalog items within the catalog folder can be moved by right-clicking and choosing the Move to Project action.
The catalog items will be placed within the chosen Project at root level, but can be further moved around as needed.
Access Patterns
Access Patterns created in v9.4 or earlier need to be moved manually to a Project before they will export with the Project. Please see the Creating Access Patterns for Table Integrations document for steps on how to move them.
Work Queues
Work Queues and Scheduled Jobs are now Project specific. Work Queue Types and Workers remain in the System level as they did in prior versions.
Message Queues
Message Queues are now Project specific. Message Queue Modules need to be given dependencies to Project. Once those are established, any new Message Queues created will be found within the Project they were created in.
Any Message Queues that were created in a prior version will work at the System level after upgrade. New Message Queues will not be able to be created at the System level.
Rule Sets
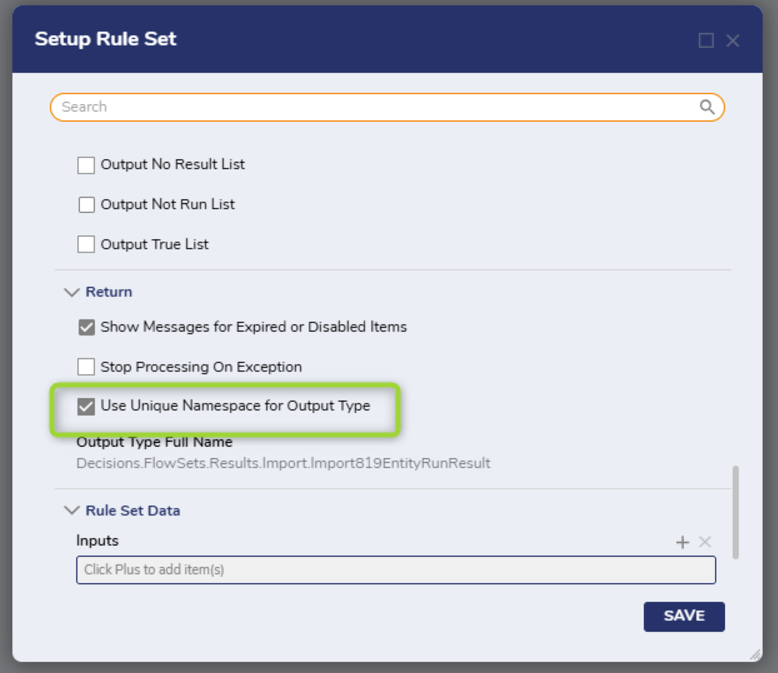
Rule Sets created in v8.16 or below, if using either (or both) a user defined type or a data return Rule Set will have issues when being imported into a version below v9.4. Starting in v9.4 a setting called "Use Unique Namespace for Output Type" will appear under the Return section in the Setup Rule Set dialog menu. This setting by default is set to true. The setting can be set to False for users with a prior ruleset in a Flow that was using the old name space. This will allow it compile and the Flow using the Rule Set to work properly.
The "Use Unique Namespace for Output Type" setting will not appear for Rule Sets that were created in v8.17 or above, or v9.