Step Details | |
| Introduced in Version | --- |
| Last Modified in Version | 9.8.0 |
| Location | Data > Excel & CSV |
The List to CSV Mapping step can be used to populate a CSV or Excel File with data from a list.
This article describes all the Step Properties and the usage of Mapping Editor to pass the data from a user-defined data type to generate a CSV or EXCEL file.
Properties
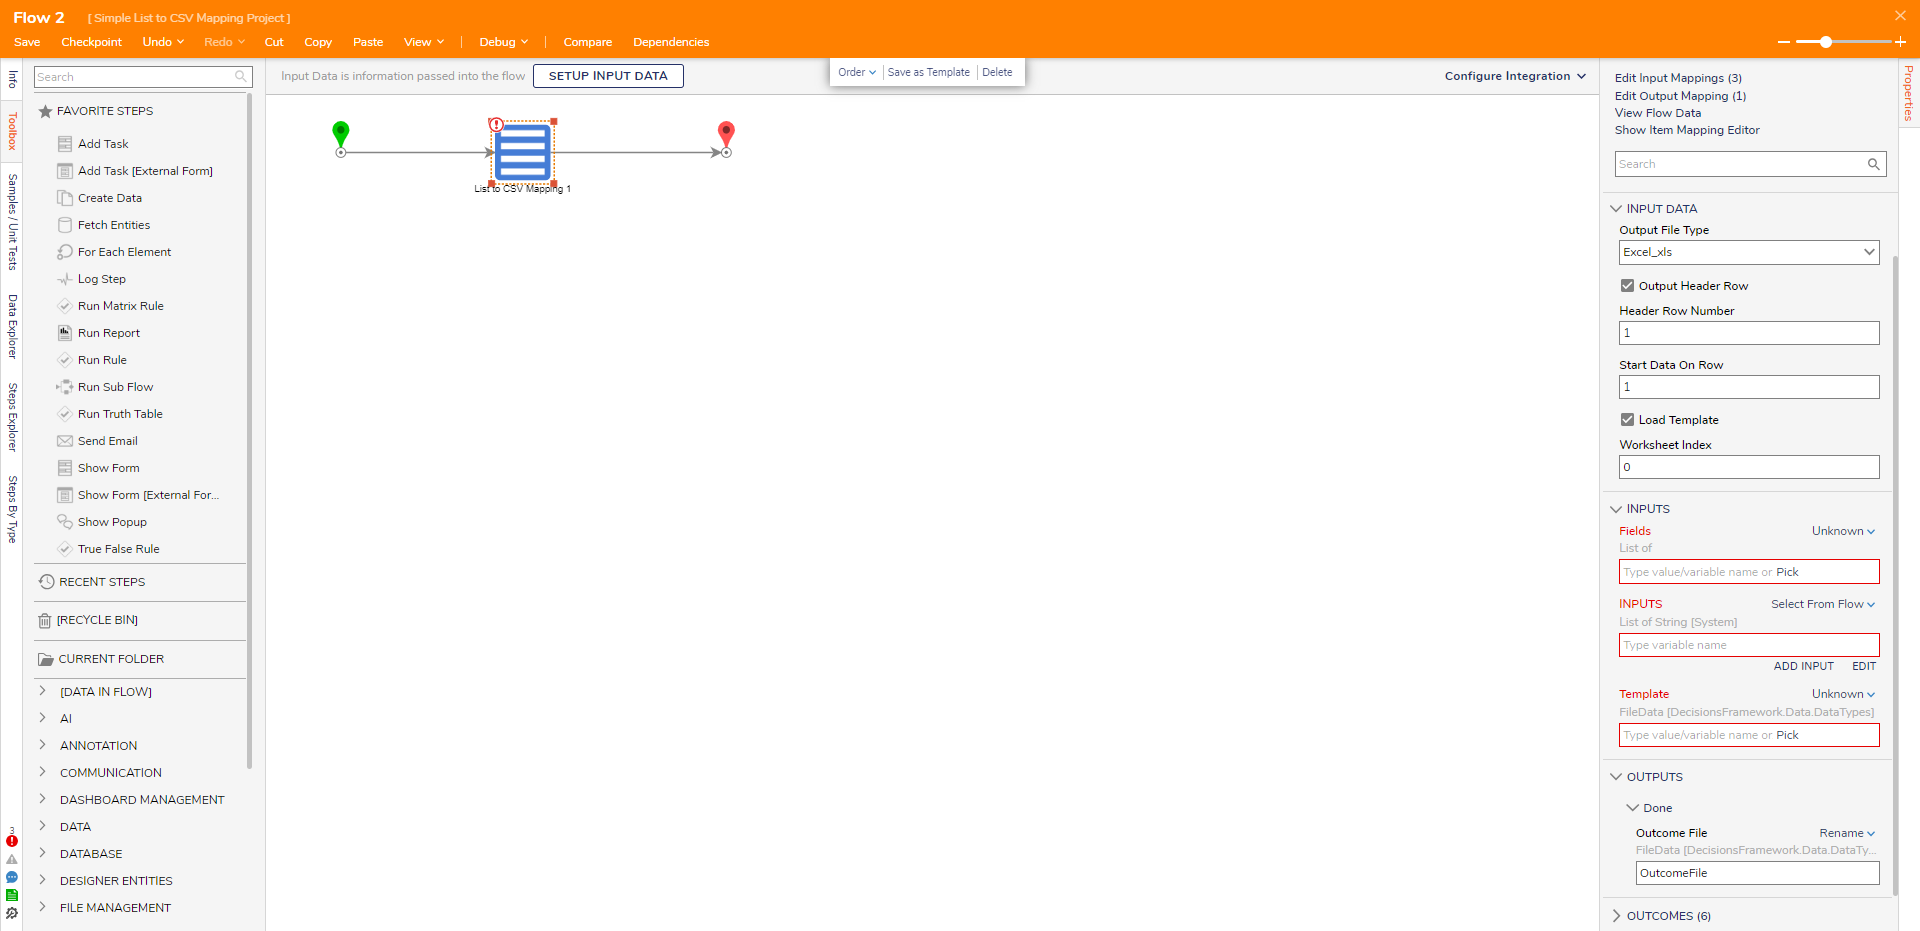
Input Data
This will allow to configure the file that the step will output.
| Property | Description | Data Type |
|---|---|---|
| Output File Type | Defines the type of file the step will output. Currently, the options are CSV, Excel_xls, Excel_xlsx, and AutoSelect. Note: Autoselect defaults to CSV. | -- |
| CSV Delimiter | Allows configuring the separator to be used for the CSV row. | -- |
| Output Header Row | Enabling this property exposes a new setting: Fields under the INPUTS section in the Properties panel. This gives users access to adding a header row and configuring the formatting of the text defined in the header. | Boolean |
| Header Row Number | Determines which row the headers are placed on in the file. | Int32 |
| Start Data On Row | Determines which row the data begins on the file. | Int32 |
| Load Template | Enabling this property gives users access to the Template Inputs. | Boolean |
| Worksheet Index | Determines the sheet number where the values should be presented. The index of the worksheet starts from 0. Note: Only applicable for .xls and .xlsx file types. | Int32 |
| Quotation Mark Behavior | This will allow users to specify when to include quotation marks (") for CSV values. E.g., the list contains a comma,
| -- |
| Auto Format Cell Value (v9.8+) | Only available for the Excel_xls and Excel_xlsx Output File Types. When this is enabled the cell values will automatically format to the type of data being passed into the step. Without this enabled all values will be of the String data type. | Boolean |
INPUTS
This will enable the definition of the input data to be passed.
| Property | Description | Data Type | |
|---|---|---|---|
| INPUTS | List of Objects to add to the CSV file. Users have the flexibility to pass any user-defined data type to this property. This allows adding multiple fields (columns) to the CSV or Excel file. This can be achieved by mapping additional fields via the mapping editor. Note: It is mandatory to map input data using the Show Item Mapping Editorin the step properties located above the search bar. For more information, refer to the next section of this article. 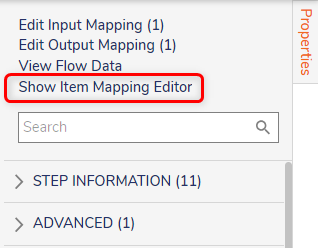 | List of String | |
| Fields | Allows to define the formatting of the header. | --- | |
| Is Bold | Formats the text in Bold. | --- | |
| Percent Increase in Font Size | Increases the size of the Header text in percentage. | --- | |
| Title Setup | Defines the text shown in the header row. | --- | |
| Column Width | Defines the width of the Column containing the Header Row. | --- | |
| Template | Defines the formatting of the new CSV file to follow the same formatting of this template. | FileData | |
Outputs
| Property | Description | Data Type |
|---|---|---|
| Outcome File | File created when the Flow executes this step successfully. | FileData |
Using the Mapping Editor
As mentioned in the above section (under INPUTS), the step accepts the input type as "List of String," but users can pass any user-defined data type to this property. The following section demonstrates how to map the user-defined data type by adding multiple fields.
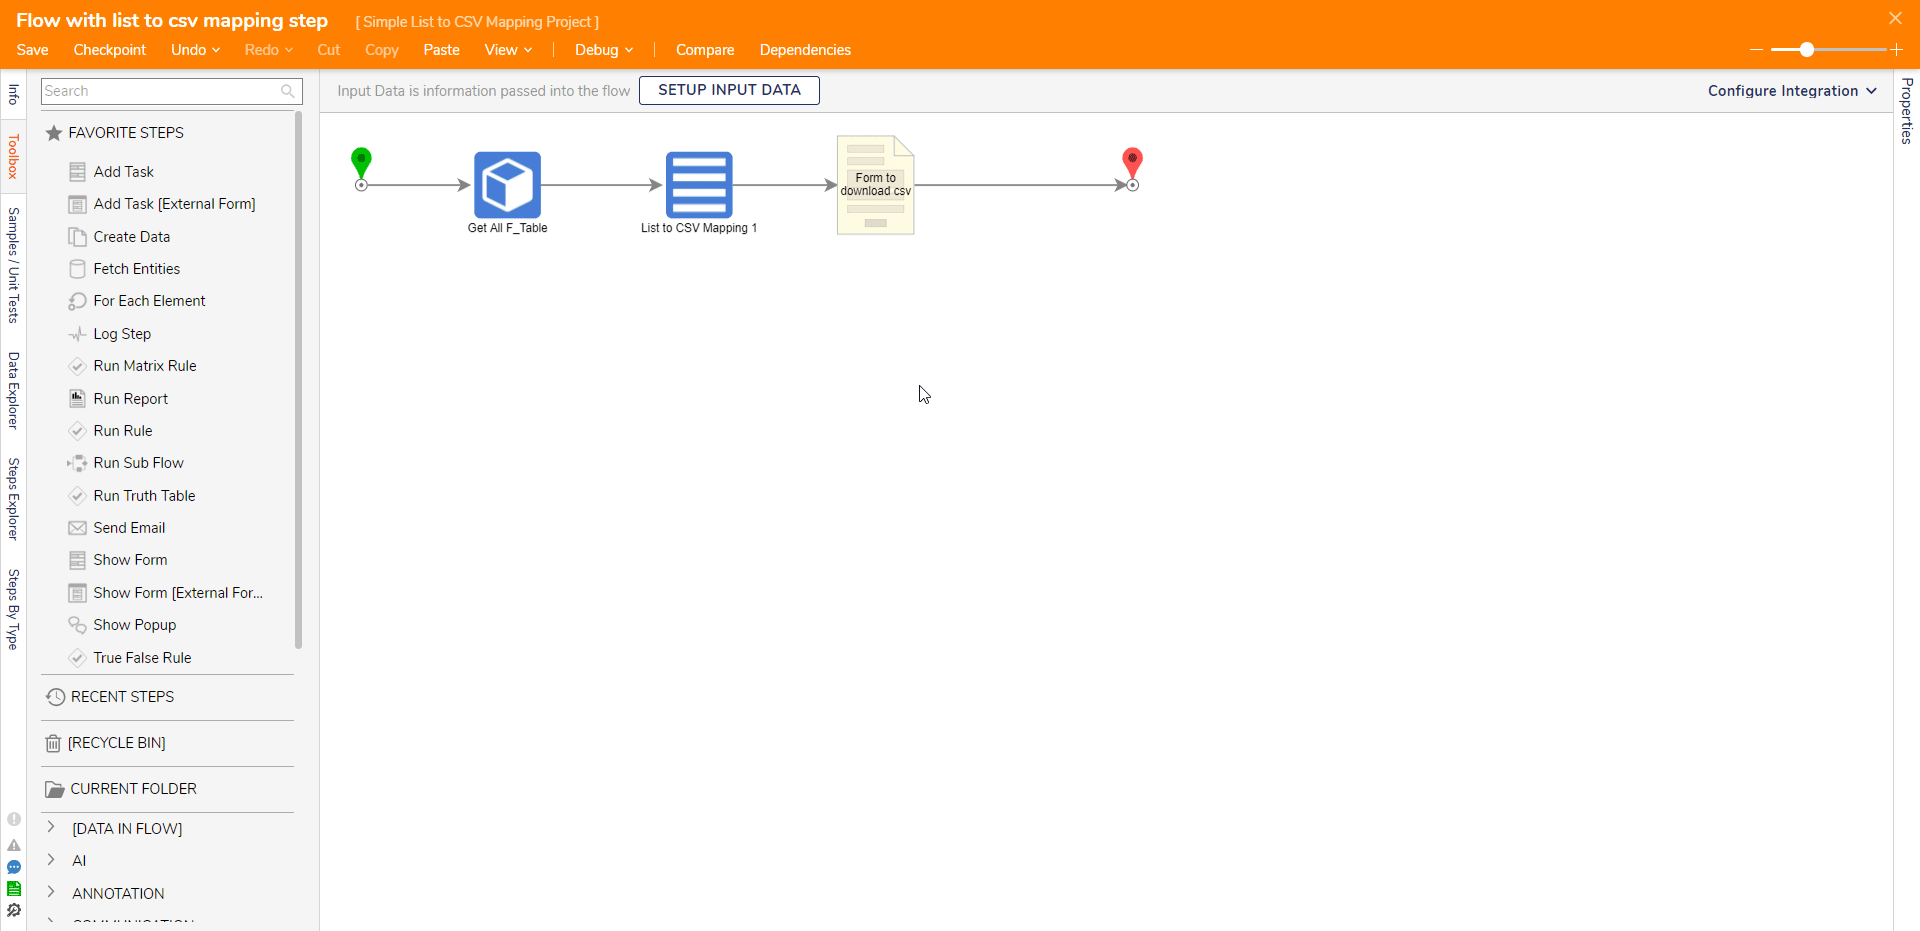
- From the Toolbox, Add a GetAll step from any of the User-Defined Types and join it to the 'List to CSV Mapping Step'.
- From the Properties Panel, navigate to the INPUTS of the 'List to CSV Mapping Step'.
- Choose the mapping type 'Select From Flow'. Click on 'Edit' and pick the data as the output of the GetAll step (Results). Click on Done.

- Click on the 'Show Item Mapping Editor' from the properties panel located above the search bar. A Mapping Editor screen appears with two sections:
- FLOW DATA: This section shows all the inputs available within the Flow.
- STEP INPUTS: This section allows configuring the number of fields to be added in CSV or EXCEL.
- From the STEP INPUTS section, expand the Inputs, change the mapping type of ITEM to Build Data, and click on the Pencil icon to add the number of fields. This defines the number of columns that will be generated in the output file.
- From the FLOW DATA, expand the __INPUT and map the fields to the newly added fields. Mapping is done by clicking and dragging action, generating a blue-dotted line showing the value passed from __INPUT to the added Fields.
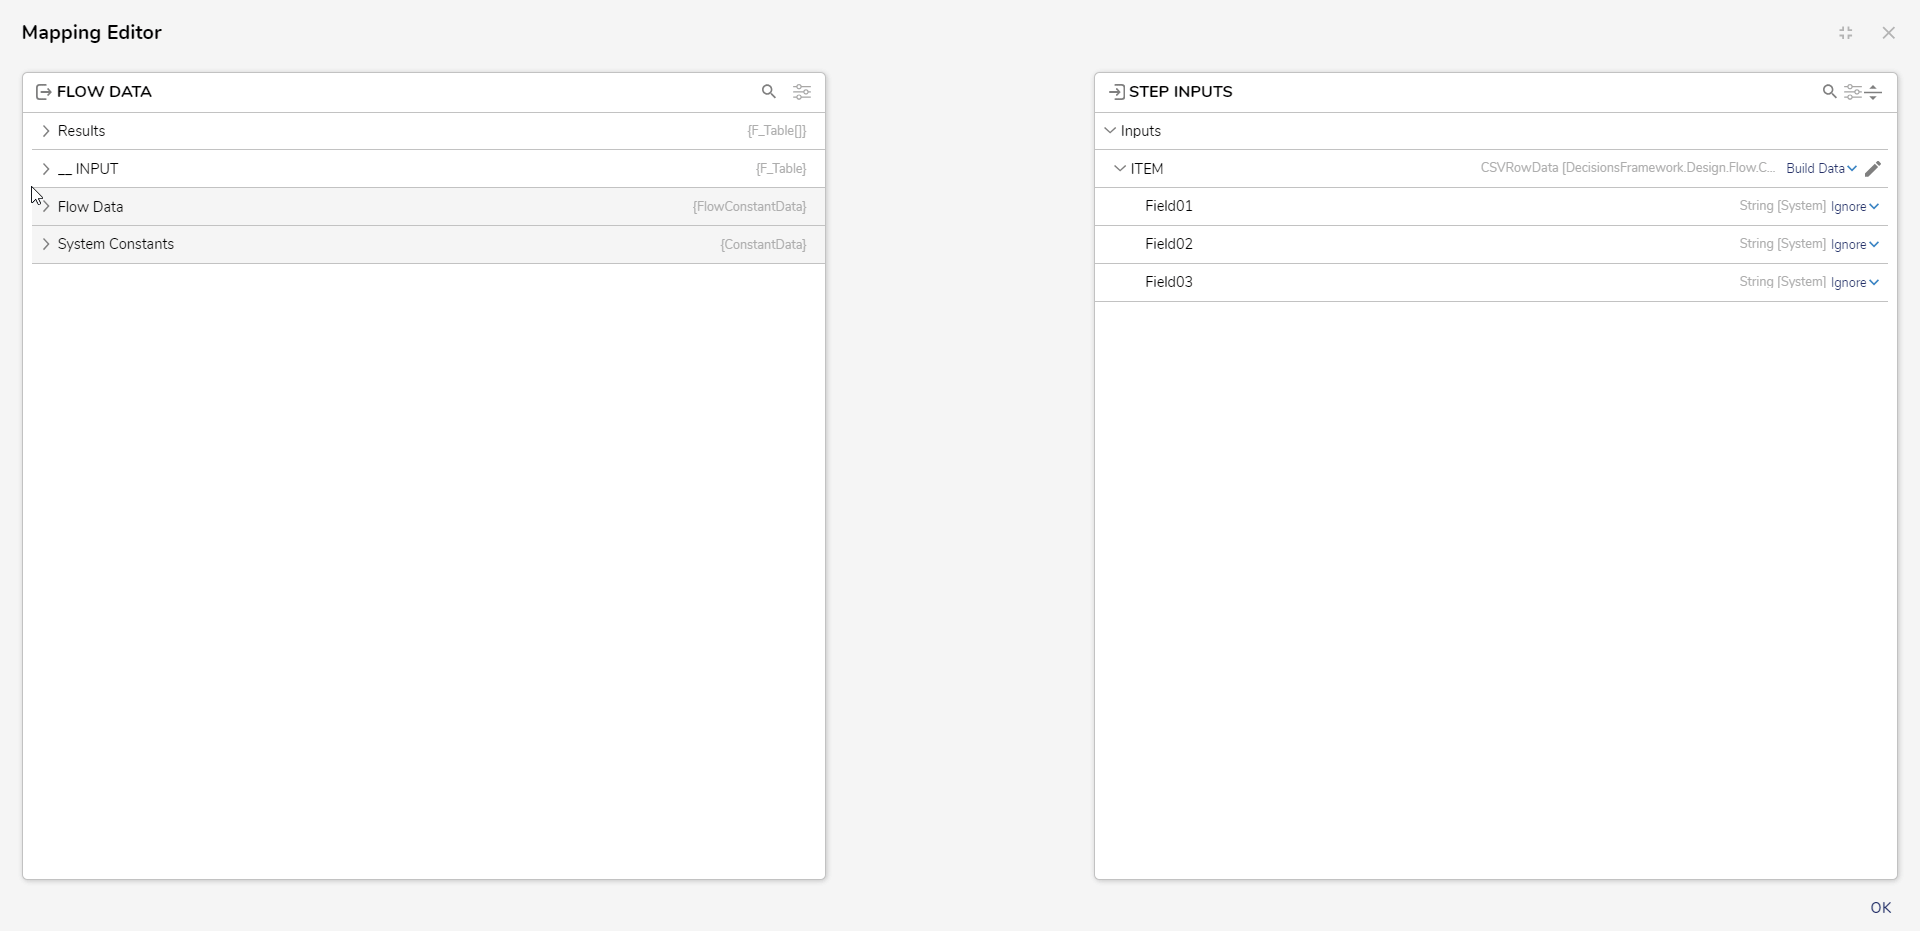
- Click OK and Debug the Flow. Data from the User-Defined type will be passed to the respective fields.
Feature Changes
| Description | Version | Release Date | Developer Task |
|---|---|---|---|
| Added the ability to define the Behavior of Quotation Marks for CSV file type. | 8.17 | December 2023 | [DT-038734] |
| Added the Auto Format Cell Value setting. | 9.8 | March 2025 | [DT-043525] |
Example Lab:
Using List To CSV Mapping Step
Forum Posts:
How Do I Use The List To CSV Mapping Step?
Number Of Fields On List To CSV Mapping Step
List To CSV Mapping Step, Excel Numbers
Training Video:
Dynamic Excel Creation