Overview
Salesforce Routing streamlines and automates lead assignments within Salesforce. When a new lead enters the system, the project automatically directs it to the correct assignee based on the selected business configuration. Leads may be routed to a default owner, assigned according to predefined Rules, or distributed using various routing types such as Default Assignment or Round Robin, ensuring fair distribution and faster response times. This helps organizations optimize lead management, improve efficiency, and enhance customer engagement.
Key Features
- Ability to manage Salesforce Users.
- Pre-designed Dashboards for Salesforce routing.
- Scheduled Jobs that auto-update assignee information.
Considerations
- Users must install Error Handling before installing this Project and add it as a dependency.
- Users must also install the Salesforce Module and add it as a dependency.
- Lead Fetch Criteria:
- The system in this project currently fetches Leads from Salesforce where OwnerId is NULL. This means that only unassigned Leads are retrieved.
- Users who wish to change this logic must follow this path:
- Get Salesforce Leads with No Owners (Flow) > Get Leads (Step) > Edit SOQL Query
- After importing the Project, Users must enable the Scheduled Job in the Systems folder. To enable the Scheduled Job:
- Navigate to System > Jobs and Events > Scheduled Jobs. From there, right-click on the following jobs and enable the following:
- Update Routing Assignees
- Auto Routing Assignments
- Navigate to System > Jobs and Events > Scheduled Jobs. From there, right-click on the following jobs and enable the following:
Main Flows
| Flow Name | Description | Image |
|---|---|---|
| Create Routing System | This Flow is a User Action available on the Salesforce Routing Manager Dashboard that enables Users to create a new routing system. The Flow first validates the provided Salesforce Token ID to ensure the connection is active. Once verified, the action allows Users to add multiple Routing Assignees through a dynamically populated dropdown that lists all available Users from the connected Salesforce instance. After assigning Users, the system further provides the option to define routing Rules, which will be executed on the Salesforce side during later stages of the project. | 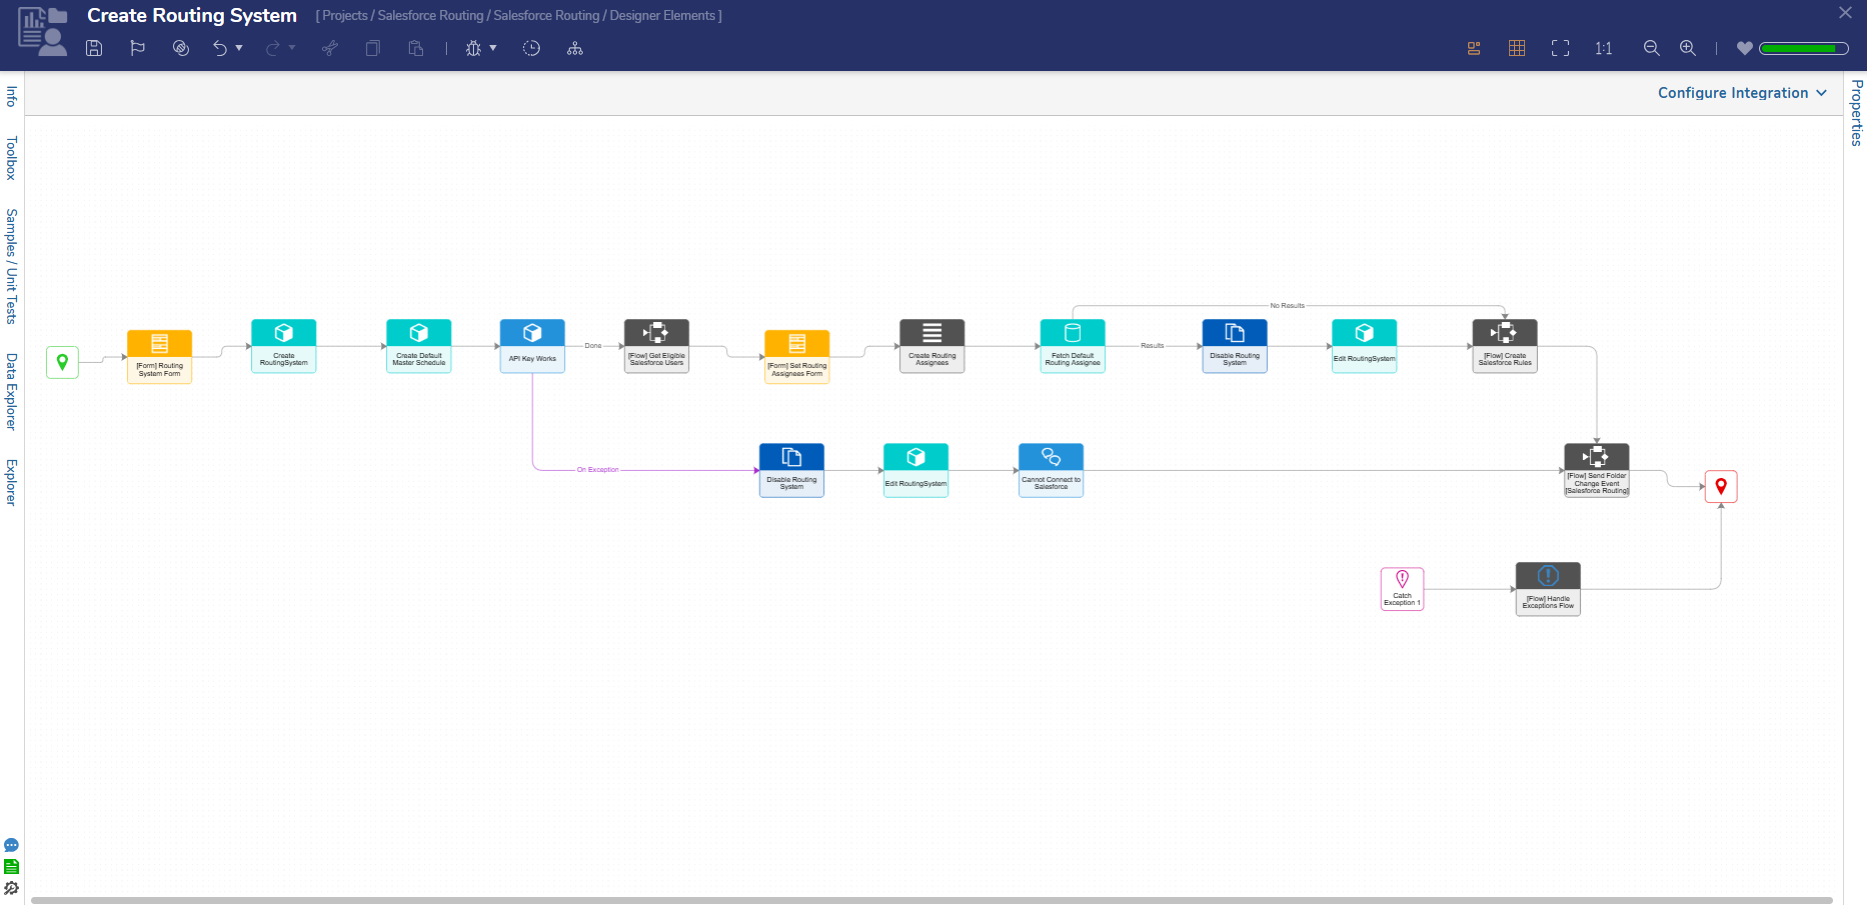 |
| Create Salesforce Rules | This Flow accepts a RoutingSystemId as an Input and enables Users to define Rules that will be executed on the Salesforce side. It then dynamically populates relevant data such as Table Name, Property Name, Assignees, and other details from the specified Routing System, allowing seamless rule creation and configuration. |  |
| Salesforce Rules Logic Flow | This Flow takes a RoutingSystemId as an Input and retrieves all Rules defined within the corresponding Routing System. It then executes those Rules to determine the appropriate Routing Assignee. If no Rules match, the Flow proceeds along the "No Results" path. If no Rules exist in the system, the Flow terminates through the "Not Valid" path. | 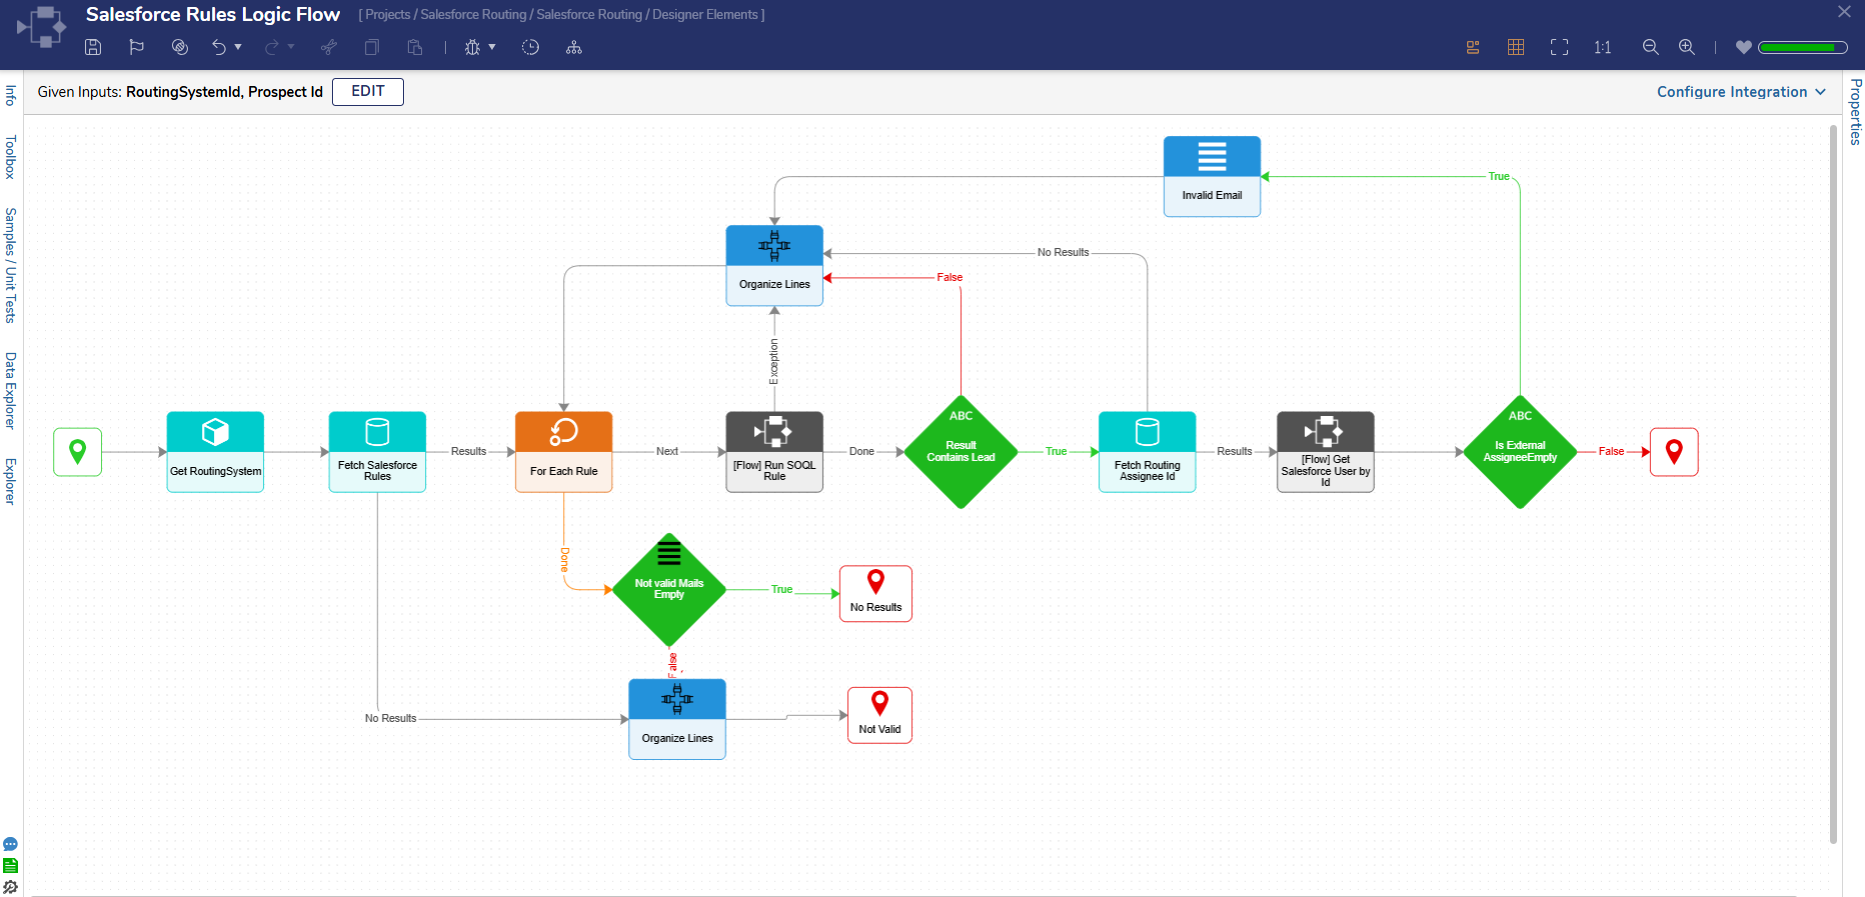 |
| Update Routing Assignees from Salesforce | This Flow accepts a RoutingAssignee and a Salesforce Token ID as Inputs. It retrieves the corresponding User details from Salesforce and updates the Routing/Assignee information based on the data fetched from the Salesforce side. | 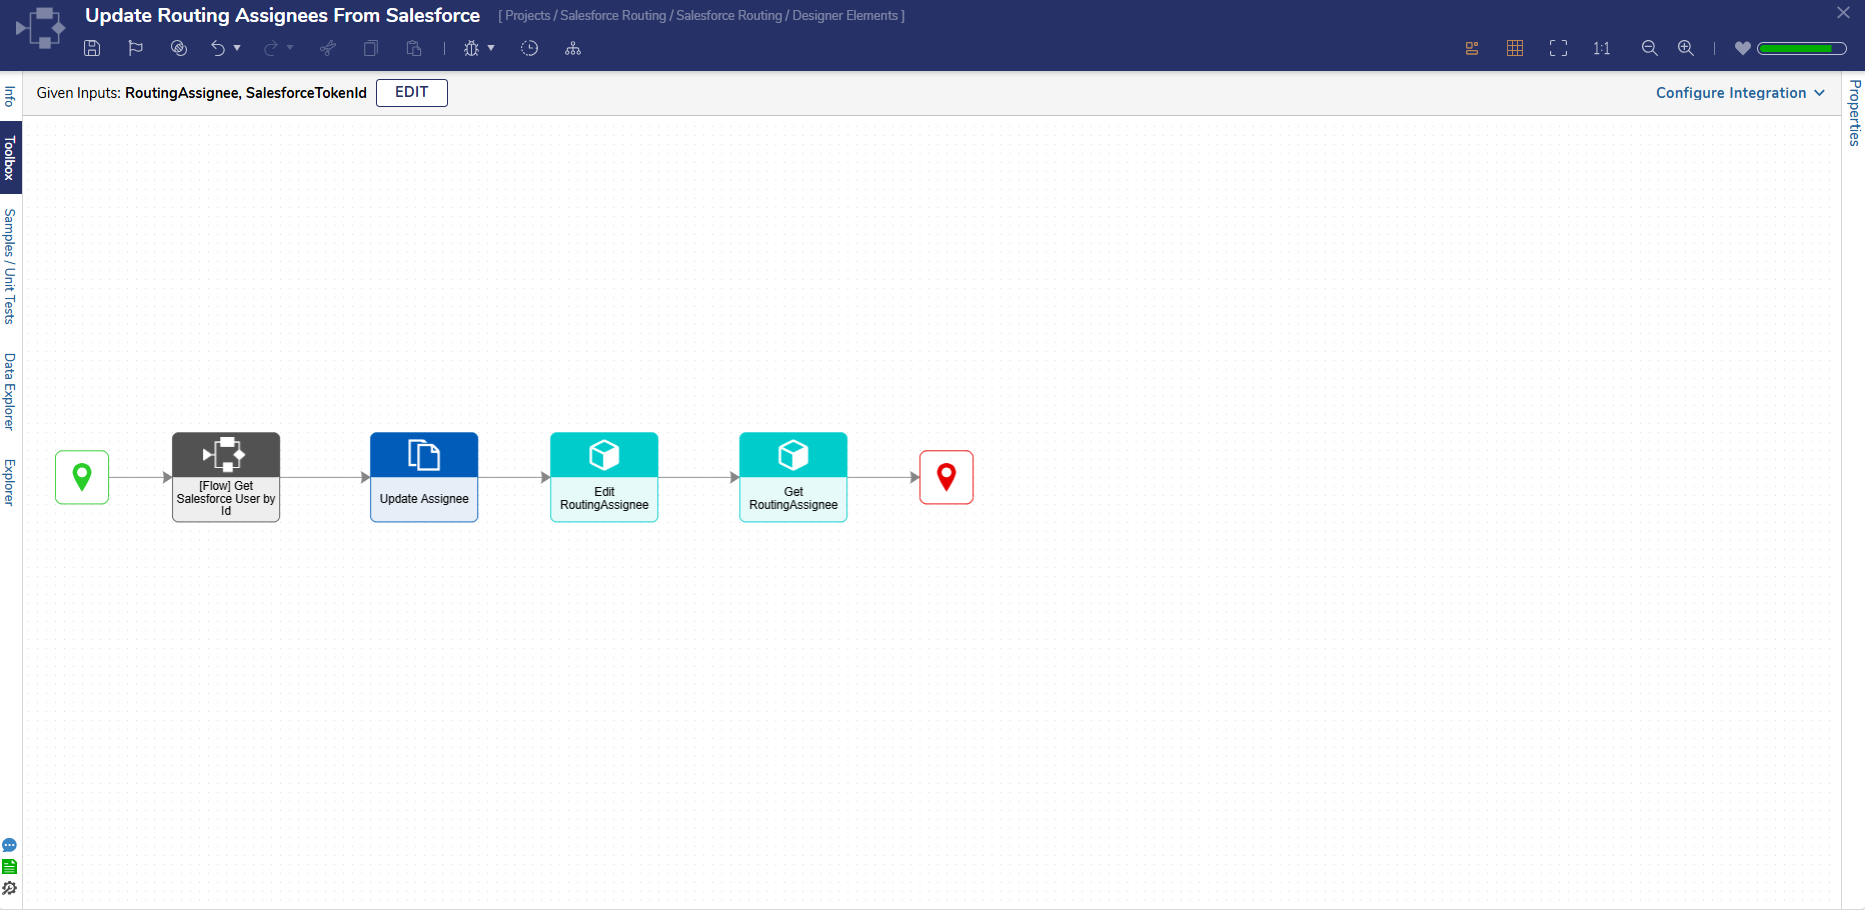 |
| Determine Assigned User | This Flow accepts Prospect and RoutingSystem as Inputs, producing Routing/Assignee and DelegatedTo as Outputs. The following conditions determine assignment logic:
Once the Routing Assignee is determined, the Flow updates the necessary data structures using:
| 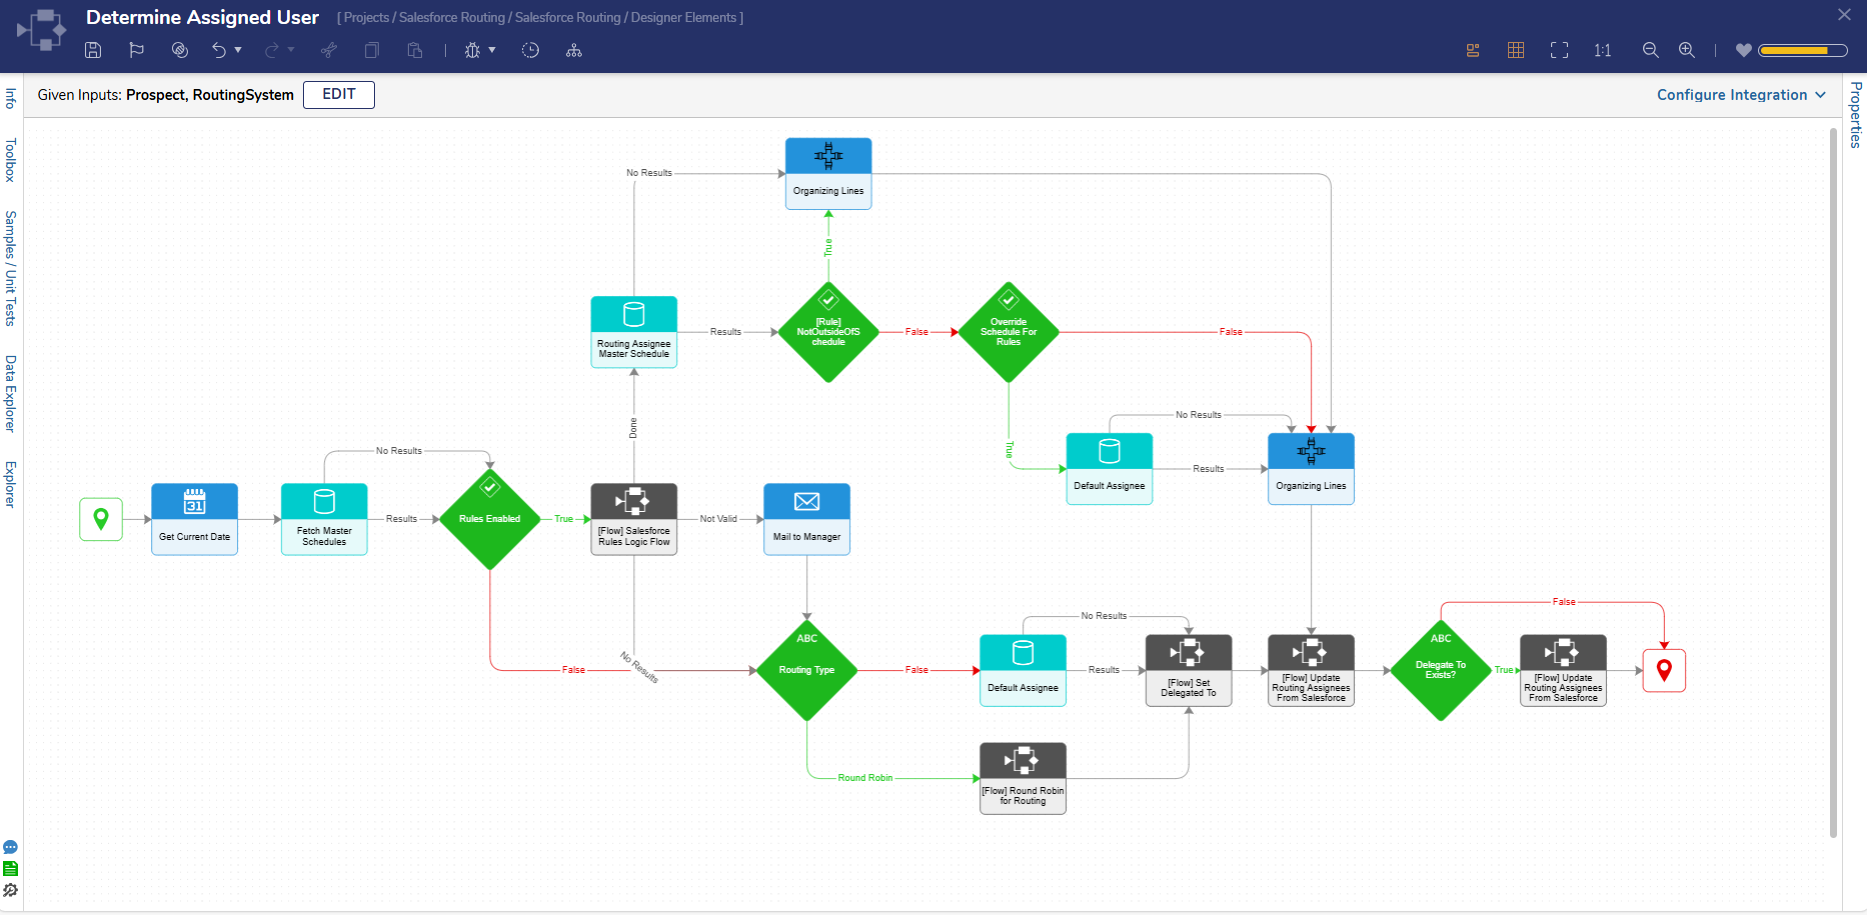 |
| Get All Table Objects from SOQL Table Flow | This Flow accepts a Salesforce Token ID as an Input and retrieves all available table objects from the connected Salesforce instance by executing a SOQL query. The retrieved results are then converted into SOQLObjects for further processing within the system. | 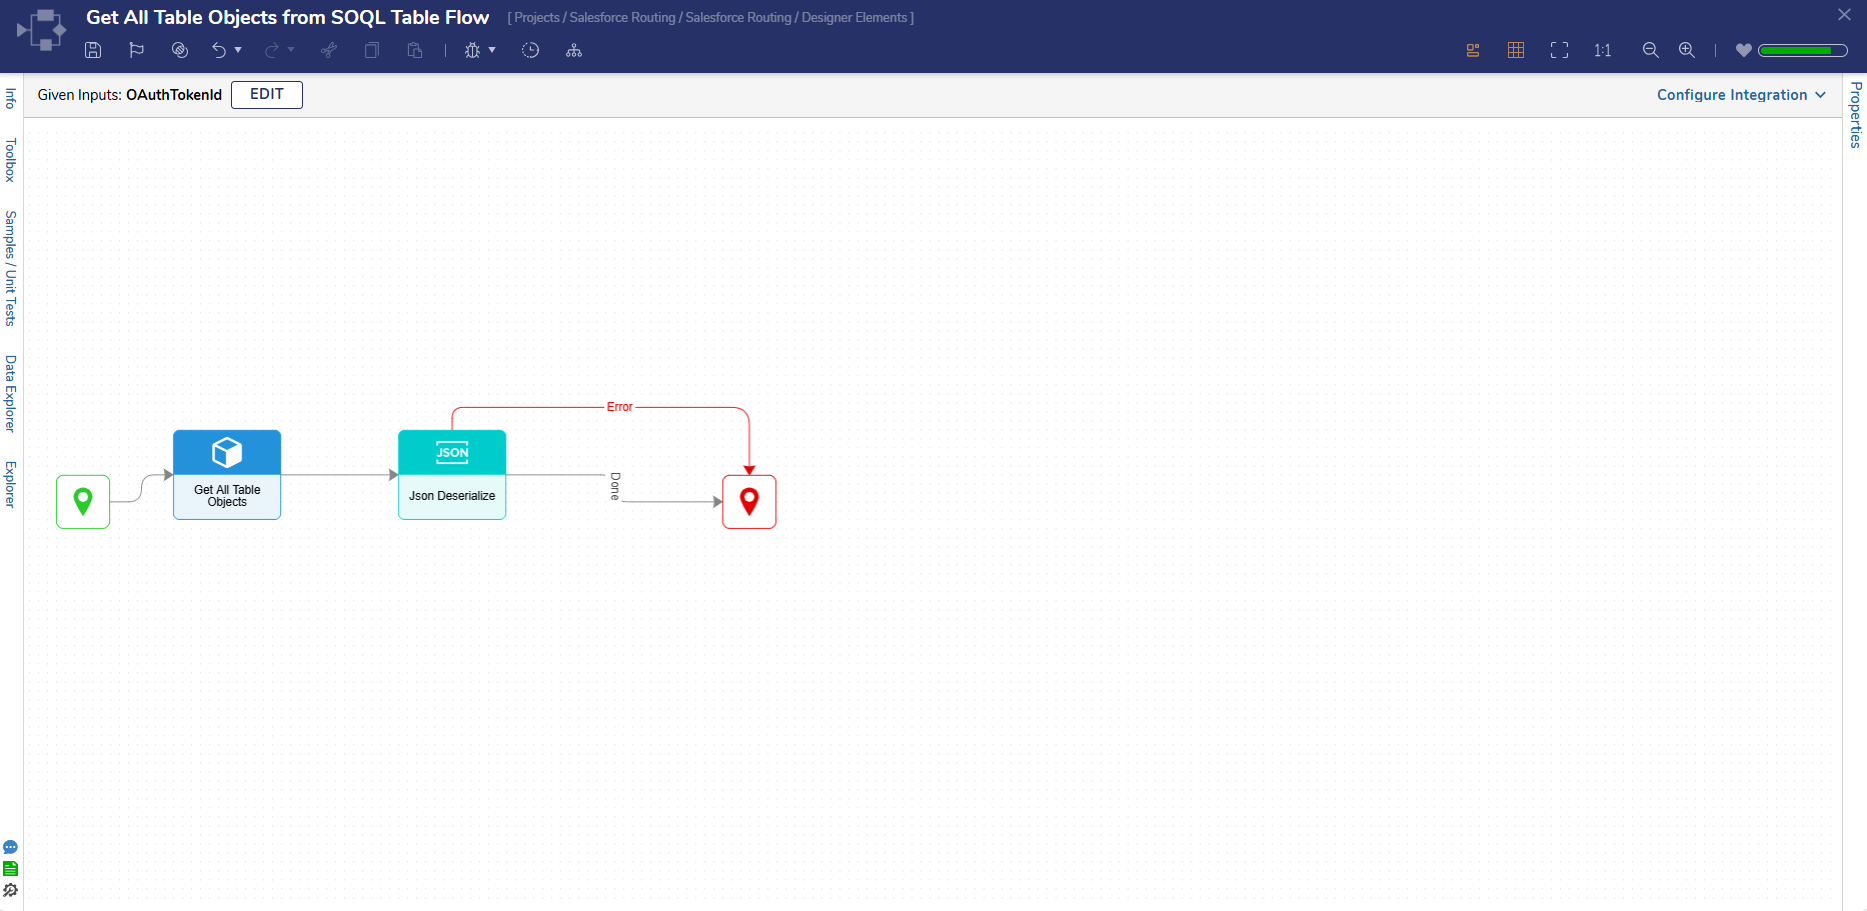 |
| Get All Fields from SOQL Table | This Flow takes SalesforceTokenId and ObjectTableName as Inputs, fetches the available columns in the given table, and deserializes the results into the Salesforce Property Type. | 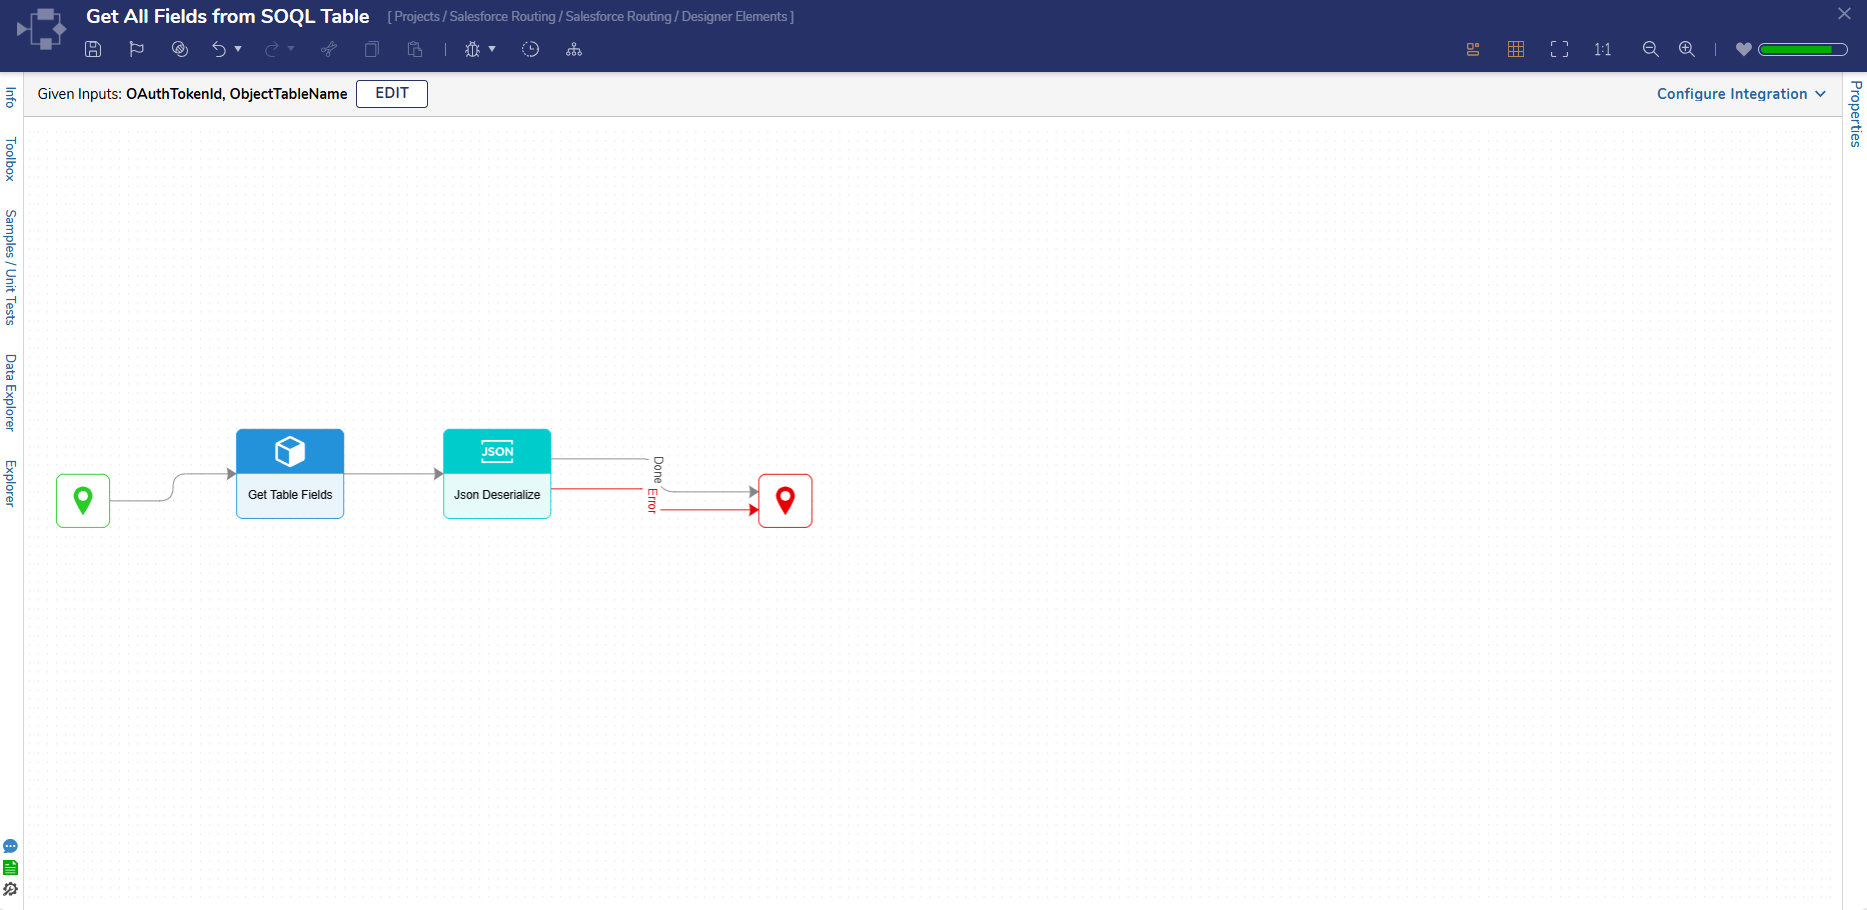 |
Dashboards & Pages
Salesforce Routing Manager
This Dashboard acts as a homepage where Users can manage all routing systems and associated information. The page contains two Reports that have a parent-child relationship. The left-hand side of the Dashboard displays each routing system, and the right-hand side displays all assignees present in the selected routing system.
.png)
Routing Assignee Overview
This page acts as an overview page for individual Routing Systems and will display the following Reports:
- Master Schedule: This Report displays information from the Routing Assignee's Master Schedule.
- Delegation Schedule: This Report displays information from the Routing Assignee's Delegation Schedules.
- Delegate Assignee's Assignments: This Report displays information from the current assignee's assignments.
This page will also display KPIs of information related to the current assignee.
.png)
Routing System Overview
This page acts as an overview for an individual Routing System and displays a Report that contains all associated assignees. The page also displays a few KPIs that hold information related to the current system. All actions related to the Routing System and Routing Assignees can be performed from this page.

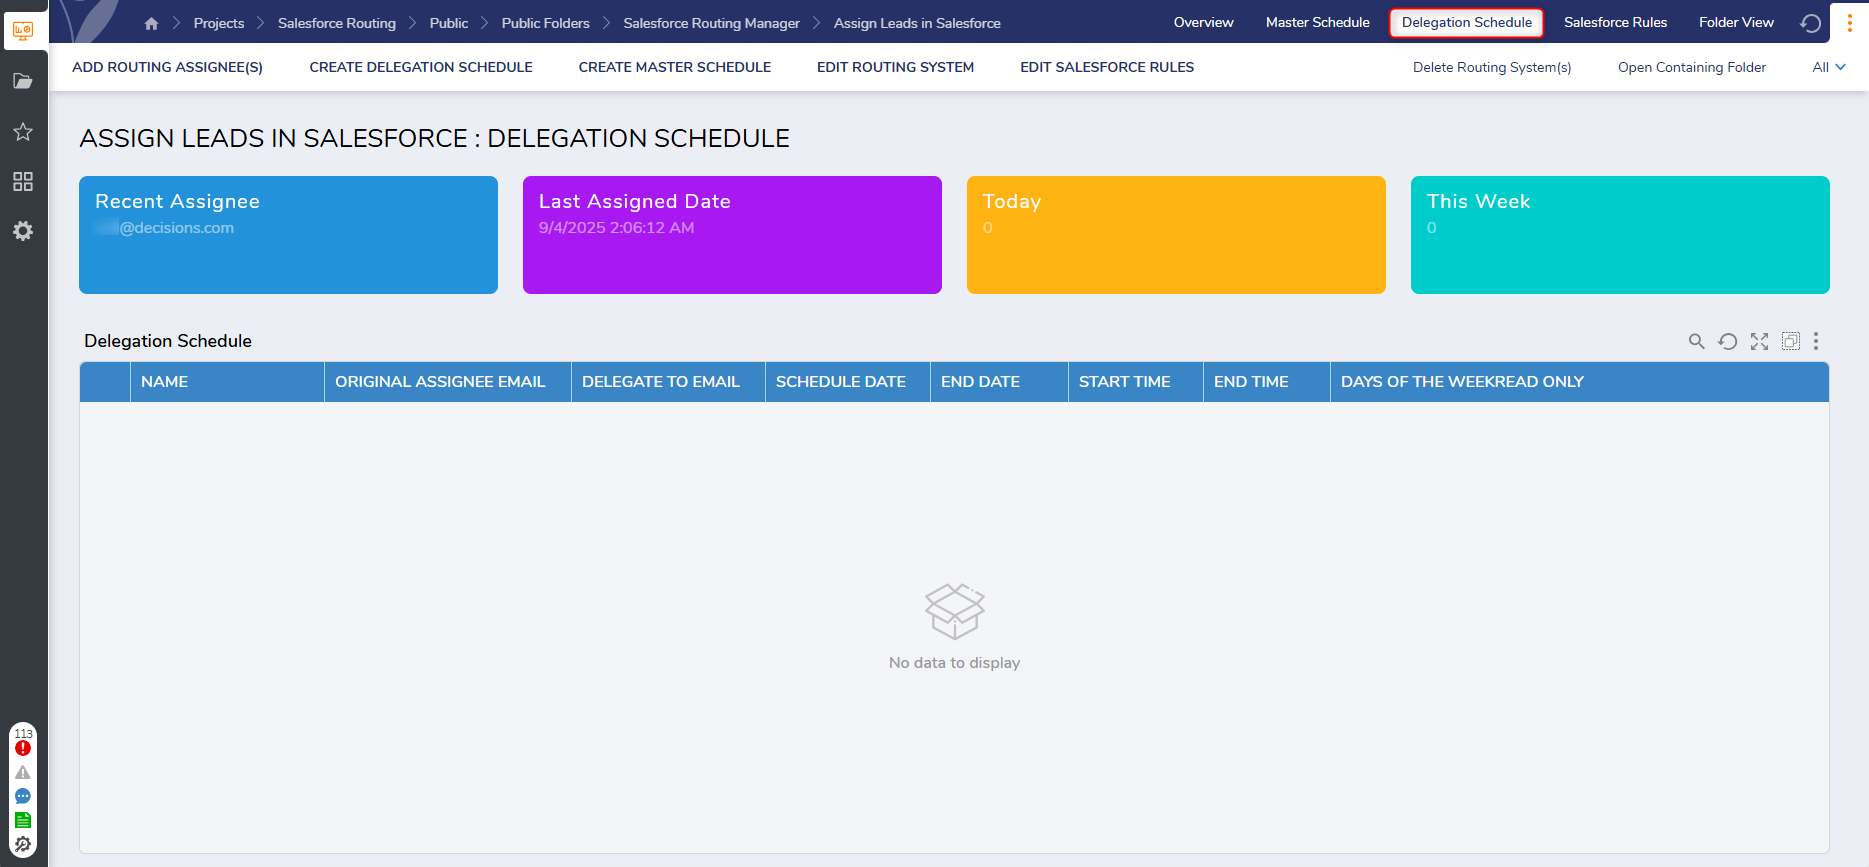
Routing System Delegation Schedule
This page acts as a delegation schedule and displays a list of the current delegation schedules present in the current Routing System. This page will also display the following KPIs:
- Recent Assignee: (Email of recent Assignee)
- Last Assignee Date: (Date when the last assignment happened)
- Today: (Total Assignments assigned today)
- This Week: (Total Assignments assigned this week)
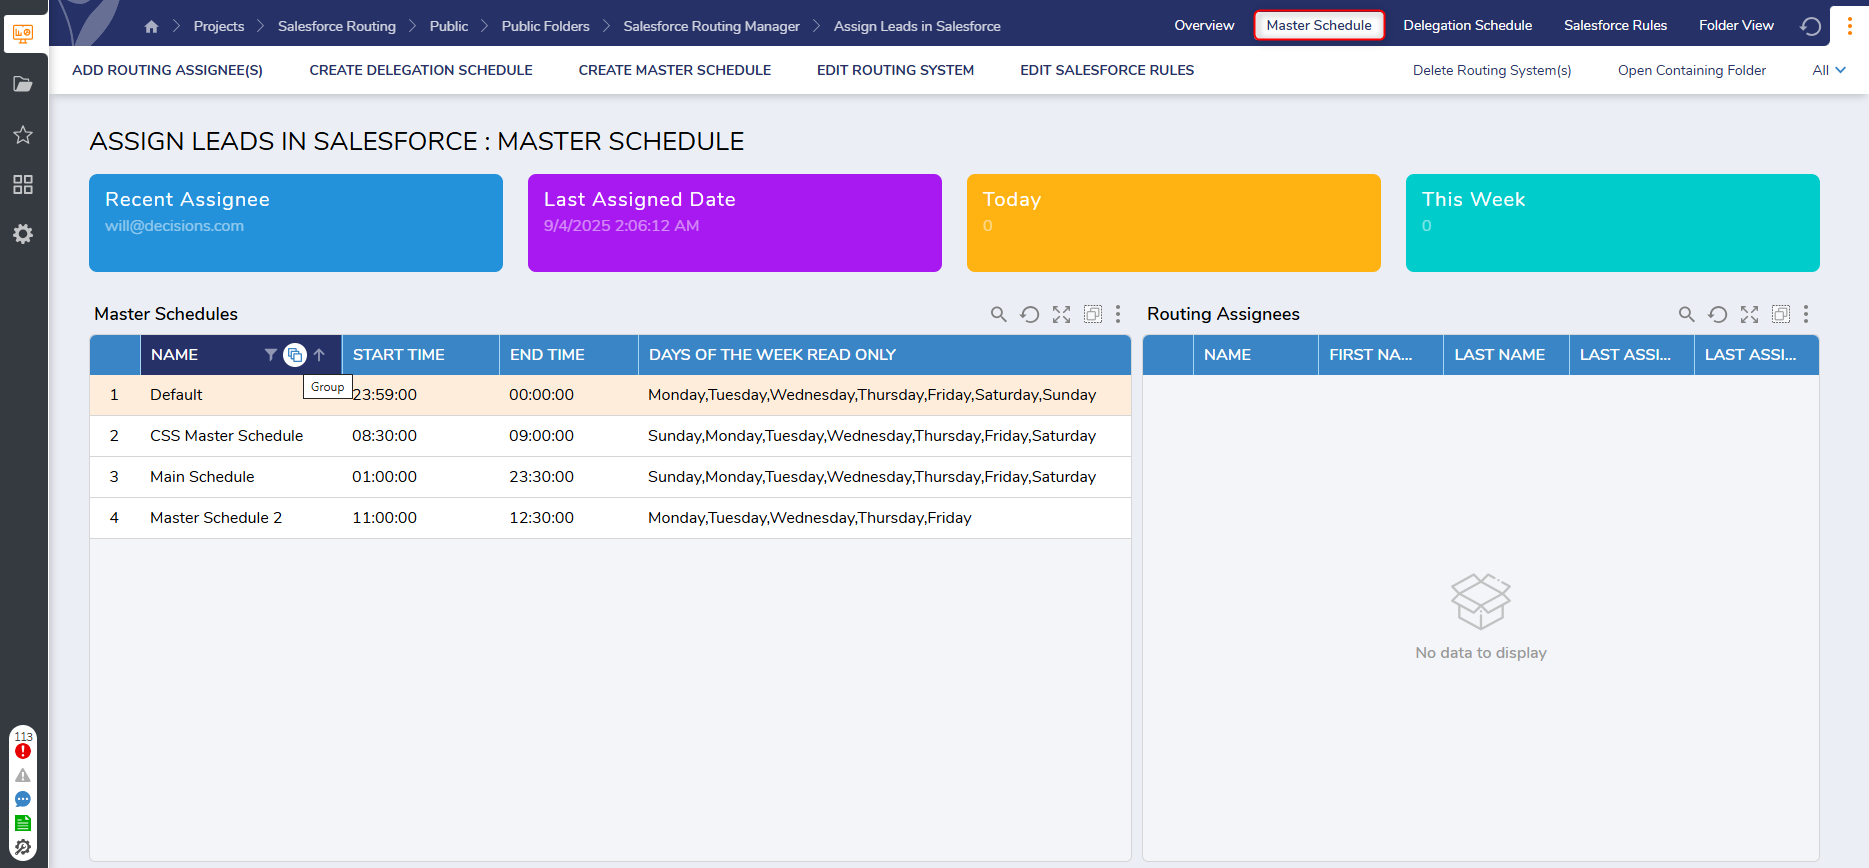
Routing System Master Schedule
This page acts as a master schedule and will display a list of every master schedule present in the current Routing System.
The page will also display the following KPIs:
- Recent Assignee: (Email of recent Assignee)
- Last Assignee Date: (Date when the last assignment happened)
- Today: (Total Assignments assigned today)
- This Week: (Total Assignments assigned this week)
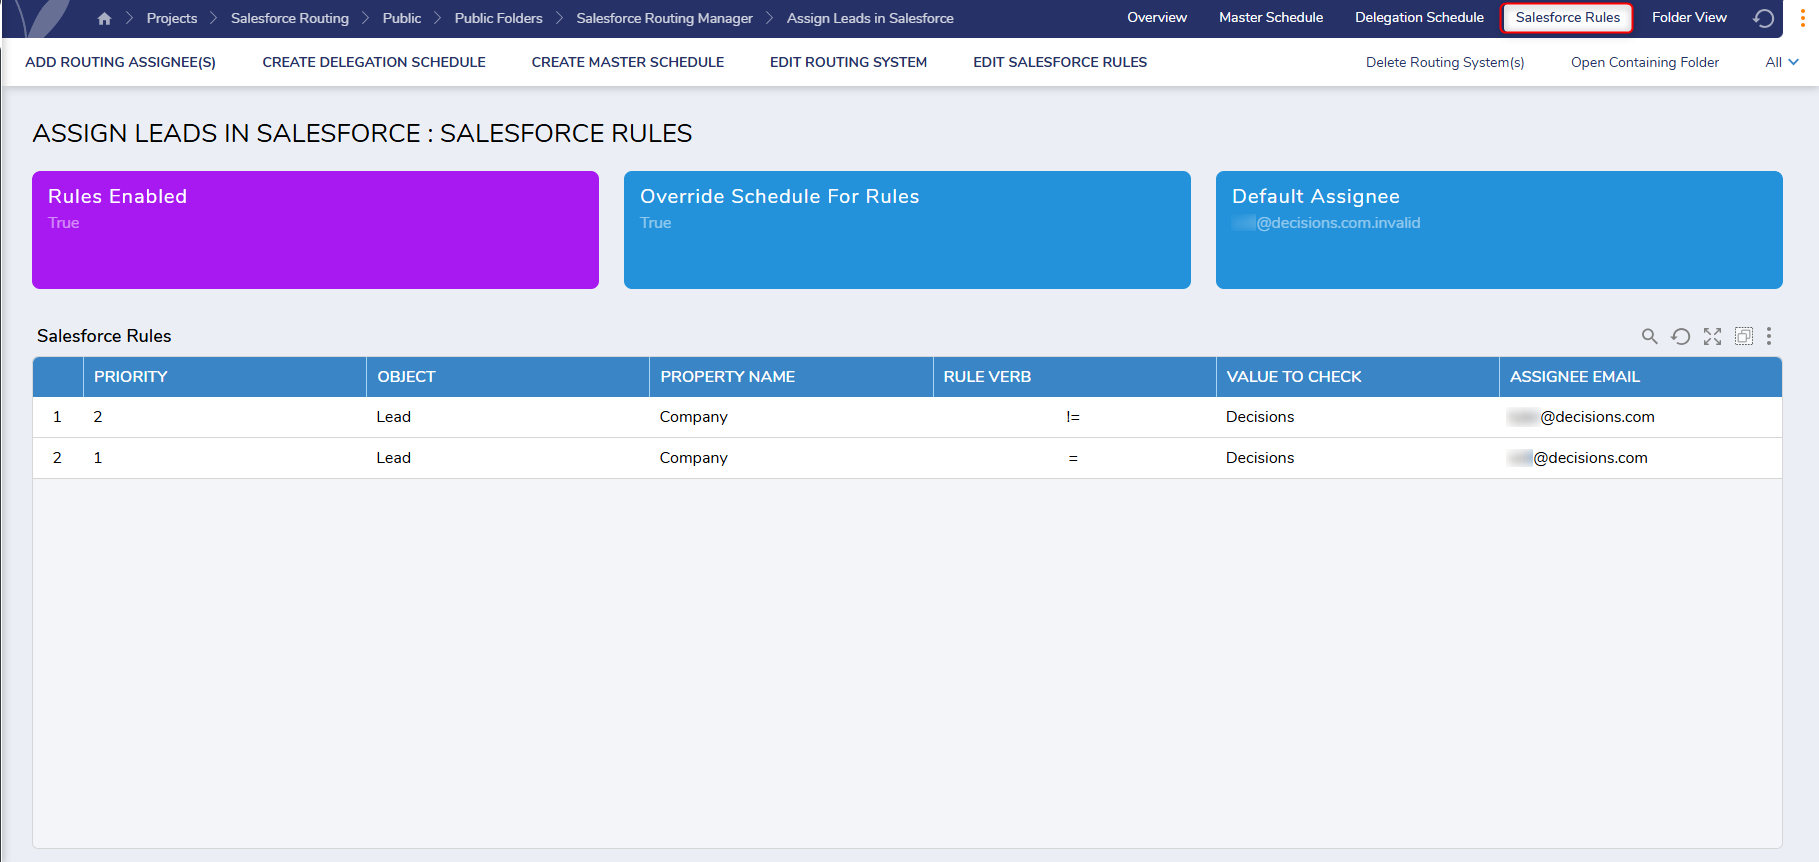
Salesforce Rules
This page will display a report of every Salesforce Rule that is present in the current Routing System. All actions related to Rules can be performed from this page. This page will also display the following KPIs related to the current Routing System:
- Rules Enabled: (Rules will only be executed if they are enabled)
- Override Schedule for Rules: (The Assignee Schedule will be overridden if this is set to enabled)
- Default Assignee: (Email of the Default Assignee)
Utilizing Salesforce Routing
The following User Actions can be found by navigating to the Salesforce Routing Manager Dashboard. 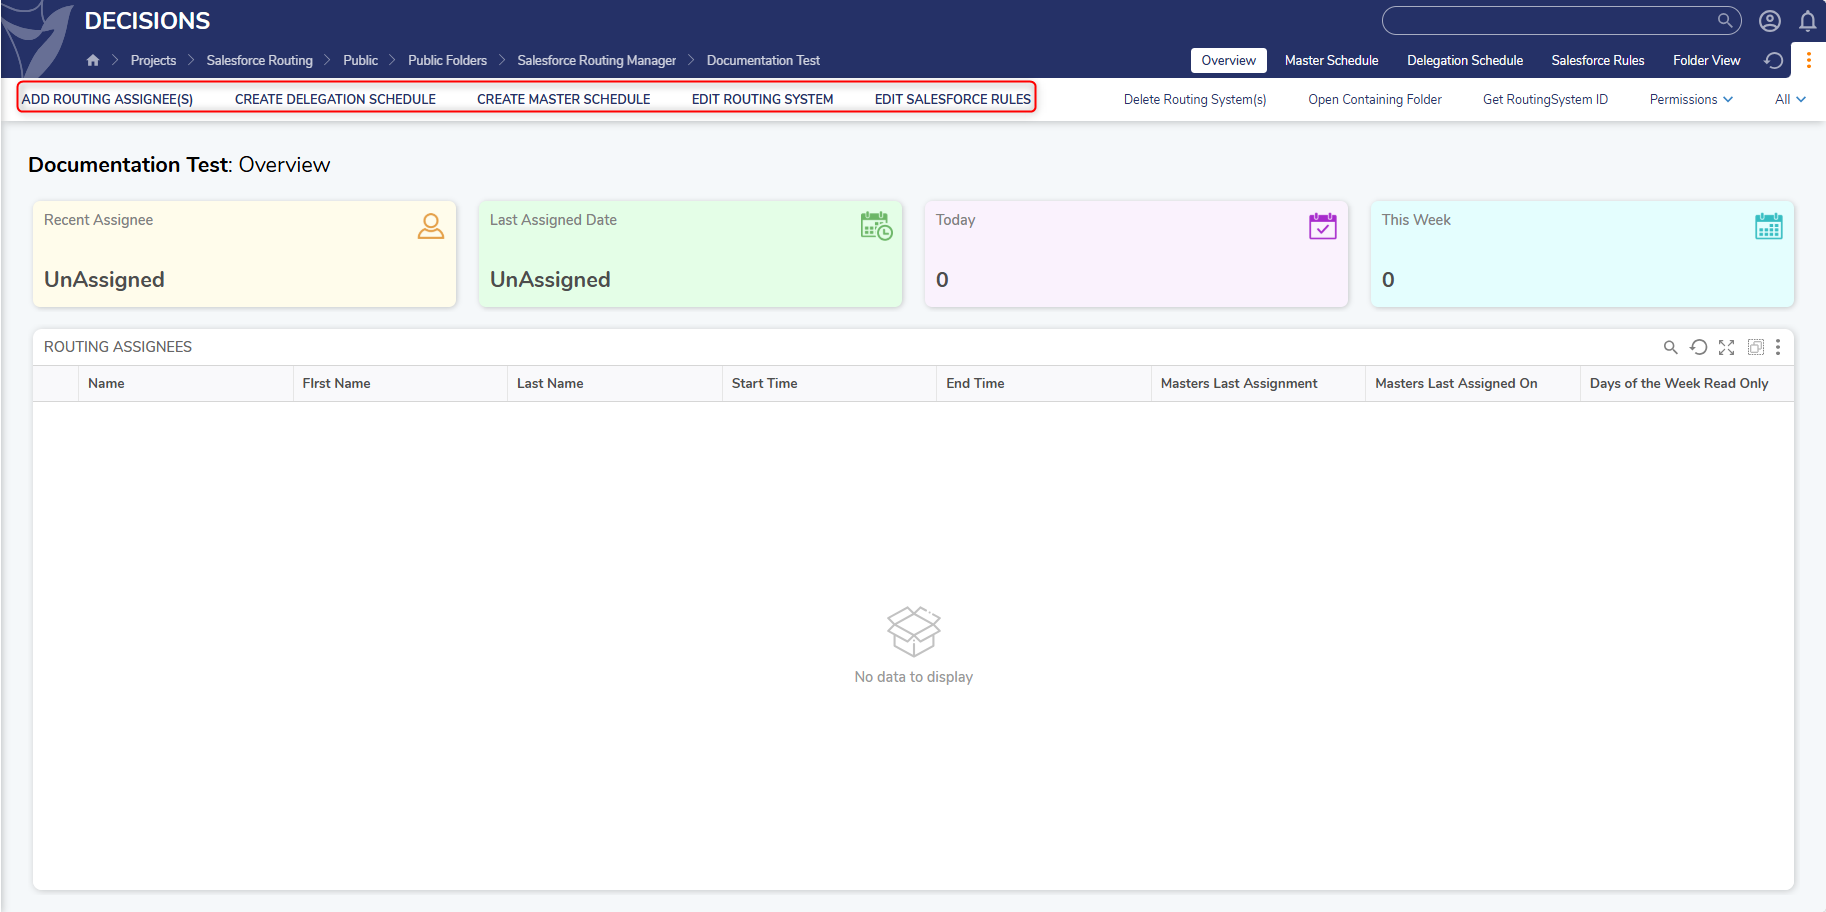
Create Routing System
This User Action enables Users to create a new Routing System after clicking "Create Routing System". This action will then display the Routing System Form, where Users will need to provide the following information:
- Name
- Manager Email
- Description
- Routing Type
- Rules Enabled
- Salesforce Token ID
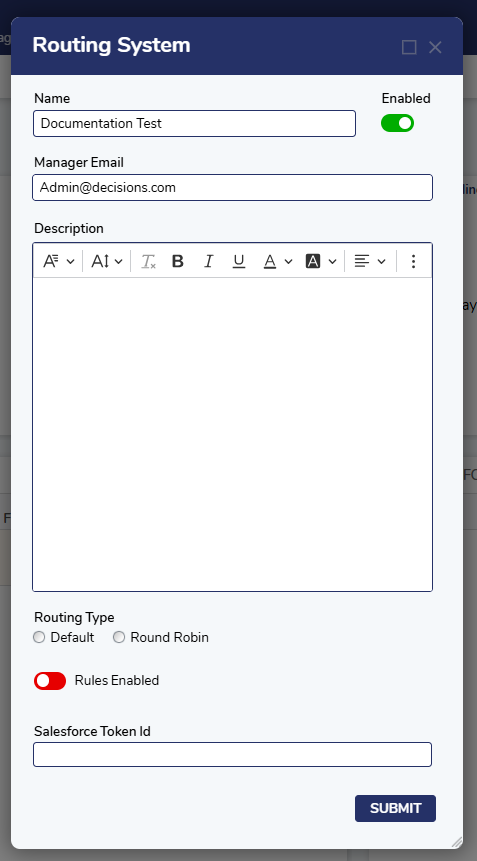
Once the fields have been completed, click Submit to create the new Routing System.
Edit Routing System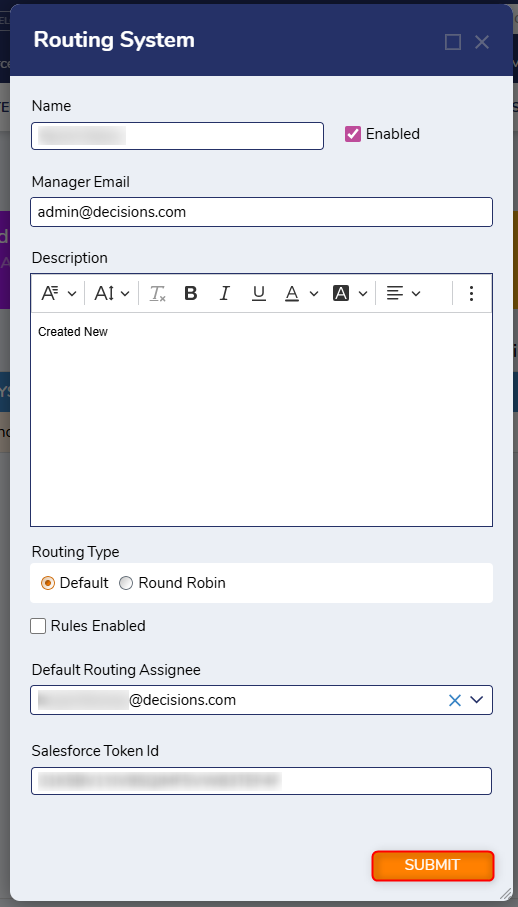
This User Action enables Users to modify existing information for the Routing System.
- The system will be updated upon submission of the Form.
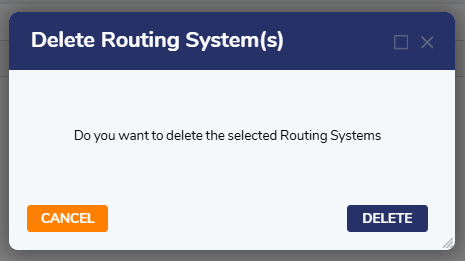
Delete Routing System
This is a Group User Action that enables Users to delete one or more Routing Systems.
Add Routing Assignees
This User Action enables Users to add additional routing assignees by populating Users from the provided Salesforce Token Id. .png)
Upon submitting the Form, the selected assignees will be added to the Routing System.
Edit Salesforce Rules
This User Action enables Users to edit/add/remove Salesforce Rules from the current system.
- Clicking on this button will display the Salesforce Rules Form, which enables Users to edit existing rules or add additional rules to the system.
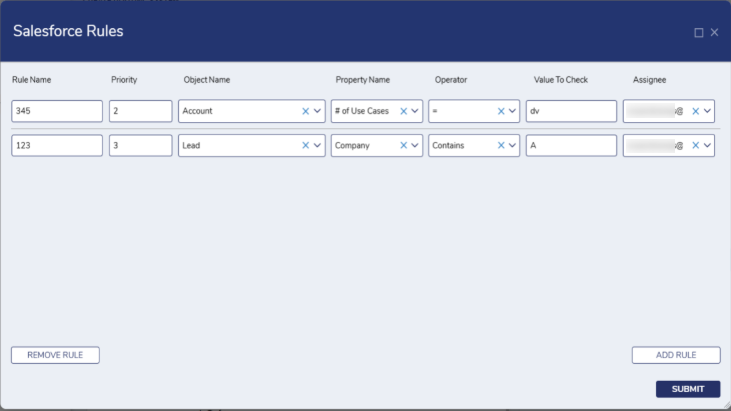
- After clicking Submit, the rules in the Routing System will be updated accordingly.
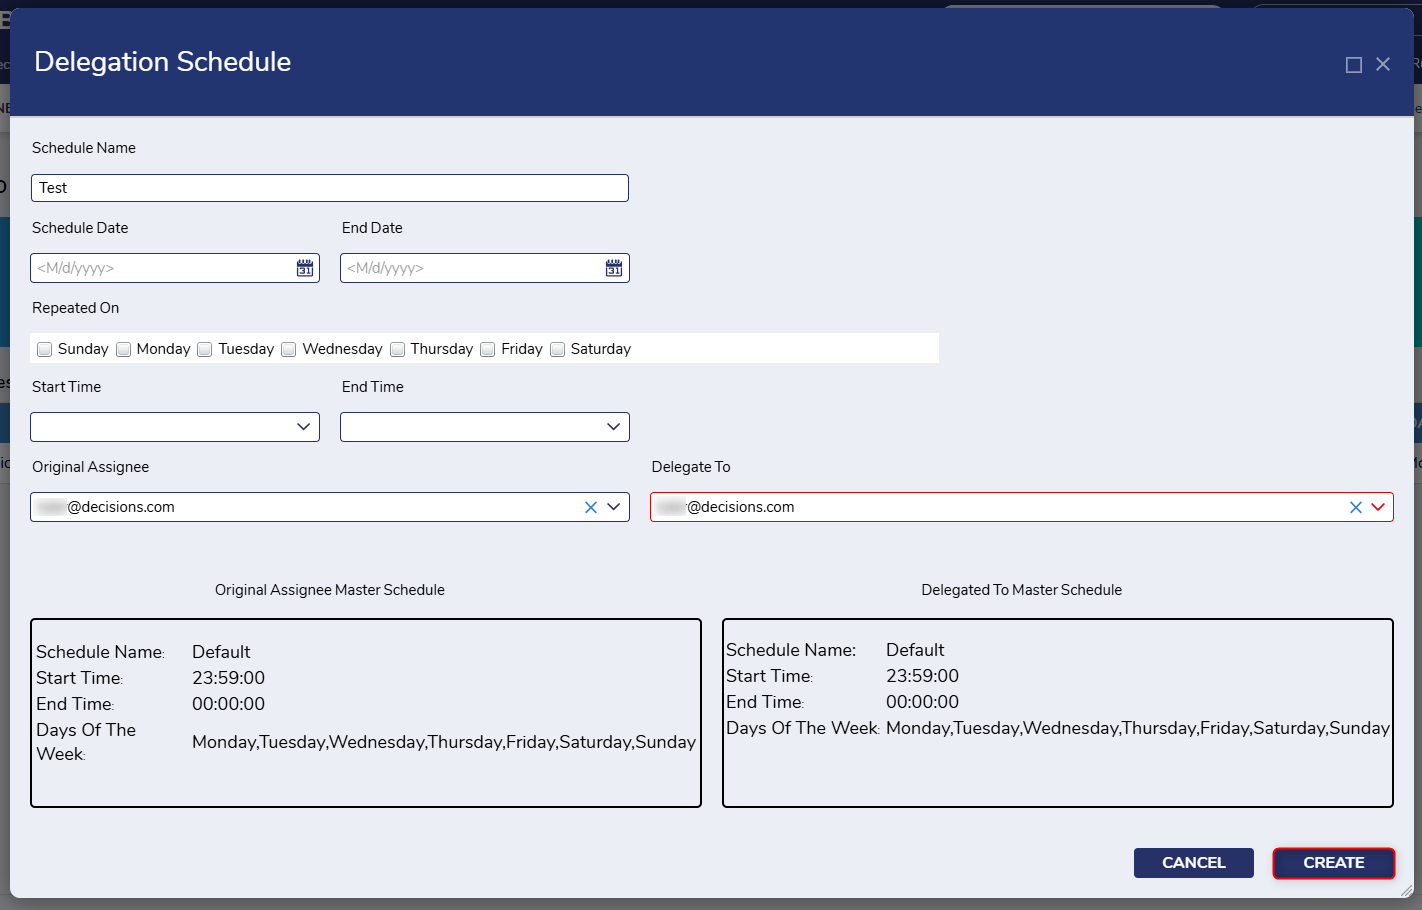
Create Delegation Schedule
This User Action enables Users to create a new Delegation Schedule after entering the following inputs:
- Schedule Name
- Schedule Date (and End Date)
- Repeated On
- Start and End Time
- Original Assignee
- Delegate To
Dropdown values are sourced from the current list of Routing Assignees in the Routing System.
Create Master Schedule
This User Action enables Users to create a new Master Schedule after entering the following inputs:
- Schedule Name
- Repeated Name
- Start and End Time
- Assignees
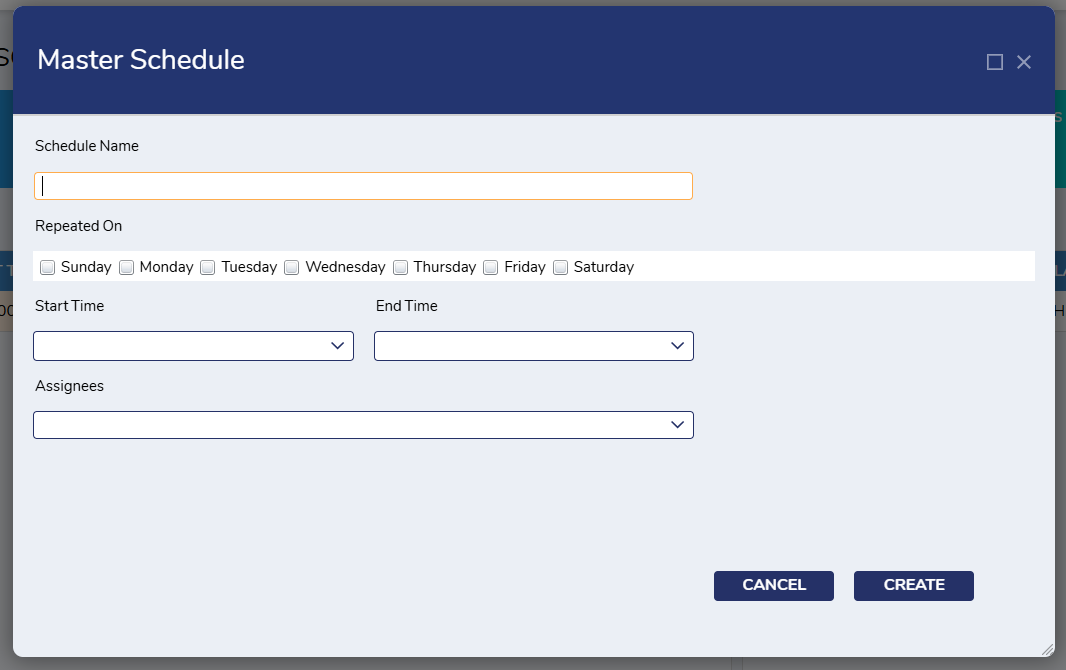
Dropdown values are sourced from the current list of Routing Assignees in the Routing System.