Overview
This document outlines the foundational workflows for managing development within the Development Server and Deployment Tower, focusing on how teams structure, organize, and track their work using Projects and Sprints.
Projects serve as the primary containers for all development-related activities. Within a Project, teams use Sprints to plan and execute work in structured, time-bound cycles that mirror real-world agile development processes. Sprints are programmatic representations of iterative development cycles, where a team commits to completing a defined set of tasks called User Stories within a fixed period of time.
Sprints enable collective assignment, tracking, and testing of related tasks. This supports more organized and incremental progress throughout the development lifecycle. For example, a typical Sprint might last two weeks, during which the development team works to complete all assigned User Stories.
Within a Project, the Development section is accessible from the left panel and is available only to users with admin permissions. This view displays all relevant information, including Sprints, user stories, incoming stories, and local changes associated with the selected Project. Sprints can be created or imported on the Development Server and can also be imported from the Deployment Server when using a configured PMIS connection.
Admins can create, edit, delete, and mark Sprints as complete. This functionality allows project teams to efficiently manage iterative work cycles and maintain clear oversight of development activities.
Creating Sprints
Creating a Sprint is the primary way to prepare a set of User Stories for an upcoming development cycle. Once a Sprint has been created, User Stories can be added to it so related tasks are tracked, developed, and tested together as part of the same cycle.
There are two primary methods to create sprints:
Manual Sprint Creation
Sprints can be created manually from the Development Server.
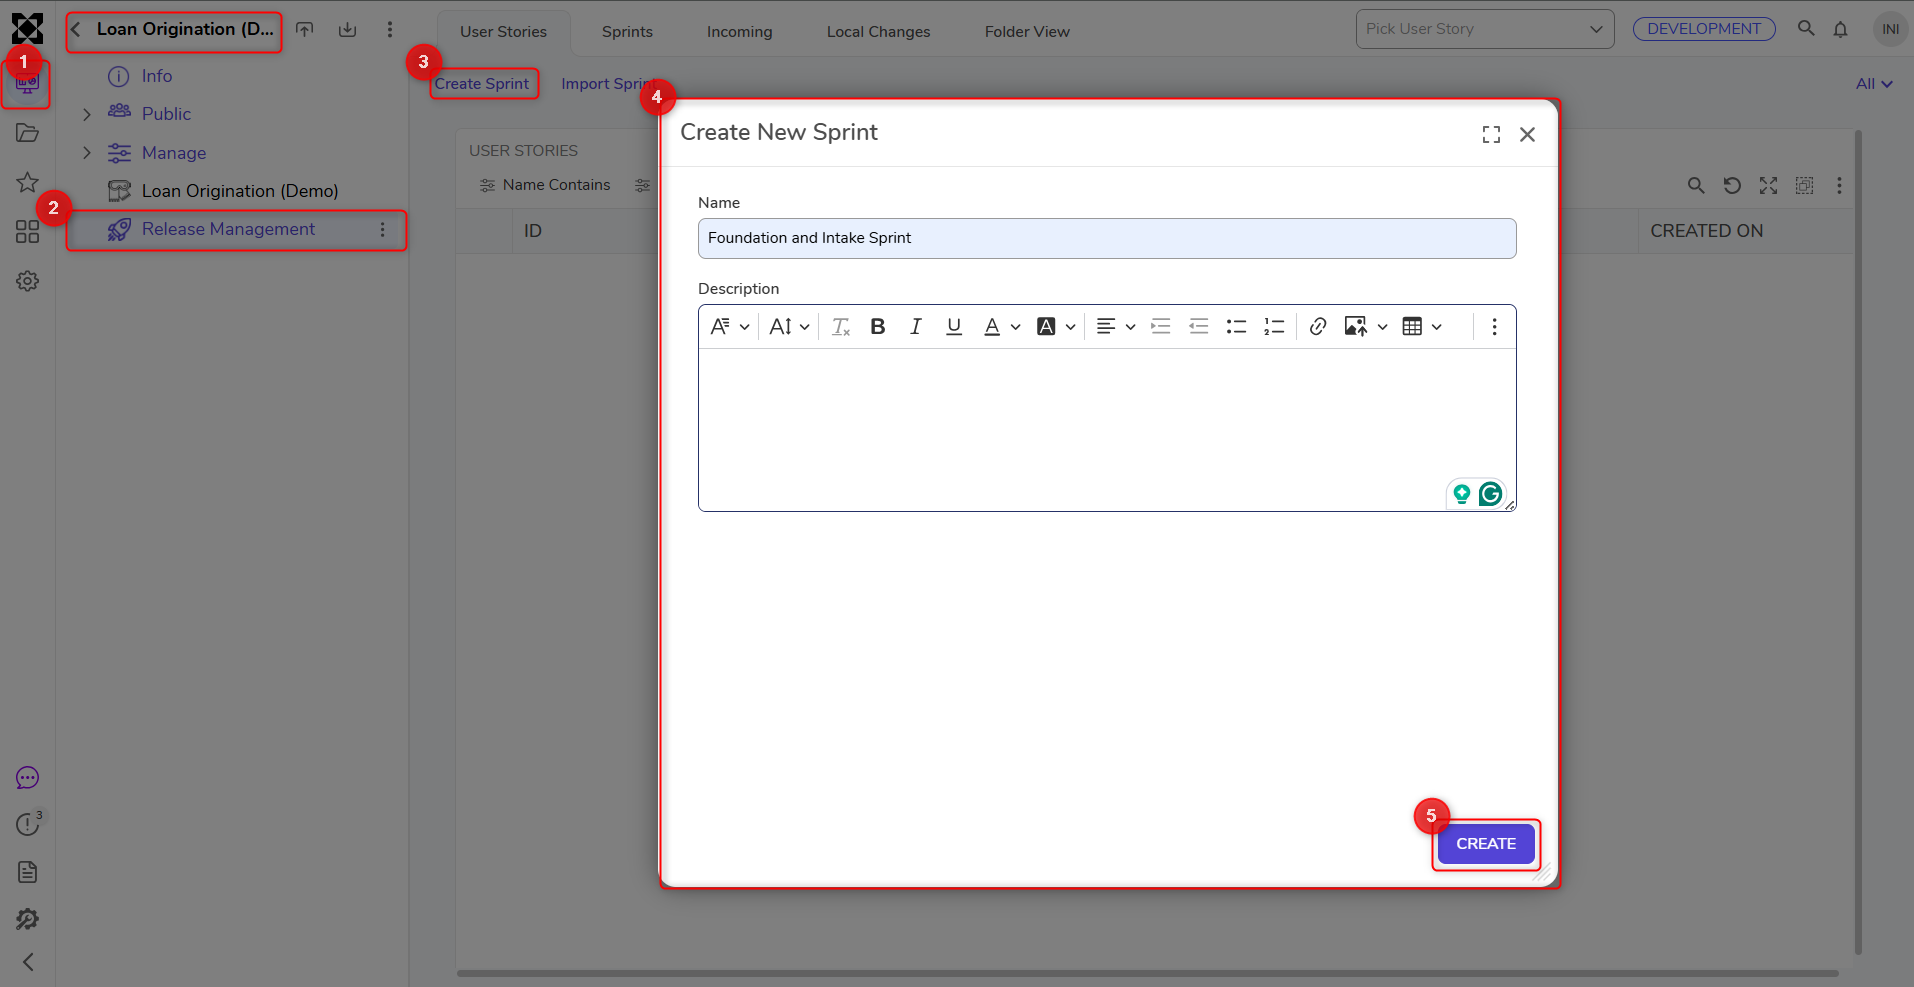
To create a Sprint manually:
- Navigate to the Project where the Sprint should reside.
- Open the Release Management section from the left panel (visible only to Admin users).
- Click Create Sprint. A dialog will prompt for the following details:
- Name: A brief, descriptive title for the Sprint.
- Description: Additional context or objectives of the Sprint.
- Select Create to finalize the Sprint.
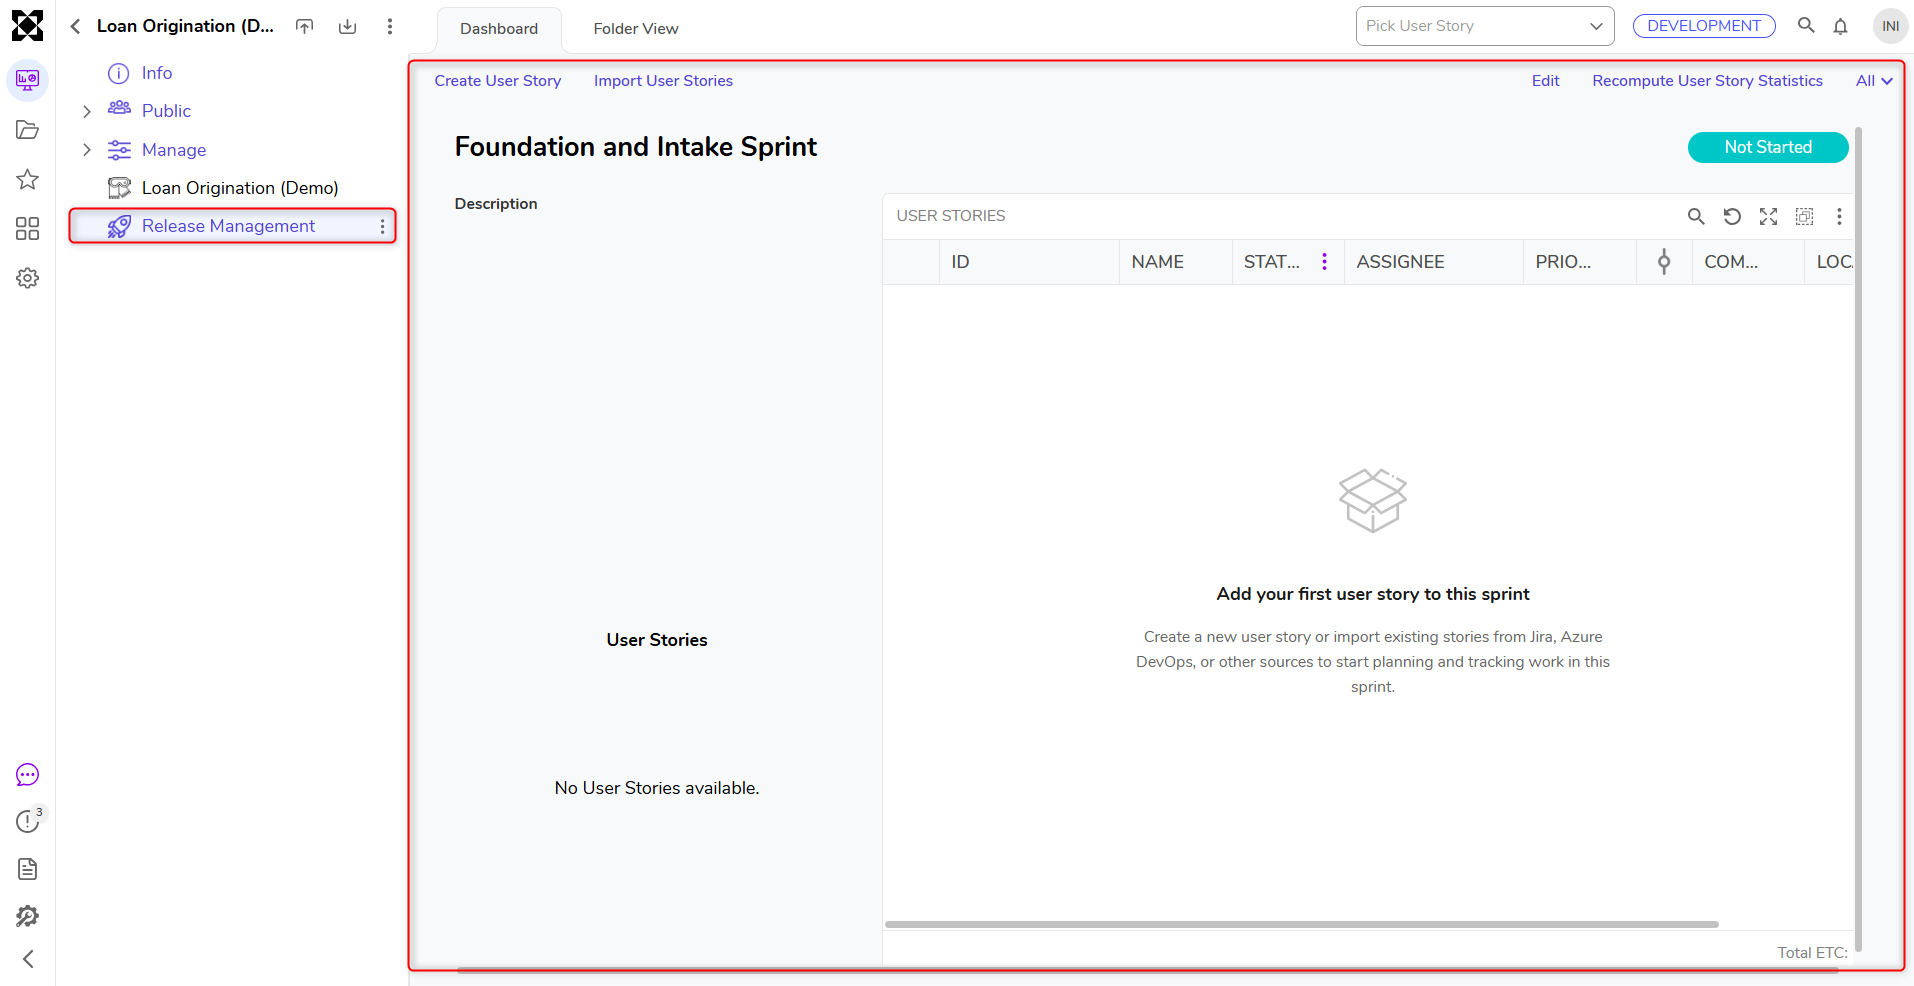
Upon creation, the Sprint Info page opens automatically.
PMIS Import
Sprints can be imported from supported Project Management Information Systems (PMIS), such as Jira and Azure DevOps. PMIS connections are configured on the Deployment Server from Settings > Integrations > PMIS. Once configured, sprints can be imported from either the Development Server or the Deployment Server.
Before importing sprints, ensure that the required PMIS connection is configured and active. For configuration details, see PMIS Configuration.
When a sprint is imported from a PMIS, the associated user stories from the external PMIS system can also be reviewed and imported into Decisions.
Importing Sprints on the Development Server
- Navigate to the intended Project.
- Open the Release Management folder.
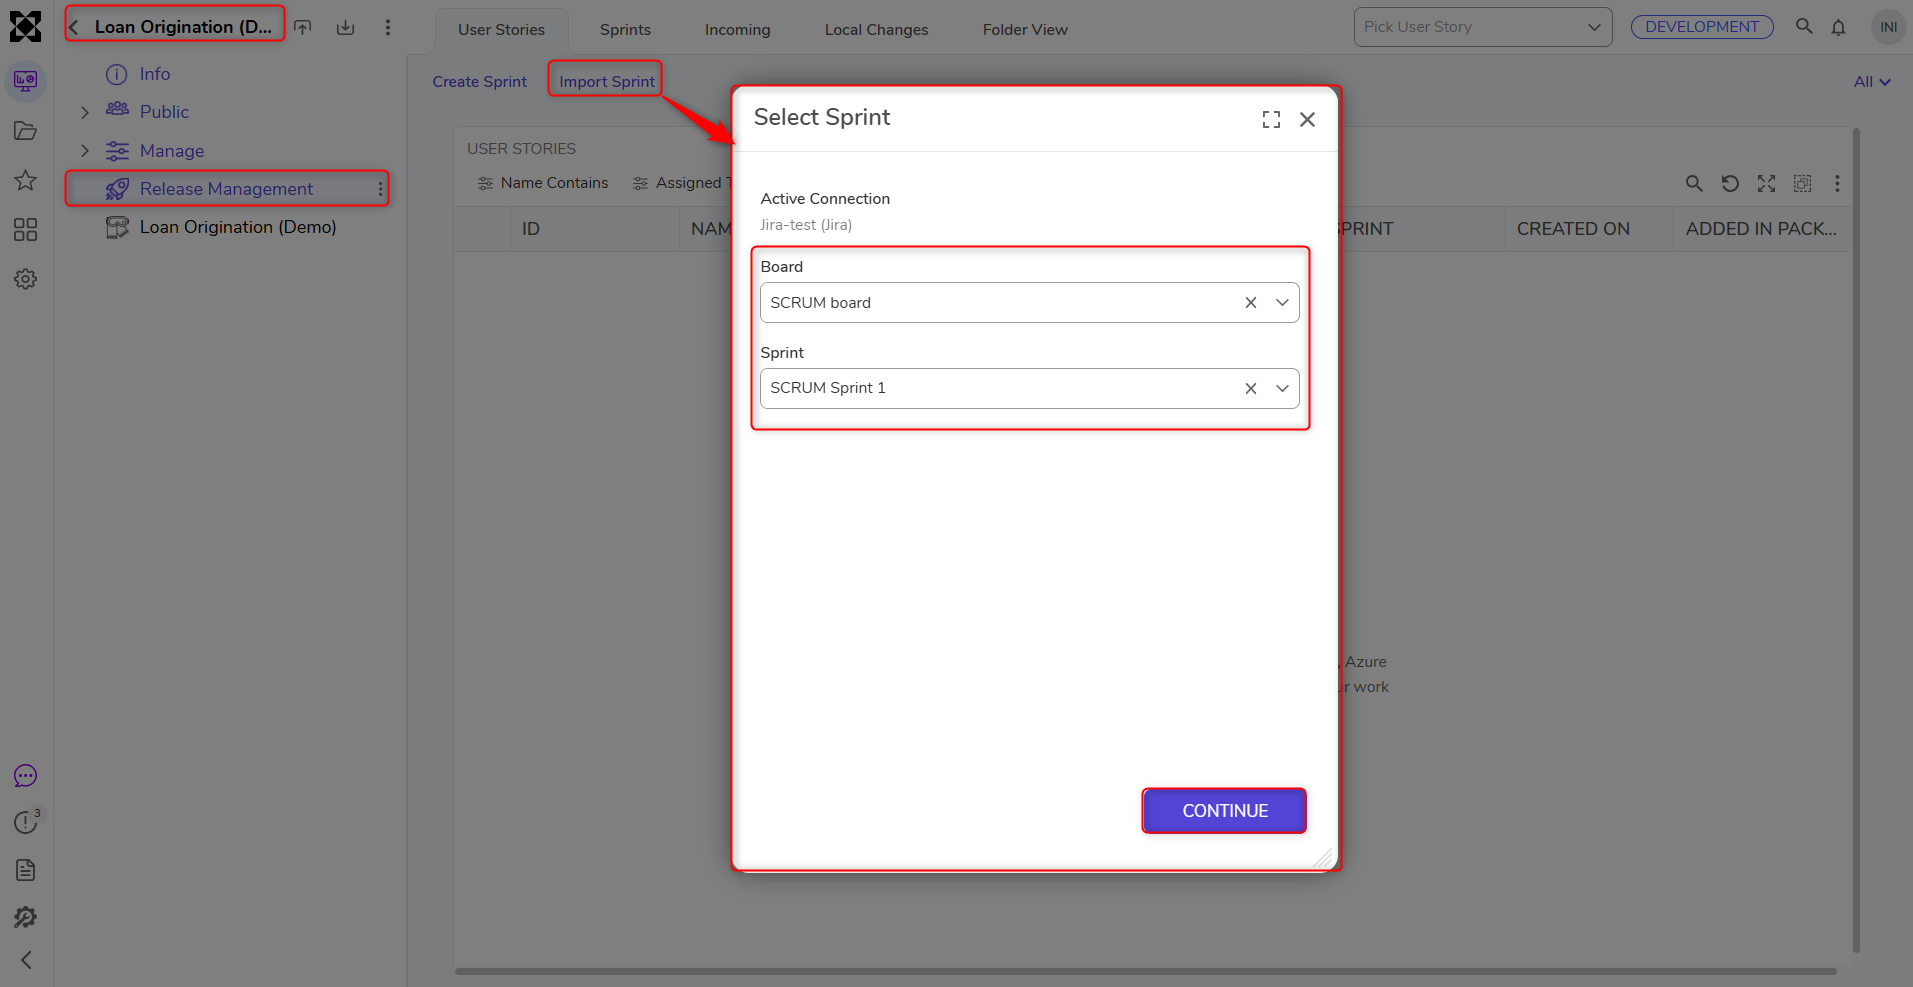
- Click Import Sprint. This opens the Select Sprint dialog.
- In the Select Sprint dialog, select the Board and Sprint to import from.
- Click Continue.
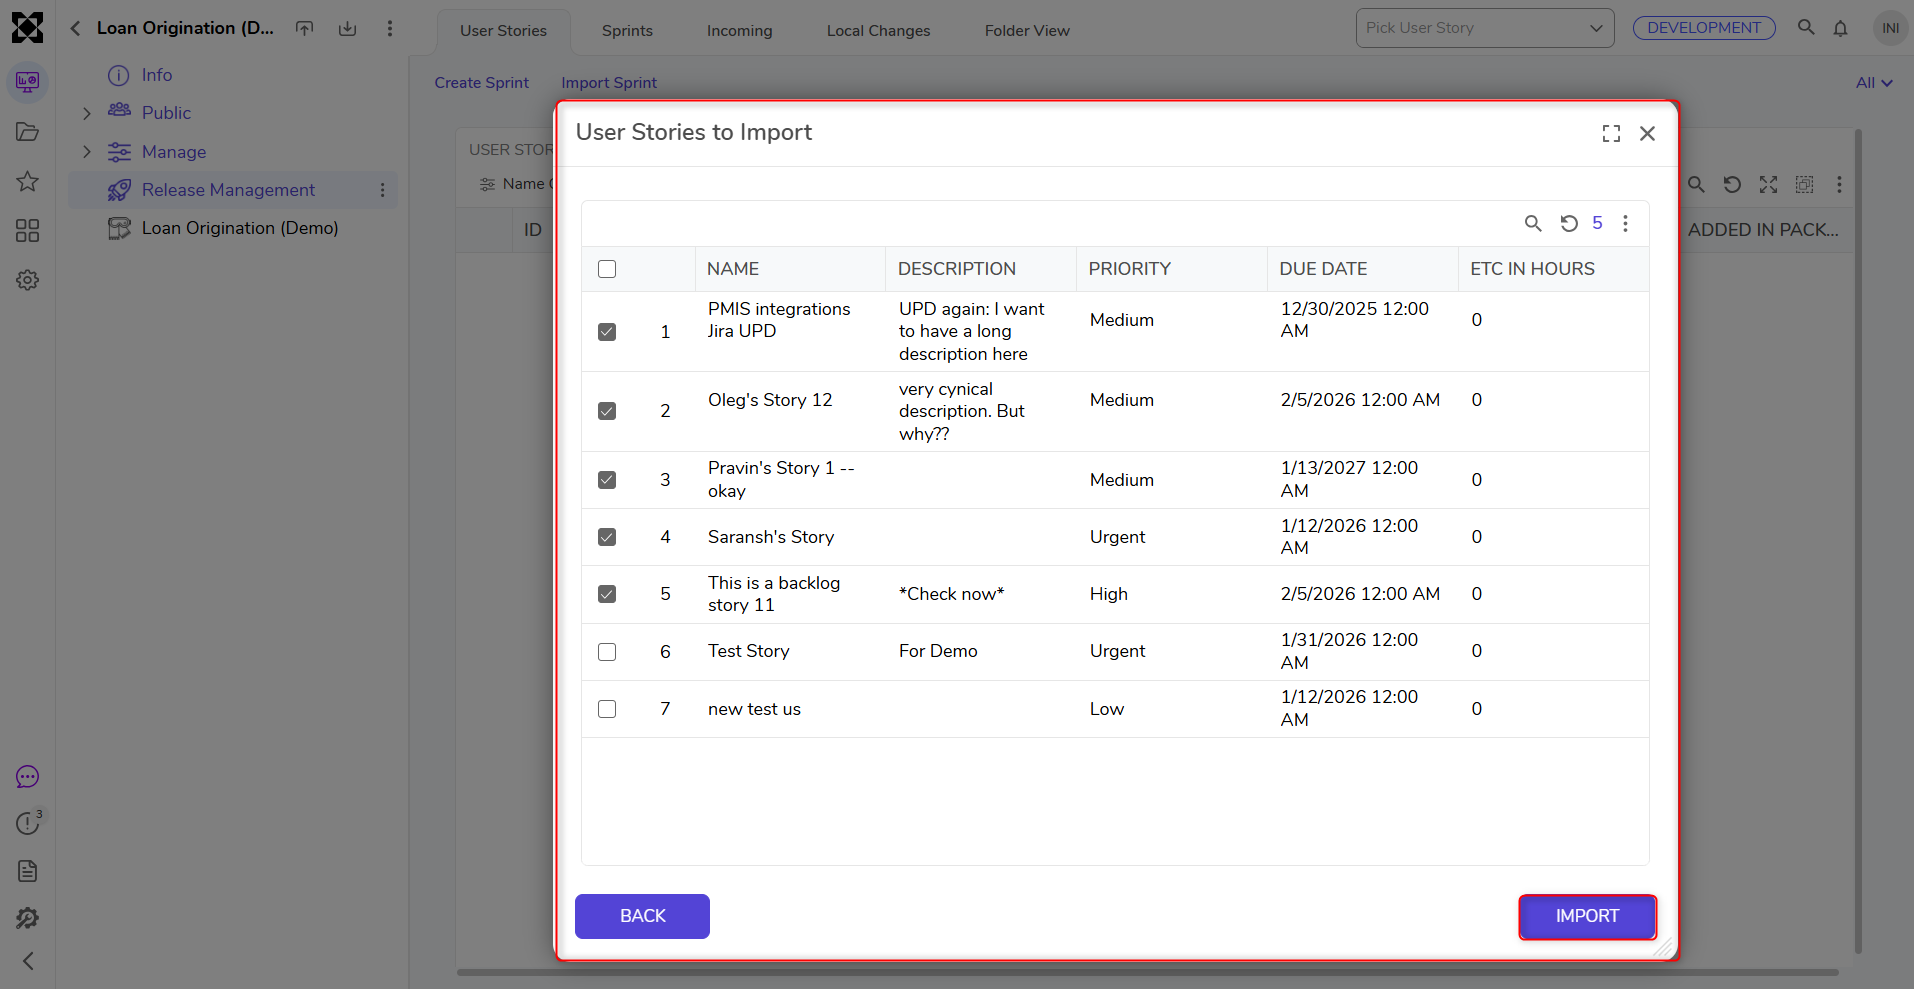
- Review the returned work items from the external PMIS system.
- Select or deselect the items to import.
- Click Import to create the Sprint and selected User Stories in Decisions.
Importing Sprints on the Deployment Server
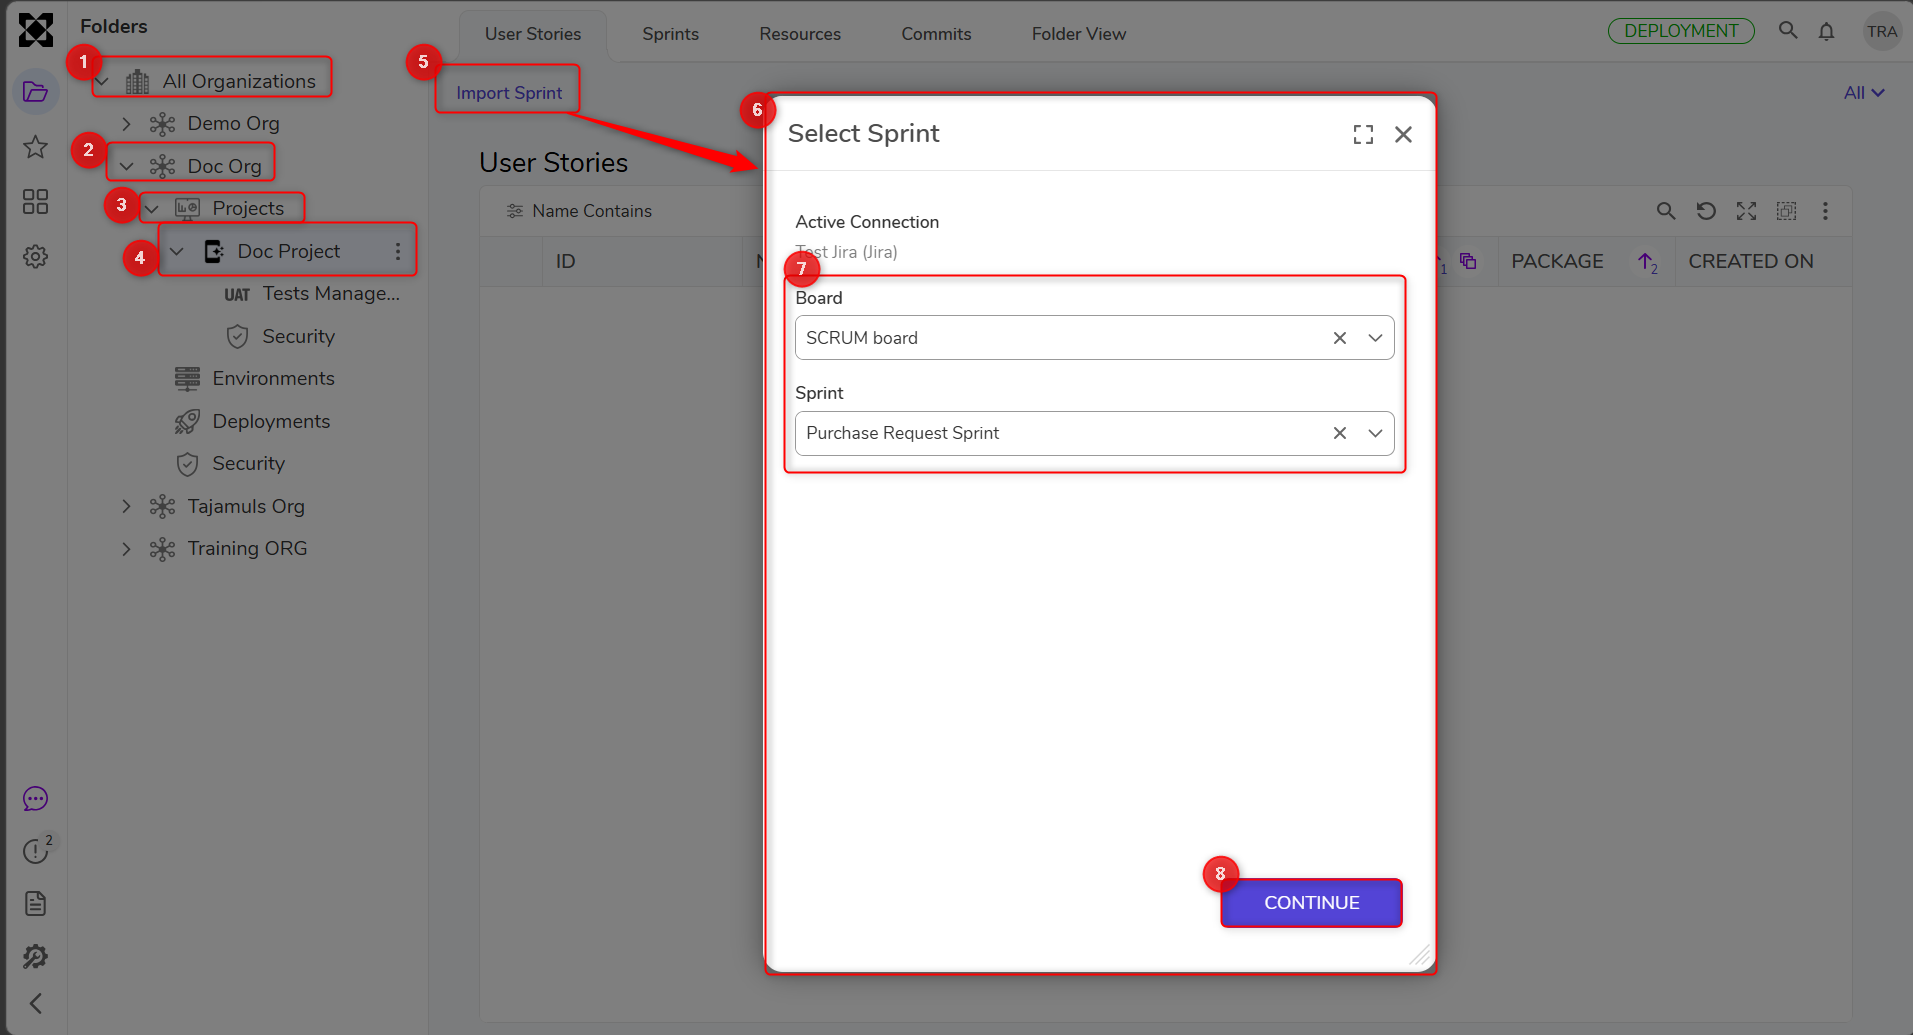
- On the Deployment Server, navigate to Folders > All Organizations.
- Open the organization that contains the project you intend to work on.
- Open the target Project.
- Click Import Sprint. This opens the Select Sprint dialog.
- In the Select Sprint dialog, select the Board and Sprint to import from.
- Click Continue.
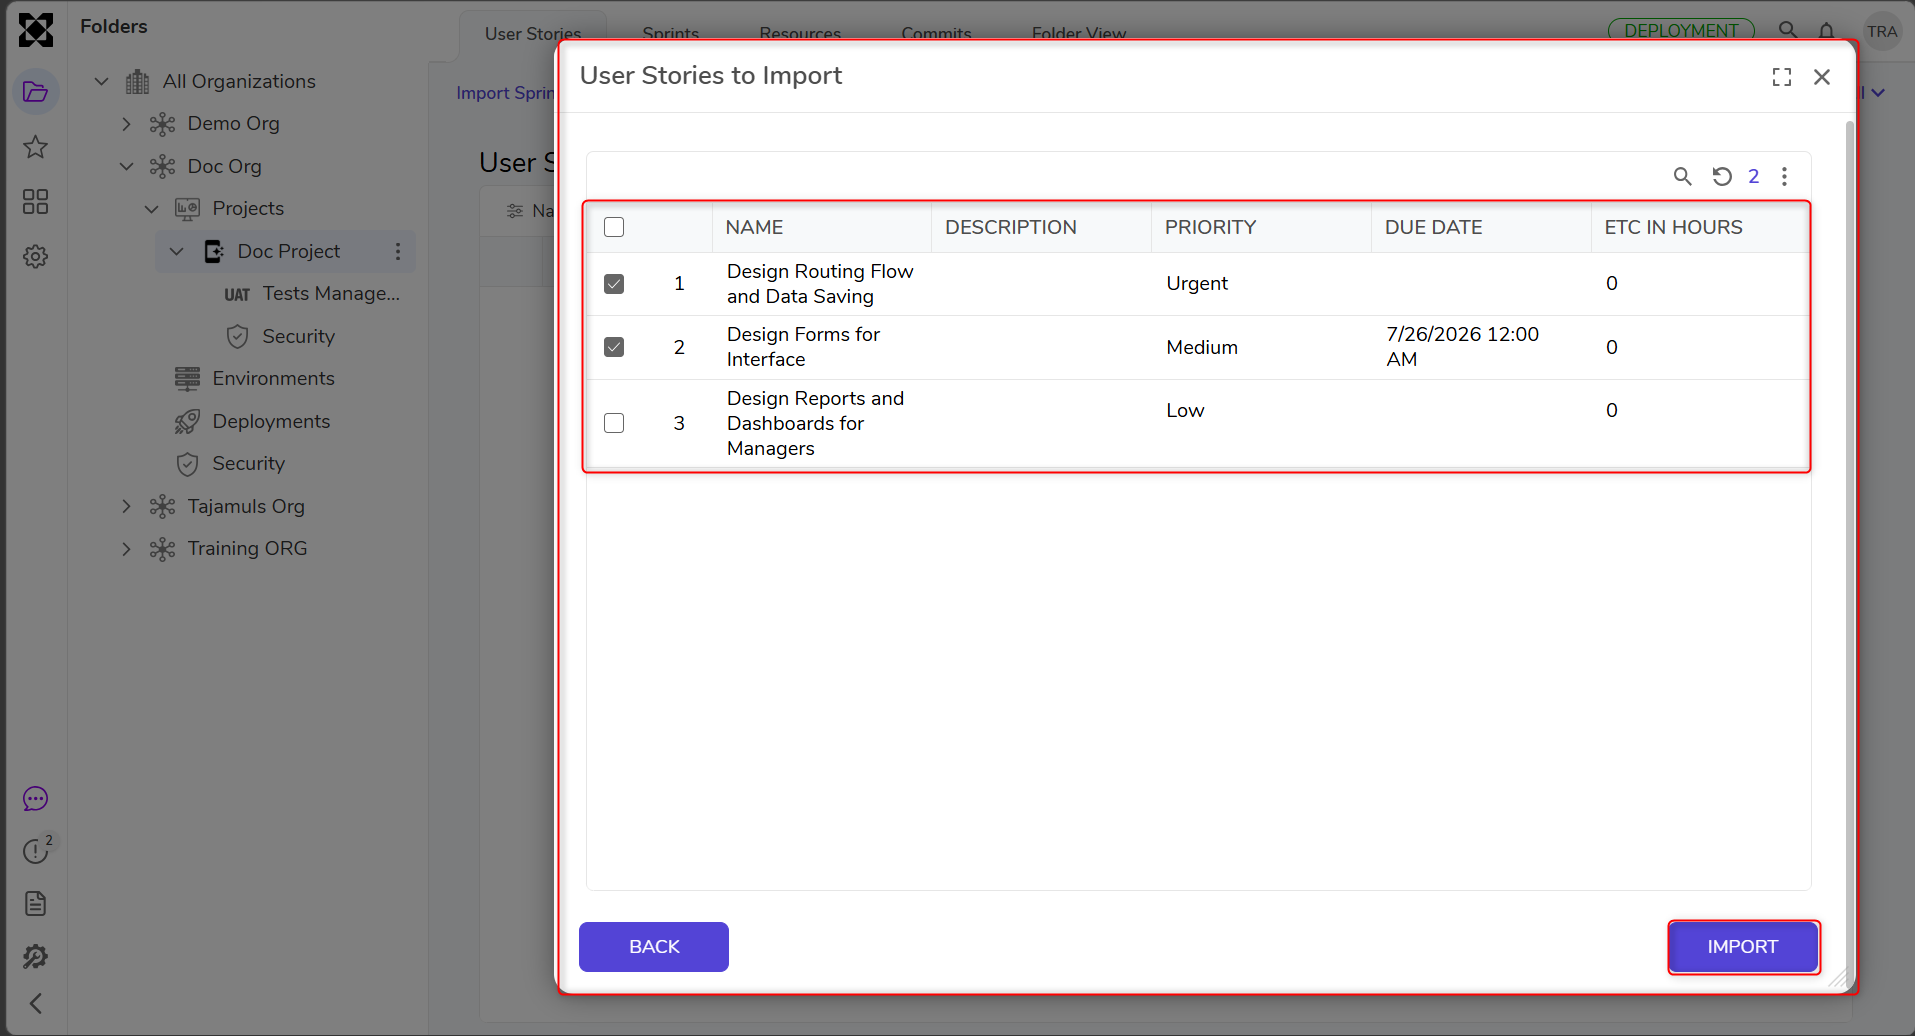
- Review the returned work items from the external PMIS system.
- Select or deselect the items to import.
- Click Import to create the Sprint and selected User Stories in Decisions.
Imported sprints and user stories are associated with the selected Decisions Project. For details on active PMIS connection behavior, see Active PMIS Connection Behavior.
Once a Sprint has been created, whether manually or through PMIS import, User Stories can be added to it directly from the Sprint Info page. See Creating User Stories for how to add work to a Sprint.
Sprint Management and Functionality
Sprints can be created, edited, deleted, or marked as complete by users with appropriate permissions. While Sprints do not enforce strict timelines, they help segment progress and facilitate reporting.
A sprint can be deleted only if none of the work is committed to the Deployment Server and has local changes (modified but not committed to the Deployment Server) in it.
Key functional aspects:
- High-level tracking only - No enforced deadlines.
- Project organisation support - Groups related user stories for focused development.
- Supports early feedback - Deployed in controlled environments to gather input.
Sprint Actions
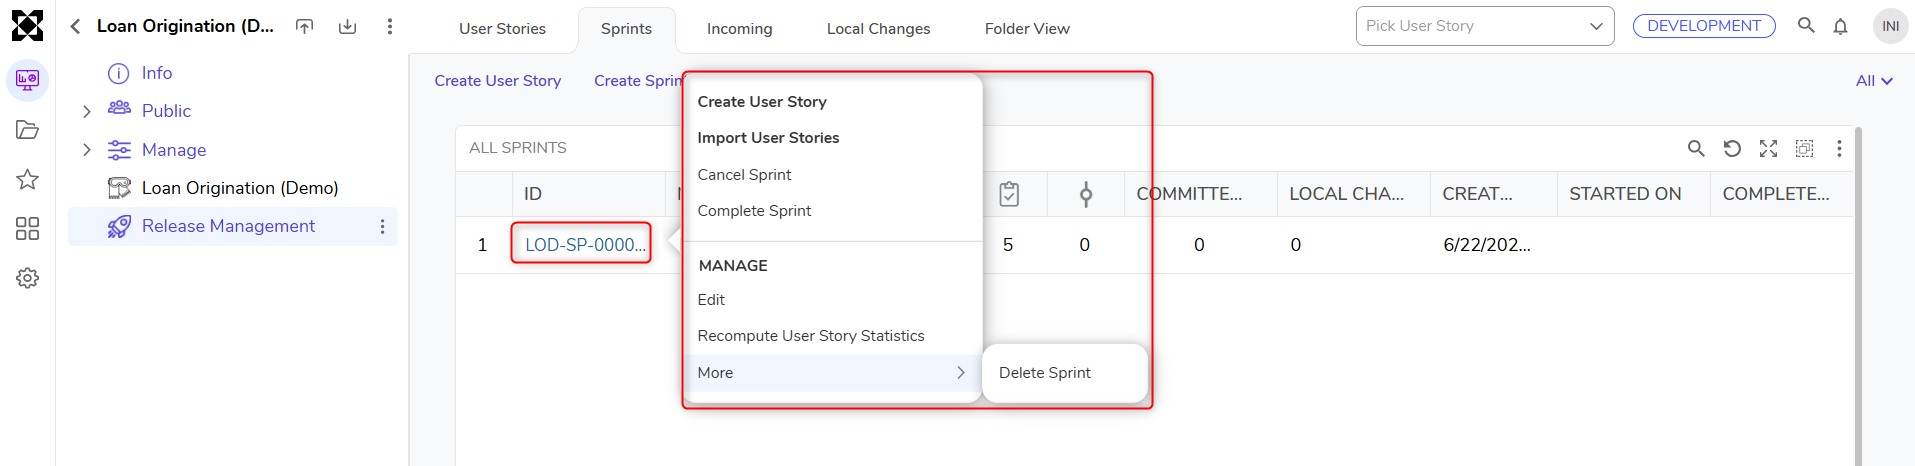
When a user right-clicks on a Sprint in the interface, the following actions are available:
- Create User Story - Add a new user story directly within the selected Sprint.
- Import User Stories - Use a CSV import wizard to bulk create multiple user stories within the selected Sprint.
- Cancel Sprint - Mark the Sprint as cancelled (subject to rules below).
- Complete Sprint - Mark the Sprint as complete if all stories are approved.
- Delete Sprint - Permanently remove the Sprint from the project.
- Edit - Update the Sprint's name or description.
Sprint Lifecycle States
A Sprint automatically transitions between the following states based on the status of its contained user stories:
- Not Started - Default state when the Sprint is first created.
- In Development - Triggered when any change task (user story) within the Sprint is started.
- Complete - Set when all user stories in the Sprint are approved.
- Canceled - Can be manually marked by the user if a Sprint is no longer needed.
These states provide guidance and visibility into Sprint progress without enforcing rigid workflows.
Sprint Cancellation Rules
A Sprint can be canceled when it is no longer needed or if work within the Sprint is deprioritised. However, cancellation is subject to the following conditions:
- A Sprint can only be marked as “Canceled” if it is not already in the “Complete” state.
This ensures that completed work is preserved and not removed from historical tracking.
User Permissions
Sprint and user story management is governed by a set of user permissions that determine what actions are available:
| Permission | Capabilities |
|---|---|
canAdd | Create sprints and user stories |
canDelete | Delete sprints and user stories |
canEdit | Edit sprints and user stories, start work, approve changes, request changes |
canAdd + canEdit | Move sprints |
These permissions ensure that only authorised users can initiate or modify key development structures.