| Feature Details | |
| Introduced in Version | 6x |
| Modified in Version | 8.14 |
Overview
Repo-SSO is a Decisions feature that is used to communicate with the Repository Server without being able to provide any login credentials to the Repository server. With Repo-SSO, users with Admin and Designer access can perform all the Repository actions from the Client Server (Decisions Server) seamlessly without providing login credentials each time they want to perform repository-related actions. Only one action, i.e., Open the Repository Server, cannot be executed and will need the login credentials to enter the Repository server.
How Does Repo-SSO work?
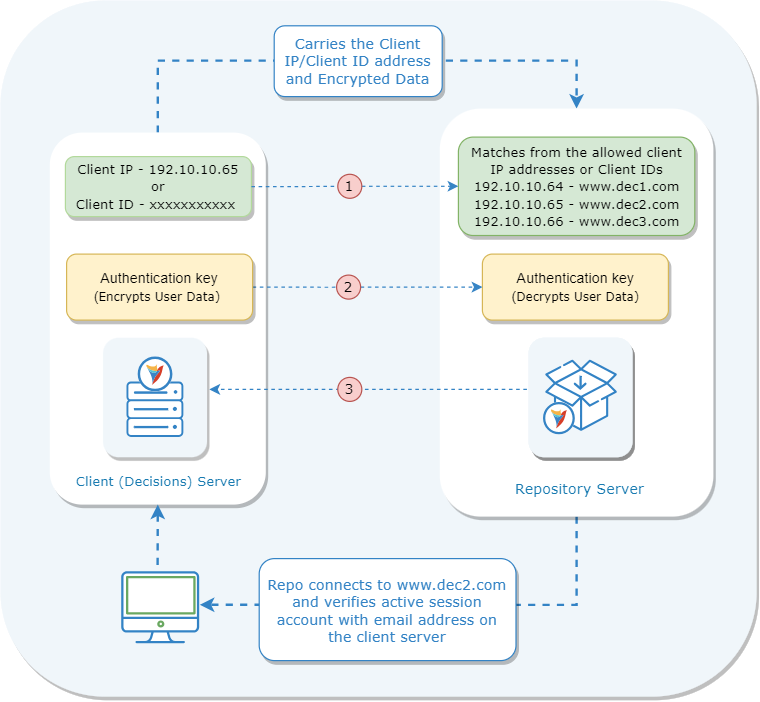
- When a user performs Repository actions on the Client (Decisions) Server, it carries the Client IP or Client ID and encrypted data to the Repository Server.
- The Repository Server lists allowed Client IP addresses/ Client IDs, Client Portal base URLs, and Client Instance names. The Repository Server will verify the received Client IP/ID with the list of allowed Client IP/ID and decrypt the data. It will also create a new account if the user is not found on the Repository Server.
- The Repository Server will connect back to the Portal Base URL based on the verified Client IP/ID and verify the email address with the active session account on the Client-Server. This completes the connection and lets users perform the Repository actions.
For users to Commit or Checkout changes to and from the Repository, there must be an account on the Repository Server. If no matching account is found, an invalid access error will occur.
Difference between Repo-SSO and Single Sign-On (SSO)
Repo-SSO and Single Sign-On (SSO) are both different terminologies. Repo-SSO is a Decisions developed feature that uses a native authentication method to communicate with the Repository Server. In contrast, SSO allows users to log in to the Decisions Server via an authentication method provided by an external identity provider. For more information, refer to SSO Basics.
Authentication Mode
Currently, there are two ways in which users can authenticate the Client (Decisions) Server with the Repository server.
| Authentication Method | Description | Reference Image |
|---|---|---|
| Client IP | This mode uses the Client machine IP address to authenticate with the Repository server. The Repository server must be configured with the Client machine IP address during the initial configuration. | 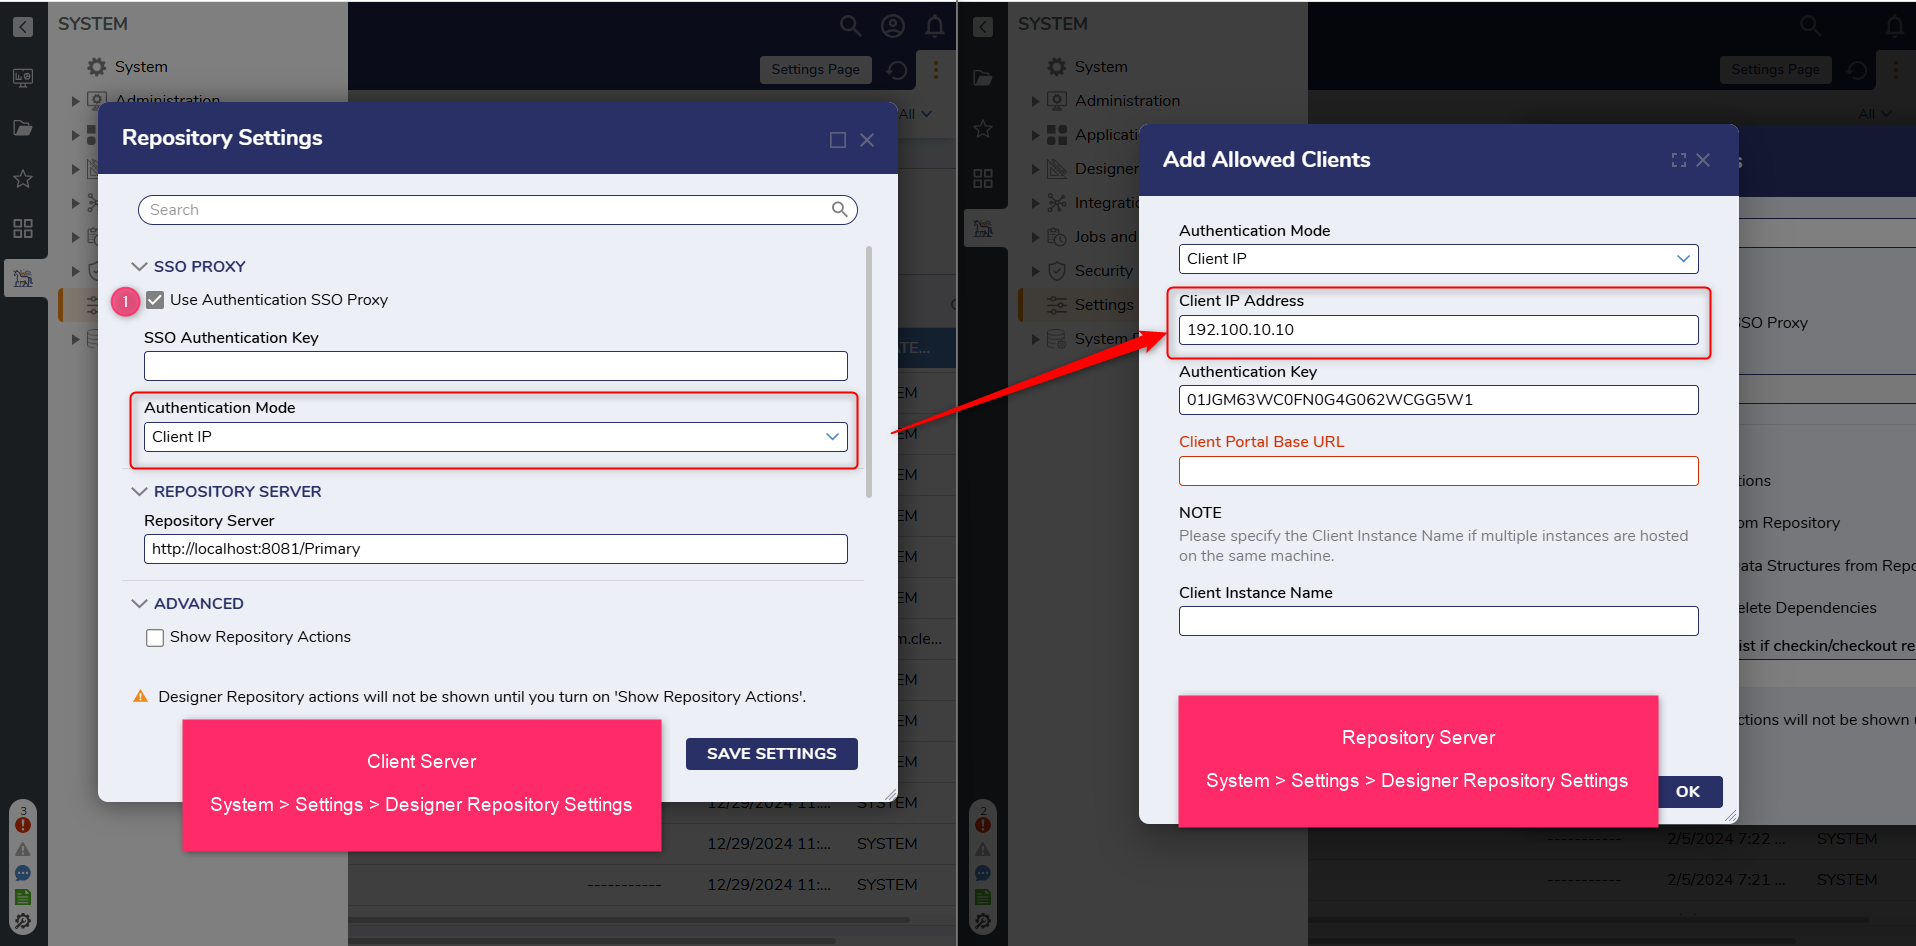 |
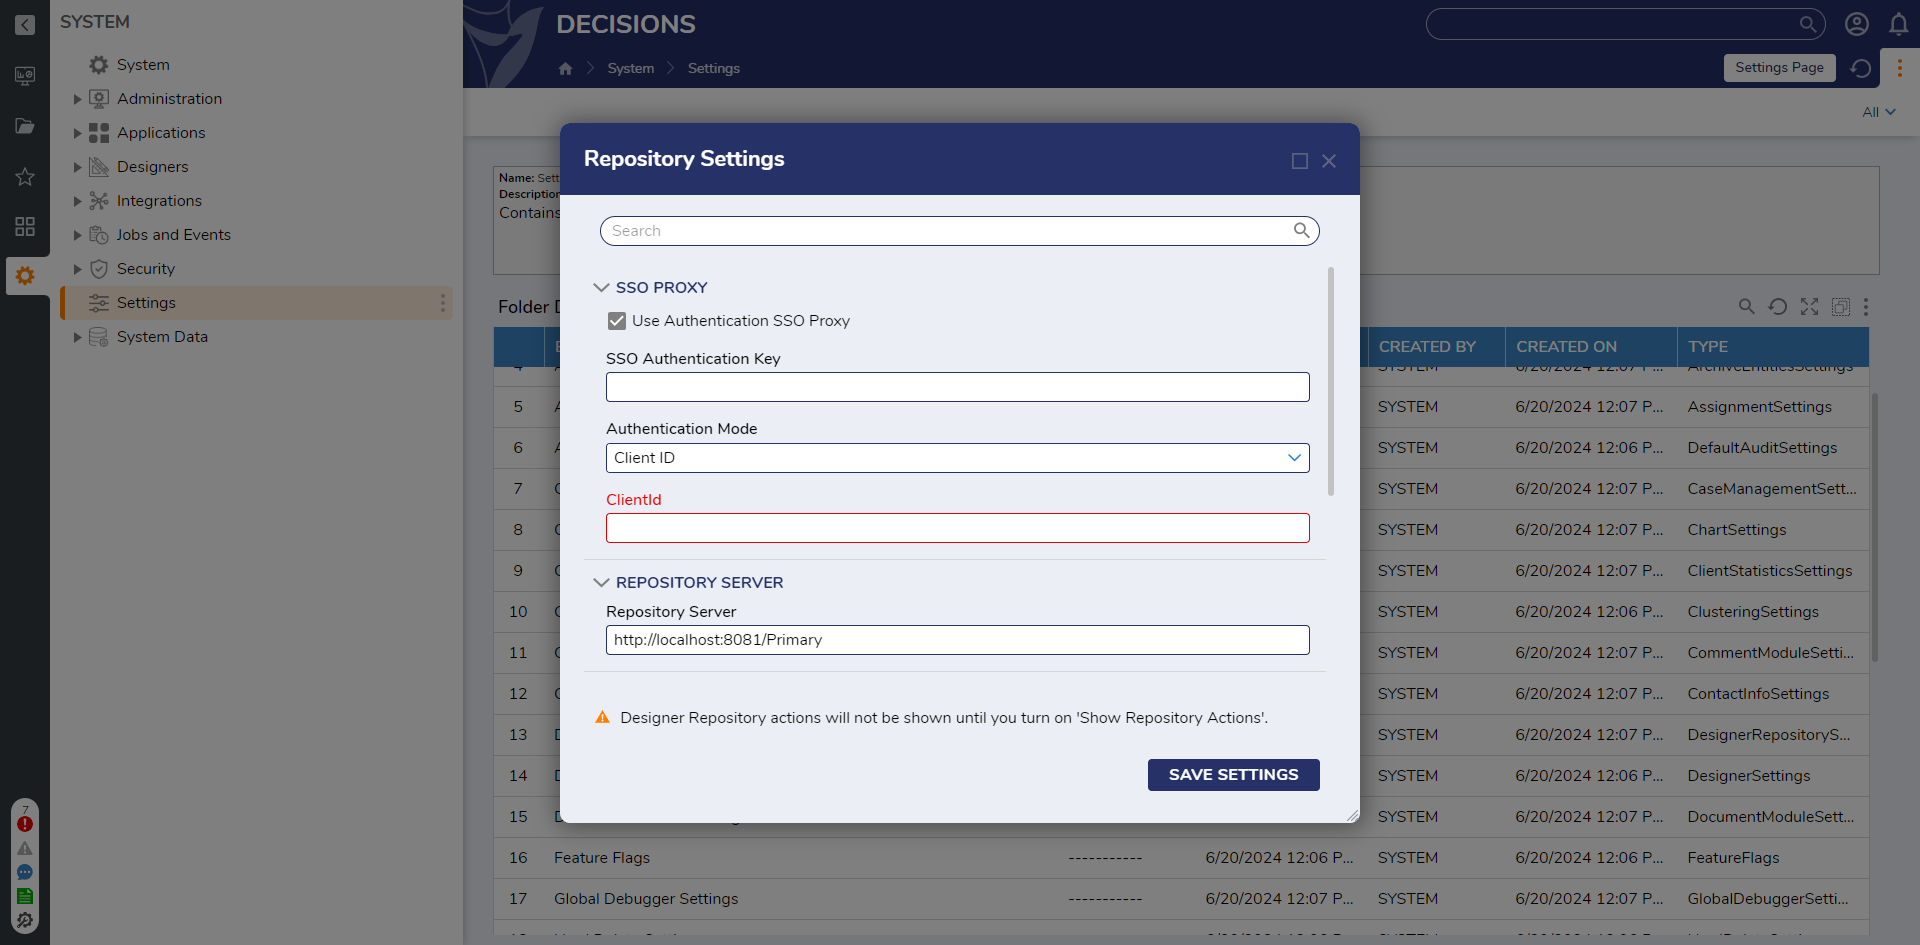
| Client ID | In this authentication mode, the Client ID is used for authentication with the Repository Server. The Client ID is automatically generated during the initial configuration of the Repository server and must be subsequently configured in the Client Server (Decisions Server). | .png) |
Selecting the Right Authentication Mode
Client IP: This is the standard approach to follow when the servers are hosted with platforms with static IP addresses.
Client ID: This approach is specifically utilized when the Client (Decisions server) operates within a Containerized or Kubernetes architecture, which assigns dynamic IP addresses to the application.
The following section demonstrates how to configure the Decisions and Repository servers to communicate with each other.
Configuring Client (Decisions Sever)
- Navigate to System > Settings > Designer Repository Settings.
- Under SSO PROXY, enable the Use Authentication SSO Proxy.
- Set a desired user-declared string value to SSO Authentication Key. This must match both the Repository and Client environments.
- Select the desired Authentication Mode.
- ClientID: Copy the Client ID from the Repository Server and paste it under it.
- Verify that the Repository Server URL matches the IP or DNS Name of the Repository Server.
- Click SAVE SETTINGS.
Configuring the Repository Server
- Navigate to System > Settings > Designer Repository Settings in the Repository Server.
- Enable Use Authentication SSO Proxy, then under Allowed Clients, click on Add.
- Configure the settings from the Add Allowed Clients screen based on the following table.
Setting Name Description Authentication Mode Allows to pick the preferred type or Authentication Mode to connect to the Client Server. - Client IP Address
The IPv4 address of the machine where Decisions is hosted (e.g., 192.168.10.100). - Client ID
This is an auto-generated unique string for every Client. Authentication Key This is a user-declared auth key. This must match both the Repository and Client environments. Client Portal Base URL Portal Base URL of the Client server. Client Instance Name This will be the Instance name of the Client Server (helpful in using one Repo Server for a Multi-Tenant Environment when the Tenants are hosted on the same machine). Warning:Users cannot add a Client IP Address with the same Instance Name multiple times.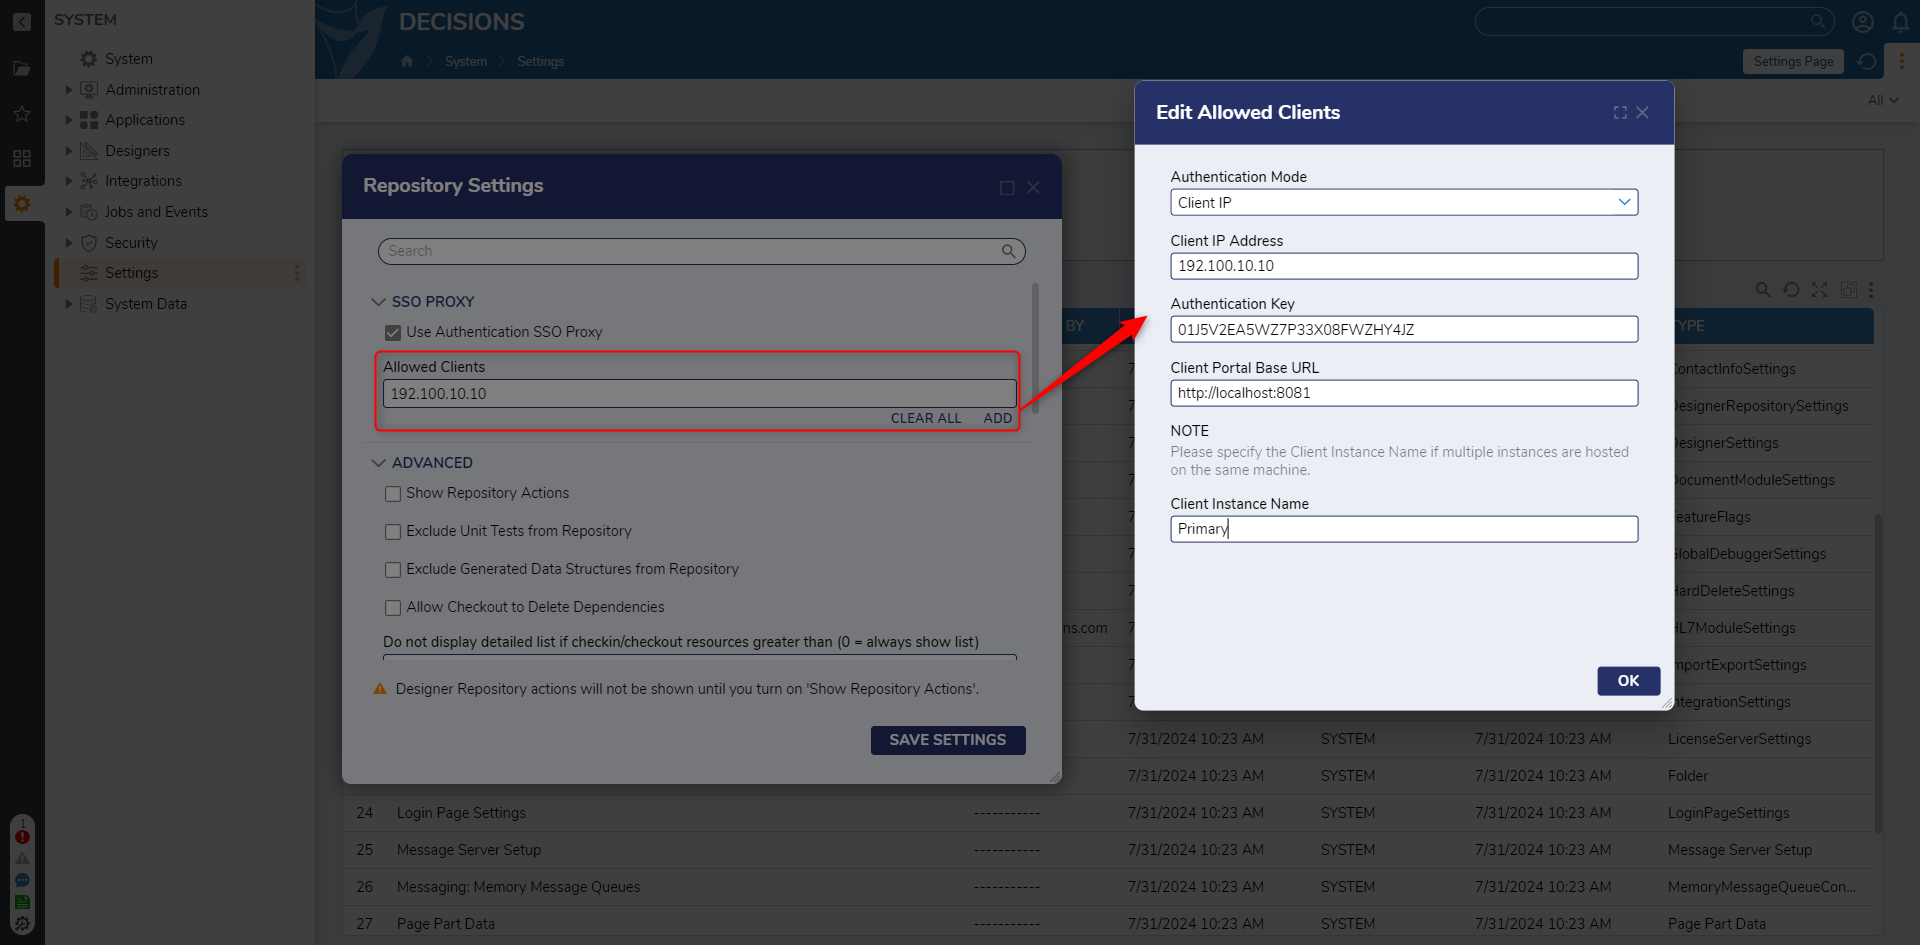
- To add new Client details, click on Add under Allowed Clients. Enter all the Client details and click OK, then SAVE SETTINGS.
- Once these settings have been configured, users can use the Repository without getting prompted for a username or password.
Validating the Connection
Validating ensures that the configuration that has been set up for the servers is correct and that the servers communicate with each other as intended.
- From the Decisions server (where the Repository is configured), navigate to any Folder/Designer Folder. Right-click on the Folder > Designer Repository > Checkin Changes for Project.
- If the connection is successful, then the Check-In: Select Entities dialog box should pop up.
- If the connection is not established successfully, it will prompt the users to enter a Username and Password on a Designer Repository dialog box.
Troubleshooting the Repo-SSO Connection
To troubleshoot the connection from the Client, refer to Common Trouble Shooting Points.
- Ensure the Client Server is reachable and actively running. If the server is unreachable, please get in touch with your IT administrator.
- Confirm that the User Authentication SSO Proxy is the same for the Client and Repository server.
- Confirm the Client IP, Client Portal Base URL, and Client Instance Name entered are correct.
- Check Event Viewer for any possible logs related to the Repository. If unable to resolve the issue, reach out to support@decisions.com.
If the problem persists, admin users can enable the log category for RepositoryServerSSOUserContext that log's three stages of connection. For more information, refer to the Logging Overview.
| Debug Message | Description |
|---|---|
| {ClientIP} is trying to connect to this server with instanceName {InstanceName} | This indicates the Client is trying to connect with the Repository Server SSO. This information lets you cross-check the incoming IP with the IPs in the allowed Client. |
| {EmailAddress} from {Ip} is trying to connecting to this server | This indicates that the Repository Server found the entry in the allowed Client IP, and the user from the Client is trying to connect to the Repository Server. |
| {EmailAddress} from {callerIp} is connecting to this server | This indicates that the Repository Server is successfully connected to the Client. |