Overview
This document describes how to configure a CI/CD deployment pipeline for the Decisions platform using Azure DevOps Classic Release Pipelines and the Azure DevOps Deployment Project (provided by Decisions Support). The goal is to push Decisions project resources from a Decisions Repository into an Azure DevOps Repo, then use an Azure DevOps Release Pipeline to trigger an API call that deploys the latest branch revision to one or more target Decisions environments.
This guide is intended to be used alongside video exports that demonstrate the following processes:
- Running the Flow to create the Azure Repo
- Pushing initial code into Azure DevOps
- Setting up the Release Pipeline
- Creating a Variable Group and deploying a release
- Azure DevOps account. To learn more, see https://dev.azure.com/
- Azure DevOps project created
- Classic Release pipelines enabled in Azure DevOps
- Personal Access Token (PAT) created. To learn more, see Microsoft's documentation for Personal Access Tokens.
- Two Decisions environments configured (at least one Non-production)
- A Decisions Repository previously configured
- Named Session configured on the target Decisions Server (recommended)
- Continuous Deployment Project from the Decisions App Store imported on each target environment (targets must have publicly accessible URLs if Azure DevOps will call the API endpoint directly)
- Azure DevOps Deployment Project (reach out to Decisions Support)
Decisions Repository Configuration
Start by configuring the Repository environment using the Azure DevOps Deployment Project. This project includes Flows that create an Azure DevOps repository from a Decisions Repository branch and push branch resources to Azure DevOps using REST API calls.
- Import the Azure DevOps Deployment Project into the Repository environment.
- Update the REST API steps in the provided Flows as needed. The REST calls generally require the following inputs:
- Auth Header: Configure by Base64 encoding your PAT token and combining it with the word Basic.
- Request Body: Varies per API call and is typically already configured.
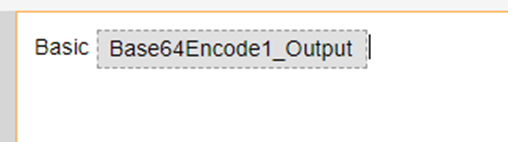
- Configure the Base64-encoded PAT token used by all REST methods:
- At the beginning of each Flow, locate the Base64Encode step.
- Paste your PAT token as a constant value formatted with a leading colon:
:yourtokencontenthere - Use the encoded output to construct the Auth Header using the Basic prefix.
Enter the PAT as a constant value at the beginning of the Flows.
Project Linking
Video reference: Check in and Azure Repo Creation
Once the REST APIs are configured in the Repository environment, link a Decisions project to Azure DevOps by creating an Azure Repo for that project.
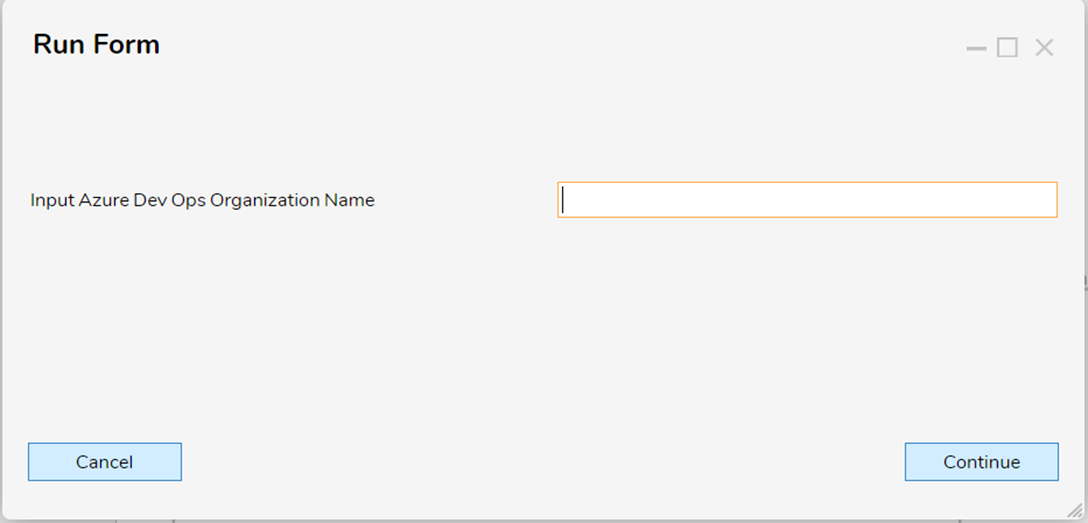
- In the Repository environment, run the Create Azure Repo from Decisions Repo Branch Flow.
- When prompted, enter the name of your Azure DevOps Organization.
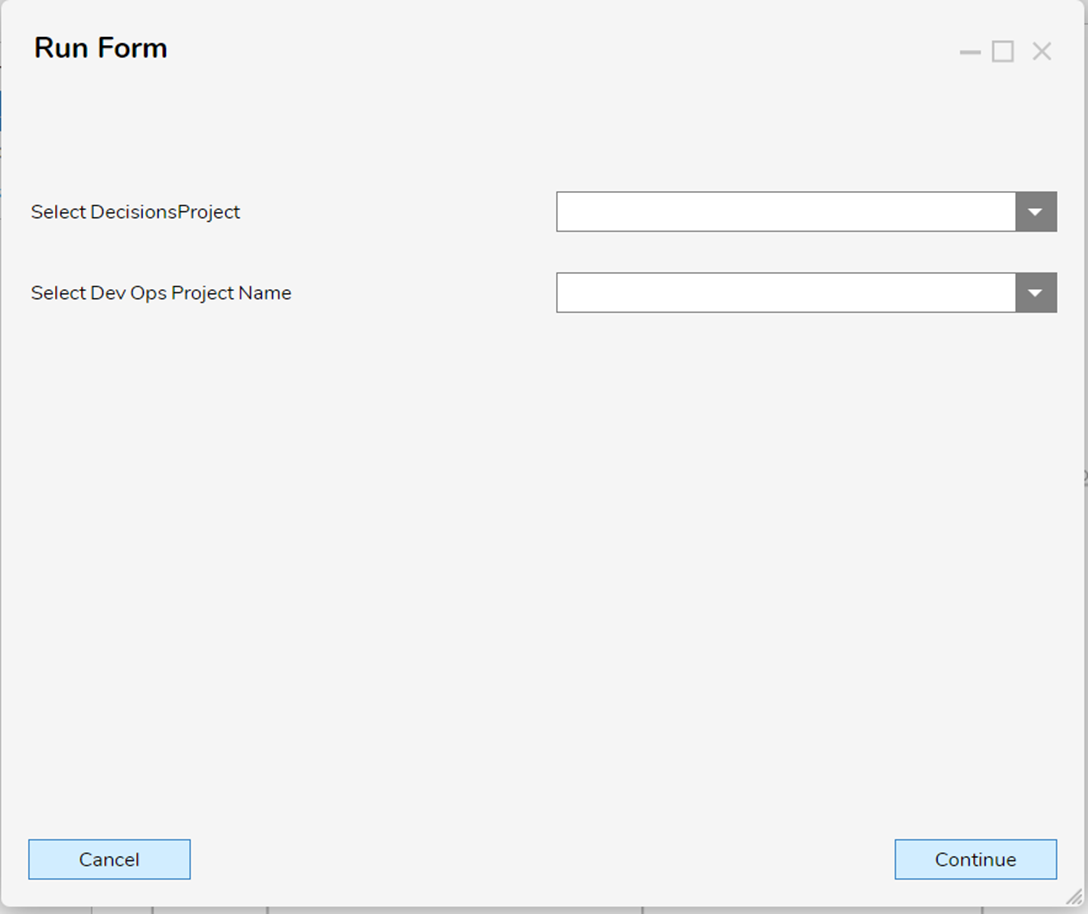
- Select the Decisions Project to link.
- Select the Azure DevOps Project that the Decisions Project will be linked to.
Sending a Branch to Azure DevOps
Video reference: Initial Code Push to Azure
After the project is linked, push a Decisions Repository branch to Azure DevOps. This process sends the resources in the selected branch to the Azure DevOps repository using REST API calls.
- Run the Flow used to push code to Azure DevOps (for example, the initial code push Flow included with the Azure DevOps Deployment Project).
- At the beginning of the Flow, a Base64 encoding step is used to encode the PAT token. This encoded value is used only for the REST API Auth Header.
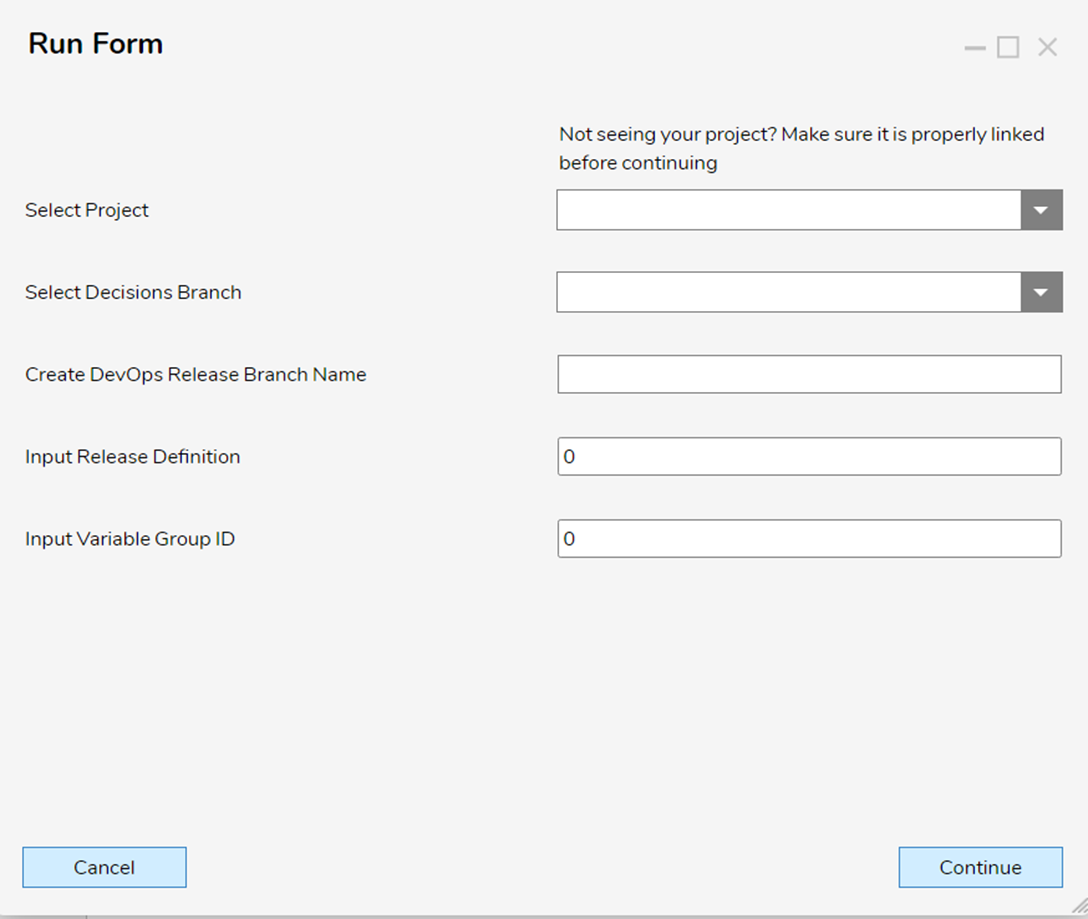
- When prompted, select:
- Decisions Project
- Branch being pushed
- Release Name
- Release Definition ID and Variable Group ID (only required if you are planning to start a release)
- The Flow sends resources from the selected branch to Azure DevOps:
- A Get Module Resources step retrieves resources from the selected branch.
- Each module file is retrieved and pushed to Azure DevOps individually as a separate commit.
- The Flow pushes code using the POST API method.
Because of limits on how much data can be sent in a single commit, the Flow pushes branch content as multiple commits, with each file committed individually.
REST API Inputs Used When Pushing Code
- Auth Header: Encoded PAT token combined with Basic.
- Organization: Name of the Azure DevOps organization the project belongs to.
- Project: Name of the Azure DevOps project the repository belongs to.
- Repository Id: ID of the repository receiving commits.
- Request Body: Commit payload sent to the Azure DevOps repository.
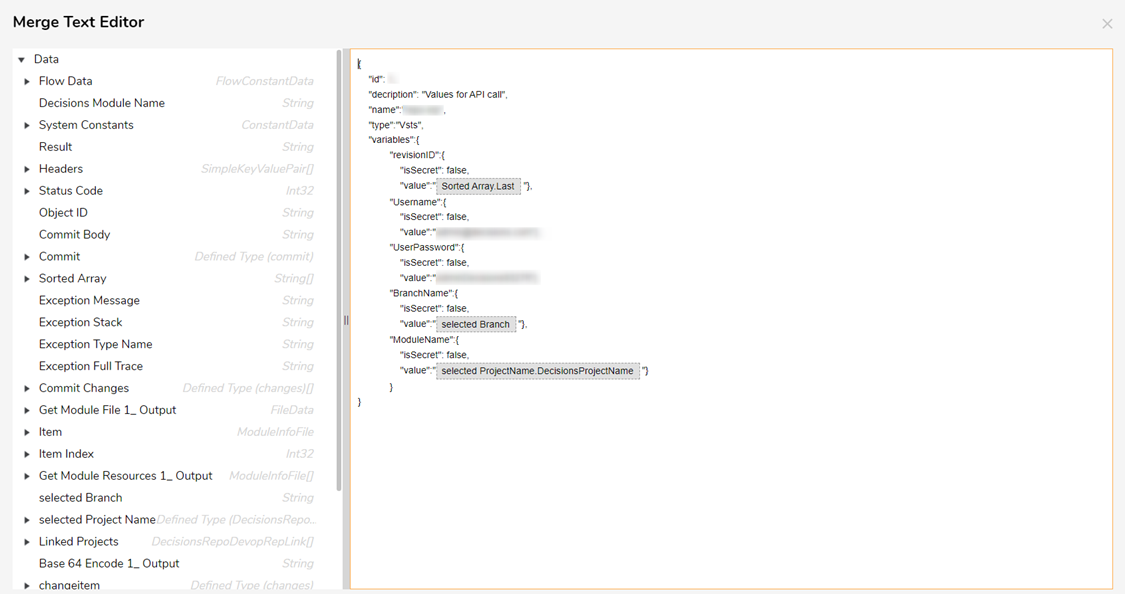
Request Body Fields (Commit Payload)
- Name: Branch name/path being pushed, typically
refs/heads/<SelectedBranch>. - OldObjectId: Object ID of the branch being pushed to.
- Commits: Built in the Flow. Currently supports add commits only (mapped as CommitBody). Only new files can be added to the branch.
- NewContent: Base64-encoded byte content of the file sent to Azure DevOps.
After pushing code, the Flow updates the Azure DevOps Variable Group (used by the Release pipeline for deployment parameters). After the Variable Group is updated, the Flow creates a release for the Release pipeline.
The request body for the API call looks like this:
Azure DevOps Configuration
Video reference: Setting up the Release pipeline
Do not proceed with this section until code has been pushed into Azure DevOps using the Initial Code Push to Azure process.
- In Azure DevOps, navigate to Pipelines > Releases.
- Select New to create a new Release Pipeline.
- Use the Empty Job template.
- Take note of the definitionid in the URL after the pipeline is created (see the
definitionid=<number>in the URL on the Releases page).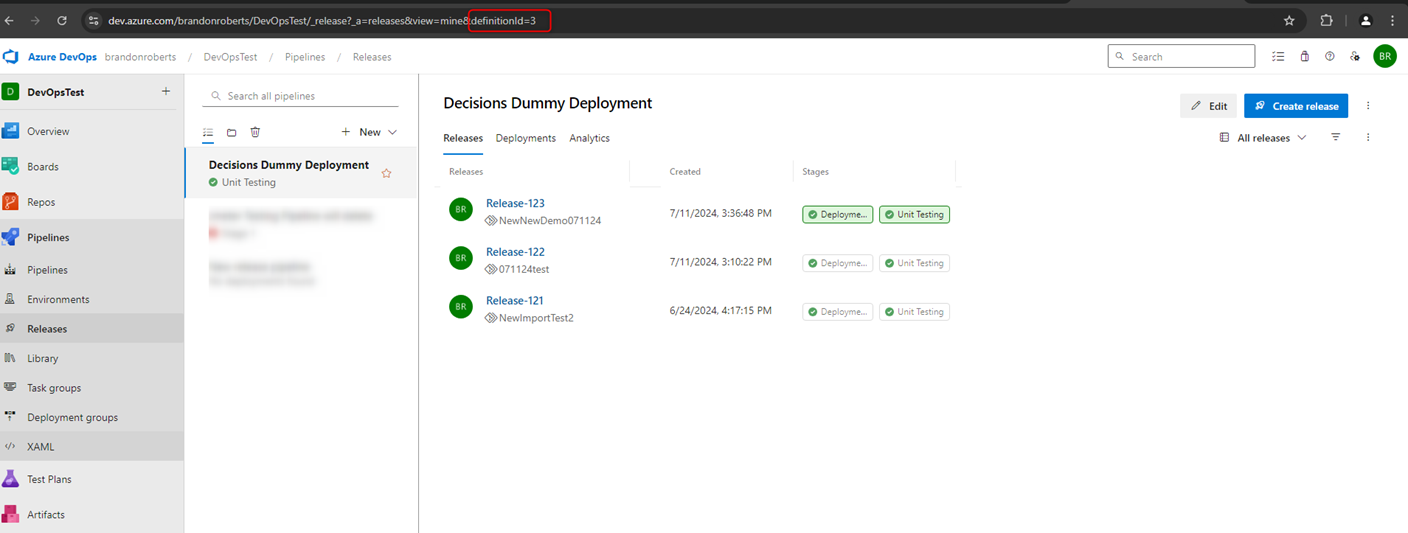
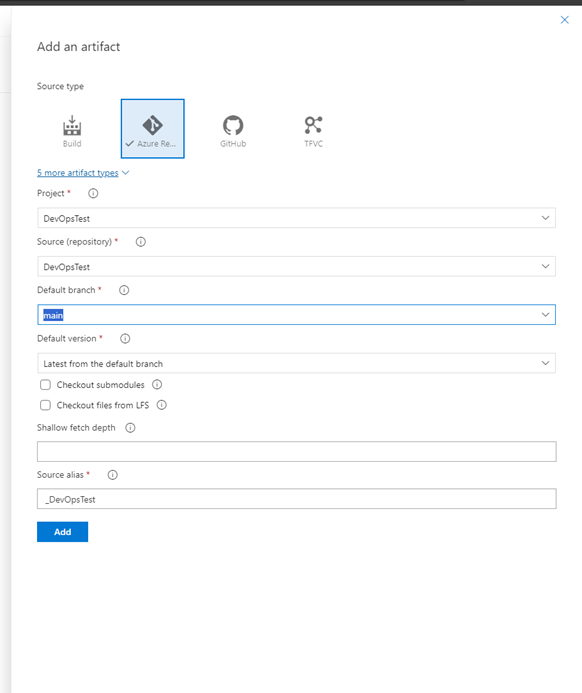
- Select Add an artifact and choose the DevOps Repository created during Project Linking.
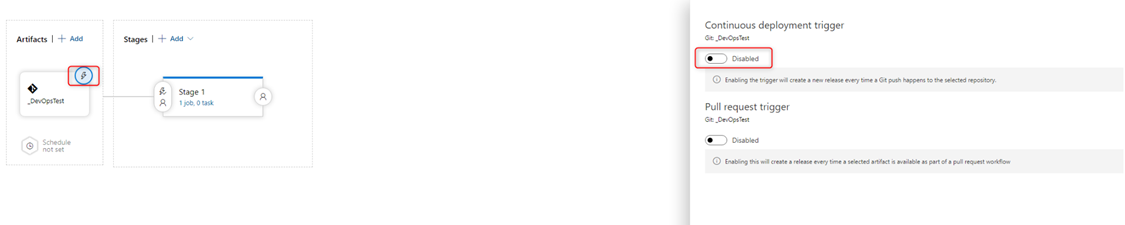
- On the artifact, select the lightning bolt icon and enable the Continuous deployment trigger. This allows repository pushes to trigger the Release pipeline.
- Add a deployment stage for the deployment tasks.
Task Configuration
- In the Deployment stage, remove the default agent job and add an Agentless job.

- Add an Invoke REST API task to the Agentless job. This task makes an API call to the target Decisions Server.
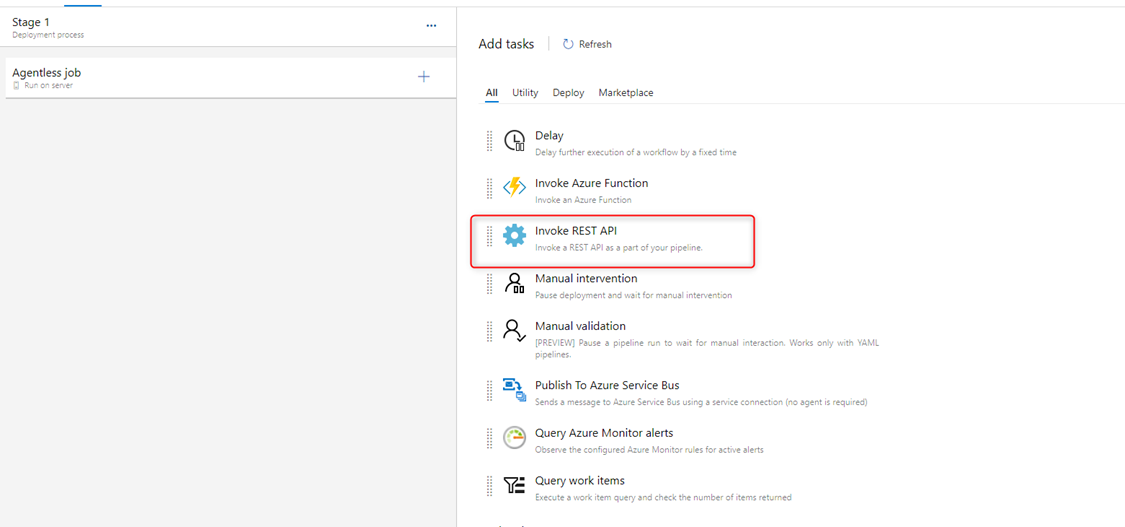
- Configure the task using a Generic connection type and a Service connection that points to the target Decisions API endpoint (POST URI).
- Remove headers from the API call configuration and use the following body:Body
{"sessionid": "","outputtype": "Json","parentFolderId": "","moduleName": "$(ModuleName)","branchName": "$(BranchName)","Username": "$(Username)","UserPassword": "$(Userpassword)","RevisionId": "$(revisionID)","DeploymentID": ""}
- Using a Named Session is recommended but not mandatory.
- The parentFolderId can be set to the MyApps folder ID of the target server.
Variable Group Configuration
Video reference: Creating a Variable group and Pushing Release
Variable Groups ensure that the Release pipeline deploys the latest branch revision by storing deployment values that can be updated as part of the code push process.
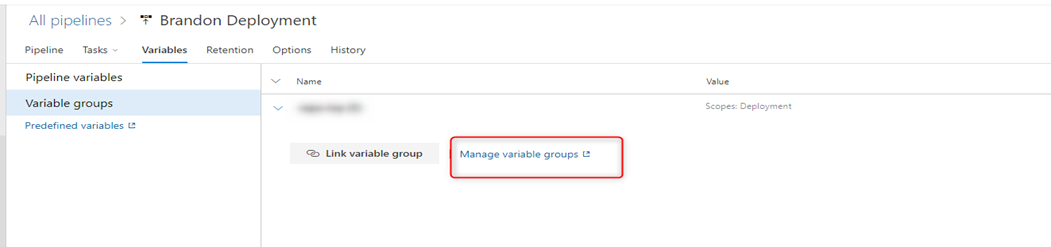
- In the Release pipeline, select Variables and then select Variable groups.
- Select Manage Variable groups.
- Create a Variable Group containing default values for the following variables:
- BranchName
- ModuleName
- RevisionID
- Username
- UserPassword
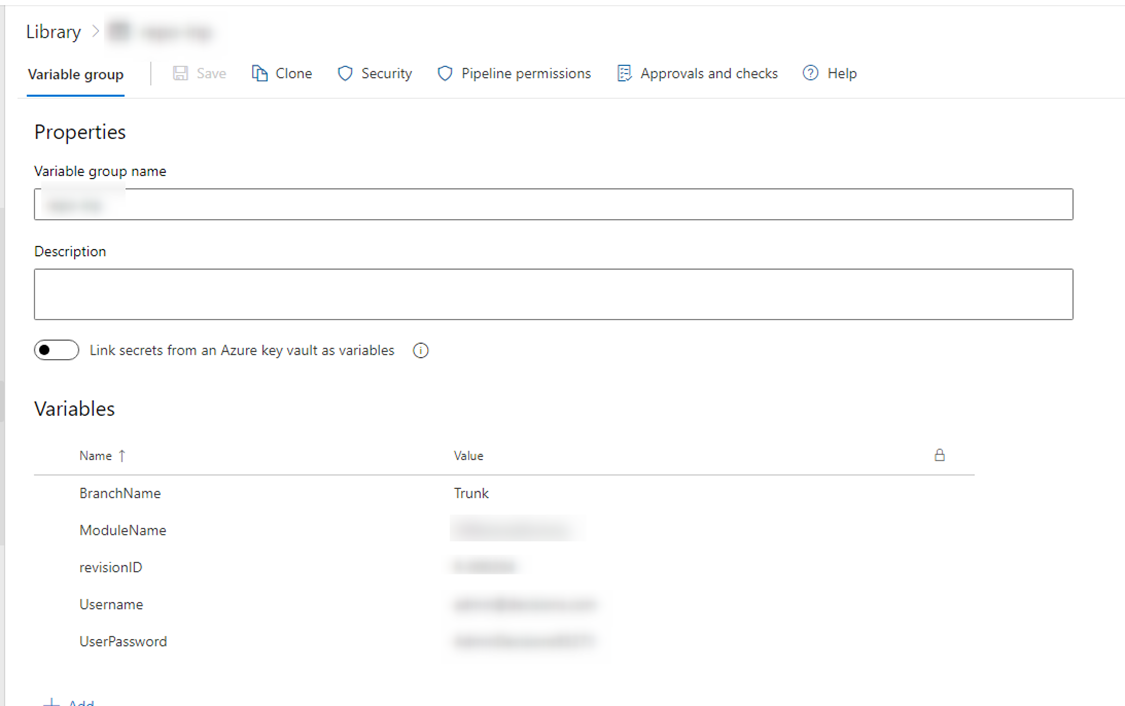
- Take note of the groupid in the URL. This ID is required when pushing updates to the Variable Group.
- Save the Variable Group.
- Navigate back to the Release pipeline and link the Variable Group to the pipeline.
After linking the Variable Group, update the corresponding REST API call on the Decisions side so the Variable Group can be updated after a branch is committed (see the Sending a Branch to Azure DevOps section).
Target Server Configuration
Continuous Deployment Project
- Import the Continuous Deployment Project on every target server that will participate in CI/CD.
- Expose the AutoDeploymentWrapper Flow as an API endpoint used by the Azure DevOps Release pipeline.
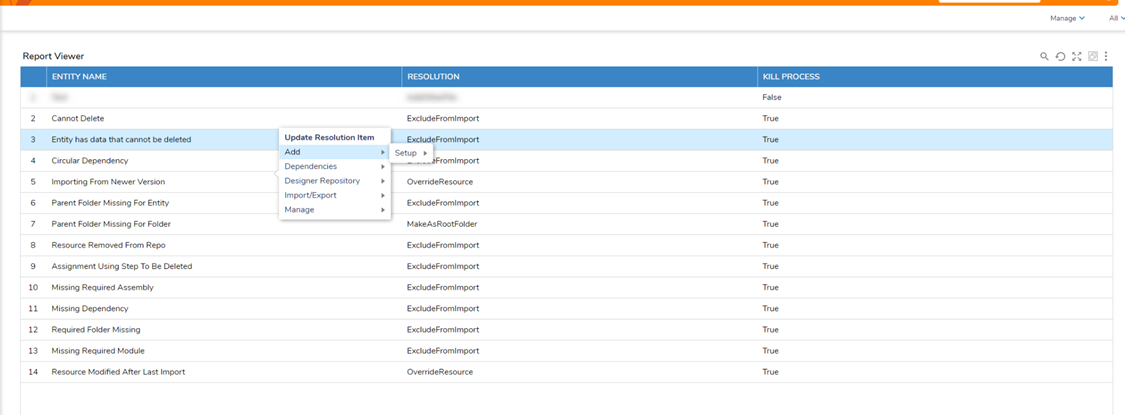
Import Resolutions Manager
- Import resolution items are provided to help control how import validation issues are handled during deployment.
- The project includes a report with a right-click action that allows selecting the resolution for each validation item.
- A Flow and Form are also included for creating Import Resolution Managers. These entities are typically included with the project and do not need to be recreated.
Unit Testing
- A Flow is provided to run unit tests included in the project.
- This can be integrated into Azure DevOps by adding an additional task that calls the Unit Testing Flow after deployment.