- 28 Oct 2024
- 5 Minutes to read
- Print
- DarkLight
Case Entity CRUD Actions
- Updated on 28 Oct 2024
- 5 Minutes to read
- Print
- DarkLight
Overview
Case Entity Data Structures are typically used to delineate non-linear, data-driven, or state-driven processes (e.g., order fulfillment).
Users may build, configure, and utilize CRUD actions to create, update, and delete a Case Entity's data with Flow logic.
Step Properties
Settings
| Name | Description |
|---|---|
| SkipDuplicateFolderNameCheck | When marked true, the step will not verify whether an entity with the same name already exists. |
| Send Event | Allows to send an event that will refresh the Folder. |
| Send | This action will trigger a refresh event within the Folder that contains the Entity Folder. |
| SendWithTreeChange | This will send the refresh event that will also update the folder tree. |
| DoNotSend | This will not send any refresh event. |
Inputs
| Name | Description |
|---|---|
| Case Prefix | This will allow users to override the configured prefix number in the Case Entity Data Structure. |
| Extension Data | This will allow users to configure all the parameters of the entity. Changing the mapping type to Build Data will expose all the fields. |
| Folder Description | Sets a description to the Folder. |
| Folder Name | Allows to set the folder name of the entity. |
| Parent Folder ID | This will allow you to pick a folder to store the case entity. It is recommended not to store case entity data in the Configuration Folder. |
Outputs
| Name | Description |
|---|---|
| Folder ID | The step will return the Folder ID of the created entity. |
Prerequisite
To follow this tutorial, create a Case Entity Data Structure with the below data fields:
| CaseEntityPerson | |
|---|---|
| Data Field Name | Data Field Type |
| FirstName | String |
| LastName | String |
| DOB | Date time |
After completing the creation of the Case Entity, a Configuration Folder named "[CaseEntityName] Configuration" is automatically generated. Clicking on this opens the Case Editor Page. CRUD actions will not be saved here, however.
To store the CRUD Action Flows, create a new Designer Folder. It is a best practice to name it after its Data Structure. In this case, "CaseEntityPerson CRUD" suffices. The following examples will take place here.
To store the Case Entity's data, create a Folder that references the following examples. For this example, it is named "CaseEntityPerson Data".
Create
- In the Designer Folder, create a new Flow and name it "CaseEntityPerson Create". It will automatically open in the Flow Designer.
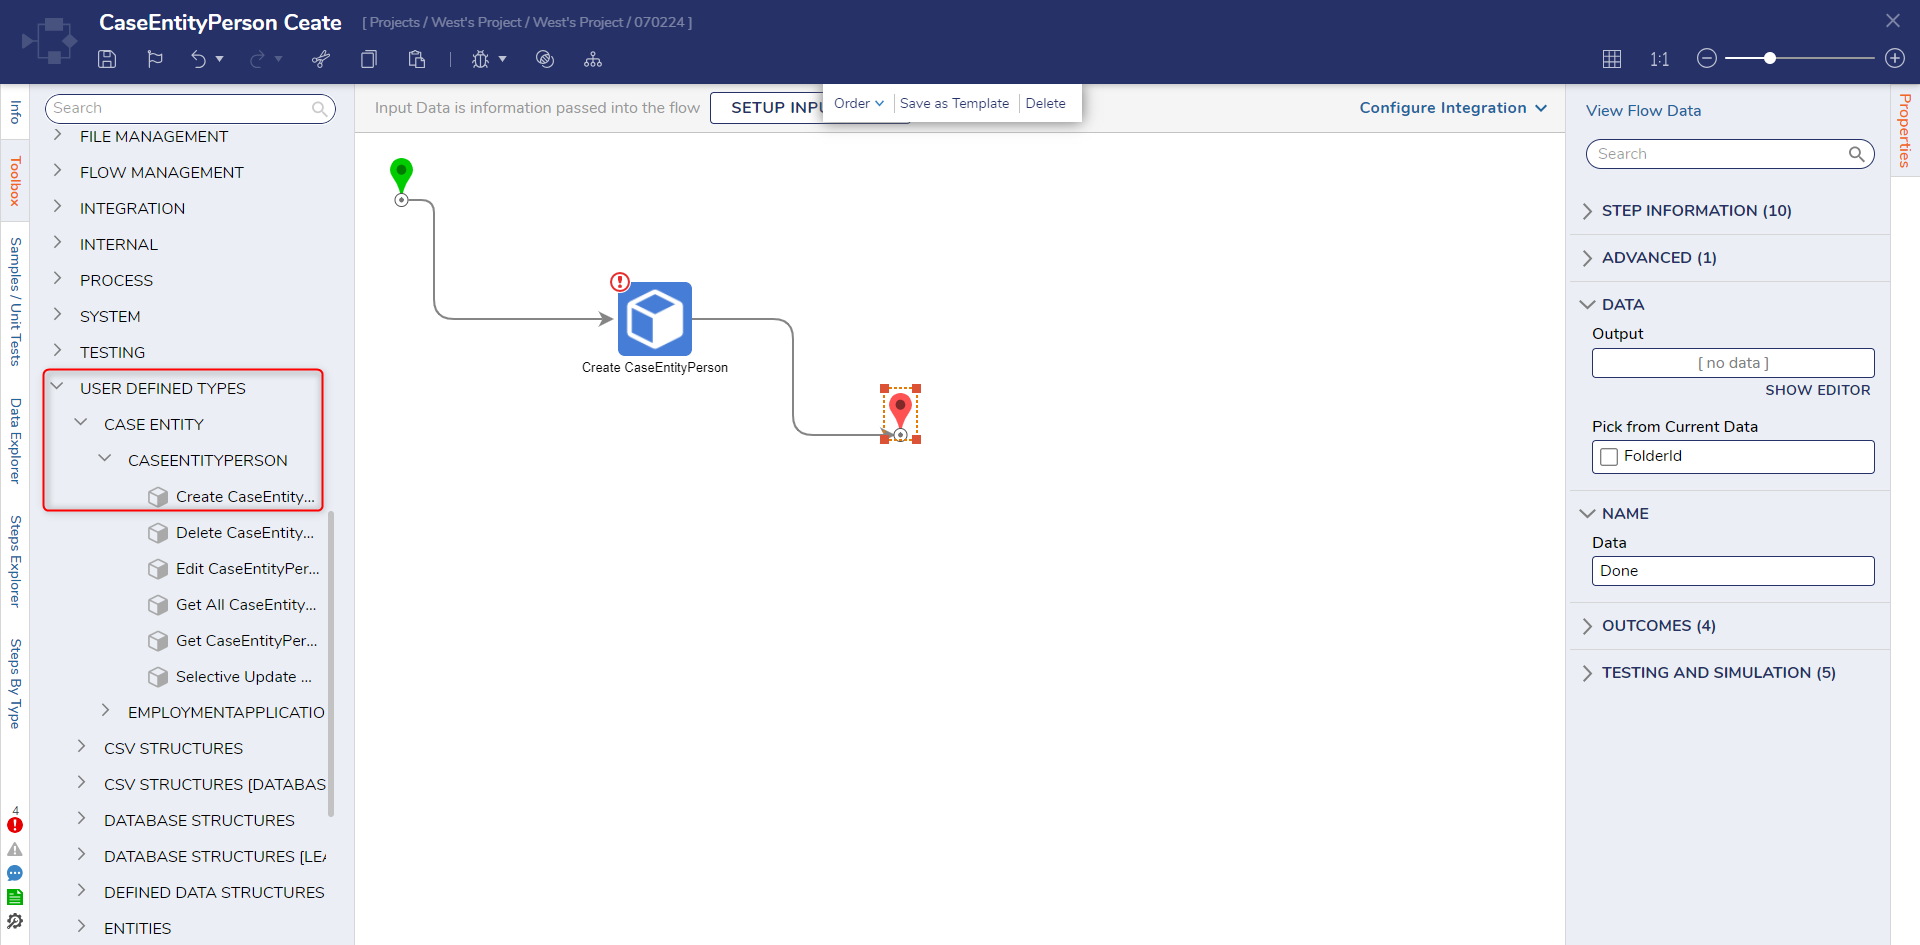
- In the Flow Designer, navigate to Toolbox > USER DEFINED TYPES > CASE ENTITY > CASEENTITYPERSON. Add a Create Person step to the Start and End steps.

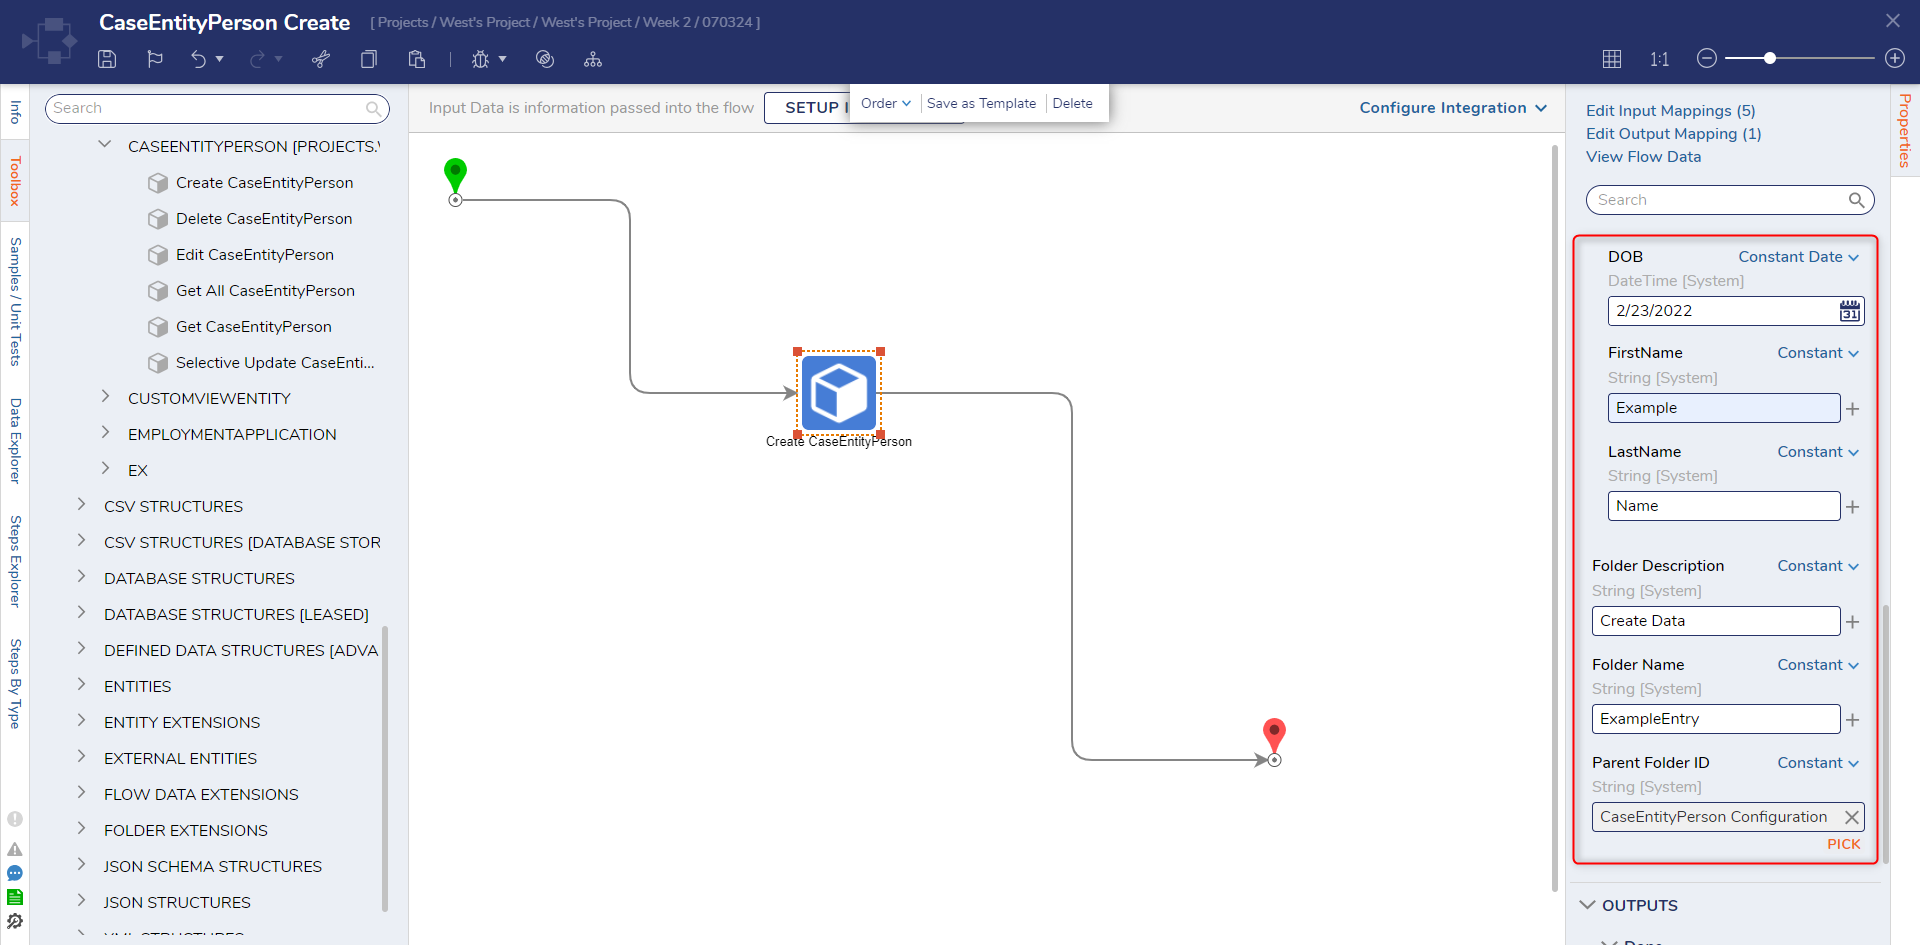
- With the Create Person step selected, in the Properties panel INPUTS > Extension Data field, change the input mapping from Unknown to Build Data.
Notice the appearance of the Case Entity values "DOB", "FirstName", and "LastName". Change the input mappings on each from Unknown to Constant and input example information. - Change the input mapping for Folder Description and Folder Name from Unknown to Constant, then input example information. For Parent Folder ID, select PICK and choose the Folder to store data: "CaseEntityPerson Data".

Debug
- In the Flow Designer, select the Debug action from the top action bar. This automatically saves the Flow.
- Click START DEBUGGING.
The Flow creates a record in the CaseEntityPerson Data Folder with the inputted information.

The newly created data record is also visible when sourcing the Case Entity in a Report.

Update
Users may update their data with either the Edit [CaseEntityName] step or the Selective Update [CaseEntityName] step found alongside the Create [CaseEntityName] step in the Toolbox.
The two steps offer two different methods of editing Case Entity data records:
- Edit: Changes every data field, even those not intended to change. Any fields left without a value will become Null, so enter data to prevent this.
- Selective Edit: Changes only the data field(s) that were given a new value(s). Leaving fields blank instead maintains their original values and thus will not become Null.
For most use cases, Selective Edit is recommended over the Edit step.
One exception is with nested defined types. Selective Edit will clear out unmodified property values and acts the same as the Edit step. The reason for this is that the entire nested object is received through mapping. This makes it impossible to identify which specific properties should be updated or ignored. Users can achieve selective updates by first fetching the data, mapping the existing nested data, and then updating the desired properties.
Update Flows rely on the Fetch Entities step to grab the correct data record(s) to change in a Data Structure by passing the data record's ID into the Edit or Selective Update steps.
Edit Step
- In a Designer Folder, create a new Flow and name it "CaseEntityPerson Update". It will automatically open in the Flow Designer.
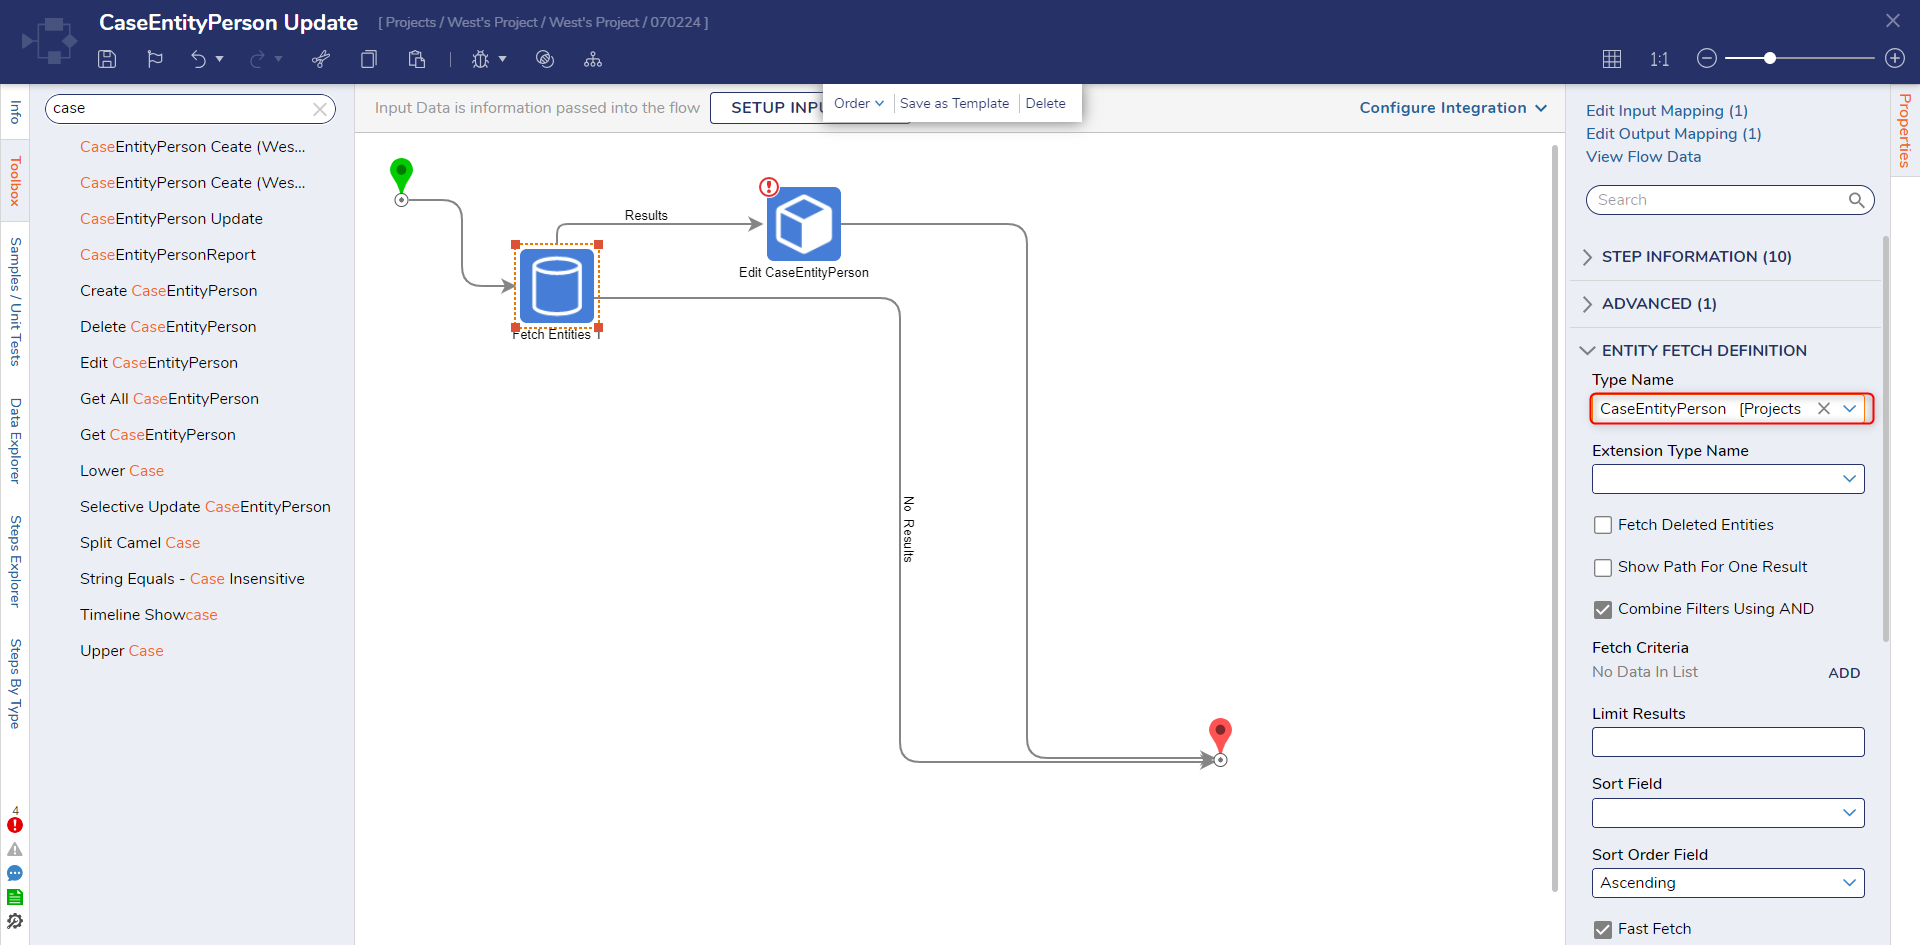
- From the Toolbox's Favorite section, add a Fetch Entities step after the Start step.
- In the Fetch Entities' Properties tab, change its Type Name search for the Case Entity: "CaseEntityPerson".

- After the Results outcome of the Fetch Entities step, add an Edit CaseEntityPerson step found under Toolbox > USER DEFINED TYPES > CASE ENTITY > CASEENTITYPERSON. Connect the No Results path to the End step.
- View the Edit CaseEntityPerson's Properties. For Extension Data, change its mapping type to Build Data.
For the CaseID, EntityID, and ExtensionID inputs, change the mapping type to Select From Flow and map the respective IDs of the record to edit such as EntityResults.First.EntityId
Change the "FirstName", "LastName", and "DOB" data fields' mappings to Constant, then enter example information different from the Create example.Null ExampleThe "DOB" field is left blank in this example to demonstrate the occurrence of null values when leaving a field blank. - Change the input mapping for Folder Description and Folder Name from Unknown to Constant, then input example information.
For Folder ID, enter the Folder ID of the Folder storing data.
Selective Update Person
- Repeat steps 1-3 in the Edit step example above.
- After the Results outcome of the Fetch Entities step, add a Selective Edit CaseEntityPerson step found under Toolbox > USER DEFINED TYPES > CASE ENTITY > CASEENTITYPERSON. Connect the No Results path to the End step.
- View the Selective Edit CaseEntityPerson's Properties. For Extension Data, change its mapping type to Build Data.
For the CaseID, EntityID, and ExtensionID inputs, change the mapping type to Select From Flow and choose the respective IDs of the record to edit within the results of the Fetch Entities step.
Change the "FirstName", "LastName", and "DOB" data fields' mappings to Constant, then enter example information different from the Create example. This example will only change the "FirstName" field. - After running the Flow, the data updates with the provided field values.
Debug
- In the Flow Designer, select the Debug action from the top action bar. This automatically saves the Flow.
- Select START DEBUGGING.
Once the Flow runs successfully, it updates the specified data record with the new data field values.

Delete
- Repeat steps 1-3 in the Edit step example above.
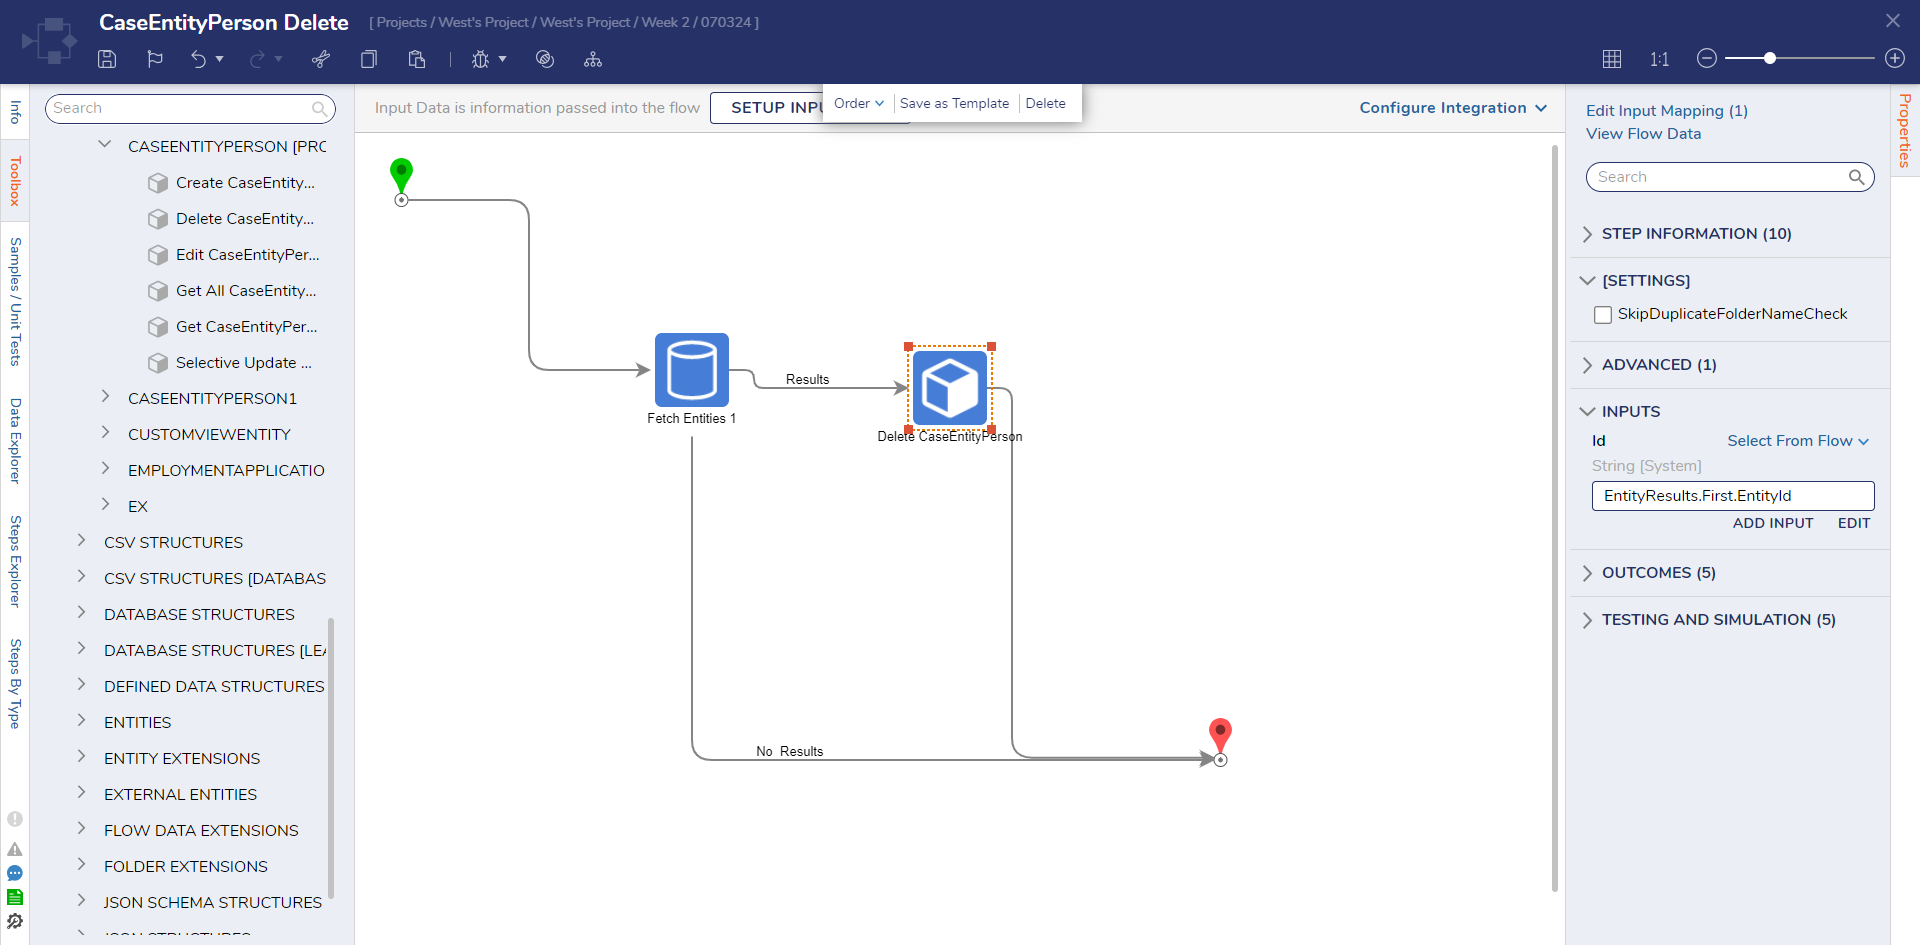
- After the Results outcome of the Fetch Entities step, add a Delete CaseEntityPerson step found under Toolbox > USER DEFINED TYPES > CASE ENTITY > CASEENTITYPERSON. Connect the No Results path to the End step.
- View the Delete CaseEntityPerson's Properties. For EntityID, change the mapping type to Select From Flow and choose the Entity ID of the record to remove within the results of the Fetch Entities step.

- After running the Flow, the specified record is deleted from the Case Entity.


