SolaceMQ Module
- 28 Nov 2023
- 4 Minutes to read
- Print
- DarkLight
SolaceMQ Module
- Updated on 28 Nov 2023
- 4 Minutes to read
- Print
- DarkLight
Article summary
Did you find this summary helpful?
Thank you for your feedback!
Overview
The SolaceMQ module provides Flow steps that can be used to integrate with Solace PubSub+ event brokers. Solace PubSub+ is an event streaming platform used to send and receive requests between two applications.
The module includes steps that can be used to start, stop, pull, or post messages from a configured Solace Queue. Decisions can also act as consumers, processing messages through a Message Handler Flow.
Setting up SolaceMQ PubSub+ broker
The following section covers the setup and configuration of a broker/message queue and is intended to serve as an example resource to integrate with Decisions. The example highlights the values needed to connect a message queue to Decisions and is meant for informational and troubleshooting purposes.
Please refer to the product's official documentation for a more in-depth and detailed guide on configuring a message queue for use in production environments.
The Solace PubSub+ broker can be installed locally onto a container. To install the broker onto a container, Docker Desktop will need to be installed. Once Docker has been installed:
- In an elevated Command Prompt, run the following command to create a container with the PubSub+ broker.
Ensure that port 8080 is available; otherwise, the container may not start.docker run -d -p 8080:8080 -p 55555:55555 -p 8008:8008 -p 1883:1883 -p 8000:8000 -p 5672:5672 -p 9000:9000 -p 2222:2222 --shm-size=2g --env username_admin_globalaccesslevel=admin --env username_admin_password=admin --name=solace solace/solace-pubsub-standard - Once the container has been created, navigate to http://localhost8080 to be brought to the web console for the message broker. Enter admin as both the username and password to access the web console.

Creating a queue
- To create a queue, select Queues in the left hand menu, then select the add Queue button in the top right hand corner.
- A popup should open. Provide a name for the Queue. This name will also be used in the Queue Name field in Decisions. Once the name is entered, click Create.
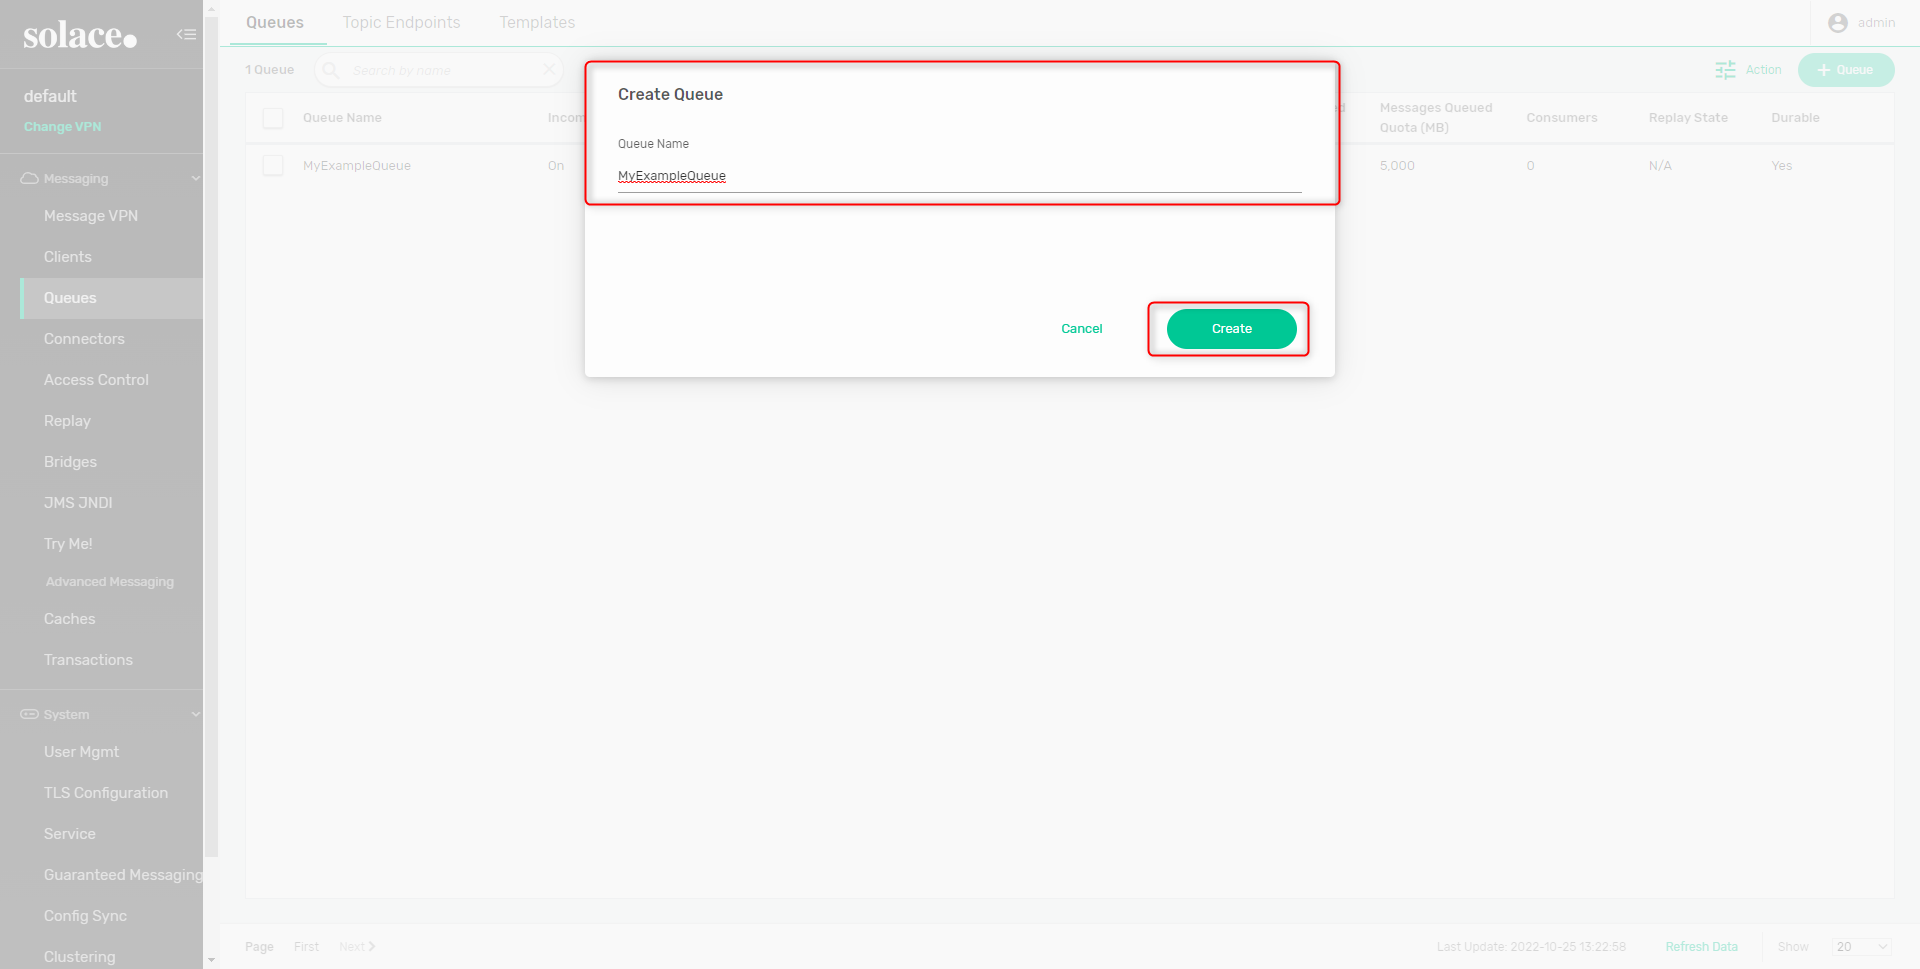
- A new queue should appear with the defined queue name.
- Selecting the Queue from this menu will display a summary of the Queue. Only the Queue Name will be needed when configuring a connection to the queue in Decisions


SolaceMQ Settings
SolaceMQ settings can be found under System > Settings Solace MQSettings. These settings configure the default connection to the message queue host.
| Configuration Options | Description | |
|---|---|---|
| Default Host IP or Name | The configured Host IP or Server name for the SolaceMQ broker. | |
| Default Virtual Router Name | Optional setting used to test how messages can be sent and received from a SolaceMQ message broker. | |
| Default User Name | The default user name is used to establish a connection to the SolaceMQ broker. | |
| Default Password | The password is used to establish a connection to the SolaceMQ broker. | |
| Use Client Certificate for Authentication | Enables SSL connections to SolaceMQ. If enabled, the following fields will require inputs: Filename of Client Certificate, Filename of PFX/P12/PKCS12 File To Sign with, Password for PFX/P12/PKCS12 File, SSL Trust Store Directory. | |
| Filename of Client Certificate | The name of the file containing the SSL certificate. | |
| Filename of PFX/P12/PKCS12 File To Sign with | The name of the file holding the signatures for the SSL certificate. | |
| Password for PFX/P12/PKCS12 File | The password to access the SSL certificate. | |
| SSL Trust Store Directory | The full file path to the SSL Trust Store Directory. If no trust store directory is specified and TCPS is enabled, the certificate will be retrieved from system certificates. If TCPS is not enabled, no Trust Store is used at all. | |

Adding a Solace Message Queue
Once the settings have been configured to connect to a Solace MQ host machine:
- Navigate to System > Integration > Jobs and Events > Message Queues.
- Select Add Solace Queue from the action bar and define the values for the message queue. Save.
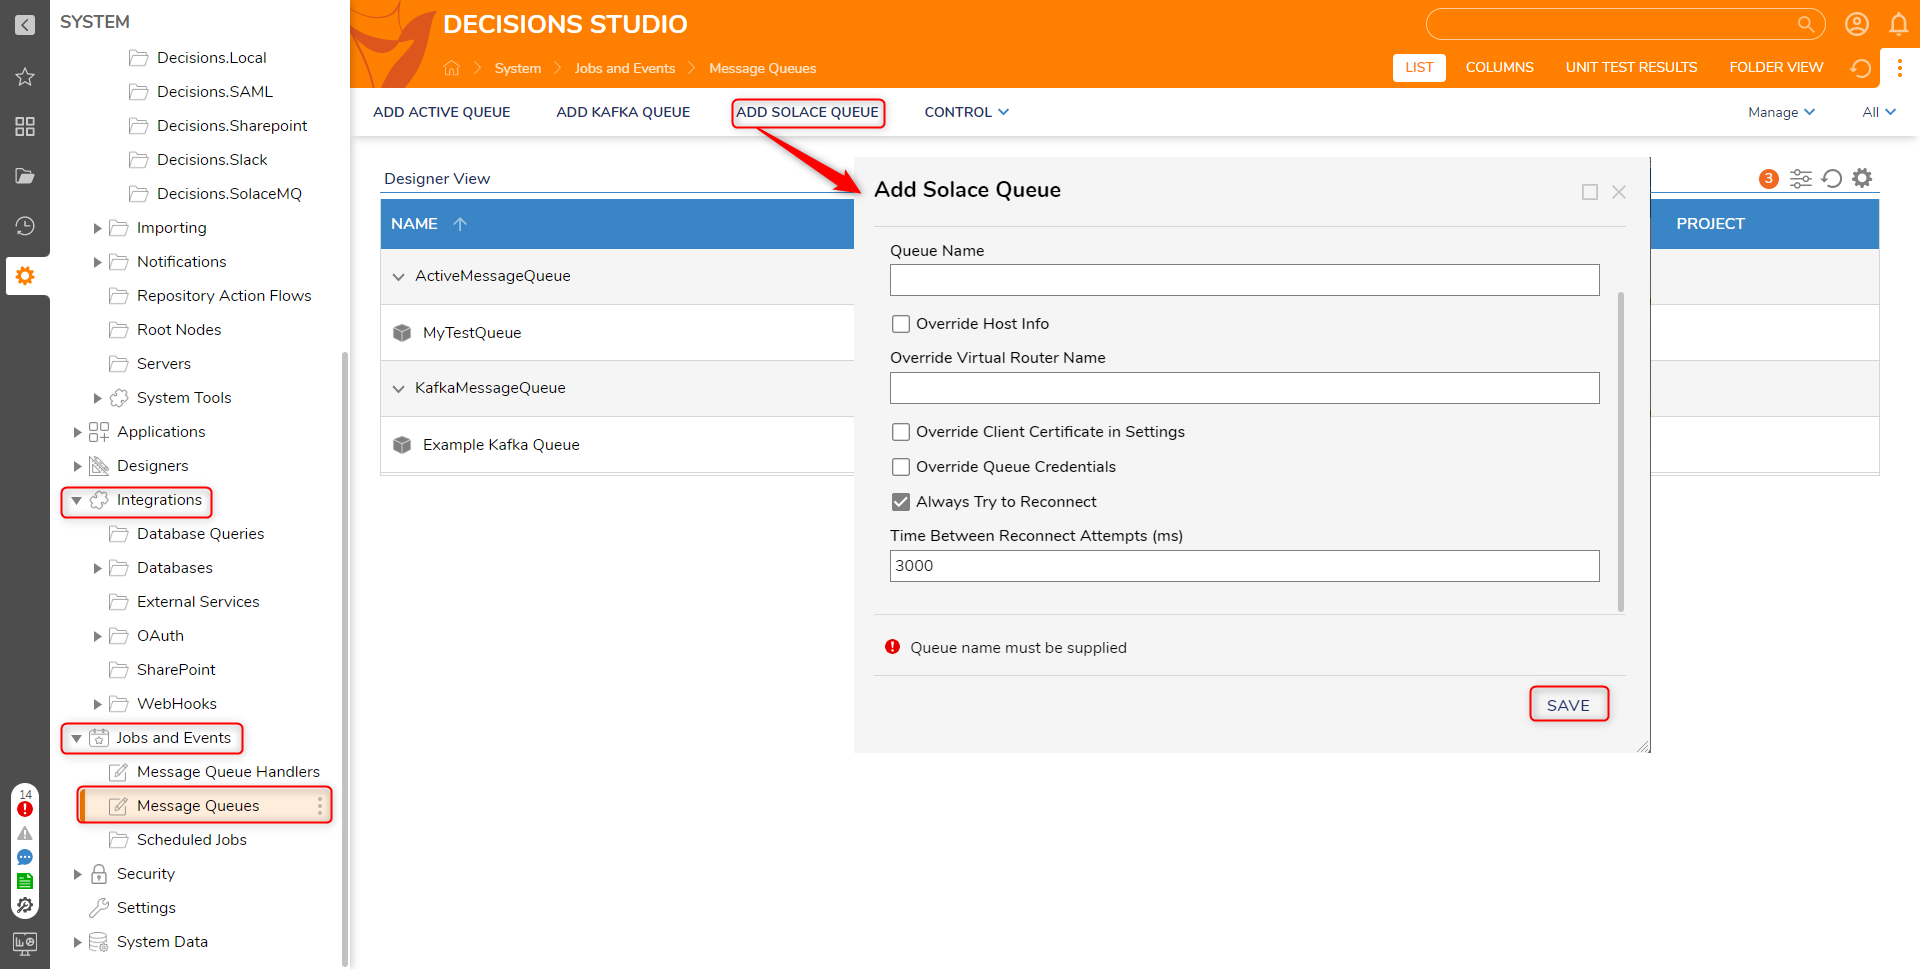

Add Solace Message Queue Properties
| Properties | Description |
|---|---|
| Display Name | The name of the message queue as it will appear in Decisions. |
| Queue Name | The name of the message queue. |
| Override Host Info | If enabled, provides a textbox used to override the Host IP or Name field defined in SolaceMQ Settings. |
| Override Virtual Router Name | Optional input is used to override the Virtual Router Name field defined in SolaceMQ Settings. |
| Override Client Certificate in Settings | If enabled, provides textbox controls used to override Filename of Client Certificate, Filename of PFX/P12/PKCS12 File To Sign with, Password for PFX/P12/PKCS12 File, and SSL Trust Store Directory fields defined in SolaceMQ Settings. |
| Override Client Credentials | If enabled, provides textbox controls used to override the User Name and Password fields defined in SolaceMQ Settings. |
| Always Try to Reconnect | If enabled, attempt to reconnect to the queue after a set period of time. |
| Time Between Reconnect Attempts (ms) | Defines the time between reconnects to the message queue. By default, this setting is set to 3000 |
Available Steps
The following table lists all the steps available in the Module.
| Step Name | Description |
|---|---|
| Disable Solace Queue | The Disable Solace Queue step allows users to disable a Solace message queue through a Flow. |
| Enable Solace Queue | The Enable Solace Queue step allows users to enable a Solace message queue through a Flow. |
| Get String Message from Solace Queue | The Get String Message from Solace Queue step allows a set number of messages to be pulled from a Solace message queue to be used in Decisions. |
| Publish Message to Solace Topic | The Publish Message to Solace Topic step posts messages to a Solace Topic. The Topic must be added as a queue in Decisions in order for the step to be used. |
| Put Binary Message in Solace Queue | The Put Binary Message in Solace Queue step is used to send a message to a Solace Queue. The message sent will be in binary format. |
| Put String Messages in Solace Queue | The Put String Message in Solace Queue step is used to send a message to a Solace Queue. The message sent will be as text. |
Feature Changes
| Description | Version | Developer Task |
|---|---|---|
| The "SSL Trust Store Directory" text box has been unlinked from the "Use Client Certificate for Authentication" and will always be visible. | 8.15 | [DT-038905] |
Was this article helpful?