Contents x
- Introduction
- Installation
- Self Service Licensing Guide Updated
- Prerequisites
- Decisions License Updated
- Basic
- Advanced
- Enterprise
- Containers
- Containers Overview
- Decisions Container Updated
- Decisions Environment Variables
- Deploying Containers on Docker
- Deploying Containers on Azure
- Deploying Containers on Amazon ECS
- Deploying Containers on GCP
- Deploying Azure Kubernetes Services (AKS) Updated
- Deploying an AWS Kubernetes Cluster
- Securing Decisions Container Environment
- Clustering
- Multi Tenancy
- Containers
- Upgrading
- Getting Started
- Data Structures
- Starting with Data Structures
- Creating Data Structures
- Creating Case Entities
- Creating Entities
- Creating Leased Entities
- Creating External Entities
- Creating Entity Extensions
- Creating Folder Extension Data Structures
- Creating Flow Execution Extension Data Structures
- Creating Flow Structures
- Creating Defined Data Structures
- Creating Database Structures
- Creating Value Lists
- Creating a CSV Data Structure
- Creating Types From JSON Schema
- Creating Types From XSD
- Creating Types From JSON
- Data Fields
- Building Data Structures CRUD Actions
- Data Structure CRUD Overview
- Case Entity CRUD Actions
- Database Structure CRUD Actions
- Defined Data Structure CRUD Actions
- Entity Structure CRUD Actions
- Entity Extension CRUD Actions Updated
- External Entity CRUD Actions
- Flow Execution Extension CRUD Actions Updated
- Folder Extension CRUD Actions Updated
- Managing Data Structures
- Flows
- Create Flows
- Flow Behaviors
- About Flow Behaviors Updated
- Building and Using Converter Flows
- Flow Step Trigger (After, Before, Error) Flow Behavior
- Folder Count Flow Behavior
- Login User Flow Behavior
- Post to Flow Handler Behavior
- Login User UI Flow Behavior
- Tile Source Flow Behavior
- Turn Flow Statistics On
- Get Page Variable Updated
- Report Field Action Handler Flow
- Password Reset Flow
- Creating a BPMN Flow
- Exporting BPMN Flow
- Report Group Action Flow
- Steps
- Simple Flows
- Sub Flows
- Flow Behaviors
- Configure Flows
- Debug Flows
- Implement Flows
- Best Practices
- Create Flows
- Forms
- Create Forms
- Form Controls
- Form Control Comparison
- Data Grids
- Data Repeaters
- Dropdown Lists
- Javascript Controls
- Form Control Glossary
- Form Control Behavior Overview
- Form Control Key Triggers
- Adding a Timeline to a Series of Forms
- Color Picker
- Copy-able Label
- Creating Help Text Messages for Form Fields
- Masked Textbox Control
- Currency Box and Number Box/Spinner
- Document Viewer
- Multiple File Upload and Download Controls
- Tree View Control
- User Controls
- Video Control
- Latitude and Longitude Control Updated
- HTML Display Control
- Create Form with Property Grid
- Editing Data Objects in a Wizard Property Grid
- Progress Bar Overview
- Editing CSV Records in a Form
- Simple Forms
- Form Controls
- Configure Forms
- Layout & Design
- Creating Form Backgrounds
- Layouts Overview
- Form Organization
- Grid Layout
- Canvas Layout
- Header Container Layout
- Horizontal and Vertical Stacks
- Split Panel Layout
- Responsive Containers and Grids
- Tabs Container Layout
- Using the Tab Editor to Set Tab Order
- Side Menu Containers
- Creating End Forms Updated
- Data & Logic
- CSS
- Form Settings in the Flow Designer
- Layout & Design
- Implement Forms
- Create Forms
- Rules
- Create Rules
- Creating Statement Rules
- Creating an Expression Rule
- Creating a Truth Table
- Creating an External Truth Table
- Creating a Rule Table
- Creating a Matrix Rule
- Creating a Tree Rule
- Creating a Rule Set
- Creating an Interceptor Rule
- Creating a Rule Chain
- Creating a Sequential Rule
- Leveraging Default Rules
- Rule Verbs
- Configure Rules
- Debug Rules
- Implement Rules
- Create Rules
- Reports Updated
- Pages / Dashboards
- Create Page / Dashboard
- Page Controls
- Charts
- Tiles
- Selecting a Data Drill View for the Report Viewer
- Report Viewer Control
- Flow Run Part Updated
- Folder Activity Panel
- Folder Viewer
- Tag Browser
- Adding Folder Navigation Buttons to a Page
- Horizontal Folder Timeline
- Adding Run Flow Links or Buttons to a Page
- Adding User Actions with a Page/Dashboard with the Action Bars Component
- Date Range Filter on Pages
- Filtering Reports via Page Control
- Adding an Image to a Page/Dashboard
- Page Controls
- Configure Page
- Implement Page
- Create Page / Dashboard
- Networking
- Integrations
- Azure Account and Group Sync
- Starting with Integrations
- Agents
- Database Integrations
- Integrating an External Database with a Flow
- Creating Database Table Relationships
- Creating a Database in MSSQL for Decisions
- External Database Integration
- Advanced Postgres Connection
- Integrate with Database Table
- Fetching External Data to a CSV
- Connecting with an ODBC
- Return Dynamic Data Rows When Fetching Data From Database
- Creating Access Pattern For Table Integrations
- Using Stored Procedure in Flows
- Raw SQL Step
- Integrating Decisions with External Oracle Database
- Connect to MySQL
- External Service for OData
- Adding a Query to a Database
- Add Query (Parameterized Queries)
- Using Transaction Steps
- Connecting to Amazon Redshift
- Integrating with Snowflake
- Managing Database Connection Timeouts
- Troubleshooting Database Connection Response Times
- External Webservices
- JWT
- OAuth
- REST Service Integration
- Using Decisions in External Applications
- Services
- Query Editor
- Decisions Backend
- Process Mining
- Modules
- About Modules
- Available Modules Updated
- Installing Modules
- Modules in GitHub
- Uploading and Installing Custom Modules
- Updating Custom Modules
- Generating Certificates with OpenSSL
- Active Directory
- Adobe Sign
- AI.Common
- AWS
- AWS Bedrock
- Azure
- Box Module
- Datamatics
- Docker
- Docusign
- Dropbox
- Enterprise Module
- Equifax
- Exchange Web Services
- Experian
- FHIR
- Financial
- Foreign Exchange
- Google Cloud
- Google Drive
- HL7
- HubSpot
- iCal
- Jira
- Logging.WindowsEvent
- Messaging
- MongoDB
- MSMQ
- MS OneDrive
- Okta
- OpenAI
- OpenID
- PGP
- Plaid
- PowerShell
- Python
- QR Codes
- Remedy
- R Module
- Salesforce
- SAML
- Sharepoint
- Slack
- SSH
- Symantec
- Telephony
- UnitTestCore
- USPS
- Word To PDF
- X12
- Advanced
- API and Authentication
- Troubleshooting
- Using Selenium and NUnit for Front-end Testing
- Understanding Thread Jobs and Processes
- Logging & Auditing
- Logging Overview Updated
- Logging Settings
- Reading Logs
- Using the Log Step
- Writing To Log Files
- Creating Custom Log Files
- Setting up AWS Cloudwatch Logging
- Setting Up Azure Log Analytics Integration
- Enabling W3C Logging
- Enabling Auditing
- Viewing Audit History
- Troubleshooting Using the Profiler
- Configuring Decisions with Grafana Loki
- Decisions Disaster Recovery Architecture
- SDK
- Administrators
- User Management
- Deployment
- Import & Export
- Best Practices for Decisions Deployment
- Repository
- Repository Overview
- Repository Installation
- Connecting a Decisions Server to a Repository Server
- Repository Settings
- Using The Repository
- Configuring CICD Process Using Azure DevOps
- Configuring Repository with Repo-SSO
- Repository Features and Functions
- Troubleshooting Repository
- Repository Revisions
- Repository Branches
- Sub Project Overview
- Repository Action Flows
- Customization
- Permissions
- System Folders
- System Settings
- System Folders Tree
- Customizing System Page
- Controlling Assignment Notification Types for Server
- Creating Custom Modes of Notification with Notification Flows
- Event Viewer
- Flow Management Dashboard
- System Validation Folder
- Turn Portal Statistics On
- Configuring Locations
- Stored Workflows
- Setting Up Notifications for Events
- Toolbox Visibility Rules
- Email and SMTP in Decisions
- File Archiving and Deletion
- Integration Activities
Have Questions? Need Expert Answers? JOIN LUNCH N' LEARNS!
Article summary
Did you find this summary helpful?
Thank you for your feedback
Overview
A Rule Table is a new type of Rule configuration. This feature operates similarly to a Truth Table in that it uses a column and row layout. With a Rule Table, each column is defined with a piece of input data, and each row is used to configure Statement Rules for incoming data to be evaluated against. In a Truth Table, as long as input data values match the criteria for some combination of columns and rows, then an output value will be reached. In a Rule Table, the only way that an output value is reached is if the input values match the statement Rule configured in a row.
Note:
The Rule Table evaluates the output based on AND condition across the column within the same row.
Creating a Rule Table
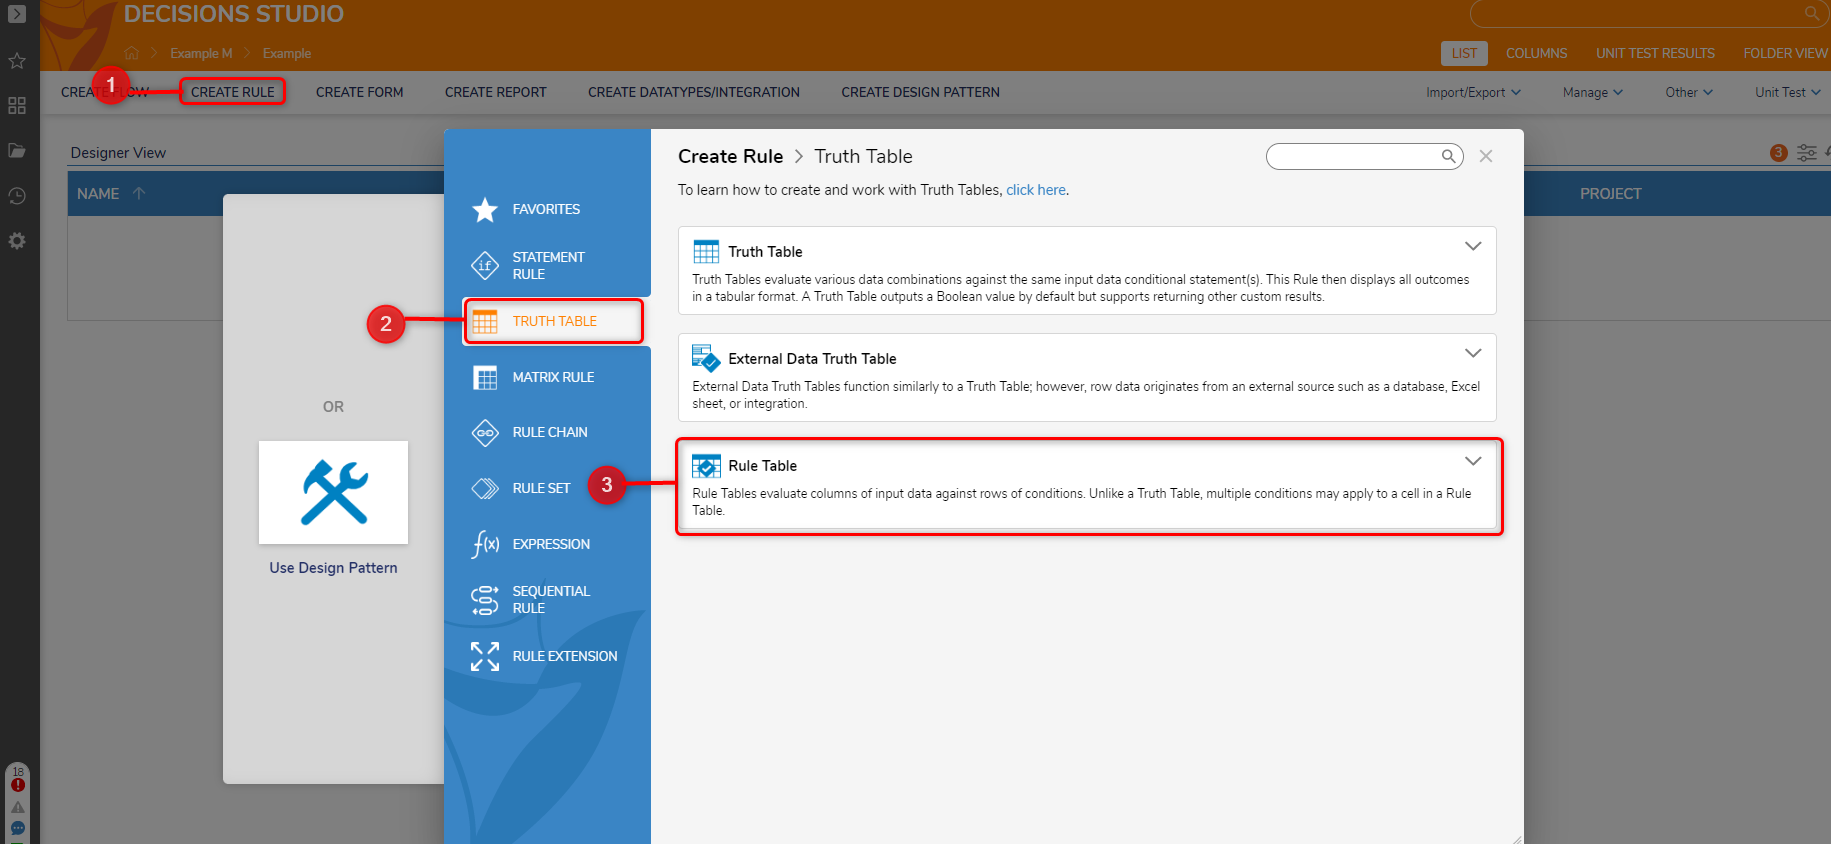
- From a Designer Project, select the CREATE RULE button from the top Action Bar.
- When the Element Gallery appears, open the Truth Table section and then select, name, and create a Rule Table.
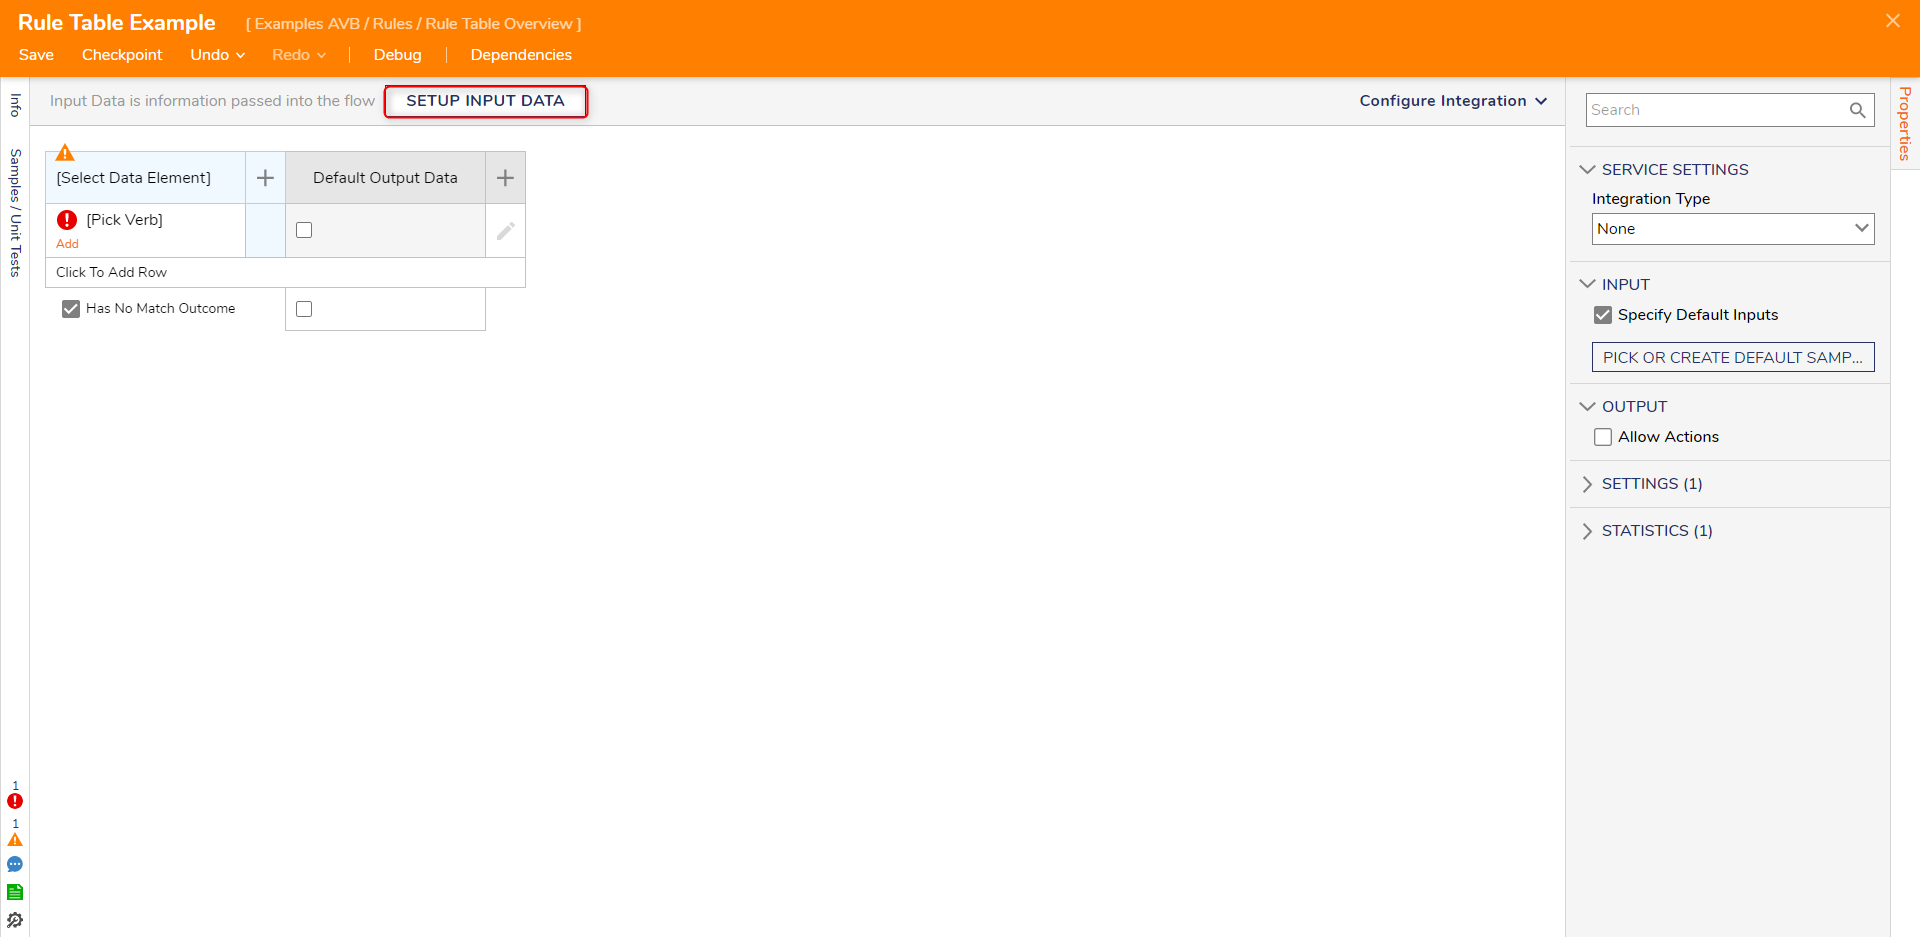
- In the Rule Table Designer, select the SETUP INPUT DATA to configure the data that this rule is expecting to receive.
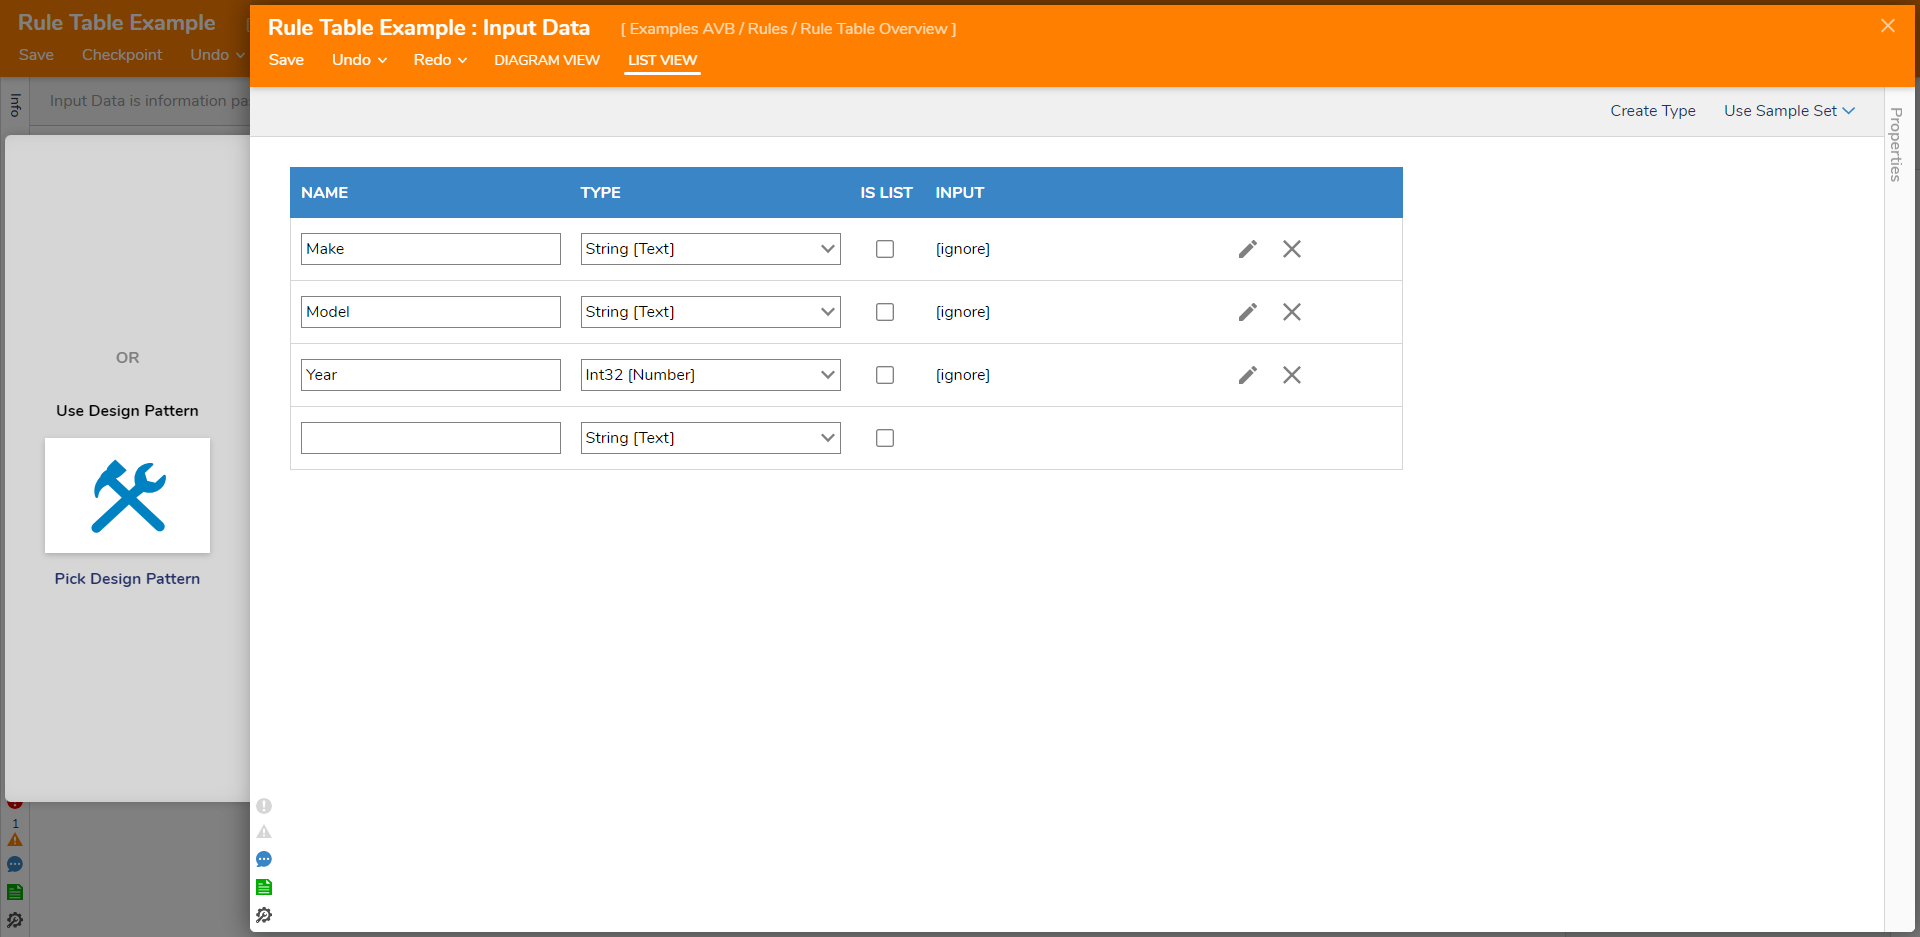
- When the button is selected, a popout will appear with a LIST VIEW Data Designer.
- Use this area to configure data members for the Rule that are related to the project or reference an existing Design Pattern.
- Select the Save button on the top Action Bar of the Data Designerpopout, then select the 'x' in the top corner.Editing Input Data in a Rule TableEditing the NAME of an existing data member will cause a new column to create with the new name and apply a validation warning to the column using the previous name. Editing the TYPE of an existing data member does not create a new column, but it does remove previous configurations for the cell from the previous type.
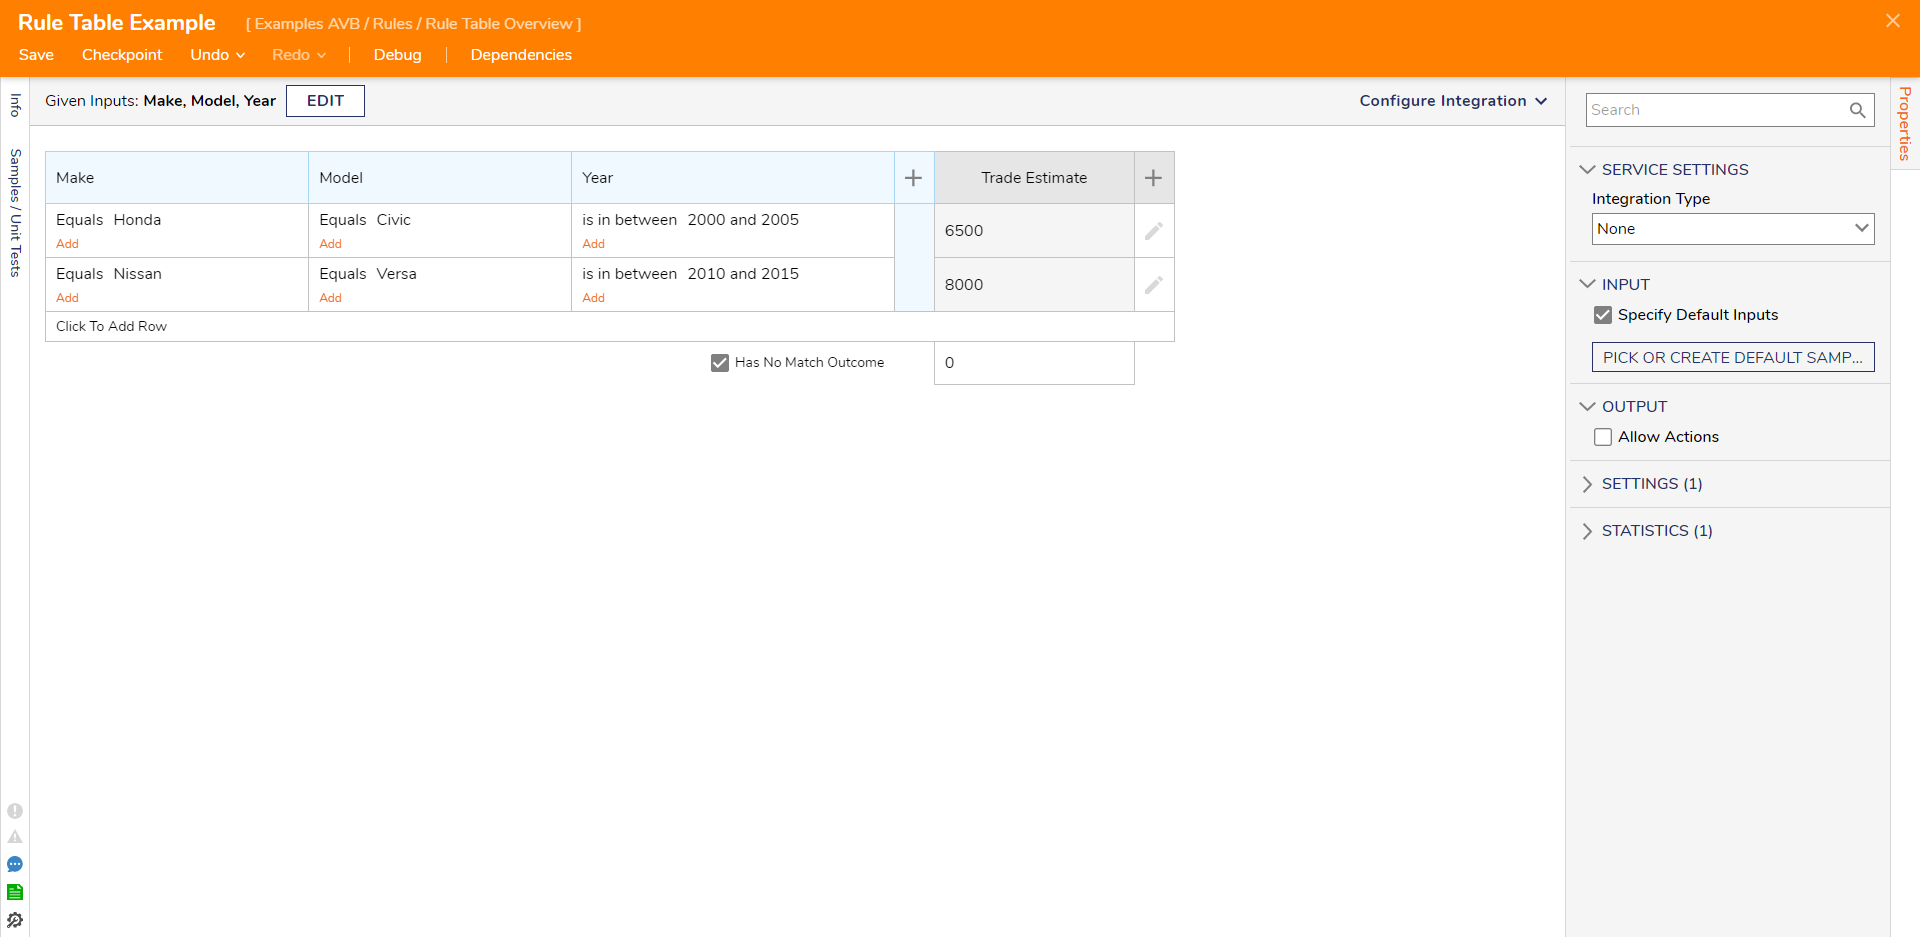
- Column headers populate automatically with the previously configured input data.
- The Verb portion of the Rule logic is used to configure statements that the received data is evaluated against.
In order for an output value to be determined, the data received must evaluate successfully against the conditions of an entire row. Data values cannot match other row conditions to reach a certain output like with Truth Tables. - Once the Rule Table has been configured, select the Debug button from the top Action Bar.
- In the Debug window, enter some data values for the table to evaluate.
- Select the START DEBUGGING button to see what output result is reached after the evaluation.
For further information on Rules, visit the Decisions Forum.
Was this article helpful?
Thank you for your feedback! Our team will get back to you
How can we improve this article?
Your feedback
Comment
Comment (Optional)
Character limit : 500
Please enter your comment
Email (Optional)
Email
Please enter a valid email
Table of contents
Related articles
Tags