Wait On External System
- 03 May 2021
- 4 Minutes to read
- Print
- DarkLight
Wait On External System
- Updated on 03 May 2021
- 4 Minutes to read
- Print
- DarkLight
Article Summary
Share feedback
Thanks for sharing your feedback!
Overview
The Wait on External System step an Assigned Form that monitors the External System (Service, External Database, etc.), for a desired condition. When this condition is met, it continues Flow execution on the Defined Outcome Path.
The following example demonstrates how to use the Wait on External System step to monitor the Accounts database in Decisions. If a new Account is added to the table, the Flow will stop monitoring External Table, send a notification email about the new Account, and start monitoring the Accounts Table again.
If interested in utilizing a different database, see Integrating an External Database with a Flow.
If interested in utilizing a different database, see Integrating an External Database with a Flow.
Example
- From a Designer Project. select the CREATE FLOW button from the Global Action Bar. Then, select Flow, provide a Name, and click CREATE.
- From the Flow Designer, in the Toolbox tab, attach a Get all from dbo.entity_account step from the INTEGRATION > DATABASE > LOCAL CONNECTION (DATABASE) > DBO.ENTITY_ACCOUNT (TABLE) category, to the Start step. Connect the Failed path to the End step.
- Select the Get all step to navigate to its Properties tab; under INPUTS > Limit count, change the mapping to Ignore.

- Under Toolbox > INTEGRATION, attach a Wait On External System step to the Done path of the Get all from dbo.entity_account step. The Wait on External System is an Assignment that is assigned to the External System, and functions as such.
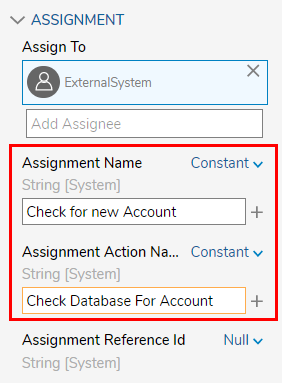
- Navigate to the Wait On External System step's Properties and under ASSIGNMENT provide the desired Assignment Name and Assignment Action Name.
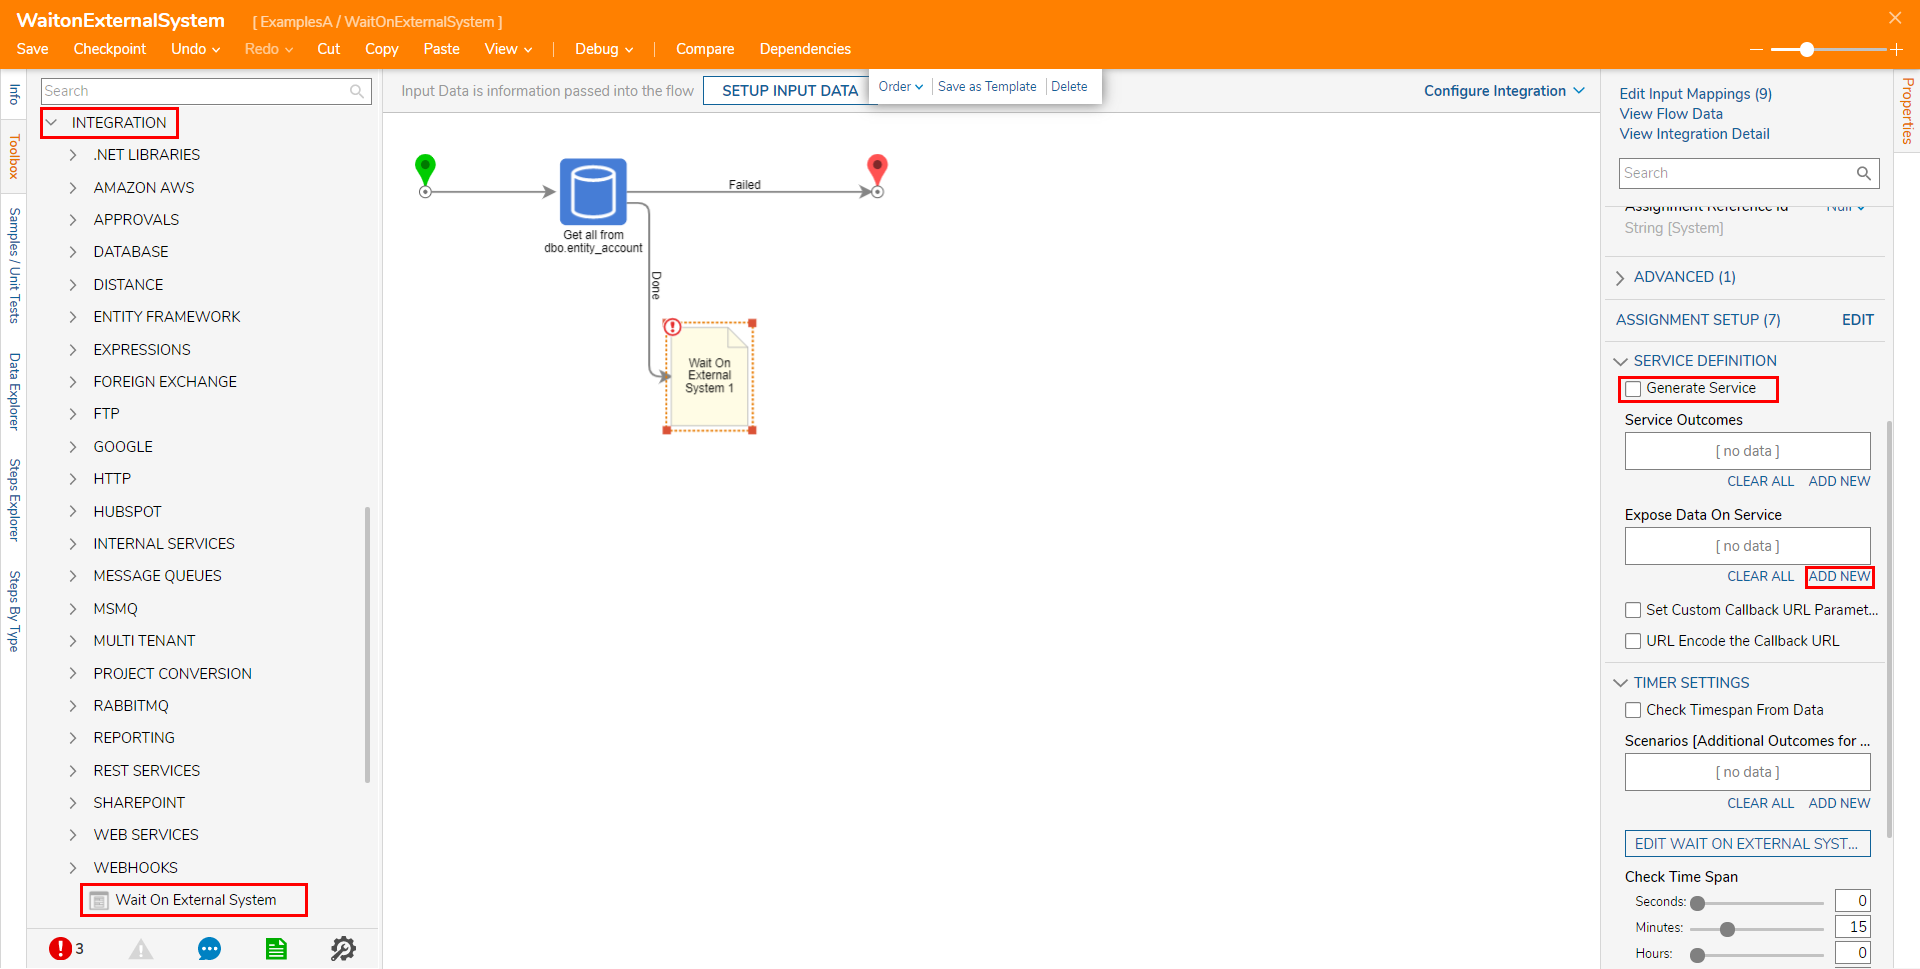
- Under SERVICE DEFINITION, uncheck Generate Service. Then, under Expose Data On Service, click Add New. This definition will allow the Wait On External System step to operate via data from the Flow.
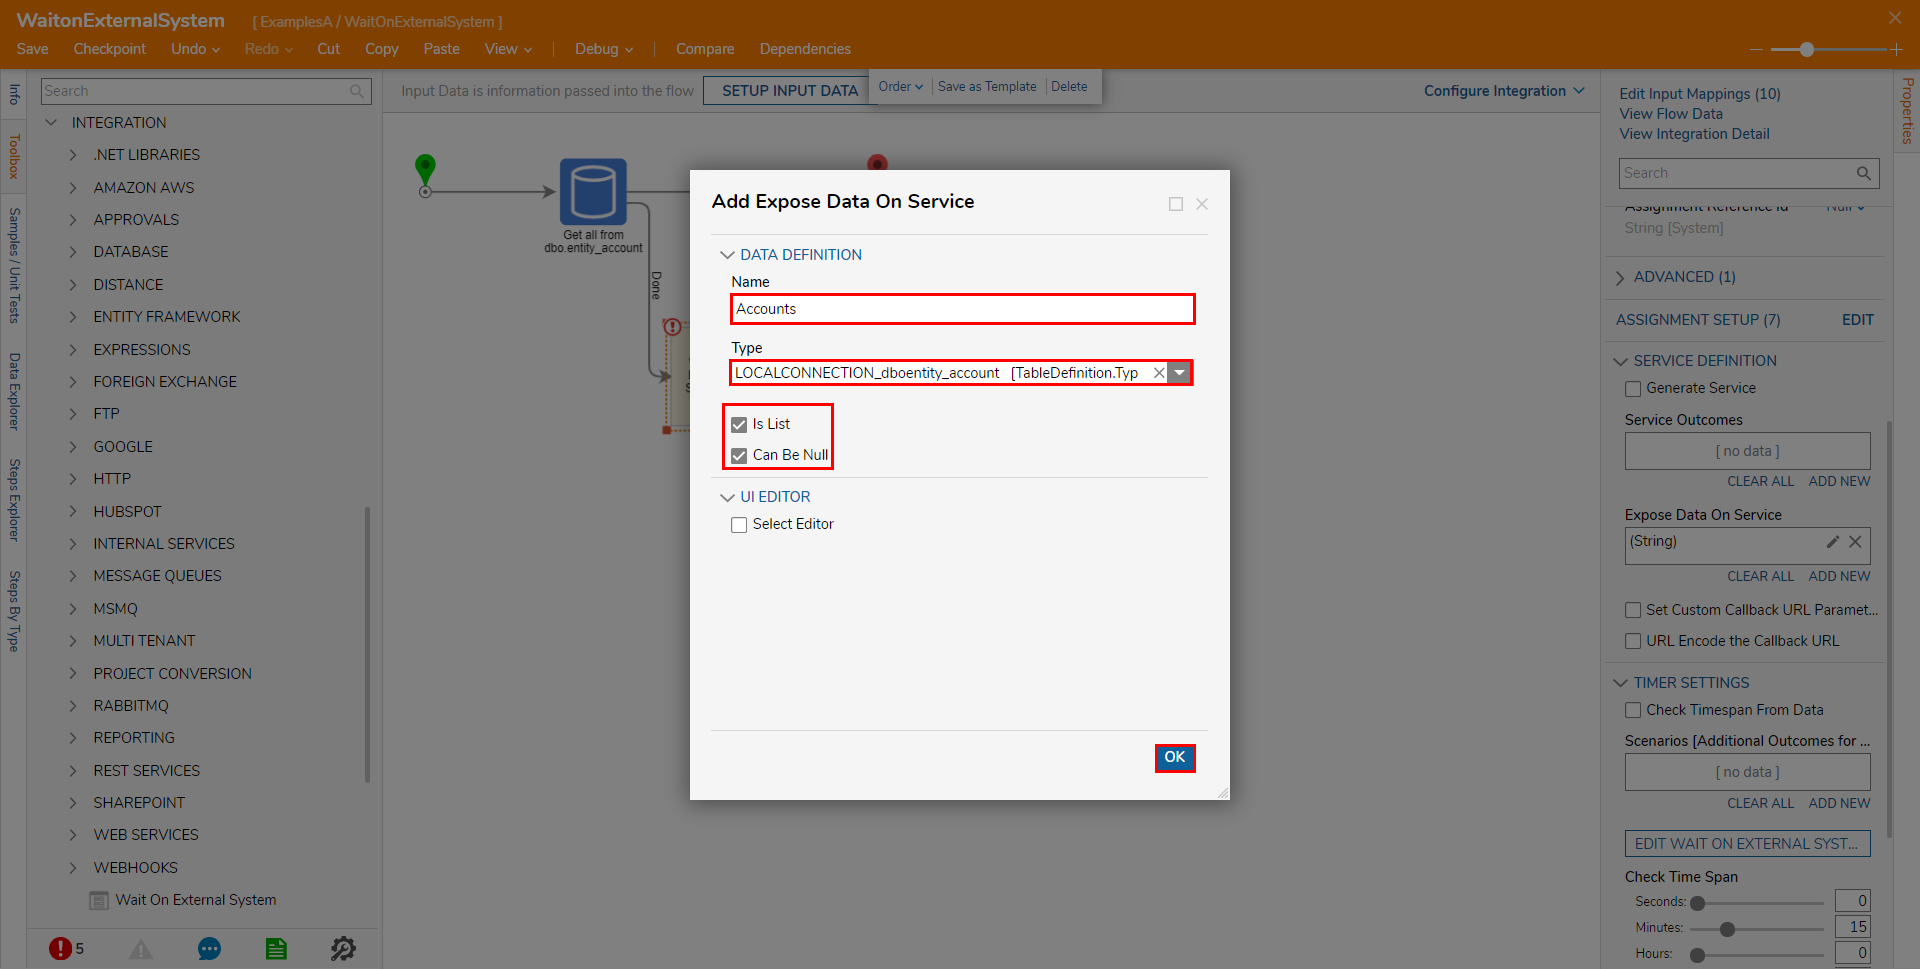
- From the Add Expose Data on Service window, provide the Name "Accounts" and under Type select LOCALCONNECTION_dboentity_account [TableDefinition.Types] from the dropdown menu. Check Is List, Can Be Null, and click click OK.
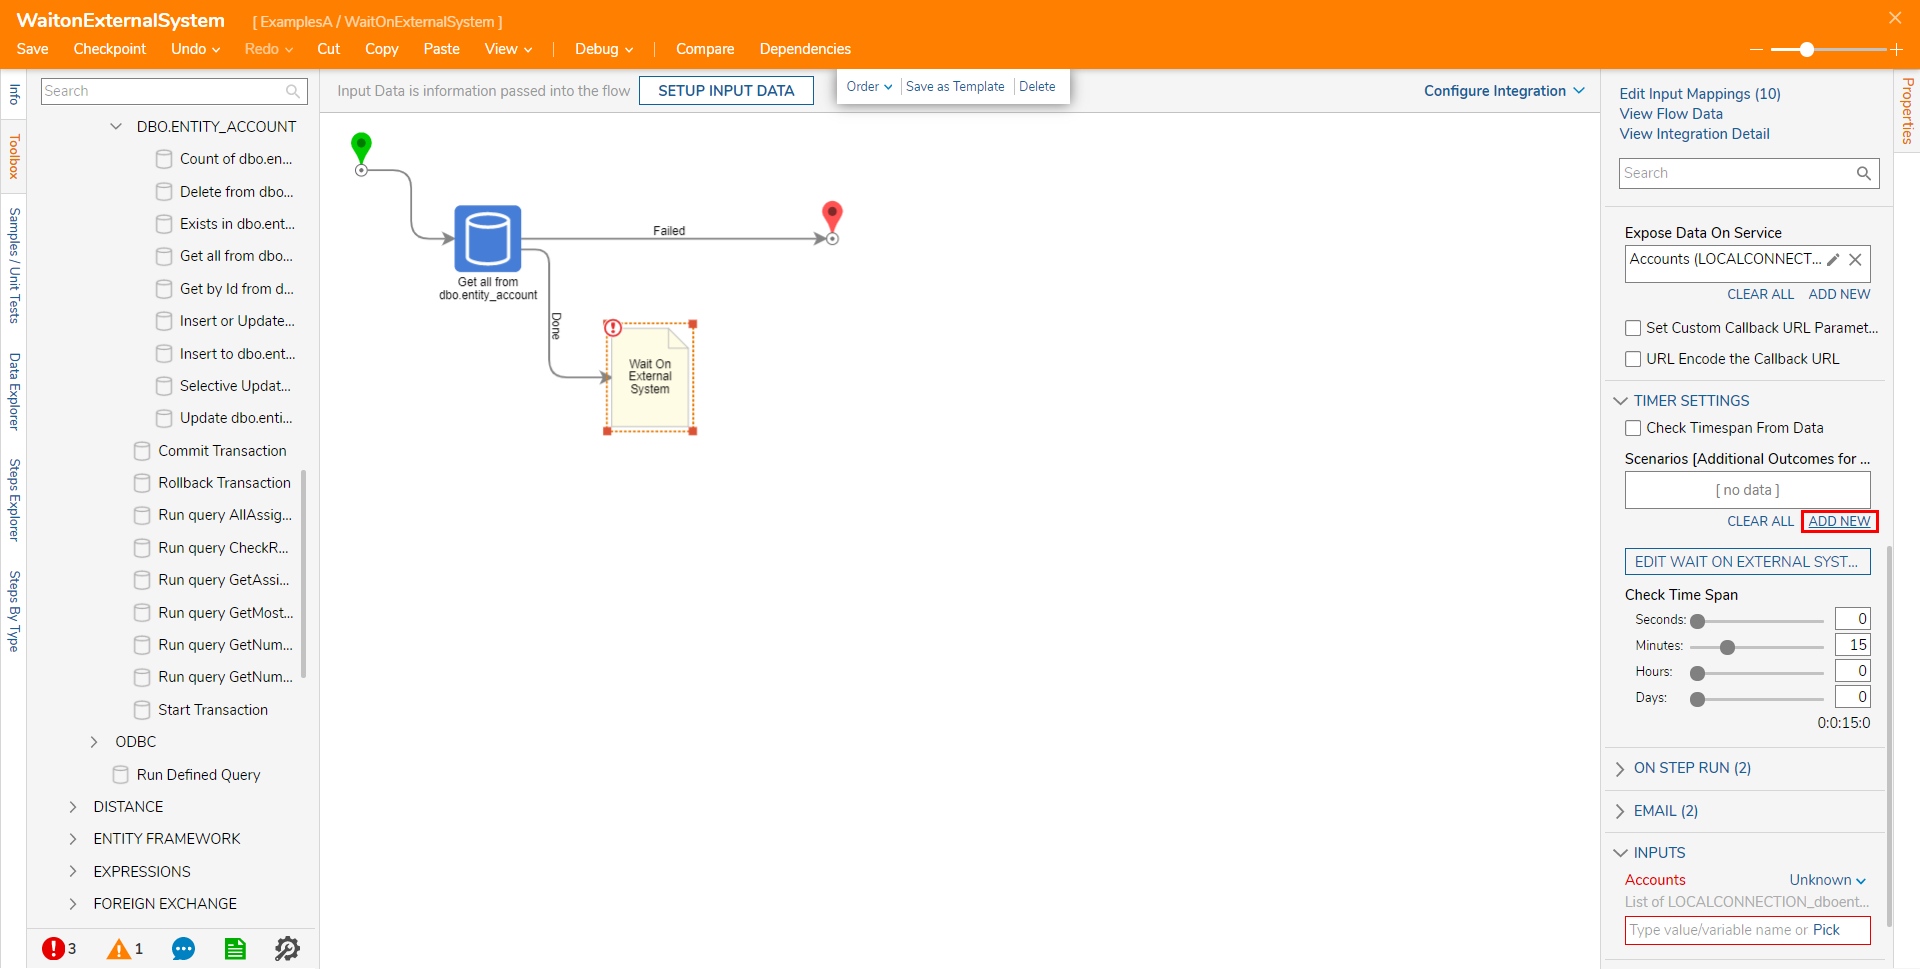
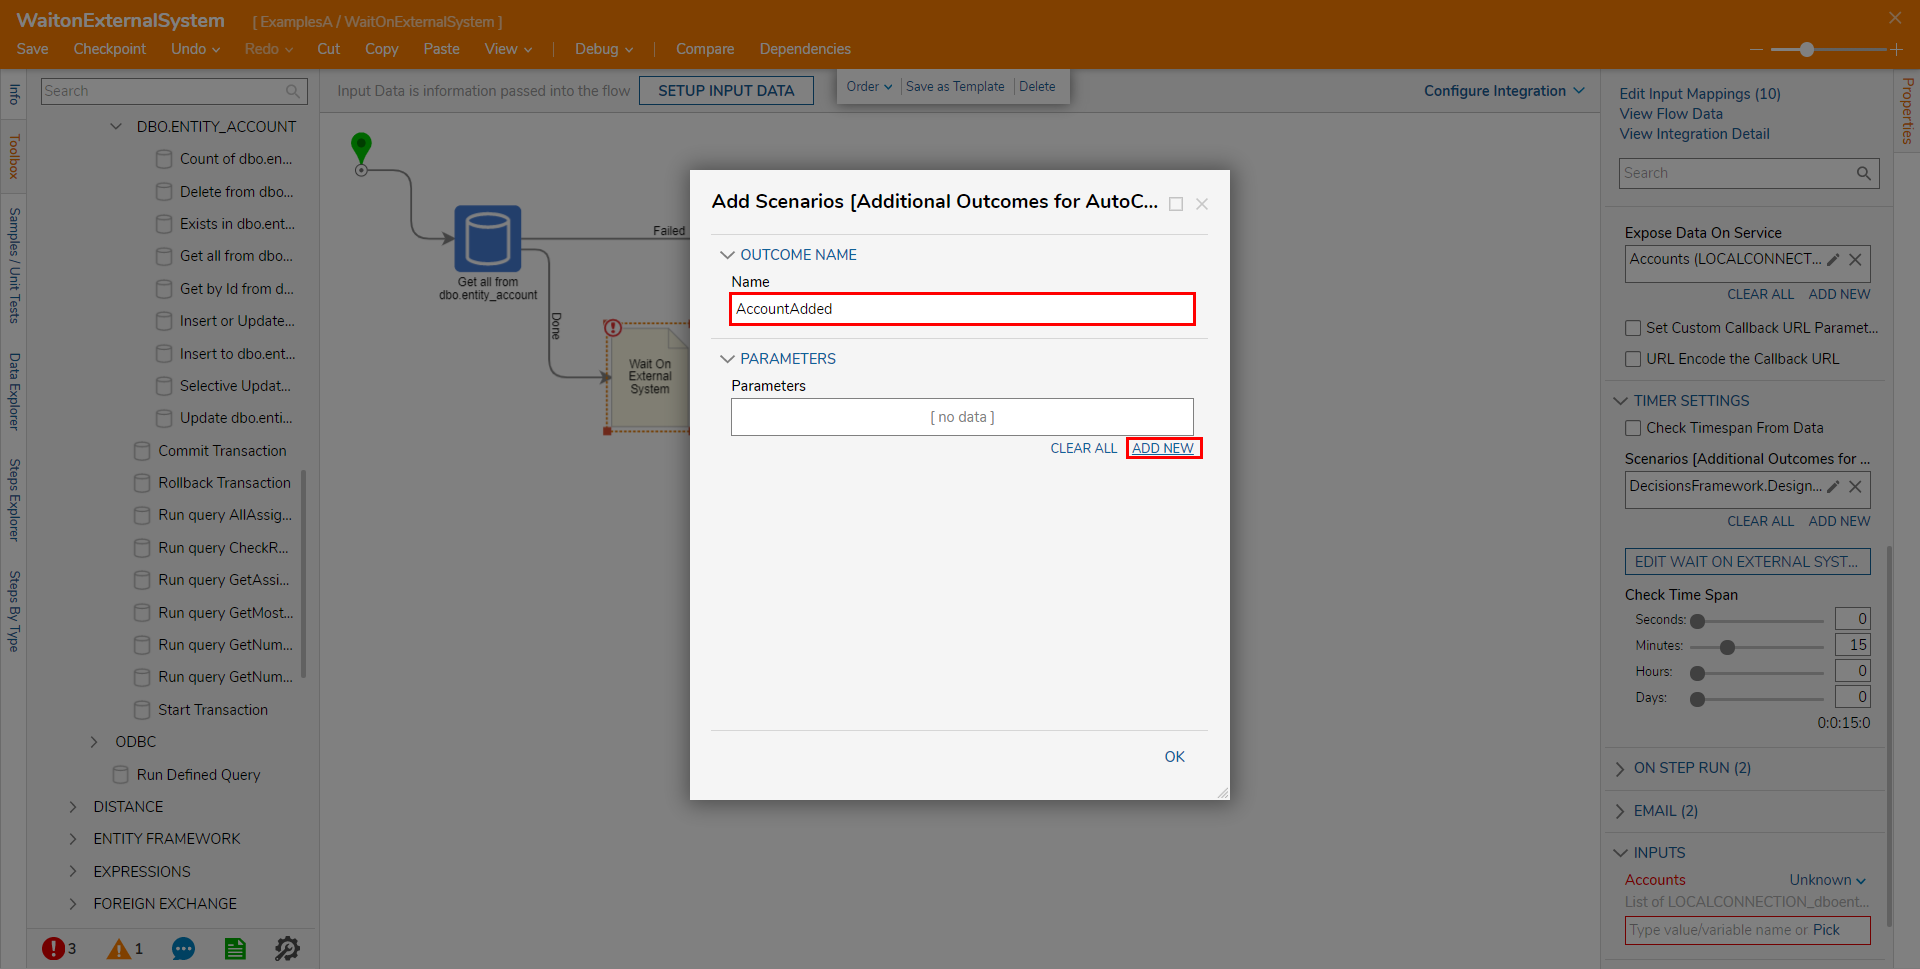
- Set up the TIMER SETTINGS; first, click Add New under Scenarios [Additional Outcomes for AutoComplete].
 Note on Check Time SpanSetting Check Time Span to any time below 5 seconds is not recommended as it may affect system performance depending on the overall system load. Establishing this will trigger a warning message and highlight the Check Time Span settings in yellow.
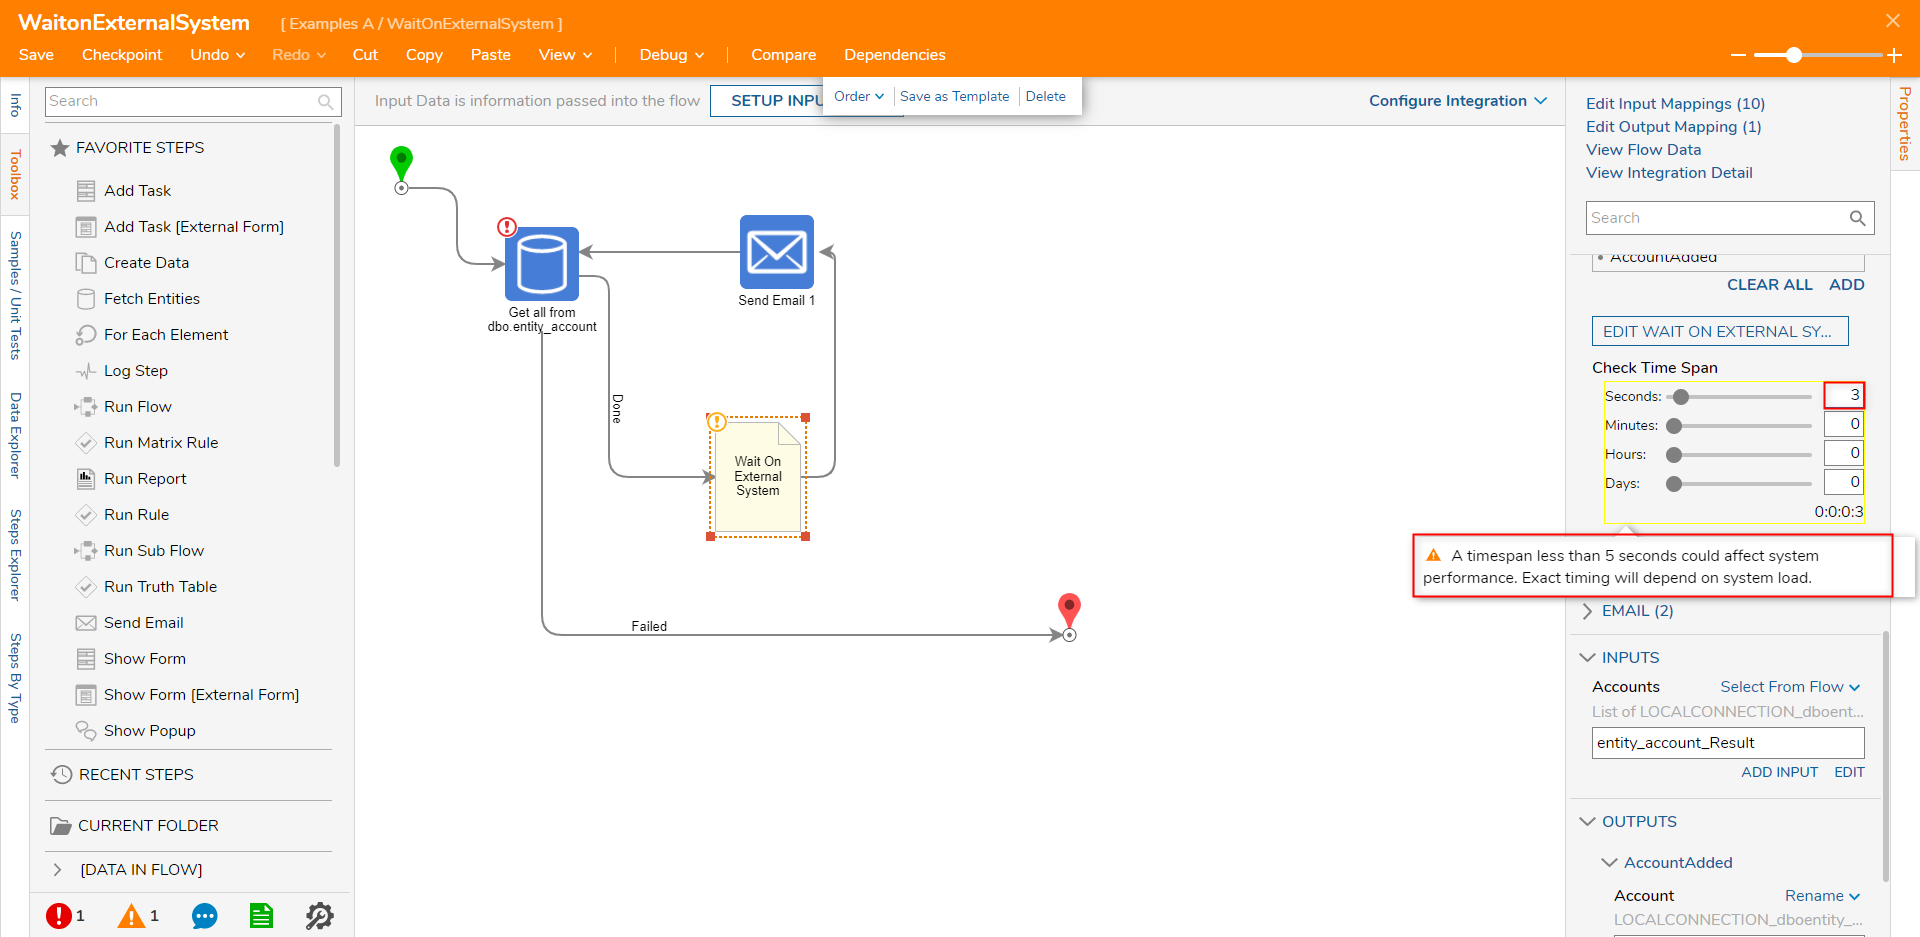
- In the resulting Scenarios window, Name the Scenario "AccountAdded". Then, under Parameters click ADD NEW.Each of these Scenarios will be an End step in the AutoComplete Flow for this step.
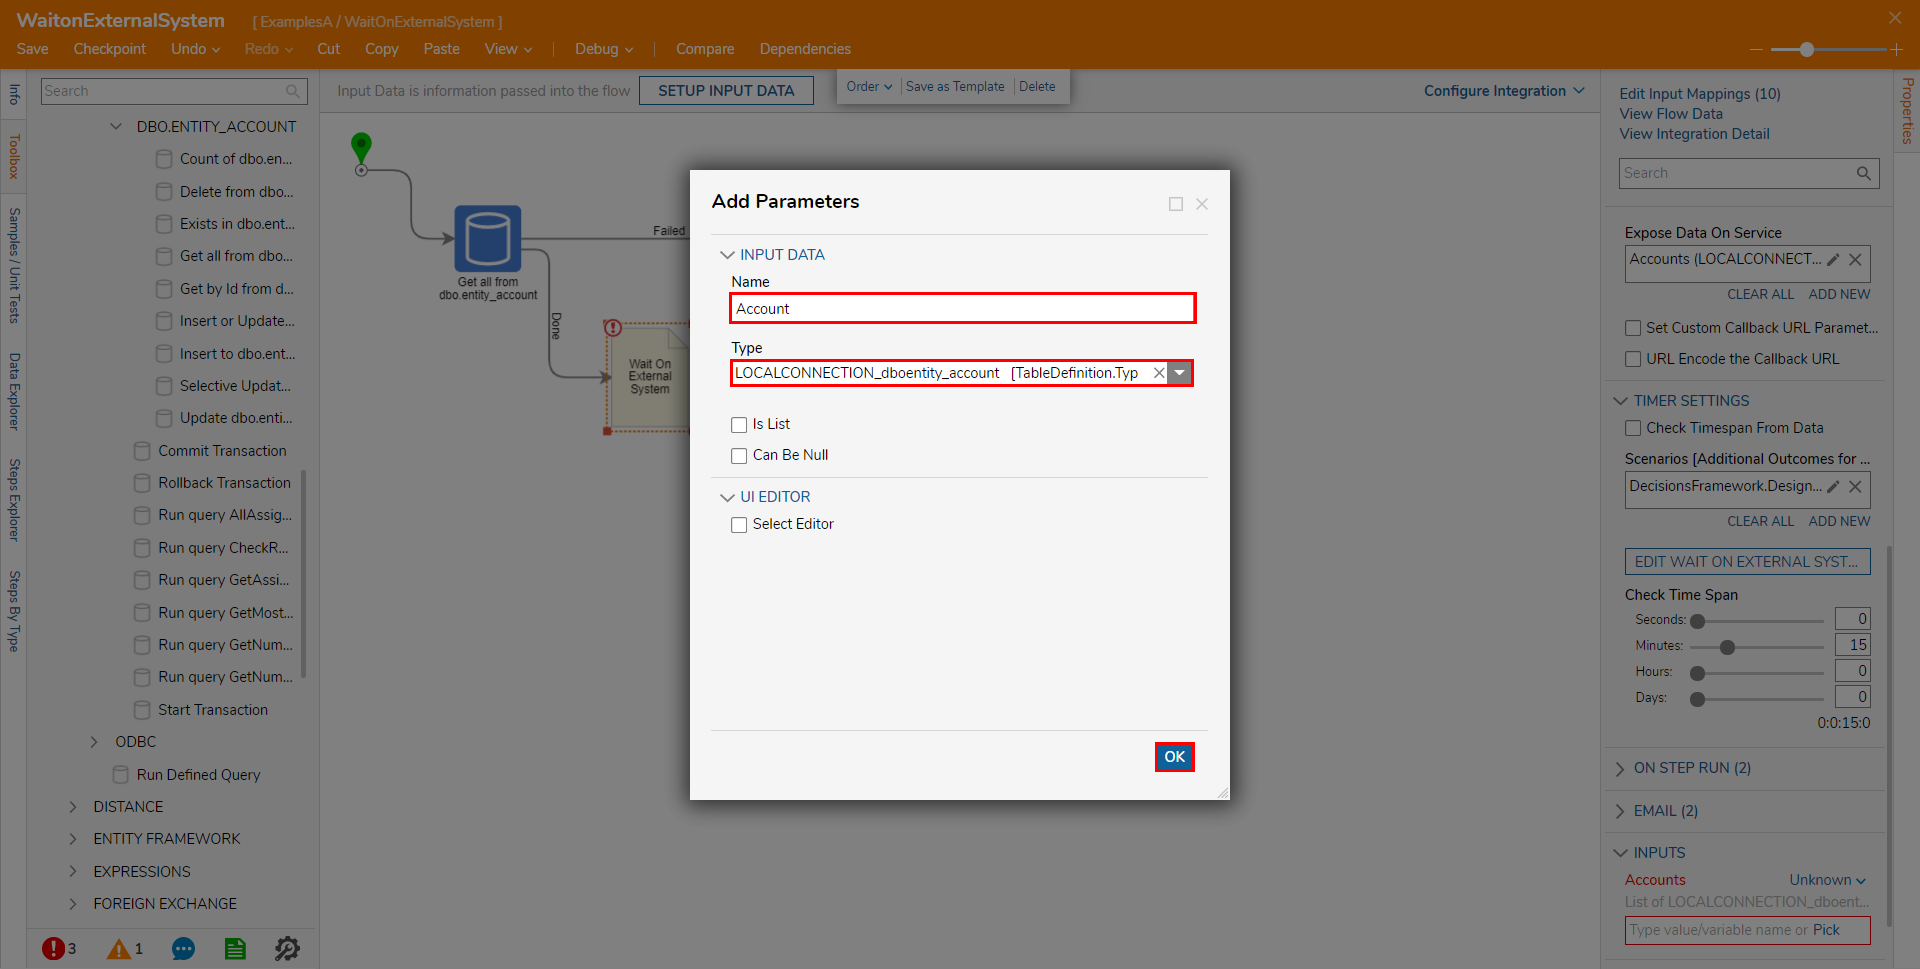
- From the Add Parameters window, Name the INPUT DATA Account, then select LOCALCONNECTION_dboentity_account [TableDefinition.Types] from the Type dropdown menu. Then click OK to save and close the window. This Parameter will represent when a single Account is added to the Account database.
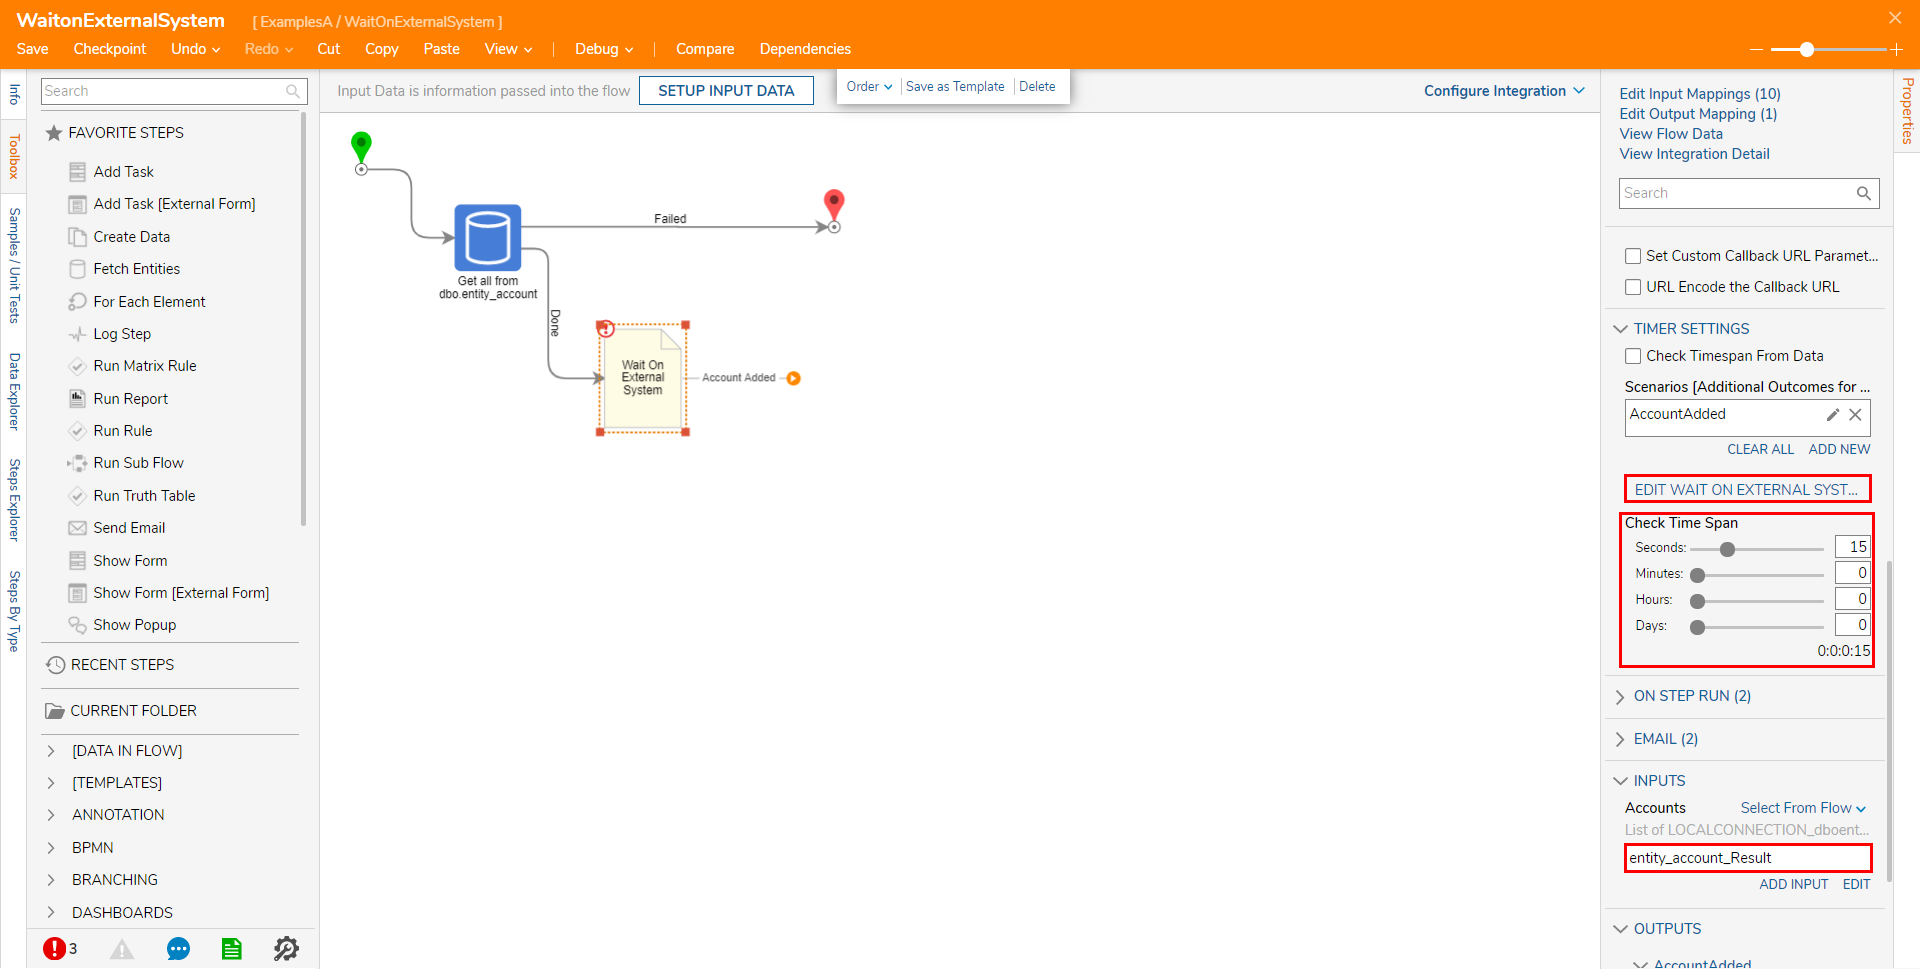
- Back in the Wait On External System step's Properties, define Check Time Span. For the example, set the Time Span to monitor the database every 15 seconds.
- Map entity_account_Result to INPUTS > Accounts; then click EDIT WAIT ON EXTERNAL SYSTEM AUTO COMPLETE FLOW.This Flow will monitor the External System and evaluating which outcome path the Flow should take; AccountAdded or StepNotComplete.
 From the Flow Designer for the Auto Complete Flow, attach a Get all from dbo.entity_account from step from Toolbox > INTEGRATION > DATABASE > LOCAL CONNECTION (DATABASE)> DBO.ENTITY_ACCOUNT, to the Done path of the Start step. Then, from the Get All step's Properties, set Limit count to Ignore. Then, under ADVANCED, rename the Output Variable Name "Accounts_Results_New."
- Connect the Failed path to Step Not Complete, then attach a Greater Than (Number) step from Toolbox > DATA > NUMBERS to the Done path.
- Navigate to the Greater Than (Number) step's Properties and map NewAccountsResults to Value1 and entity_account_Result.Count to Value2.

- Attach the False path to Step Not Complete; then, from Toolbox > ITERATION, attach a ForEach Step to the True path.
- Navigate to the ForEach Step's Properties and under INPUTS, map NewAccountsResults to Collection.
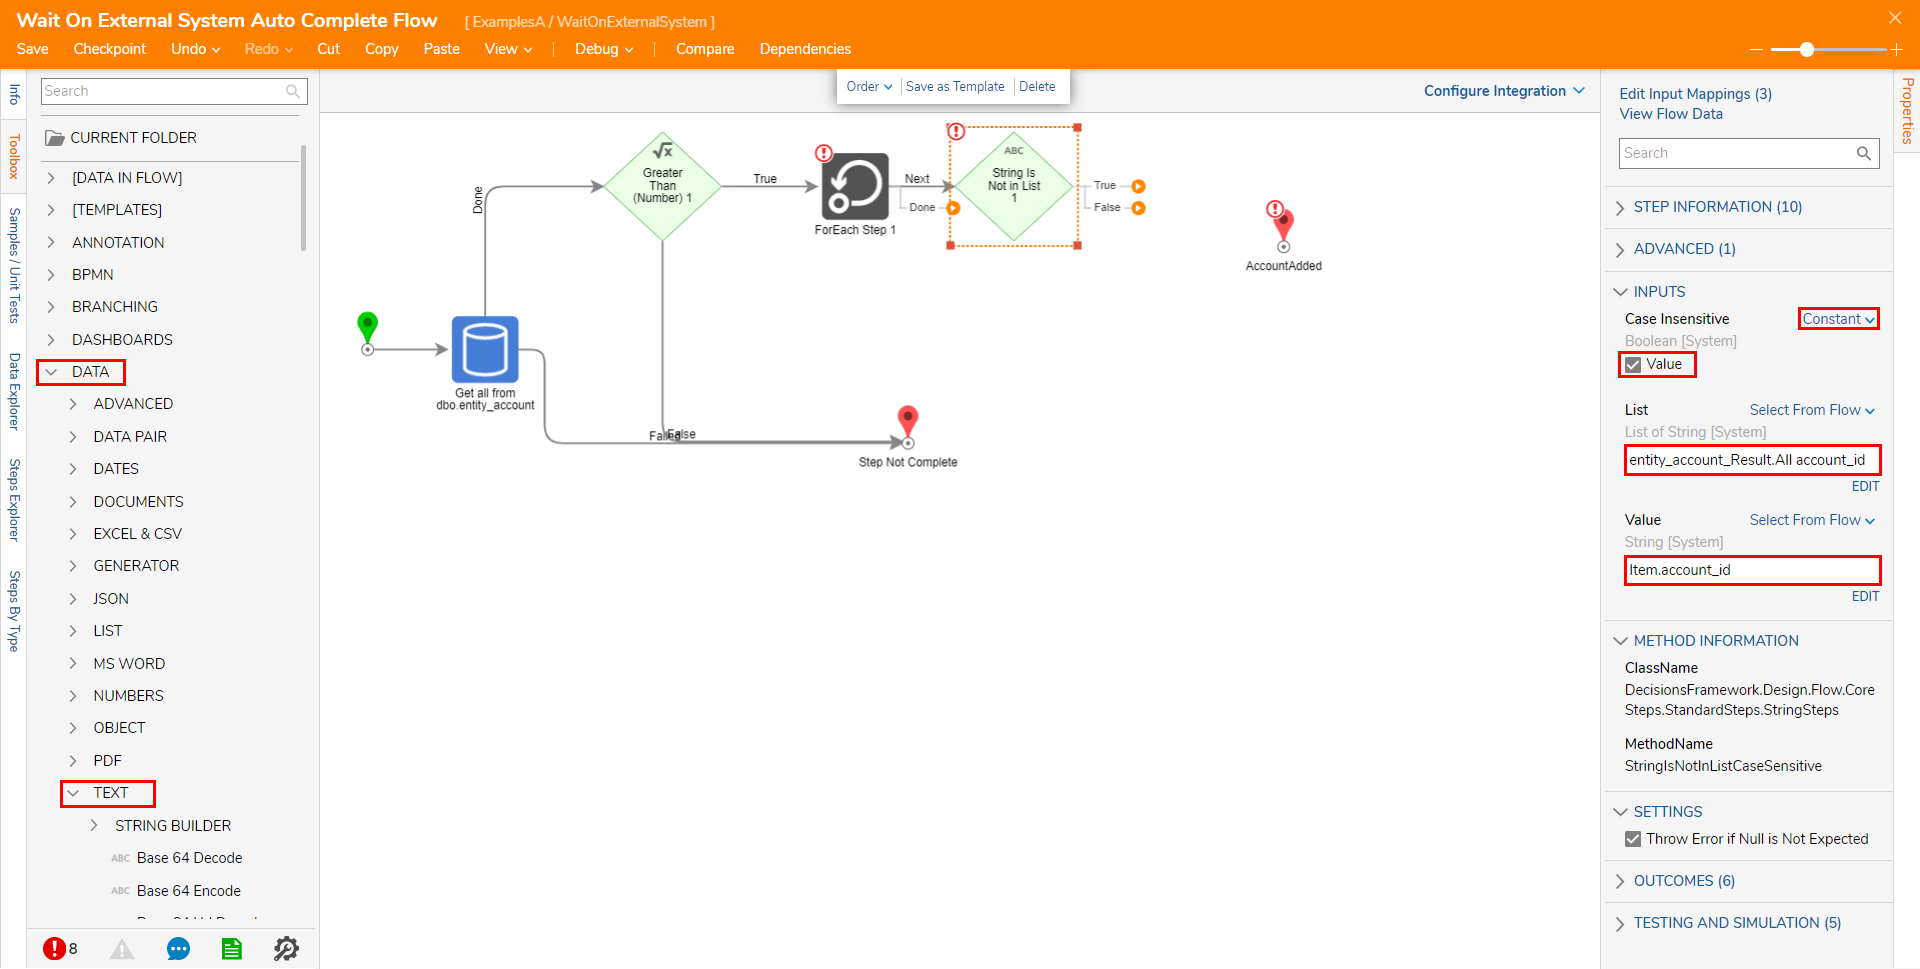
- Attach a String is Not in List step from Toolbox > DATA > TEXT, to the Next path, then navigate to its Properties tab.
- From the Properties tab under INPUTS, Constant map Case Insensitive as True, map entity_account_Result.All account_id to List, and Item.account_id to Value.
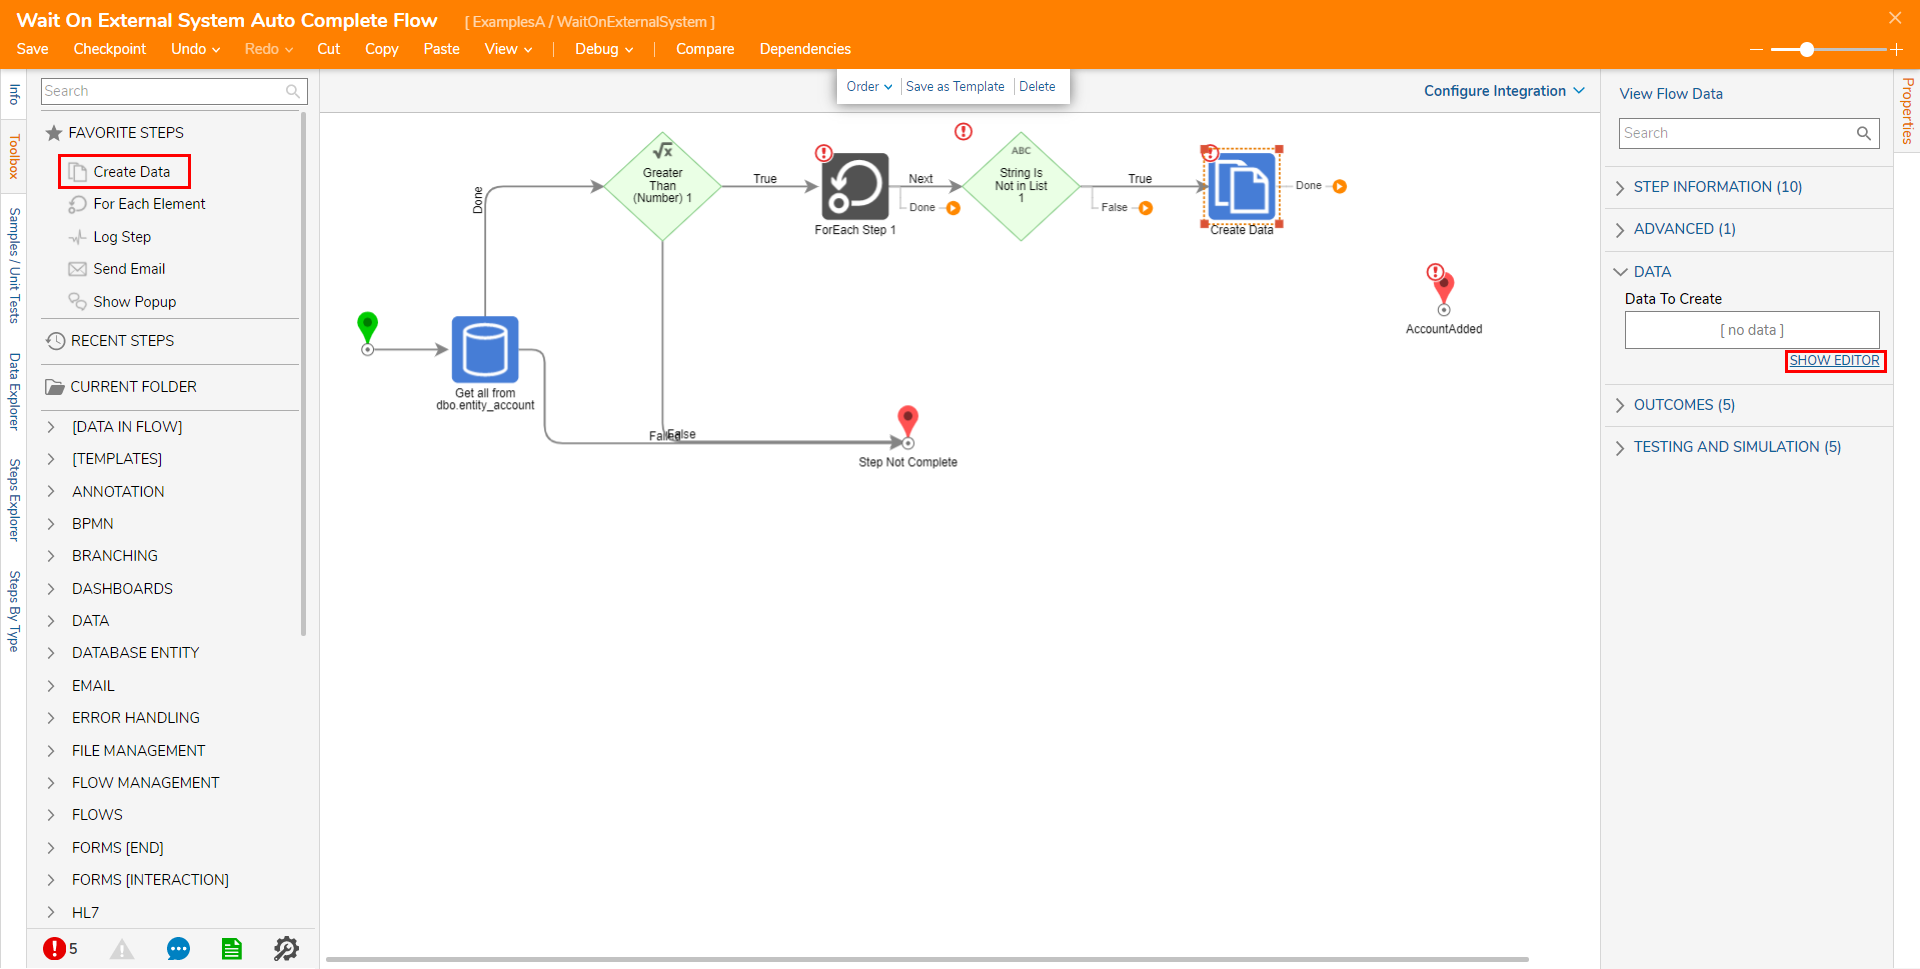
- On the True path for the String is Not in List step, attach Create Data step from the FAVORITE STEPS category of the Toolbox. Navigate to the step's Properties then click SHOW EDITOR.
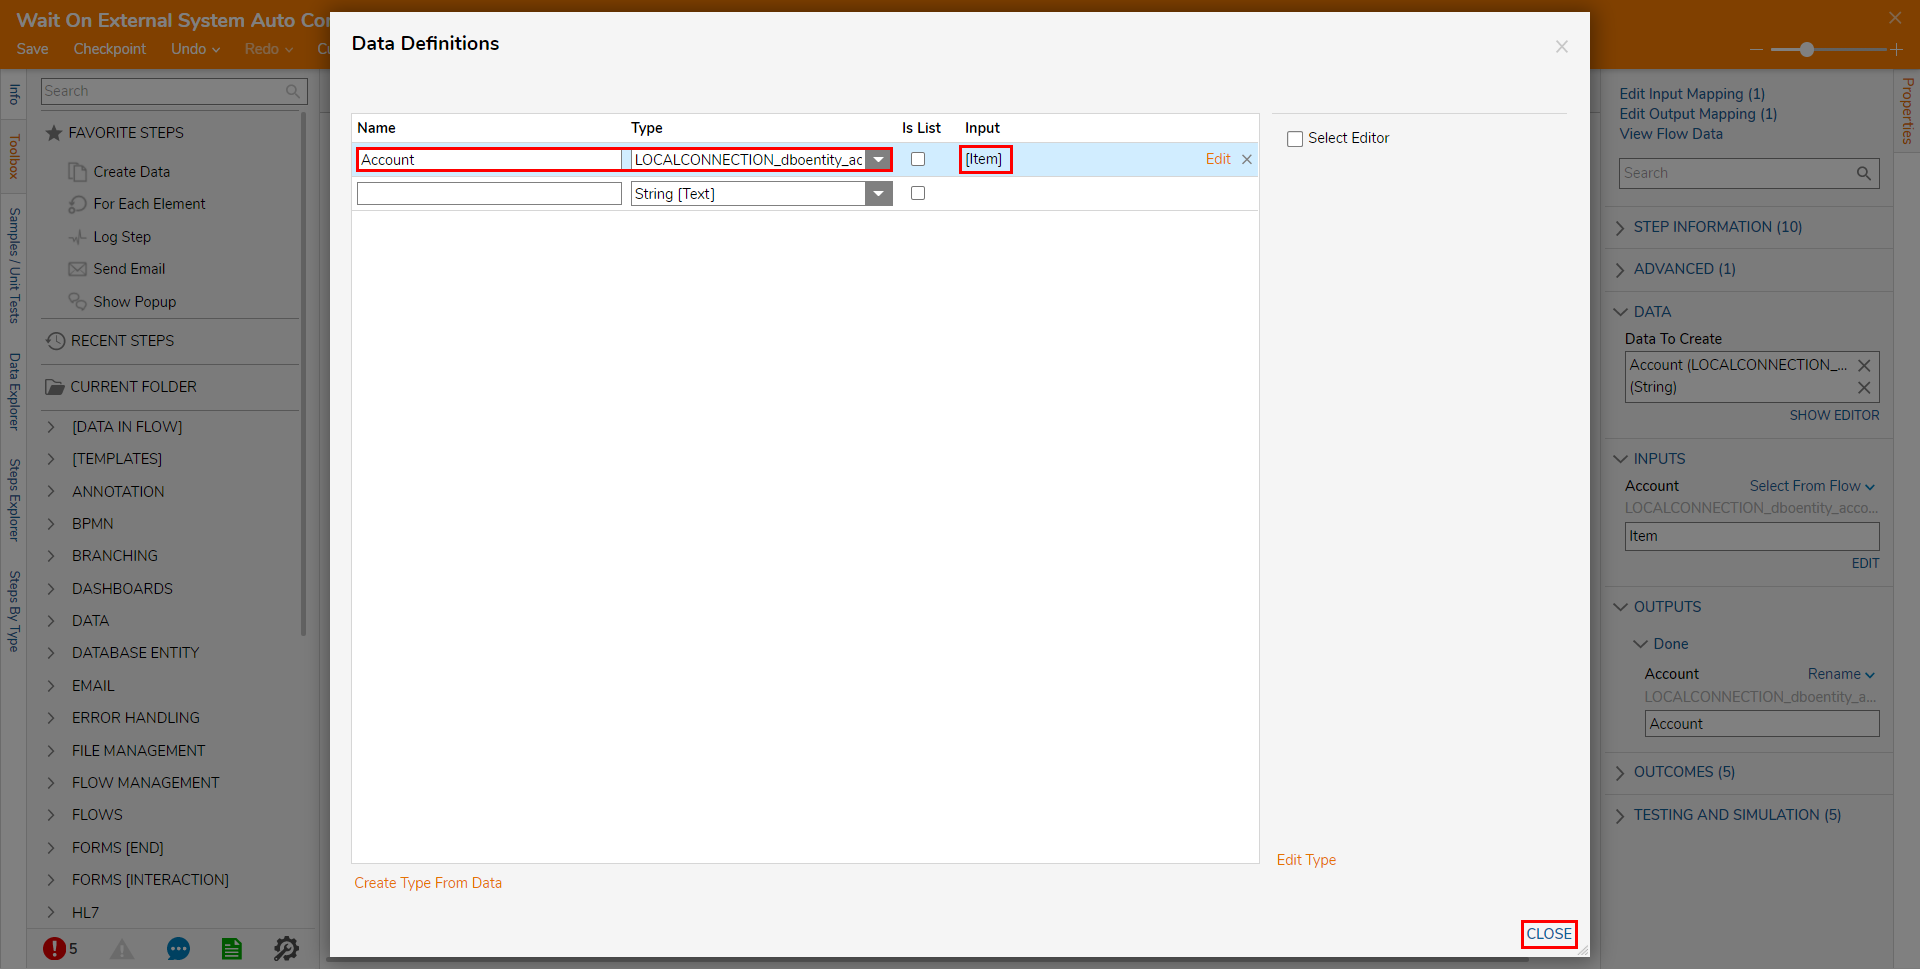
- From the Data Definitions screen, Name the data Account, select LOCALCONNECTION_dboentity_account from the Type dropdown, and map [Item] to Input. Click CLOSE to exit and save the configuration.
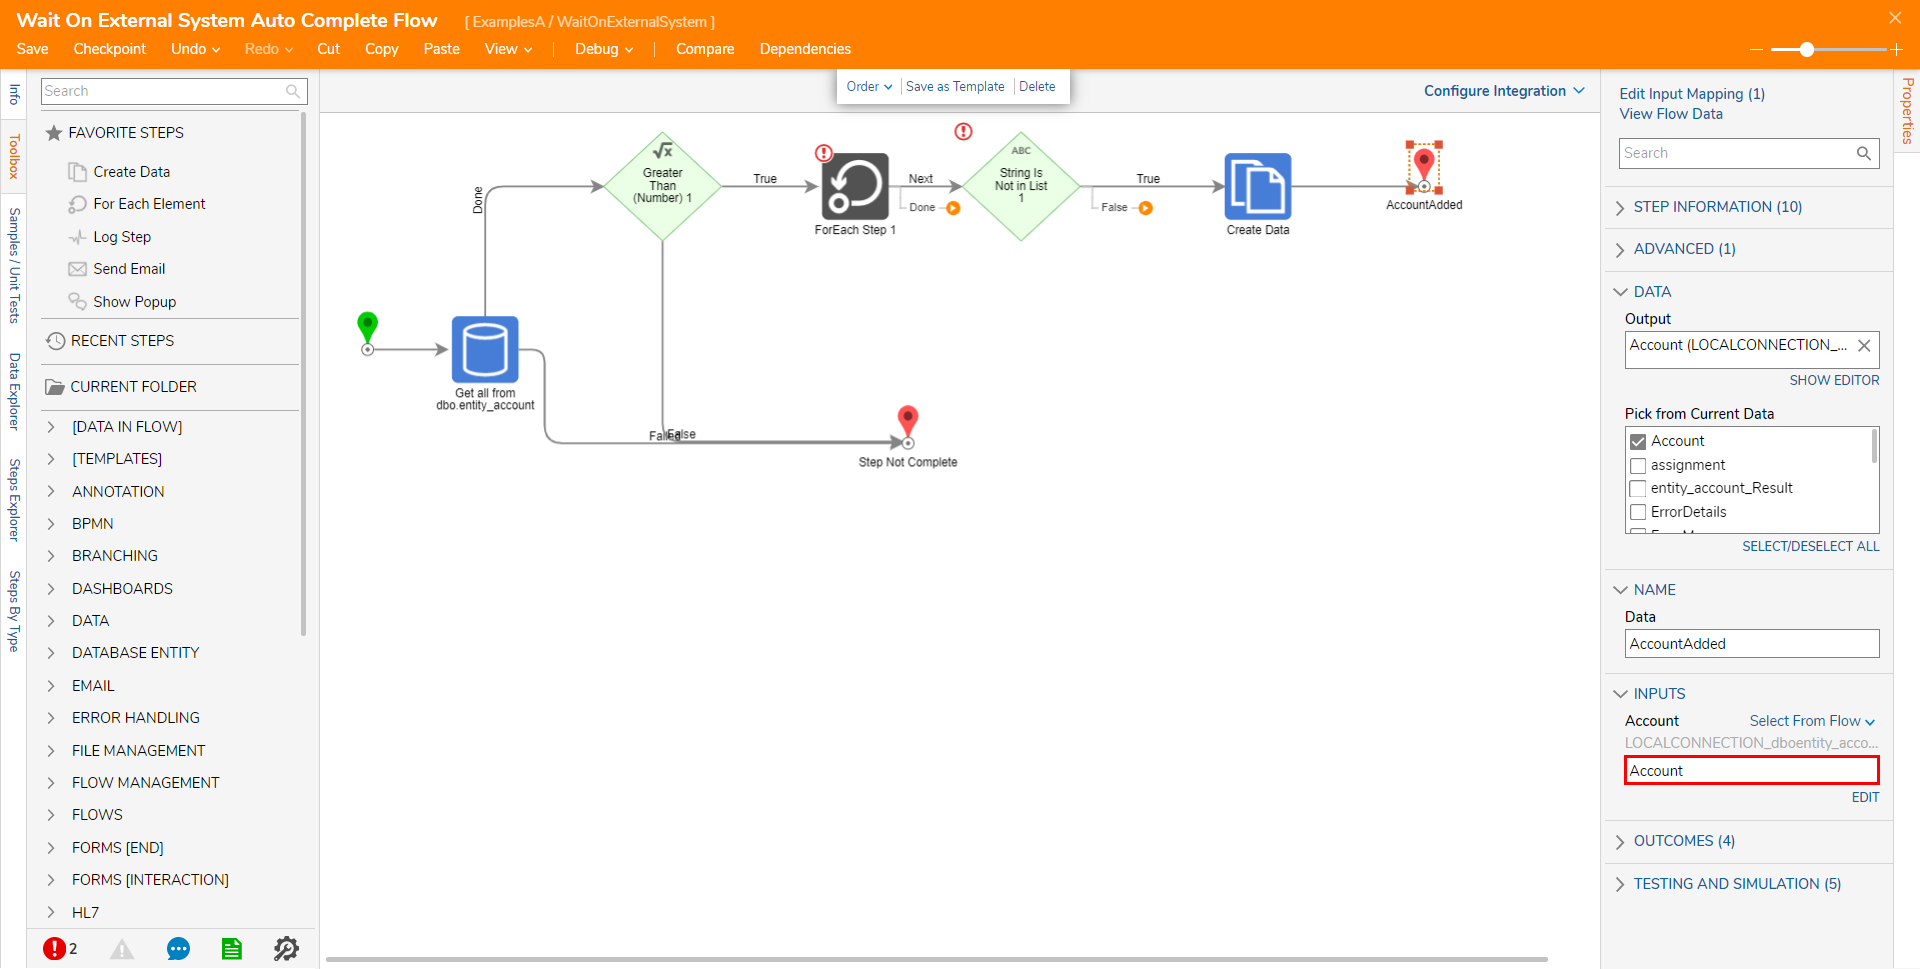
- Connect the Done outcome from the Create Data step to AccountAdded. Then, navigate to AccountAdded's Properties and map Account to its respective Input.
- Connect the rest of the Outcome paths as follows, then Save and close the Flow. Connect the False path from the String is Not in List step to the ForEach step.
Connect the Done from the ForEach step to the Account Added step.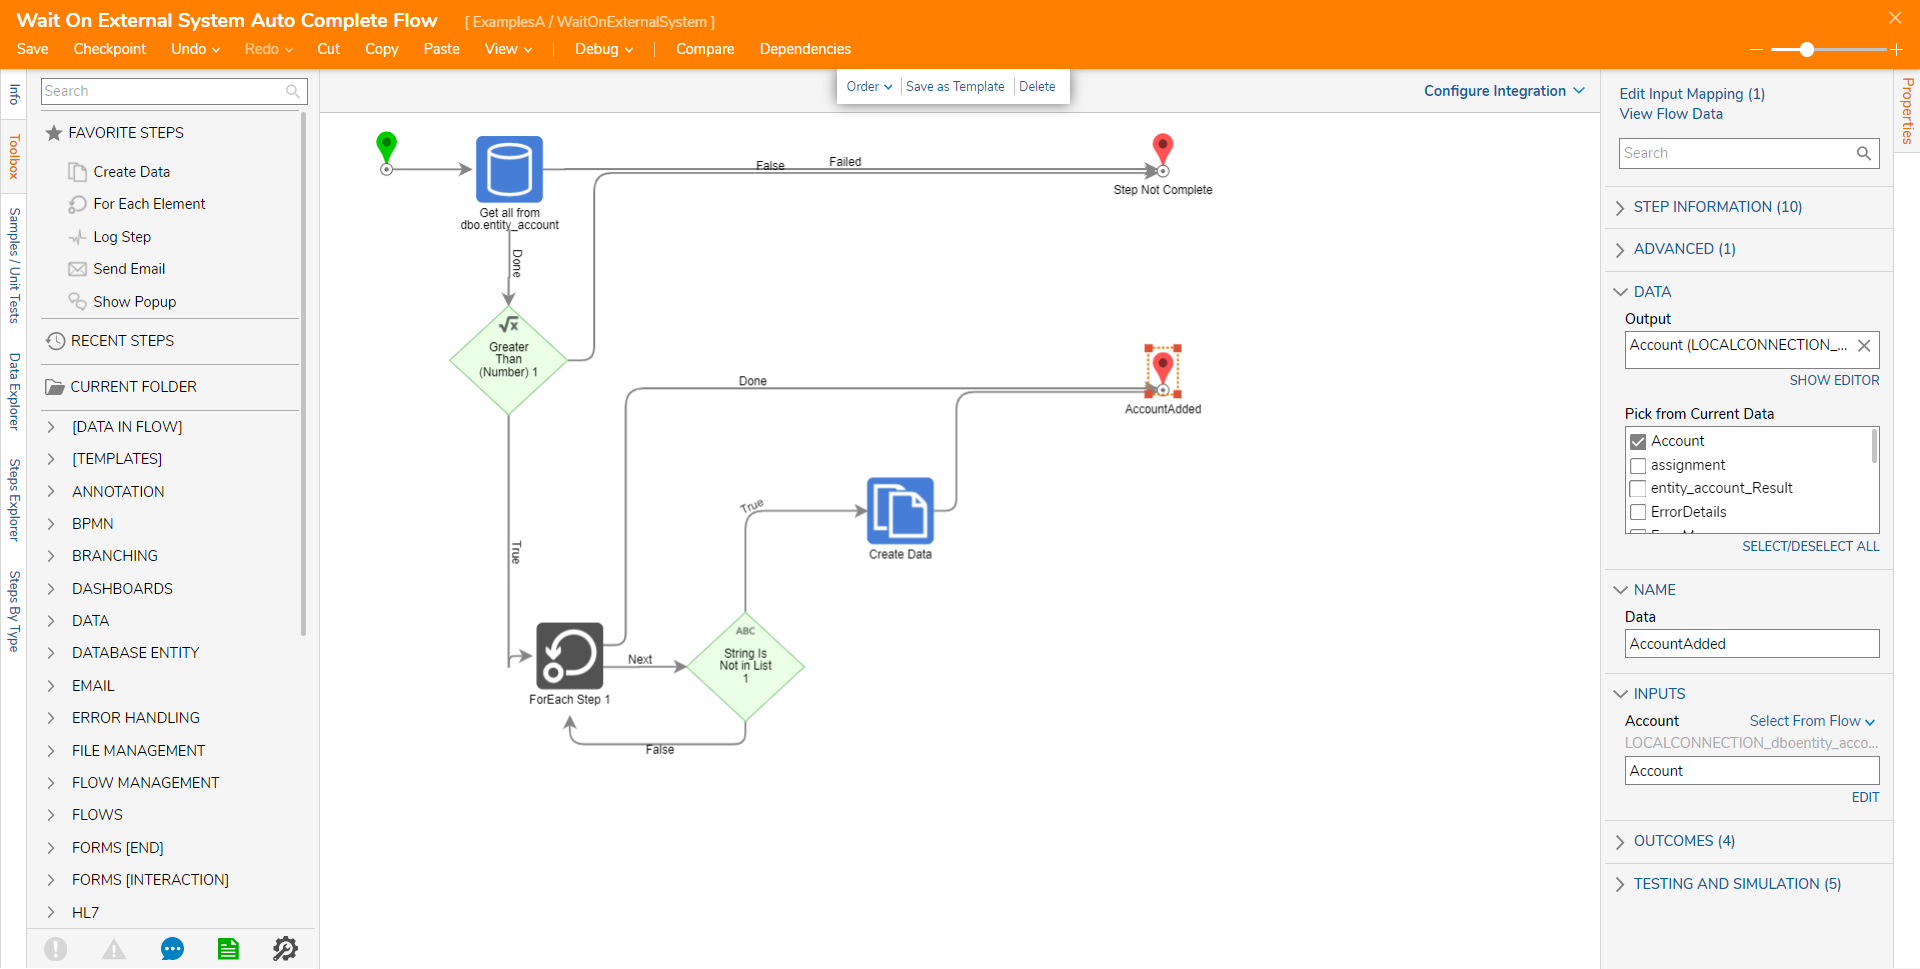
Back in the Main Flow, attach a Send Email step from Toolbox > FAVORITE STEPS, to the AccountAdded path.
Select the Send Email step to navigate to its Properties and define the EMAIL values; Constant map the desired From and To addresses. Then, Constant map the value, "Account Added," to the Subject. Set the mapping for Body to Merge Plain Text then click SHOW EDITOR.
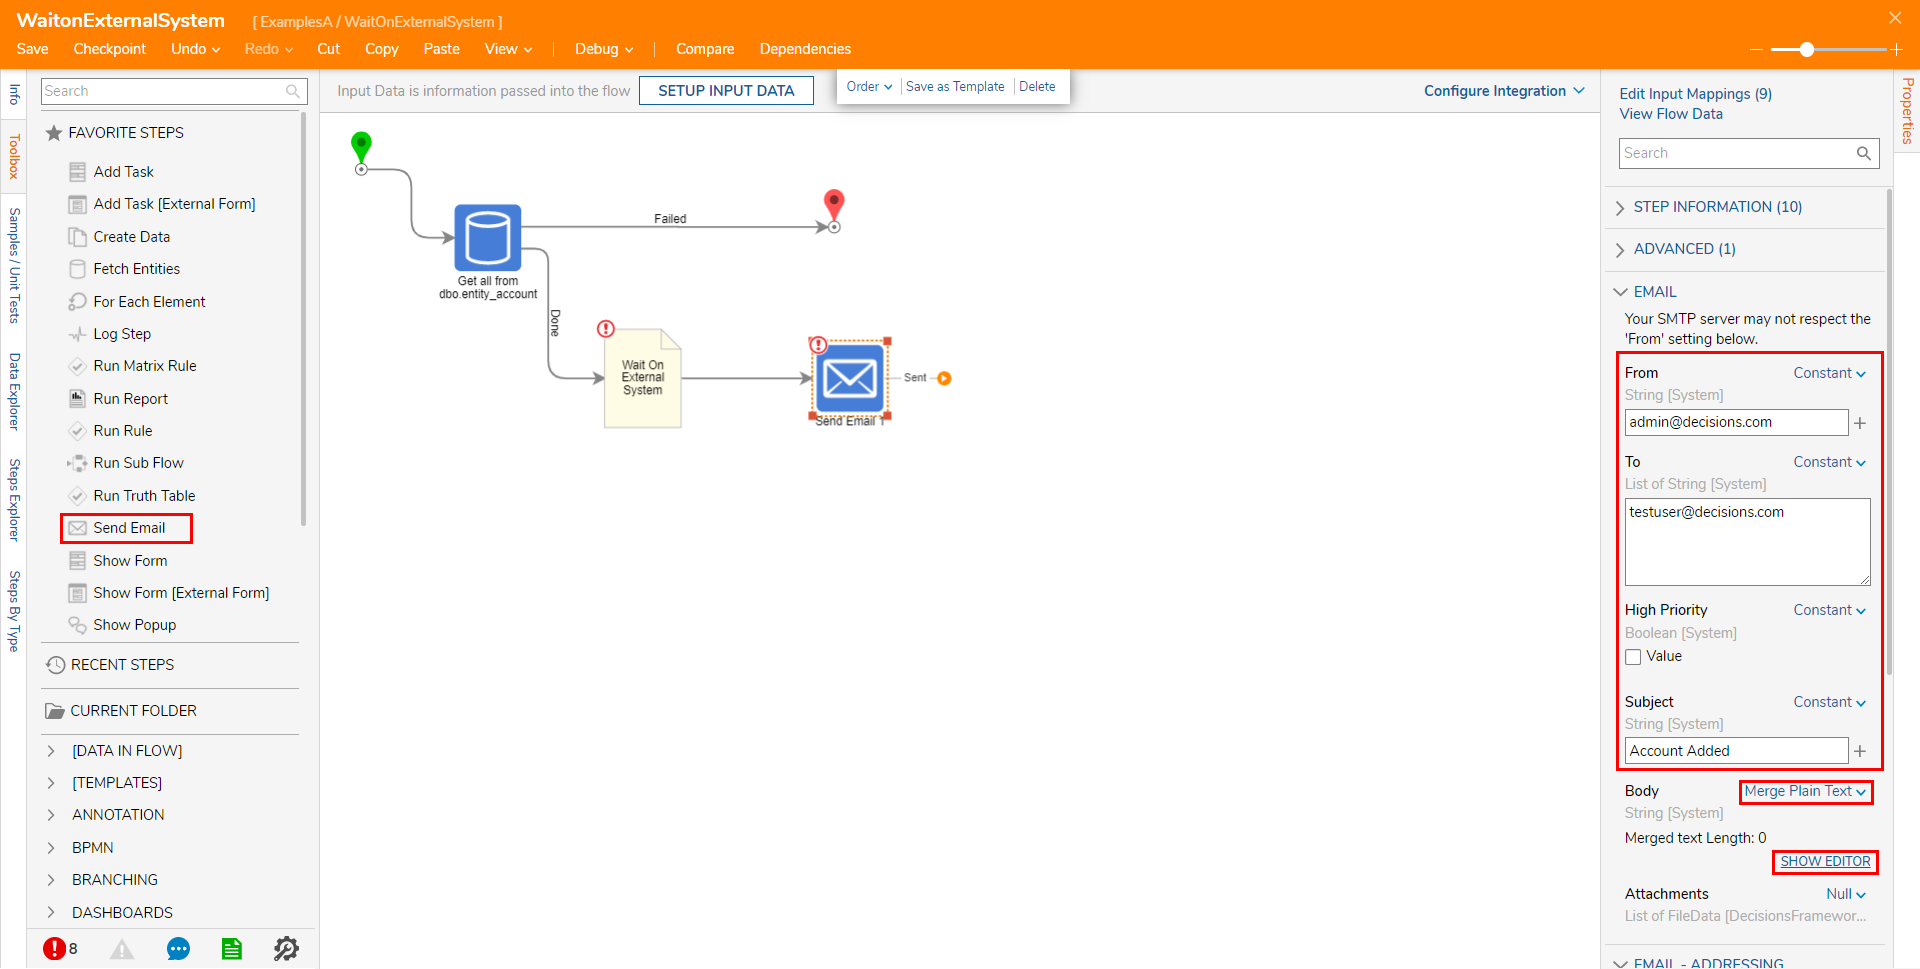
In the Merge Text Editor, use the Properties from the Account data on the left to compose the message, then click SAVE.
Define the message as Account: [Account_account_id][Account_account_type] was added in the Database.
Connect the Sent path back to the Get all from dbo.entity_account step. Then, Save the Flow, and if desired close via X.
This configuration allows the Flow to continue monitoring the External Database.


 From the Flow Designer for the Auto Complete Flow, attach a Get all from dbo.entity_account from step from Toolbox > INTEGRATION > DATABASE > LOCAL CONNECTION (DATABASE)> DBO.ENTITY_ACCOUNT, to the Done path of the Start step. Then, from the Get All step's Properties, set Limit count to Ignore. Then, under ADVANCED, rename the Output Variable Name "Accounts_Results_New."


Debug
- From the Flow Designer, select the Debug link from the top action bar.
- Click START DEBUGGING.

- Once the Flow reaches the Wait On External System step, navigate to the External Database and add a new record Accounts Database.
Back in the Flow Debugger, the Wait On External System step detects that the new Account was added to the Database and continues Flow Execution. .png)
- Navigate to the email address of the To Input and verify that the new Account email sent.

- Repeat the process again to ensure that the Wait On External System step and the Flow function as intended.

.png)

Was this article helpful?