Mapping a Complex Object
- 22 Jan 2021
- 1 Minute to read
- Print
- DarkLight
Mapping a Complex Object
- Updated on 22 Jan 2021
- 1 Minute to read
- Print
- DarkLight
Article Summary
Share feedback
Thanks for sharing your feedback!
Overview
The Mapping Editor can be used to create a Complex Object from multiple-step Inputs. For example, mapping the Output of data entered in Form Fields to the Inputs of Internal Services can transform user-entered information into a Knowledge Base article.
To map a Complex Object within the Mapping Editor, drag the anchors for selected Outputs to the Inputs which should be populated with that data.
Example
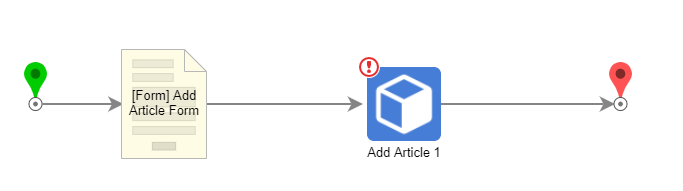
This example Flow will create an Article object based on information collected from a Form.
- Navigate to a Designer Project and create a Form that contains one Text Box, one Text Box Multi Line, a Button, called Add Article Form.

- Select Save, then close the Form with X to return to the Designer Project.
- Create a Flow; give the Flow a Name, such as, "Create KB Article," and click CREATE.
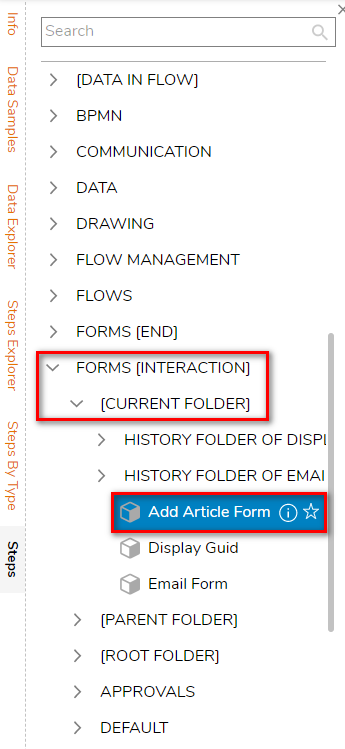
- Add Add Article Form from Forms [Interaction] > [Current Folder].
- Select the Form step and from the Properties tab, set each of the INPUTS Mapping to Ignore.
- In the Toolbox panel, in the category Integration > Internal Services > KnowledgeBaseService, select an AddArticle component and drag it to the workspace.
- Connect the Outcome paths in the Flow.
- Click the Add Article step, and select Edit Input Mappings.This Article object has three properties: the Folder containing the entity, the title, and the description. Because the Folder containing the entity is not provided by the Form, enter it manually by changing the mapping type of entity FolderId to Constant to designate the value for the desired Folder location for the article.
To obtain a Folder's Id, right-click it from the Portal and navigate to Manage > Get Designer Folder Id. - Map the Outputs by dragging the anchor from each Output to the field that will receive it as input. Click OK to save the mapping.

- Save the Flow, then close with X if desired.


Debug
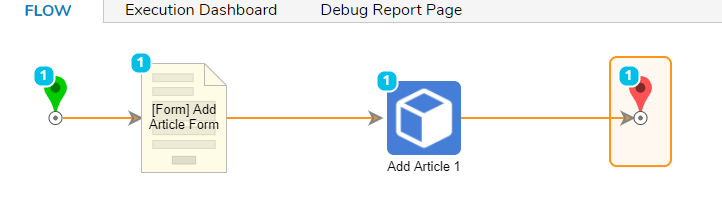
- From the Flow Designer, select the Debug link.
- Click START DEBUGGING.
- Complete the fields and click Add Article.
 The information entered into this Form is sent to the Add Article step, which will, in turn, create an Article object
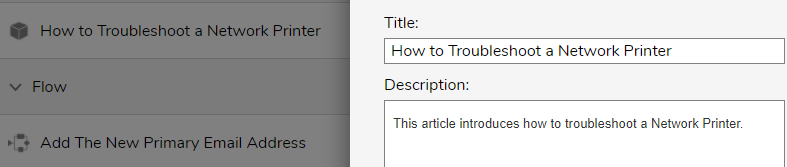
 - Verify that the Article has been added, by returning to the Portal and selecting the user-defined Folder, where the article resides.


Was this article helpful?