Allow Runtime CSS File Name
- 19 Jul 2022
- 2 Minutes to read
- Print
- DarkLight
Allow Runtime CSS File Name
- Updated on 19 Jul 2022
- 2 Minutes to read
- Print
- DarkLight
Article Summary
Share feedback
Thanks for sharing your feedback!
Overview
This tutorial demonstrates how to apply different CSS documents at runtime on Forms. Featured in Decisions v4.0+ instances, this allows Designers to dynamically style Forms at runtime.
Example
This example creates a Flow with two Forms: the first prompts the end user to pick a color from a drop-down list which changes the second Form's CSS depending on the user's selection. Upload the two following CSS documents into Decisions.
Need Help Uploading CSS?
Please refer to our Uploading CSS article for a step-by-step process.
The first document sets the background color of the Button to green. The second document sets the background color of the Button to red.
.SilverButtonStyle .buttonControl{
	background-color: green;
}
.SilverButtonStyle .buttonControl{
background-color: red;
}- Begin with creating a new Flow in the Designer Folder. Name the Flow and select CREATE to proceed.
- Add a Show Form step from the Toolbox to the workspace.
- Select the PICK OR CREATE FORM button to build and set the size of the Form.
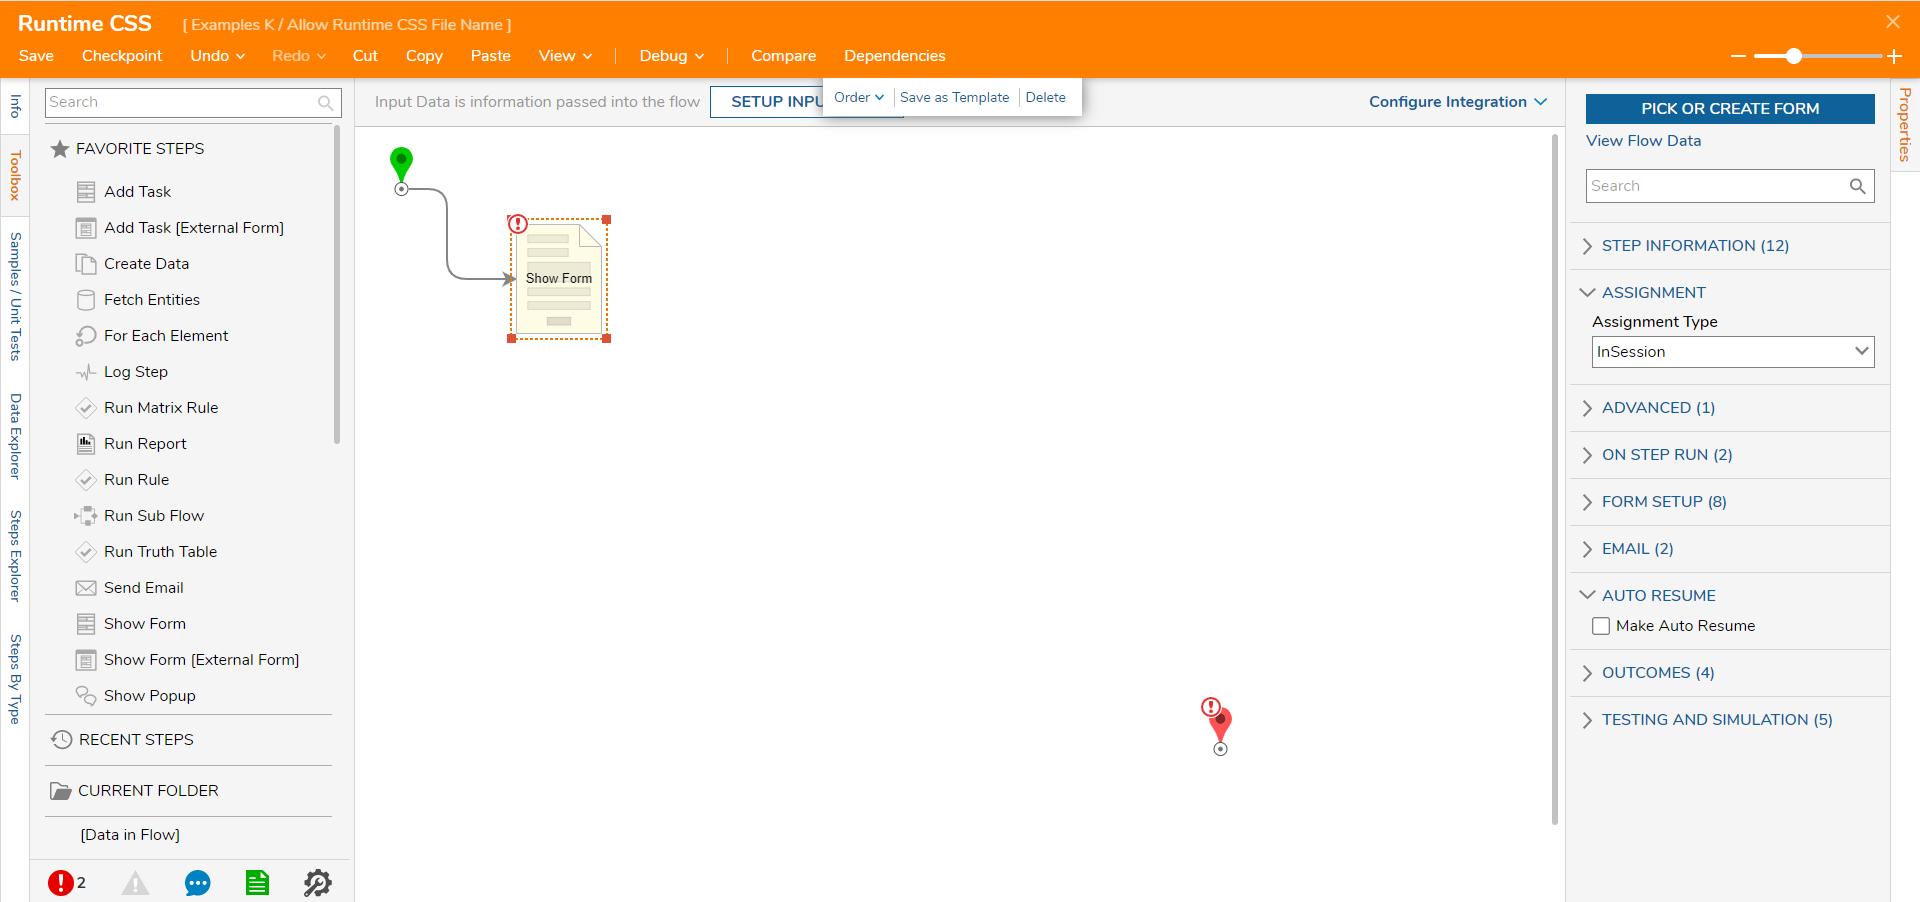
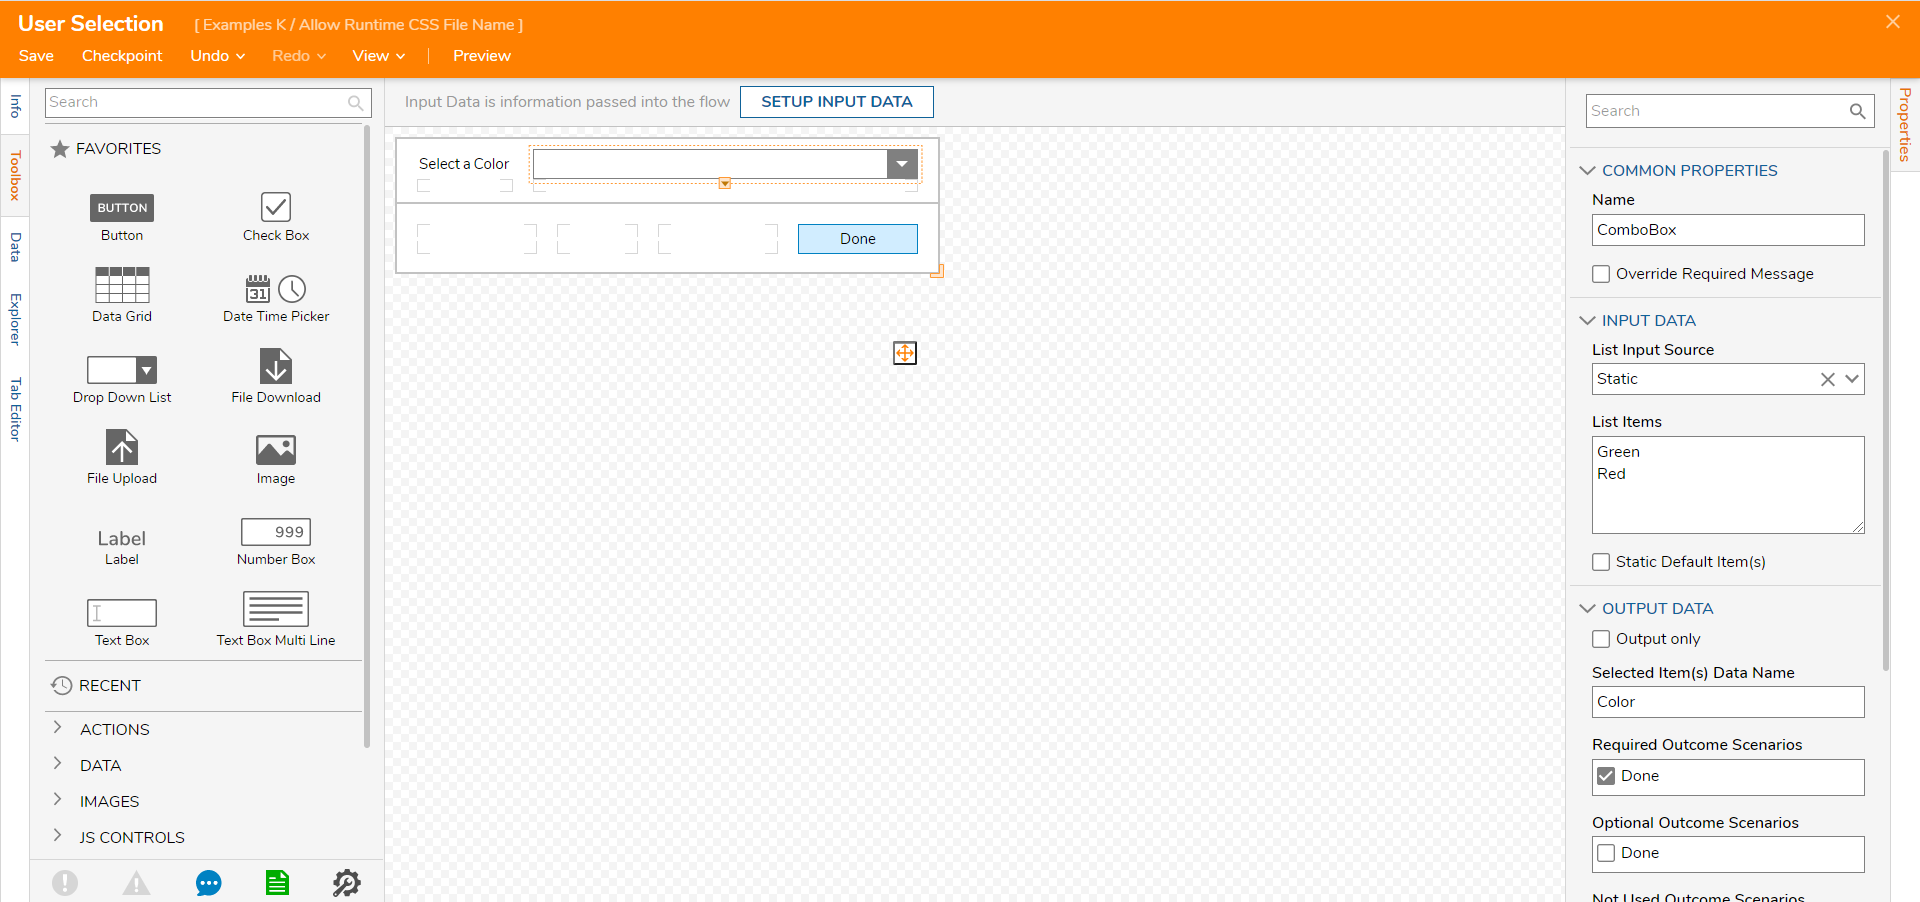
- Build the Form to contain the following components: a Button, Label, and Drop Down List with a Static String List using "Green" and "Red."
- Save and close the Form Designer.
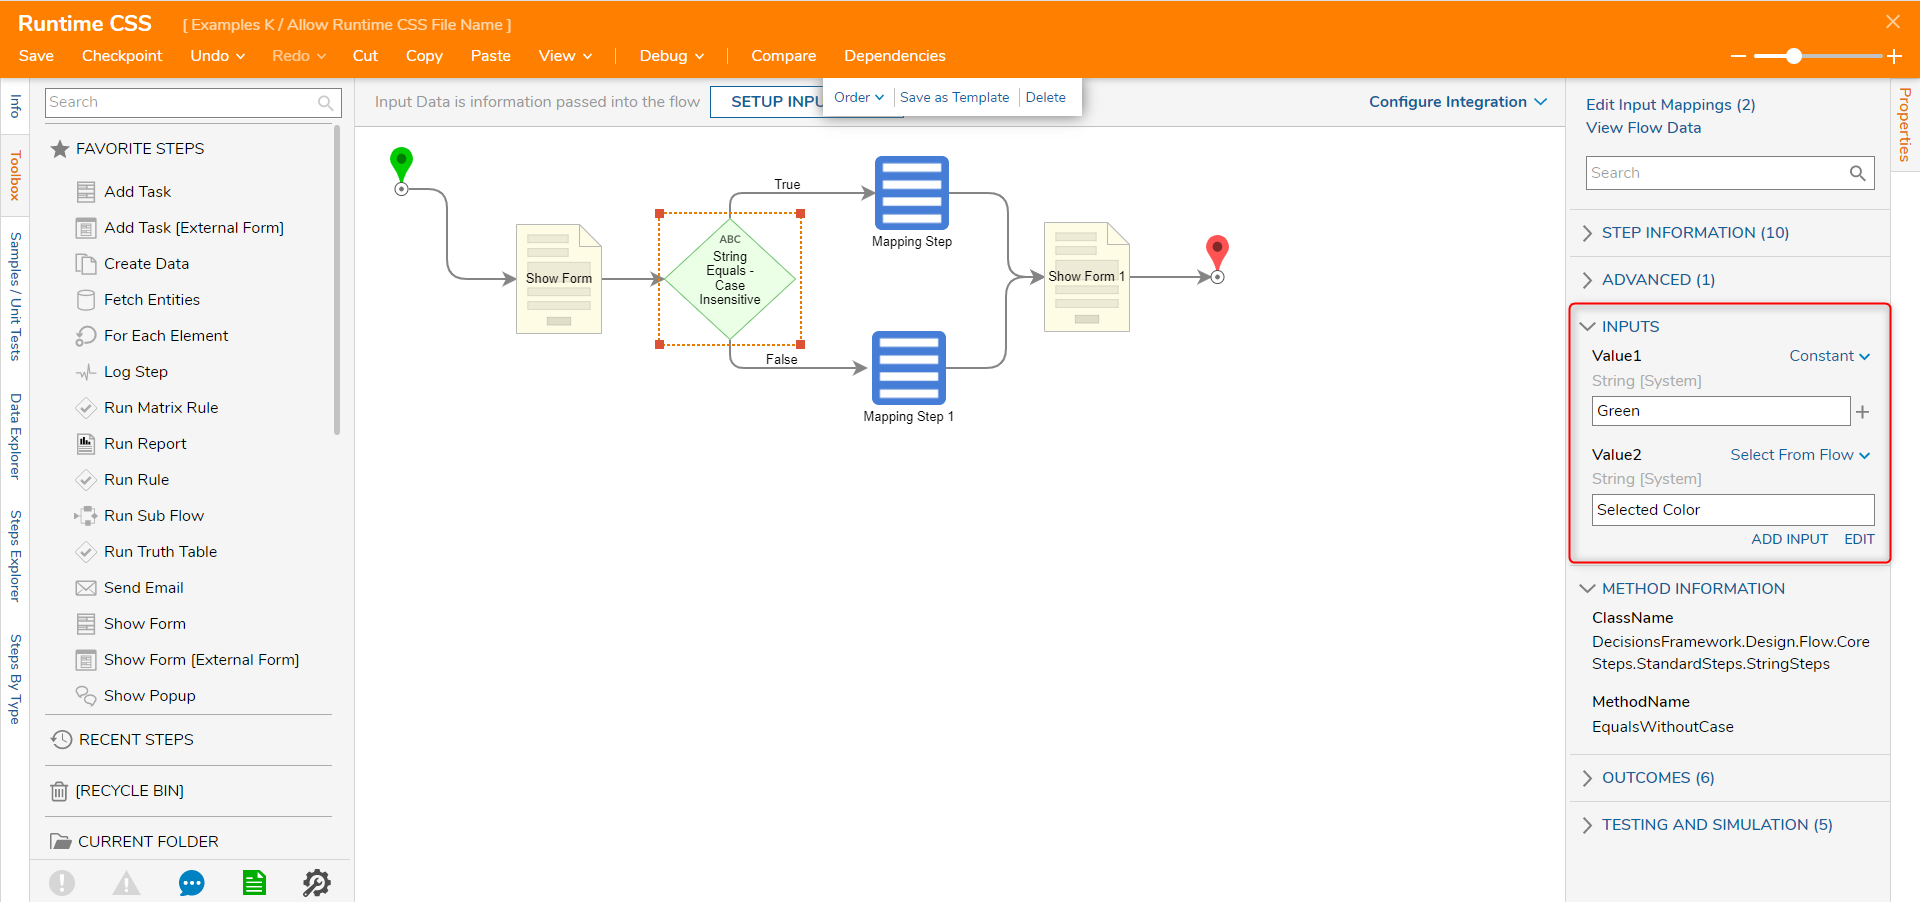
- Add String Equals – Case Insensitive step from All Steps [Catalog] > Data > Text category.
- With the String Equals – Case Insensitive selected, navigate to the Properties panel. Under Inputs > Value 1, select Constant as the mapping type and type "Green."
- Under Inputs > Value 2, choose Select From Flow as the mapping type and choose Selected Color (the selected output from the Form).
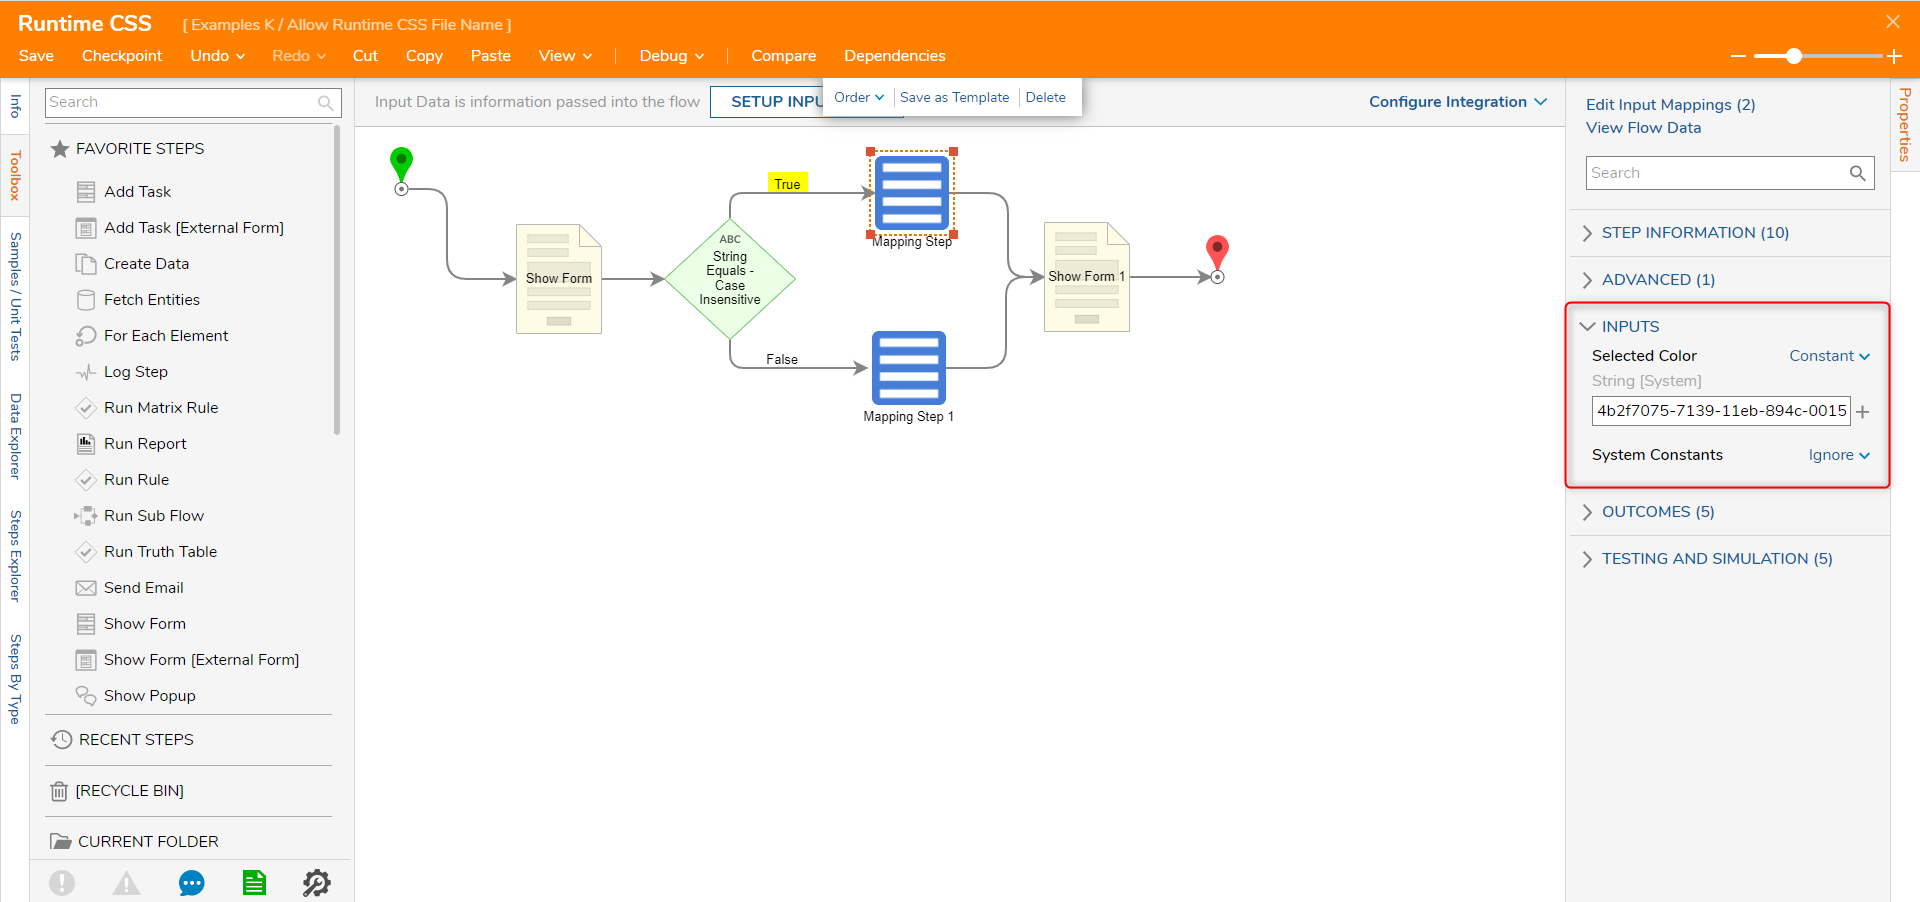
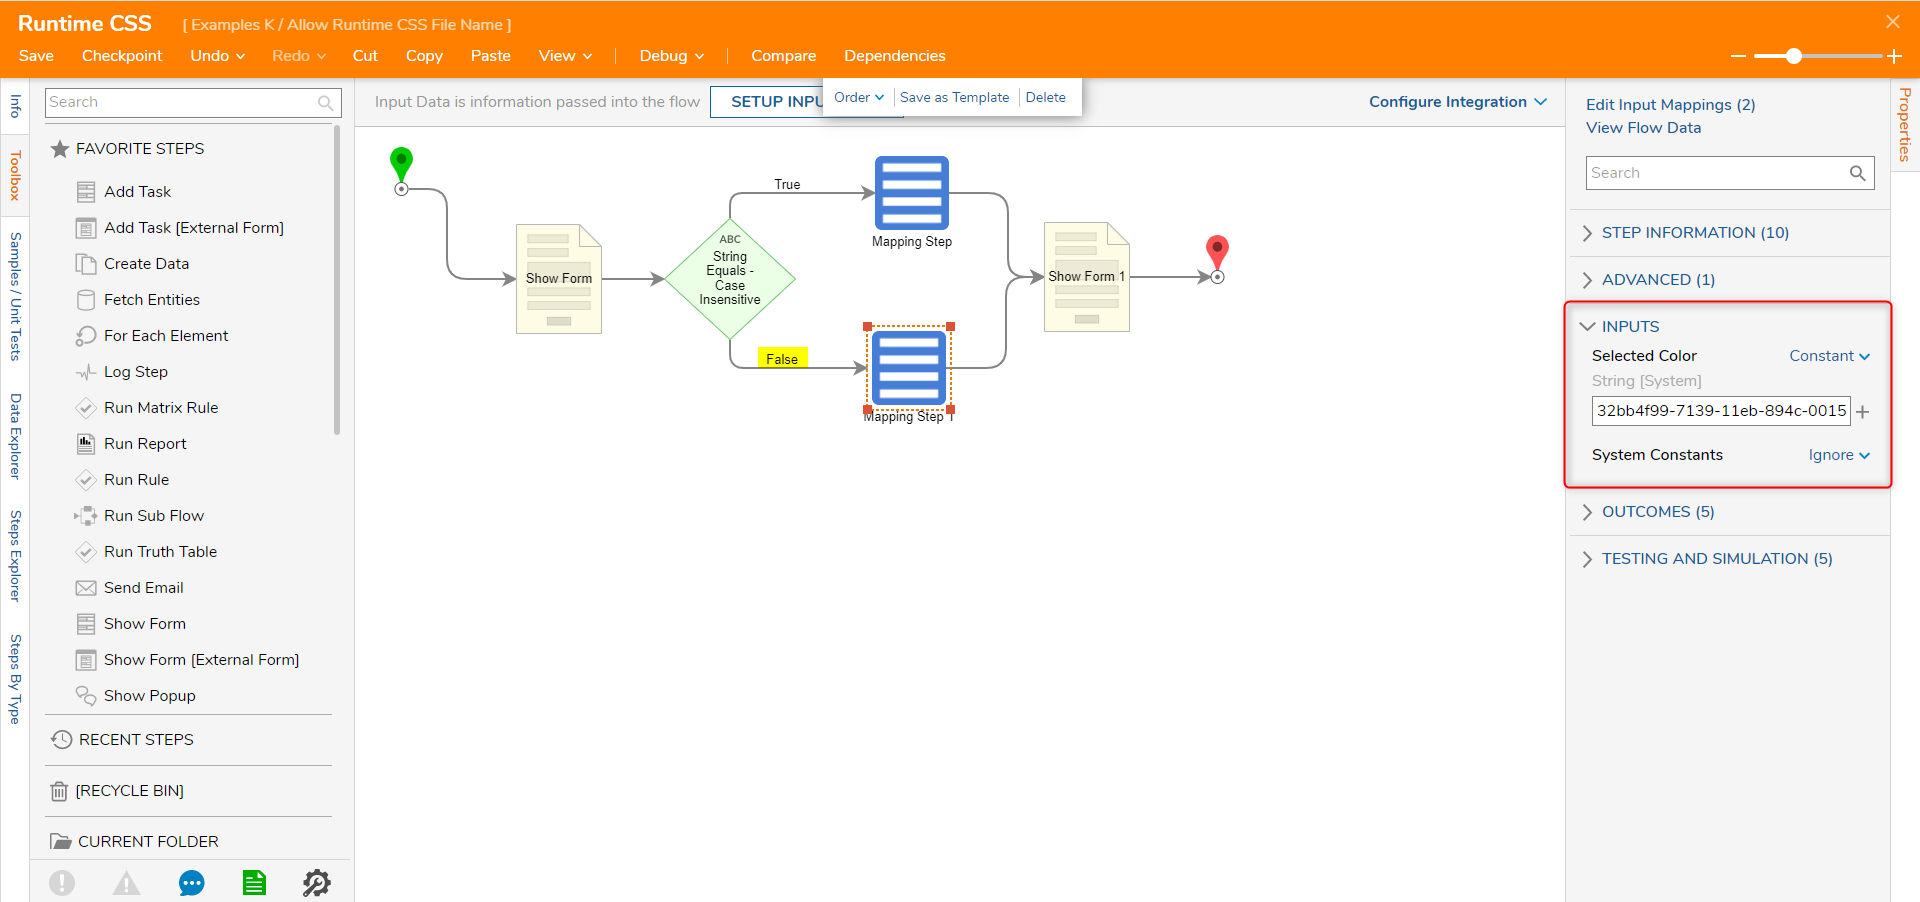
- Add a Mapping Step from the Data category in the Toolbox to the True outcome path of the String Equals – Case Insensitive Rule.
- Select the Mapping Step and navigate to the Properties panel. Under Inputs > Selected Color, change the mapping type to Constant. The Constant value will be the Document ID of the Green Button CSS document.
- Locate CSS document in System > Designers > Css Folder in the Portal , right-click, and select Manage > Get Document ID. Copy the Document ID. Paste the Document ID into the Selected Color value.
- Add a Mapping Step from the Data category in the Toolbox to the False outcome path of the String Equals – Case Insensitive Rule.
- Select the Mapping Step and navigate to the Properties panel. Under Inputs > Selected Color, change the mapping type to Constant.
- The Constant value will be the Document ID of the Red Button CSS document.
- Locate CSS document in System > Designers > Css Folder in the Portal , right-click, and select Manage > Get Document ID. Copy the Document ID. Paste the Document ID into the Selected Color value.
- Locate CSS document in System > Designers > Css Folder in the Portal , right-click, and select Manage > Get Document ID. Copy the Document ID. Paste the Document ID into the Selected Color value.
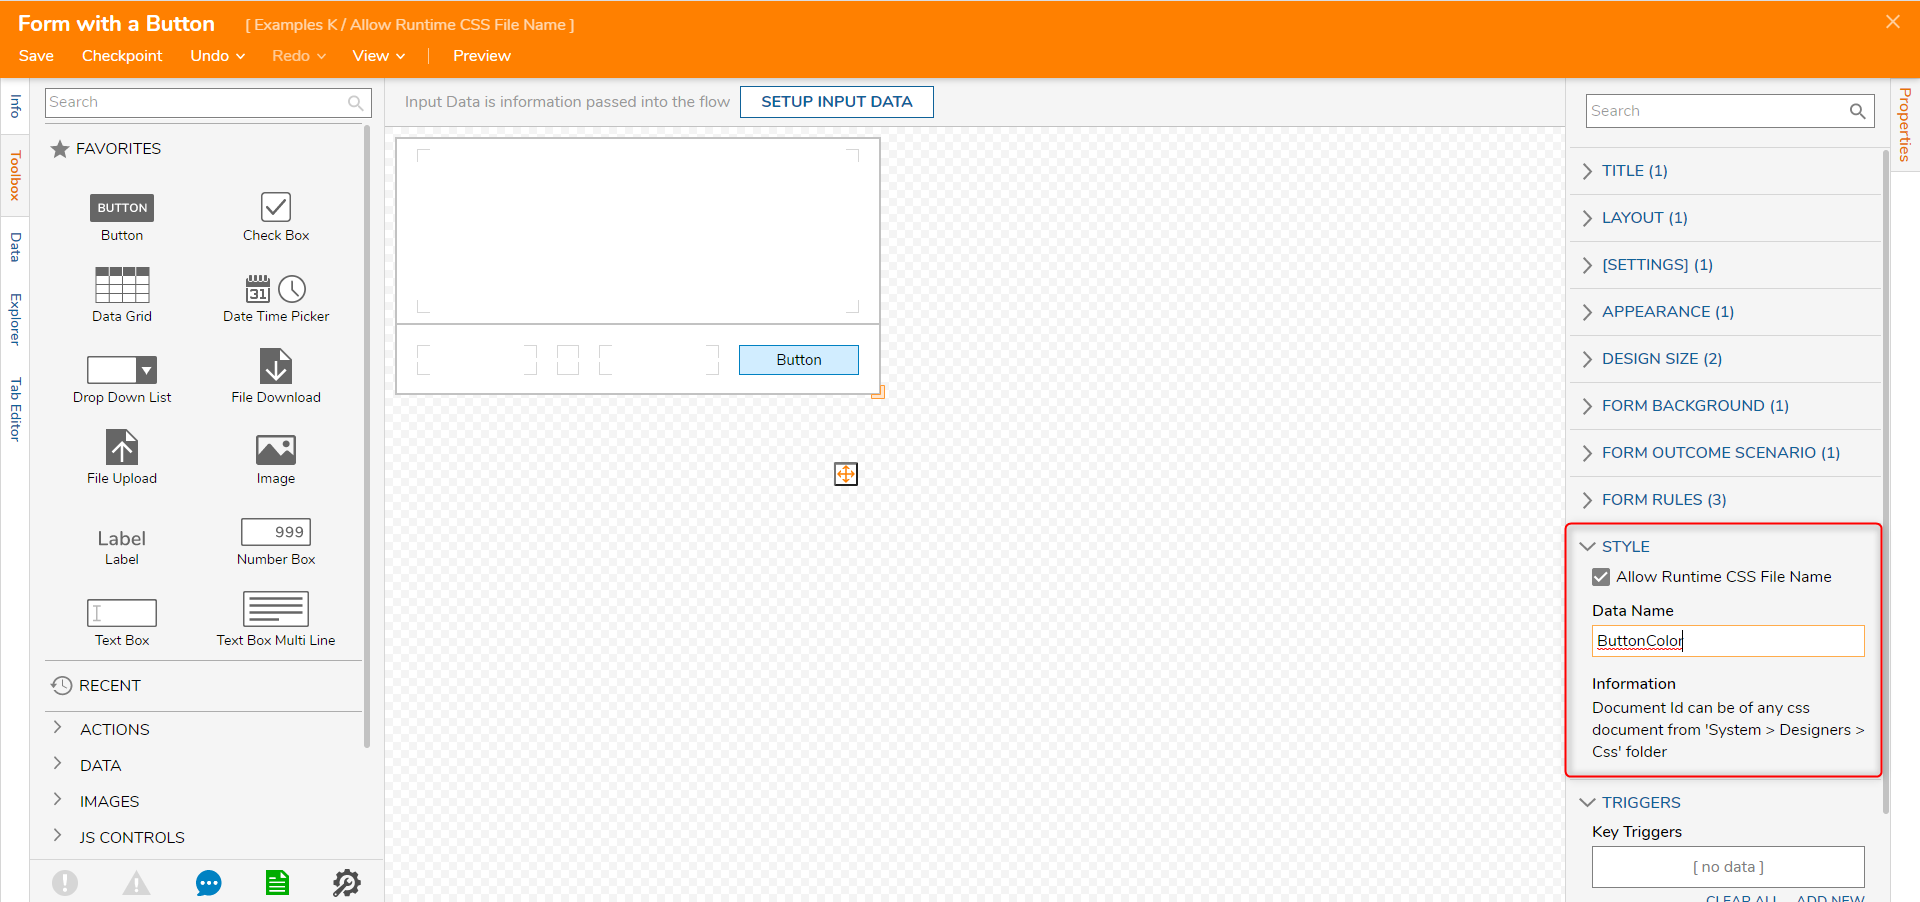
- Add a Show Form step from the Toolbox to the workspace.
- Select the PICK OR CREATE FORM button to build and set the size of the Form. The Form is designed with one Button.
- Navigate to the Form Properties, expand Style, and set Allow Runtime CSS File Name check-box to True.
- Set the Data Name to "ButtonColor".
- Save and close the Form Designer.
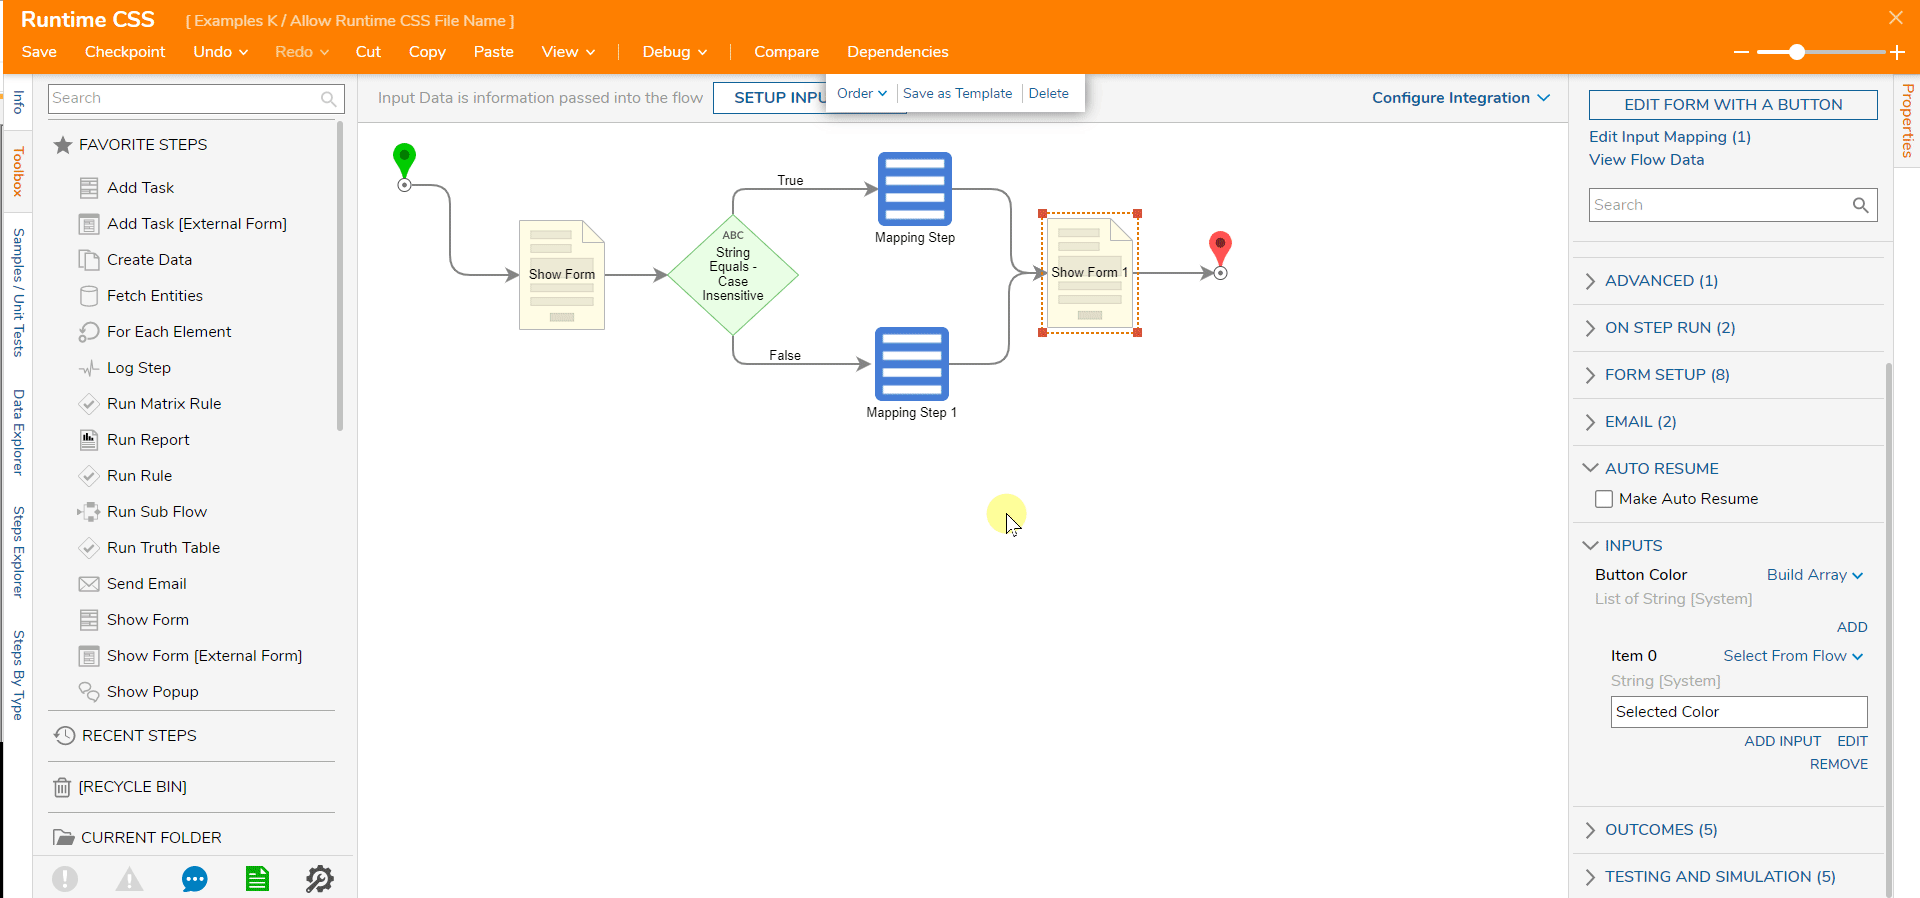
- In the Flow Designer, connect the outcomes from both Mapping Steps to the second Form step.
- Select the second Form step. In the Properties panel, under INPUTS > Button Color, change the mapping type to Build Array.
- Choose Select From Flow for the mapping type for Item 0 choose Selected Color.
- Connect the second Form to the End Step.
.png)


.png)
Debug
- In the Flow Designer, select Debug in the top action panel. Select START DEBUGGING.
- First Form shows, select Green from the drop-down list. Select Done.
- The second Form shows that the Button background is green.
- Select CREATE NEW SESSION, the Flow runs again; this time, select Red from the drop-down list.
- The second Form shows that the Button has a red background.

Was this article helpful?