Overview
CRM Lite is a streamlined customer relationship management application that helps teams organize and maintain key information about their customers and internal contacts. Users can quickly create and manage teams, add and categorize customers, track primary and secondary contacts, and store addresses along with related customer files. From managing client accounts to tracking employee interactions, CRM Lite provides a powerful interface that efficiently organizes customer data, communication history, and supporting documents.
This Accelerator is ideal for organizations of any size, offering a User-friendly solution to centralize customer information, improve collaboration, and ensure consistent relationship management across departments.
Key Features
- Pre-built Forms that enable Account Managers to create and edit various teams, customers, and information for associated customers.
- Dashboards that enable Customer Admins to create and edit various customer and associated information for each customer.
- Flows that facilitate User Actions such as creating/editing teams and customers.
Considerations
- Users must install Error Handling before installing this Project.
- After installing the Project, Users must create or add existing accounts to the Account Manager, Customer Admin, and CRM Users Groups. Users who are a part of either of these groups will have access to the appropriate actions. To make an account:
- Navigate to System > Security > Accounts.
- Select Account on the top action bar.
- Enter an Email Address and Password for the new account and scroll down to the Select Group section.
- Click Add New and select Account Manager, Customer Admin, or CRM Users (depending on intended permissions for the User) and click Pick.
- Select Create Account. The account will be created in Decisions and added to the appropriate Group.
Main Flows
| Flow Name | Description | Image |
|---|---|---|
| Create Team | This team is used as a Folder action on the CRM Lite Views Dashboard. When used, it presents a Form to Users, allowing them to insert details about the team, such as Team Name and Team Manager. | 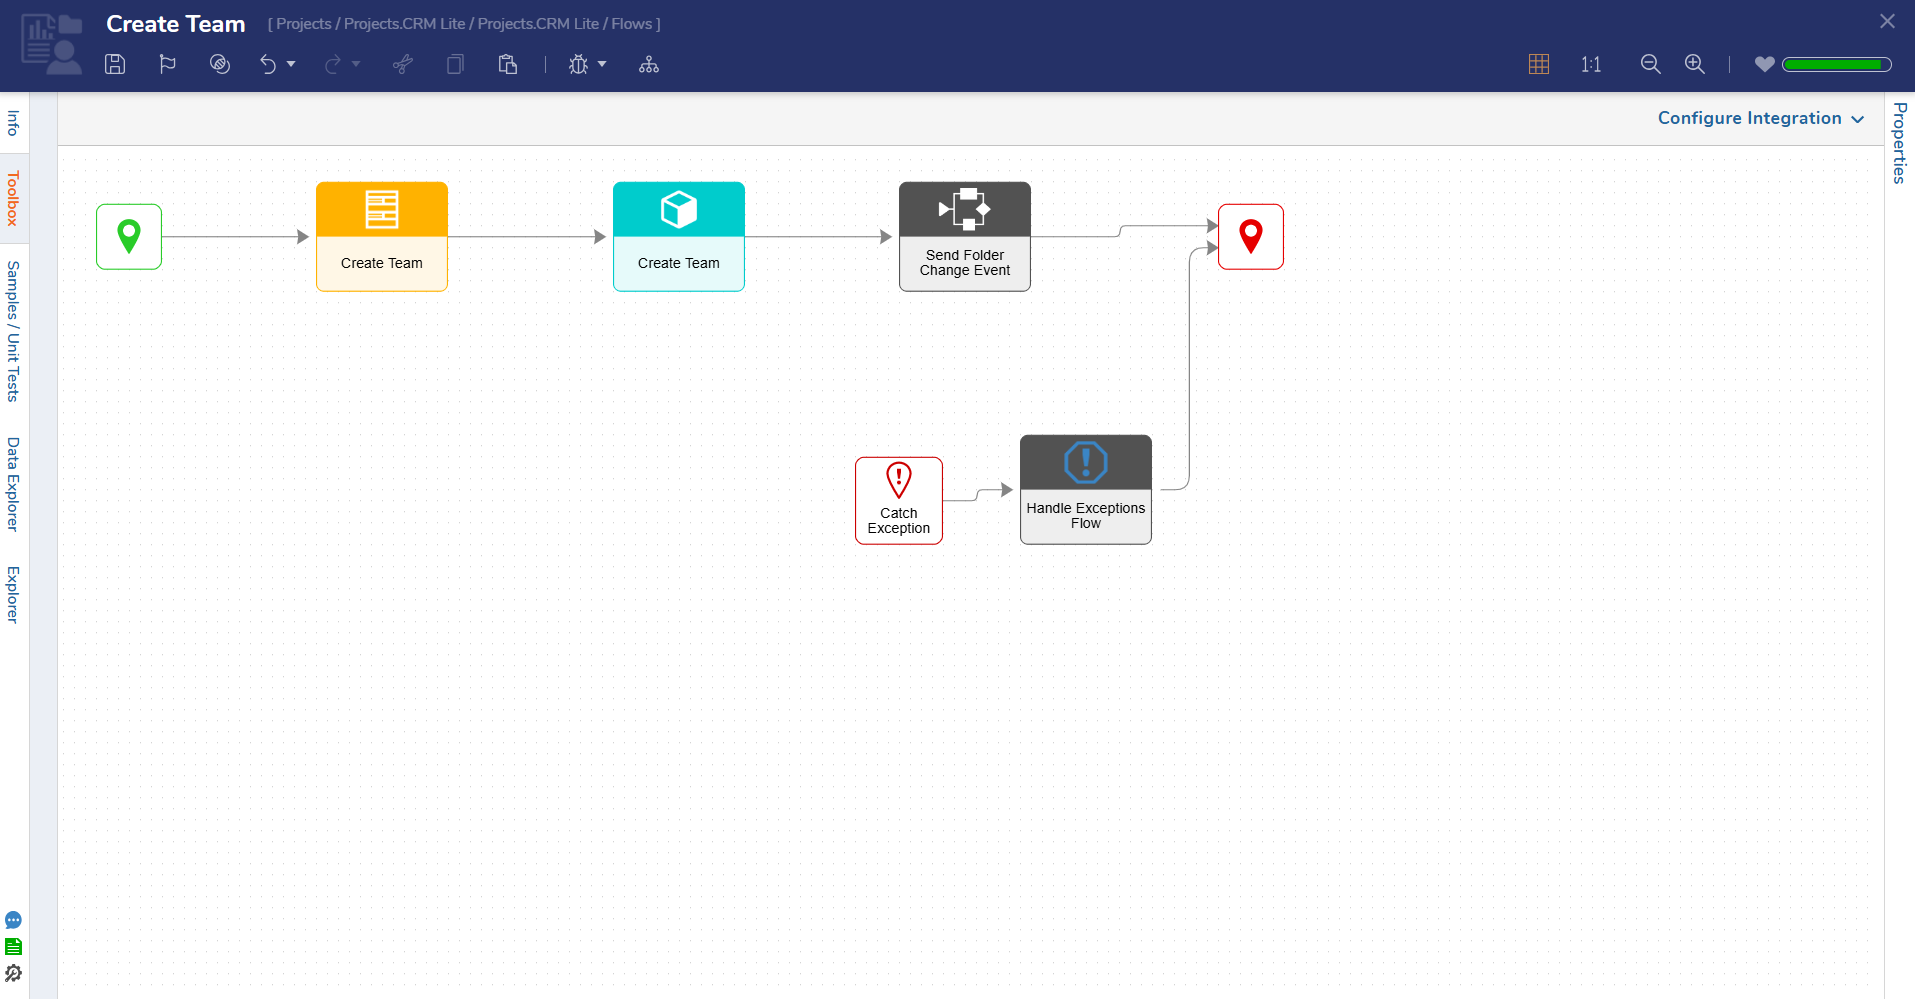 |
| Create Customer | This Flow runs as a User Action within a team. The action displays a Form that prompts Users to fill in details for the new customer. Once the details have been added and verified, the new customer is created. | 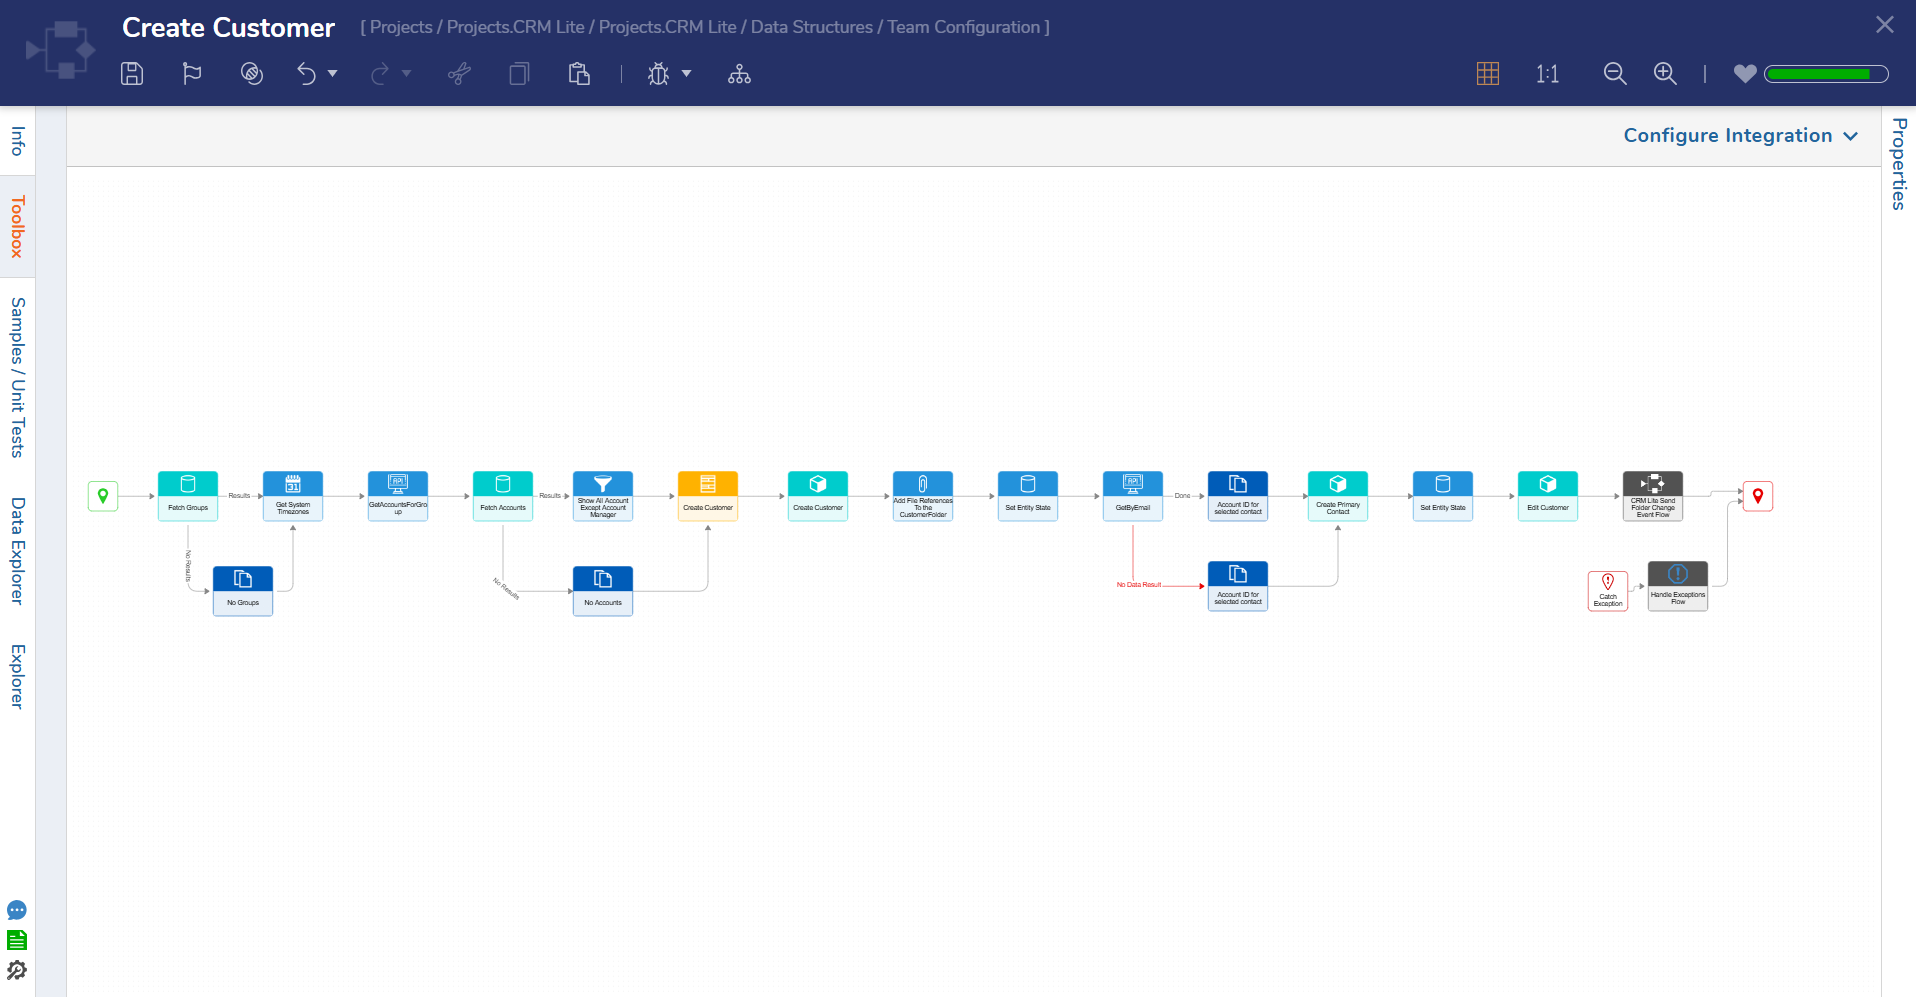 |
| Add Address | This Flow runs as a User Action on a customer. The action displays the Create Address Form, which enables Users to input address details and select whether the address is a main address, a billing address, or both. Once details have been added and verified, the address will be added for the selected customer. | 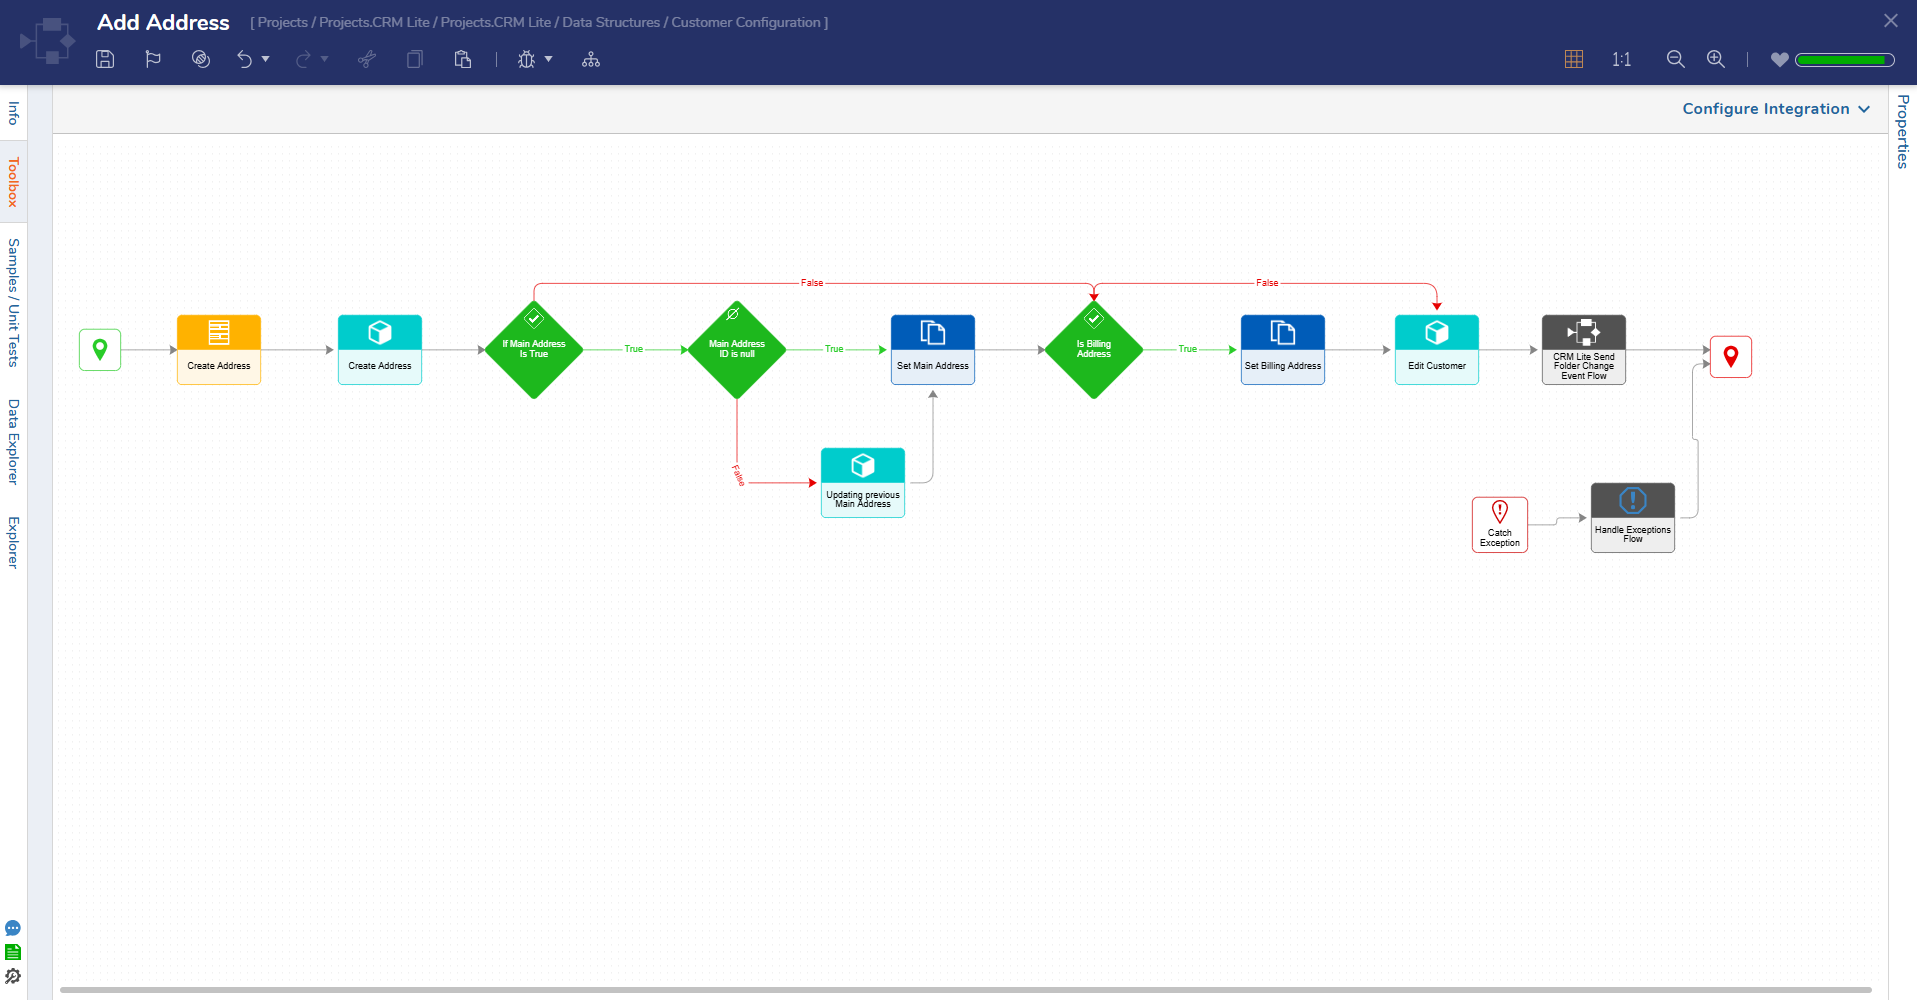 |
| Add Comments | This Flow runs as a User Action on a customer. This action displays a Form enabling Users to specify desired comments. Once the comment has been input, it will be added to the selected customer. | 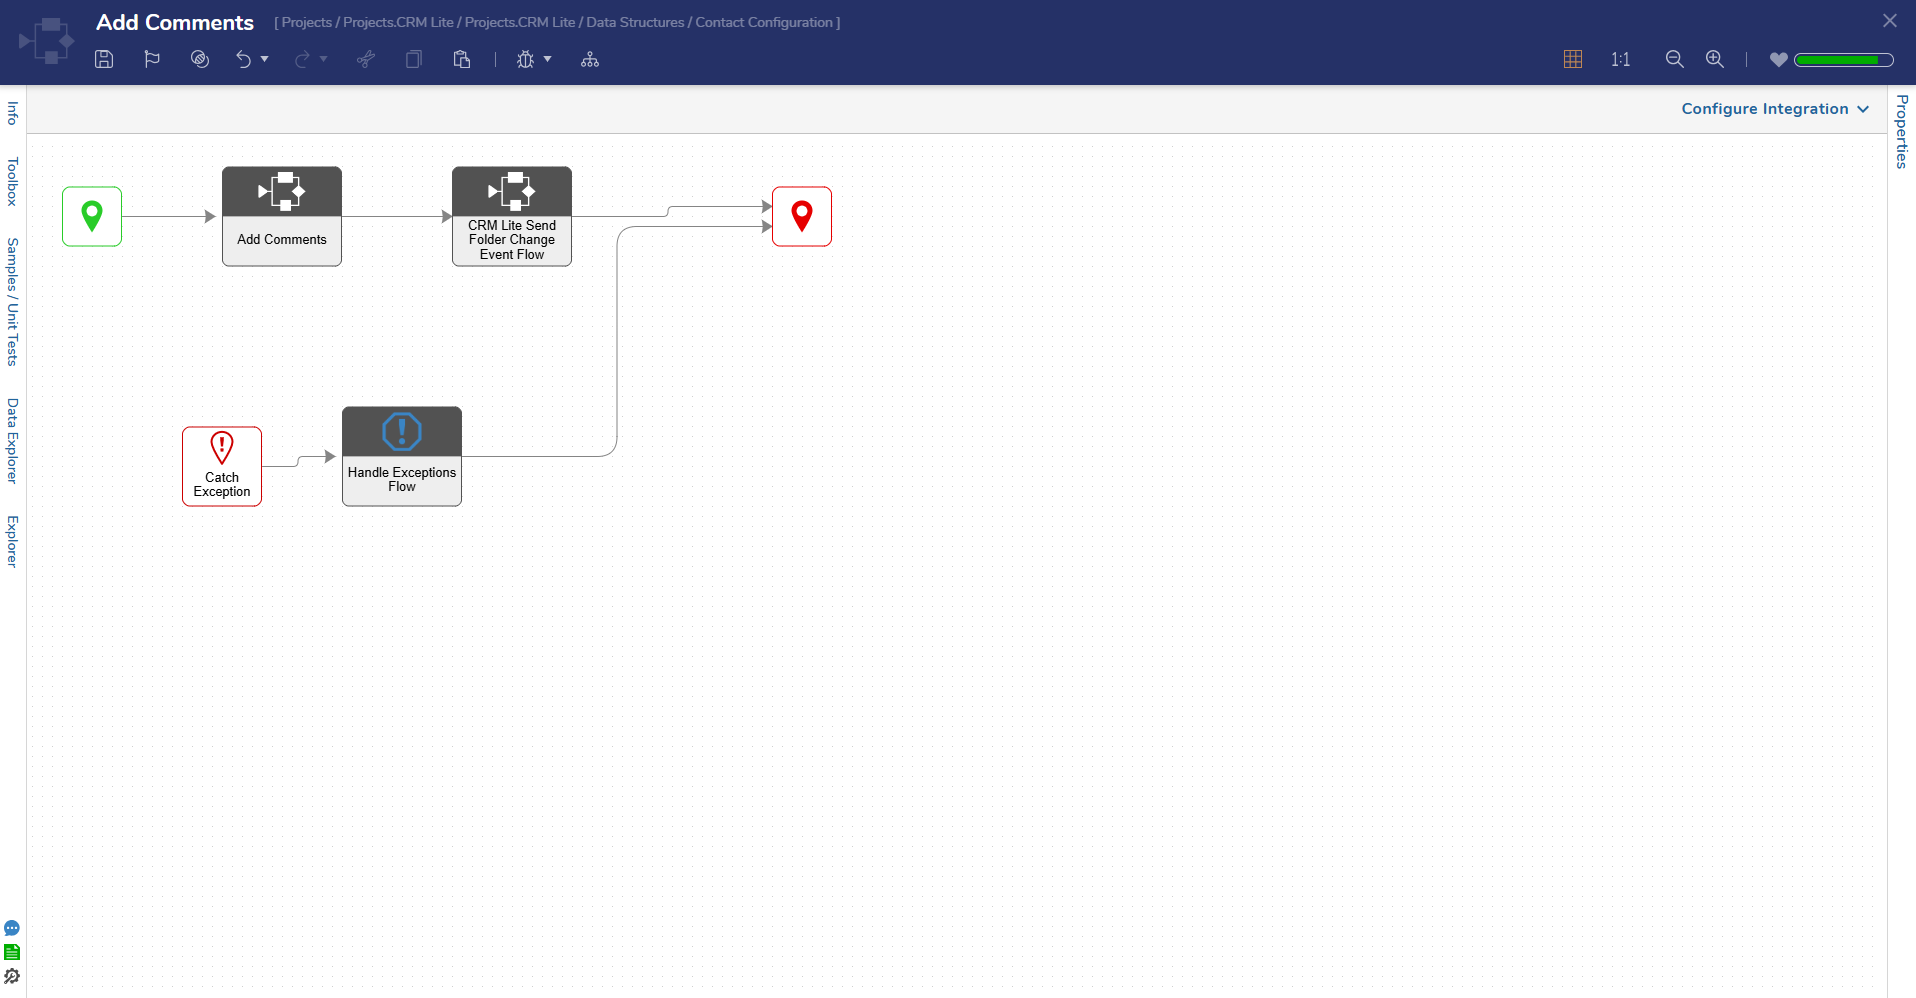 |
| Add File | This Flow runs as a User Action on a customer. This action displays a Form enabling Users to upload a file. Once a file is uploaded, it will be added to the selected customer. | 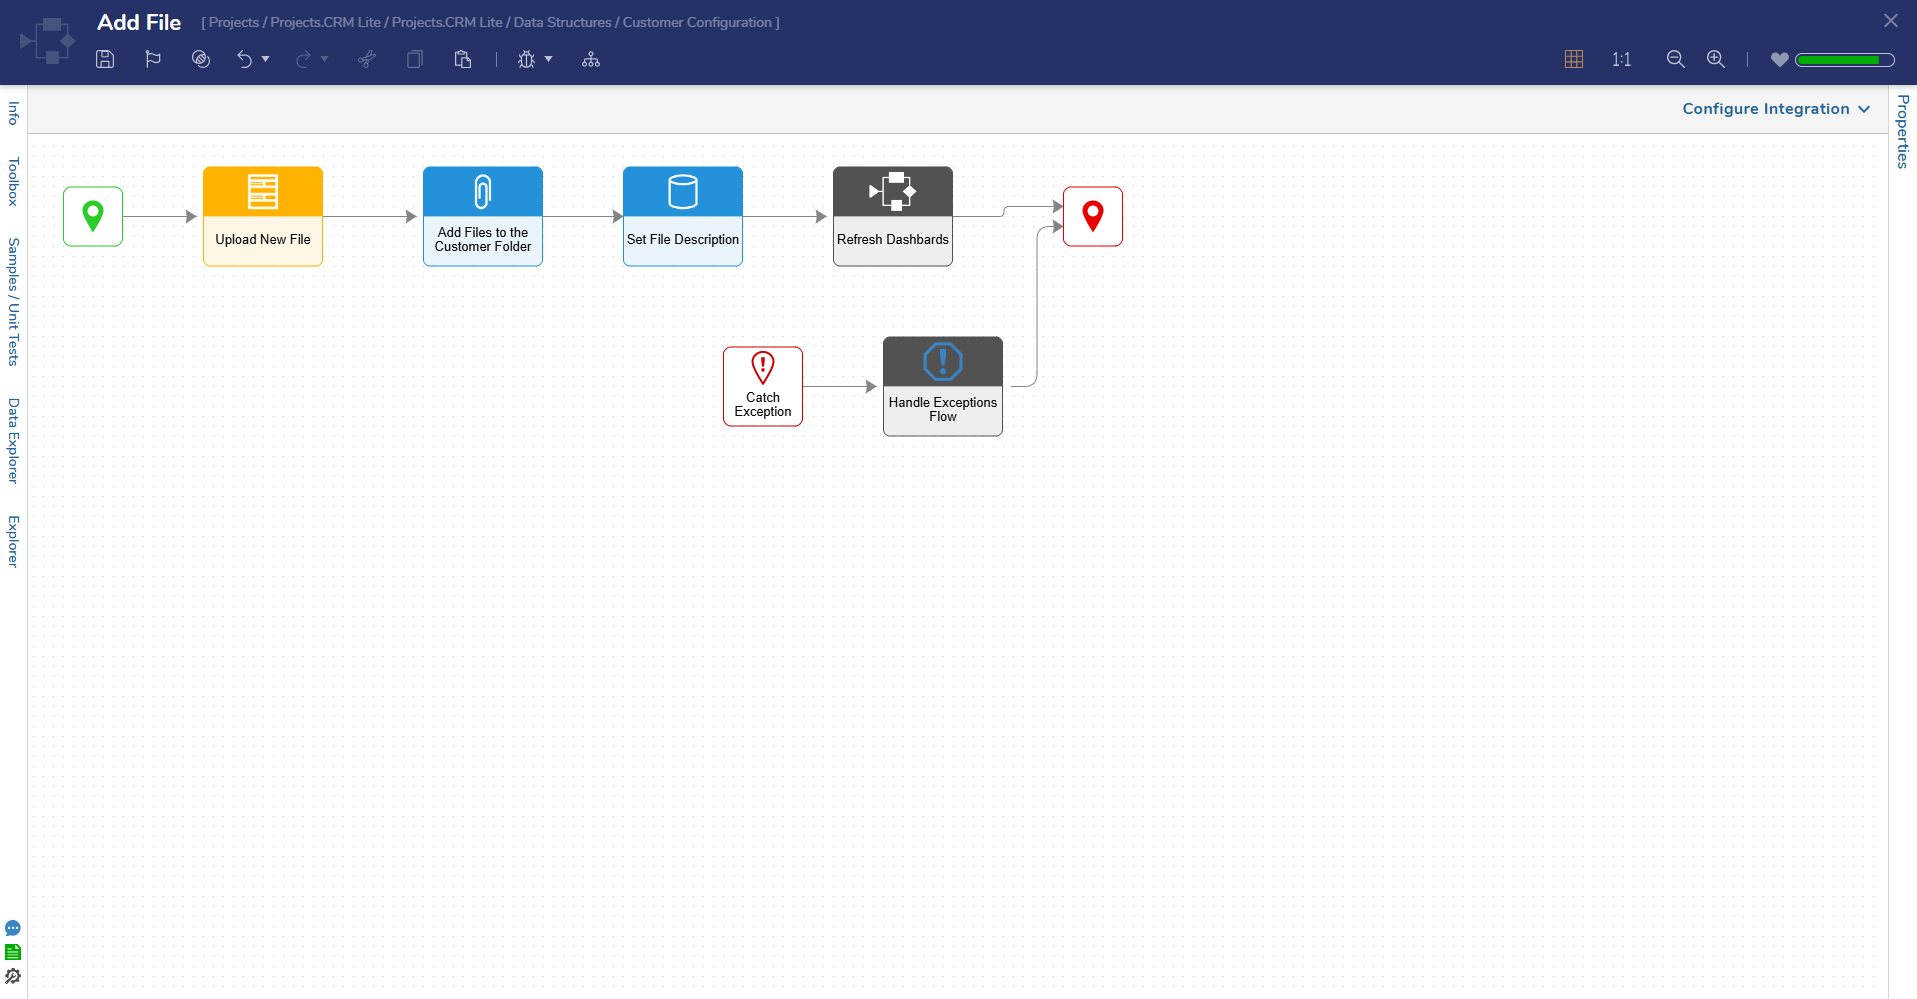 |
Dashboards & Pages
This Project contains two Dashboards:
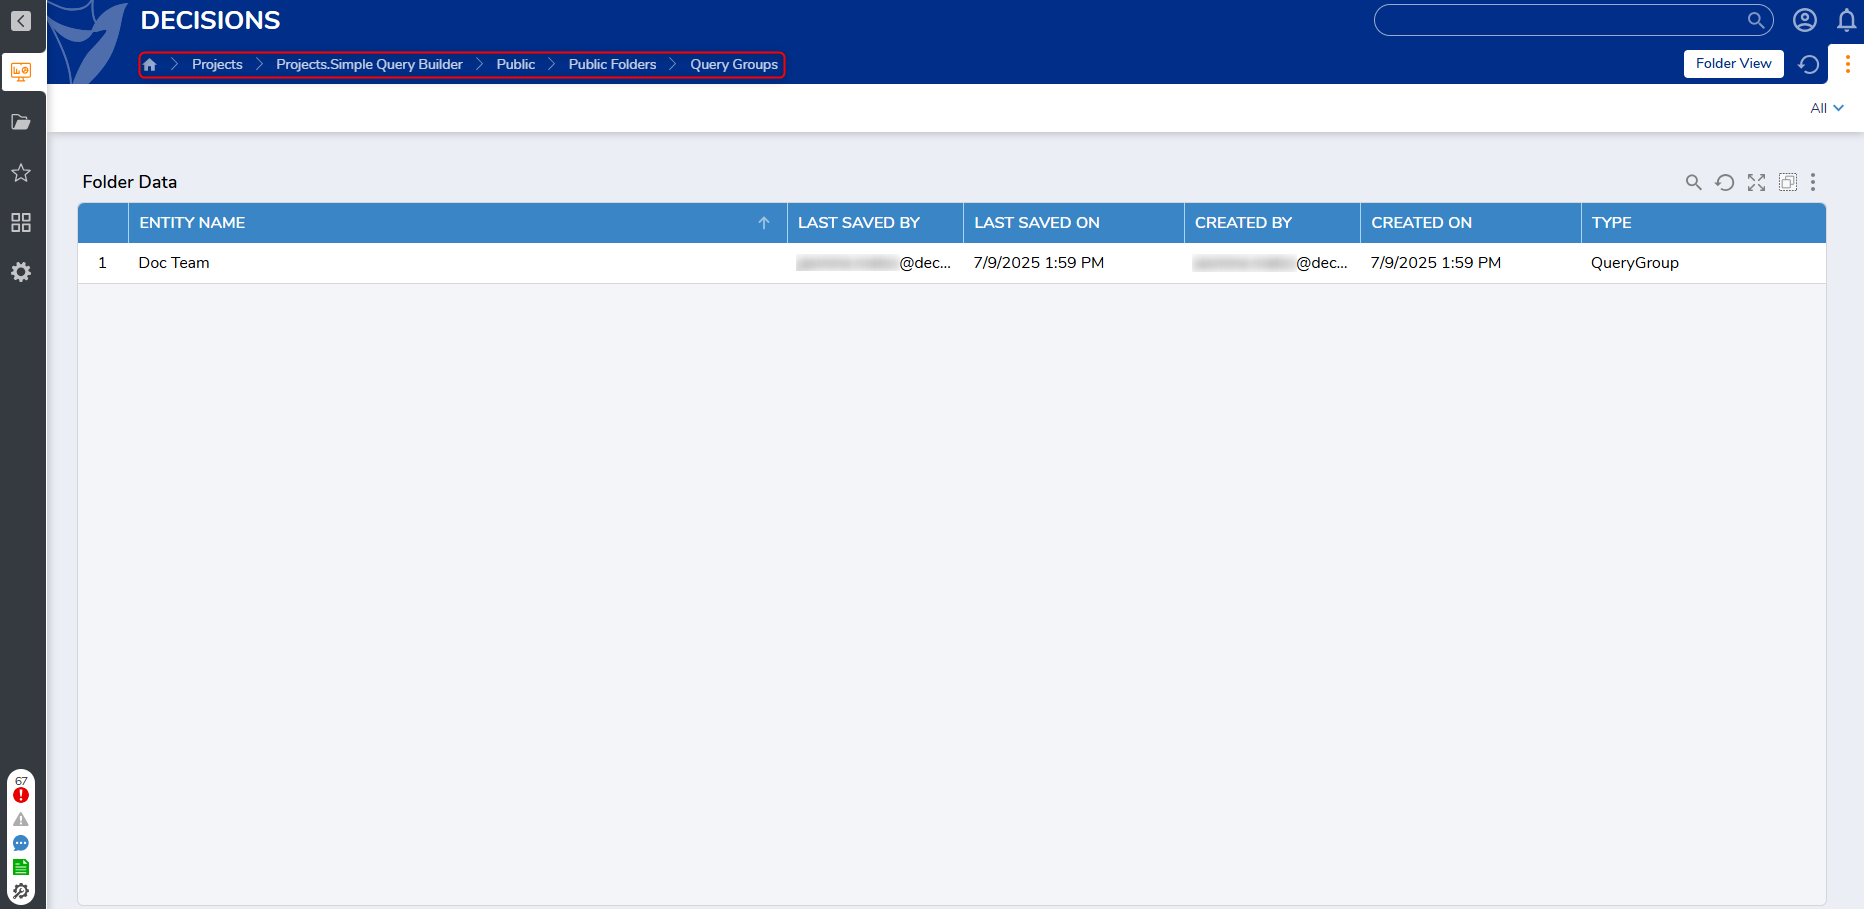
CRM Lite
This Dashboard displays a single page of Folder data for the Project, organized by:
- Entity Name
- Last Saved By
- Last Saved On
- Created By
- Created On
- Type
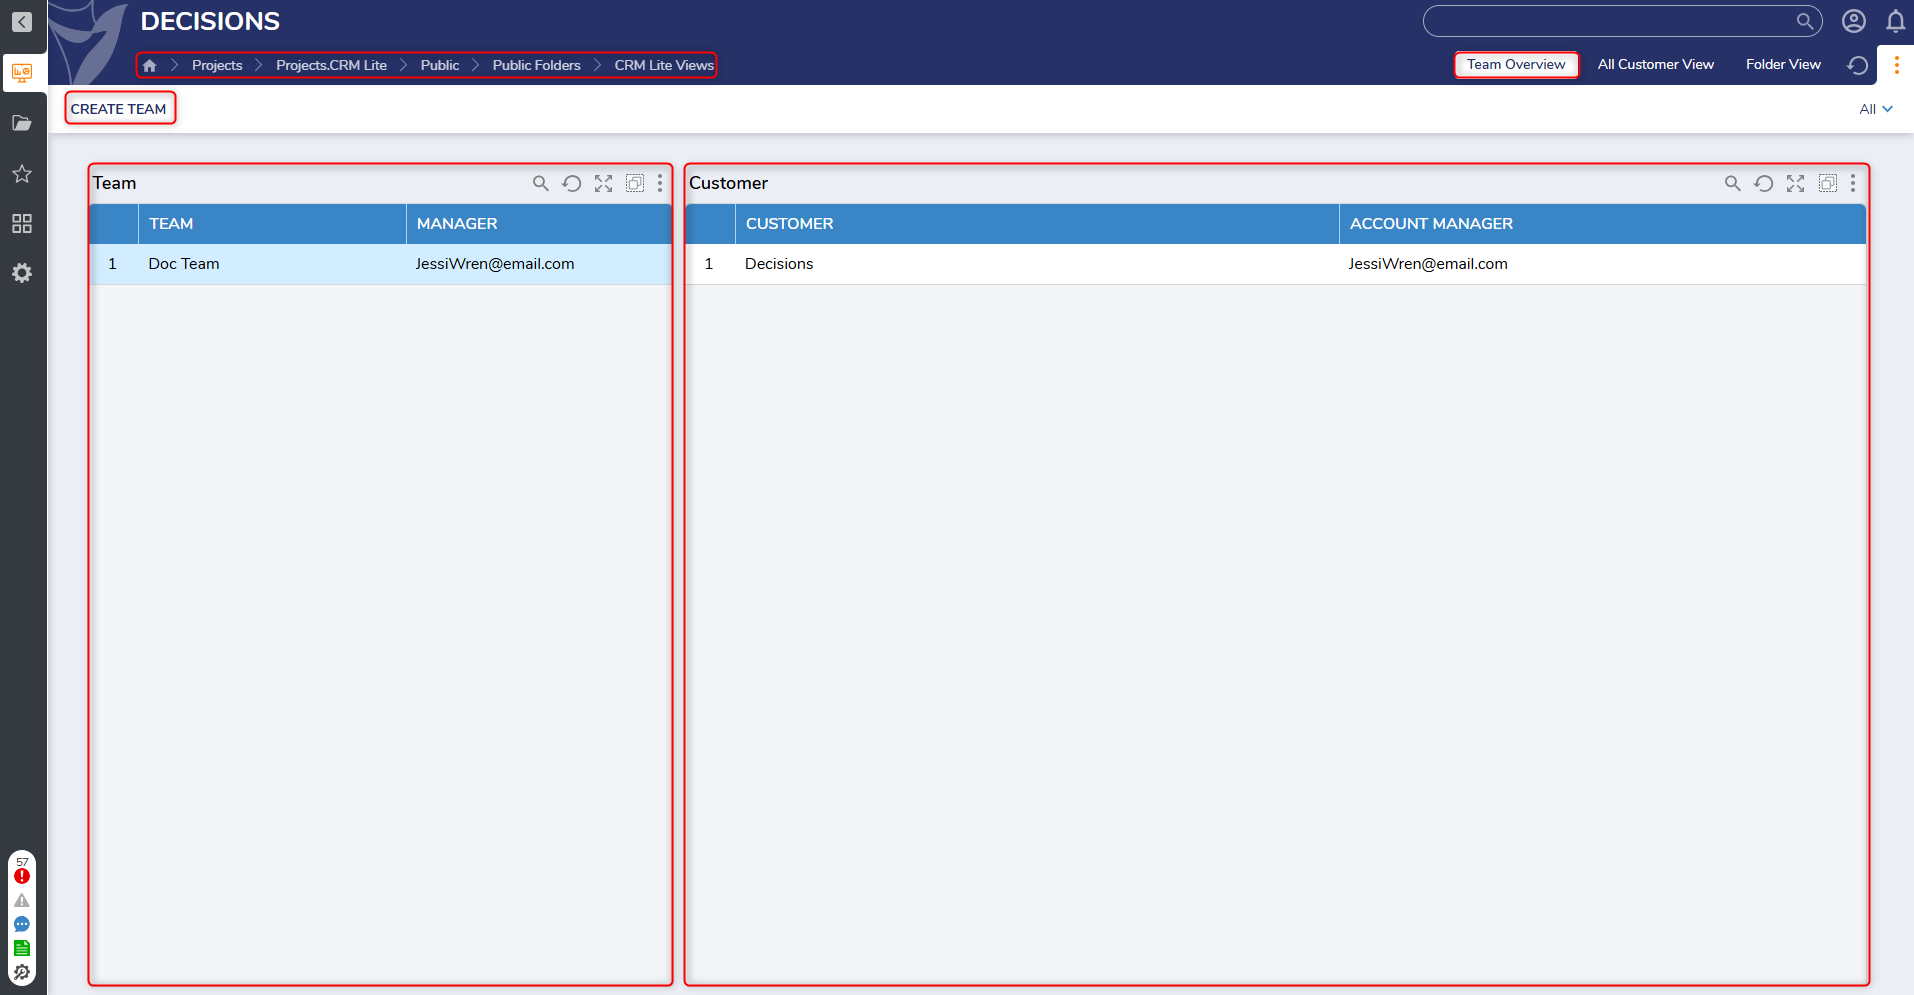
CRM Lite Views
- This Dashboard displayed two Reports:
- Team: This Report displays all created teams, organized by:
- Team
- Manager
- Customer: This Report displays all created customers, organized by:
- Customer
- Account Manager
- Users can click the folder action Create Team on the upper left-hand side of the Dashboard to create a new team.
- Team: This Report displays all created teams, organized by:
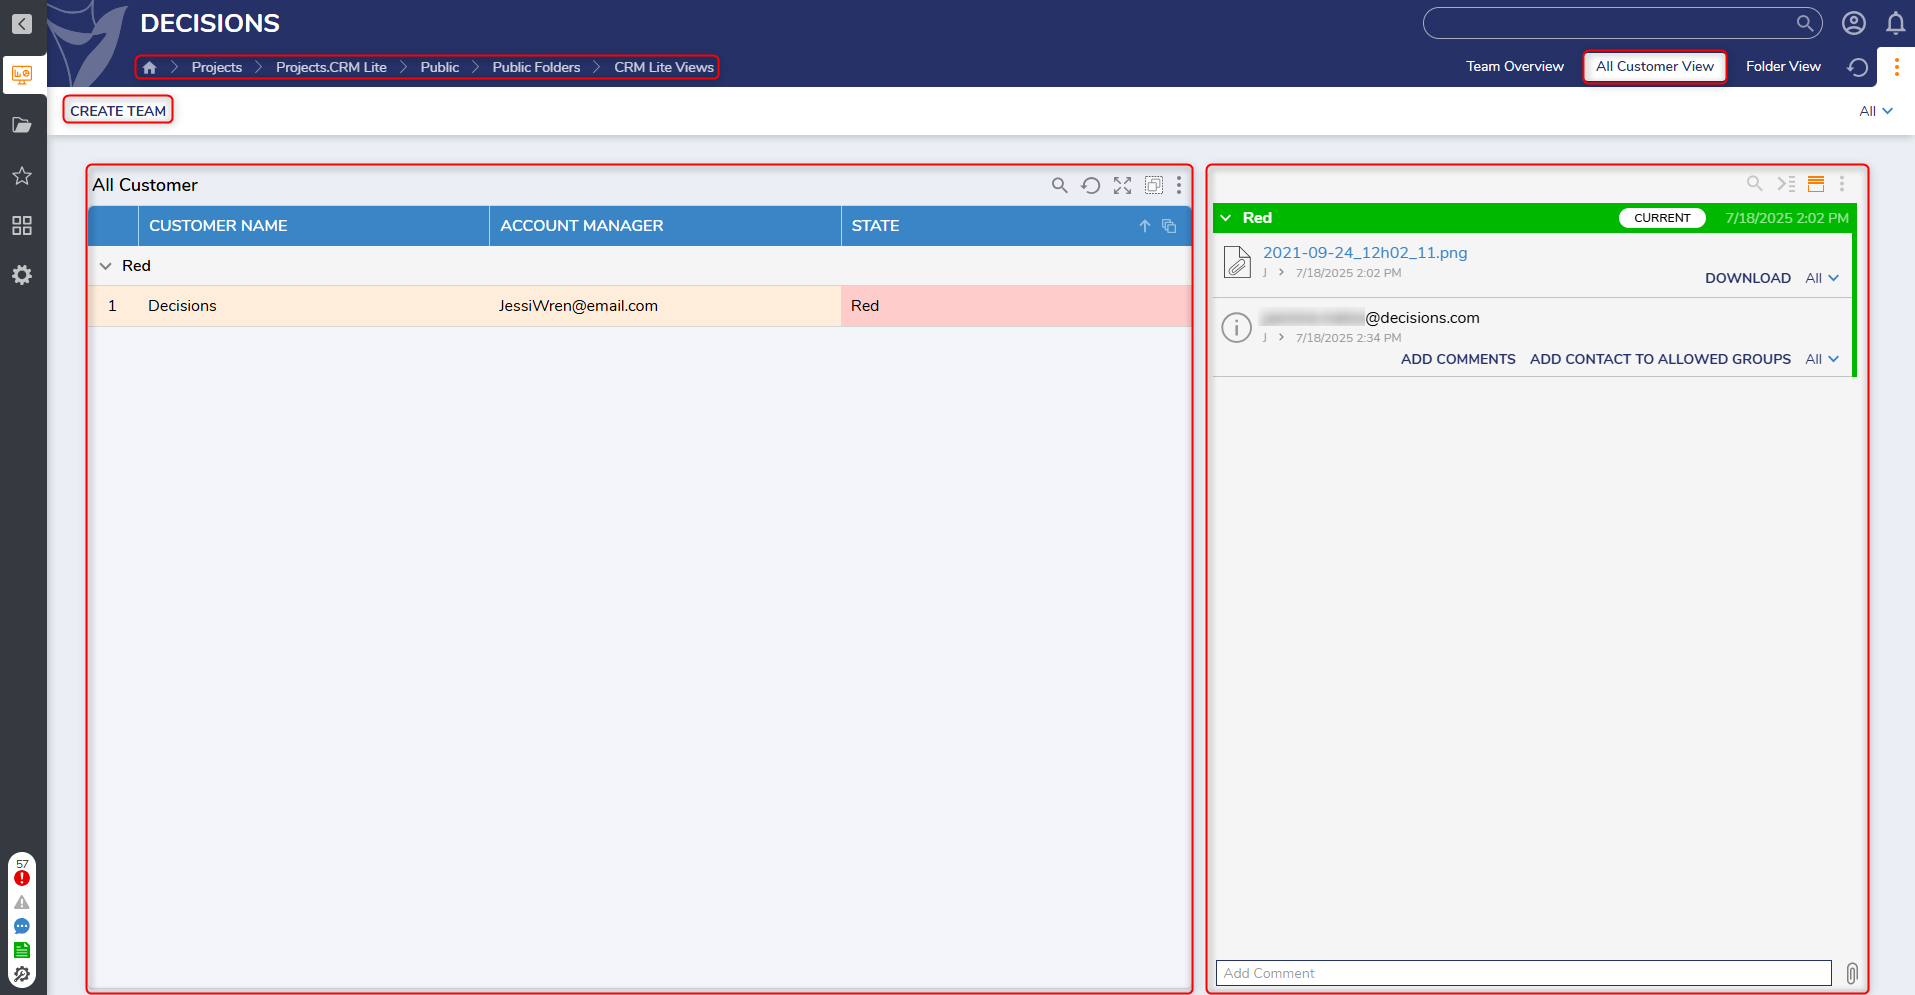
All Customer View
- This Page displays all created customers grouped by state (red, green, and yellow) and organized by:
- Customer Name
- Account Manager
- State
- The Dashboard will also display a Folder Activity Panel, which displays uploaded images organized by state, followed by which User who uploaded each file.
- Users can also create a new team using the Create Team Folder action at the top of the Dashboard.
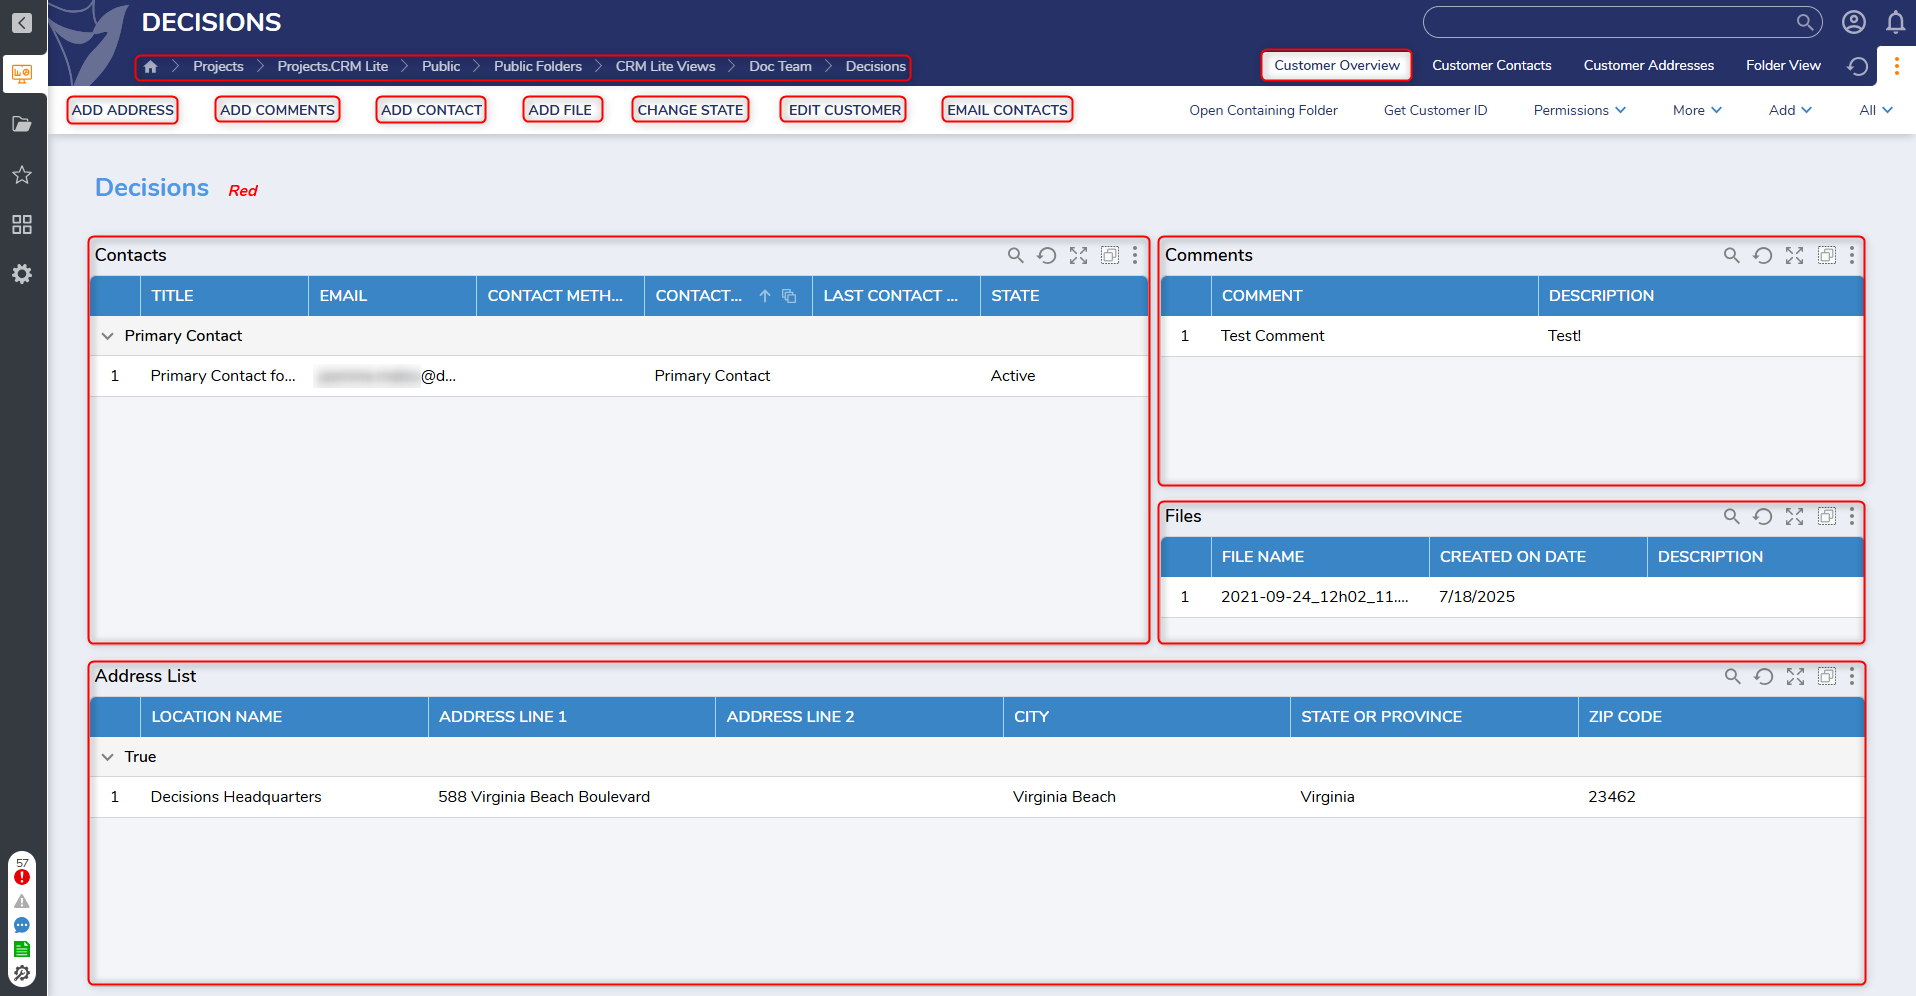
Customer Overview
All customers created in the Project have a dedicated Dashboard that displays specific information.
- The Customer Overview Page displays four Reports:
- Contacts: This Report displays a list of created contacts, organized by:
- Title
- Contact Method
- Last Contact Date
- State
- Comments: This Report displays all comments (with descriptions) that have been added for the selected customer.
- Files: This Report displays all files that were uploaded for the selected customer.
- Address List: This Report displays a list of addresses associated with the selected customer, organized by:
- Location Name
- Address Line 1
- Address Line 2
- City
- State or Province
- Zip Code
- Contacts: This Report displays a list of created contacts, organized by:
- This Dashboard also displays buttons for the following Folder actions:
- Add Address
- Add Comments
- Add Contact
- Add File
- Change State
- Edit Customer
- Email Contacts
- Additional Project-specific actions are available on the top right-hand side of the Dashboard.
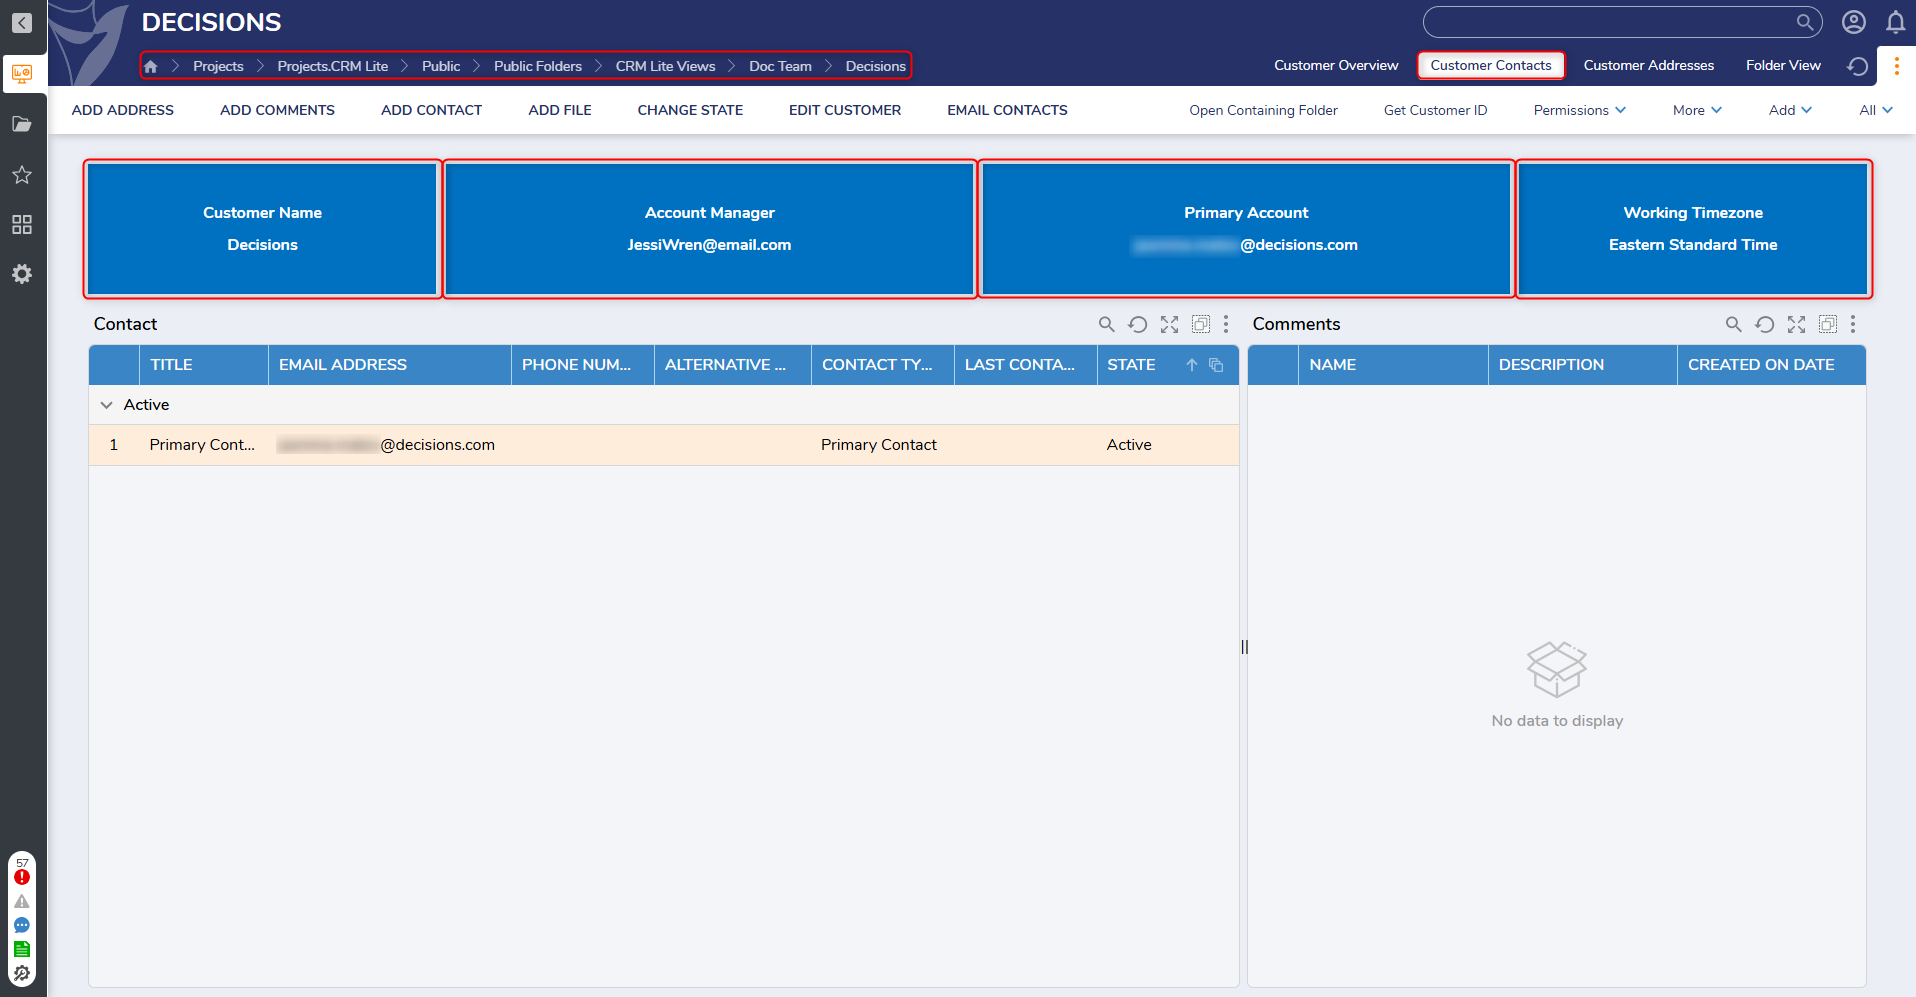
Customer Contacts
- The Customer Contacts Page displays a Customer Contacts Report grouped by state and organized by:
- Title
- Email Address
- Alternative Timezone
- Contact Type
- Last Contact Date
- State
- The Page also displays a set of tiles with the following information:
- Customer Name
- Account Manager (Email Address)
- Primary Account (Email Address)
- Working Timezone
Customer Addresses
- The Customer Addresses Page displays the same Address Report and Folder actions as the Customer Overview and Customer Contacts Pages.
- This Page displays tiles with the following information:
- Customer Name
- Account Manager (Email Address)
- Primary Account (Email Address)
- This Page displays tiles with the following information:
.png)
Utilizing CRM Lite
Creating a Team
- To create a team, navigate to the CRM Lite Views Dashboard and select the Create Team action on the left-hand side of the Dashboard.
- This action is only available to Users in the Account Manager Group.
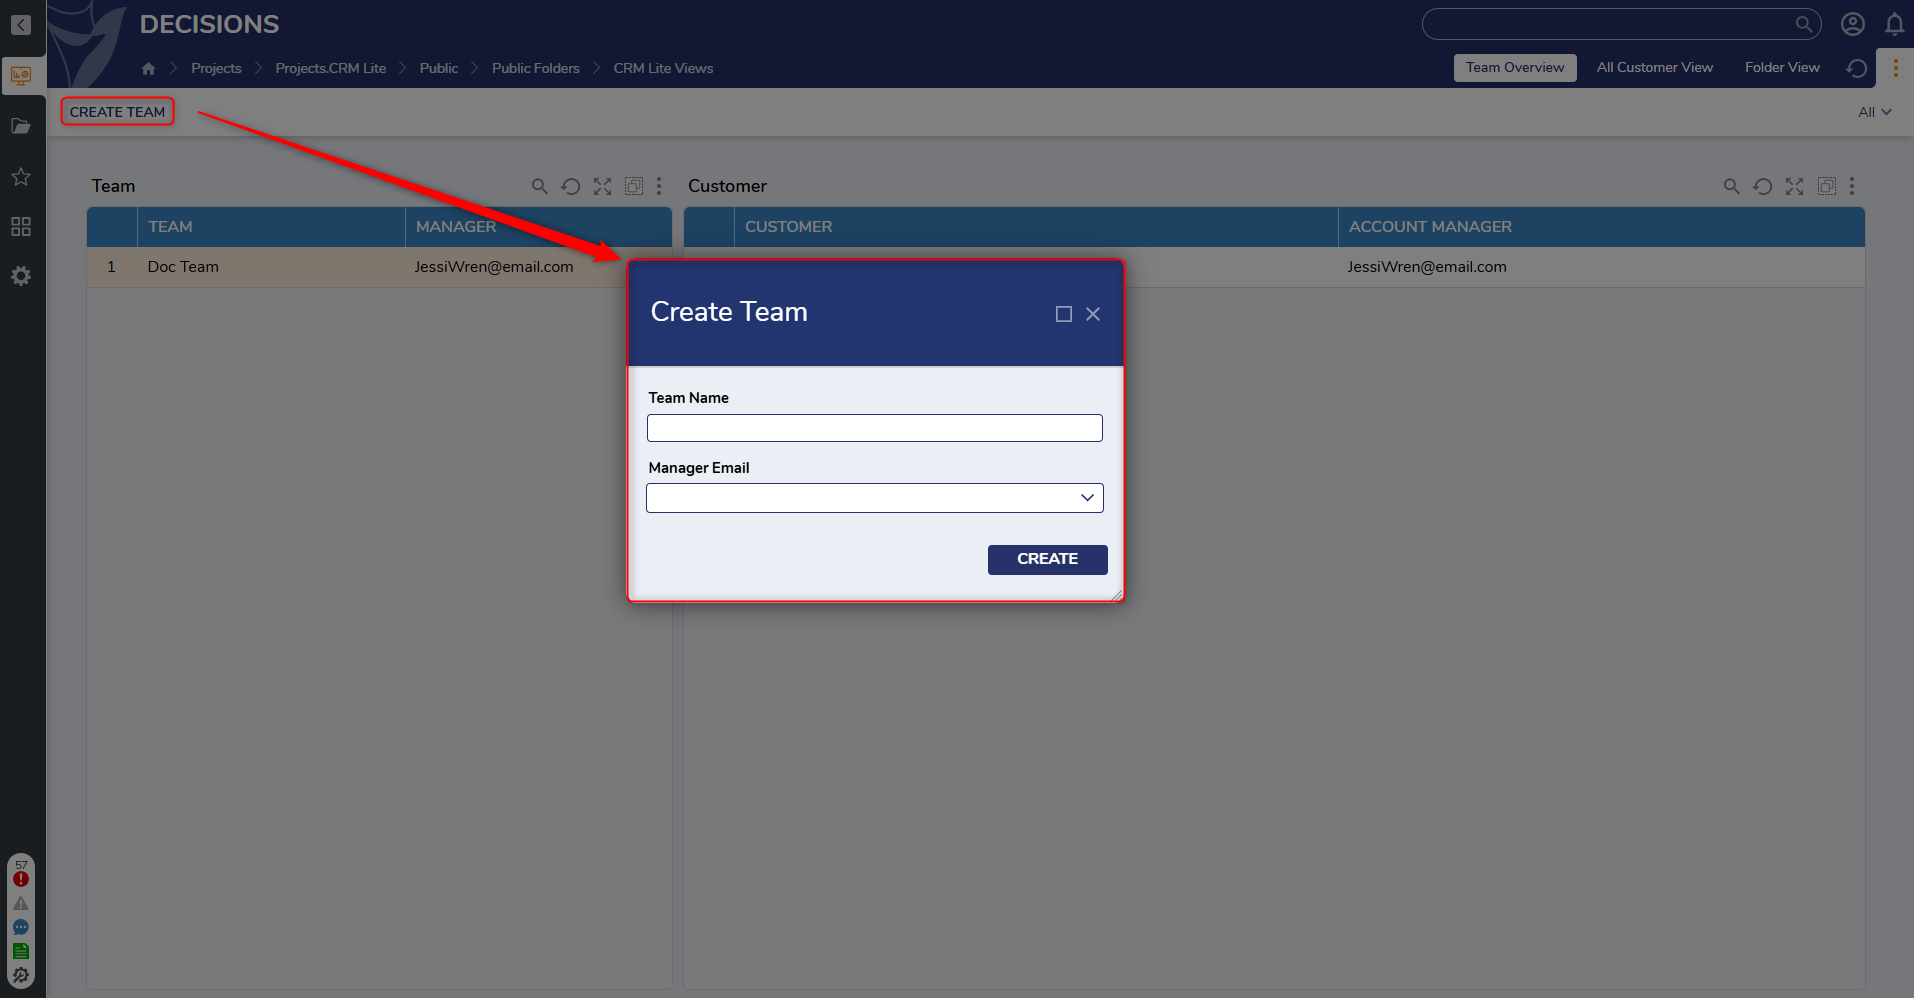
- This action is only available to Users in the Account Manager Group.
- This action will display the Create Team Form. Users can fill out the field to provide a Team Name and select the associated Manager Email.
Once all the fields have been completed, click Create to save the changes and create the new team.
Editing a Team
- To edit a team, right-click on a desired team and select Edit Team.
- The Edit Team action is only visible to Users in the Account Manager Group.
- This action will display the Edit Team Form. This Form will display all previously entered details for the selected team.
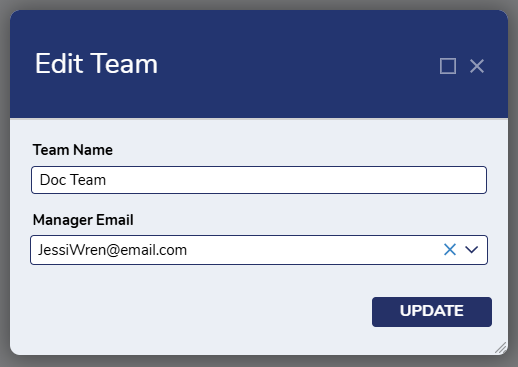
- After making any necessary changes, click Update to push the new changes to the team.
Create Customer
- To create a new customer, right-click on the desired team the customer will be added to and select Create Customer.
- This action will display the Create Customer Form, where Users can input details for the new customer.
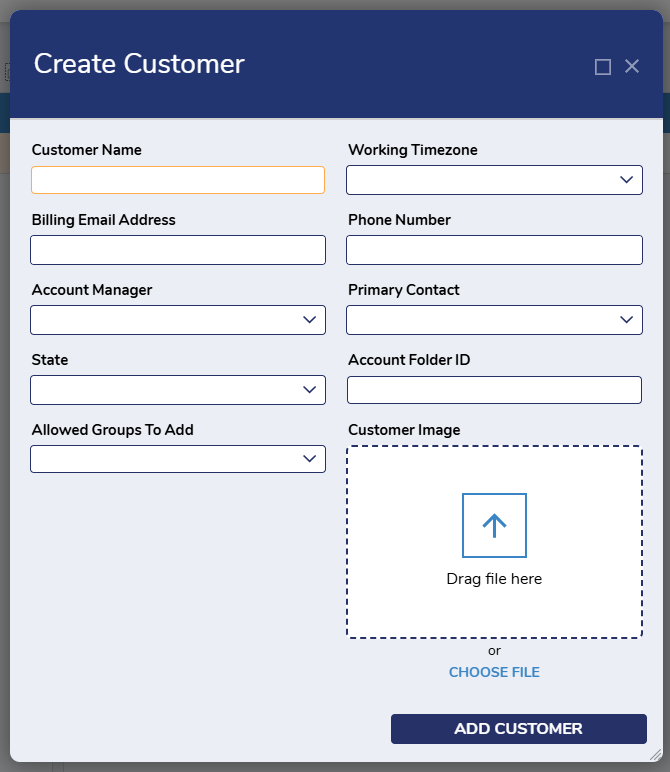
- After the necessary changes have been made, click Update to proceed with the desired changes.
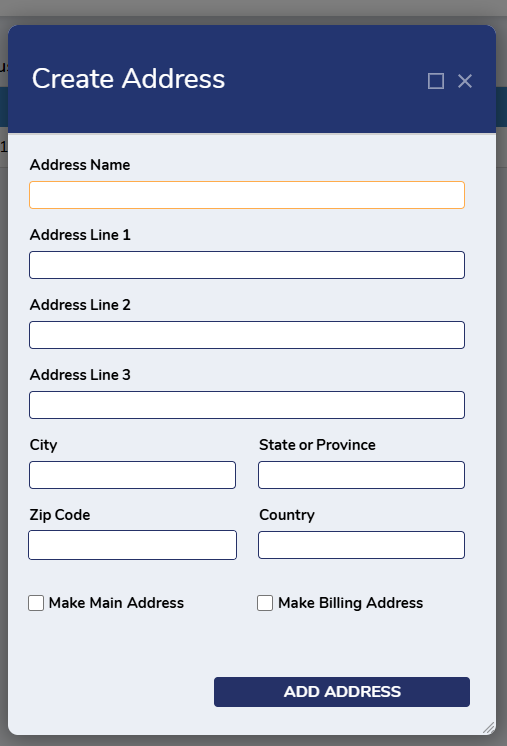
Add Address
- To add an address for a customer, right-click on the desired customer and select Add Address.
- This action will display the Create Address Form, allowing Users to input address details for the selected customer.
- This action will display the Create Address Form, allowing Users to input address details for the selected customer.
- Once all the details have been inputted, click Add Address to establish the new address for the selected customer. .
Edit Address
- To edit a customer's address, click on the desired customer to navigate to their designated Dashboard.
- From here, right-click on the address that needs to be updated and select Edit Address.
- This action will display the Edit Address Form with previously inputted details about the address.
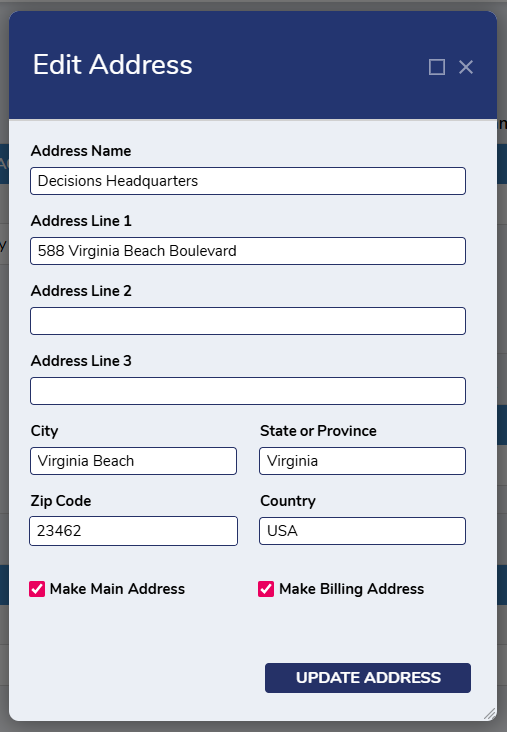
- After making the necessary changes, click Update Address.
- This action can also be done from the Customer Address Page.
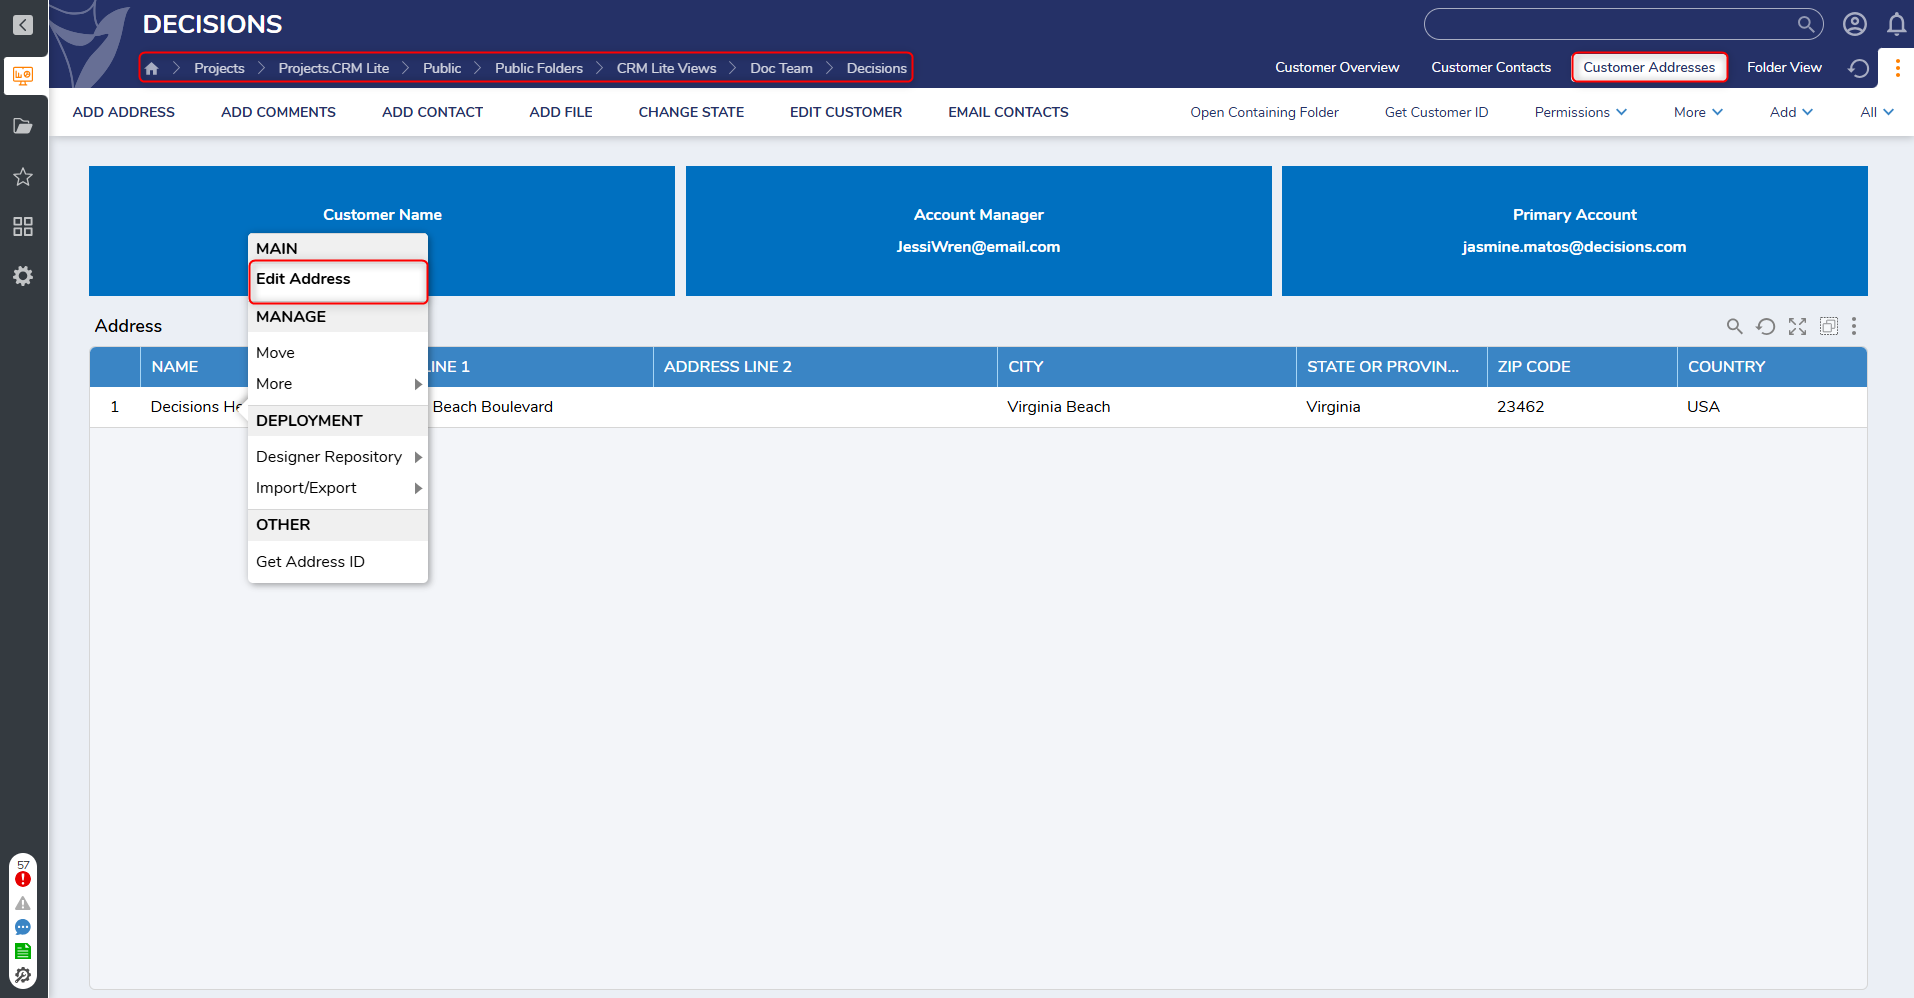
- This action can also be done from the Customer Address Page.
Make Main Address/Make Billing Address
- Users can designate an address as a Main or Billingaddress by clicking the respective checkbox when creating a new address or when updating a created address.
- To mark an address, click on the desired customer and navigate to the Customer Overview Page. From here, right-click on the desired address and select Make Main Address or Make Billing Address.
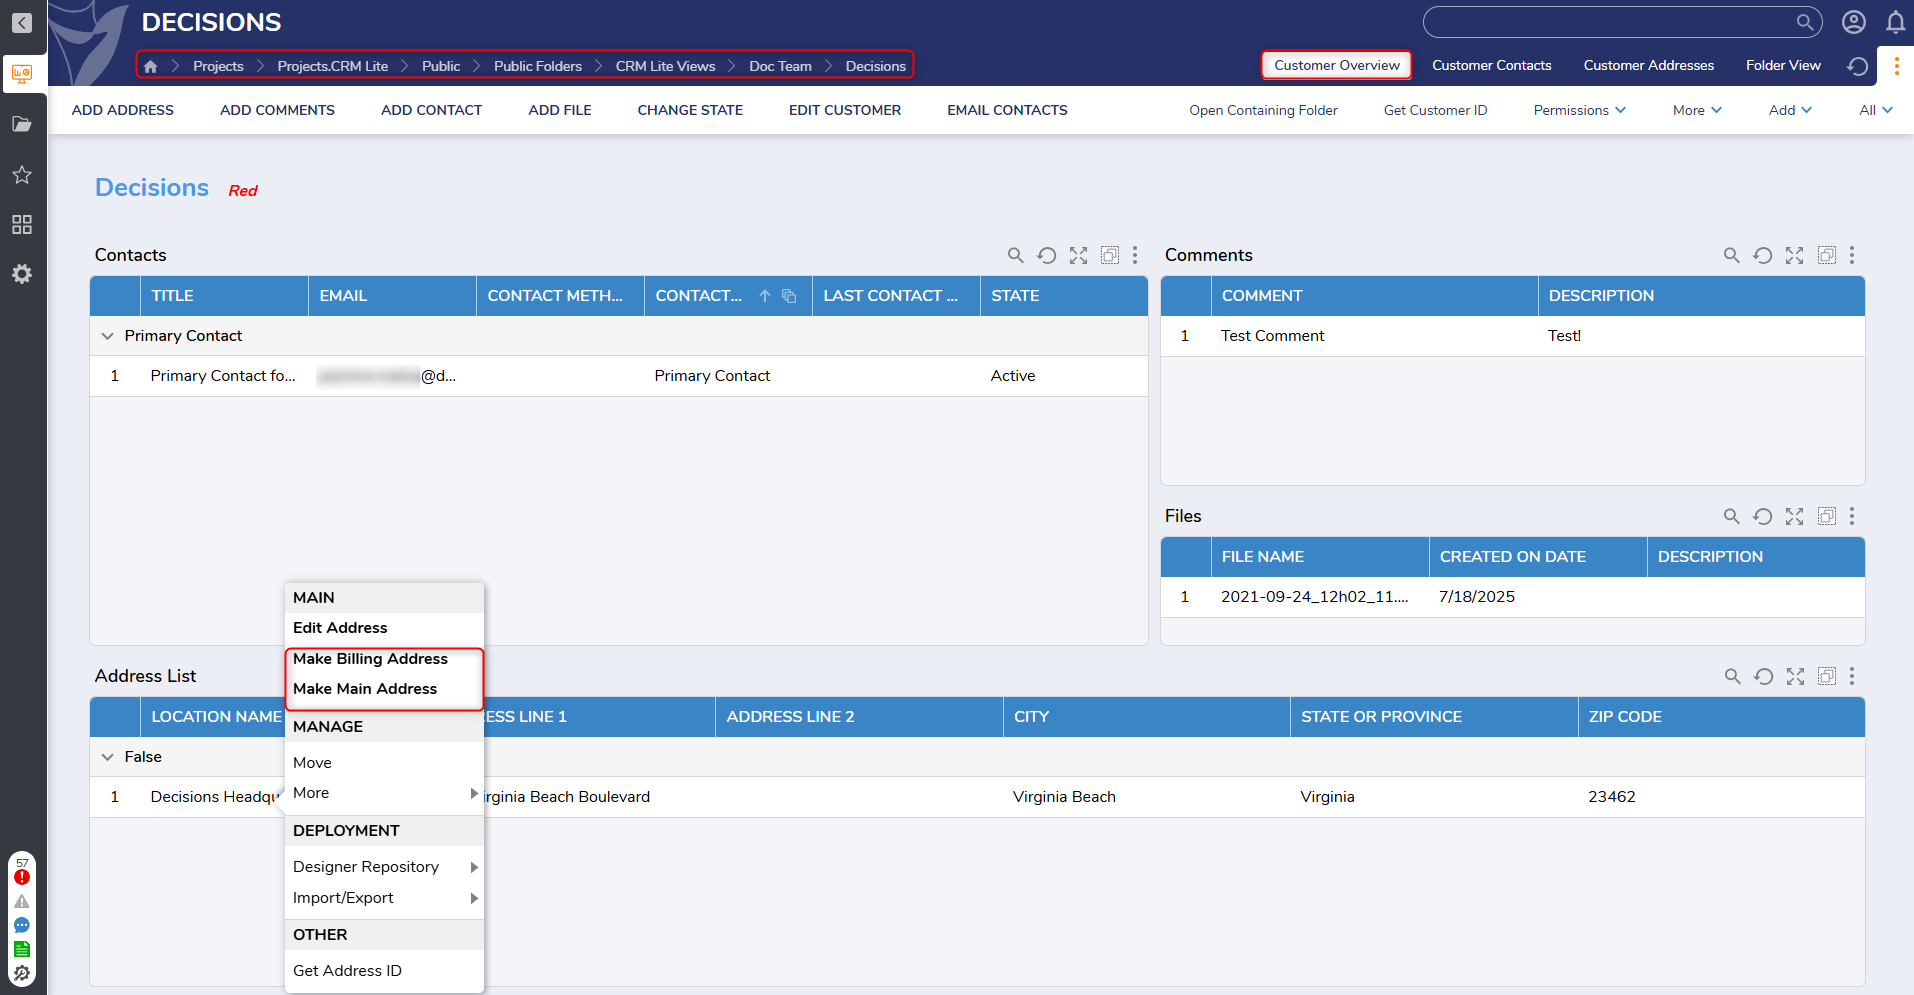
- These actions will only appear if the address has not been marked as Billing Address or Main Address previously.
- To mark an address, click on the desired customer and navigate to the Customer Overview Page. From here, right-click on the desired address and select Make Main Address or Make Billing Address.
- Selecting either of these buttons will present a confirmation Form. Users can proceed with marking the address with either option by clicking Confirm, or else hit Cancel.
- This action can also be done on the Customer Addresses Page.
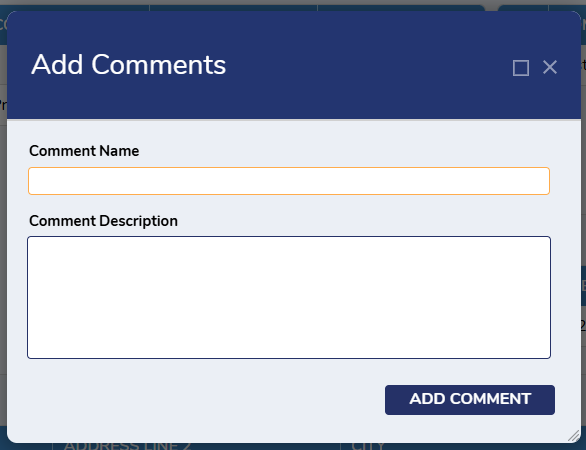
Add Comments
- To add a comment for a customer, right-click on the desired customer and select Add Comments.
- This action will display the Add Comments Form. Users can choose a name and description for the comment.
- Once all the necessary changes have been made, select Add Comment to register the comment to the selected customer.
Add/Edit/Manage Contacts
Add Contacts
- To add a contact to a customer, right-click on the desired customer and select Add Contact.
- This action will display the Add Contact Form, where Users can input details about the new contact.
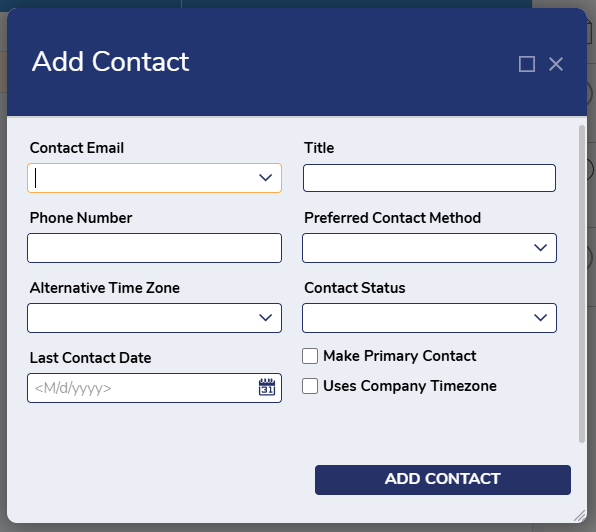
- Once all details have been inputted, click on Add Contact. The comment will then be added to the selected customer.
- This action will display the Add Contact Form, where Users can input details about the new contact.
Edit Contact
- To edit an existing contact, navigate to the Customer Overview Page, right-click on the contact that needs to be updated and select Edit Contact.
- This action will display the Edit Contact Form. This Form will display previously inputted details for the selected contacts.
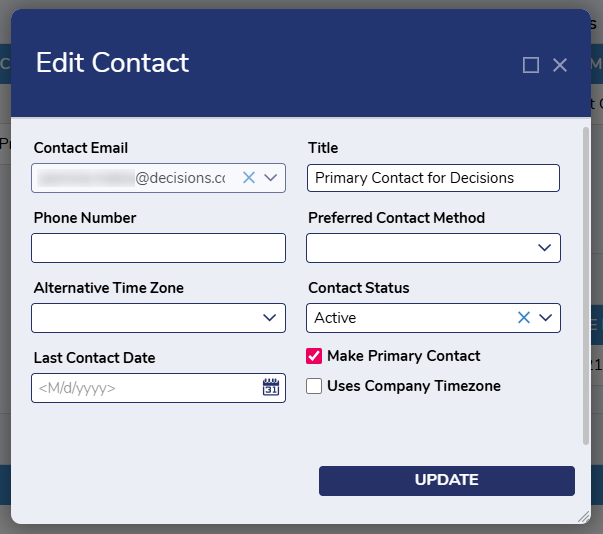
- After the necessary changes have been made, click Update. This will update the selected contact.
- This action will display the Edit Contact Form. This Form will display previously inputted details for the selected contacts.
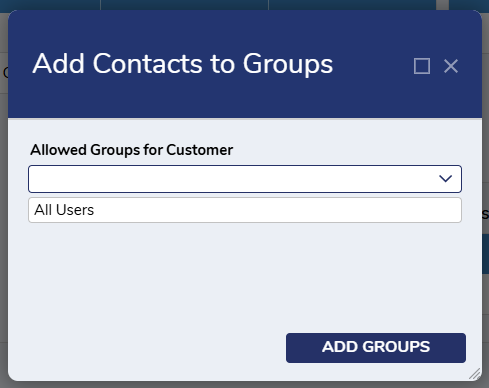
Add Contact to Allowed Groups
- To add a contact to various Groups, click on the associated customer and navigate to the Customer Overview Page. From here, right-click on the desired contact and select Add Contact to Allowed Groups.
- This action will display the Add Contact to Allowed Groups Form. Users can select the desired Groups for the contact.
- Once all the desired Groups have been selected, click Add Groups. The contact will be added into the selected Groups.
- Once all the desired Groups have been selected, click Add Groups. The contact will be added into the selected Groups.
Make Primary Contact
- To designate a contact as the Primary Contact for a customer, click on the desired customer and navigate to the Customer Overview Page.
- From here, right-click on the contact that needs to be updated and select Make Primary Contact.
- This action is only visible if the selected contact has not been selected as a Primary Contact.
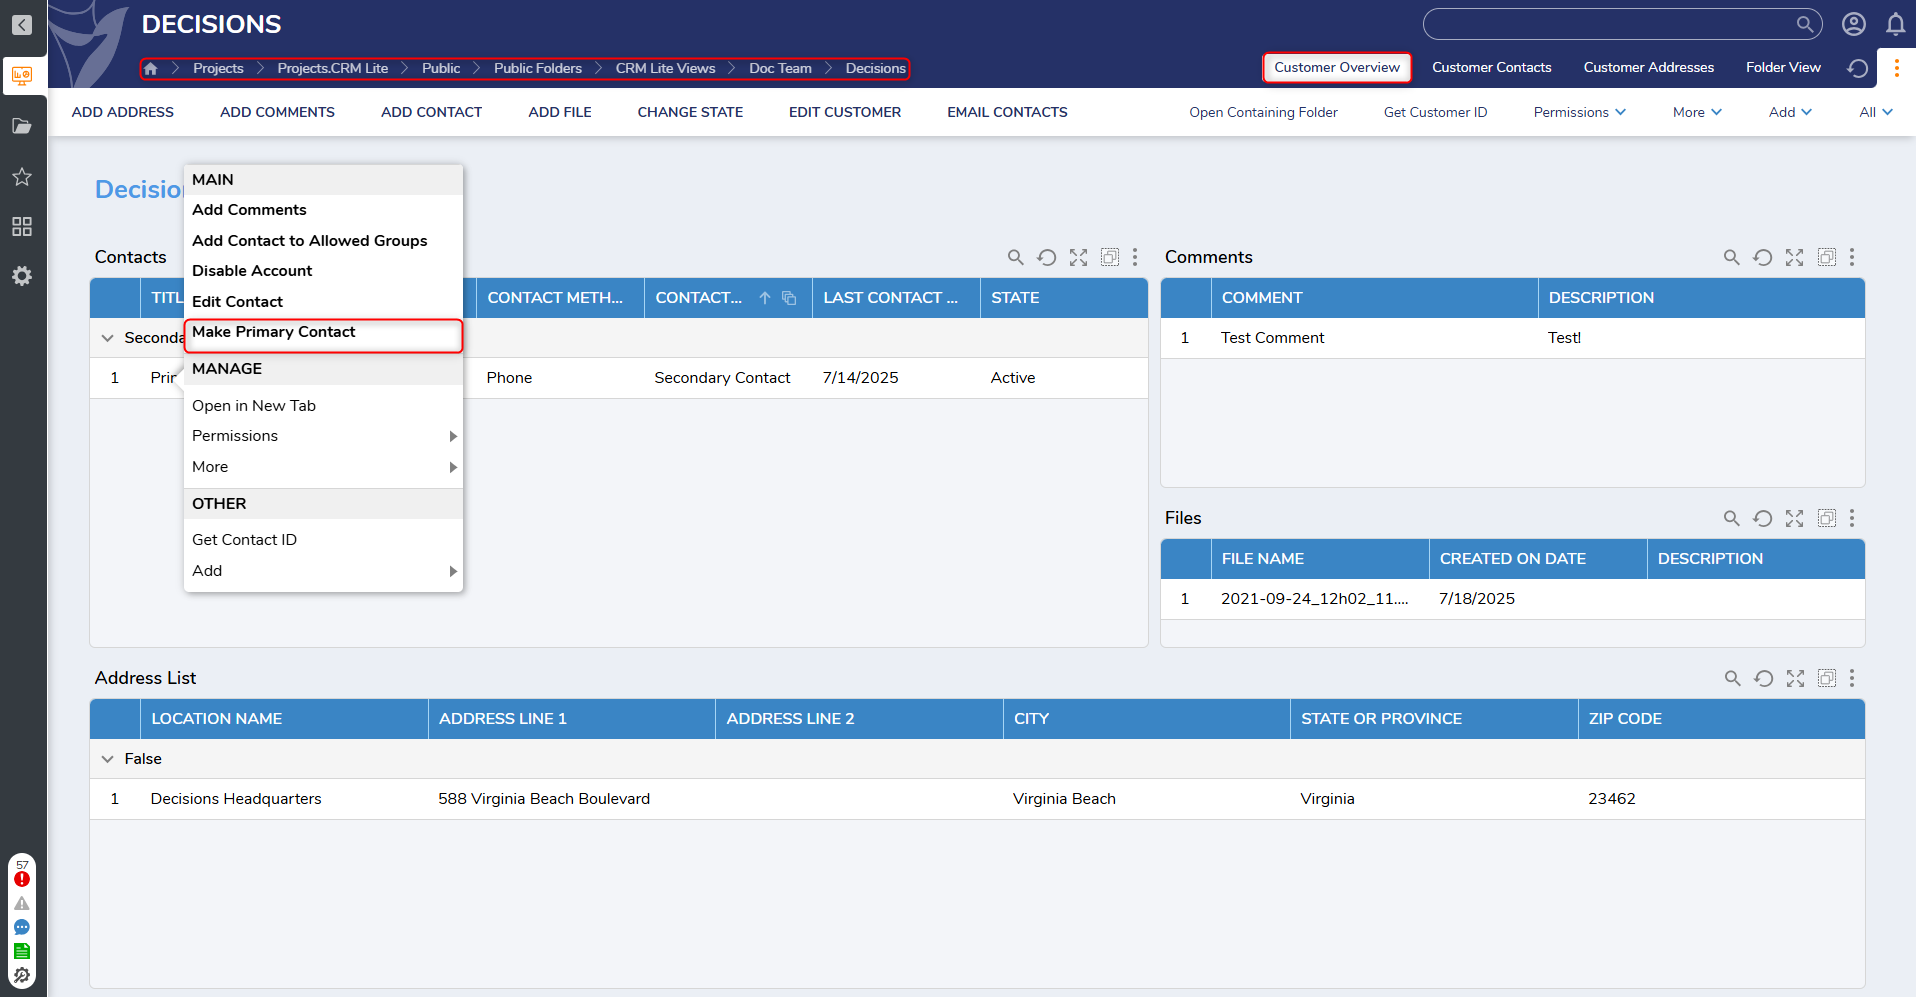
- This action is only visible if the selected contact has not been selected as a Primary Contact.
- A confirmation Form will be displayed confirming if the selected contact should be listed as the Primary Contact.
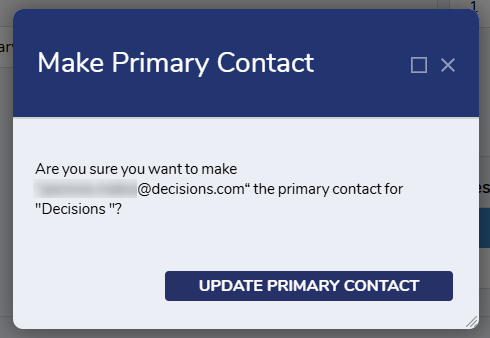
- Click Update Primary Contact to proceed with updating the selected contact.
- From here, right-click on the contact that needs to be updated and select Make Primary Contact.
Add File
- To add a file to a customer, right-click on the desired customer and select Add File.
- This action will populate the File Upload Form, allowing Users to upload a file for the selected customer.
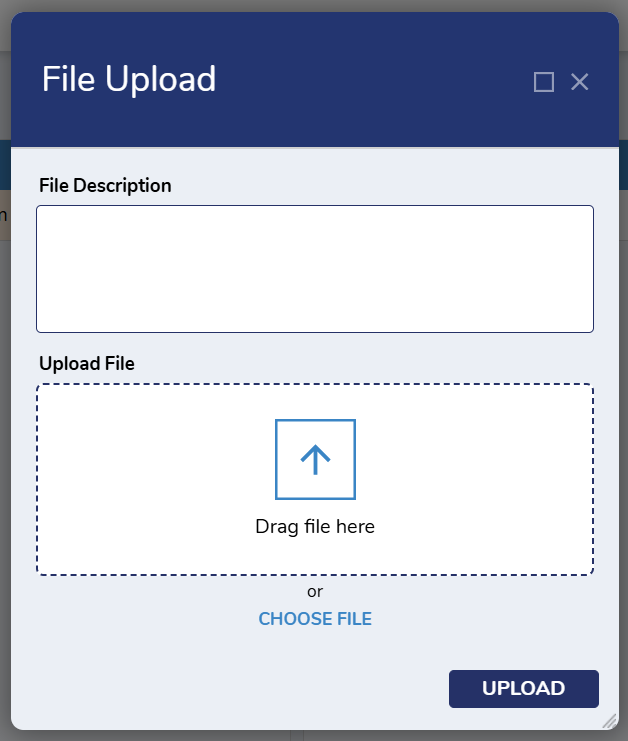
- Once the file is uploaded, select Upload to proceed with uploading the file for the selected customer.
- This action will populate the File Upload Form, allowing Users to upload a file for the selected customer.
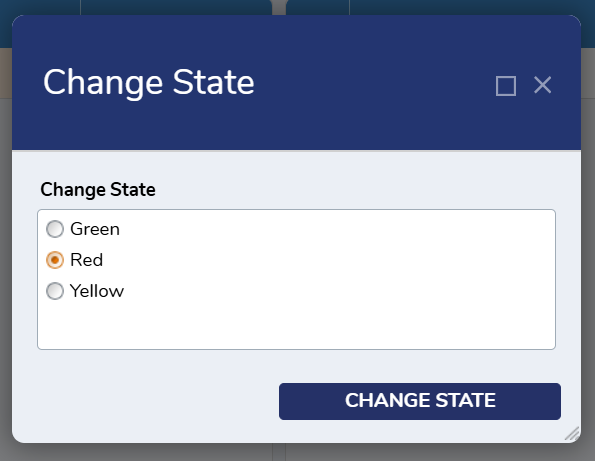
Change State
- To change a customer's state, right-click on the desired customer and select Change State.
- This action will display the Change State Form. From here, select the desired state from the available options.
- This action will display the Change State Form. From here, select the desired state from the available options.
- Click Change State to update the customer's state.
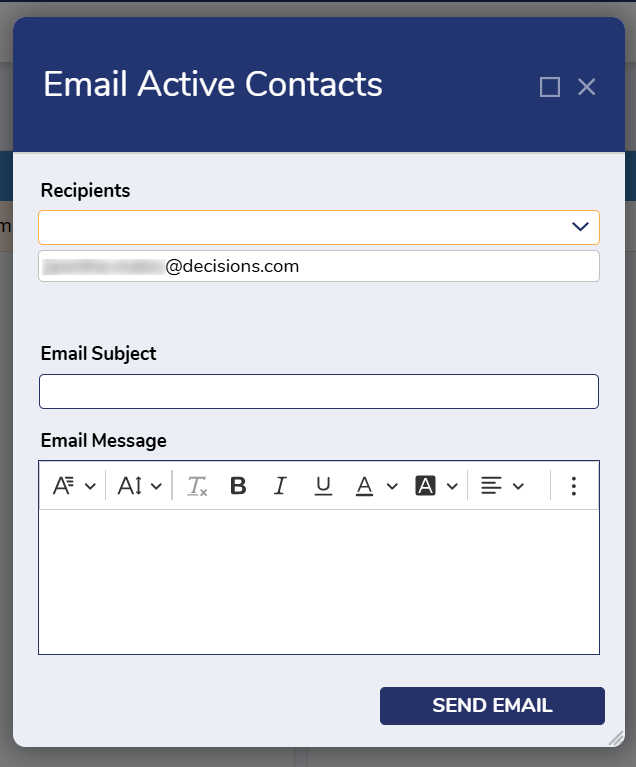
Email Active Contacts
- To send an email to all active contacts for a customer, right-click on the desired customer and select Email Active Contacts.
- This action will display the Email Active Contacts Form, where Users can select desired email recipients. Users can also specify the subject and message.
- This action will display the Email Active Contacts Form, where Users can select desired email recipients. Users can also specify the subject and message.
- Once all inputs have been specified, click Send Email to deliver the email to the selected recipients.