The Auto Complete Questionnaire with AI Accelerator utilizes a vectorized database to analyze a submitted Questionnaire and retrieve the most relevant answers to each question instantly. This Accelerator also utilizes a ChatGPT integration to generate new responses on demand, to ensure each questionnaire answer is accurate and insightful.
Some notable features of this Project include key Workflows, such as the Initial Review Trigger Flow. When triggered, this Flow creates an Assignment for a Manager, enabling them to approve or reject the questionnaire request. The ACQ Manager Views Dashboard displays a list of created Departments and organizes each questionnaire by Department.
The Auto Complete Questionnaire with AI Accelerator offers an innovative interface to maximize the efficiency of capturing questionnaire responses.
Key Features:
- Queries vectorized database for answers depending on question and match percent.
- Customizes settings to specify the database
- Dashboard with responsive view of periods, Users, and Groups
Considerations
- Users should have the Error Handling Accelerator installed before utilizing this Accelerator.
Database Configuration
- Before importing this Project, Users must create and configure their database integration for their PostgreSQL vectorized database in Decisions.
- An OpenAI Key is required for this Project.
- To utilize ChatGPT to obtain potential answers, Users will need to obtain an API Key for API. For more information on generating OpenAI keys please refer to our Open AI Documentation.
- This Accelerator uses AI Common and Open AI Modules. These Modules should be installed before utilizing the Project as Dependencies for both Modules will not be created otherwise.
- To install these Modules, navigate to Features, and select AI Common and Open AI.
- After installation, Open AI settings will be accessible in Decisions. These settings can be accessed by navigating to:
- Decisions Studio > System > Settings > OpenAI Settings.
- From here, right-click on OpenAI Settings and select Edit Settings.
- Enter the OpenAI Key in the API Key field and select Save.
Setting up a Database Integration
- Users must create a database integration before using this Accelerator. To set this up in Decisions, navigate to
- Settings > Integrations > Databases.
- Select Create Connection, enter a name in the connection, and then select POSTGRES from the database type dropdown menu.
- Then, under the POSTGRESQL SERVER section enter the details for the Server name, database name, username, and password associated with the external database.
- Users can select Test to confirm the connection or Ok to save the connection.
- Once the connection is saved, a new Folder will appear for the connection under Databases. Make note of the Folder ID for this connection as this corresponds to the Vector Database ID for the corresponding Department.
User Roles
| Role | Can Create Departments | Can Submit a Questionnaire | Can Create Repo Table | Can Bulk Insert Questions | Can View Details of Questionnaire Request | Can Pick and Edit Questions |
|---|---|---|---|---|---|---|
| Administrator | Yes | Yes | Yes | Yes | Yes | Yes |
| Manager | No | Yes | No | No | Yes | Yes |
| Writer | No | No | No | No | Yes | Yes |
Main Flows
Query Vector and Get Closest Matches from DB for Question Query
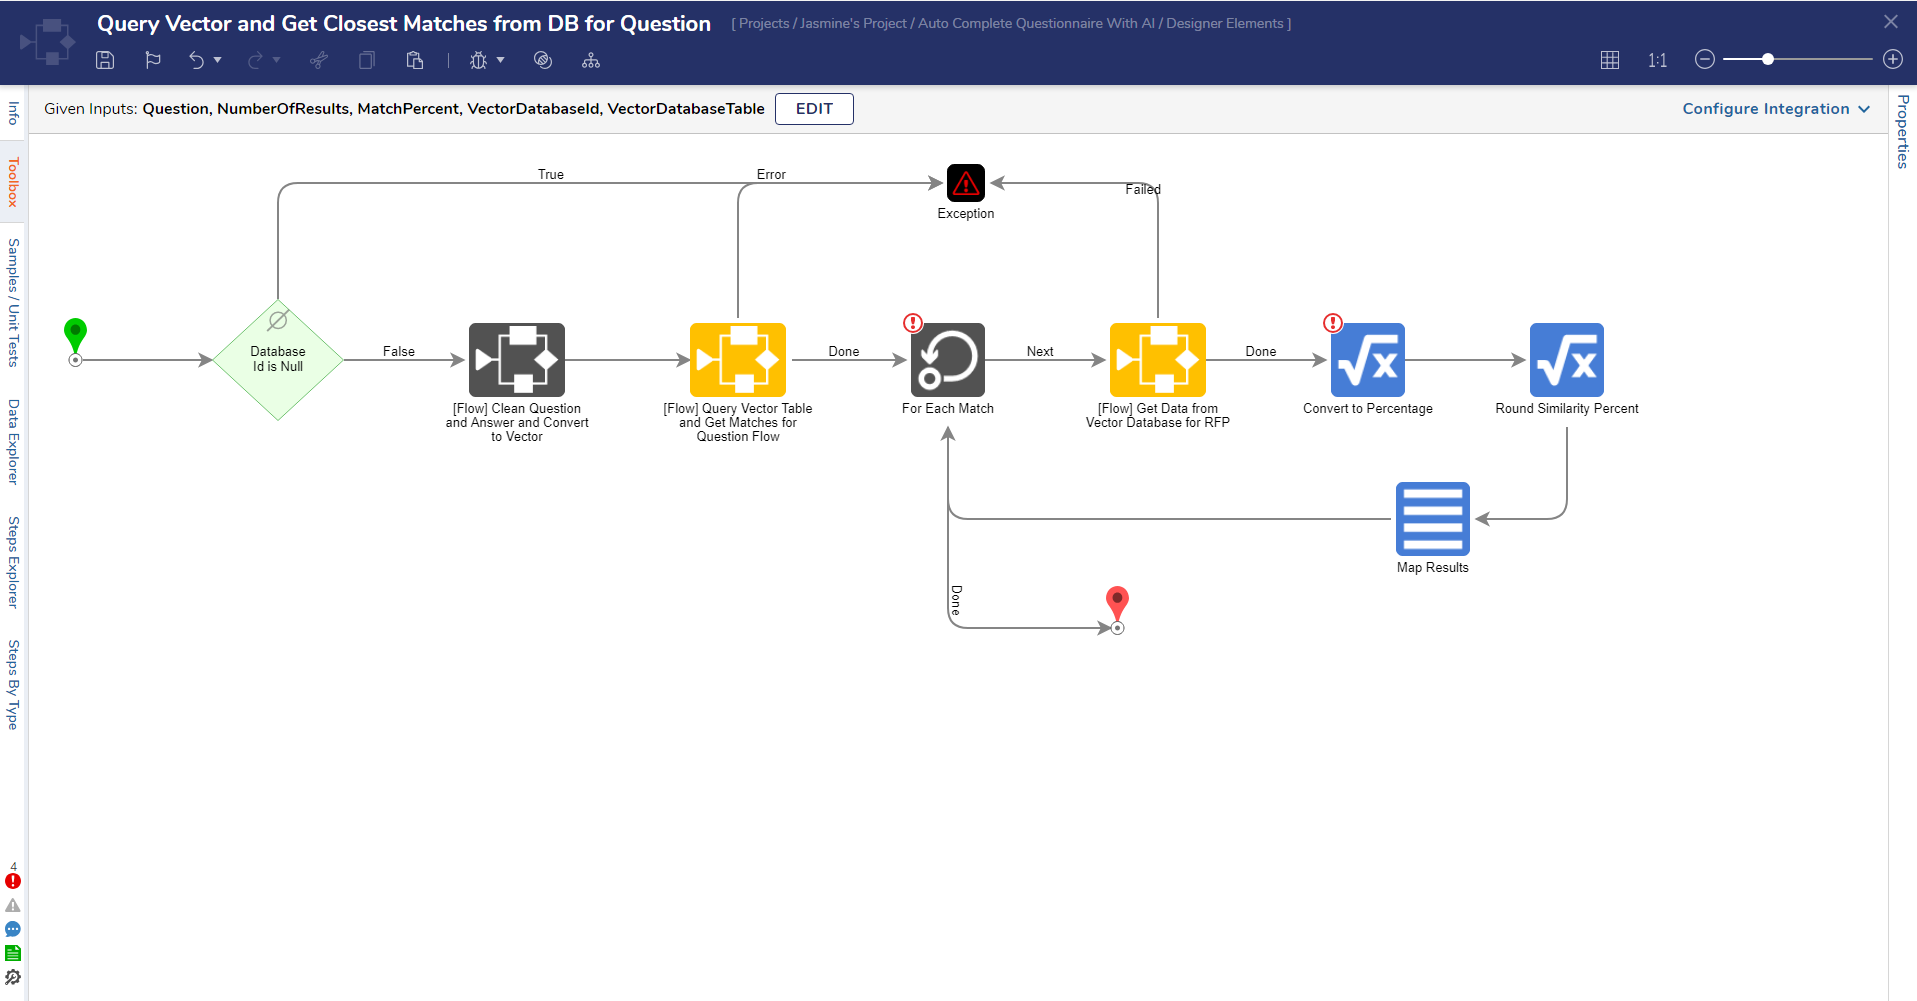
This Flow converts the given Question and Answer to a vector and queries the vectorized database table to retrieve matches based on the match percent specified for the Department. This process ultimately outputs a list of all matching results.
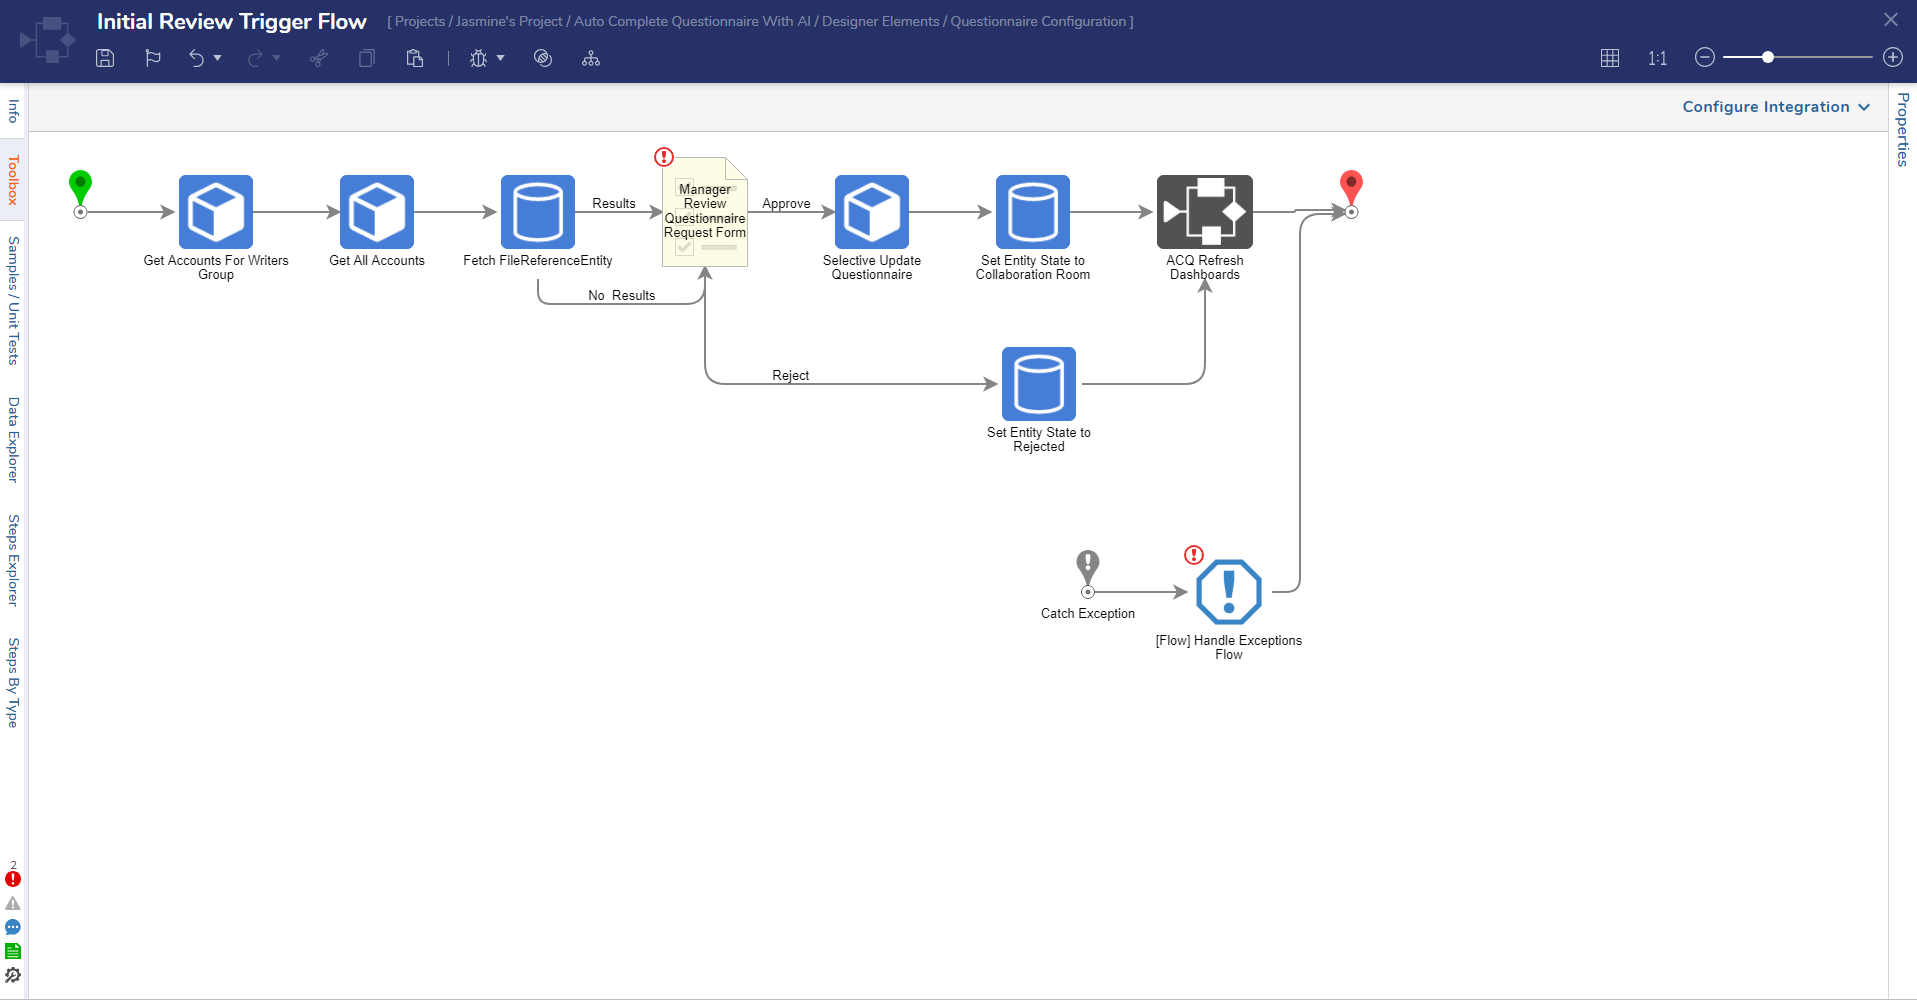
Initial Review Trigger Flow
This Flow is triggered once a questionnaire has entered the Initial Review state after creation. This process creates an assignment for the Manager, prompting them to approve or reject the questionnaire request. If the Manager approves the request, they can assign writers and collaborators to the questionnaire which will move the questionnaire to the Collaboration Room status.
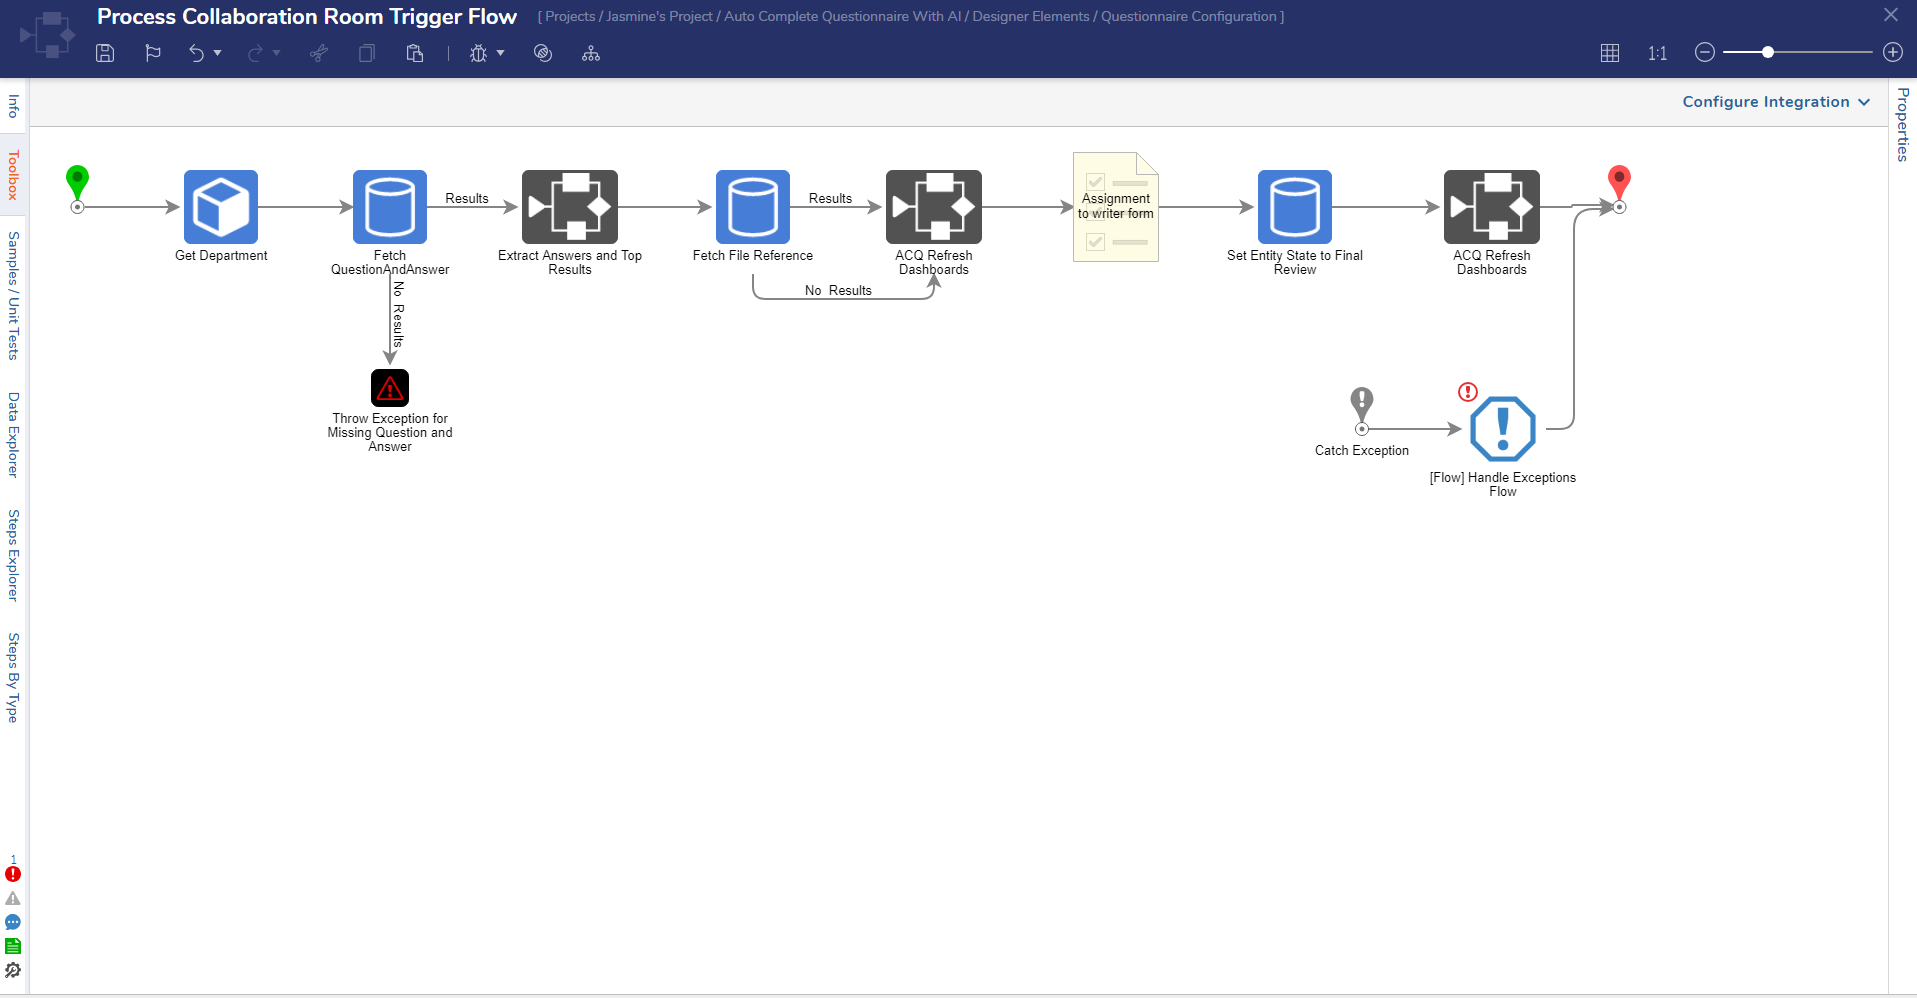
Collaboration Room Trigger Flow
This Flow triggers once a questionnaire Request has been created and approved by a Department Manager. This process queries the vectorized database and fetches answers and top results for each question. New match results are saved with Questions and Answers. An assignment will be created for the Writers, allowing them to send the questionnaire for Manager approval once any changes have been made.
Final Review Trigger Flow
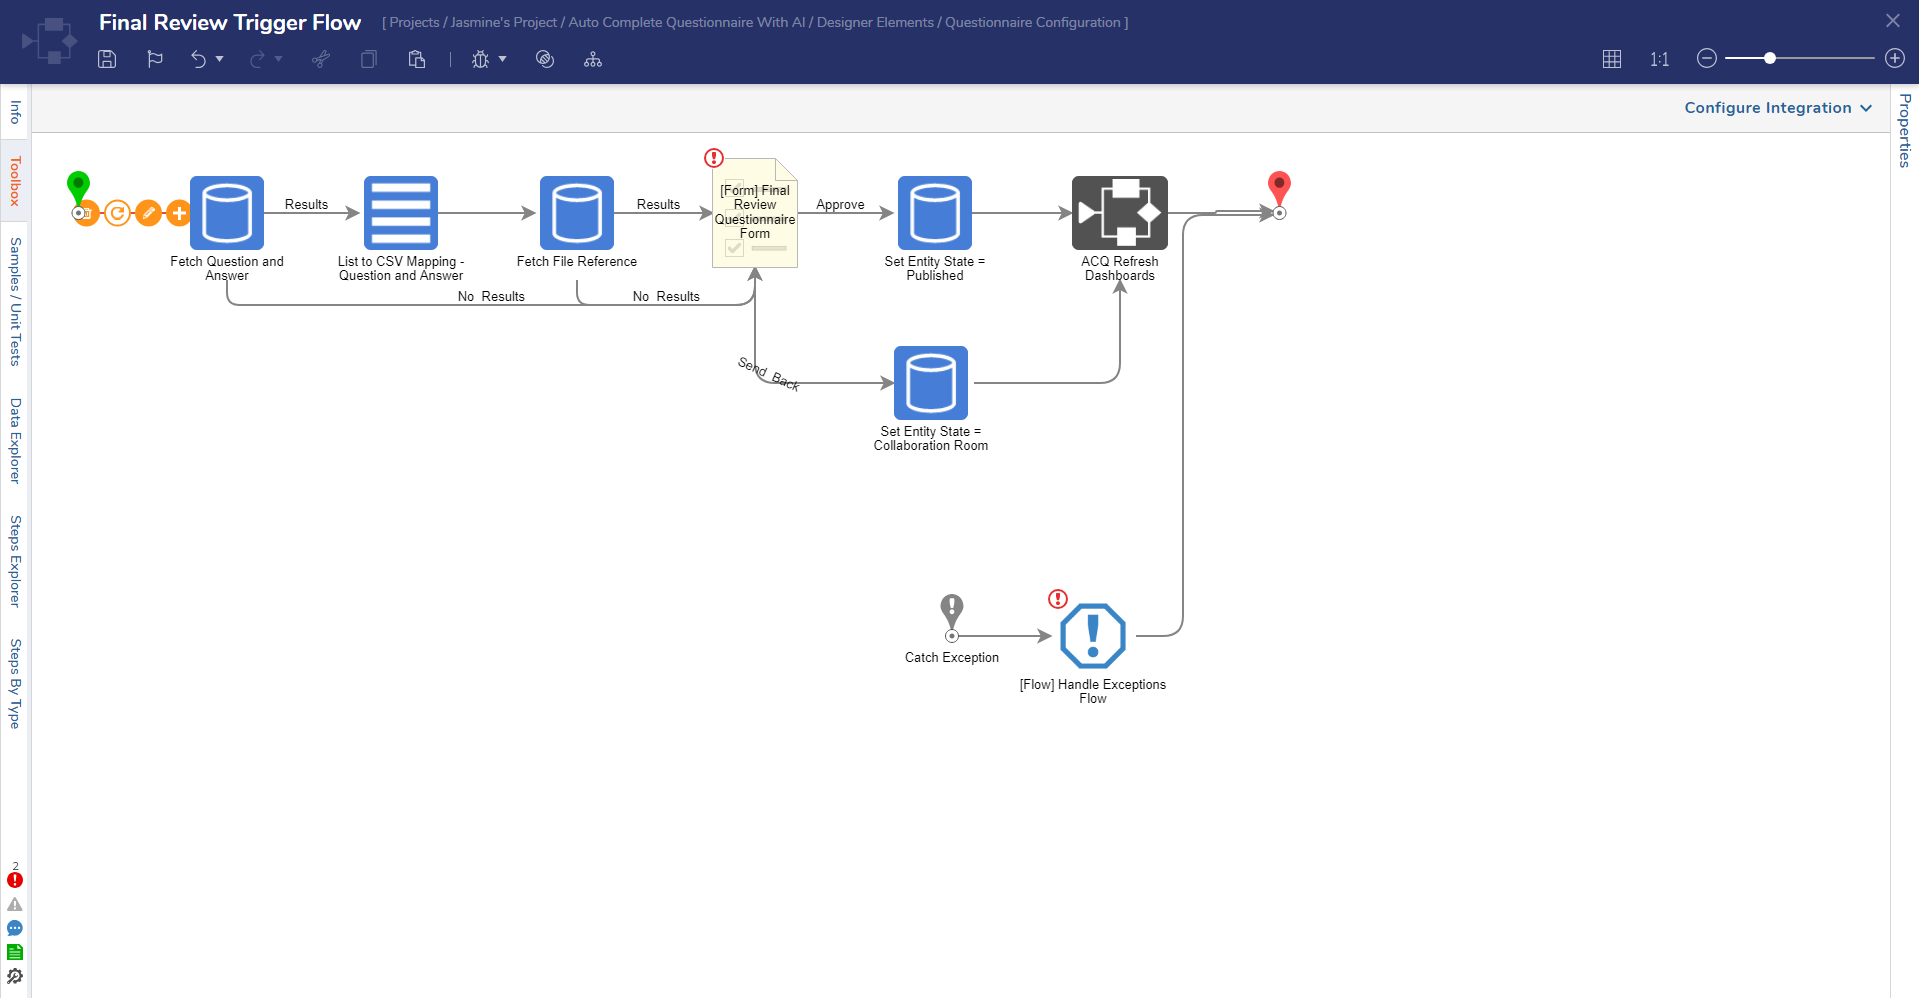
This Flow triggers once a questionnaire has been sent for approval by a writer. This process creates an assignment for the Manager, allowing them to review the work and either approve or deny it. If the questionnaire is denied, it is sent back to the Collaboration Room state. If it is approved, it will move to the Published state.
Creating a Department
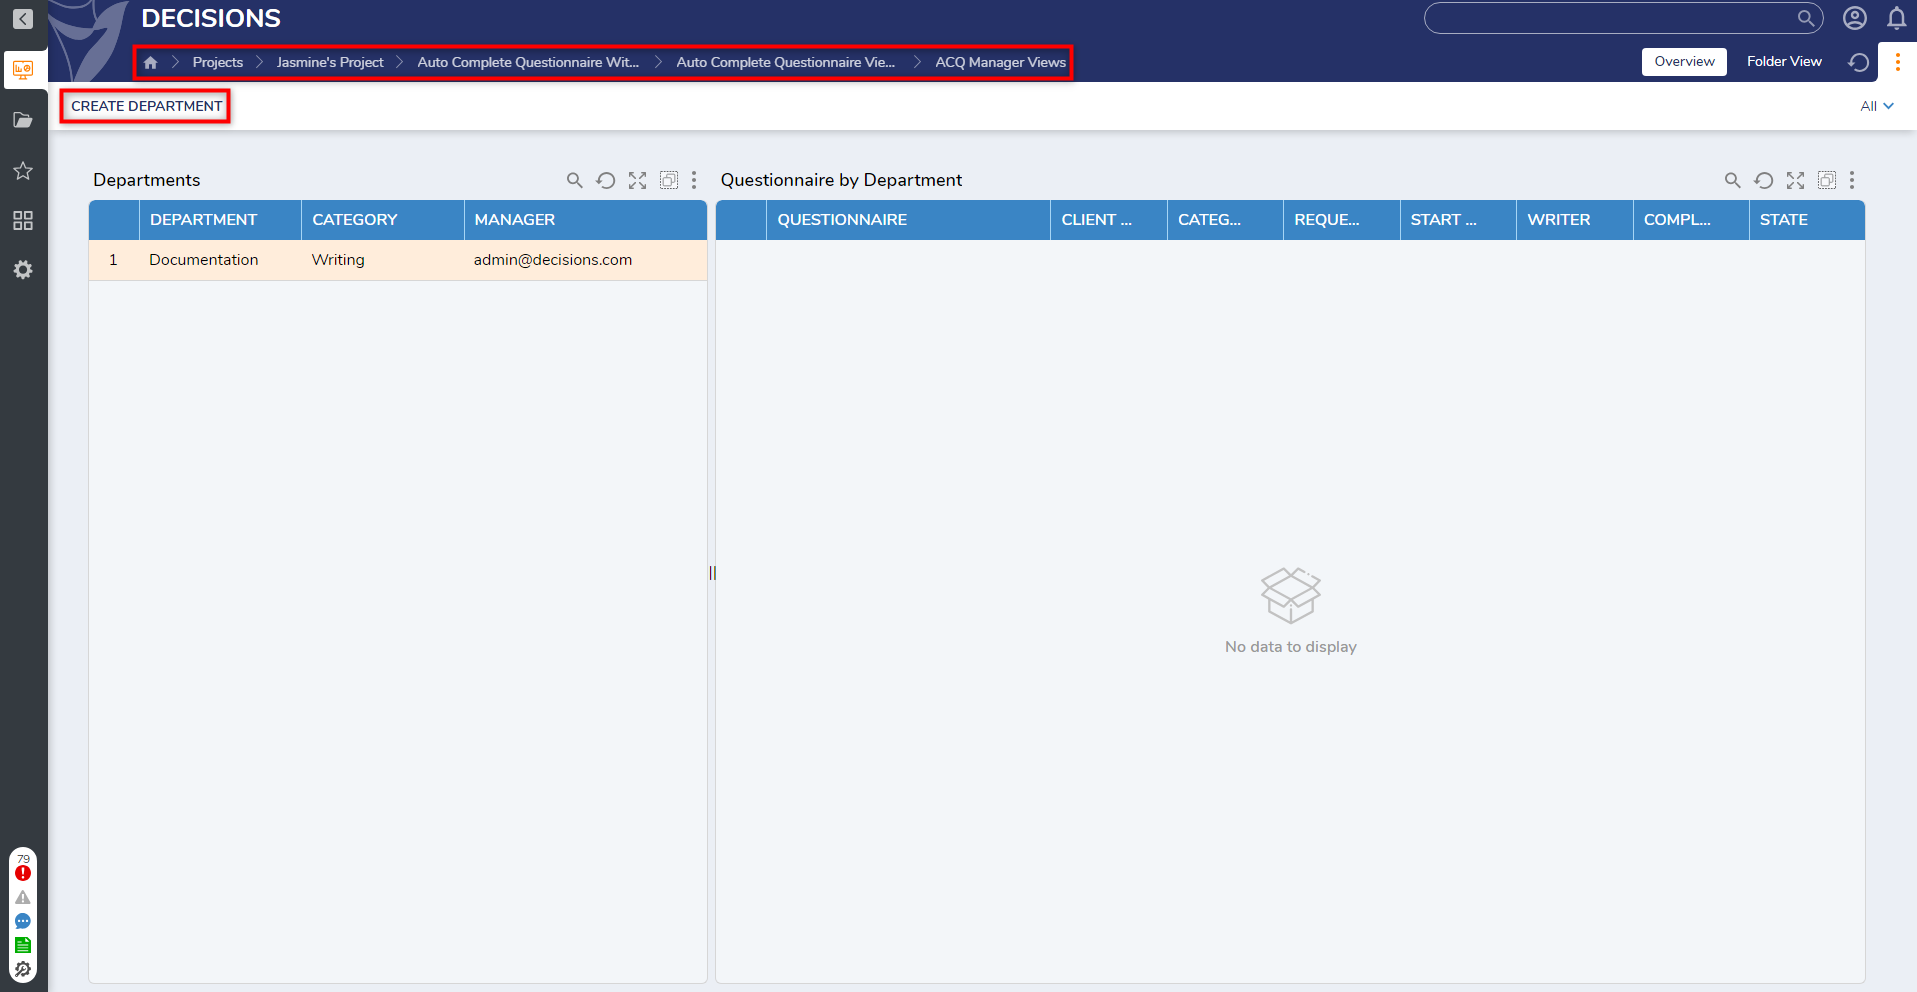
Departments help organize submitted questionnaires for various teams and each Department has a dedicated page on the ACQ Manager Views Dashboard that displays questionnaires associated with the Department. Only Users in the ACQ Admins Group can create a Department.
- From the Auto Complete Questionnaire with AI Designer Folder, navigate to the ACQ Manager Views Dashboard.
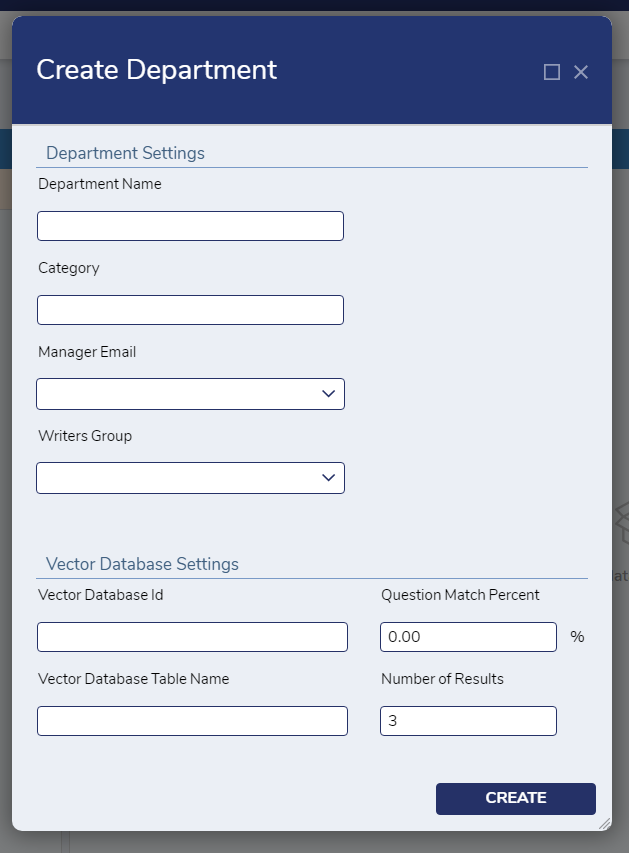
- Navigate to the Overview page and select Create Department. This action will populate the Create Department Form.
- Once the Form is populated, Administrators can provide a name for the Department, select an email address for the Manager for the Department, and select the name of the Group that will act as Writers for this Department.
- After this information has been completed, specify the Vector Database ID, Vector Database Table Name, Question Match Percent, and Number of Results under Vector Database Settings.
- The Vector Database ID is the Folder ID of the database connection created during setup.
- The Question Match Percent determines how closely matches should resemble each question when querying the database for matches.
- The Number of Results specifies how many match results should be returned for a given question.
- Select Create to save any changes.
- A new Department will be visible in the Department Report on the Overview Page.
Creating a Repo Table
Administrators have access to actions to create a new database table for a Department and bulk insert questions into the database table.
- Navigate to the ACQ Manager Views Dashboard and then to the Departments Report.
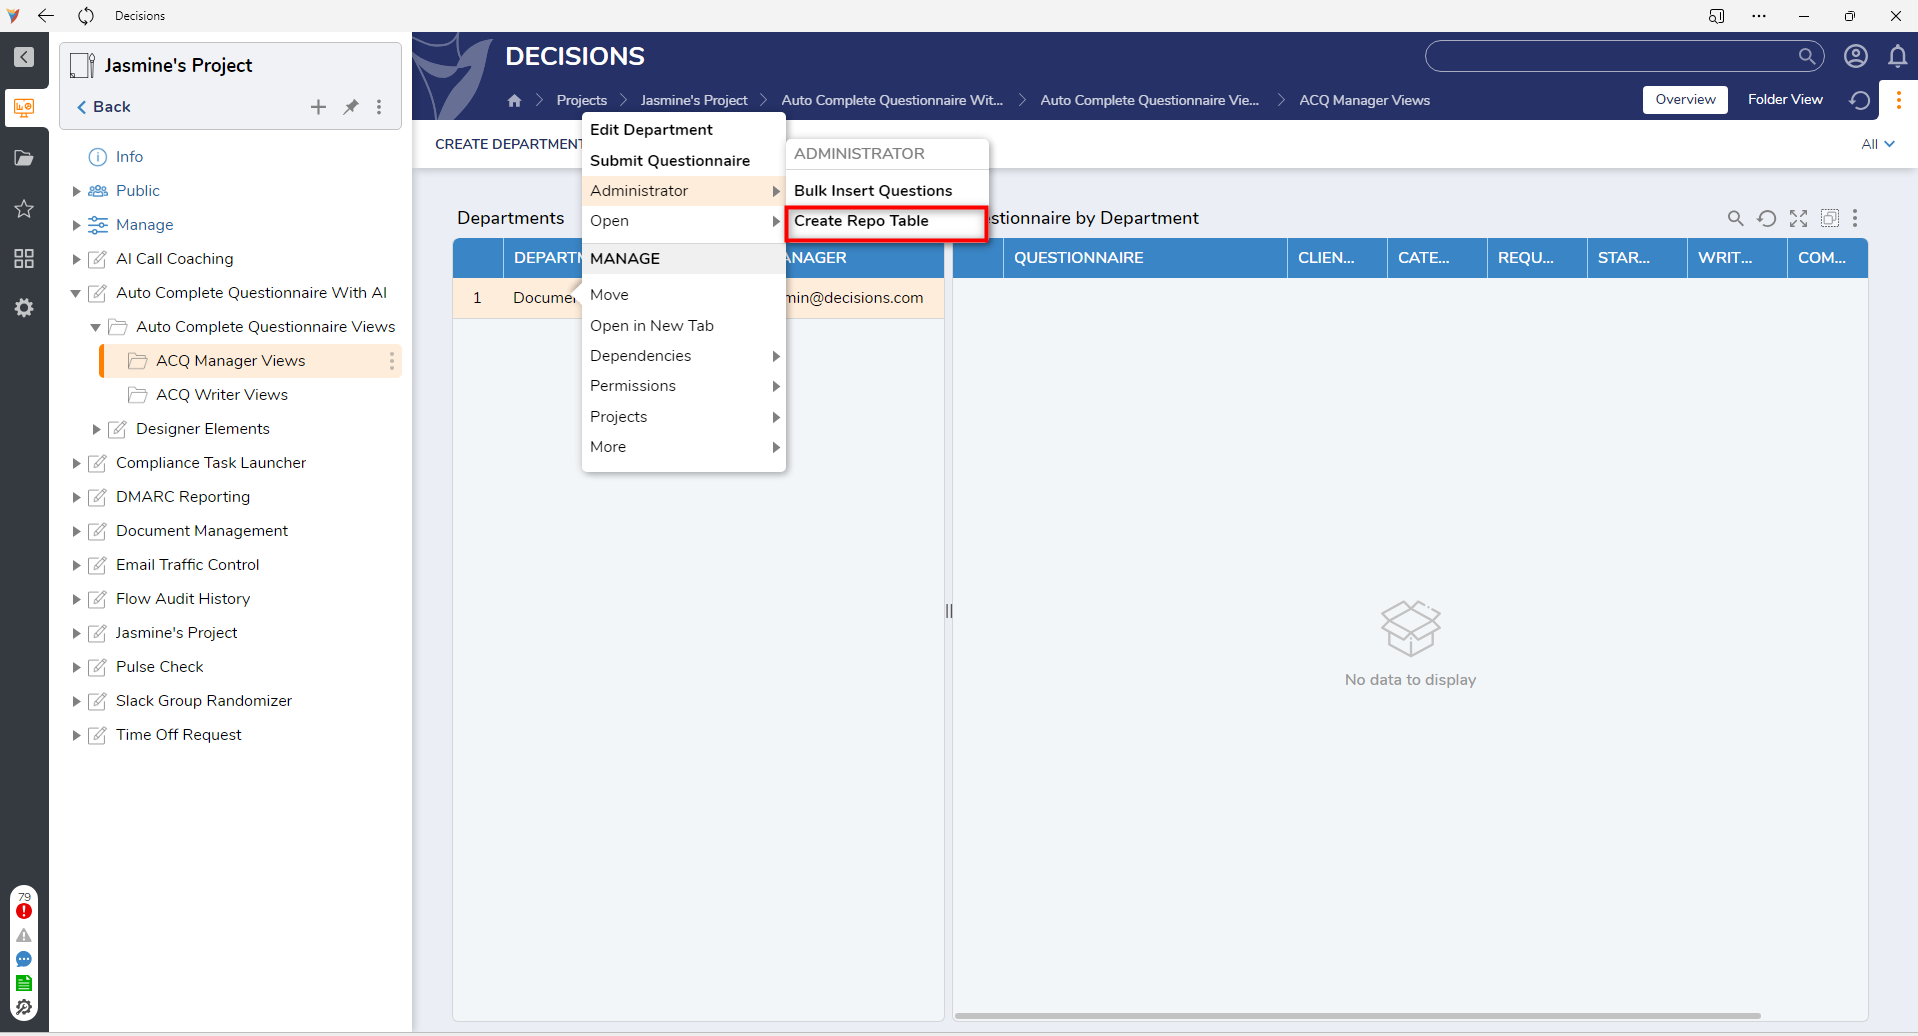
- From the Departments Report, right-click on the desired Department and select Create Repo Table.
- Alternatively, Admins can select the Department's Folder and access Administrator actions from the action bar on the Department Page.
- From here, a Flow will determine whether a database table already exists with the same name as the one specified in the Department setting. If this is true, a confirmation message will appear, and Admins will be able to bulk-insert questions into the created Table.
- To continue with Table creation select Confirm, otherwise (if a table already exists for example) select Cancel.
- After confirmation, a Table will be created, and a pop-up message will display notifying the user.
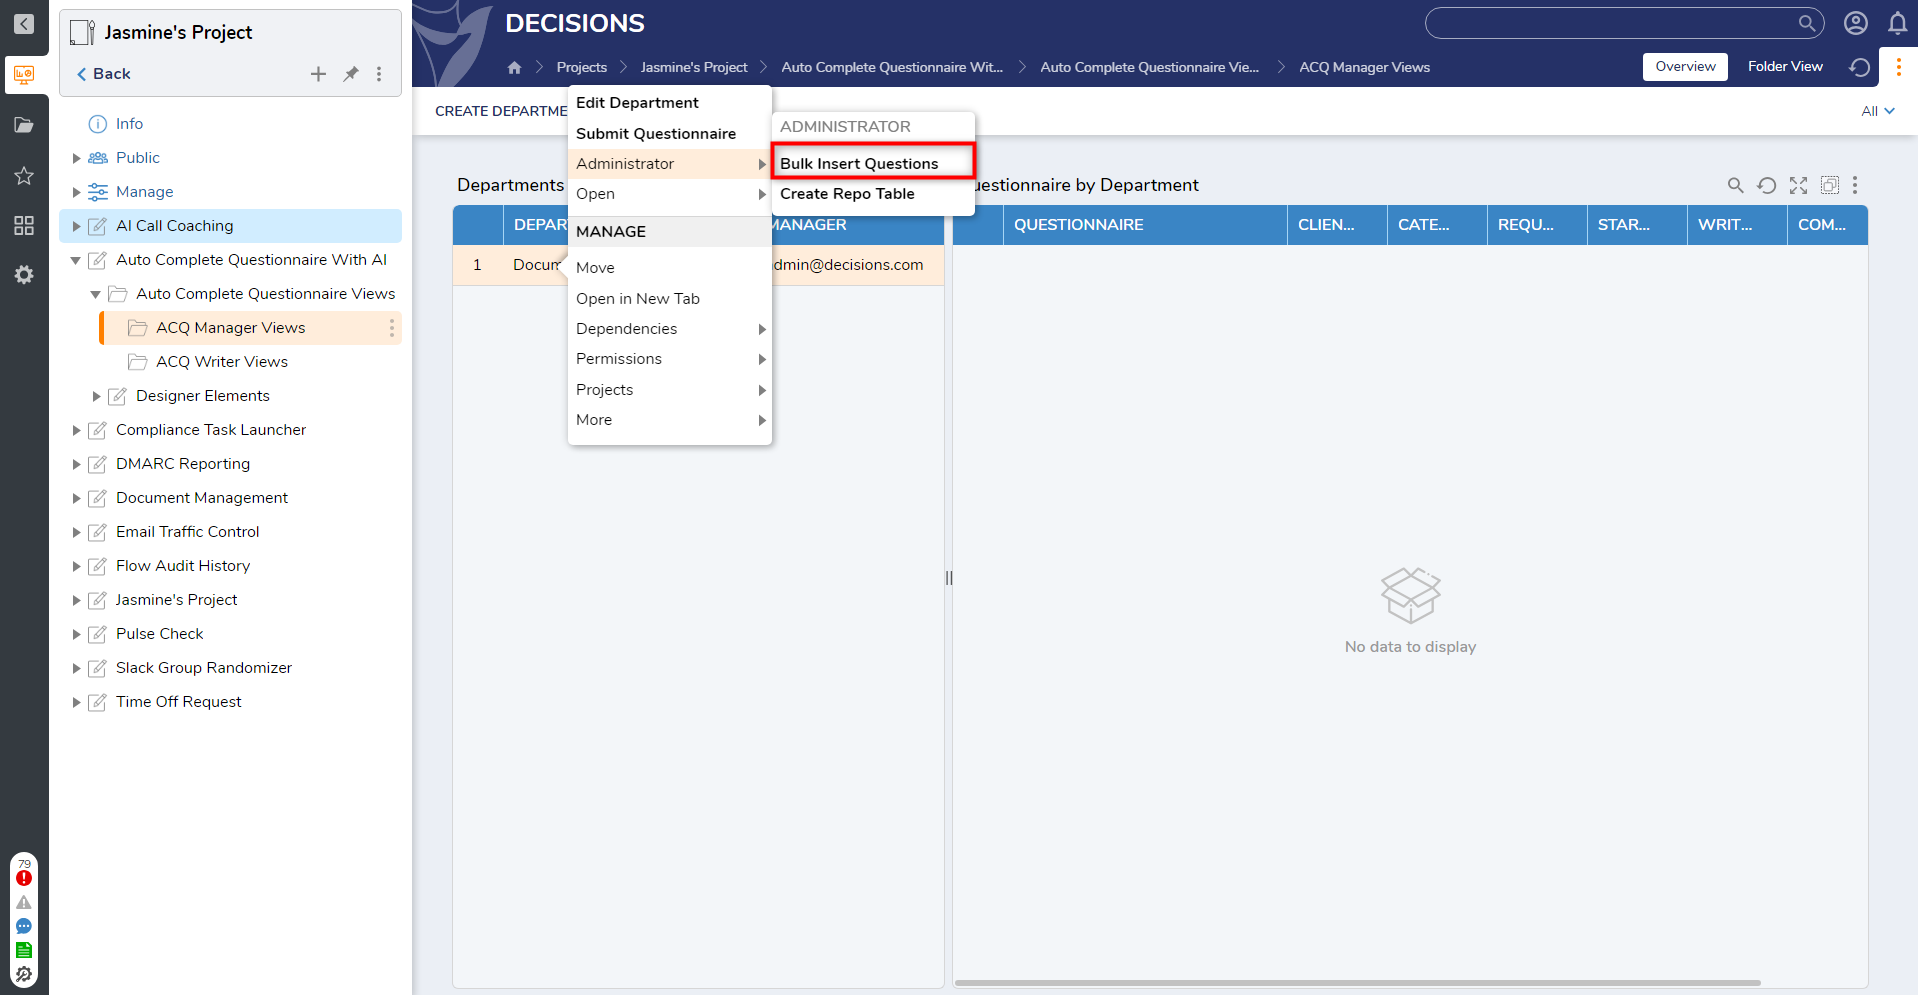
Bulk Insert Questions
- Navigate to the ACQ Manager Views Dashboard and then to the Departments Report.
- From here, right-click on the desired Department from the Department Report and select Bulk Insert Questions.
- Alternatively, Admins can select the Department Folder access Administrator actions from the action bar on the Department Page.
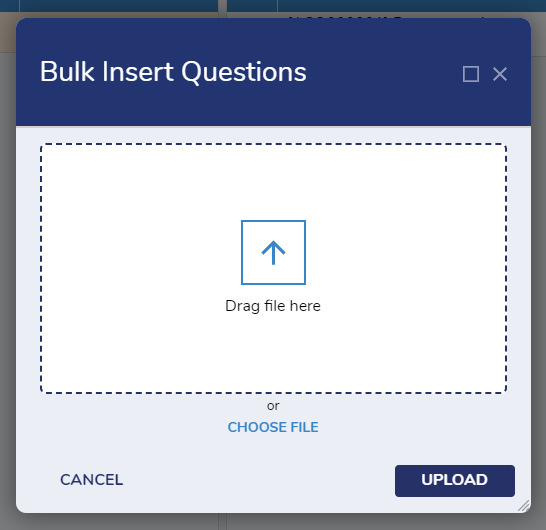
- A Form will populate allowing Admins to upload an Excel or CSV file containing questions. In the File Upload Area, drag and drop the file onto the space, or select Choose File to specify a file from the file system of a computer.
- Select Upload to save any changes.
- This process will trigger a Flow that determines if the uploaded questions exist to ensure duplicates are not created in the system. If the questions do not exist, they will be saved to the database next to the vector embedding.
Submitting a Questionnaire
Administrators and Managers can submit new questionnaire requests, but questionnaires are specific to a Department.
- Navigate to the ACQ Manager Views Dashboard, then to the Departments Report.
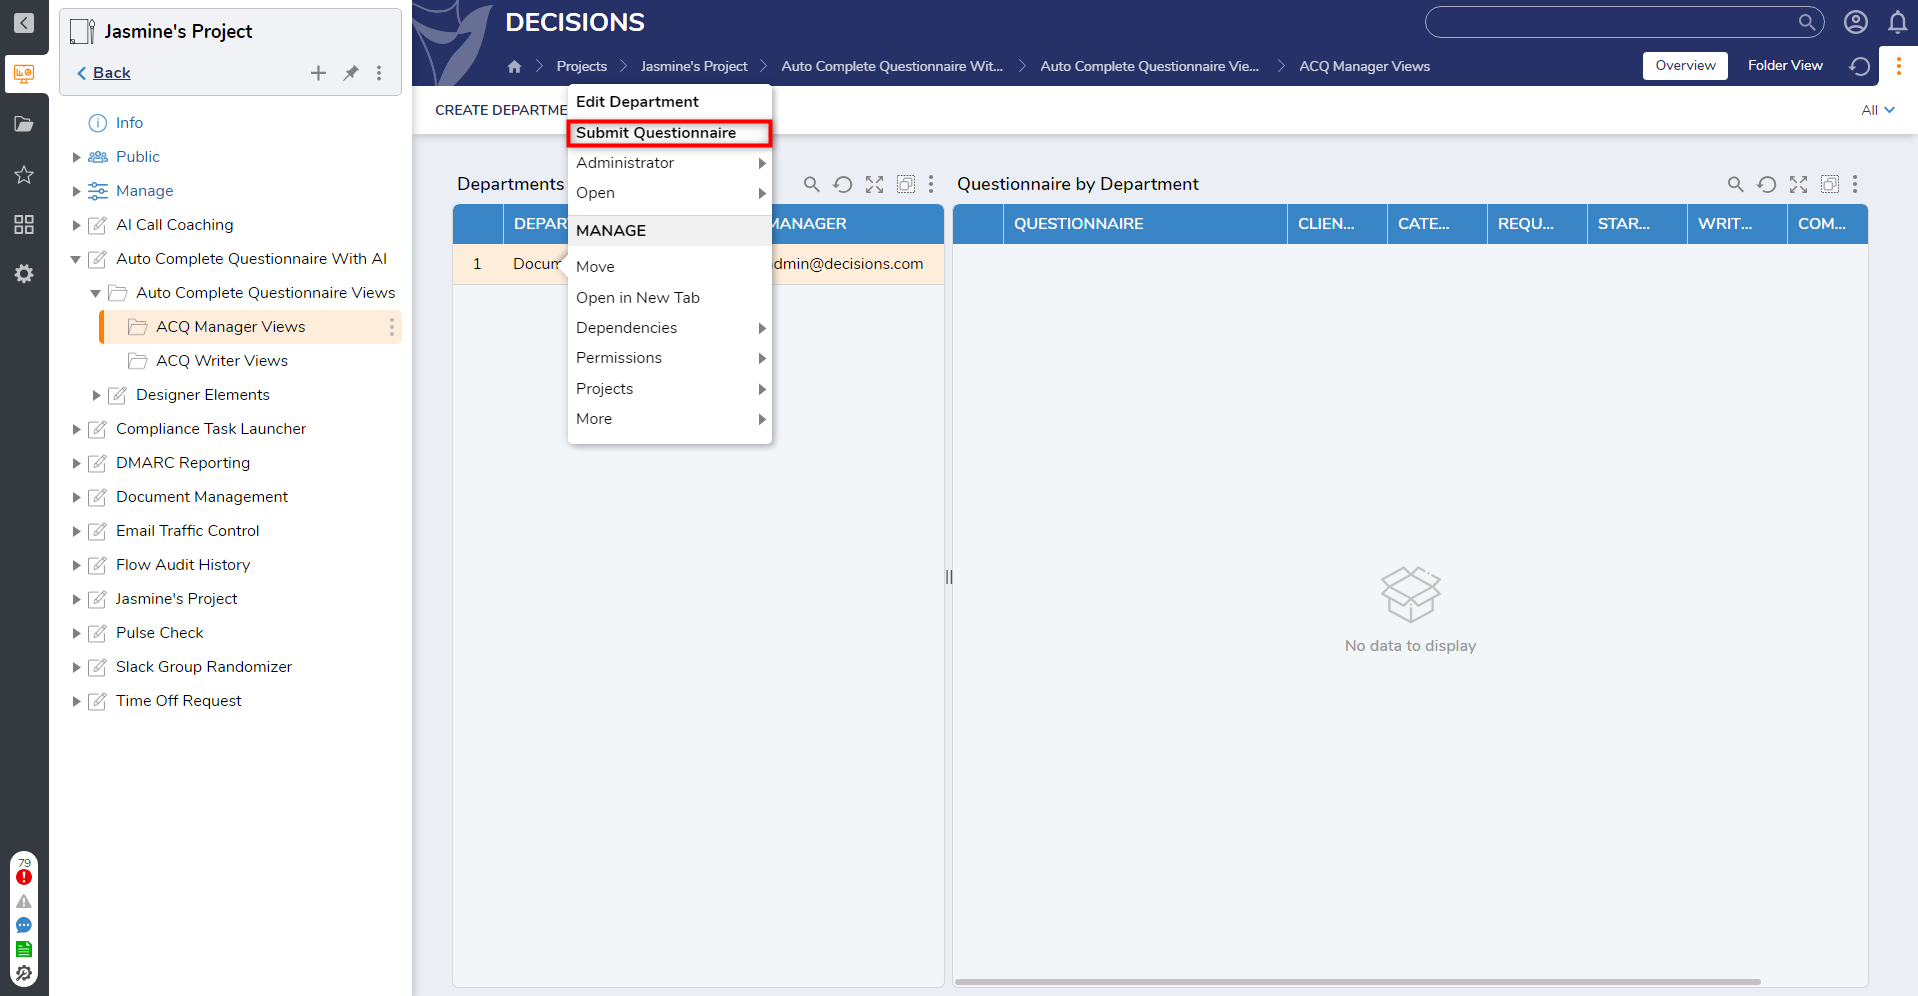
- From here, right-click on the desired Department and select Submit Questionnaire.
- Alternatively, the User can select the Department's Folder and access the Submit Questionnaire button from the action bar.
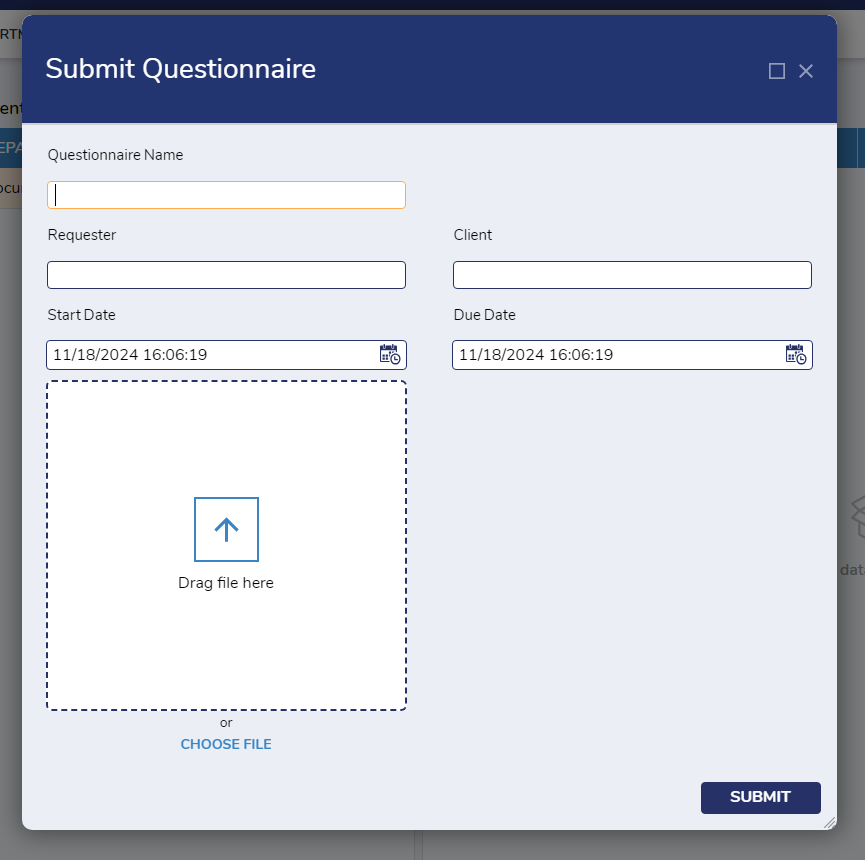
- A Form will populate for Admins and Managers to specify the name of the questionnaire, the email address of the requester, the email address of the client, as well as a start and end date.
- In the File Upload Area, drag and drop the Excel or CSV that contains the questionnaire select Choose File to select the file from a file system of a computer.
- Select Submit to save any changes.
- After submission, Admins and Managers will be directed to the Collaboration Room Page. Associated Managers will receive a popup message and email informing them the questionnaire has been submitted for Initial Review.
Pick and Edit
This action allows Users in the ACQ Admins, Managers, and Writers Groups to modify the answer to a question using Suggested Answer from ChatGPT. The Pick and Edit action is only available if the associated questionnaire is in the Collaboration Room state. The Answer can be changed by the questionnaire's Manager, Writers, or Collaborators.
- Navigate to the ACQ Manager Views Dashboard and then to the Departments Report.
- From here, select the desired Department, then in the questionnaire by Department Child Report, select the associated Questionnaire.
- This action will navigate Users in the associated Groups to the Collaboration Room Page for that questionnaire.
- Writers can access this Page by navigating to the ACQ Writer Views Dashboard and selecting the associated questionnaire from either the My Tasks or My Collaborations Pages.
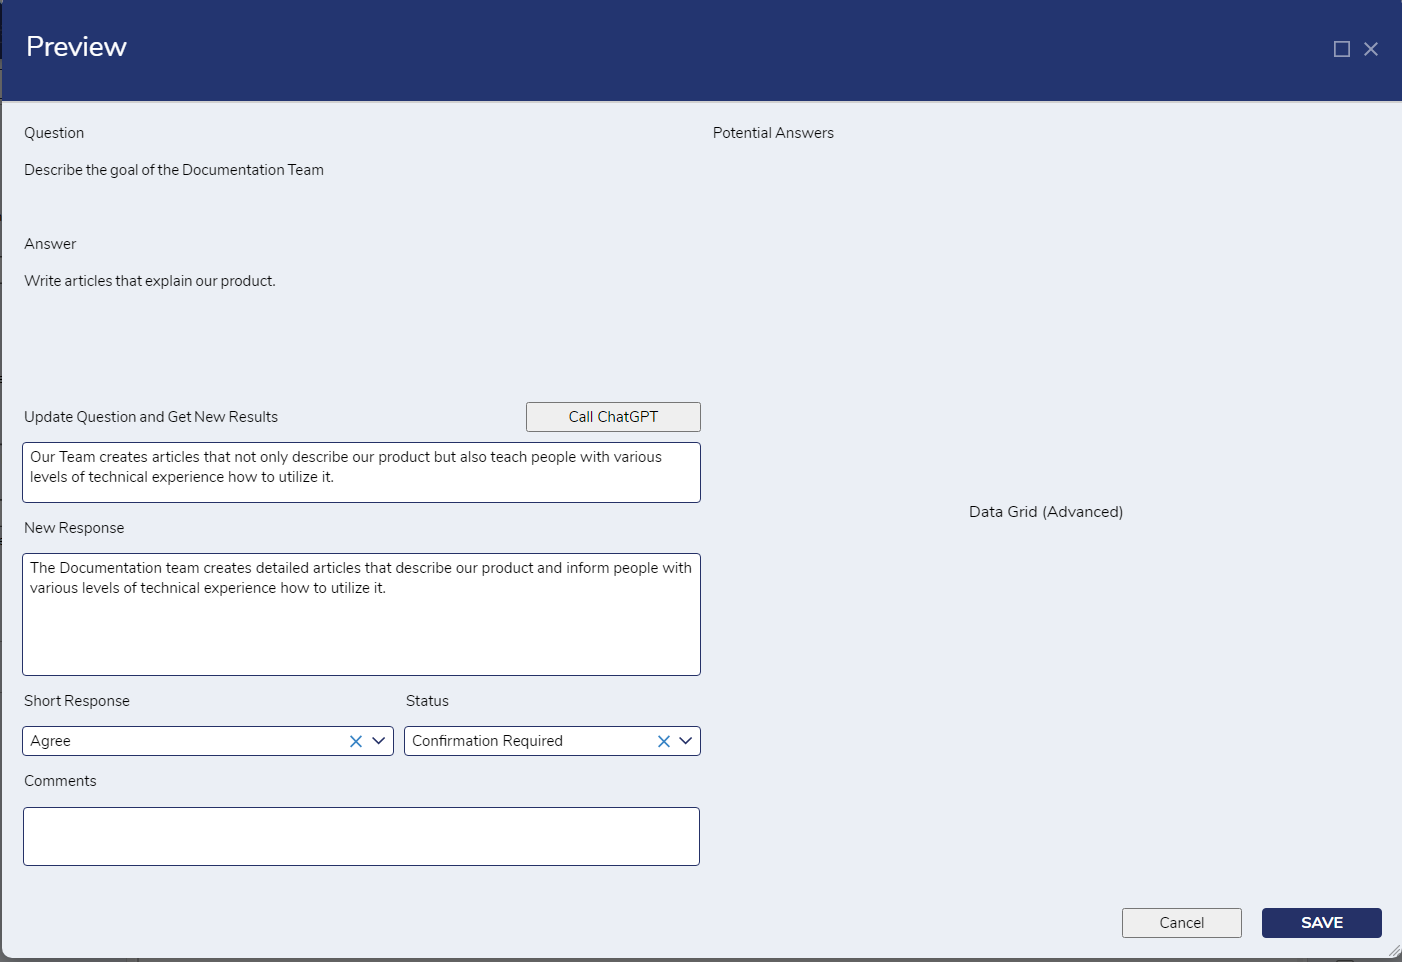
- In the Question and Answers Report, right-click on the desired Question and select Pick and Edit. This action will display the Edit Answer Form. The Question, Answer, and Status fields will be prepopulated.
- To generate a new answer, select the Call ChatGPT Event Button. A set of suggested answers will be populated in the Potential Answers Data Grid.
- In the Potential Answers Data Grid, select the desired new answer, and the response fields will be updated.
- If desired, notes can be added in the Comments field.
- Select Save. If the Question and Answer requires confirmation, an email we be delivered to the associated Manager, and collaborators will notify them of the changes.
View Details
This action allows Users in the ACQ Administrators, Managers, and Writers Groups to view the details of a Questionnaire Request.
- Navigate to the ACQ Manager Views Dashboard and then to the Departments Report.
- From the Departments Report, select the associated Department and then right-click on the desired questionnaire and select View Details.
- Managers can also access this action from the Collaboration Rooms Page and the Department Overview Page.
- Writers can access this action by navigating to the ACQ Writer Views Dashboard and right-clicking on the questionnaire in the My Tasks Report.
- A Form will populate allowing Users in the associated Groups to see the client, requester, writer, category, start, and due date, as well as a list of Collaborators associated with the questionnaire.
- Select Close to exit the form.
.png)
