Version 7.x .NET Architecture Change
- Versions 7.0.1 - 7.1 require .NET Core 3.1
- Versions 7.2 - 7.9 require .NET 5
- Versions 7.10+ require .NET 6
Overview
One of the primary reasons to create a custom step is to be able to set up the initial state of an element right. This often means setting up the right types of mappings. This document shows how to set up default mappings and discusses the different types of input mappings that you can set.
Example
After creating a step (see Flow Steps (Advanced)), the class must inherit and implement IDefaultInputMappingStep.
The implementation of this interface returns an array of IInputMapping. An IInputMapping describes the type of input you are setting and the value for this input. Below is the type of input types and examples on how to build them.
ConstantInputMapping
Corresponding Designer Mapping type: Constant
Explanation: This mapping type allows you to specify a constant value for your input data.
Example Code: new ConstantInputMapping() { InputDataName = "ConstantInputMapping Example", Value = 10 }
What this code looks like in the Designer:

IgnoreInputMapping
Corresponding Designer Mapping type: Ignore
Explanation: This mapping type does not send in anything for the selected input.
Example Code: new IgnoreInputMapping() { InputDataName = "IgnoreInputMapping Example" }
What this code looks like in the Designer:

NullInputMapping
Corresponding Designer Mapping type: Null
Explanation: This mapping type explicitly sets the value of the input to null.
Example Code: new NullInputMapping() { InputDataName = "NullInputMapping Example" }
What this code looks like in the Designer :

SelectValueInputMapping
Corresponding Designer Mapping type: Select Value
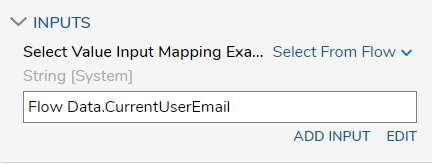
Explanation: This mapping type allows you to select a variable from within your flow or rule to use as input data. The key to setting this in code is to know the DataPath of your variable (see example code below for how to form a DataPath string).
Example Code: new SelectValueInputMapping() { InputDataName = "SelectValueInputMapping Example", DataPath = "Flow Data.CurrentUserEmail" }
What this code looks like in the Designer:
MergeStringInputMapping
Corresponding Designer Mapping type: Text Merge.Plain OR Text Merge.HTML
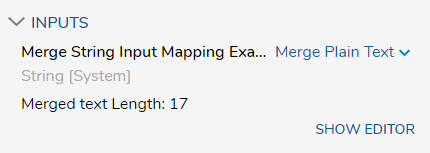
Explanation: This mapping type allows you to merge strings as plain text or as HTML. To select between plain or HTML merges set the value of MergeResutlType accordingly. The value of this is an enum of DecisionsFramework.Utilities.Data.MergeDataType which can be either .PlainText or .HTML.
Example Code:
 new MergeStringInputMapping() {
   InputDataName = "MergeStringInputMapping Example",
   MergeResultType = DecisionsFramework.Utilities.Data.MergeDataType.PlainText,
   MergeString = "My String"
}
What this code looks like in the Designer:
CurrentDateInputMapping
Corresponding Designer Mapping type: Current Date Time
Explanation: This mapping type sets the value to the current date/time at runtime.
Example Code: new CurrentDateInputMapping() { InputDataName = "CurrentDateInputMapping Example" }
What this code looks like in the Designer:

DateInputMapping
Corresponding Designer Mapping type: Constant Date
Explanation: This mapping type allows you to choose a constant date to as the input value
Example Code: new DateInputMapping() { InputDataName = "DateInputMapping Example", Value = new DateTime(2007, 06, 23) }
What this code looks like in the Designer:

DateTimeInputMapping
Corresponding Designer Mapping type: Constant Date and Time
Explanation: This mapping type is very similar to the DateInputMapping type, but in addition to allowing you to set a constant date it also allows for time input
Example Code: new DateTimeInputMapping() { InputDataName = "DateTimeInputMapping Example", Value = new DateTime(2011, 01, 24, 21, 23, 45) }
What this code looks like in the Designer:

ComputeDateInputMapping
Corresponding Designer Mapping type: Compute Date
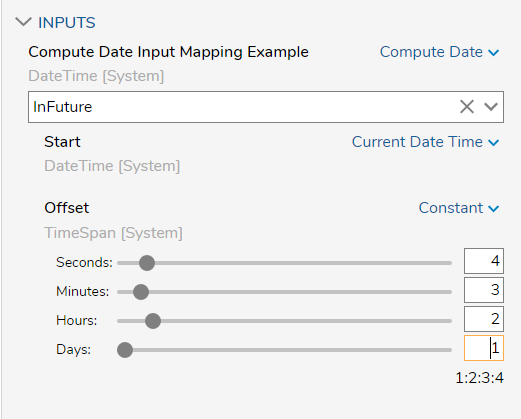
Explanation: This is a complex mapping type that allows you to calculate a date based on another date. In the example below OffsetMapping is set to ConstantInputMapping and DateTimeMapping is set to CurrentDateInputMapping. But both of these could be set to any mapping type that is value for single date inputs.
Example Code:
 new ComputeDateInputMapping() {
   InputDataName = "ComputeDateInputMapping Example",
   ComputeType = ComputeDateType.InPast,
   OffsetMapping = new ConstantInputMapping() { InputDataName = "Offset", Value = new TimeSpan(1, 2, 3, 4) },
   DateTimeMapping = new CurrentDateInputMapping() { InputDataName = "Start" }
}
What this code looks like in the Designer:
RunConverterInputMapping
Corresponding Designer Mapping type: Run Converter Flow
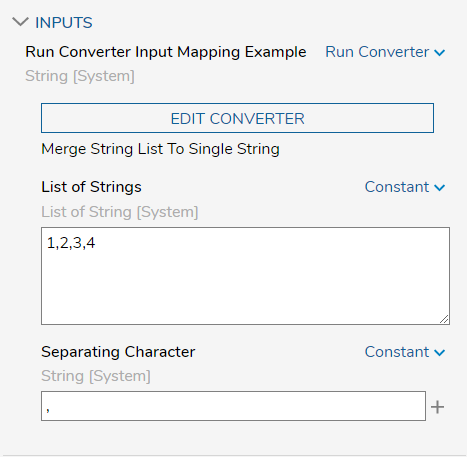
Explanation: This is a complex mapping type that allows you to choose a flow to convert the value of a variable and then use the converted value as your input. The key to setting up this input type is to know the FlowId of the converter flow you want to use and to know the names of the input data that flow takes in. In the example below the ConverterFlowId value is set to the Id of a converter flow that is delivered with every installation of Decisions, the Convert String to Int32 flow. Also in the example below, ConverterFlowMappings is built using ConstantInputMapping, but any mapping type that is valid for the data type of the input data would be OK. e.g. if your input data was a date, you could use a DateInputMapping input type.
Example Code:
 new RunConverterInputMapping() {
   InputDataName = "RunConverterInputMapping Example",
   ConverterFlowId = "8a3a318d-bdd6-4a2f-8c4c-ede0ba73deb6",
   ConverterFlowMappings = new IInputMapping[] {
       new ConstantInputMapping() { InputDataName = "String to Convert", Value = "1234" }
   }
What this code looks like in the Designer:
BuildDataInputMapping
Corresponding Designer Mapping type: Build Data
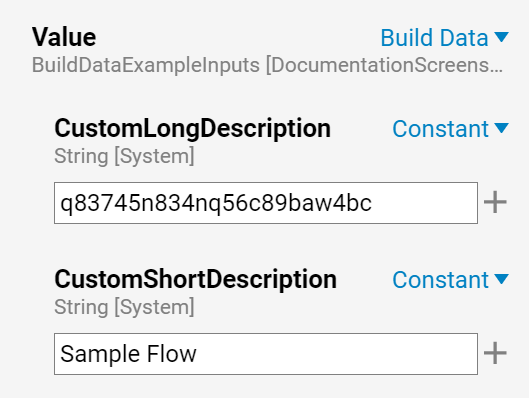
Explanation: This mapping type allows you to choose a separate mapping type for each field of a data type
Example Code:
 new BuildDataInputMapping() {
   InputDataName = "Value",
   SubMappings = new IInputMapping[] {
       new ConstantInputMapping() { InputDataName = "CustomLongDescription", Value = "q83745n834nq56c89baw4bc" },
       new ConstantInputMapping() { InputDataName = "CustomShortDescription", Value = "Sample Flow" }
   }
What this code looks like in the Designer:
ArrayInputMapping
Corresponding Designer Mapping type: Build Array
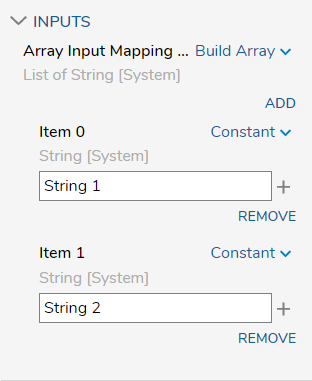
Explanation: This mapping type allows you to set the mapping type/value for each item in an array. Each item can have a different mapping type.
Example Code:
 new ArrayInputMapping() {
   InputDataName = "ArrayInputMapping Example",
   SubMappings = new IInputMapping[] {
       new ConstantInputMapping() { InputDataName = "Item 0", Value = "String 1" },
       new ConstantInputMapping() { InputDataName = "Item 1", Value = "String 2" }
   }
What this code looks like in the Designer:
ConcatArraysInputMapping
Corresponding Designer Mapping type: Join Arrays
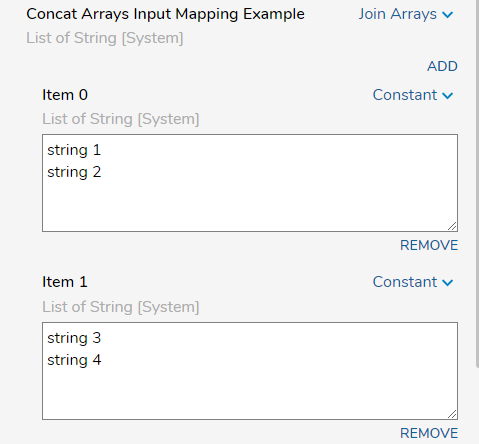
Explanation: This mapping type allows you to join two or more arrays into one as your input. The individual arrays can be built using any mapping type that is valid for an array.
Example Code:
 new ConcatArraysInputMapping() { InputDataName = "ConcatArraysInputMapping Example",
   SubMappings = new IInputMapping[] {
       new ConstantInputMapping { InputDataName = "Item 0", Value = new string[] { "string 1", "string 2" } },
       new ConstantInputMapping { InputDataName = "Item 1", Value = new string[] { "string 3", "string 4" } }
   }
What this code looks like in the Designer:
ExposeInputMapping
Corresponding Designer Mapping type: Expose Input
Explanation: This mapping type is a special version of the SelectValue input type. When used, it automatically creates a piece of input data in your flow named as the value specified in ExposeAsName and then selects that input data as its value. The exact same thing could be accomplished by manually adding the input data to the flow and using Select Value to select that input data as the value.
Example Code: new ExposeInputMapping() { InputDataName = "ExposeInputMapping Example", ExposeAsName = "ExposeInputMapping Input Data" }
What this code looks like in the Designer:
