- 27 Jan 2022
- 4 Minutes to read
- Print
- DarkLight
Creating a Rule
- Updated on 27 Jan 2022
- 4 Minutes to read
- Print
- DarkLight
Overview
A Rule is a Designer Element that is used to evaluate Input Data against a set of preconfigured conditions, to output resulting data, or affect change to a Flow, Form, or Report/Page.
The resulting evaluations from a Rule are used in special configurations that enhance the features of Forms, Reports, Pages, and more. Such features may include the ability to:
- Determine ownership of an Assignment/Task
- Alter Form Component visibility
- Format Values on Reports/Pages
- Determine when/how often to Send an Email
The following document discusses how to configure a Rule in Decisions via the Rule Designer and demonstrates how to create one of the most commonly used Rule Types; the Statement Rule.
Statement Rules
Statement Rules are configured to compare End-User Input Data against either a single or multiple conditions. These Rules are typically created in "If/Then" format, but additional conditions may be added (via "And") to the statement or may use an "Either/Or" comparison clause.
The Rule is configured with pieces of Input Data that are compared against the Rule's logic.
Statement Rules produce two different Outcome Paths in the Flow by default, True and False. Flow steps can be added to either path so that the data is worked by specific steps being evaluated by the Rule.
Example A: If/Then Statement
In the example below, a travel request application is created using Decisions. A Rule is configured to receive "Cost, Destination, and Transportation" values as Input Data from the End-User. This Input Data is then compared against two Conditional Statements which determine where the data moves in the Flow after the Rule evaluation (True path/False path).
If/And: IF the destination is one of three cities AND the cost is below $1,000, then true.
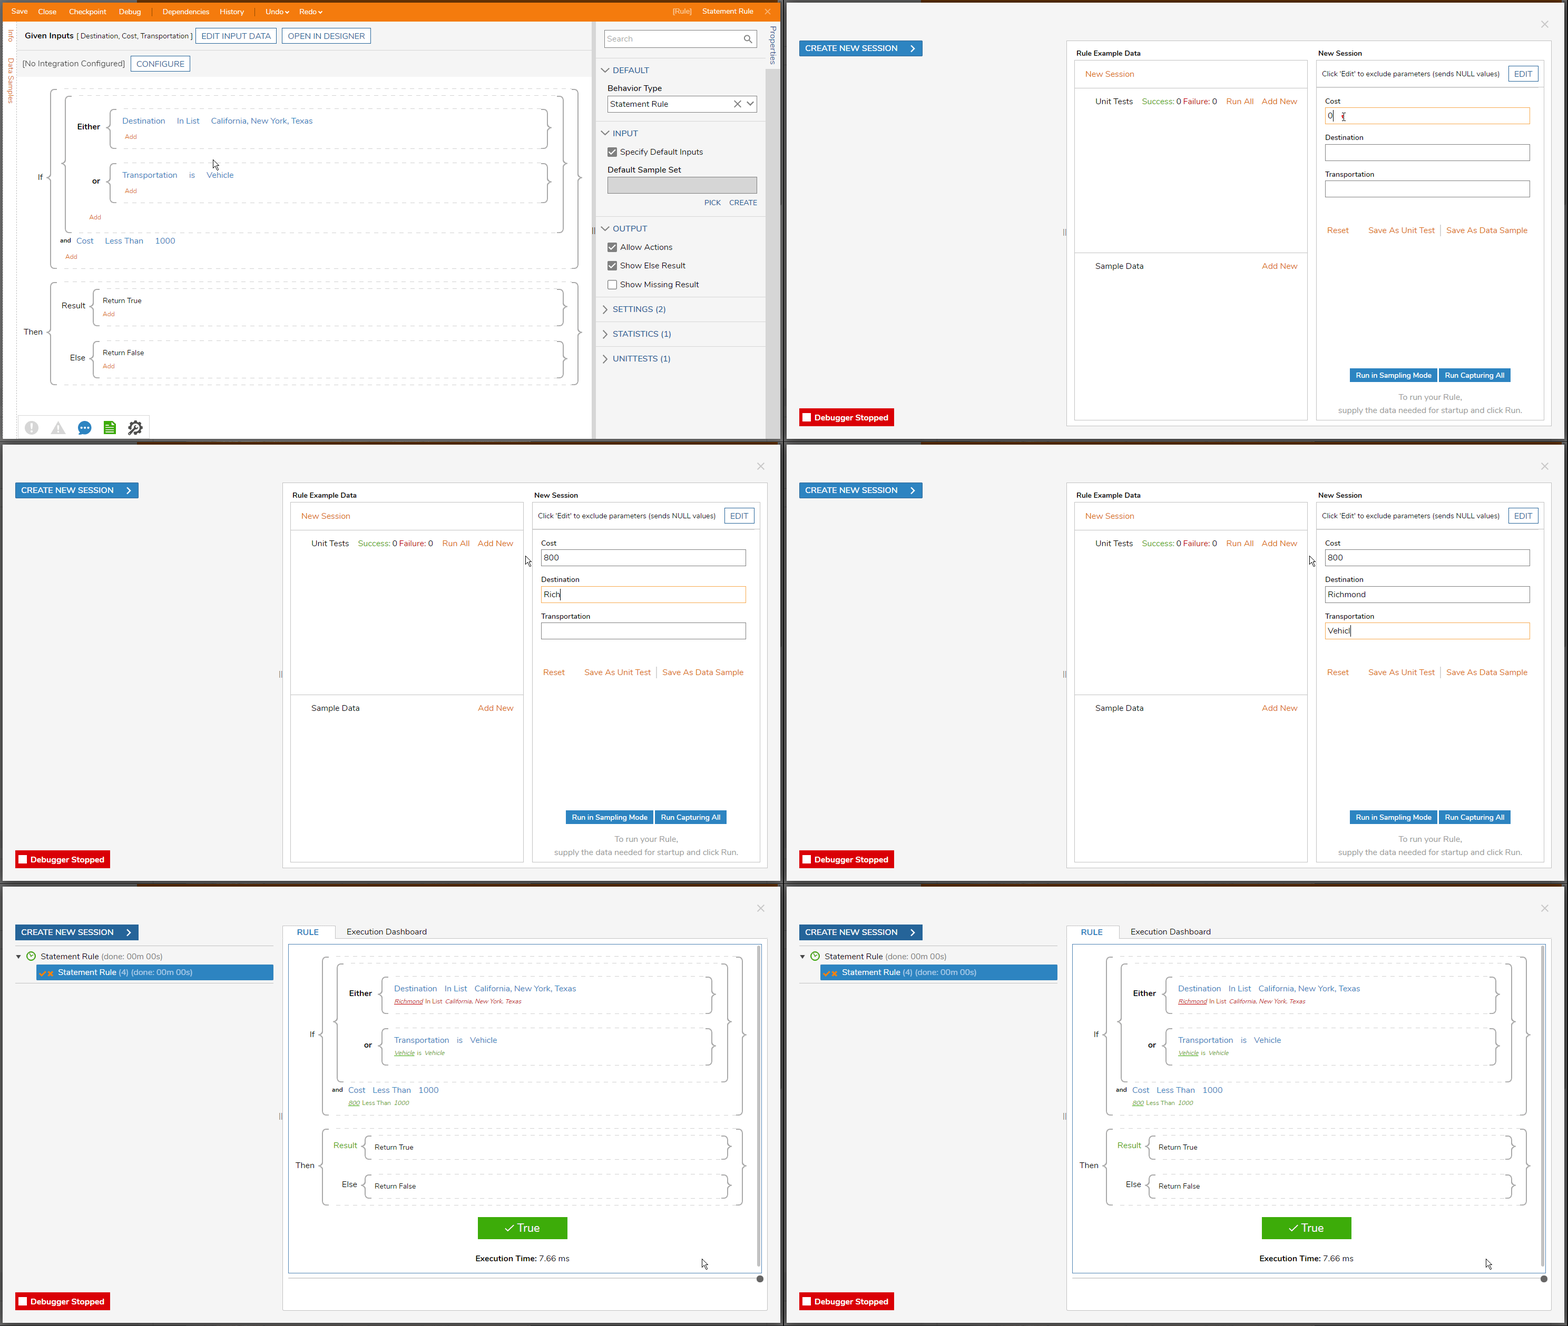
Either/Or: EITHER the destination is one of three cities OR the transportation is by vehicle AND the cost is below $1,000, then true.
To configure the example Rule:
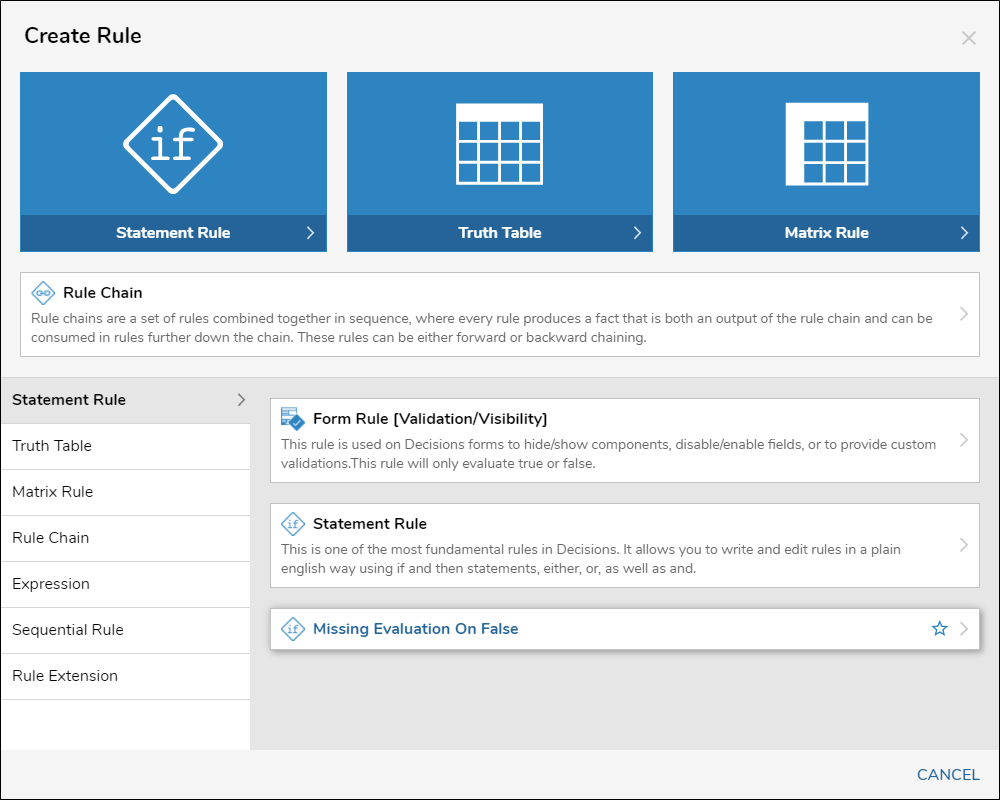
- In a Designer Folder, select the CREATE RULE button from the Global Action Bar. When the Create Rule window appears, select the Statement Rule button at the top after exploring other options. Provide a Name for the Rule, then select CREATE.
- In the Rule Designer, select the EDIT INPUT DATA button at the top of the window. From the Data Definitions window, add three pieces of Input Data named "Cost, Destination, and Transportation". About Input Data
- Both Destination and Transportation are String values.
- Cost is a Decimal type value.
Transportation is not used for the If/And Statement section, but it can be set up with the other Input Data.
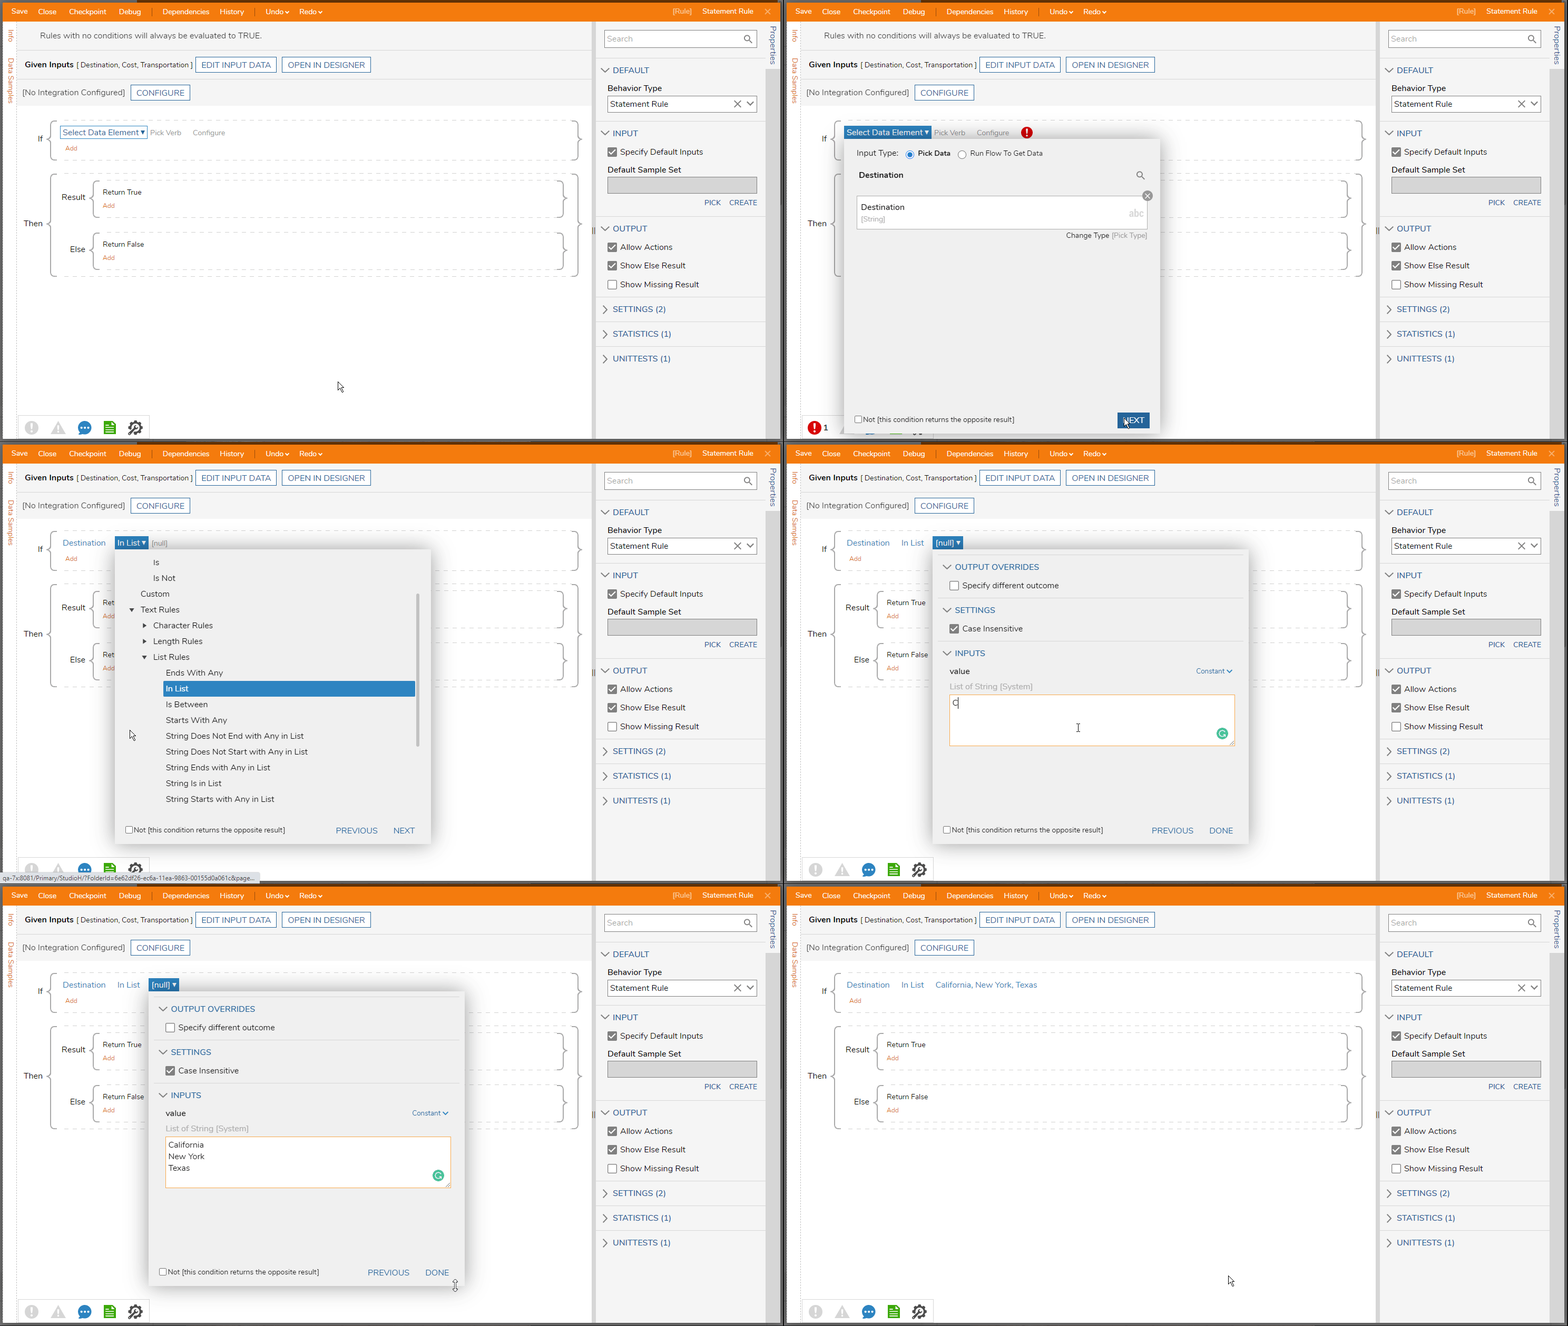
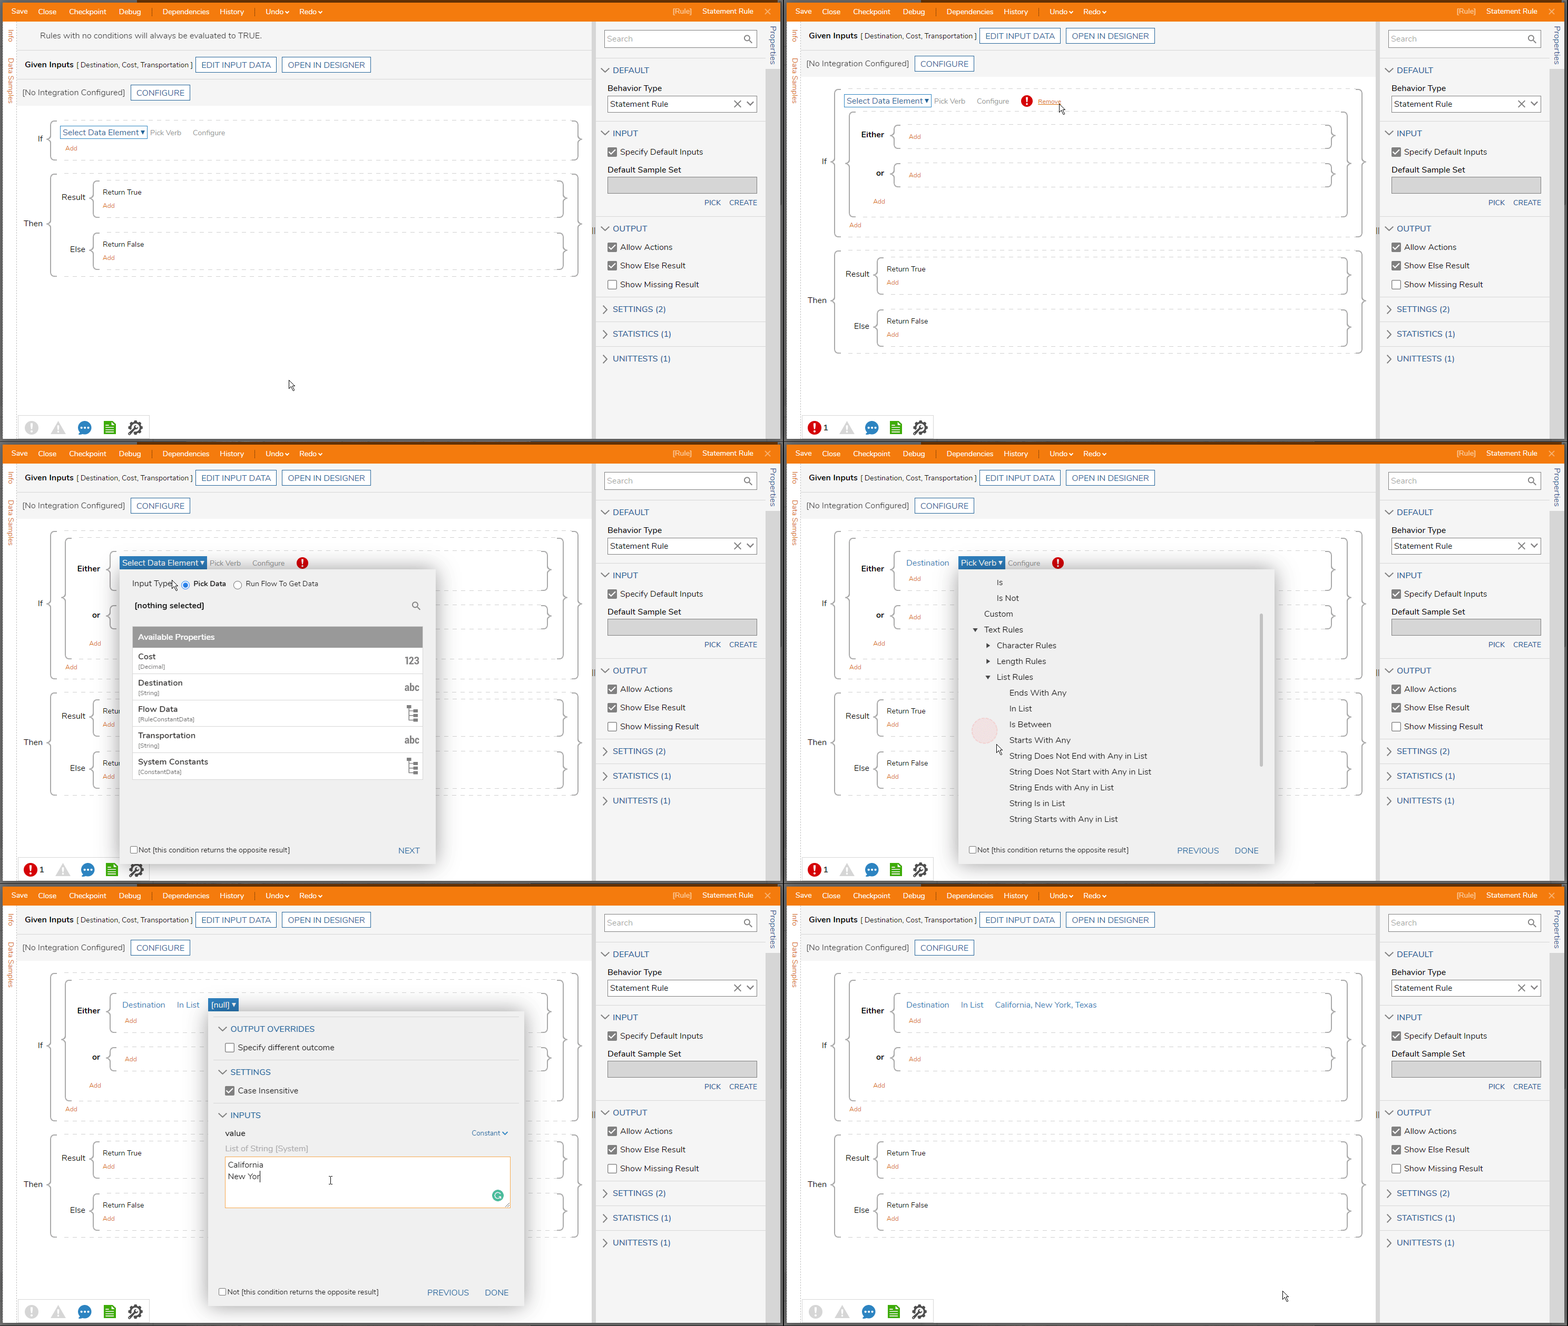
- In the Rule Designer, select [Select Data Element] following the If in the workspace. Choose Destination from the list that appears, then select the NEXT button.
- In the Pick Verb window, expand the List Rules section and select In List, then select NEXT.The Verb will display different categories depending on the Input Type (i.e. String Inputs will display text Rule Verbs and int32 will display number Rule Verbs).
- In the Configure window, use the Multi-Line Text Box to add "California", "New York", and "Texas" to the list. Select DONE once complete.
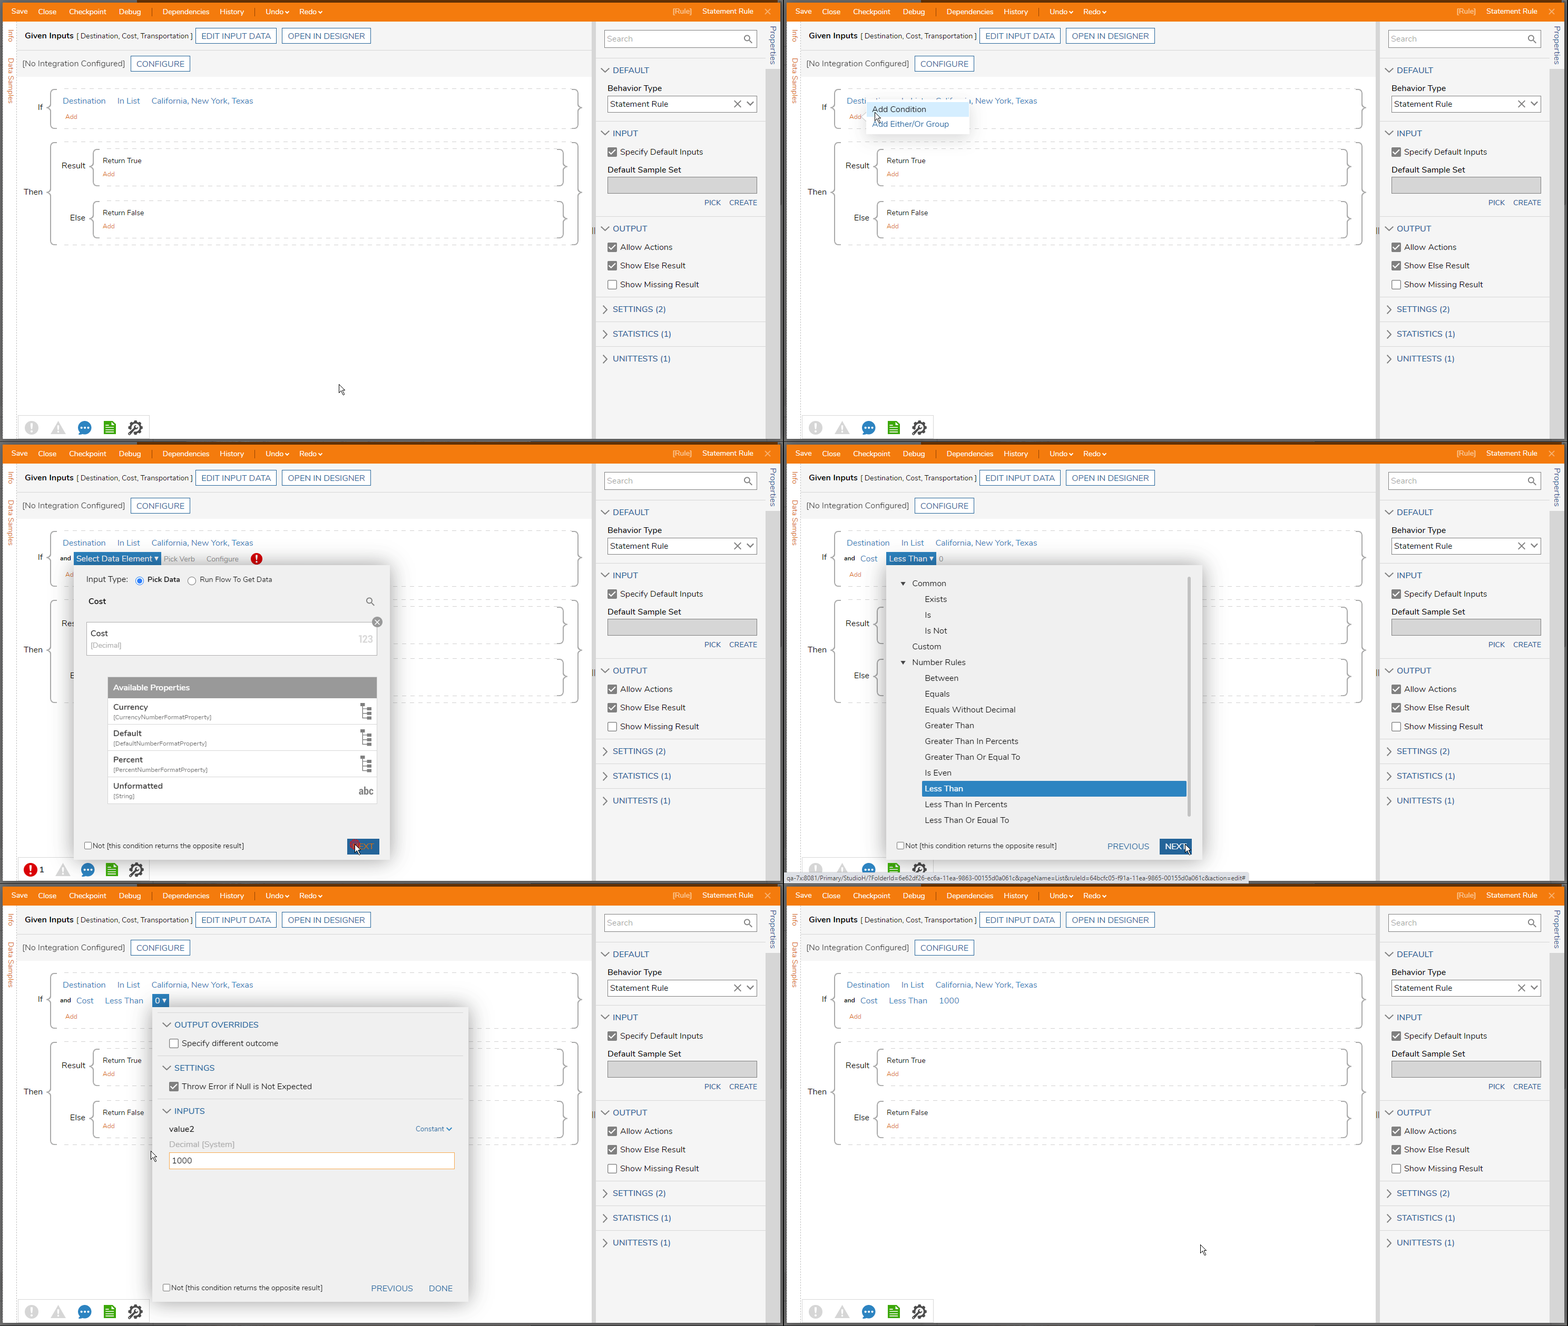
- Select the Add button below the previous Statement to include the "and" conjunction, which will create another line to configure the other condition.
- Similar to the method from the previous portion, create a Statement using Cost as the data element, Less Than as the Verb, and a Constant value of 1,000. About Rule Configuration
This Rule is configured to check Cost to ensure that a value below 1,000 is used.
- Select the Debug button at the top of the Rule Designer once the logic has been completely configured; the Input Data that was set up for the Rule will appear, where the "End-User Data" was entered and simulated. About Debug ResultsIn the capture below, the first evaluation contains a city that is not included in the Condition List, but the Cost is below $1000. Due to the Statement containing two conditions, both criteria must be met.
As the first condition before the conjunction evaluates the city, the Input Data would not pass, thus the Cost evaluation does not occur.
The second evaluation contains a city that is included in the Condition List, but the Cost is above $1000. This time, the Input Data passes the first evaluation (city is in List) but fails against the Cost being under $1000.
Both evaluations would result in a False outcome and lead down the respective Outcome Path in the Flow.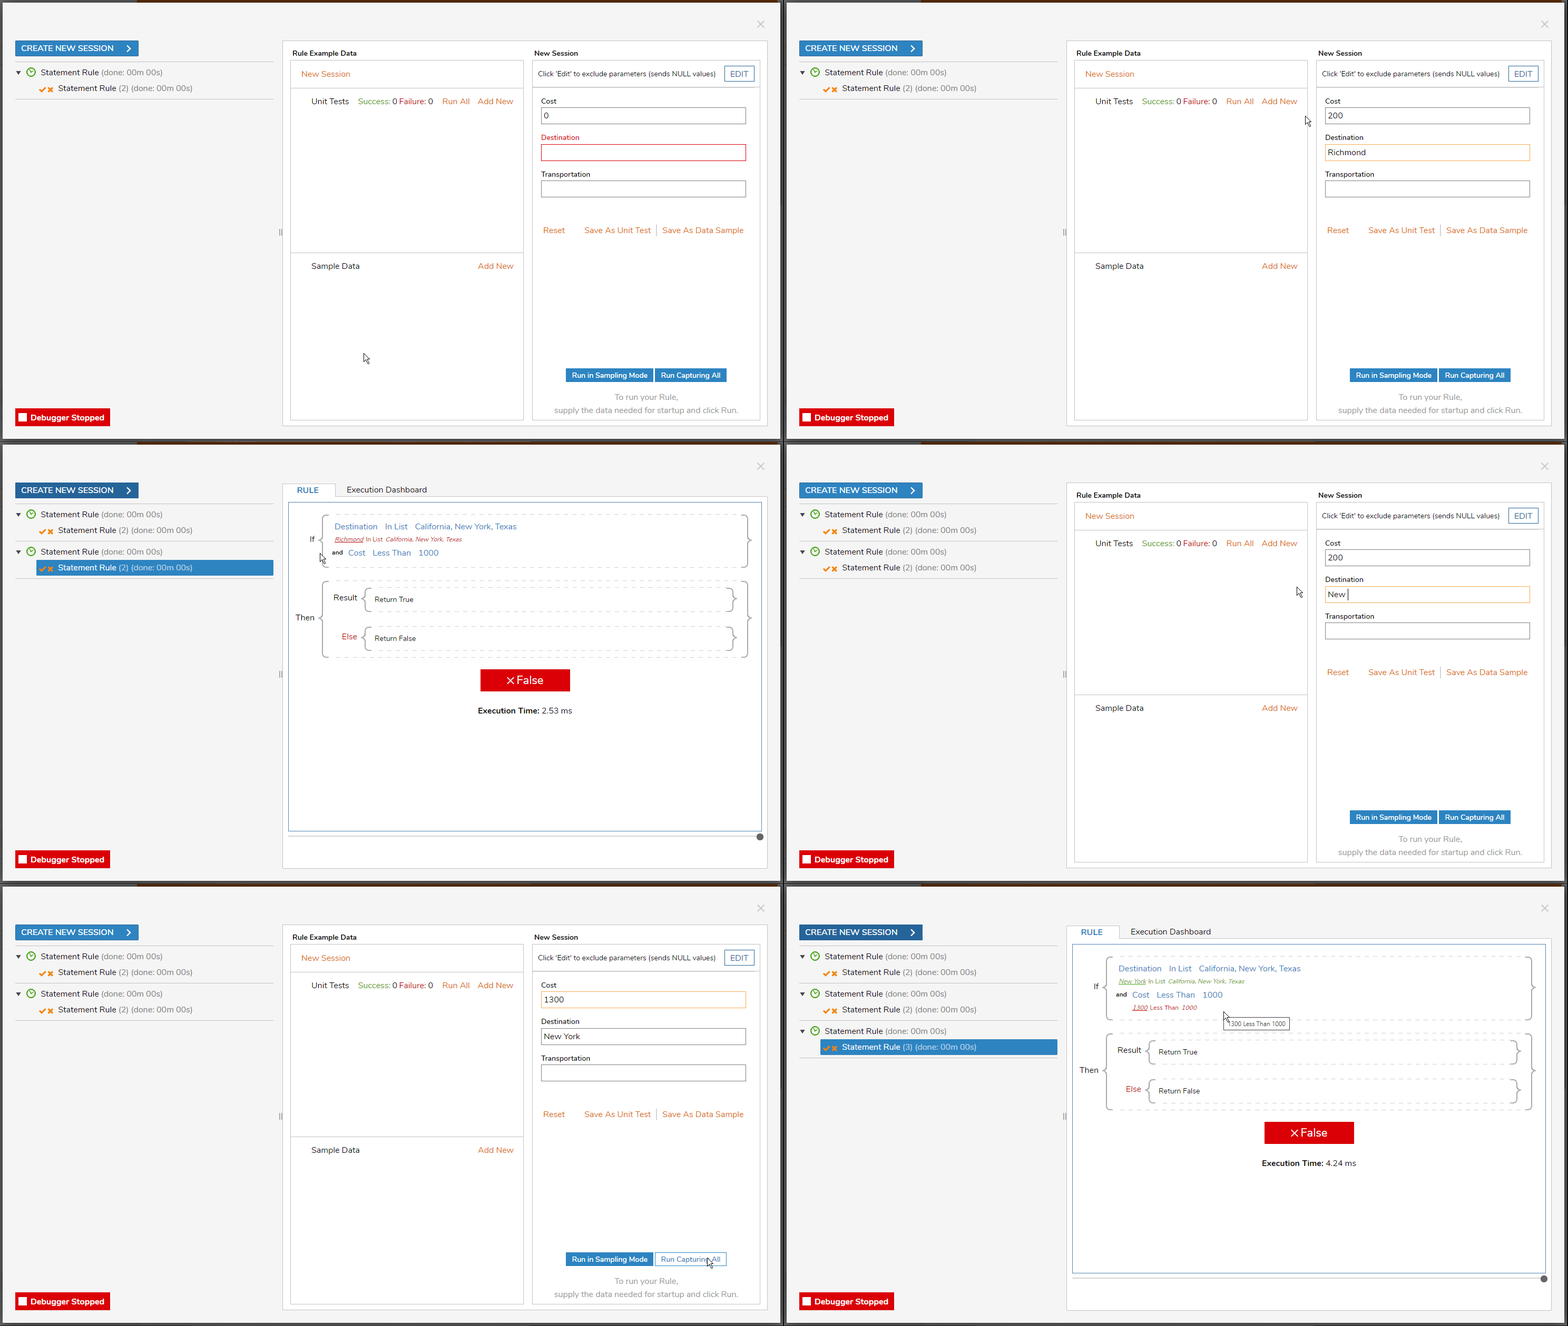
Example B: Either/Or Statement
The condition for the Cost is still applied.
To create the Either/Or Statement:
- With a blank slate in the Rule Designer, select the Add button below where the Statement would otherwise be configured; choose the option to Add Either/Or Group and click out of the first Data Element window that appears.
- Select Add on the Either line and choose the Add Condition option; configure the Statement with the same Destination condition from the previous example.
- Select Add on the or line and choose the Add Condition option. Configure the Statement using Transportation as the Data Element, Is as the Verb, and a constant Vehiclevalue.Optional ConfigurationOptionally, select the Add button under the Either/Or Statement to add an "and" conjunction, for including the cost condition as well.
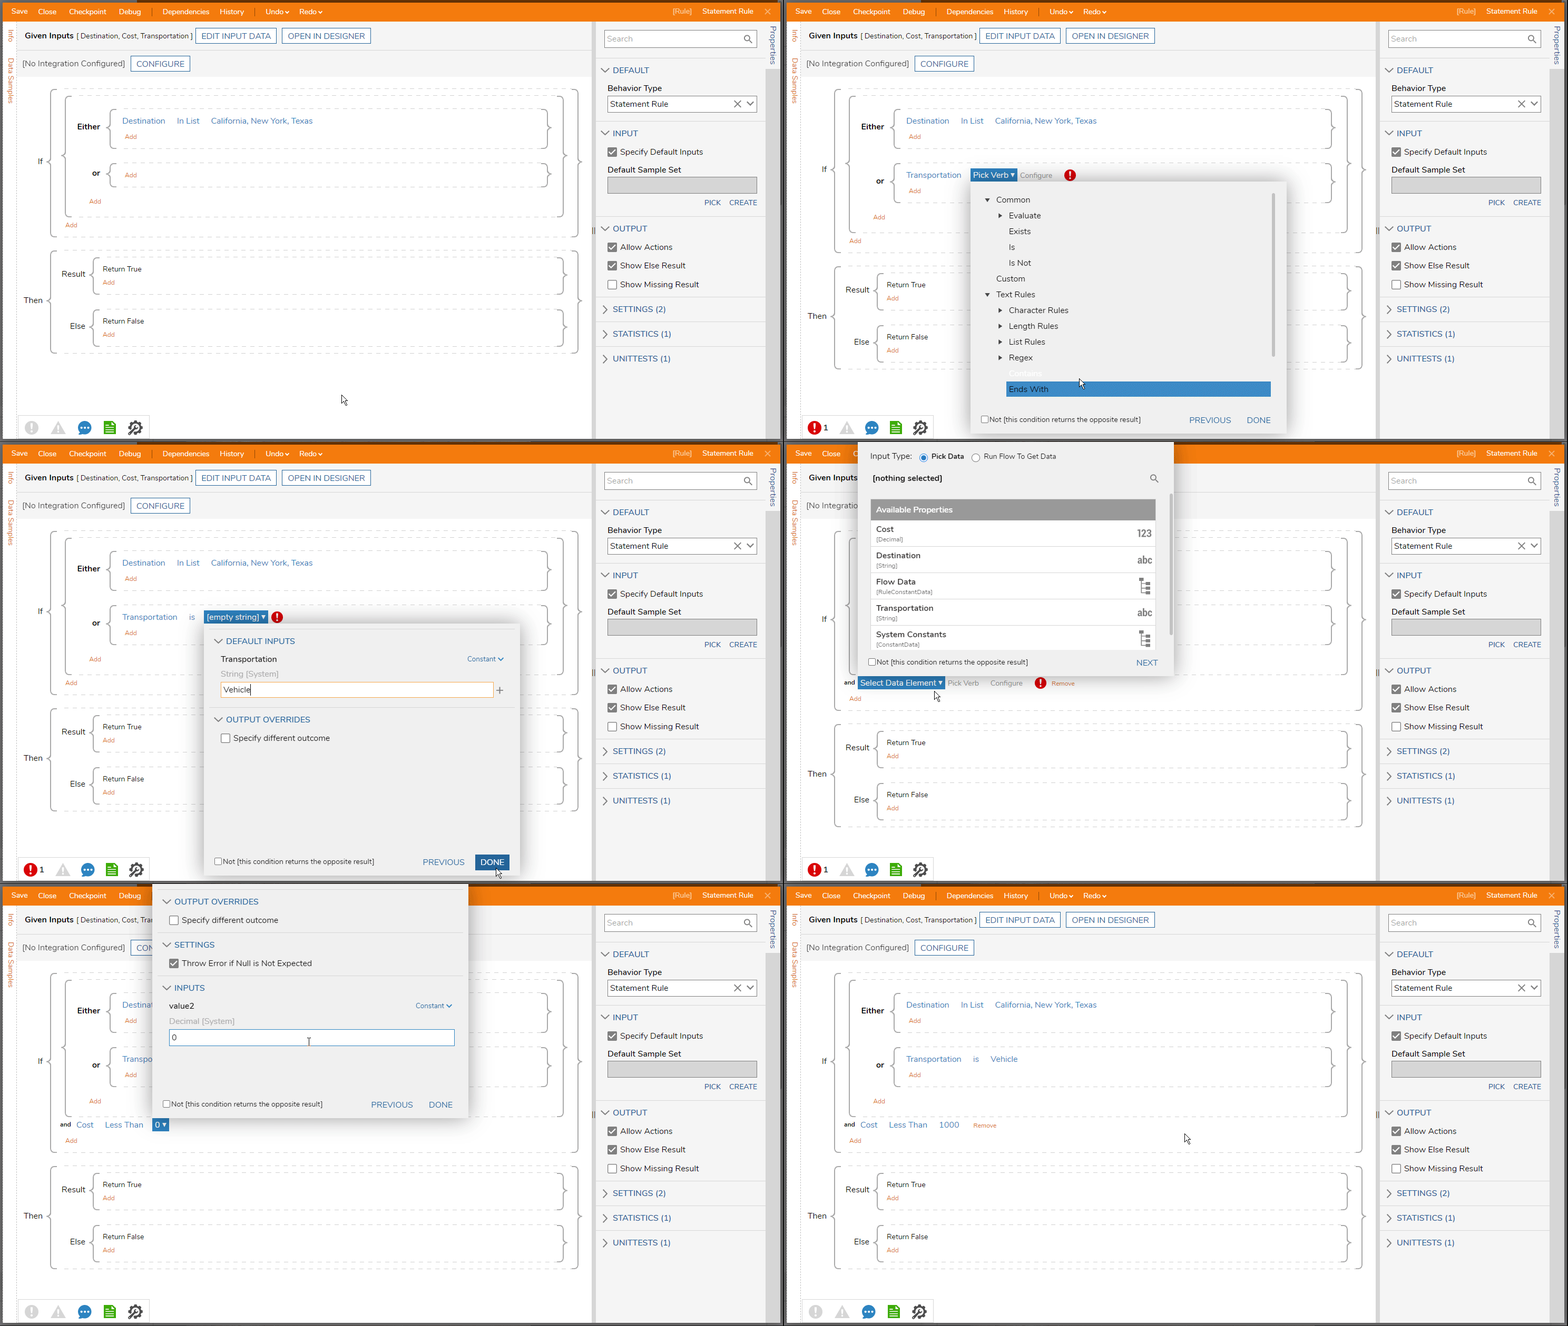
Debug the Rule.
About Debug ResultsThe following evaluation contains a city that is not on the List, but the Transportation method selected is Vehicle and the Cost is below $1000.
The Debugger shows that this does pass one of the Either/Or conditions since it fits ether condition, and passes the extra Cost condition; overall the Input on this Rule would evaluate True and follow down that respective Outcome Path in the Flow.