Overview
The following tutorial demonstrates how to use specific Steps in the Flow Designer to obtain values from an Excel Document, as well as how to Update values in the Excel Document (Set Values, Replace Values, Delete Row, etc.)
Example
Download the files below:
Display Data in Form
- From a Designer Project, select the CREATE FLOW button from the Global Action Bar; select Flow, provide a Name, and click CREATE.
- From the Flow Designer, attach a Create Data step from the FAVORITE STEPS category of the Toolbox tab, to the Start step.
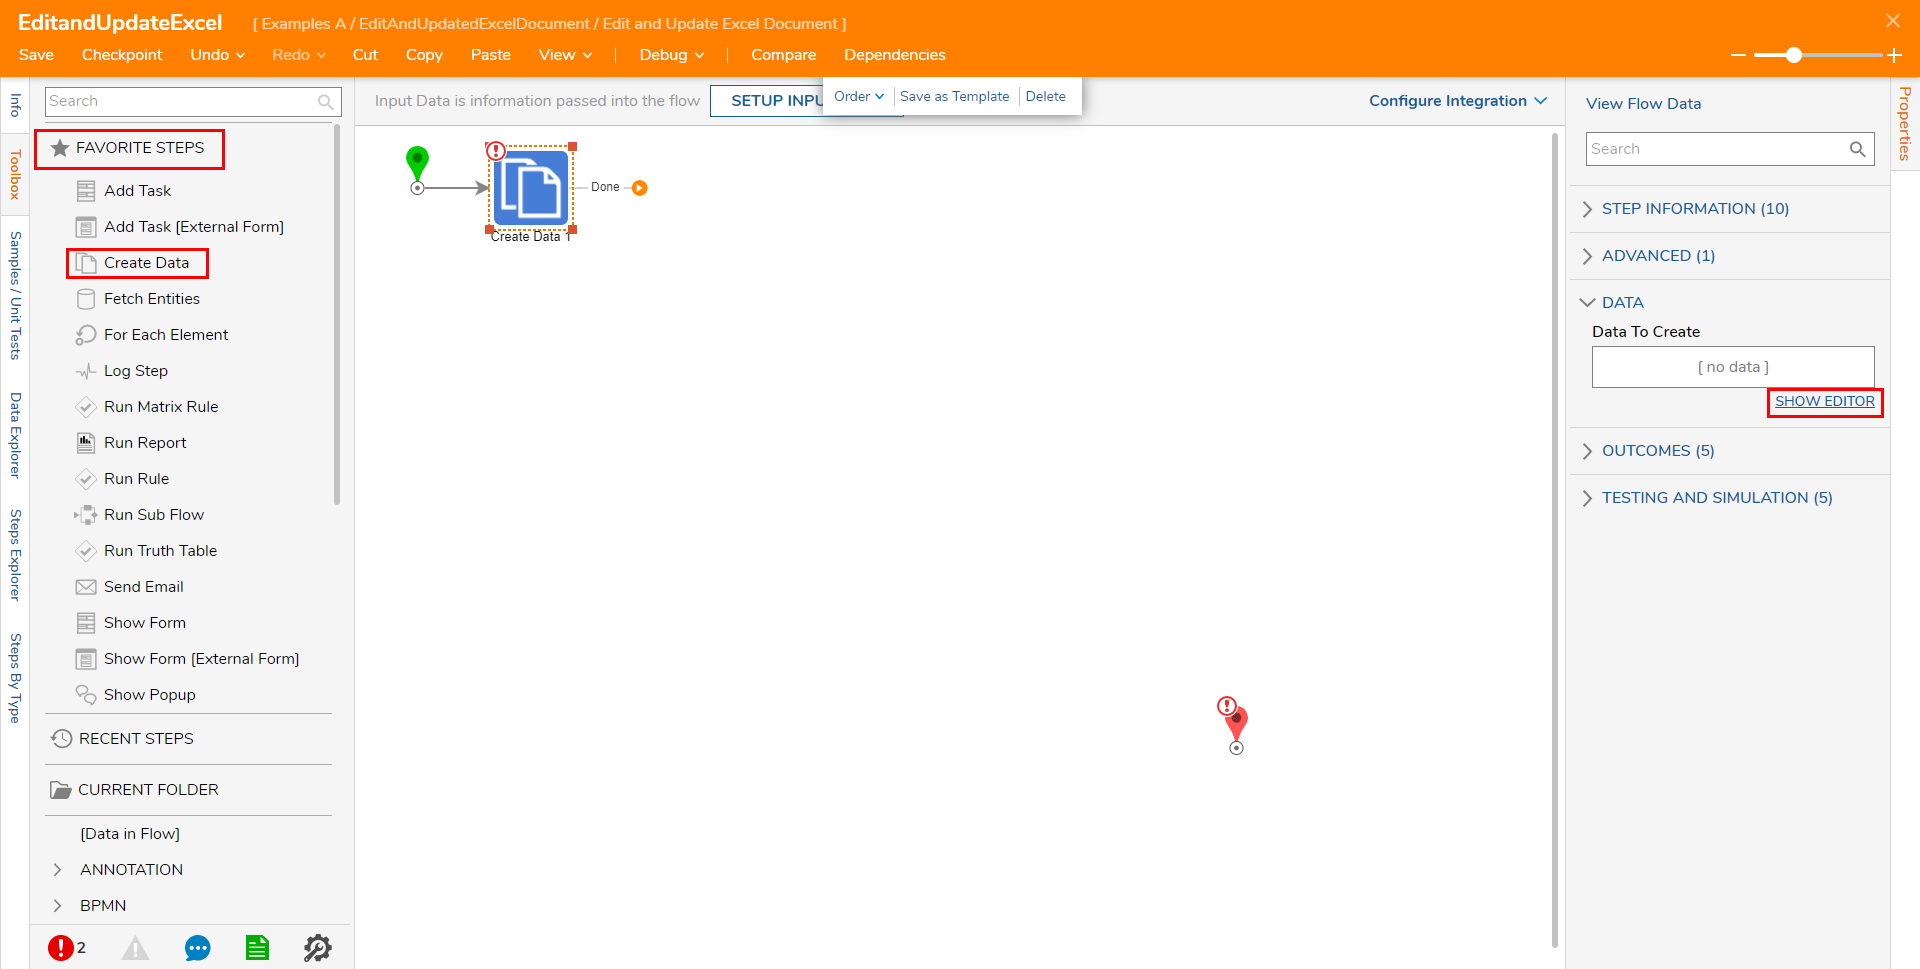
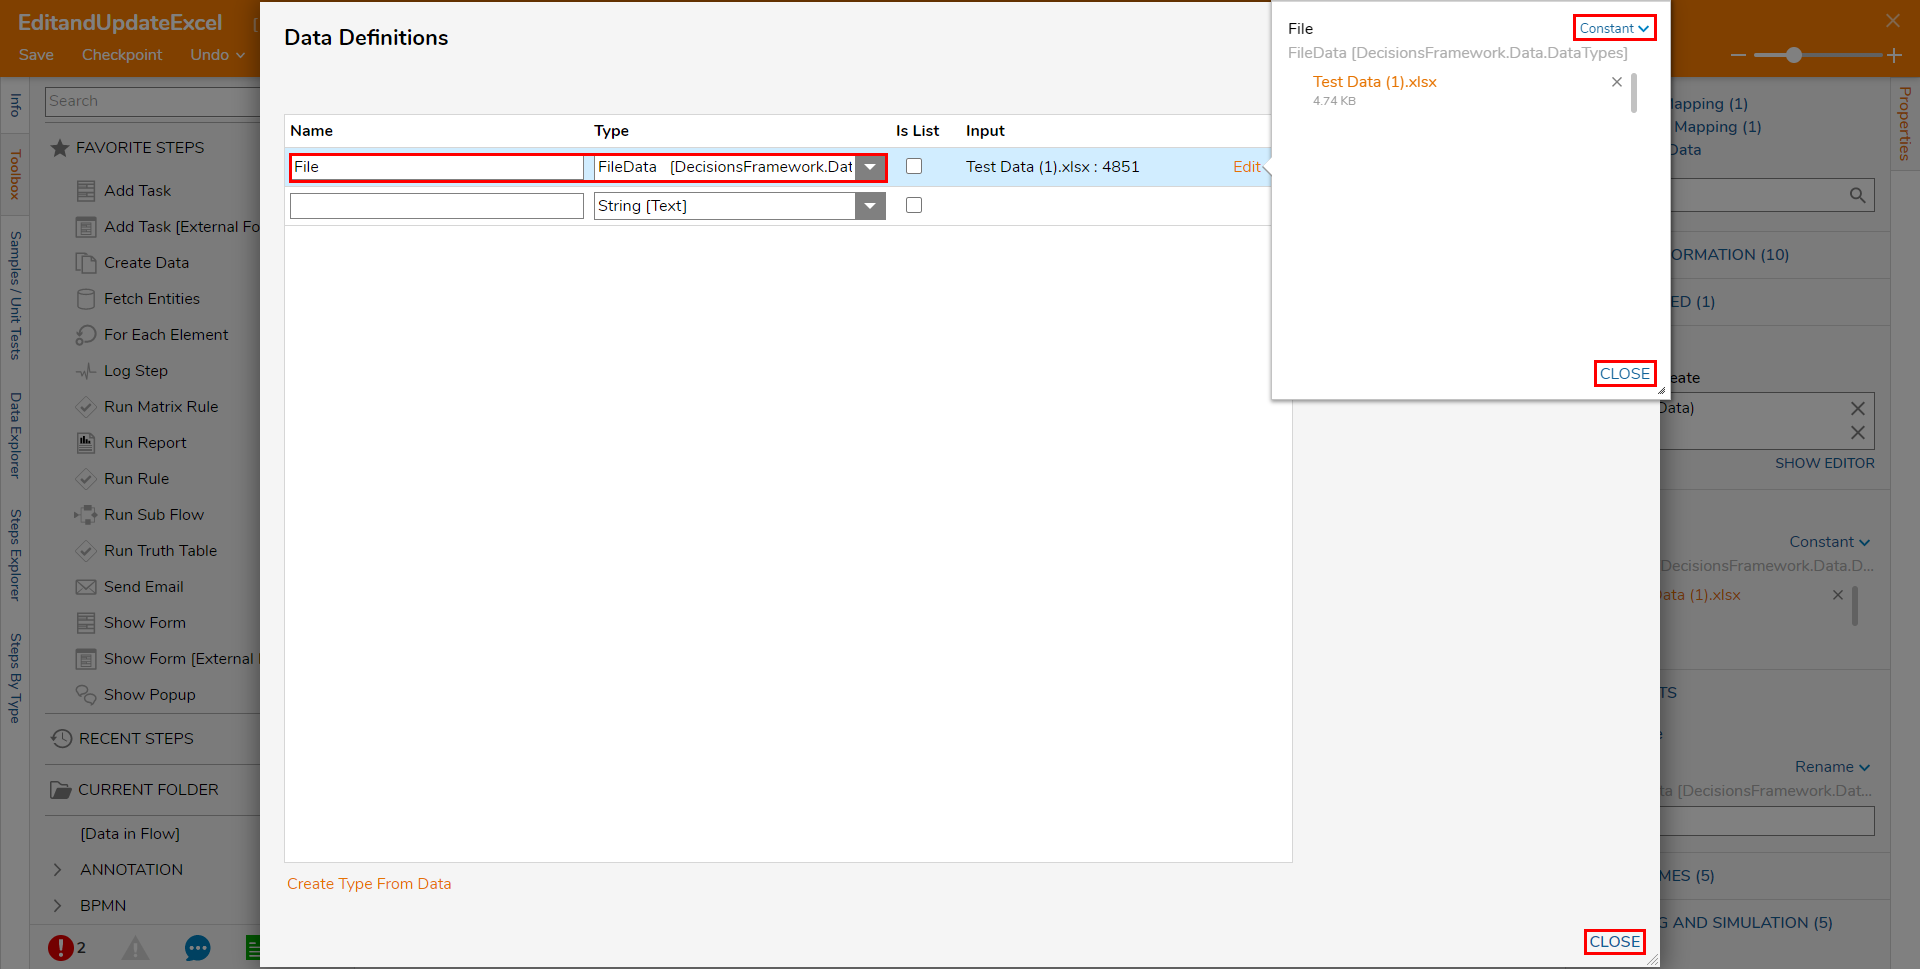
- From the Properties tab of the Create Data step, under DATA > Data To Create, click SHOW EDITOR. From the Data Definitions window, Name the Data "File", select FileData from the Type dropdown, then Constant map the sample Excel sheet to the Input. CLOSE the window to save.
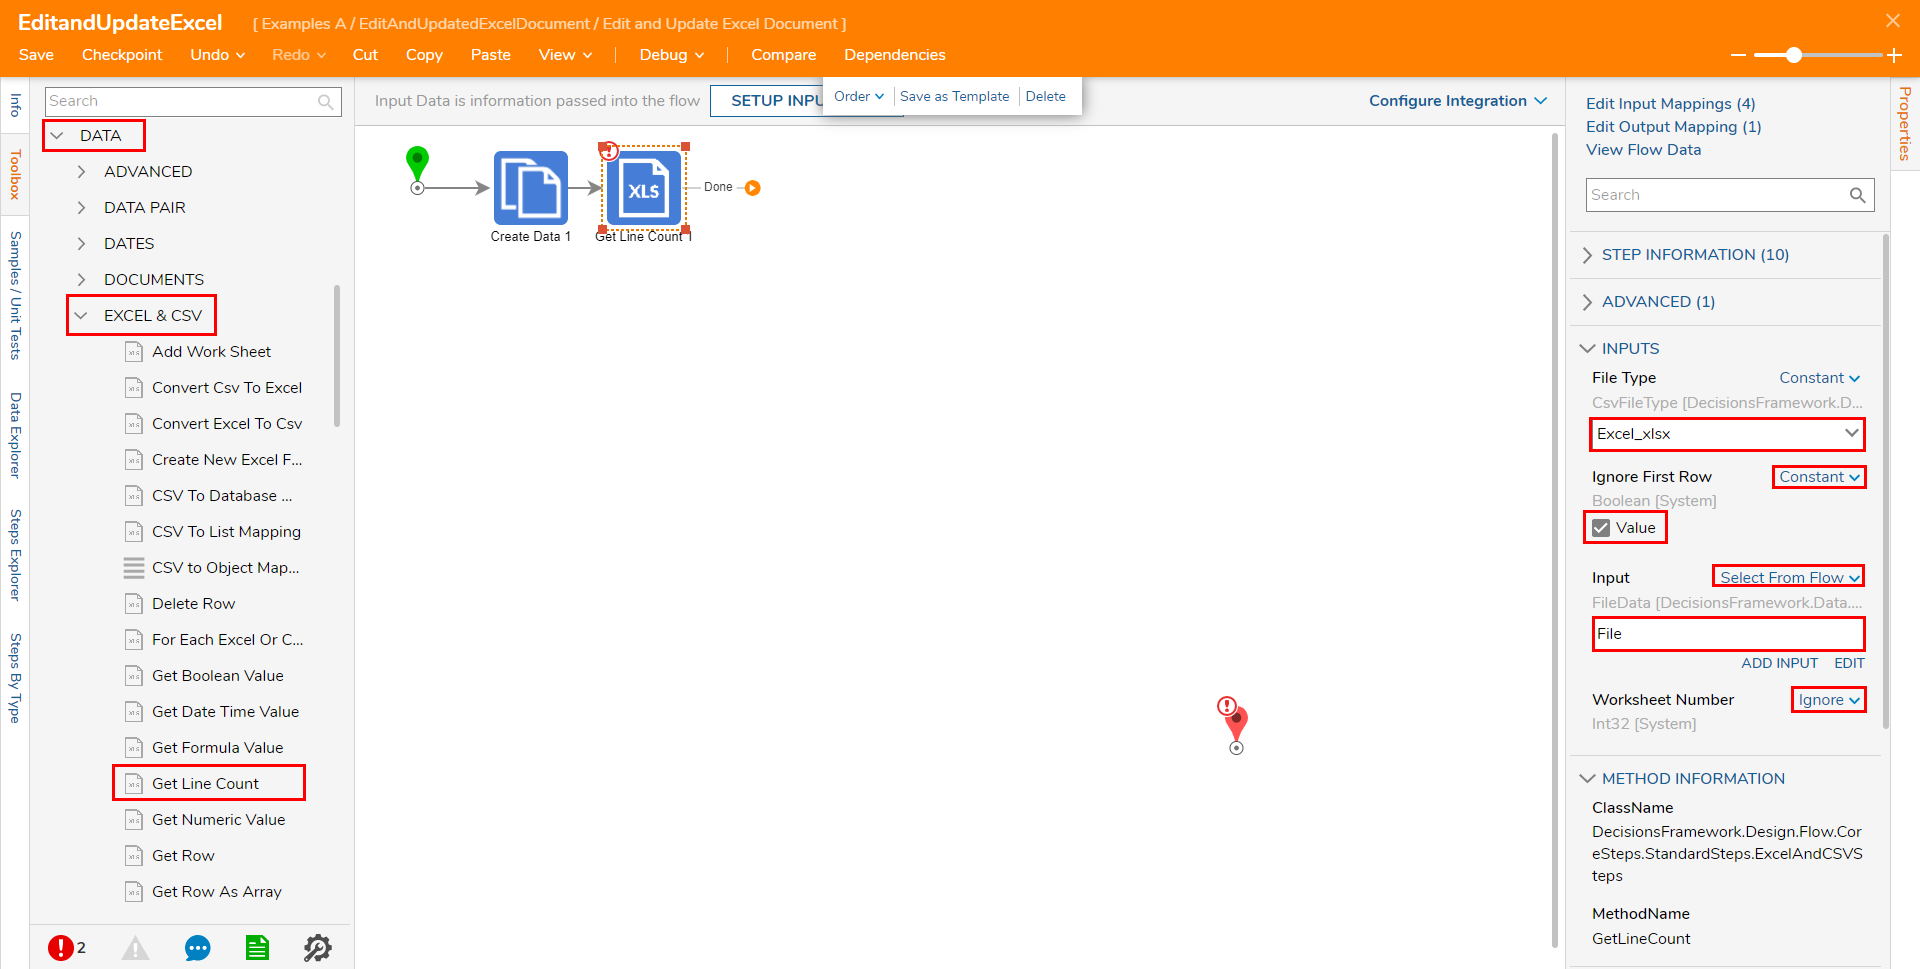
- From Toolbox > DATA > EXCEL & CSV attach a Get Line Count step to the Create Data step. From this step's Properties tab, Constant map File to Input then select the corresponding File Type (Excel_xslx) from the dropdown menu. Then, Constaqnt map True to Ignore First Row and set Worksheet Number to Ignore. The step returns the number of Rows in the Excel document.
Attach a Get Row step from the same EXCEL & CSV category, to the Get Line Count step. From the Get Row step's Properties tab, map File to its respective INPUT, set File Type to Excel_xlsx, set Ignore First Row to True, and Constant map "0" to Row Number. Set Worksheet Number to Ignore.
This step returns Data for the configured Row.Setting Row Number dictates to 0 the step to pull Input from the first Row of the Excel file.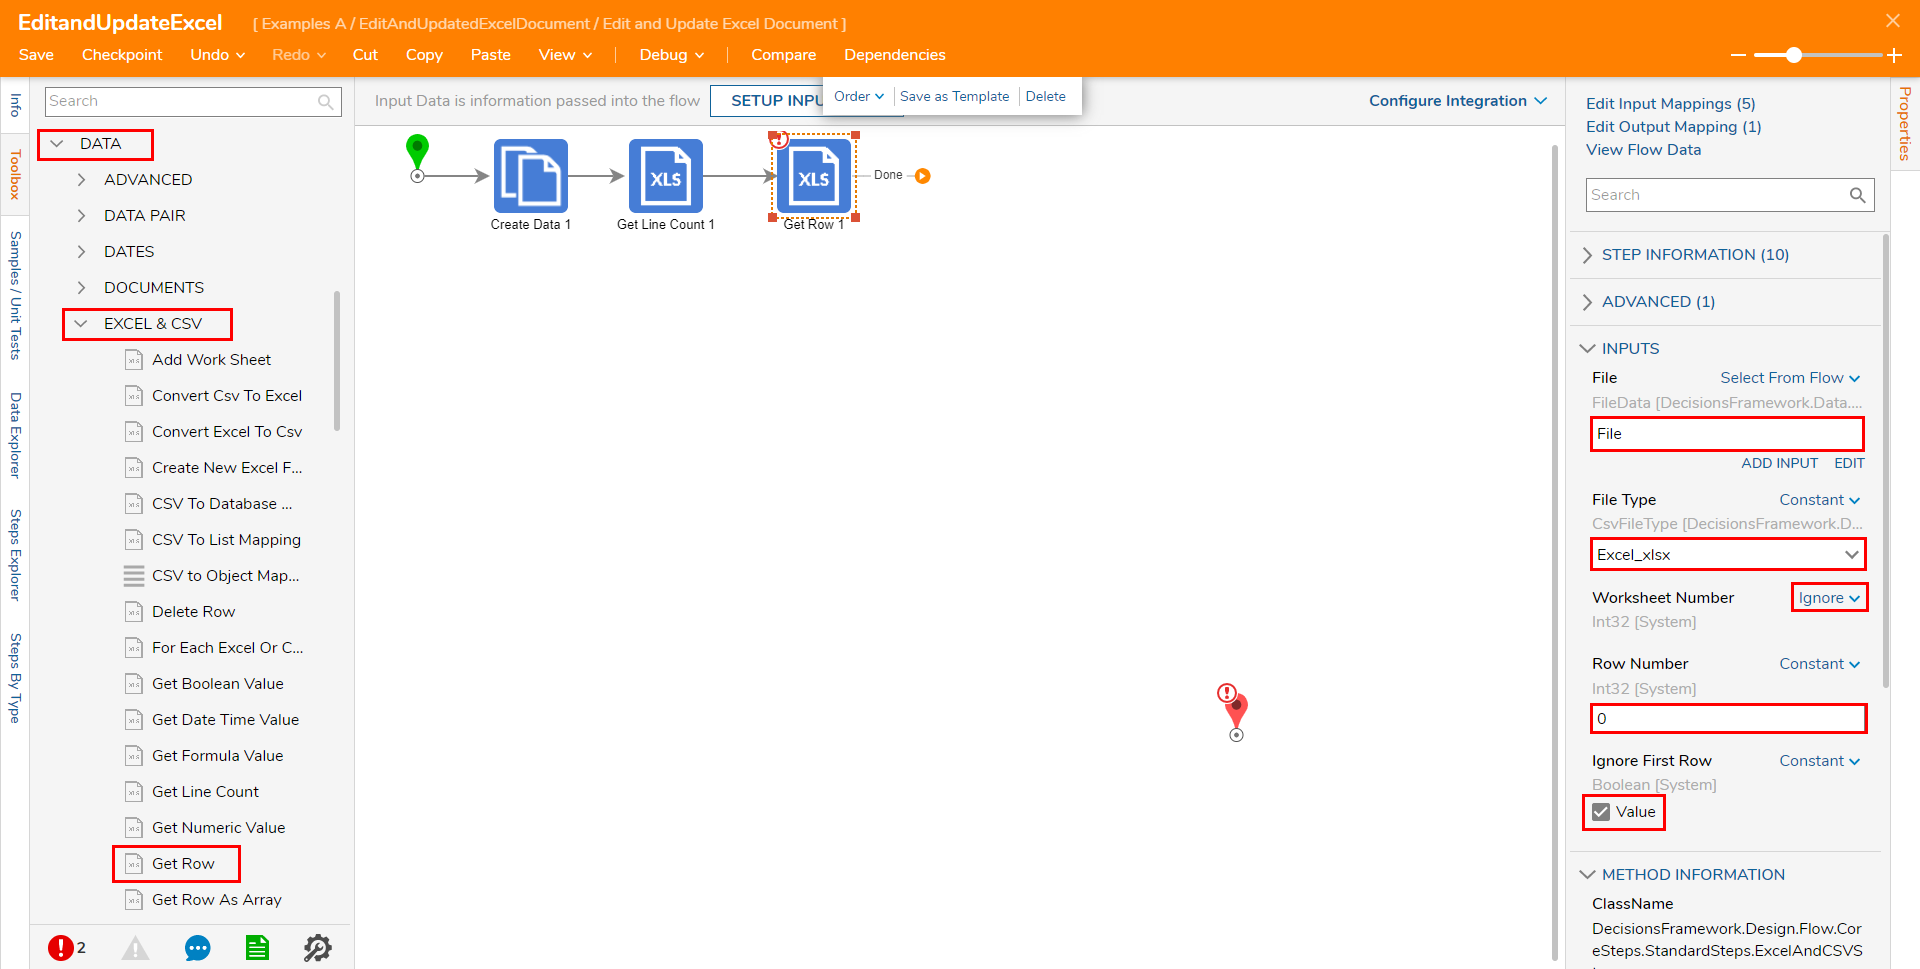
From EXCEL & CSV, attach a Get Value step. From the Get Value step's Properties, map the INPUTS as follows; Constant map "2" to Column, set File Type to Excel_xlsx, set Ignore First Row to True. Then, map File to Input, Constant map "0" to Row, and set Worksheet Number to Ignore.
The Get Value step obtains Data from a specified cell on the Excel sheet.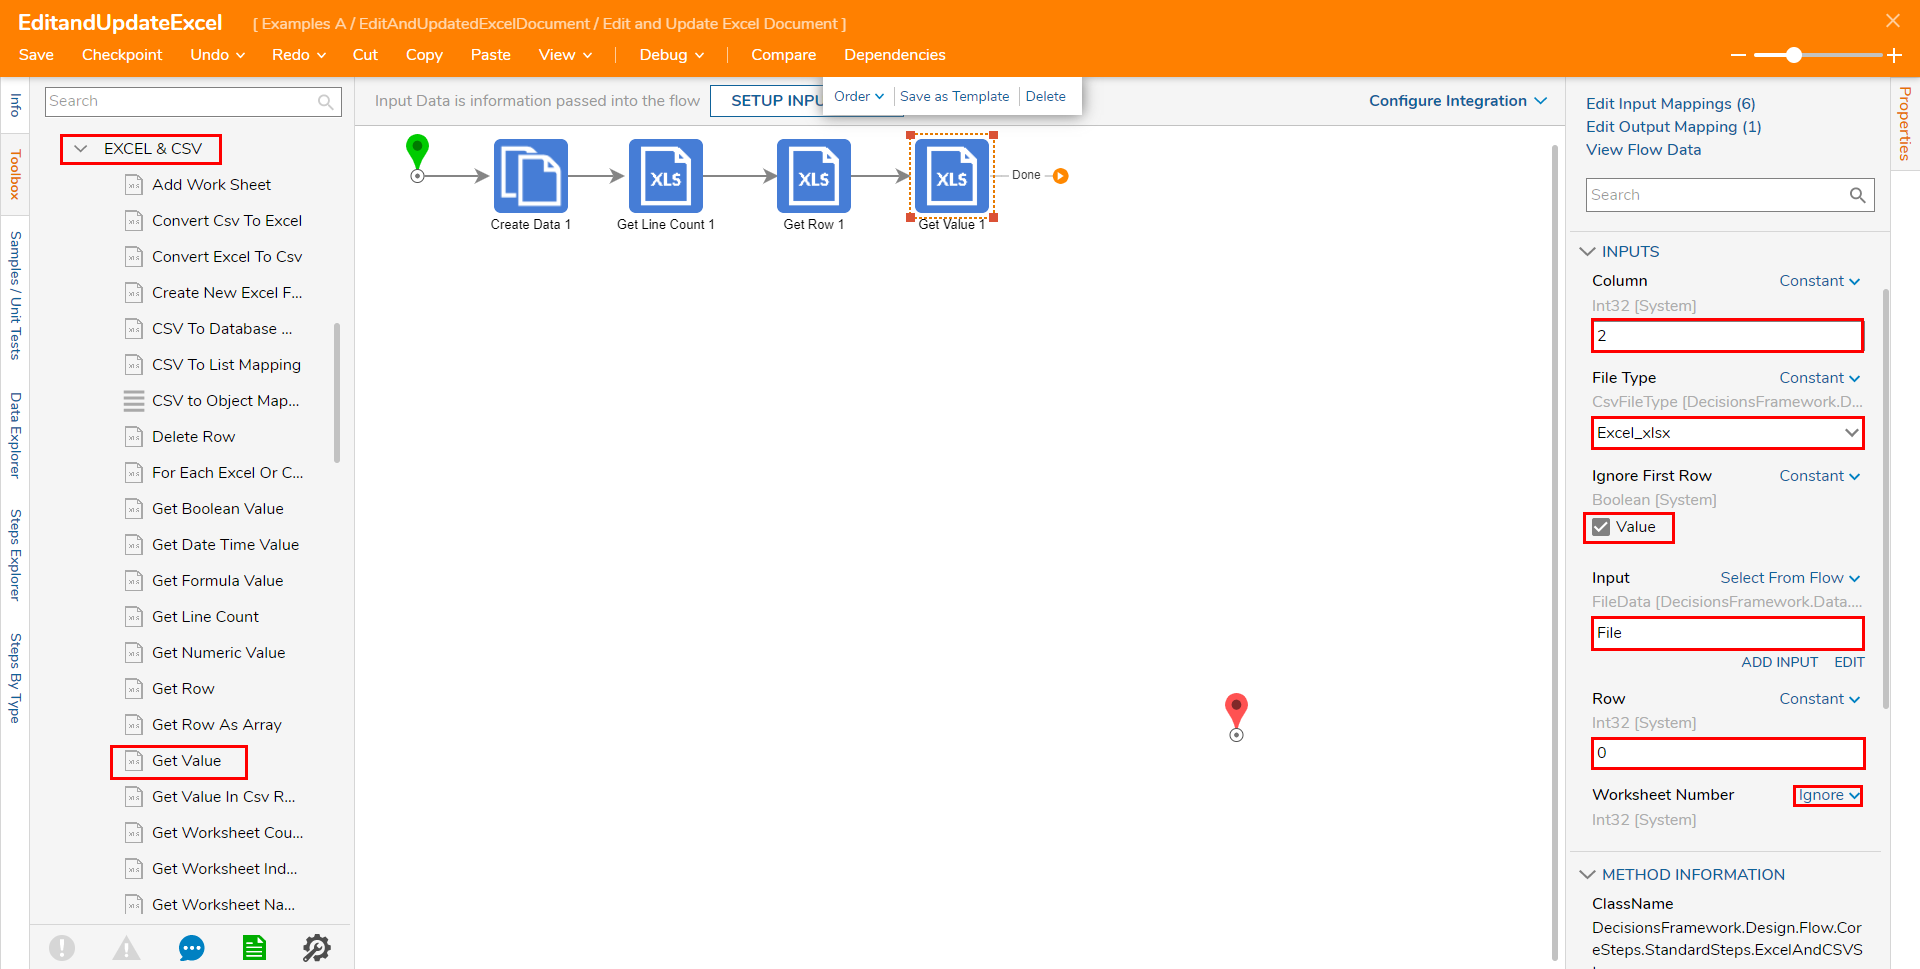
Attach a Get Row As Array step to the Get Value step. Similar to previous steps, from the Properties tab, map File to File, set File Type to Excel_xlsx, Worksheet to Ignore, and Ignore First Row to True. Afterward, set Row Number to "1", and set Include Empty Columns to False.
This step is used as an alternate method for obtaining Data from a specific Row in an Excel file. This step returns Data in the form of an Array of Strings, with each String being a single value from each Column in the Row.
This step will return data from the second Row in the spreadsheet.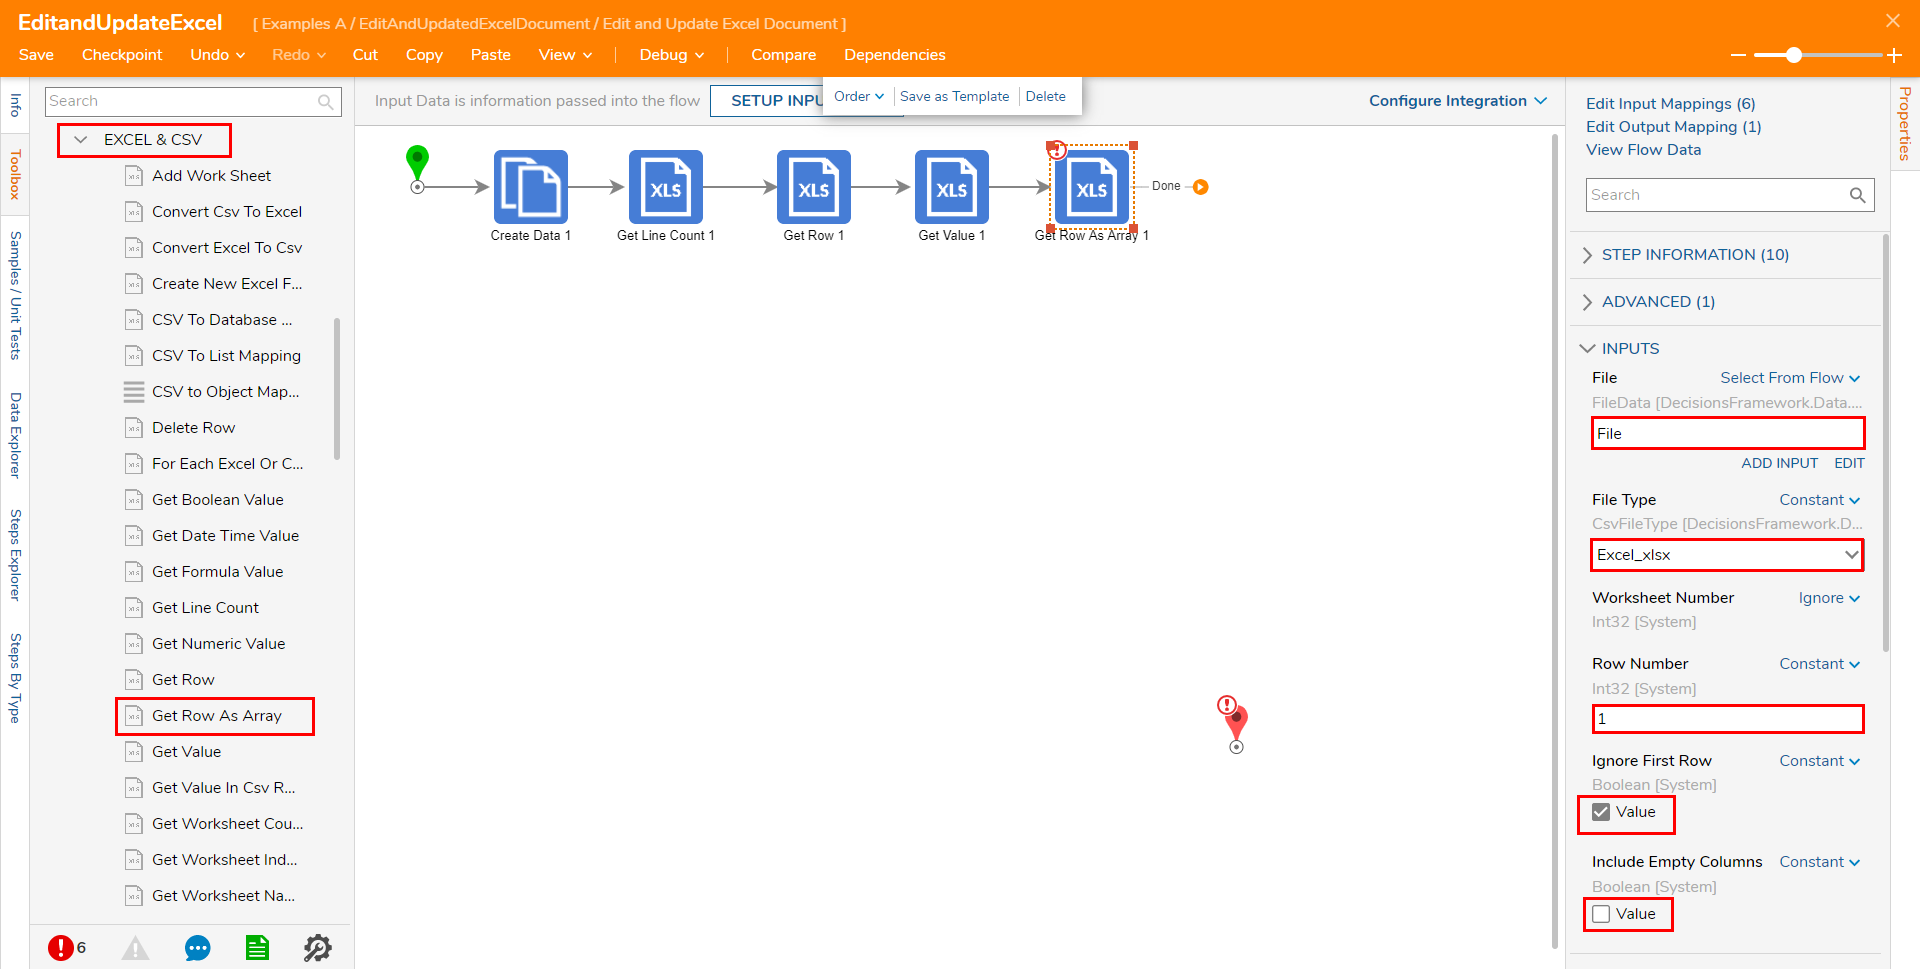
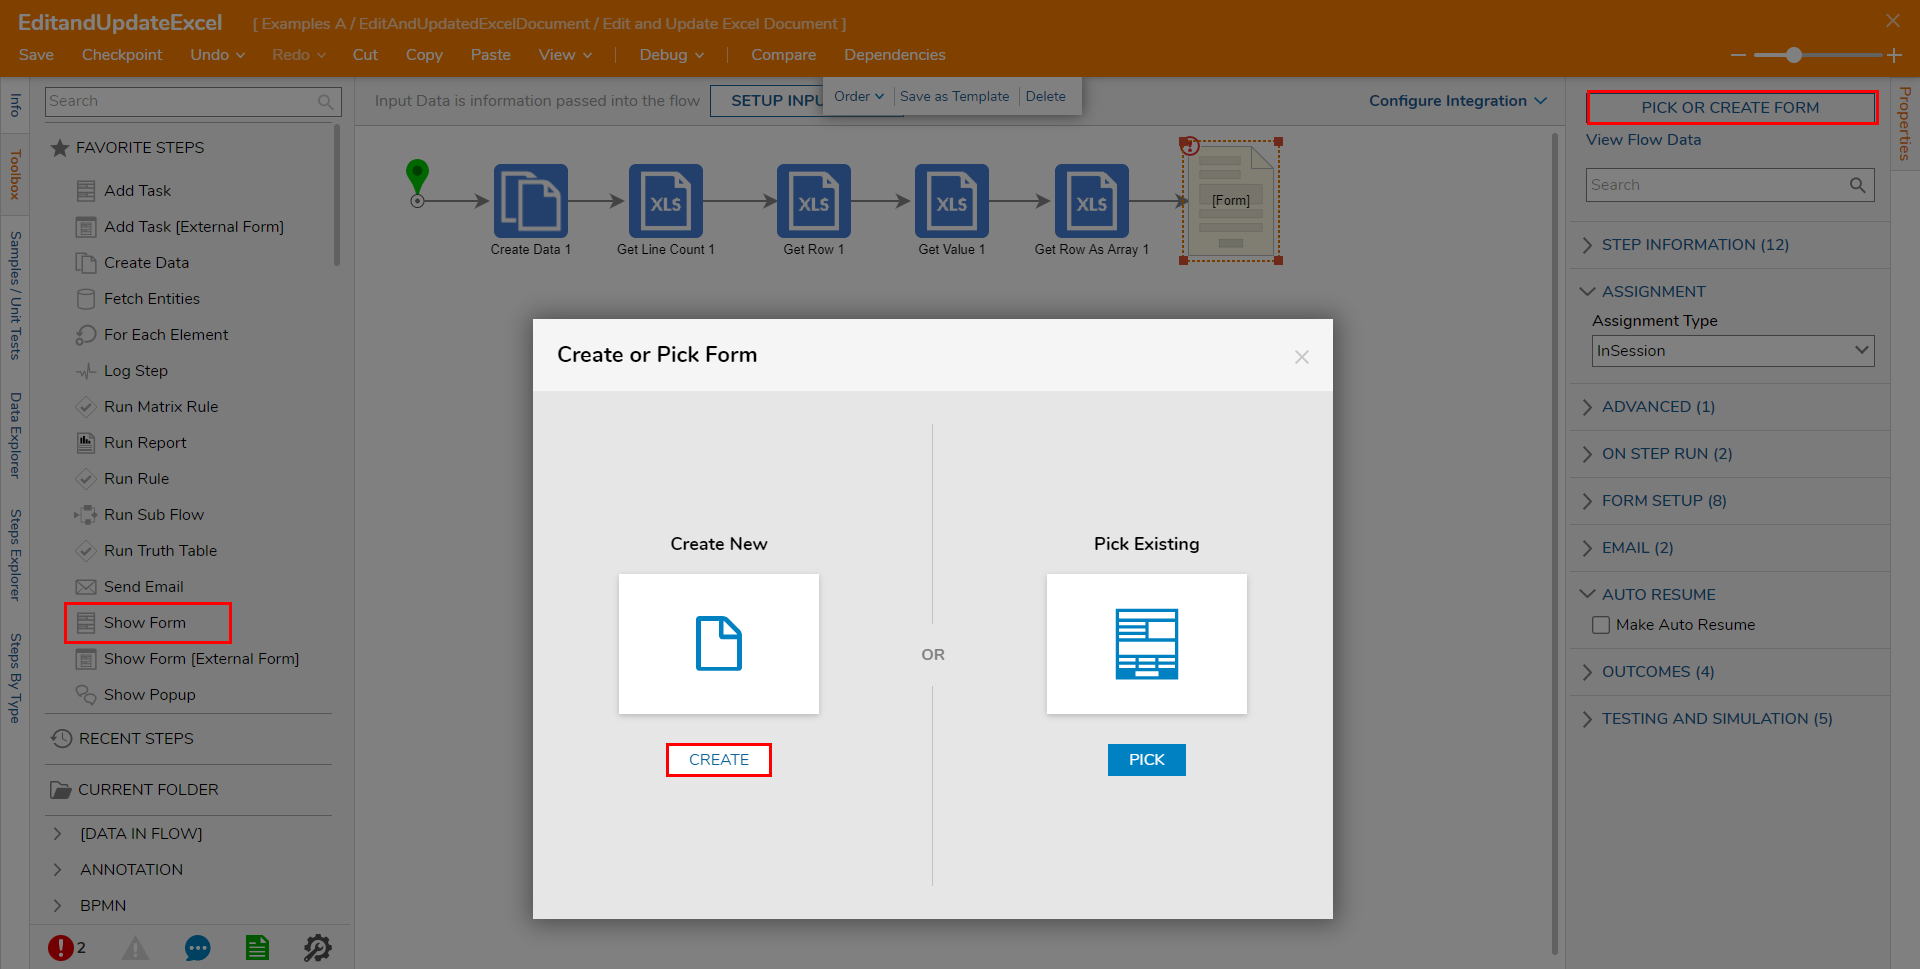
Attach a Show Form step from Toolbox > FAVORITE STEPS to the Get Row As Array step, click PICK OR CREATE FORM, then CREATE a new Form.
From the Form Designer, create a Form that utilizes a submission Button, four Label components, three Text Box components, from the FAVORITES category of the Toolbox.
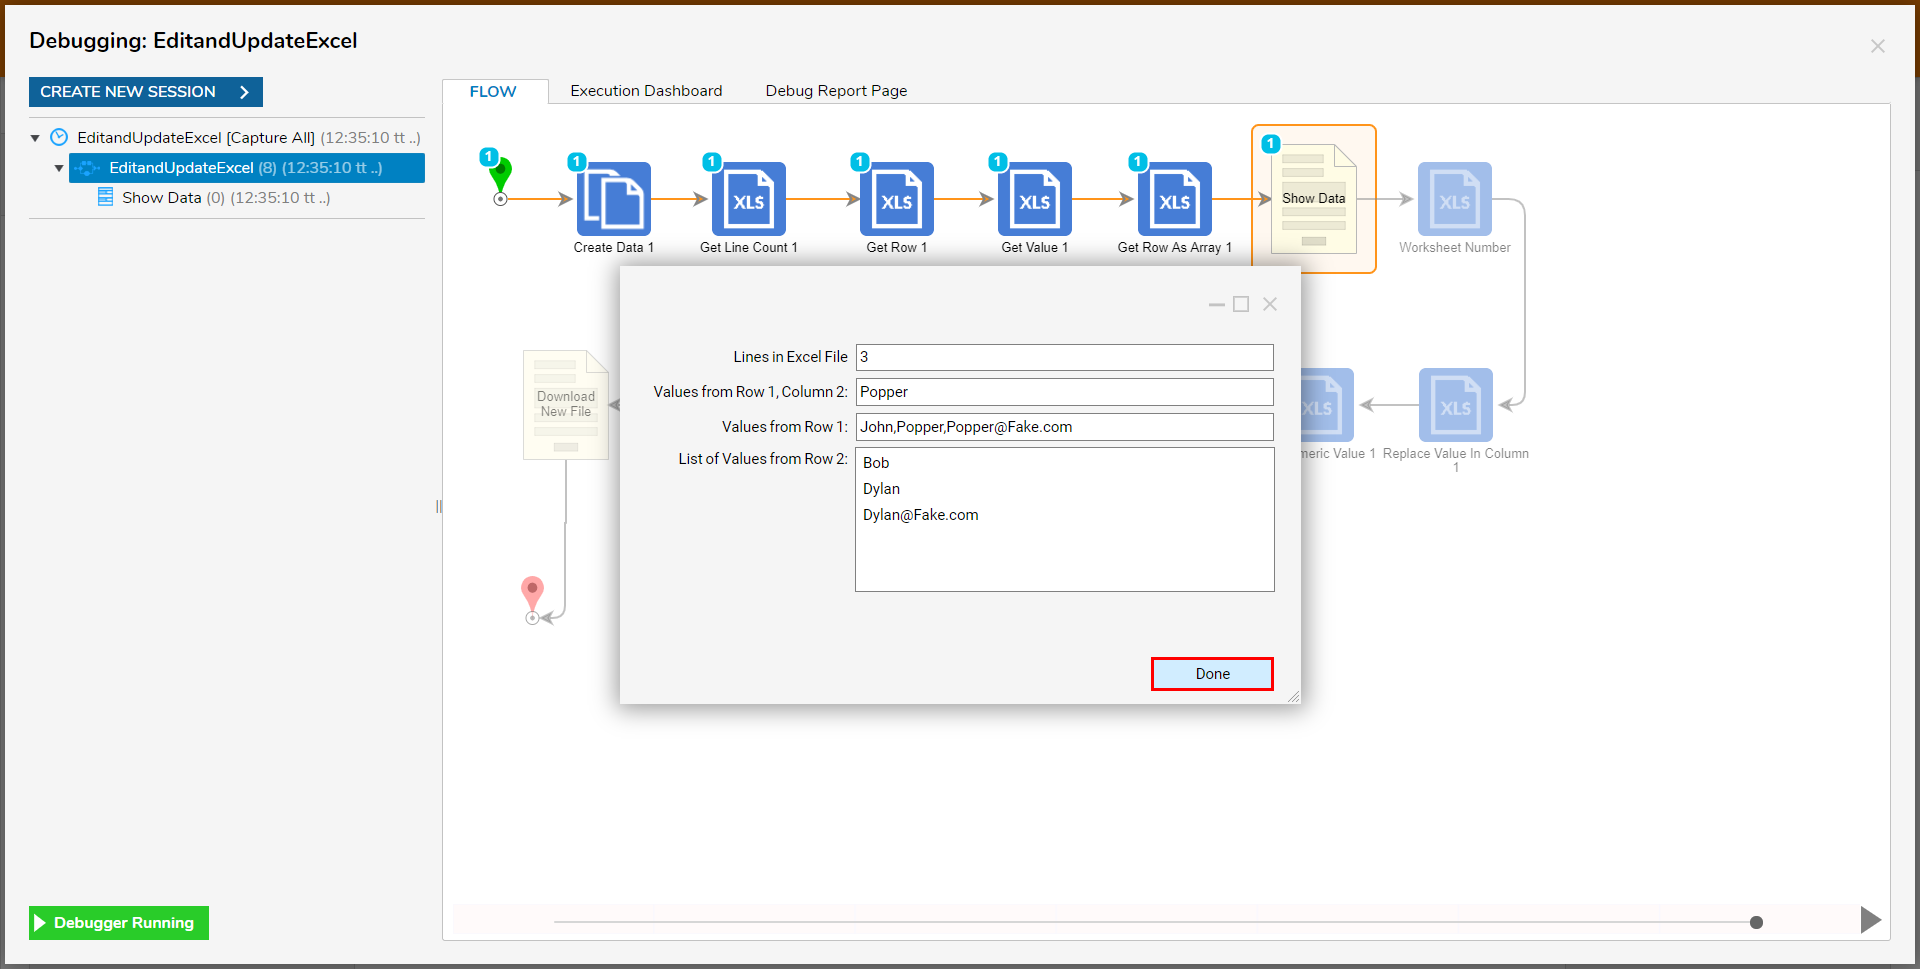
The List Box component is used to display the Array of Strings from the Get Row As Array step.Define the four Labels as follows: 'Lines in Excel File", "Values from Row 1, Column", "Values from Row 1", "List of Values from Row 2".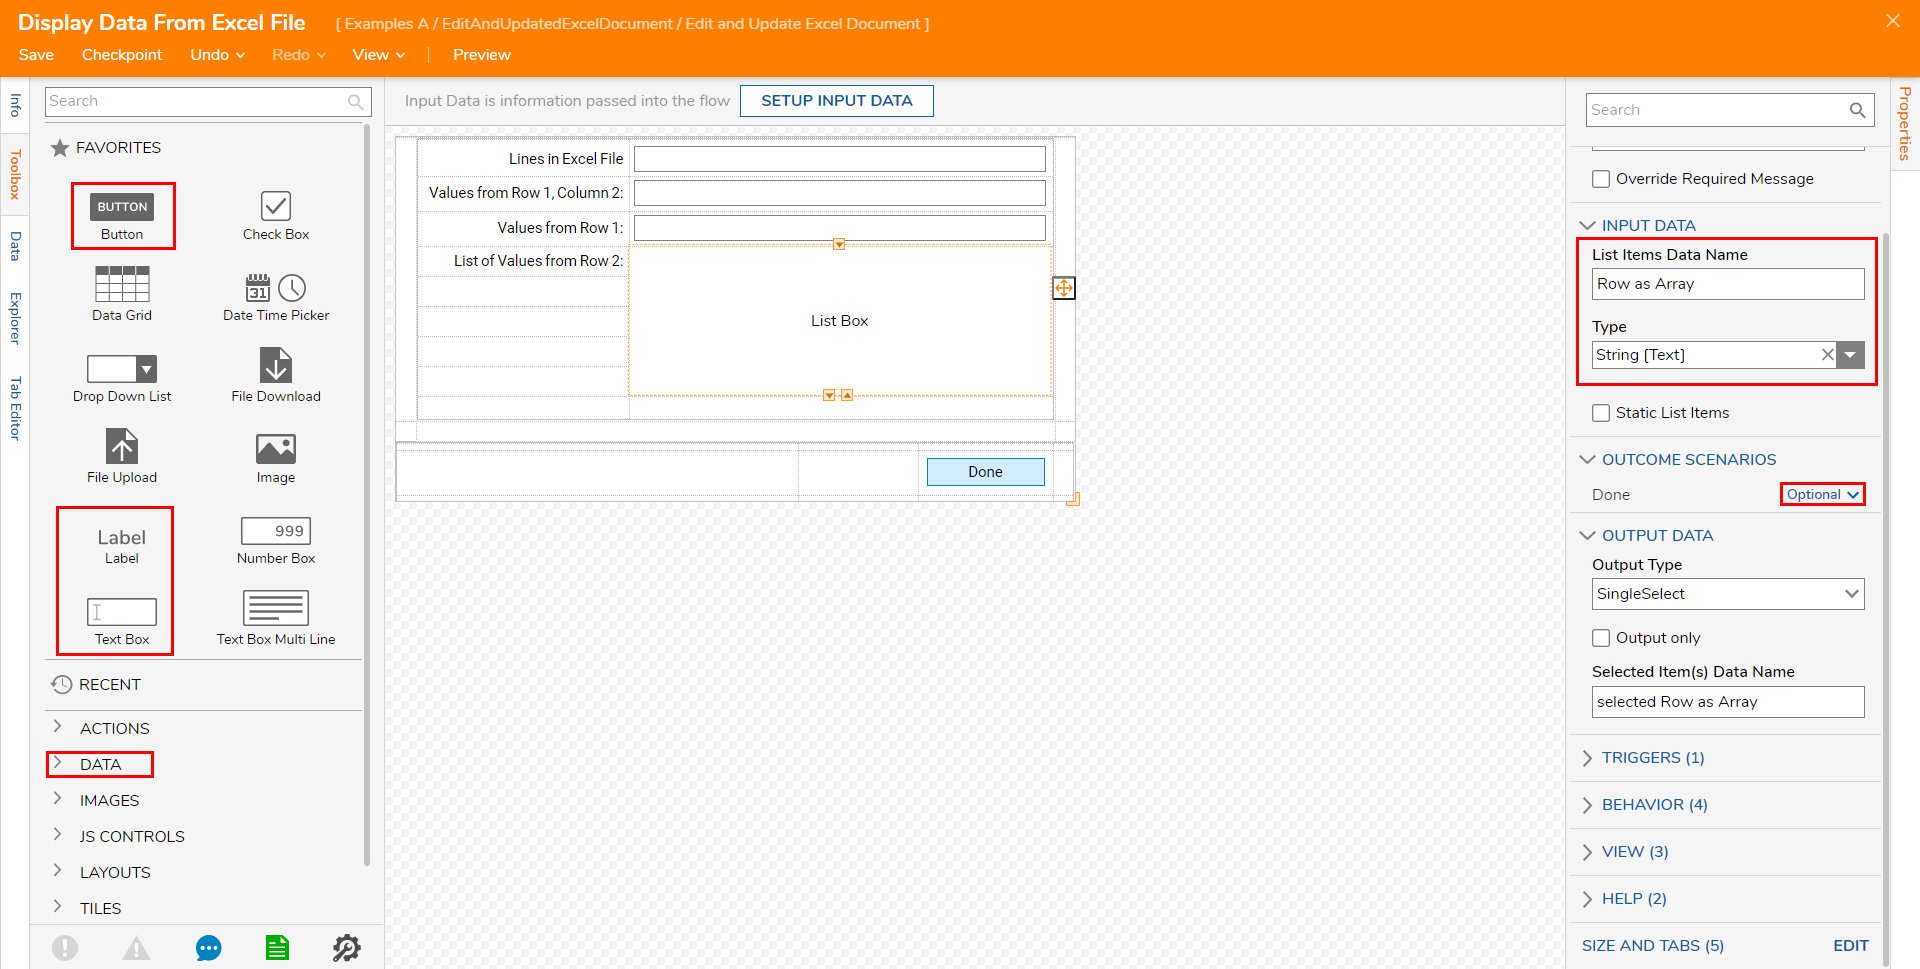
- Add a List Box from the DATA category; set the List Items Data Name to "Row as Array" and define the Type as String [Text]. Save and close the Form Designer.
- Under OUTCOME SCENARIOS, set Done to Optional.
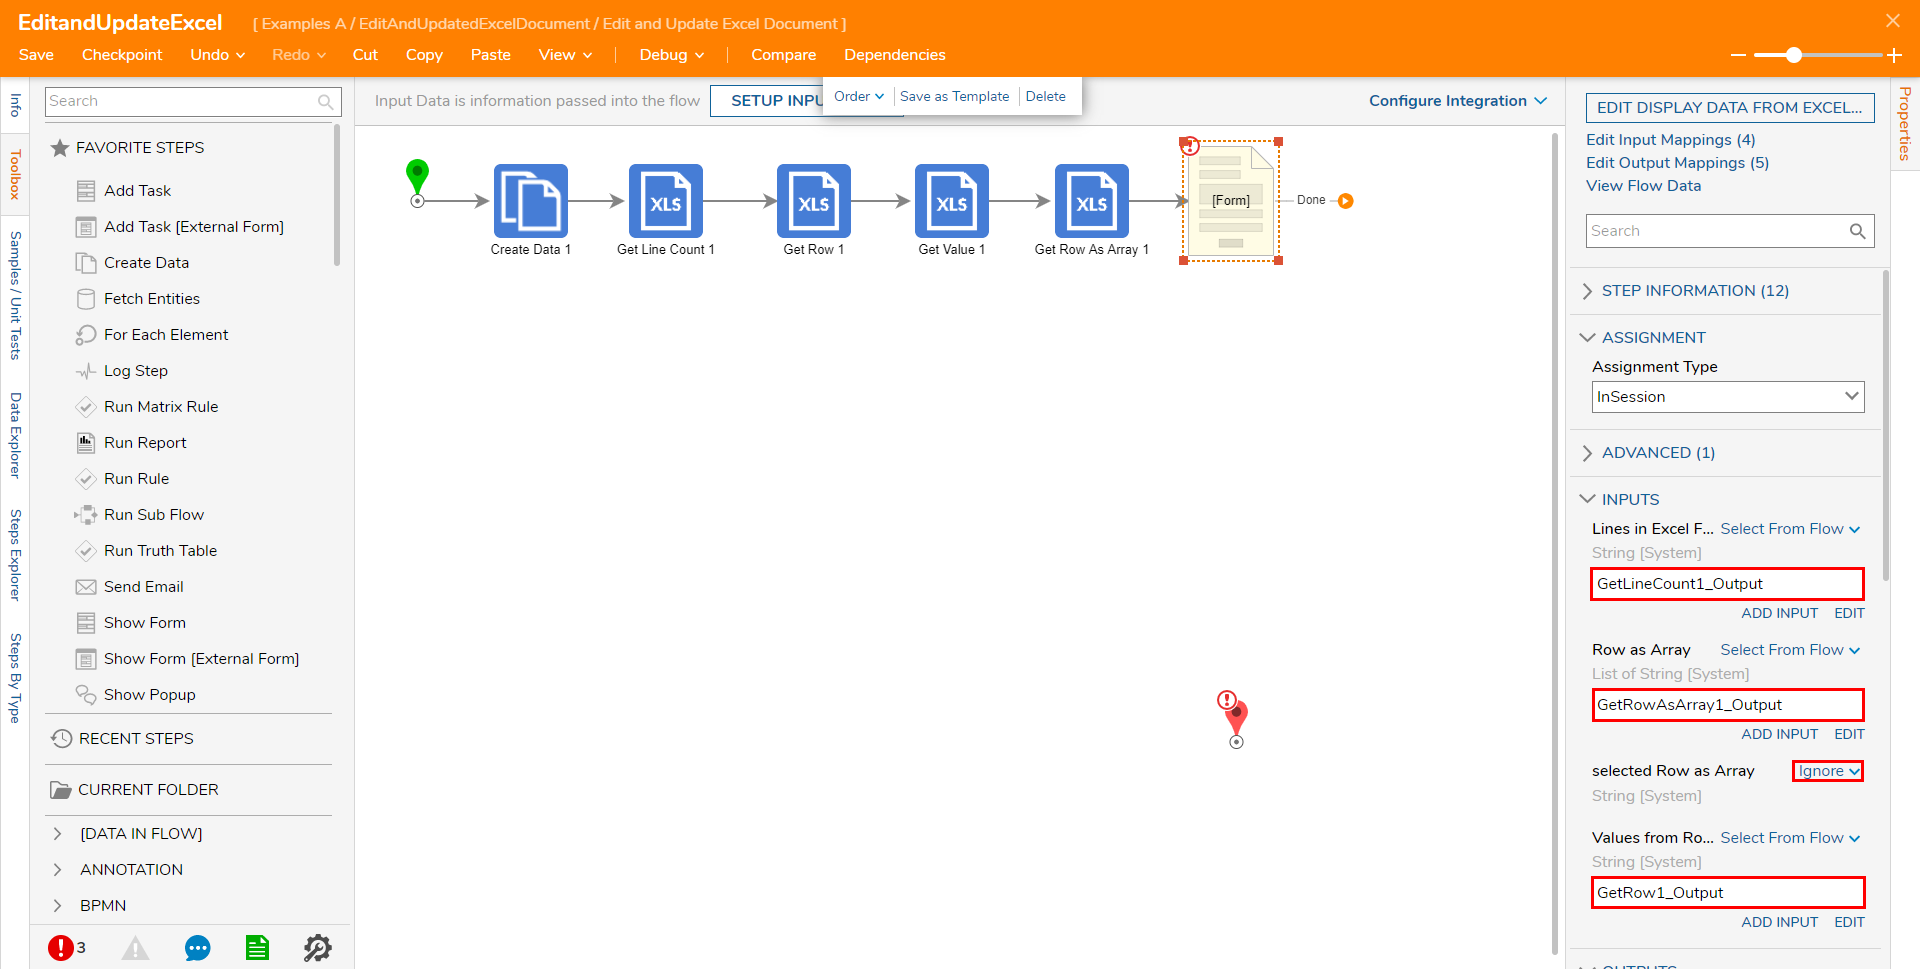
- Navigate to the Form step's Properties and map the step's INPUTS as follows; GetLineCount1_Output to Lines in Excel File, GetRowAsArray1_Output to Row as Array, Ignore to selected Row as Array, GetValue1_Output to Values From Row 1, Column 2, and GetRow1_Output to Values from Row 1.
Edit Data in Excel File
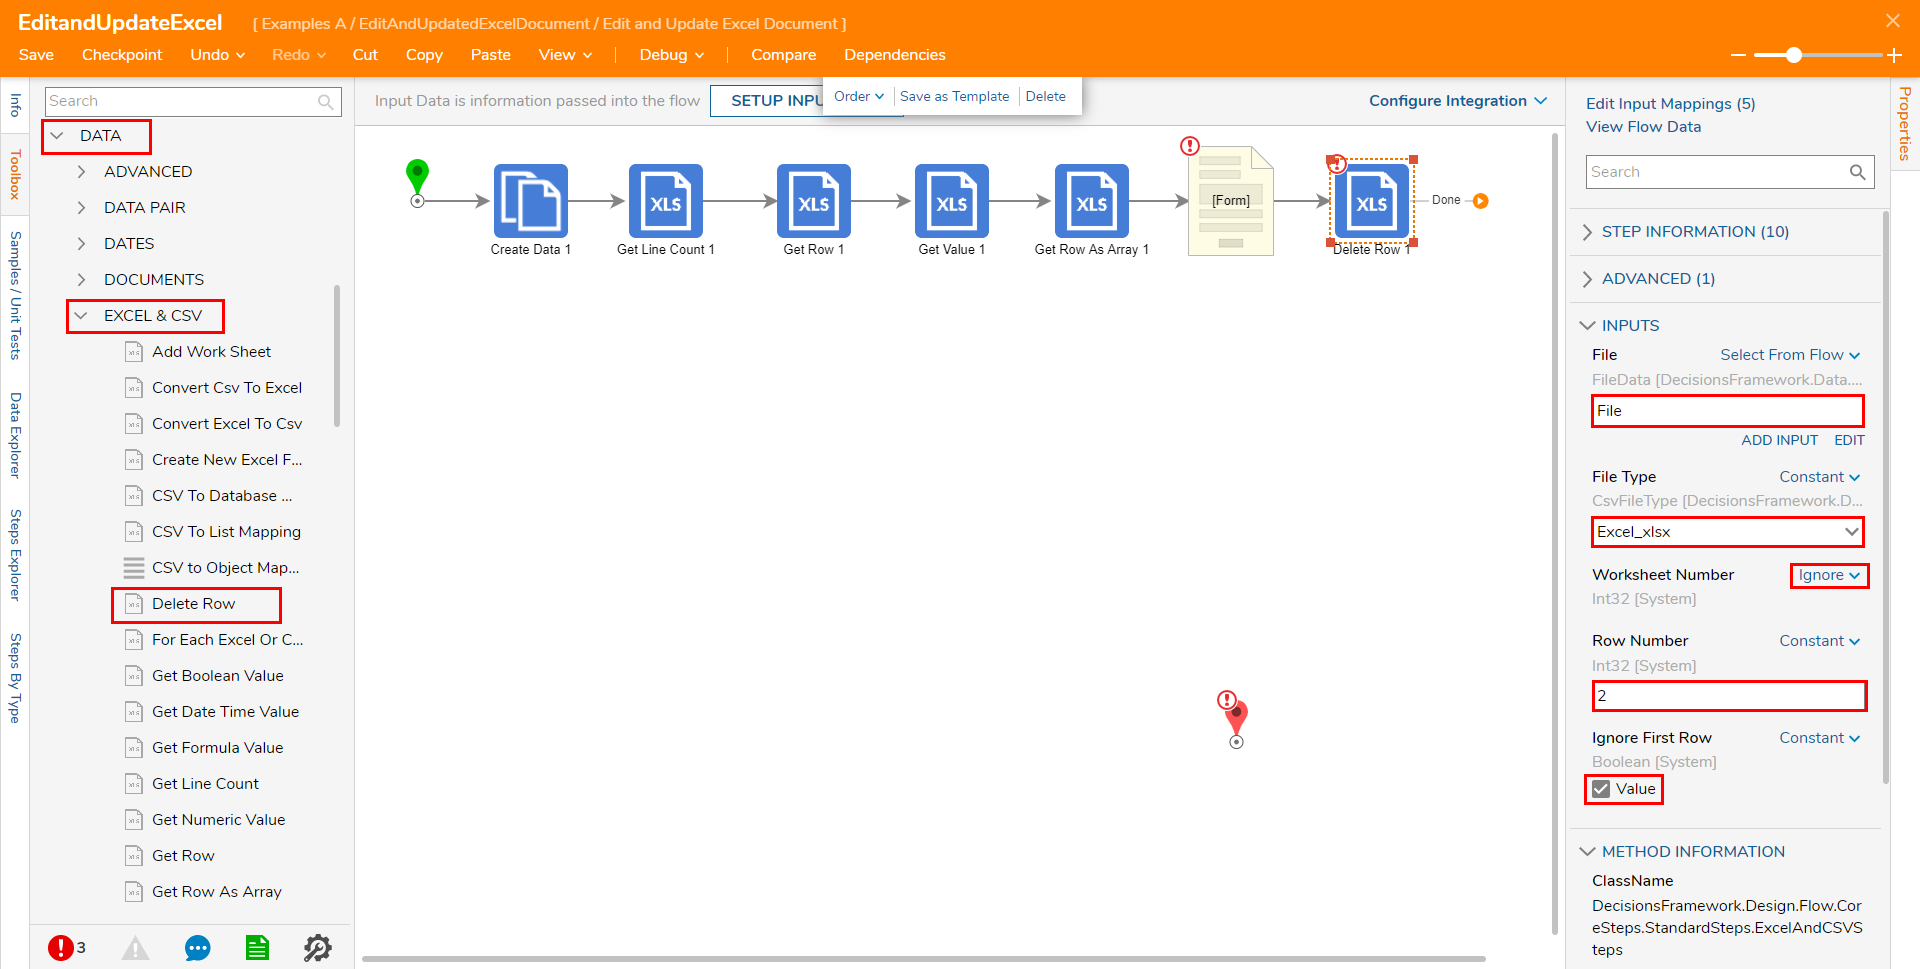
- Attach a Delete Row step from Toolbox > Data > EXCEL & CSV to the Form step. From the Delete Row step's Properties tab, map File to File, Excel_xlsx to File Type, Ignore First Row to True, and Worksheet Number to Ignore. Then, Constant map "2" to Row Number.This step is used to delete the desired Row in the Excel sheet. This particular configuration will delete the third row in the sheet.
Attach a Replace Value in Column step from the same Toolbox category to the Delete Row step. From this step's Properties tab, define File, File Type, and Worksheet Number accordingly. Constant map "3" to Column, and "Dylan@Fake.com" to Old Value. Under New Value, map the desired replacement value.
This step is used to replace the value of a specified column in an Excel file. The step executes this process by searching the Column for the Old Value and replacing it with the New Value.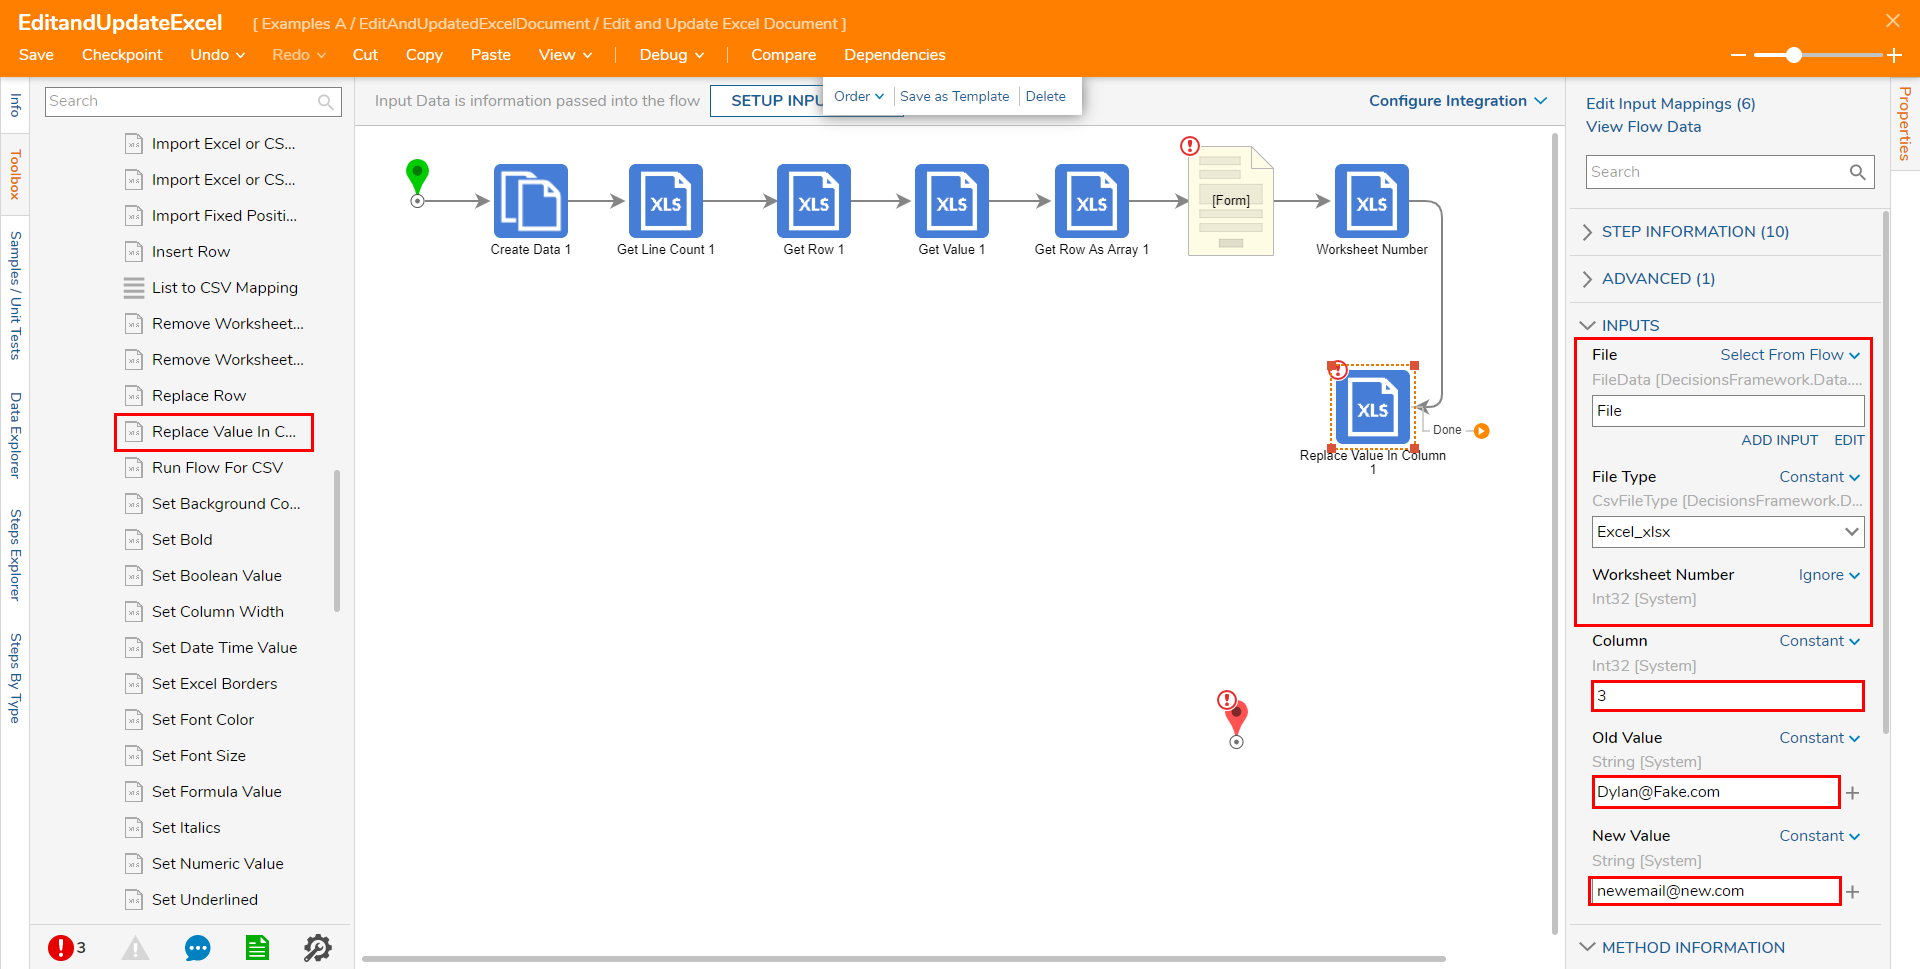
Attach a Set Numeric Value step to the Replace Value in Column step. Map File to Input File, Excel_xlsx to File Type, and set Worksheet Number to Ignore. Constant map "3" to Row (Starts at 0), "2" to Column (Starts at 1), and the desired numerical value to New Value.
This step is used to set a numeric value for a specified cell in an Excel file.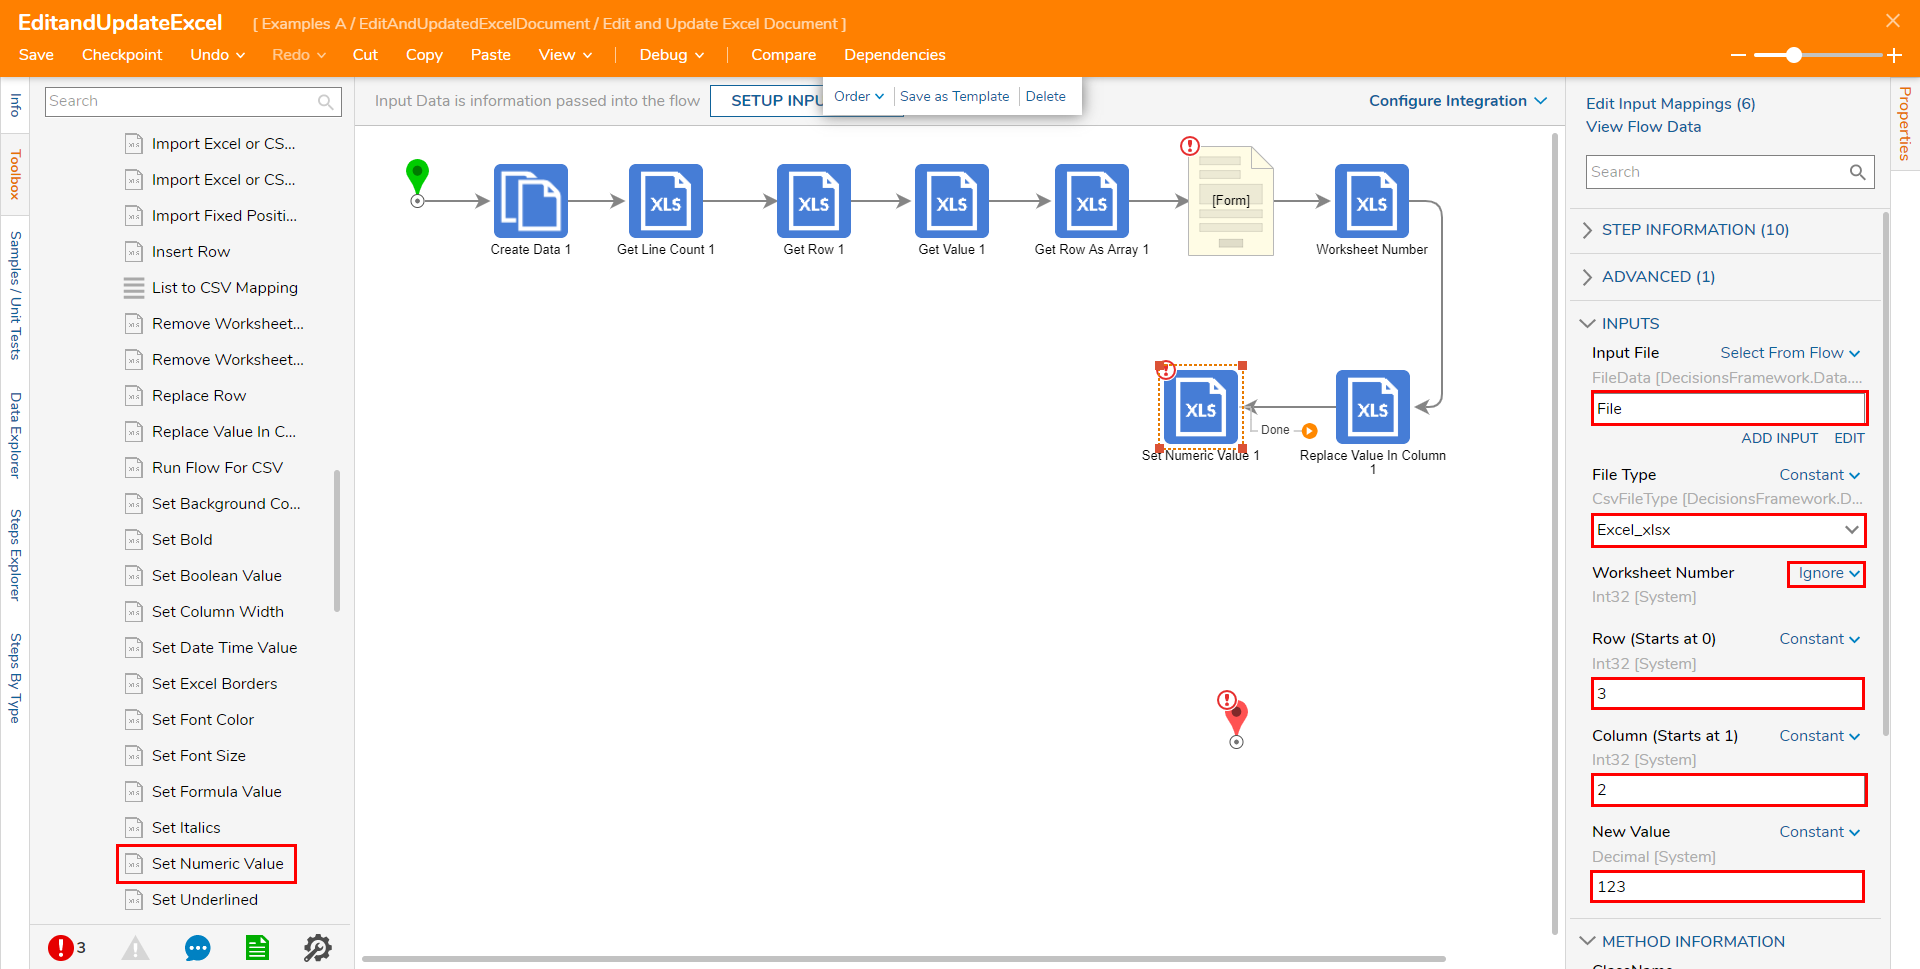
Attach a Set Value step to Done path of the Set Numeric Value step; set the mappings for Input File, File Type, and Worksheet Number to the same values as the Set Numeric Value step. Constant map "2" to Row (Starts at 0) and Column (Starts at 1), then map the desired value to New Value.
This step behaves similarly to the Set Numeric Value step but does not restrict the Designer to setting a numeric value.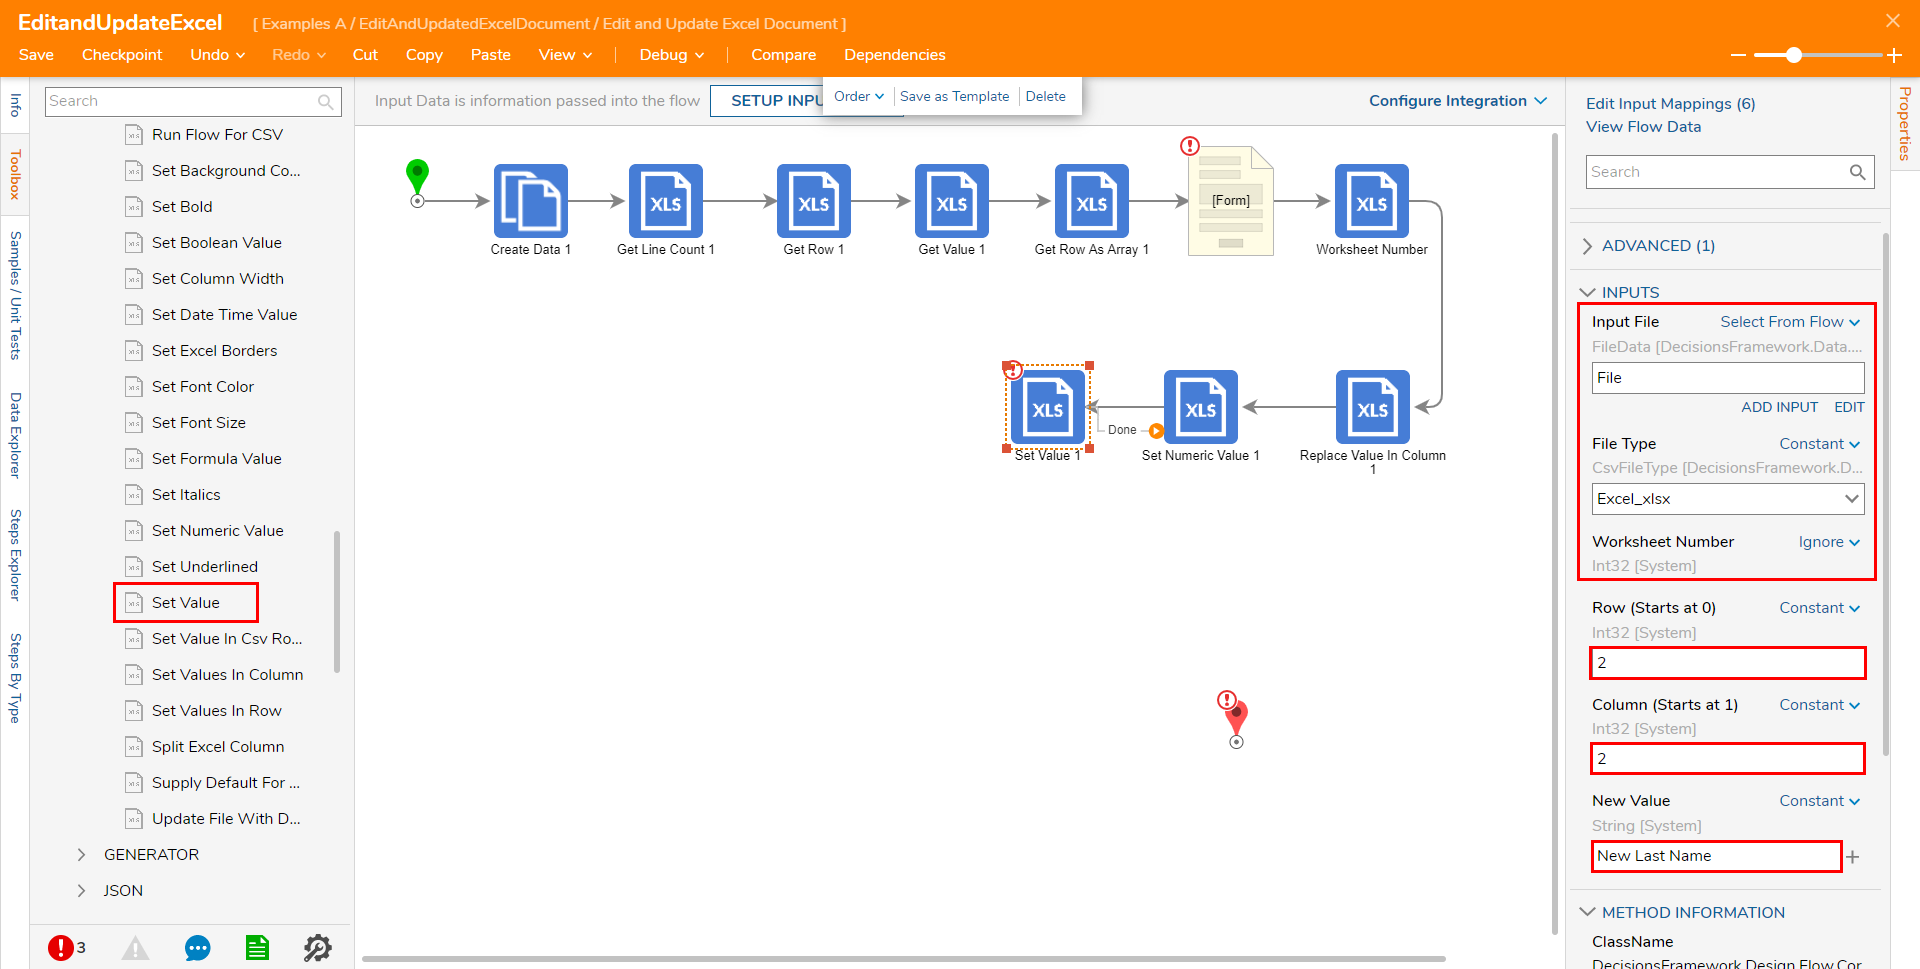
Attach a Set Formula Value to the Set Value step. Map Input File, File Type, and Worksheet Number accordingly. Constant map "4" to Row (Starts at 0), "1" to Column (Starts at 1), and a mathematic equation to New Values; for this example use "=1+2".
This step is used to set a calculated value in an Excel file.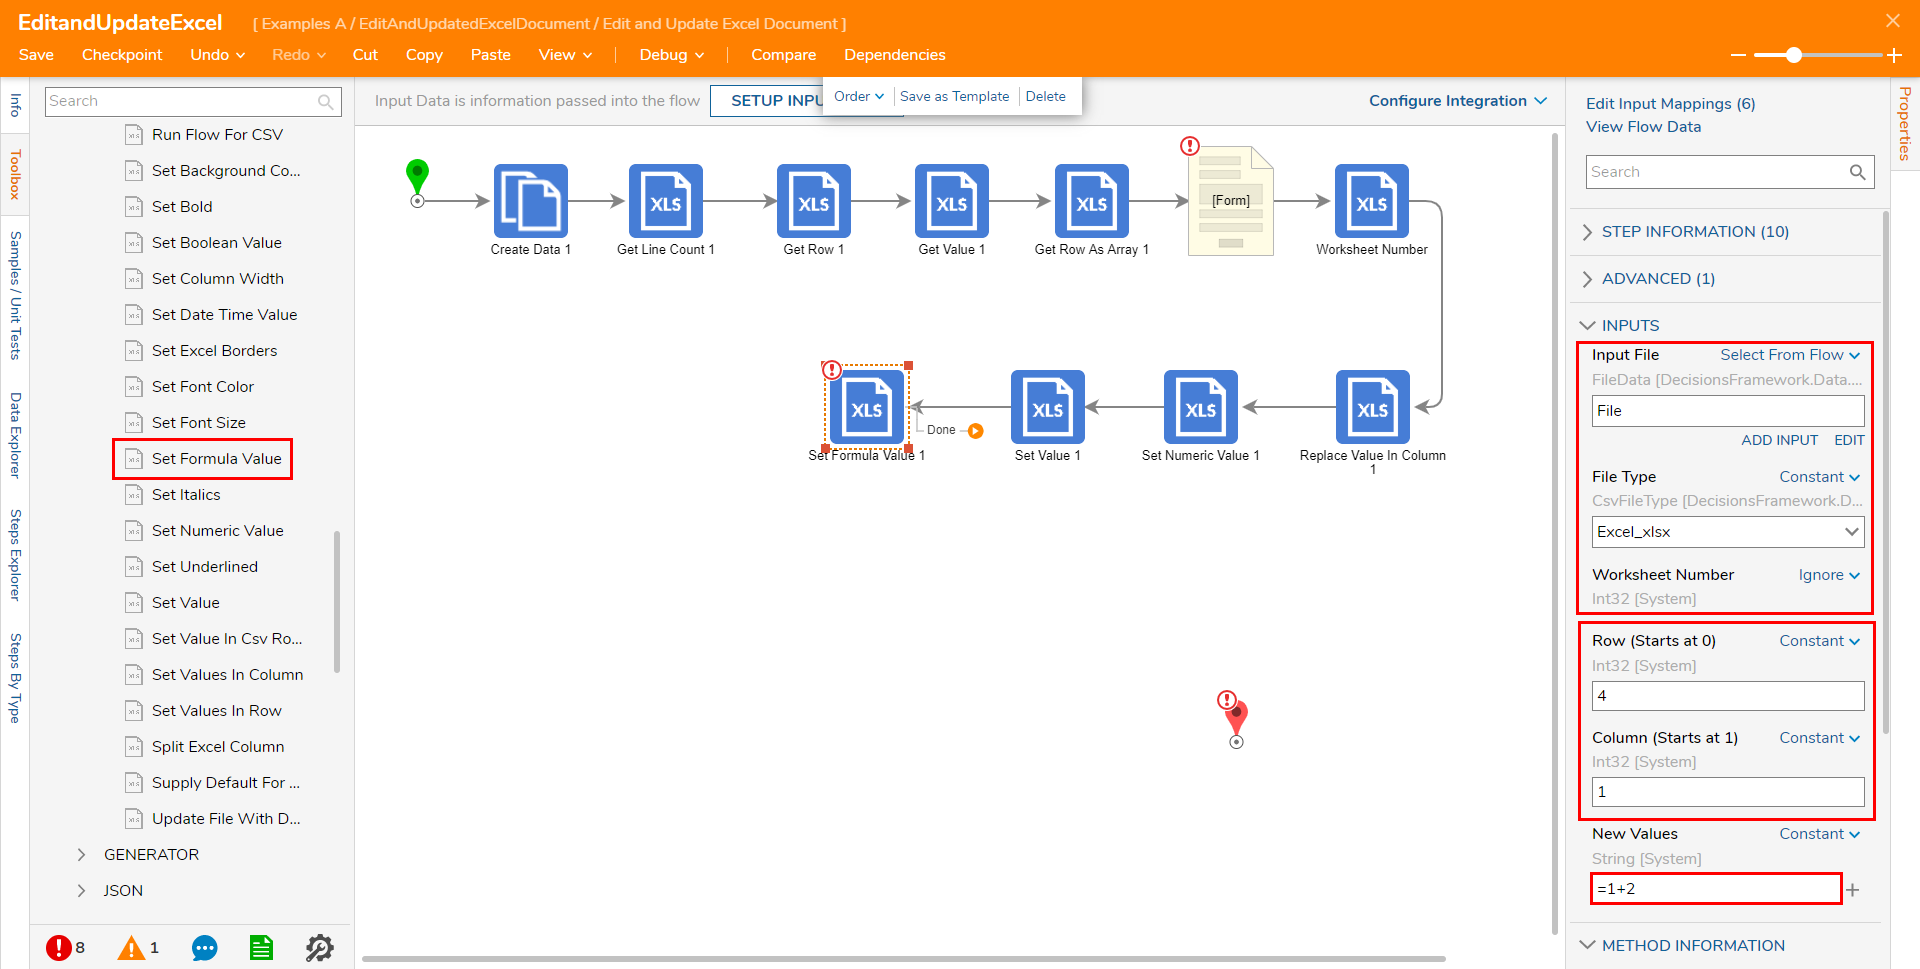
Attach a Supply Default For Column step to the Set Formula Value step. Set the mapping for File, File Type and Worksheet Number to the previously used values. Map the fifth Column by Constant mapping "4" to Column, then map the desired Default Value.
This step is used to set the desired Default value in the select Column's empty cells.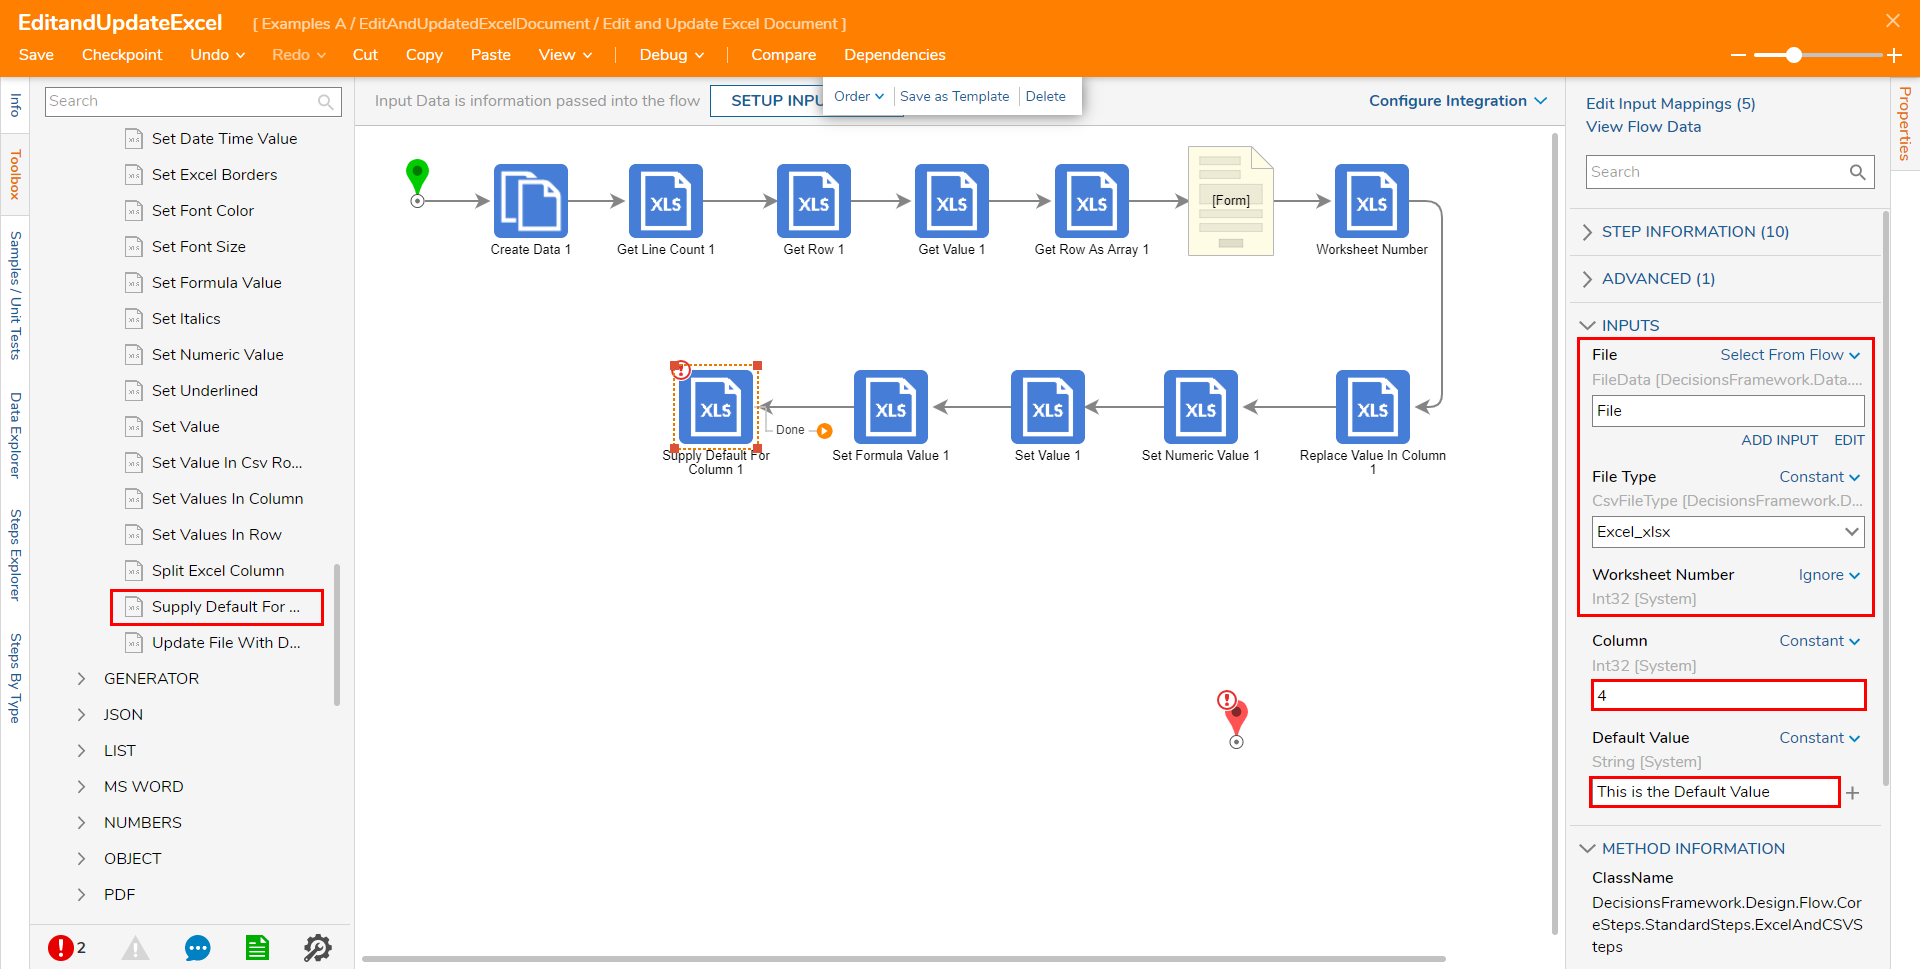
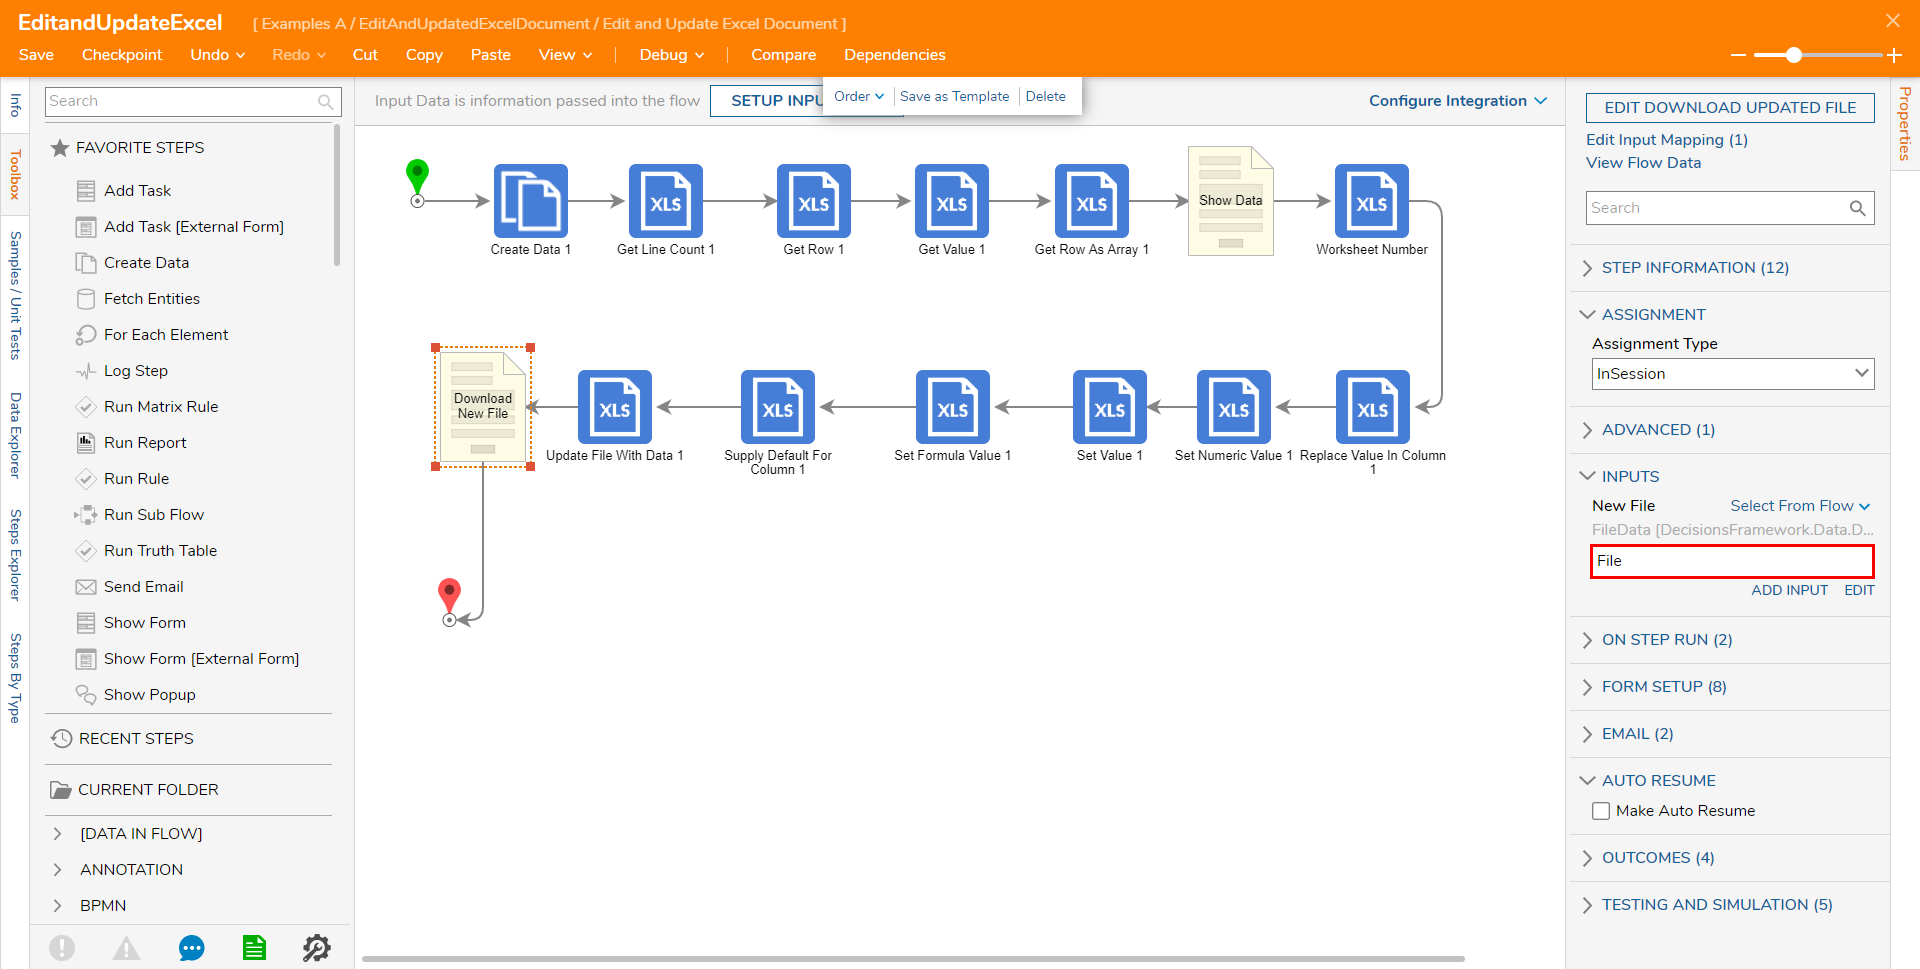
Attach an Update File With Data step to the Supply Default For Column step; under Properties > INPUTS, set File Type to Excel_xlsx and map File to Input.
This step updates the designated File with new values from previous Excel steps.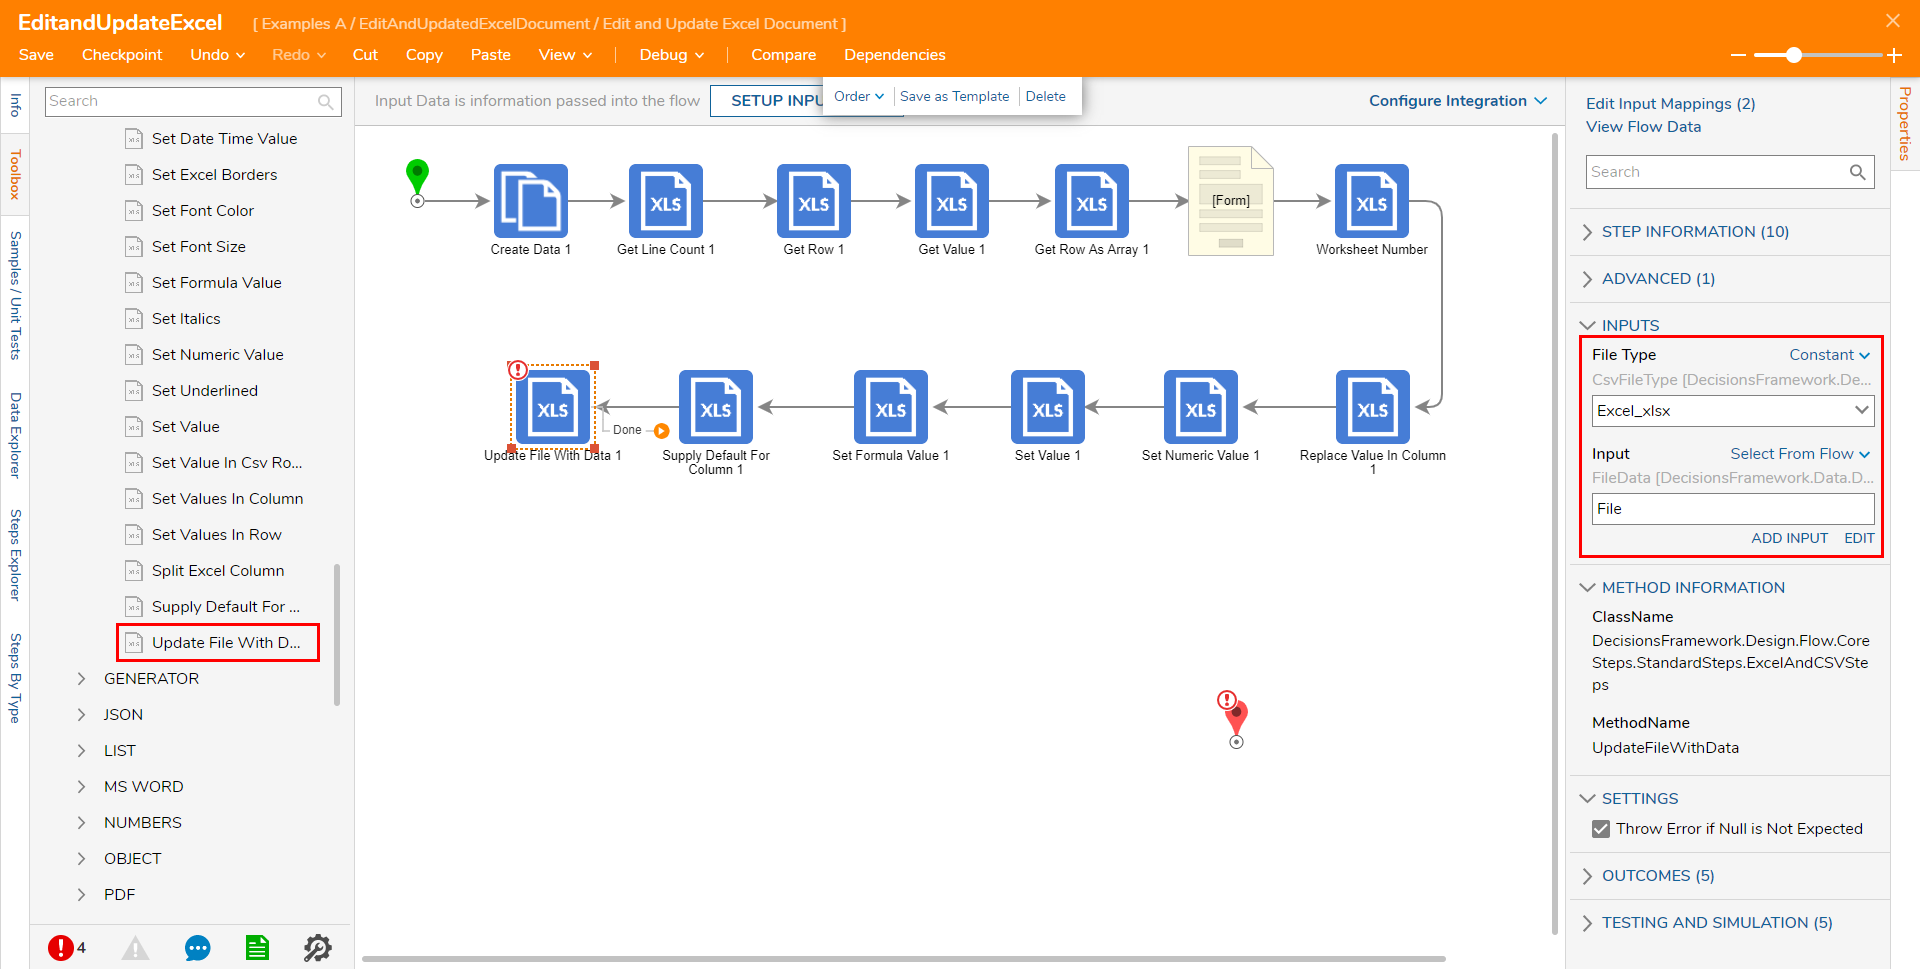
Attach a Show Form step to the Update File With Data step and CREATE a new Form. From the Form Designer, create Form containing a "Done" Button and a File Download component from Toolbox > FAVORITES. Under Properties > Common Properties > Select Button Type for the File Download component, select Button from the dropdown menu. Save the Form, then close the Designer.
This Form will act a Download Form for the updated File.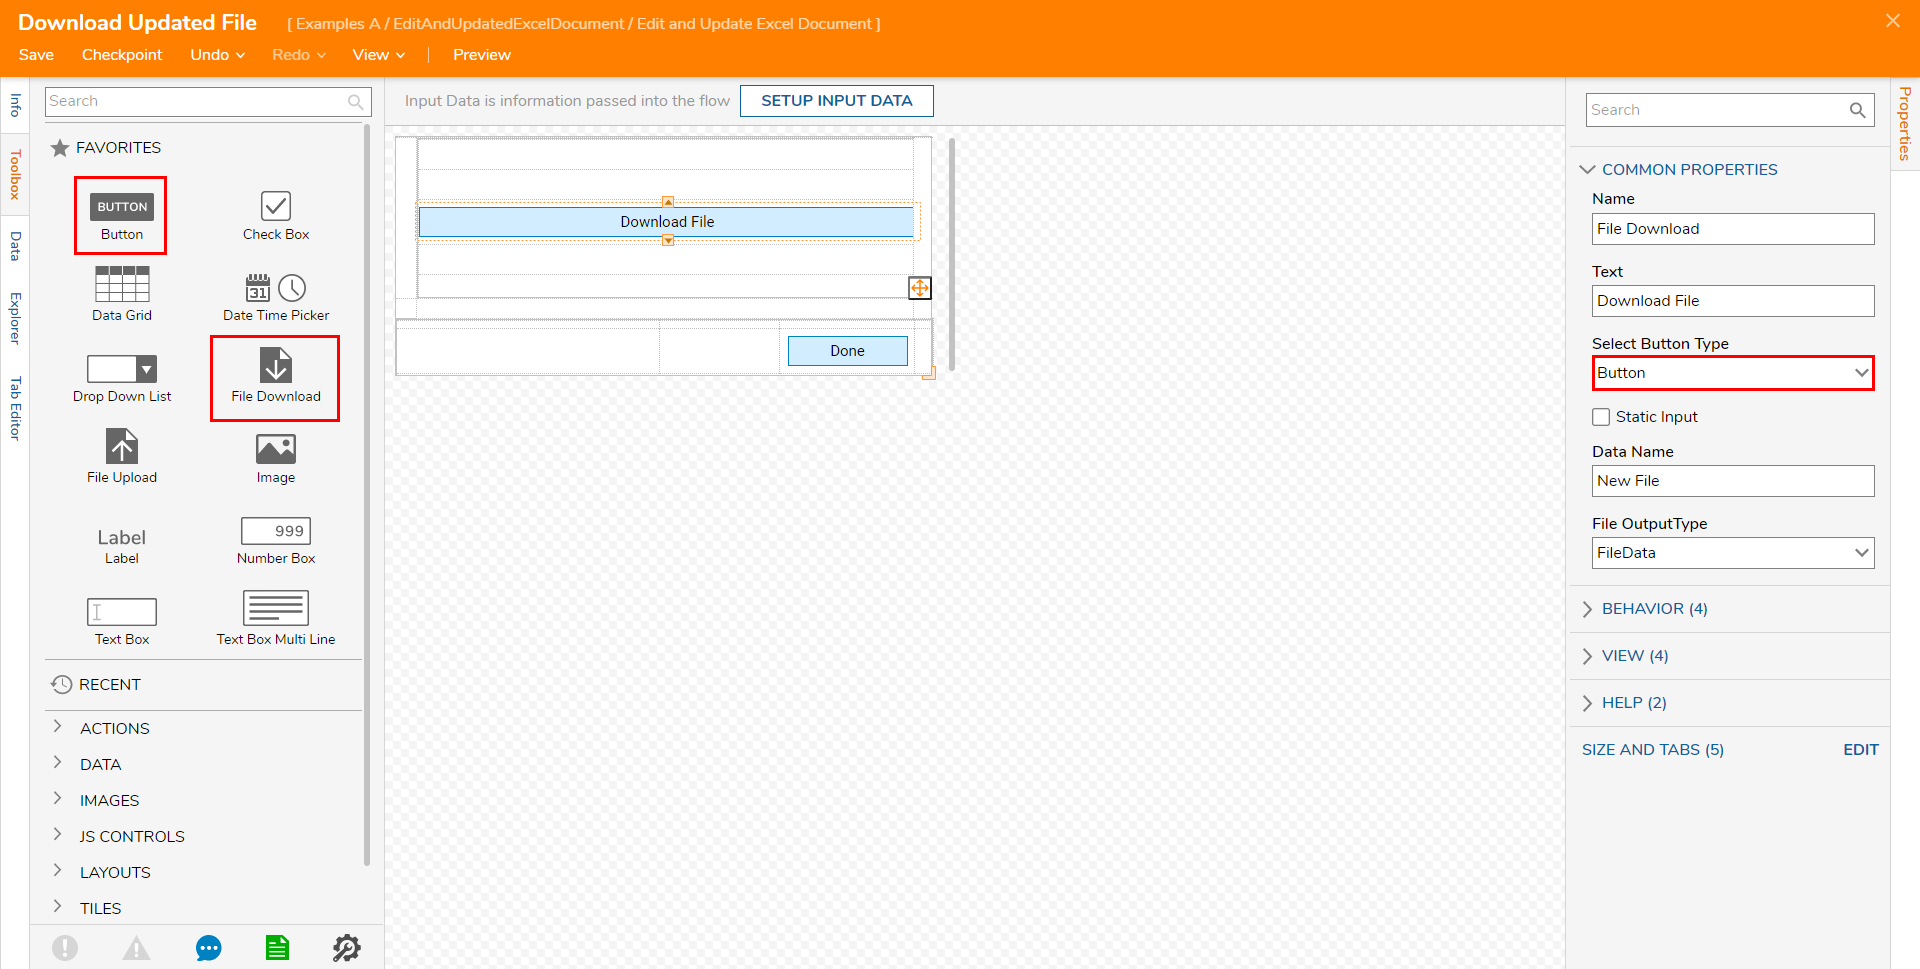
From the Show Form step's Properties in the Flow Designer, map File to New File, then connect the Form step to the End step.
Save the Flow, then if desired close the Flow Designer.
Debug
- From the Flow Designer, select the Debug link from the top action bar.
- Click START DEBUGGING.
- When the Flow reaches the first Form, compare the values to the corresponding values in the Excel sheet, then click Done.
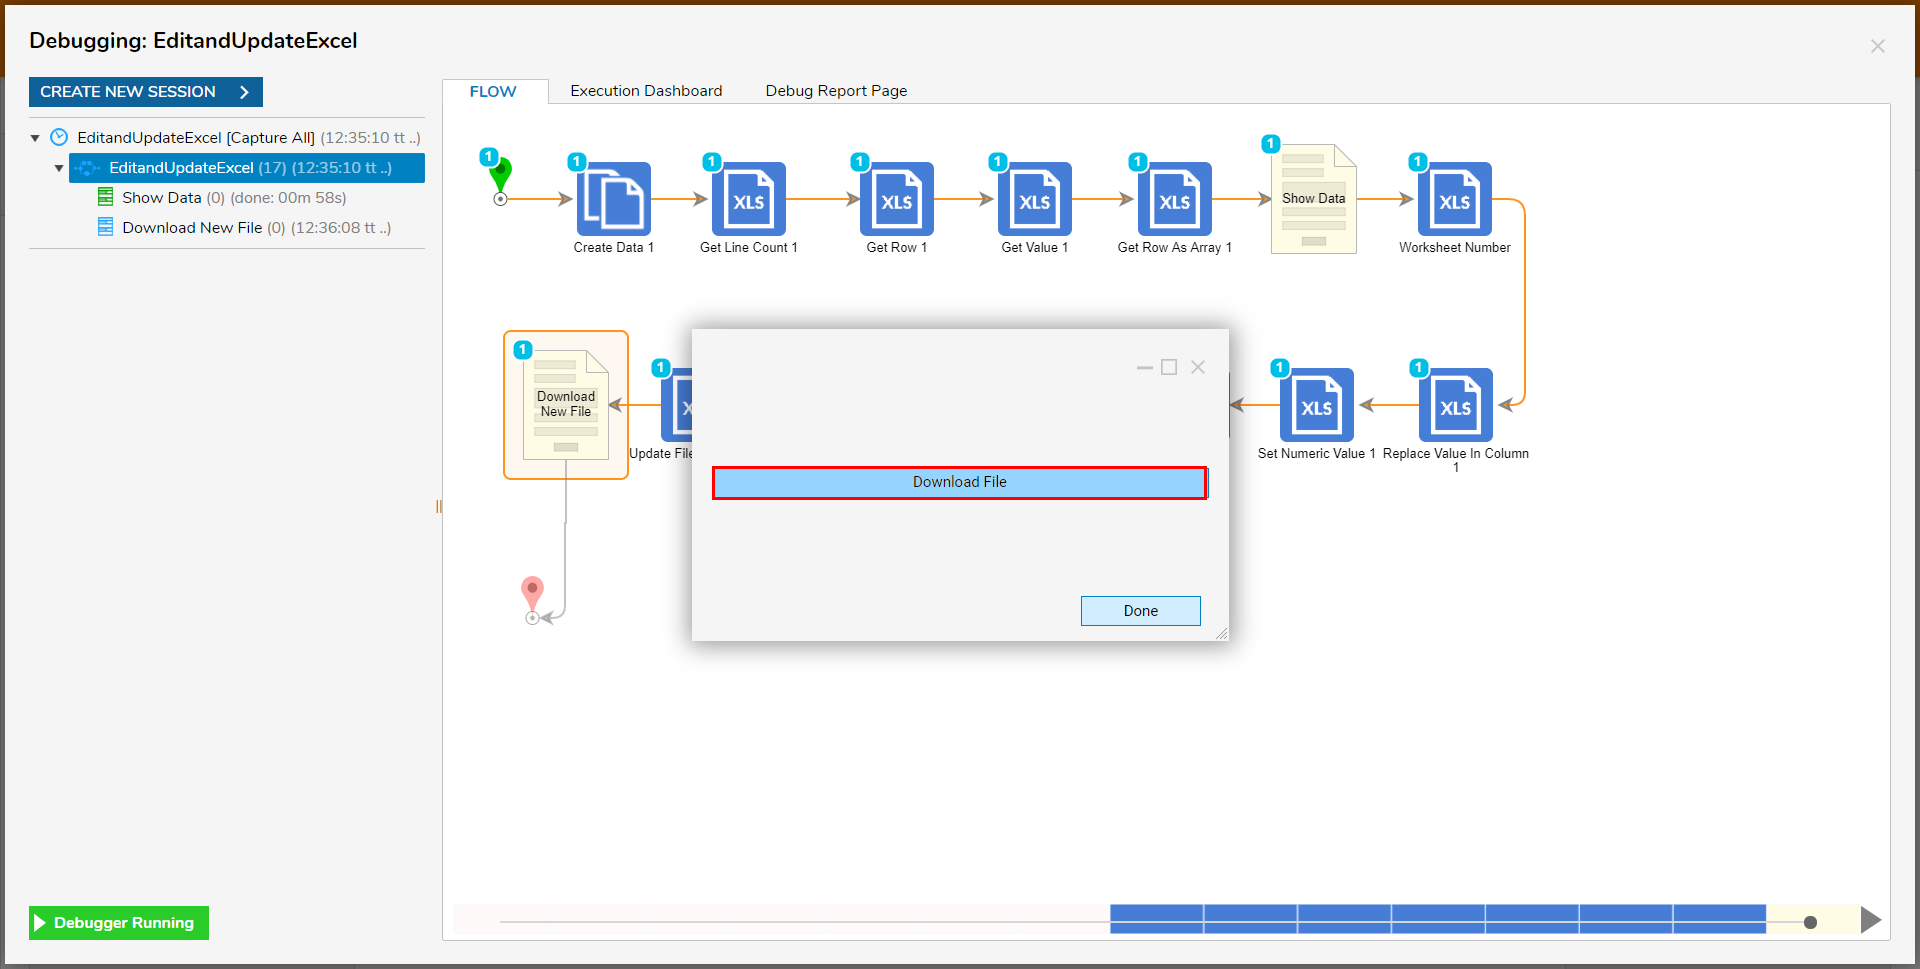
- Upon reaching the Download Form, click Download File.
- Open the downloaded file and view the appended document to verify that the Flow functioned as intended.
