Overview
Similar to a normal Data Grid, the Data Grid (Advanced) Form Component displays a list of data objects from within a Grid on a Form with each row representing an object and each column representing an object property.
The difference of Advanced Data Grids are that its objects are sourced from a Report either created or picked within the Form Properties tab. Advanced Data Grid objects are also edited in a similar process to editing objects within a Report. In contrast, the standard Data Grid only allows selection from the columns provided by the Form Control and allows limited grouping options for these columns. Therefore, Advanced Data Grids provides to Designers further flexibility for information presentation by offering a method of displaying a specified Report within a Form.
Example
- In the Designer Project, select the CREATE FLOW button.
- Select Flow, name the Flow, then select CREATE
- Select the Done outcome path of the Start step.
- In the Add After dialog, expand Integrations > All Integrations > Internal Services > Account Service, select the GetAll step. Select ADD.
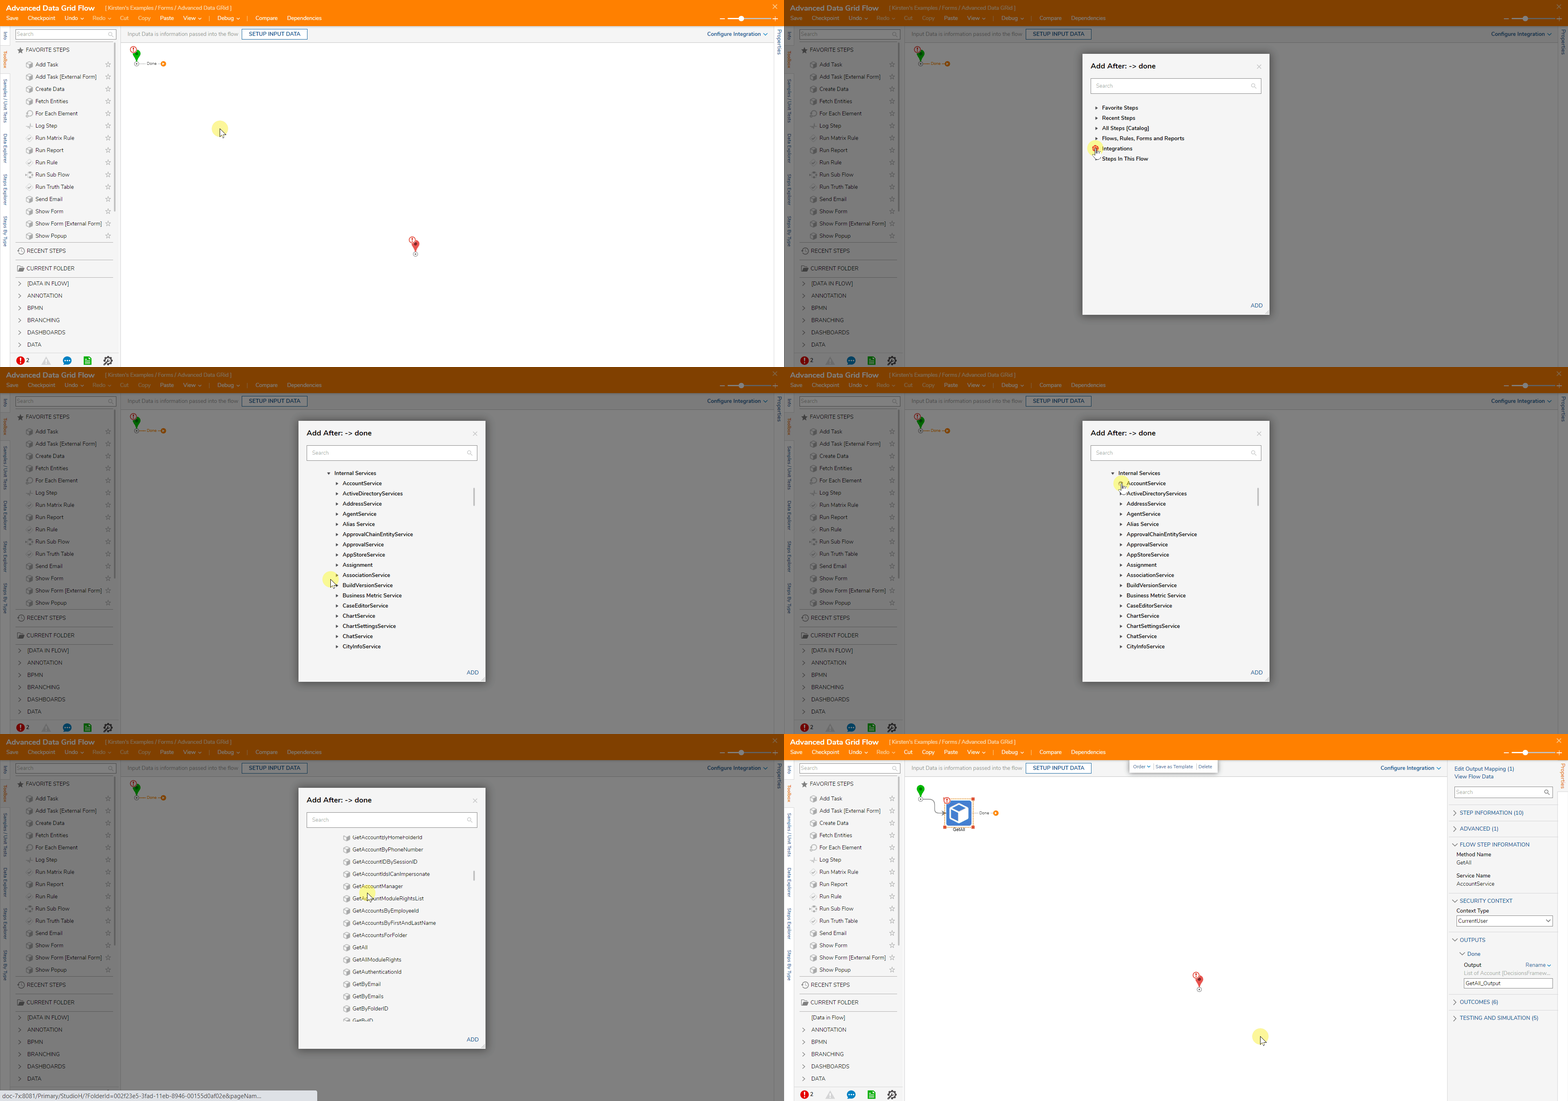
- Select the Done outcome path of the GetAll step.
- In the Add After dialog, select the Show Form step in the Favorite Steps category. Select ADD.
- With the Show Form step selected, in the Properties panel, select PICK OR CREATE FORM.
- Select CREATE under Create New.
- Choose Form, name the Form, and select CREATE.
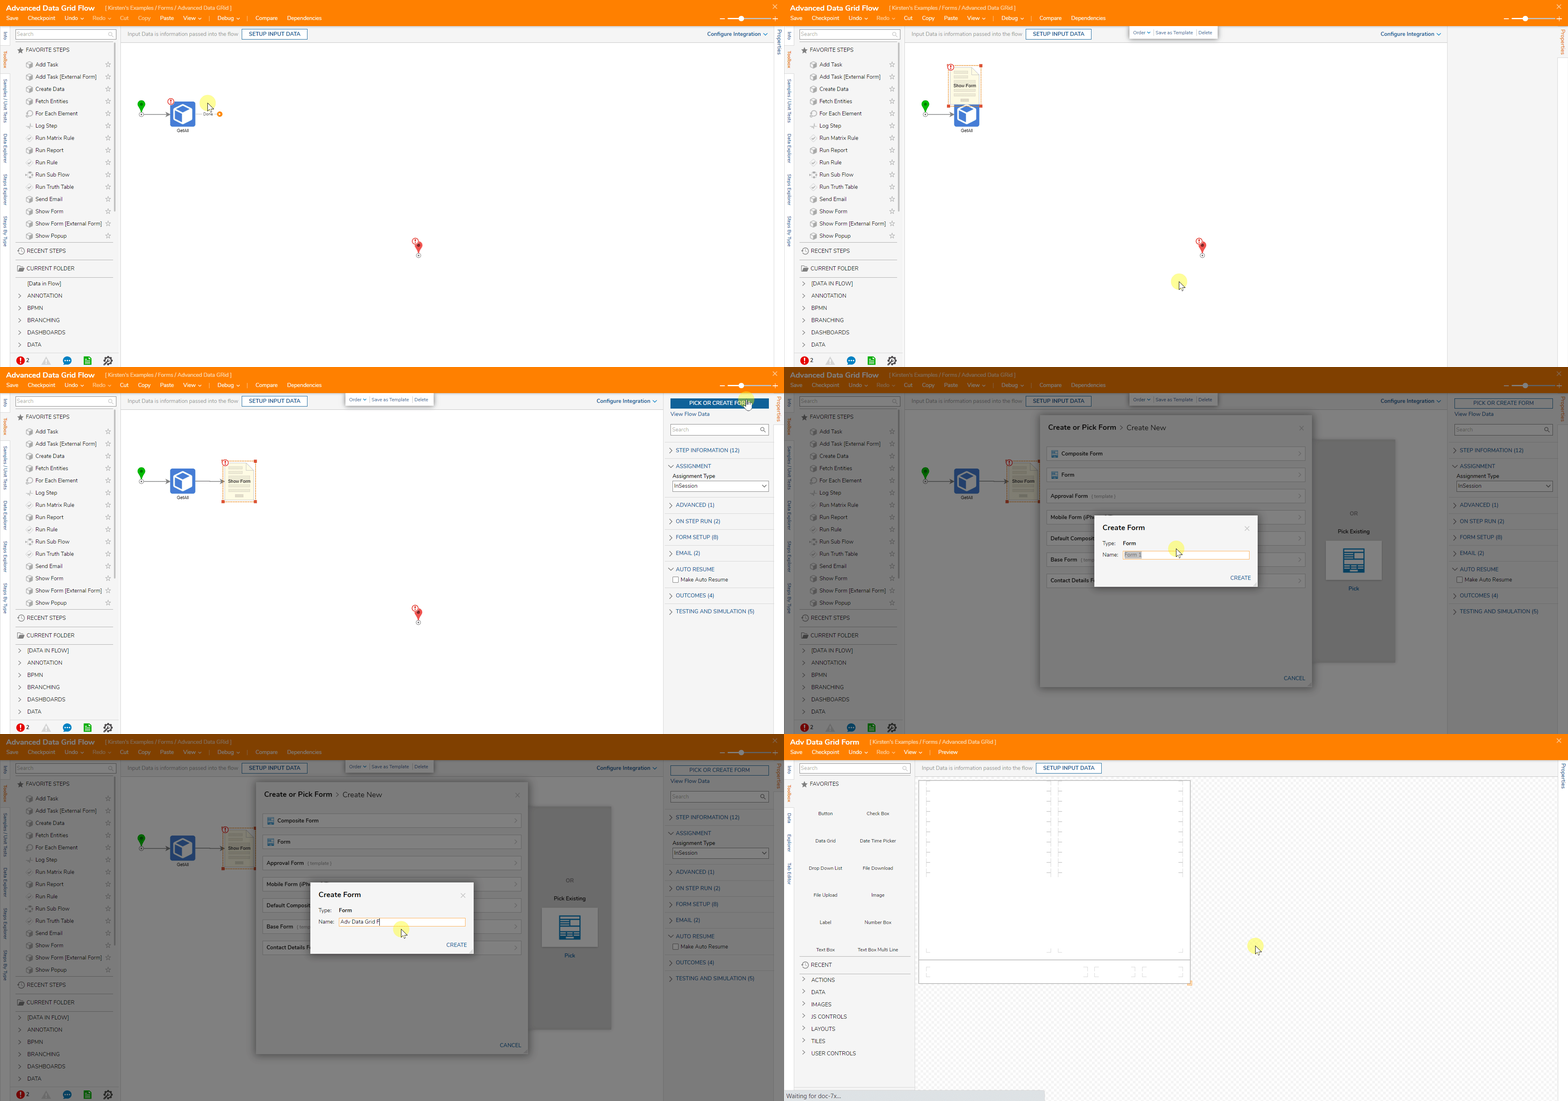
- In the Form Designer, expand the Data section of the Toolbox and add the Data Grid [Advanced] to the Form.
- Navigate to the Data Grid [Advanced] Properties panel, under Type search for and select "Account".
- Under Input > Input Data Name, type "Account Adv Data Grid".
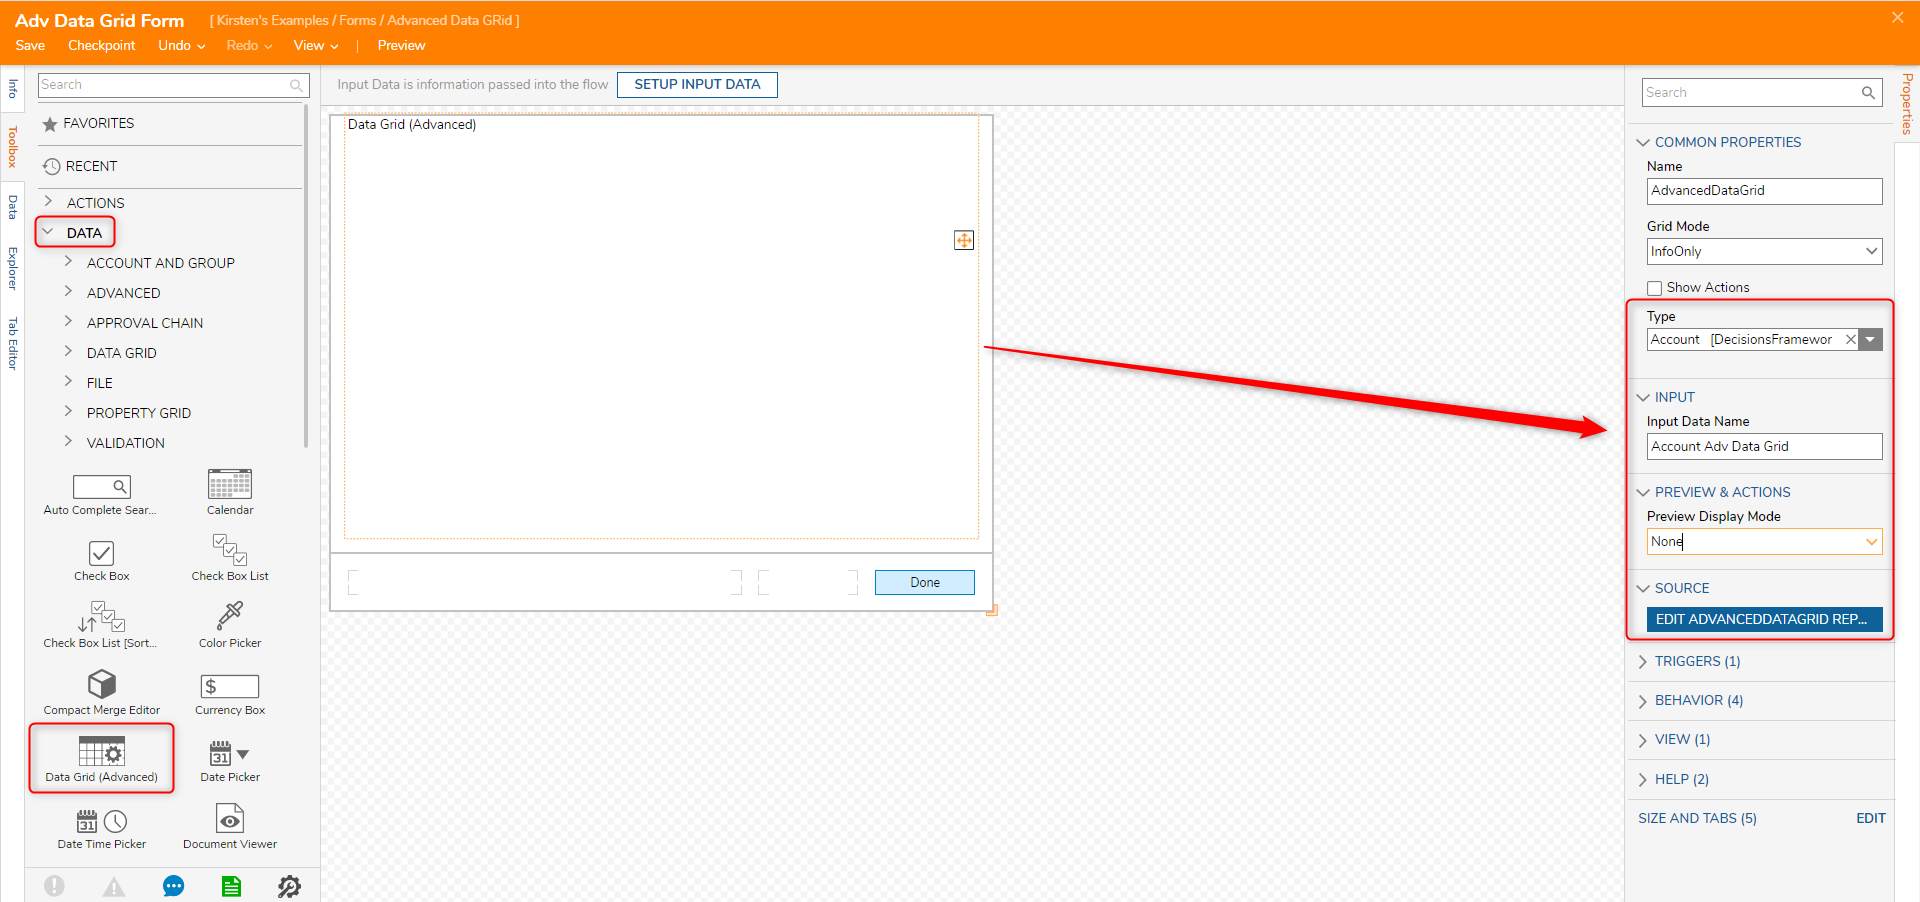
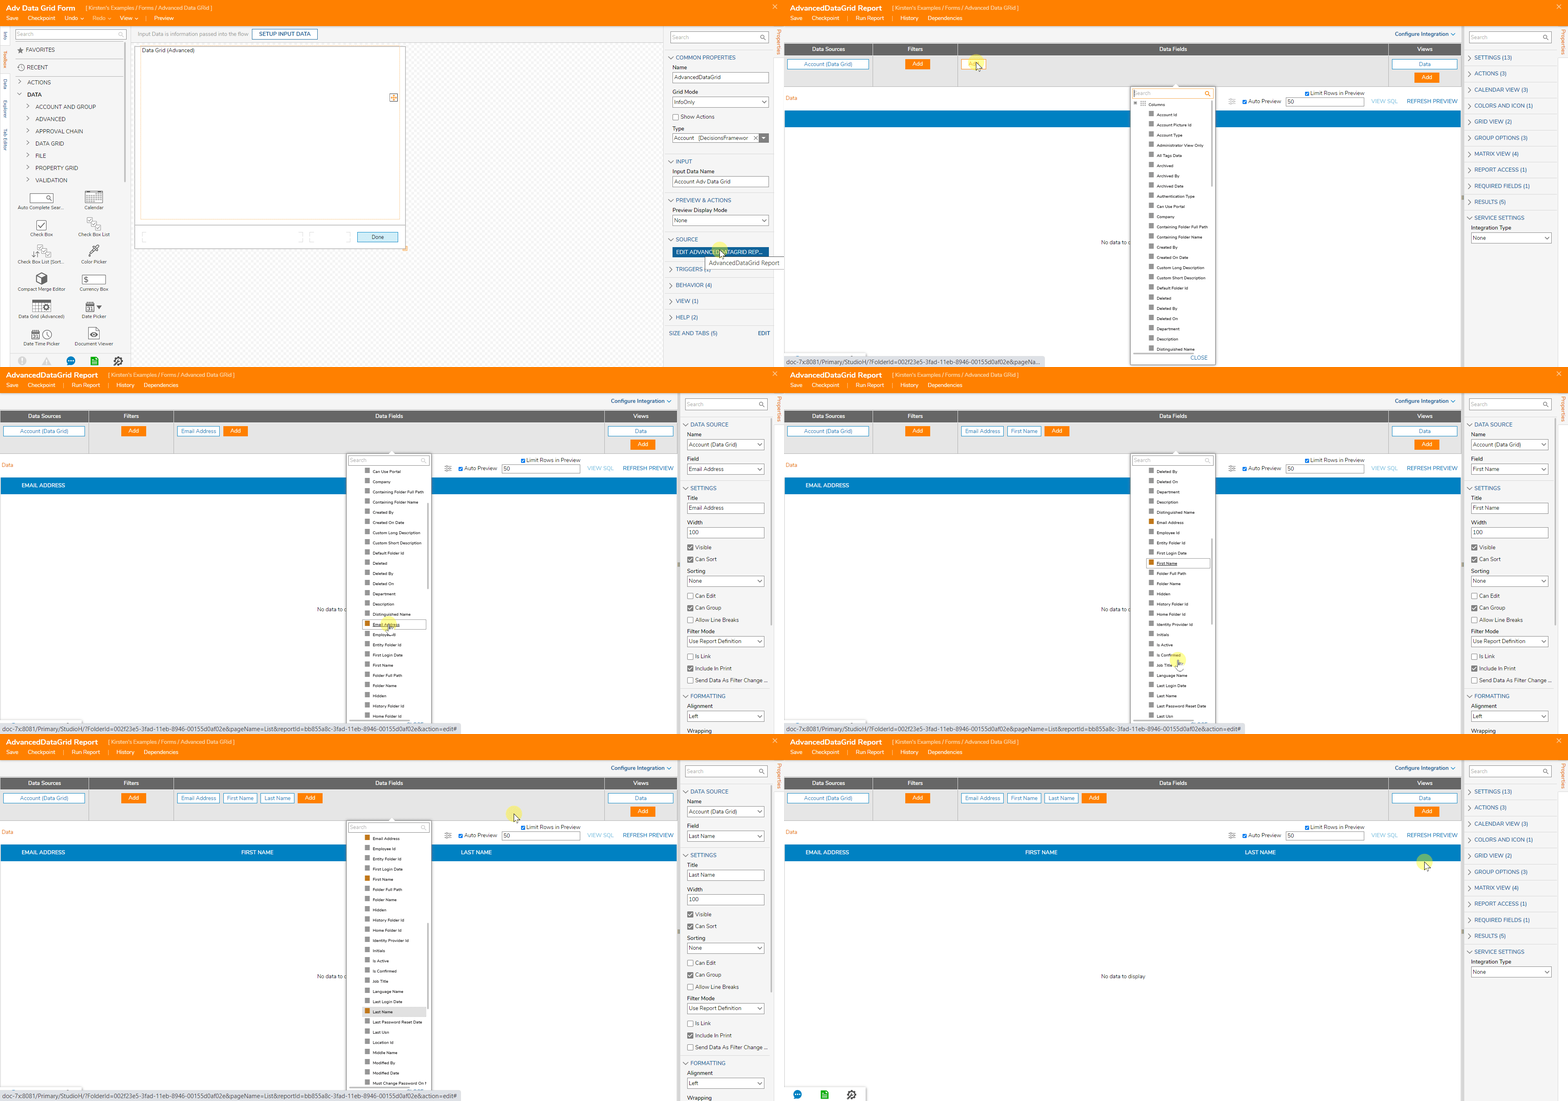
- Under Source, select EDIT ADVANCED DATA GRID REPORT.
- In the Report Designer, under Data Fields, select Add.
- Add the following fields: Email Address, First Name, and Last Name.Notice that the Data Source is already populated with the Type selected in the Properties for the Advanced Data Grid.
- Save and close the Report Designer.
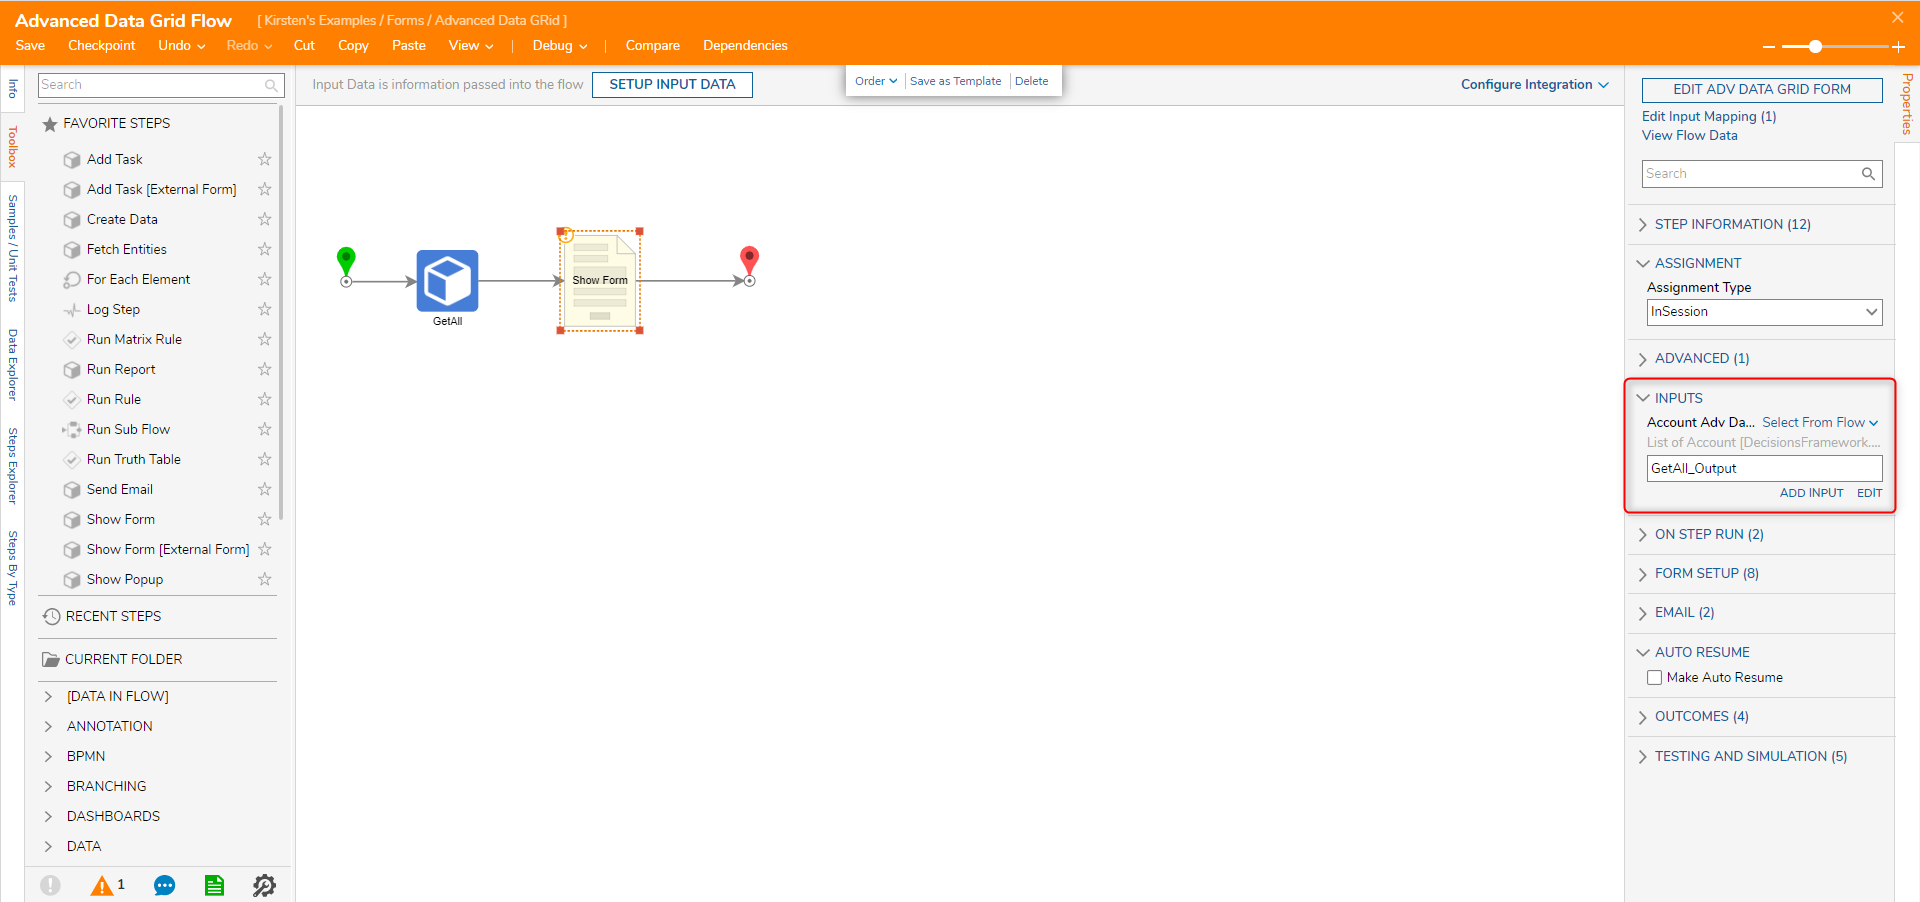
- In the Flow Designer, select the Show Form step.
- Under Inputs > Account Adv Data Grid, select Pick.
- In the Pick Data for Input dialog, choose GetAll_Output.
- Connect the path from the Show Form step to the End step.
Debug
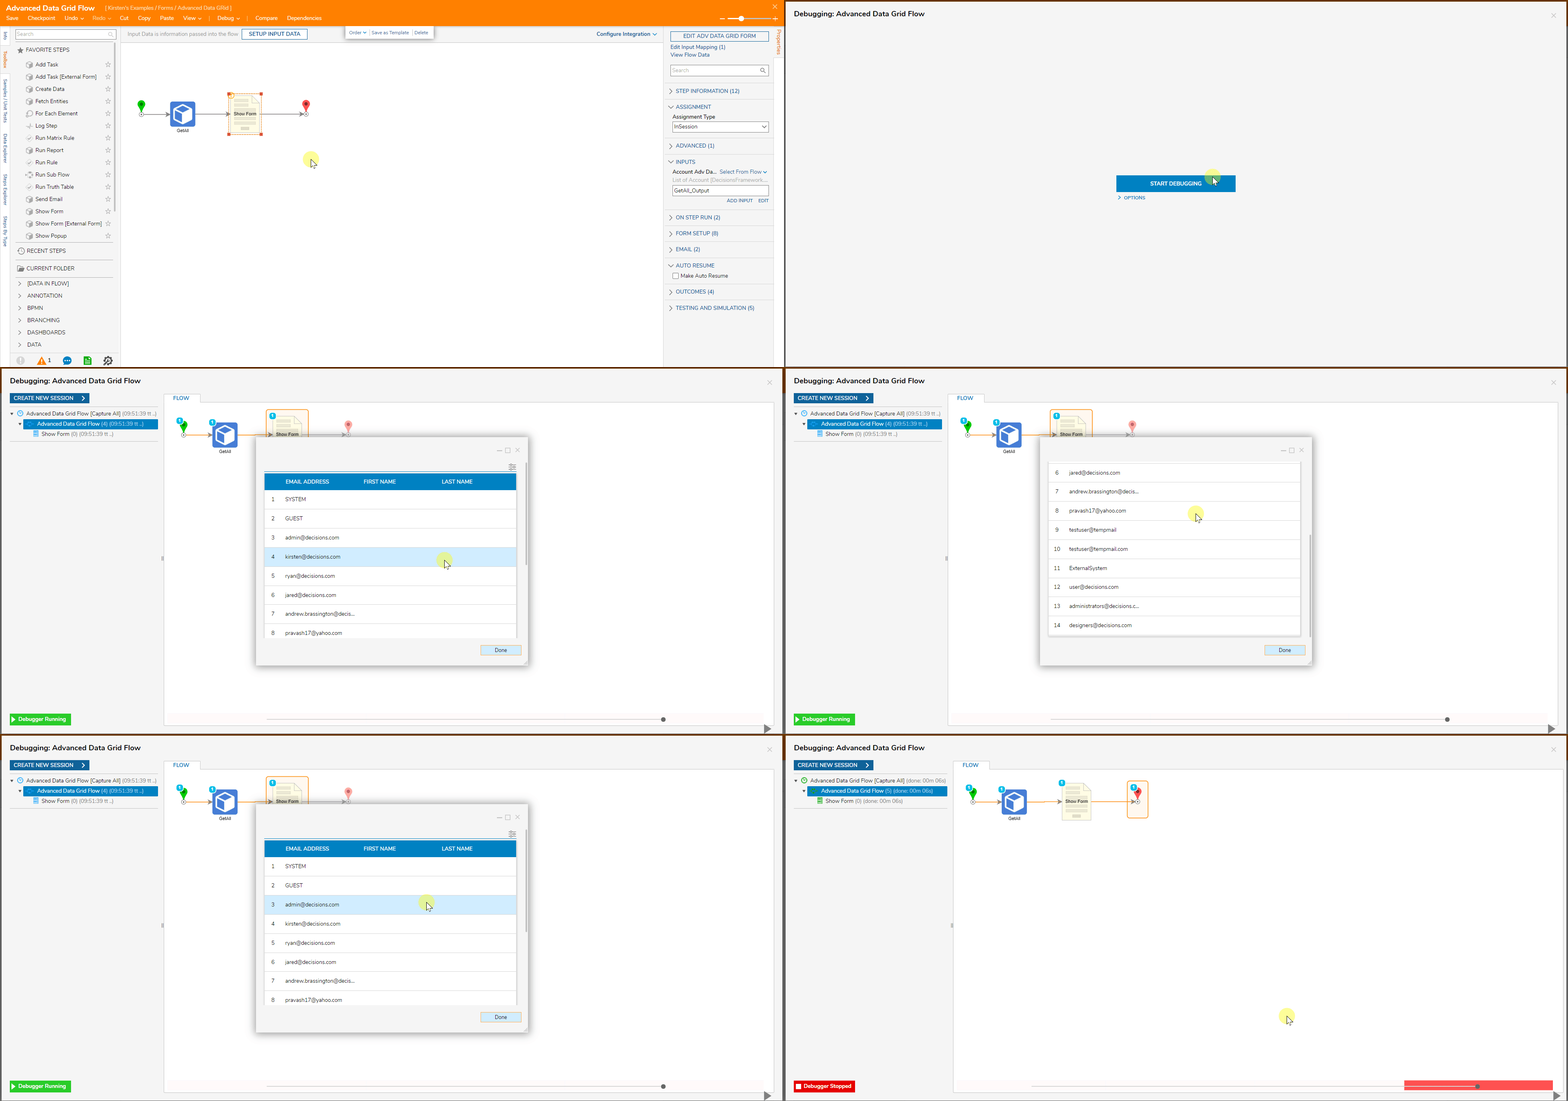
- Select the Debug button from the top action bar in the Flow Designer.
- Select Start Debugging.
- The Flow runs in the Debugger. The Data Grid [Advanced] will show the list of accounts with the appropriate Data Fields from the Source Report.
Hiding Actions
Designers may hide Actions of Entities within an Advanced Data Grid by utilizing Action Visibility Rules. Designers may hide both custom Actions and default Actions such as 'Delete', 'Manage', etc. when configured successfully.
The following example describes how to hide the default 'Delete' Action to unspecified accounts in an Advanced Data Grid.
- Entity Action Visibility - steps between these articles are similar but with some changes for Advanced Data Grids
- Entity Structure CRUD Actions
- In a Designer Folder, select Create Datatype/Integrations. Under User Defined Types, select Entity.
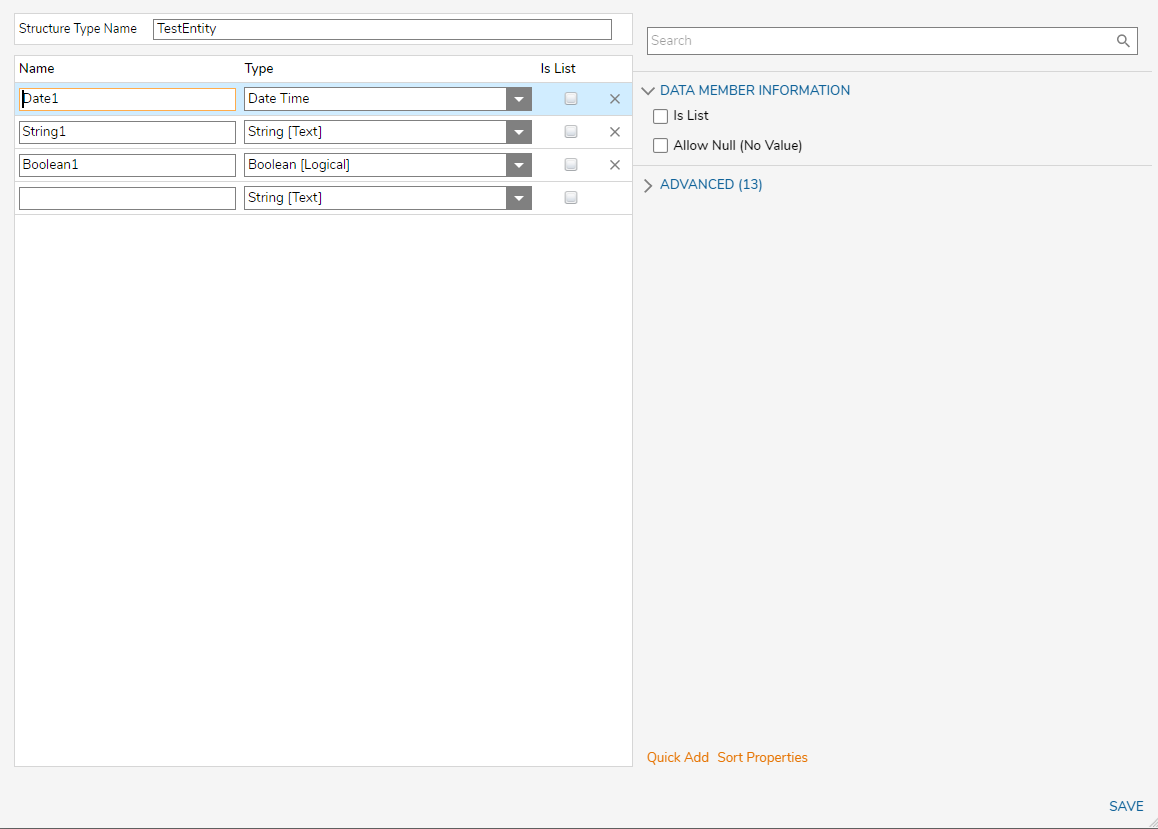
- In the Entity creation menu, mirror the configuration displayed in the screenshot below. Select Save once done.
- Back in the Designer Folder, create or open a Flow. Name it 'TestData' and open the Flow in the Flow Designer.
- Create example data for display in the Advanced Data Grid by using the Create Actions explain in the Entity Structure CRUD Actions article.
- Once configured, save and exit the Flow Designer.
- Back in the Designer Folder, create or open a Flow. Name it 'Hiding Actions on Advanced Data Grid Flow' and open the Flow in the Flow Designer.
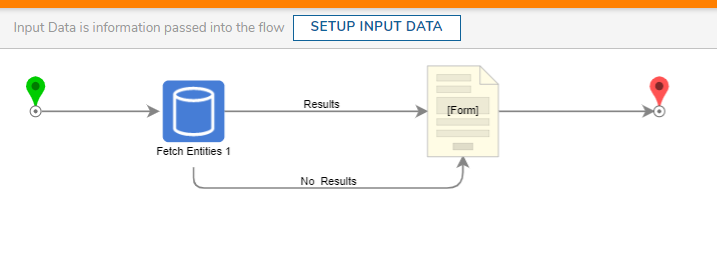
- In the Flow Designer, add the Fetch Entities step and connect the Start step to it. This step populates the Advanced Data Grid according to specified criterion. Select it.
- For Type Name, select the created Entity Data Structure aka 'TestEntity'.
- In the Flow Designer, add the Show Form step. Connect the Fetch Entities Step and End step to it as shown below. Select it.
- At the top of the Properties, select Pick or Create a Form to create a new Form. Name it and open the Form Designer.
- Add a Data Grid Add, Data Grid Remove, and a Button to the Form. The Button will serve as the 'Submit' outcome.
- Search for the Advanced Data Grid in the Toolbox and add it to the workspace. Select it to open its Properties.
- Under Source, select the created Entity Data Structure as the source of the Advanced Data Grid. This example will use an Entity Data Structure filled with sample data. Once select, the Report Designer will open.
- Configure the Report as shown in the GIF below with the Data Source listed as the Entity Data Structure and its String, Date, and Boolean Data Fields present in the Report.Refer to Understanding Differences Between Data Structures article to view which ones support Configuration Folders.
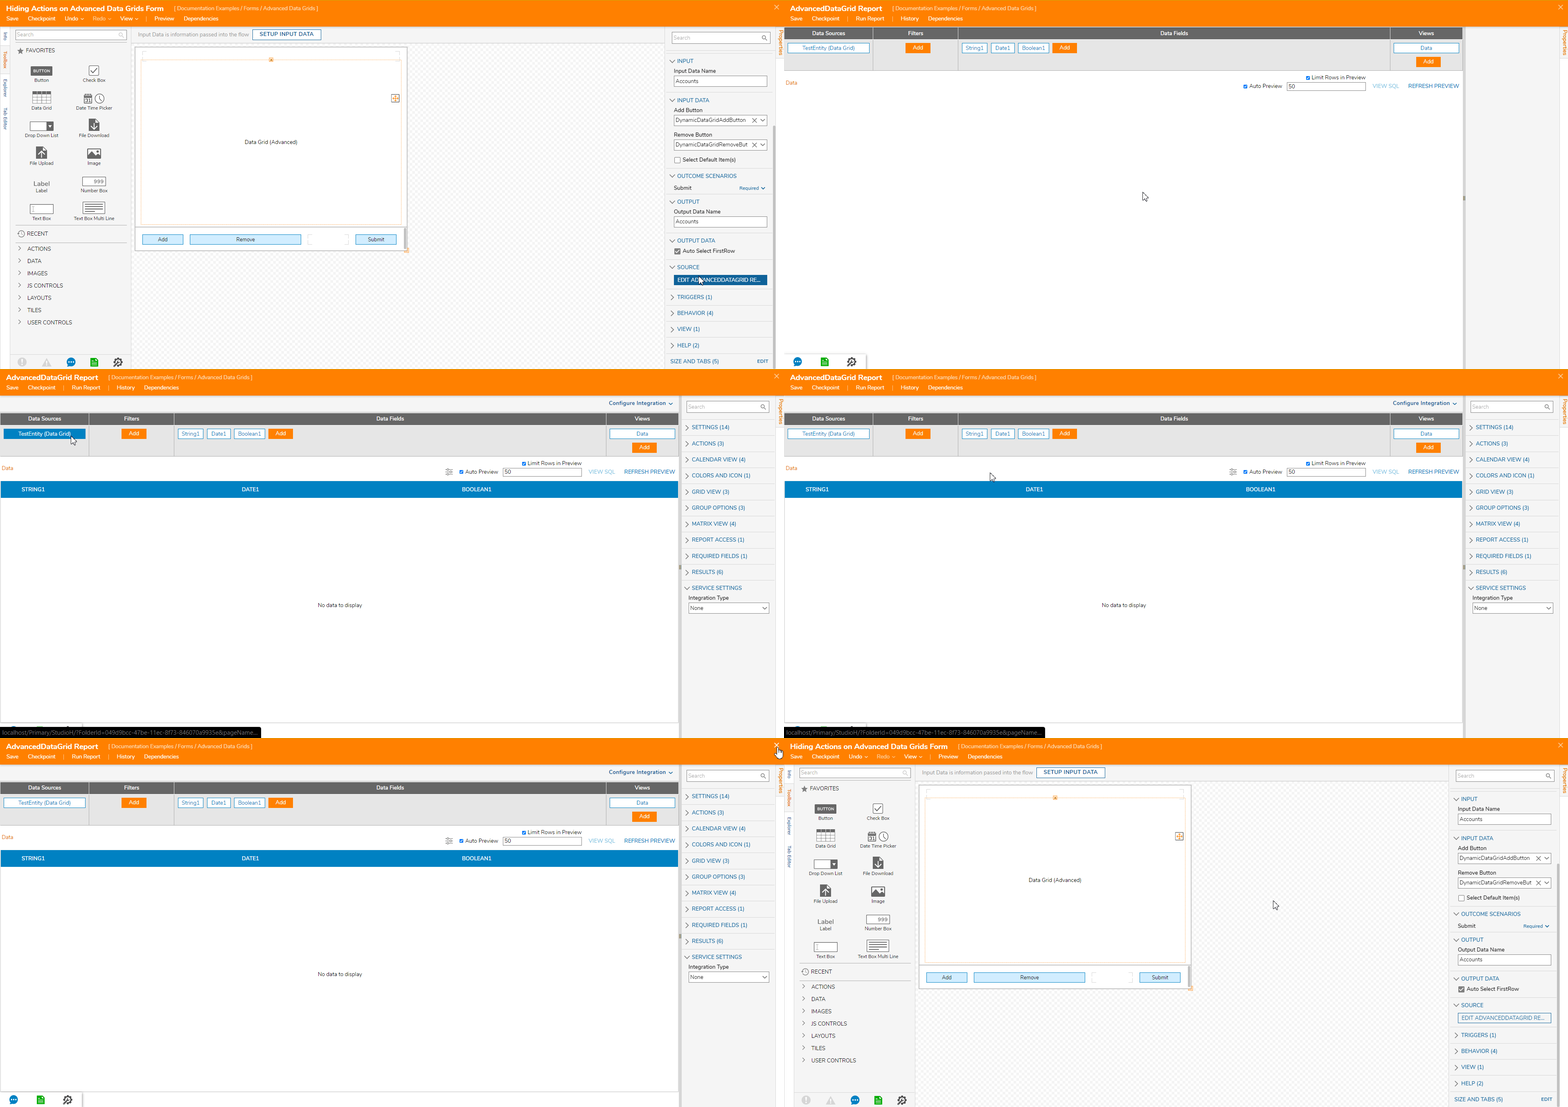
- After selecting the source, save and exit back to the Designer Folder.
- Find the Entity' Configuration Folder named ''TestEntity' Configuration' and right-click on it to open the Action Menu.
- Select Action Visibility Rule and name it 'Hide Delete'. Select CREATE to open the Rule in the Rule Designer.
- To configure this Action to affect unspecified accounts, select Select Data Element > Flow Data > Initiating Account > Email Address. Select NEXT.
- Select Is Not in the condition menu. Select NEXT.
- For the Email Address prompt, enter in the Email you are testing on. This condition specified which unspecified accounts are affected by this rule. This example uses an admin account, but any account will suffice. Once specified, select DONE.
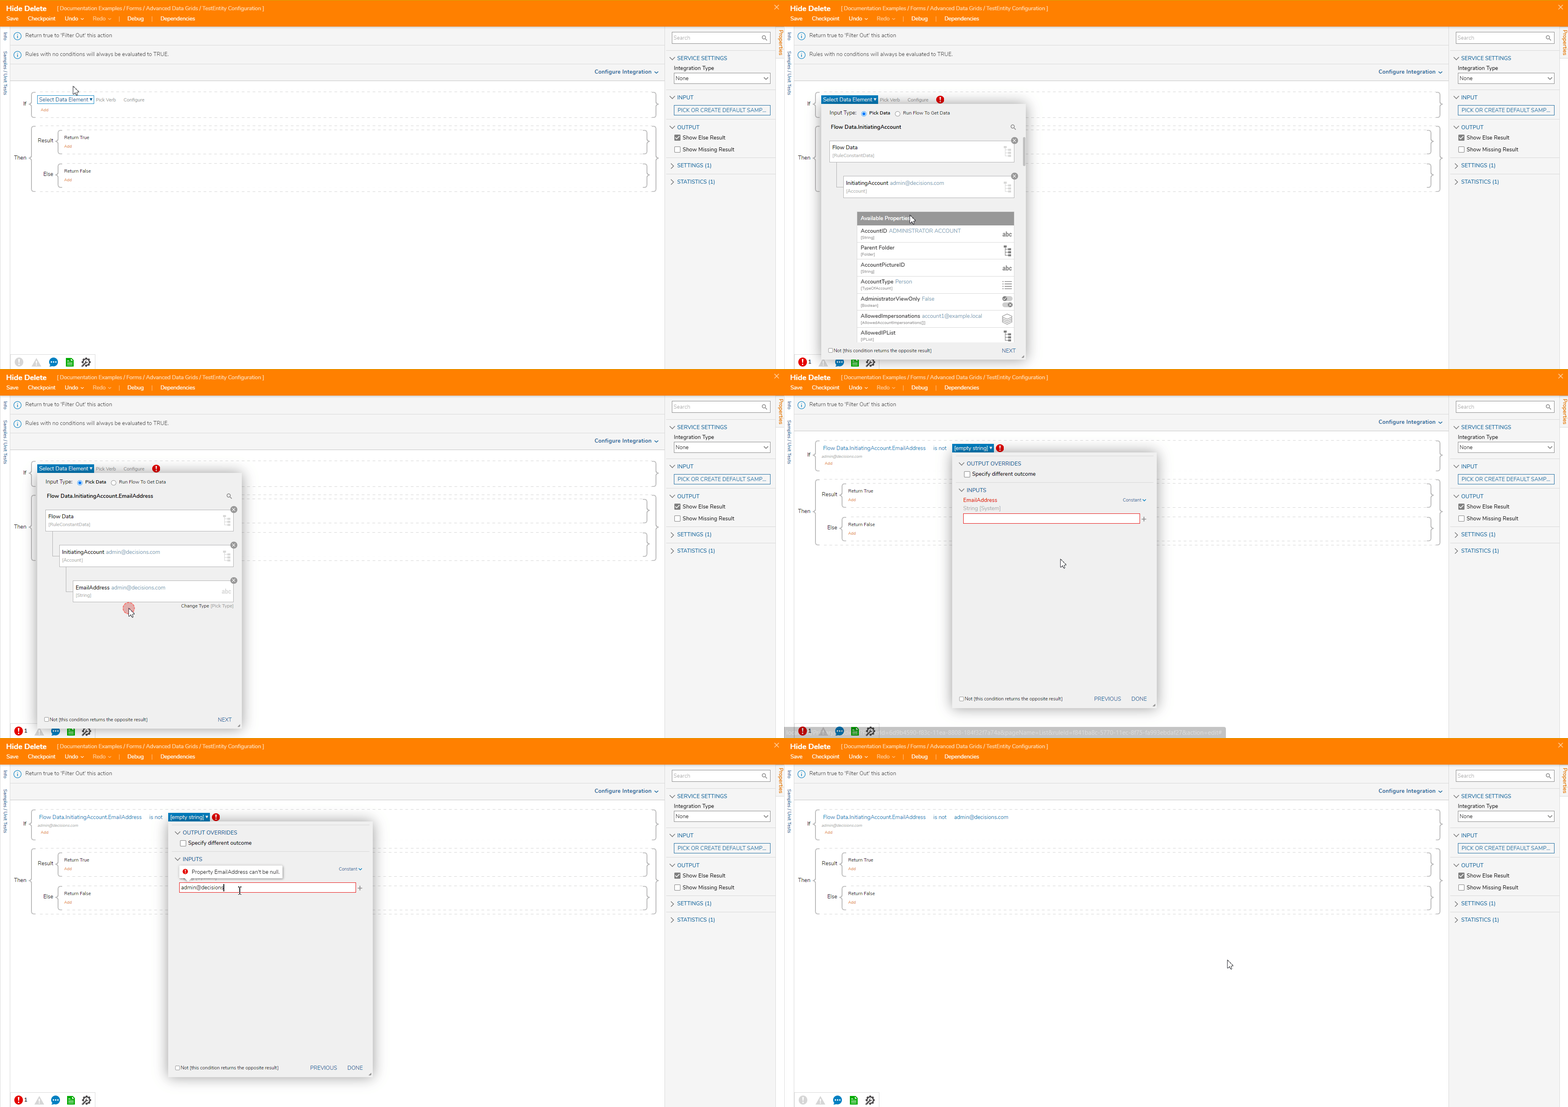
- Select the orange 'Add' button underneath the recently created condition. Select 'Add Condition'. This new condition will specify the Action to hide.
- Select Select Data Element > Action > Name. Select NEXT.
- Select Equals in the condition menu. Select NEXT.
- For the Action Name prompt, enter 'Delete. Select DONE. The Rule's configuration should now match the GIF below.
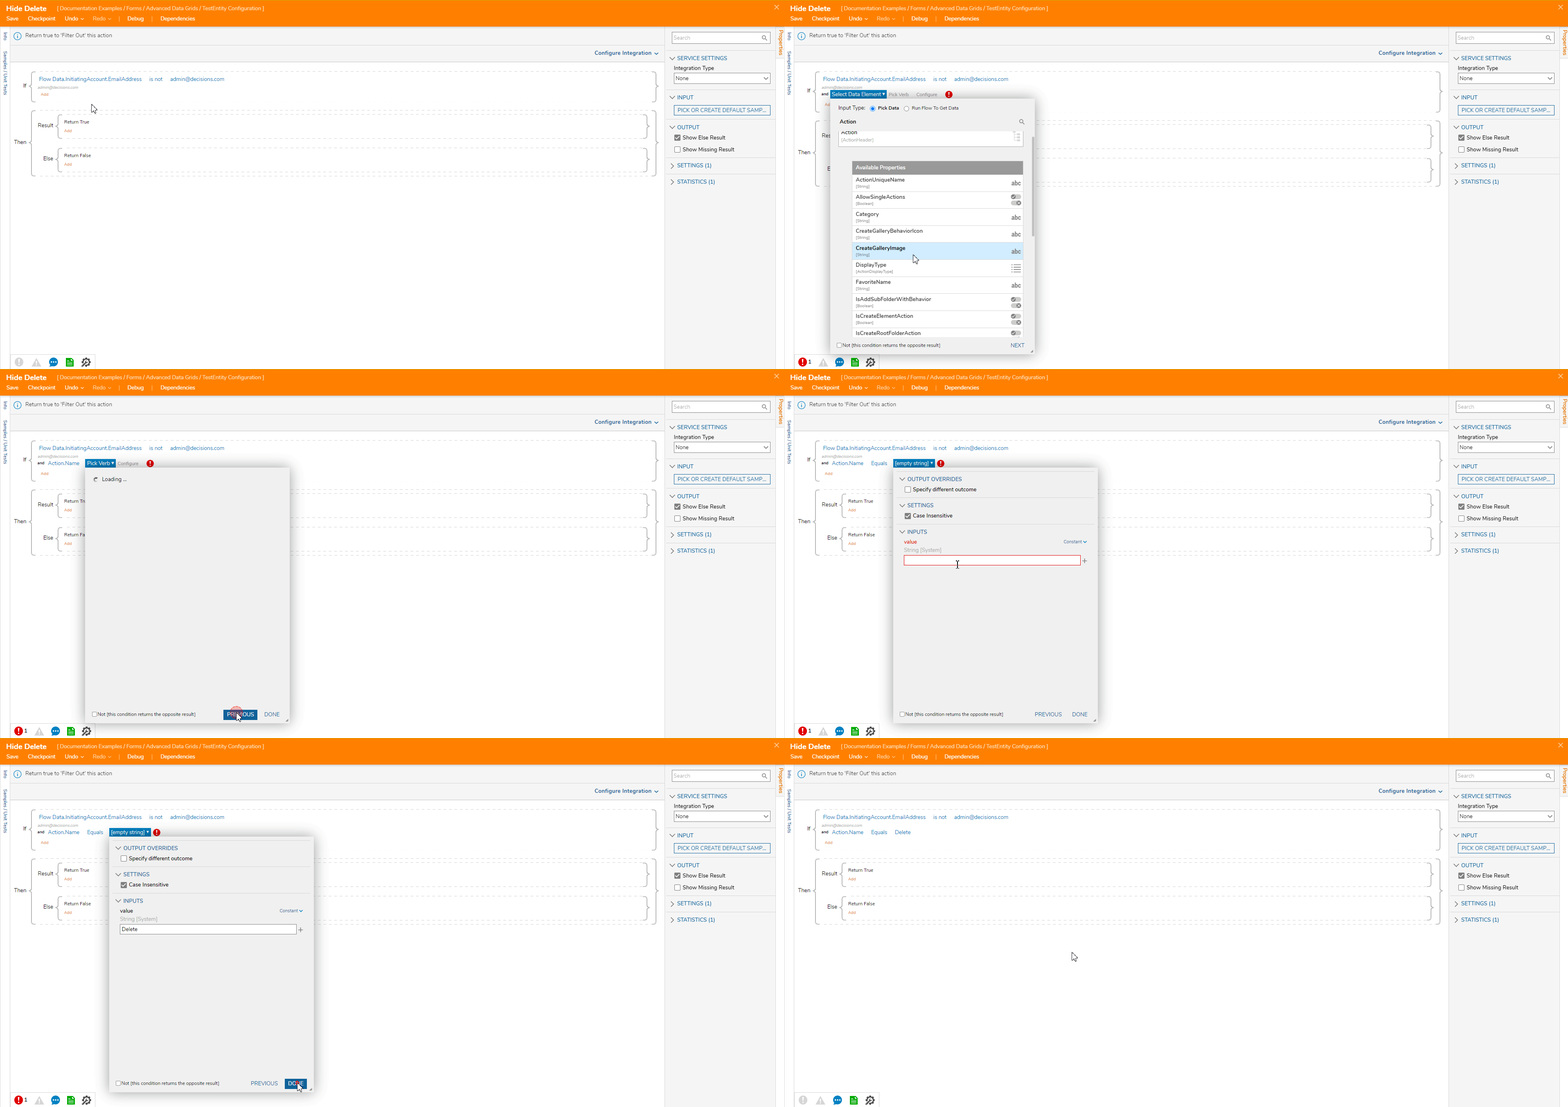
- Save and exit the Rule Designer. Return back to the Designer Folder.
- If already logged into the specified account, log out and log into an unspecified account. In this example's case, this is any account that is not admin@decisions.com.
- Once logged into an unspecified account, navigate to the Designer Folder hosting this example. Open it.
- Run the 'Hiding Actions on Advanced Data Grid Flow' and right click an Entity to view its Actions.Designer Folder not visible on the other account?Permissions for the Designer Folder may need editing to allow the second account to view and run stored Elements. Refer to our About Folder & Portal Permissions article for further details.
Debug
Visible
When logged in with the account associated with the specified email address, the Delete Action is available to use.

Hidden
After logging in with an unspecified account, the Delete Action is no longer available.
