Overview
During installation, countering security risks and potential attacks on the instance or environment is crucial. Implementing security measures and protocols ensures data protection and a strong defense against threats throughout the application's lifecycle.
Decisions supports several ways to secure an installation, including:
- Installing with Windows Integrated Security Credentials
- Secure cookies
- Enabling HTTP Strict Transport Security (HSTS)
- Displaying exception details
- Excluding specific file extensions
- Protecting against cross-frame scripting and/or clickjacking
- Hiding the Server name from the Response Headers
Installing with Windows Integrated Security
Users who have previously configured MSSQL Server using their Windows authentication credentials can leverage the same credentials to enable Windows Integrated Security for their database connection. This feature is advantageous for both system administrators who rely on Windows Integrated Security and users conducting local installations.
- Proceed with installation until the Database Setup and Hosting Options section of the Installation Guide.
- From the Settings section, define the desired Directory. Enable the Show Service Settings checkbox. Click Next.
- In the Service Settings window, under Service Account, select Specify Account.
Input the Windows Username and Password of the Windows account logged into the installing computer/FileSystem. Click Next. - From the Database Setup Page, select MS SQL for the Database Type. Under Connection Type, select Basic and enter the corresponding database server and name via DB Server and DB Database, respectively.
- Under Connection Settings, select Windows Integrated Security. Click Next.
- Proceed with the rest of the installation.
Configuring Cookies
Securing Cookies when Terminating SSL and Redirecting Requests
In v9, Secure cookies are enabled by default if the application uses HTTPS requests for web traffic communication. No additional configuration is necessary unless terminating the SSL. If SSL termination occurs at the Load Balancer/Proxy/Application Gateway and redirects the requests from HTTPS to HTTP on the application, it is essential to secure the cookies. Administrators can achieve this through any of the following two methods:
Via Portal Settings:
- Navigate to the Integration Settings within the application.
- From the Security Option drop-down menu, select 'Secure'.
- Save the close.
Running SQL Query on the Database:
Execute the following command in the Query Editor or in the database to update the Integration Settings.
UPDATE integration_settings
SET security_option = 'Secure'
Same Site Cookies
- Navigate to the Settings.xml file and update the following text values between the DefaultSameSiteCookieMode tags according to the desired cookie settings.
Text Value Cookie Properties None Indicates the client should disable the same site restrictions Lax Indicates the client should send the cookie with "same-site requests" and "cross-site" top-level navigations. Strict Indicates the client should only send the cookie with "same-site" requests. - Save the changes and Restart the application to apply the updated settings.
Securing Session ID in Logs
Users can encrypt the Session ID when viewing logs. Follow the below steps to set this up.
- Navigate to
C:\Program Files\Decisions\Decisions Serverand open Settings.xml as an Administrator. - Update the values between the ObfuscateSessionIdInLogs tags to True.
- Save the changes and Restart the application to apply the updated settings.
Enabling HTTP Strict Transport Security (HSTS)
Using HSTS via a response header, a web app can prevent HTTP communications by forcing only HTTPS communications. This may prevent access to any untrusted or invalid certificates. It also disables prompts asking a user to trust a certificate temporarily.
Method 1
The following instructions configure this for a self-hosted installation.
- Complete a Decisions installation.
- Run the installer as an Administrator. Click EDIT SETTINGS.
- Locate the EnableHttp setting and set it to False.
- Locate the EnableHttps setting and set it to True. Set the HttpsPort to 443.
- Locate the EnableHsts setting and set it to True.
- Save the changes and Restart the application to apply the updated settings.
Method 2
- Navigate to
C:\Program Files\Decisions\Decisions Serverand open Settings.xml as an Administrator. - Set the <EnableHsts> value to false.
- Add the following to the <CustomHeaders> node:
<CustomHeader> <Name>Strict-Transport-Security</Name> <Value>max-age=31536000;includeSubDomains</Value> </CustomHeader> - Save the changes and Restart the application to apply the updated settings.
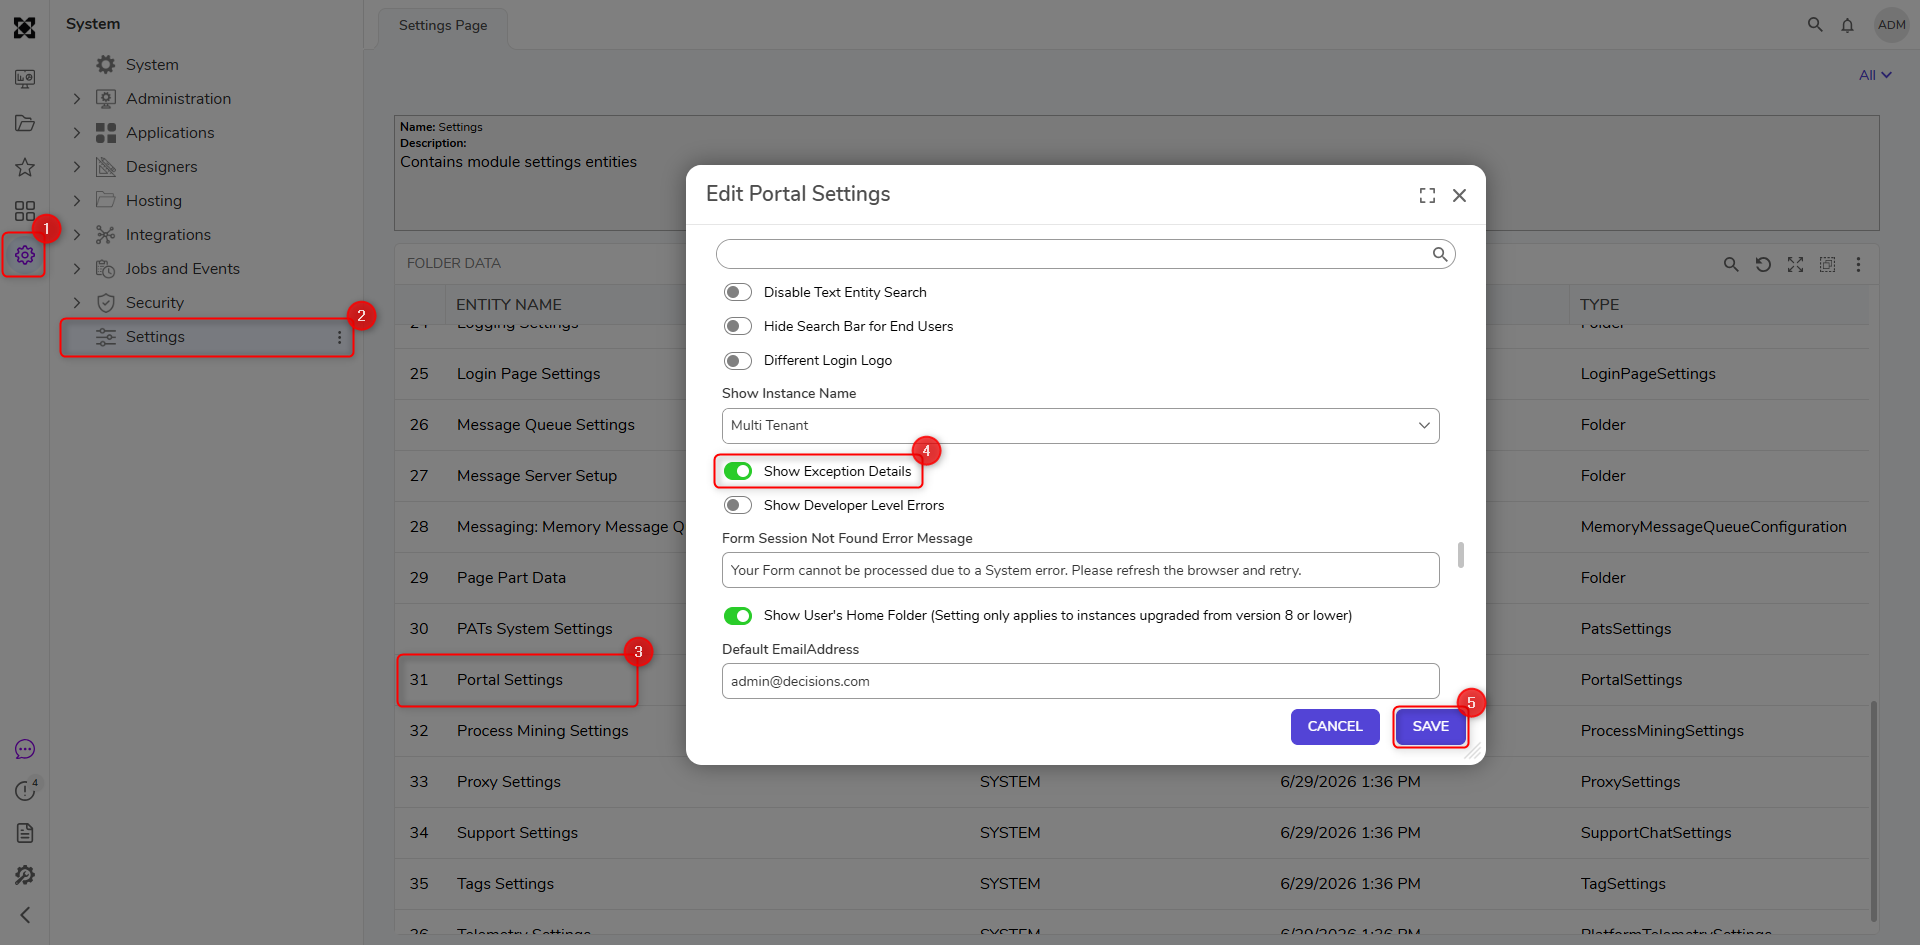
Show Exception Details
- From the Decisions Studio, navigate to System > Settings. Open Portal Settings.
- Under the PORTAL SETTINGS category, enable the Show Exception Details setting, then click SAVE.
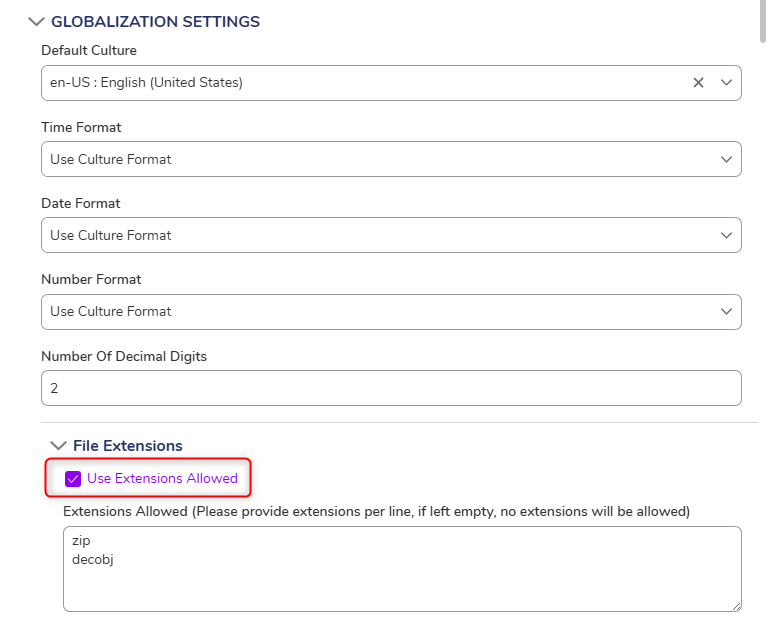
Blocking File Extensions
The File Extensions setting allows Admin users to restrict the file types that can be imported and used within Decisions. Admin users can locate this setting at System > Settings > Portal Settings. Search for extensions in the search bar.
By default, the Use Extensions Allowed box is unchecked, meaning all extensions except those entered in the box are usable. The default extensions blocked are .bat, .exe., .ps1, .com. These can be changed and added to by the Admin user. A list of blockable extensions is below.
If the Use Extensions Allowed box is checked, no file extensions are allowed except for the ones entered. By default, .zip and .decobj are permitted. It is not recommended that these be removed.
- If .zip and .decobj are not added, the Import and Export actions will not work.
- If the Extensions Allowed field is empty, no file types will be allowed in the Portal.
- If the Extensions Not Allowed field is left empty, no file types will be blocked, and all files will be allowed in the instance.
The following list details all extensions/executables/scripts that the Extensions can restrict the Not Allowed setting.
| File Extension | File Type |
|---|---|
| .asa | ASP Declarations file |
| .ashx | ASP.NET Web handler file. Web handlers are software modules that handle Raw HTTP requests received by ASP.NET. |
| .asmx | ASP.NET Web Services source file |
| .asp/,aspx | Active Server Page files |
| .bat | Batch file |
| .chm | Compiled HTML Help file |
| .cmd | Microsoft Windows NT command script |
| .com | Microsoft MS-DOS program |
| .dll | Windows dynamic-link library |
| .exe | Executable file |
| .gadget | Windows Gadget |
| .hlp | Help file |
| .hta | HTML program |
| .htr | Script file |
| .htw | HTML document |
| .msc | Microsoft Common Console document |
| .msh | Microsoft Agent Script helper |
| .msh1 | Microsoft Agent Script helper |
| .msh1xml | Microsoft Agent Script helper |
| .msh2 | Microsoft Agent Script helper |
| .msh2xml | Microsoft Agent Script helper |
| .mshxml | Microsoft Agent Script helper |
| .msi | Microsoft Windows Installer package file |
| .msp | Windows Installer Update package file |
| .pif | Shortcut to MS-DOS program |
| .pl | Perl script |
| .prf | System file |
| .prg | Program Source file |
| .ps1 | Windows PowerShell cmdlet file |
| .ps1xml | Windows PowerShell Display configuration file |
| .ps2 | Windows PowerShell cmdlet file |
| .ps2xml | Windows PowerShell Display configuration file |
| .psc1 | Windows PowerShell Console file |
| .psc2 | Windows PowerShell Console file |
| .rar | Compressed file |
| .reg | Registration entries |
| .rem | ACT! Database maintenance file |
| .scf | Windows Explorer command file |
| .scr | Screensaver |
| .sfx | Compressed file |
| .shb | Windows shortcut |
| .shtm | HTML file that contains Server-Side directives |
| .shtml | HTML file that contains Server-Side directives |
| .stm | HTML file that contains Server-Side directives |
| .svc | Windows Communication Foundation (WCF) Service file |
| .url | Uniform Resource Locator (Internet shortcut) |
| .vbe | VBScript Encoded Script file |
| .vbs | VBScript file |
| .zip | Compressed file |
Content Security Policy
In v9.6, the ability to include a nonce value in the Content Security Policy (CSP) was added to the platform. This has removed the need for unsafe-inline in script-src.
This enhancement improves security and prevents XSS attacks.
The updated CSP should be:
frame-ancestors 'self'; default-src 'self'; script-src https://[BasePortalURL] 'nonce-{nonce-value}' 'unsafe-eval'; img-src 'self' 'unsafe-inline' data:; style-src 'self' 'unsafe-inline' 'unsafe-eval'; font-src 'self' data:; worker-src 'self' 'unsafe-inline' blob:The {nonce-value} will be replaced at runtime with a unique random string for each request.
Decisions will require changes to the Customer Header section of the Settings.xml file. Enter in the URL for the origin that needs to be allowed. Once these changes have been made, restart Decisions.
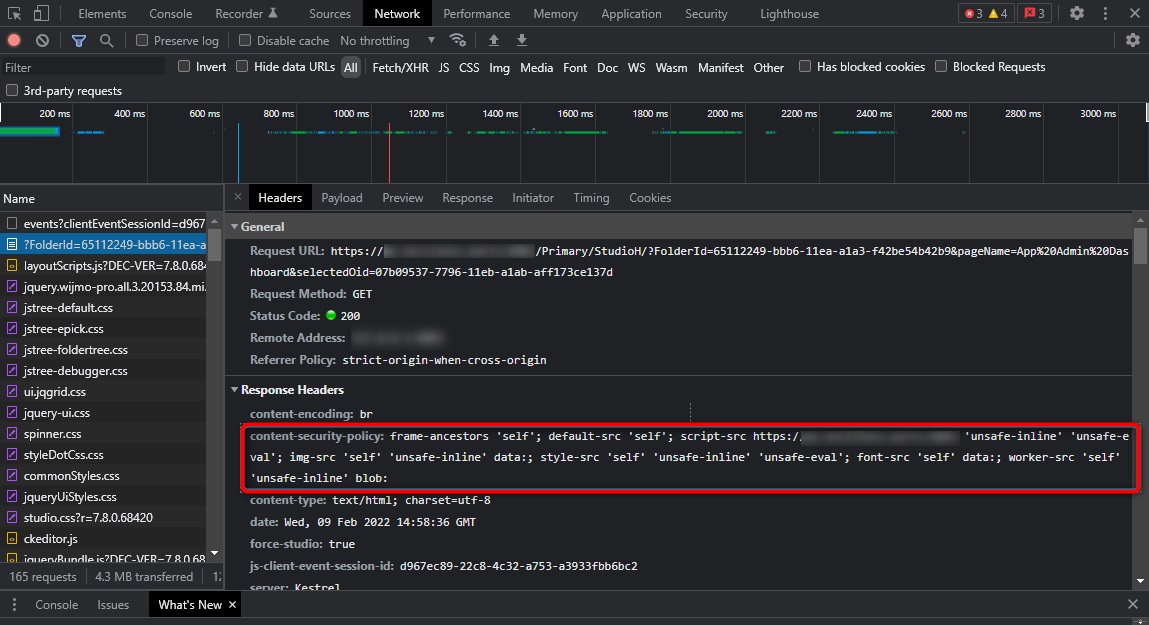
Protecting Against Cross-Frame Scripting (XFS) Attacks and Clickjacking
- Navigate to
C:\Program Files\Decisions\Decisions Serverand open Settings.xml as an Administrator. - Add the following code before the closing </Settings> tags in the XML.
This tag makes the necessary changes to the Content-Security-Policy by adding custom headers that embed Decisions with the domain in [BasePortalURL].<CustomHeaders> <CustomHeader> <Name>Content-Security-Policy</Name> <Value>frame-ancestors 'self'; default-src 'self'; script-src https://[BasePortalURL] 'unsafe-inline' 'unsafe-eval'; img-src 'self' 'unsafe-inline' data:; style-src 'self' 'unsafe-inline' 'unsafe-eval'; font-src 'self' data:; worker-src 'self' 'unsafe-inline' blob:</Value> </CustomHeader> <CustomHeader> <Name>X-Content-Type-Options</Name> <Value>nosniff</Value> </CustomHeader> </CustomHeaders> - Restart the server. If applied correctly, the tags as shown for requests in the Chrome Dev Tools.
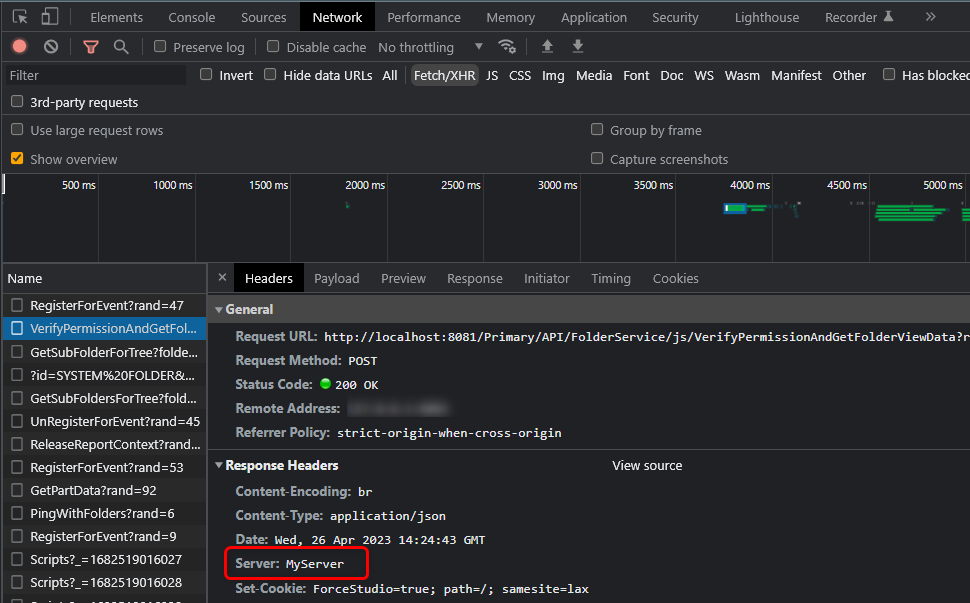
Hiding the Server Name from the Response Header
The Server header lists what software the server used to handle a user's request.
Perform the following steps to change the server name from the response header.
- Navigate to
C:\Program Files\Decisions\Decisions Serverand open Settings.xml as an Administrator. - Add the following code inside the <CustomHeaders> tags in the XML. Change the value MyServer as per convenience. Save and Restartthe server.
<CustomHeader> <Name>Server</Name> <Value>MyServer</Value> </CustomHeader> - This will change the Server Name in the Response Header if applied correctly.