Overview
Multi-Tenant (MT) environments now support containerized instances in v8. This allows the creation of perfectly isolated versions of the Control and Tenant instances offering greater flexibility and control for managing MT environments.
This article covers the configuration aspects of hosting MT containers. The choice of hosting platform for these containers is left to the users. However, if users opt to host the containers on cloud platforms, it is strongly recommended to host the MT containers on Azure Container, ECS, or GCP.
Steps to Setup the MT Containers:
- Configure the Environment variables for Control Instance
- Host the Control Instance
- Create a Tenant on Control Instance
- Configure the Environment variables for Tenant Instance
- Host the Tenant Instance
Setup
Hosting Control Instance
To configure the control instance, defining the following environment variables is necessary. For more information, refer to Creating Environment List Files (env.list).
Note: It is mandatory to add the ServerType, InstanceName, and Licensing variables to the .list file to host a control instance successfully.
DECISIONS_DATABASECONNECTSTRING=Data Source=[IP]\[ServerName];Initial Catalog=[DatabaseName];Integrated Security=false;User ID=[DBUsername];Password=[DBPassword];
DECISIONS_FILESTORAGELOCATION=[FileStorageLocation]
DECISIONS_PORTALBASEURL=[IP/PORT]
DECISIONS_DATABASETYPE=MSSQL
LANG=[PreferredLanguage]
LANGUAGE=[PreferredLanguage]
LC_ALL=[Location]
TZ=[TimeZone]
DECISIONS_SERVERTYPE=Hosted
DECISIONS_INSTANCENAME=[NameOfInstance]
DECISIONS_LICENSECOMPANYID=[CompanyID]
DECISIONS_LICENSECOMPANYNAME=[CompanyName]
DECISIONS_LICENSECONTACTEMAIL=[ContactEmail]
DECISIONS_ENVIRONMENTNAME=[GiveEnvironmentName]
DECISIONS_LICENSETYPE=[EnterpriseProduction/EnterpriseNonProduction]
After configuring the above-mentioned environment variables, proceed to host the control instance on the preferred platform, ensuring that the minimum system requirements are met, and proper configuration is in place.
Create Tenant
Upon receiving the "Application Started" message, log in to the Control Instance and create an Account and a Tenant Folder.
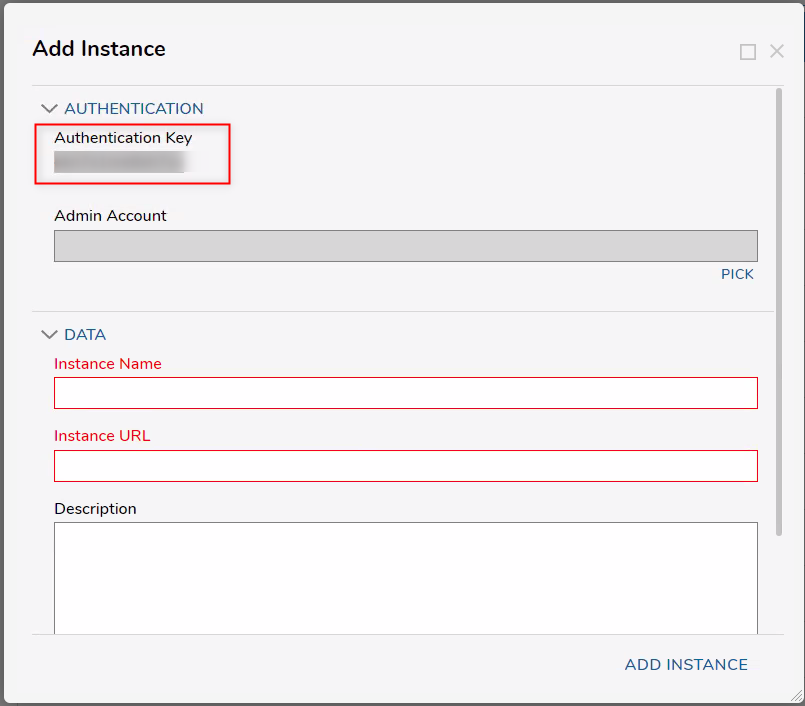
Follow steps 1-7 from the article: Adding and Setting up a Tenant Instance. While creating a Tenant instance, copy the following details for future reference.
- Authentication Key
- Instance Name
- Instance URL
Hosting Tenant Instance
- License: Every container Instance uses its unique license. Thus, providing the licensing variables to host the Tenant instance successfully is mandatory.
- Same File Storage Location as Control: Users can choose to volume map the file storage of the Tenant Instance as same as the Control Instance. Decisions will automatically create a Tenant folder with the given Tenant name. This will help to centralize the file storage for all the hosted instances.
- PortalBaseURL: When hosting the tenant instance, it is important to note that it will be accessed through a different address (such as a different port or hostname) than the primary instance. Thus ensure the PortalBaseURL is reachable by the Control Instance.
For the tenant instance, the following environment variables must be added or modified to the previously defined Environment file while hosting the Control Instance.
DECISIONS_SERVERTYPE=Tenant
DECISIONS_INSTANCEAUTHENTICATIONKEY=[CopiedToken]
DECISIONS_CONTROLINSTANCEURL=[PortalBaseURL]
DECISIONS_INSTANCENAME=[CopiedTenantName]
After configuring the above-mentioned environment variables, proceed to host the control instance on the preferred platform, ensuring that the minimum system requirements are met, and proper configuration is in place.