Overview
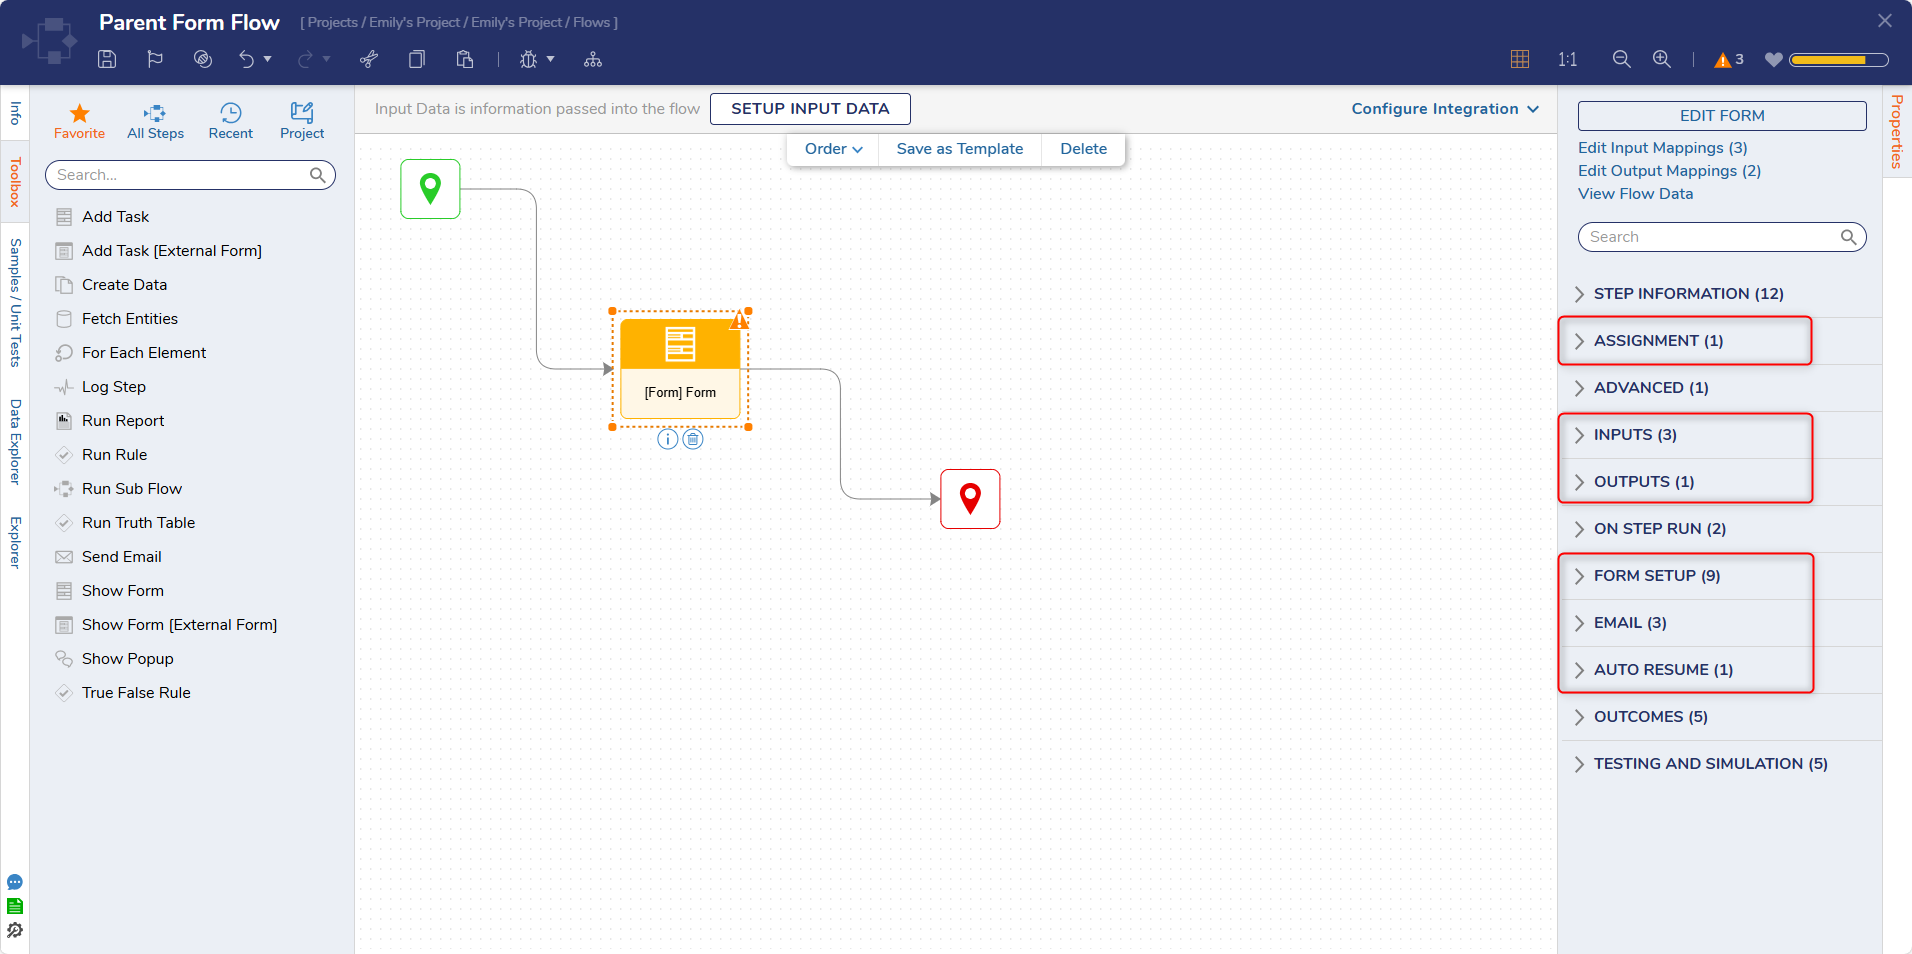
A Designer may configure a Form within the Flow Designer by selecting it's Show Form step and viewing its Properties tab.
Settings such as Assignment, Form Setup, Inputs, etc may profoundly change the Form, its function in a process, and thus its relation to data throughout the Flow.
These options are found exclusively through this menu.
The following article details the highlighted settings sections found when viewing a Form step's Properties in the Flow Designer.
For the setting sections not covered in this article, please refer to their respective articles listed below:
Top Menu
At the top of the settings above the drop-down lists, there are the following settings:
| Setting Name | Setting Description |
|---|---|
| Edit Input Mapping (# of Inputs Recognized) | Opens the interactive Input Mapper window which provides a visual guide for mapping data to the Form through use of lines connecting the Flow's data into a valid component within the Form. In complex Flows with dynamic Form values, use of this Input Mapper is strongly recommended. |
| Edit Output Mapping (# of Outputs Recognized) | Opens the interactive Output Mapper window which provides a visual guide for mapping data out of the Form through use of lines connecting the Form's output to a recipient within the Flow. |
| View Flow Data | Similar to the Data Explorer tab on the right of the Flow Designer, this displays available and existing data in the Flow that can be mapped, manipulated, and potentially stored. |
In addition, a search bar underneath these settings may help a Designer search for a specific setting.
Assignment
| Setting Name | Default Value | Setting Description | ||
|---|---|---|---|---|
| Assignment Type | In Session | Allows selection of Form assignment if present at all | ||
| In Session | -- | Assigned to the initiating user of the Flow i.e. it is not assigned to a specific account thus each submission is session-specific | ||
| Assigned | -- | Assigned to the specified account(s)/group(s) | ||
| Assign To | Blank | Prompts for which accounts/groups to be assigned the Form | ||
| Assignment Name (also appears under Assigned to Guest selection) | Blank | Prompts for naming the Assignment | ||
| Assignment Action Name | Blank | Prompts for naming the Action to open the Assignment shown when right-clicking on the Assignment in the Folder View | ||
| Assignment Reference ID | Null | Prompts of a reference ID for the Assignment; null by default | ||
| Assigned To Guest | -- | Assigns the Form to a guest instance | ||
| Assigned To Named Session | -- | Assigns the Form to a named session | ||
| Named Session | Blank | Picks the named session for the Assignment | ||
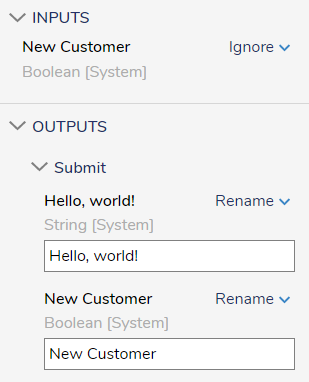
Inputs and Outputs
These sections are automatically populated with Form controls expecting data such as Textboxes, Toggle Buttons, Number Spinners, etc.
For inputs, each control accepts its specific data types. Designers may dynamically map these values via Select From Flow mapping type. Setting Inputs to Ignore allow the initiating user to enter data for dynamic reference of that data for the rest of the Flow.
Outputs populate with the specified Data Name for each control. From here, the Designer may rename these Data Values for better organizational practices. Output names should always be renamed to reflect more process-specific information especially when the Form's data will be manipulated in the Flow.
When specifying a Form Title using any of the Form Title Source Settings, the title will display in the portal (for example, during Debugging) but may not appear when deployed outside of the Decisions environment (for example, when clicking a link).
Form Setup
| Setting Name | Default Value | Setting Description | ||
|---|---|---|---|---|
| Show Form In (When Assigned) | Side Panel | Allows selection of presentation of Form once it pops up | ||
| Dialog | -- | Opens the Form in a smaller dialog box shown at the center of the screen. | ||
| Side Panel | -- | Opens the Form in a side panel similar to when clicking on Element in the Folder View | ||
| In New Window | -- | Opens the Form in a new window on the initiating user's browser | ||
| Runtime Selected Enabled | False | Toggles running the Form at runtime instead of design time | ||
| Edit Form | -- | Opens the Form in the Form Designer | ||
| Pick or Create Mobile Form | -- | Picks or creates a Form that displays on mobile devices | ||
| Pick or Create Tablet Form | -- | Picks or creates a Form that displays on tablet devices | ||
| Do Not Allow Resize | False | Toggles prevention of Form resizing | ||
| Form Title Source | Use Form Tile | Allows source selection for the Form's title's formatting | ||
| Use Form Title | -- | Uses the default Form Title, specified under Step Information | ||
| Specify Title | -- | Populates field to specify desired Form title | ||
| Form Title | Blank | Allows text entry of the specified title | ||
| Title From Flow | -- | Creates Form Title setting in Properties available for input mapping. | ||
| Use Flow Step Name | -- | Names the title after the specified Step Name | ||
| Background Color | -- | Allows selection of background color for the Form's canvas | ||
| Only If Background Color is not set in Form Host | True | Toggles if selection of background color only if not already specified in the Form Designer | ||
| Own Background Color | Blank | Allows color selection of the background color | ||
| Sizing > Own Window | -- | Configures size when Form appears in its own window | ||
| Use Preceding Form Size | False | Toggles resizing a Form to the match the previous Form's size | ||
| Size Type | Designed Size | Allows selection of Form resizing type configurations | ||
| Designed Size | -- | Sets the Form's dimensions to conform to the dimensions specified in the Form Designer | ||
| Maximized | -- | Sets the Form's dimensions to fill its containing browser window | ||
| Specify Size | -- | Sets the Form's dimensions to conform to the specified pixel dimensions. Fields for pixel Width and pixel Height appear beneath the Size Type drop down list once selected. | ||
| Sizing > Sub Dialog | -- | Configures size when Form appears as a sub dialog box | ||
| Use Preceding Form Size | False | When enabled, resizes Form to the match the previous Form | ||
| Size Type | Designed Size | Selection resizing type configuration | ||
| Designed Size | -- | Make the Form's dimensions conform to the width and height specified in the Form Designer | ||
| Maximized | -- | Make the Form fill the window that contains it | ||
| Specify Size | -- | Make the Form conform to specific pixel dimensions. Fields for pixel Width and pixel Height will appear beneath the Size Type drop down list. | ||
| Sub Dialog Position | Center | Designates location of the Form sub dialog box | ||
| Center | -- | Orients Form to center of the screen | ||
| Last Form's Position | -- | Orients Form's location to match the previous Form | ||
| Sub Dialog Use Hide Title Bar From Host | True | Enabled by default; hides the Hide Title Bar option from the host account | ||
| Hide Title Bar | False | When enabled, hides the title bar on the Form. This checkbox will not hide the title bar when using the debugger. | ||
| Setting Name | Default Value | Setting Description | ||
|---|---|---|---|---|
| Email Notifications > Notification Policy | Default | Allows selection of the notification policy of the Assignment | ||
| Default | -- | Sets notification to the Designer specified default | ||
| None | -- | No notification policy is set | ||
| Custom | -- | Sets a custom notification policy with options for subject and body entry | ||
| Clean up HTML | False | Toggles removal unnecessary HTML in the notification email | ||
| Subject | Decisions: Respond To Task | Prompts for creation of a custom subject in the email | ||
| Body | Blank | Prompts for creation of a custom body in the email | ||
| Email Response Handling > Email Template | Blank | Allows selection of a template for the email notification | ||
| Default Template | -- | Sets email to the default template | ||
| Empty Template | -- | Sets email to an empty template for quicker editing | ||
Auto Resume
| Setting Name | Default Value | Setting Description | |||
|---|---|---|---|---|---|
| Make Auto Resume | False | Toggles if the Assignment automatically saves and resumes data | |||
| Save Data | Immediately | Allows selection of when data is automatically saved on the Assignment | |||
| Immediately | -- | Saves data automatically after a certain timespan | |||
| OnAssignment | -- | Saves data on Assignment's completion | |||
| Make Auto Resume Delay | Blank | Prompts for how long the Assignment delays its auto resume | |||
| Auto Resume Expires | False | Toggles if the Assignment will automatically expire after a certain timespan | |||
| Expire Type | FollowOutcomePath | Allow selection which event triggers after expiration of the Assignment | |||
| EndFlow | -- | Ends the Flow upon Assignment expiration. | |||
| FollowOutcomePath | -- | Runs the Auto Resume Timeout outcome path upon Assignment expiration. | |||
| Expire Auto Resume Delay | Blank | Prompts timespan when assignment will automatically expire if not completed earlier | |||