Overview
Azure Blob Storage is a cloud-based object storage service that allows developers to store and manage large amounts of unstructured data, such as text, images, and video. Developers can connect to Azure Blob storage through a REST API to automate processes, integrate with other services and applications, and perform more complex operations.
Before proceeding with the REST configuration, Decisions has an Azure Storage Module that contains 10 pre-built steps for Azure Storage Blob. If the module does not contain the methods the use case requires, below is an example configuration for a REST Service that can be used to interact with Azure Storage Blobs.
Prerequisites
- Obtain an Azure storage account and create a container to store data.
Additional Resource
Example Configuration
Configuring Azure Blob as an OAuth Provider and Token
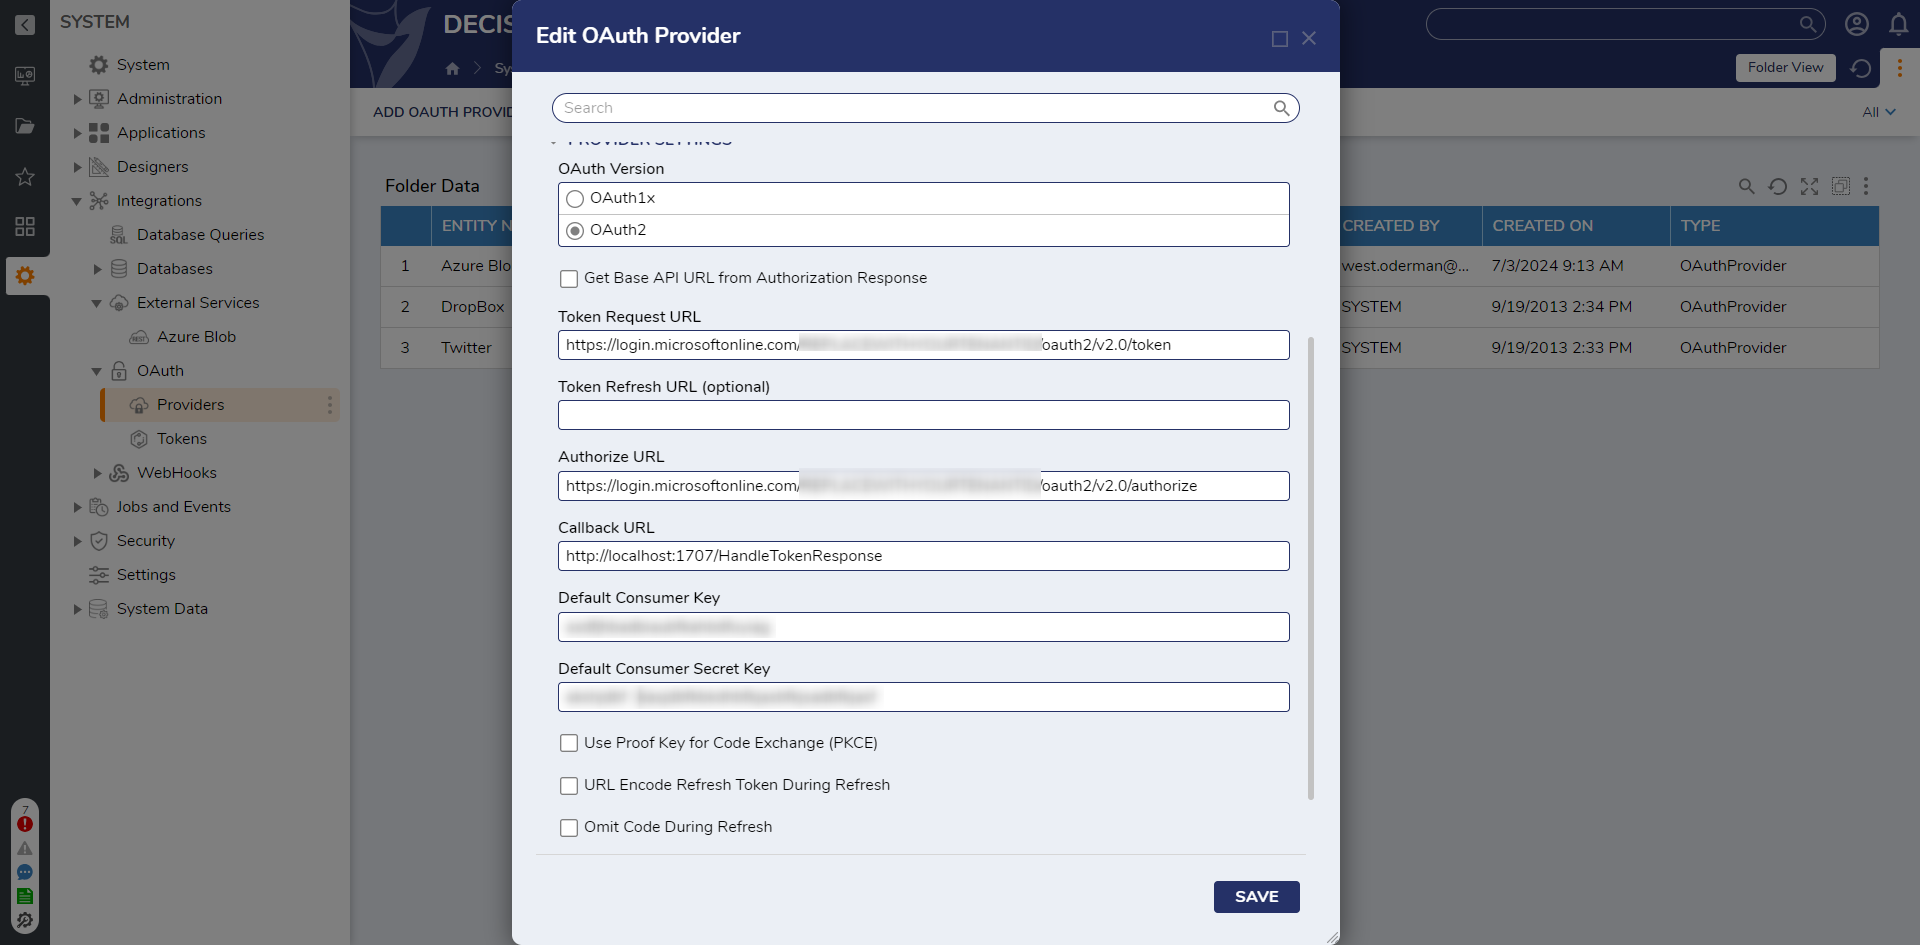
- Following Establishing an OAuth Provider, select OAuth2 for the OAuth Version.
- Enter
https://login.microsoftonline.com/REPLACEWITHYOURTENANTID/oauth2/v2.0/tokenfor the Token Request URL andhttps://login.microsoftonline.com/REPLACEWITHYOURTENANTID/oauth2/v2.0/authorizefor Authorize URL. - Provide the Callback URL, Default Consumer Key, and the Default Consumer Secret Key. Click SAVE.
Field Name Value Callback URL Redirect URI for the application: https://[BaseportalURL]/HandleTokenResponseDefault Consumer Key The Application Client ID (under the Overview page for the application in Azure) Default Secret Key Secret Key (under the Certificates & Secrets page of the application in Azure) - Save and close.

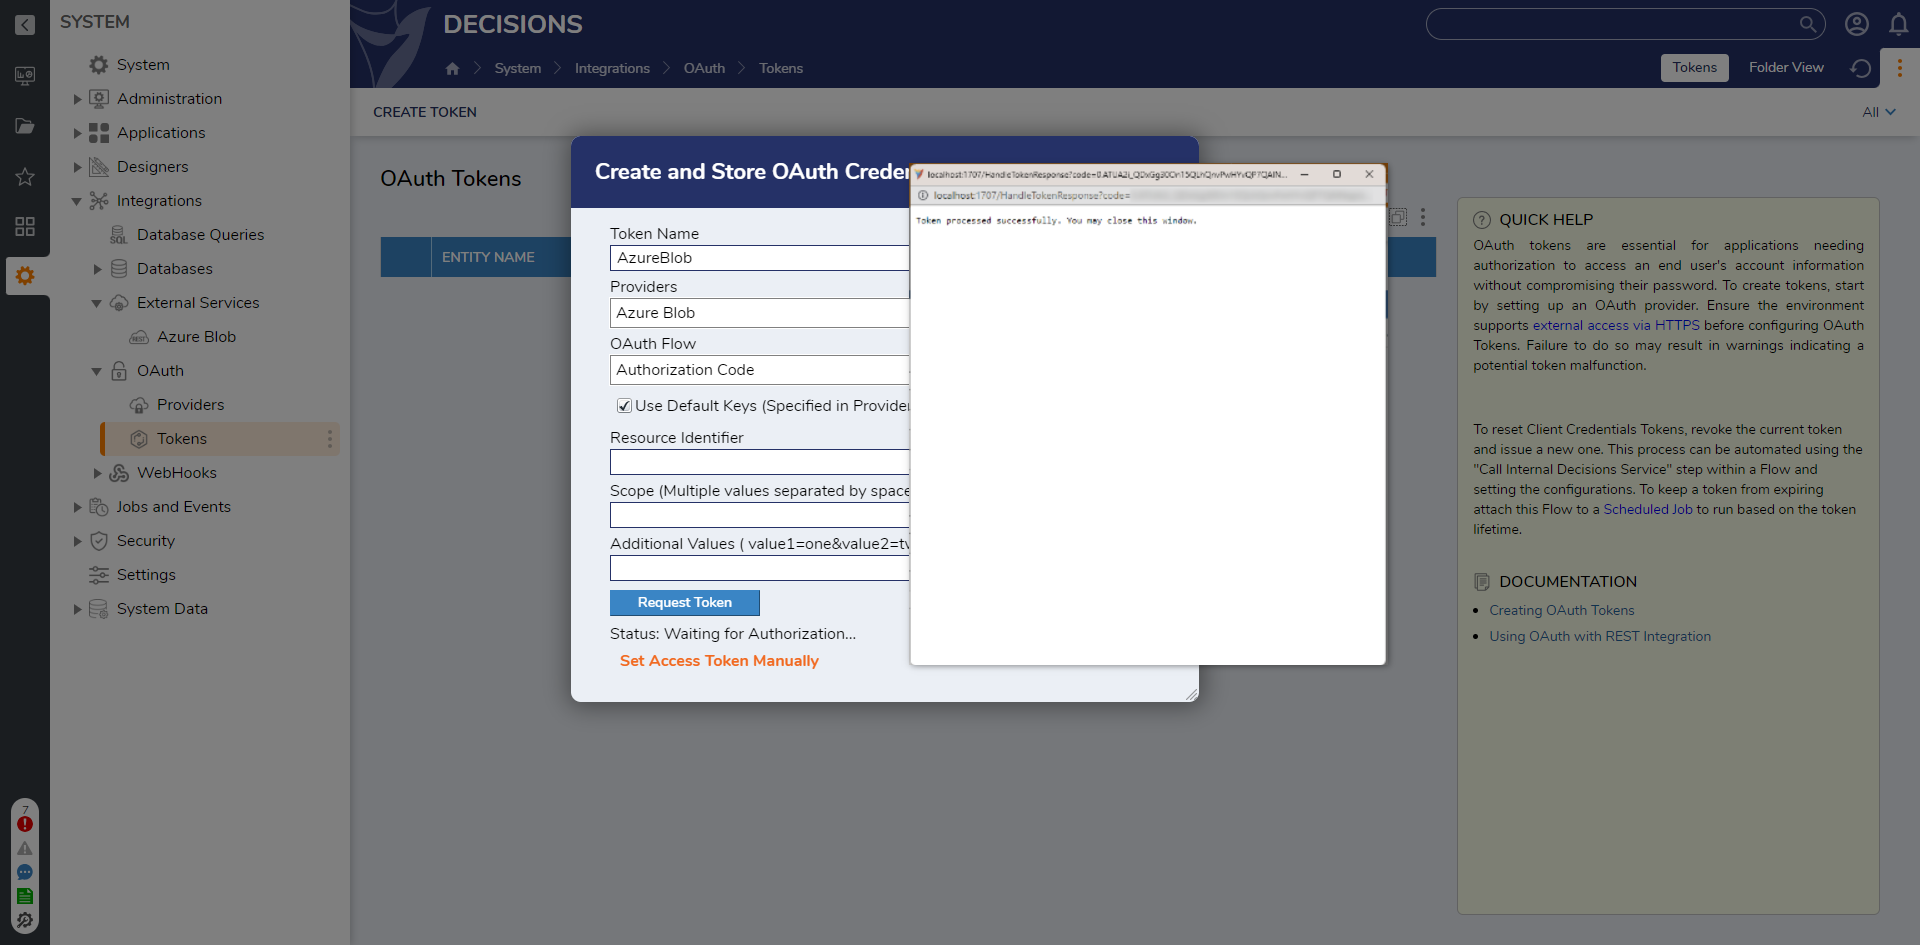
- Following Creating OAuth Tokens, under OAuth Flow, select Authorization Code. Provide the Scope for the Token by entering
https://storage.azure.com/.default.This example will use Authorization Code as the Token Authorization. Use the Token Authorization that fits how the Azure Blob is configured.- This Scope will use any permissions that were established on the Azure Blob Application.
- Click RequestToken and click OK.

Setting up REST Integration
- Following the REST Service Integration Overview, enter
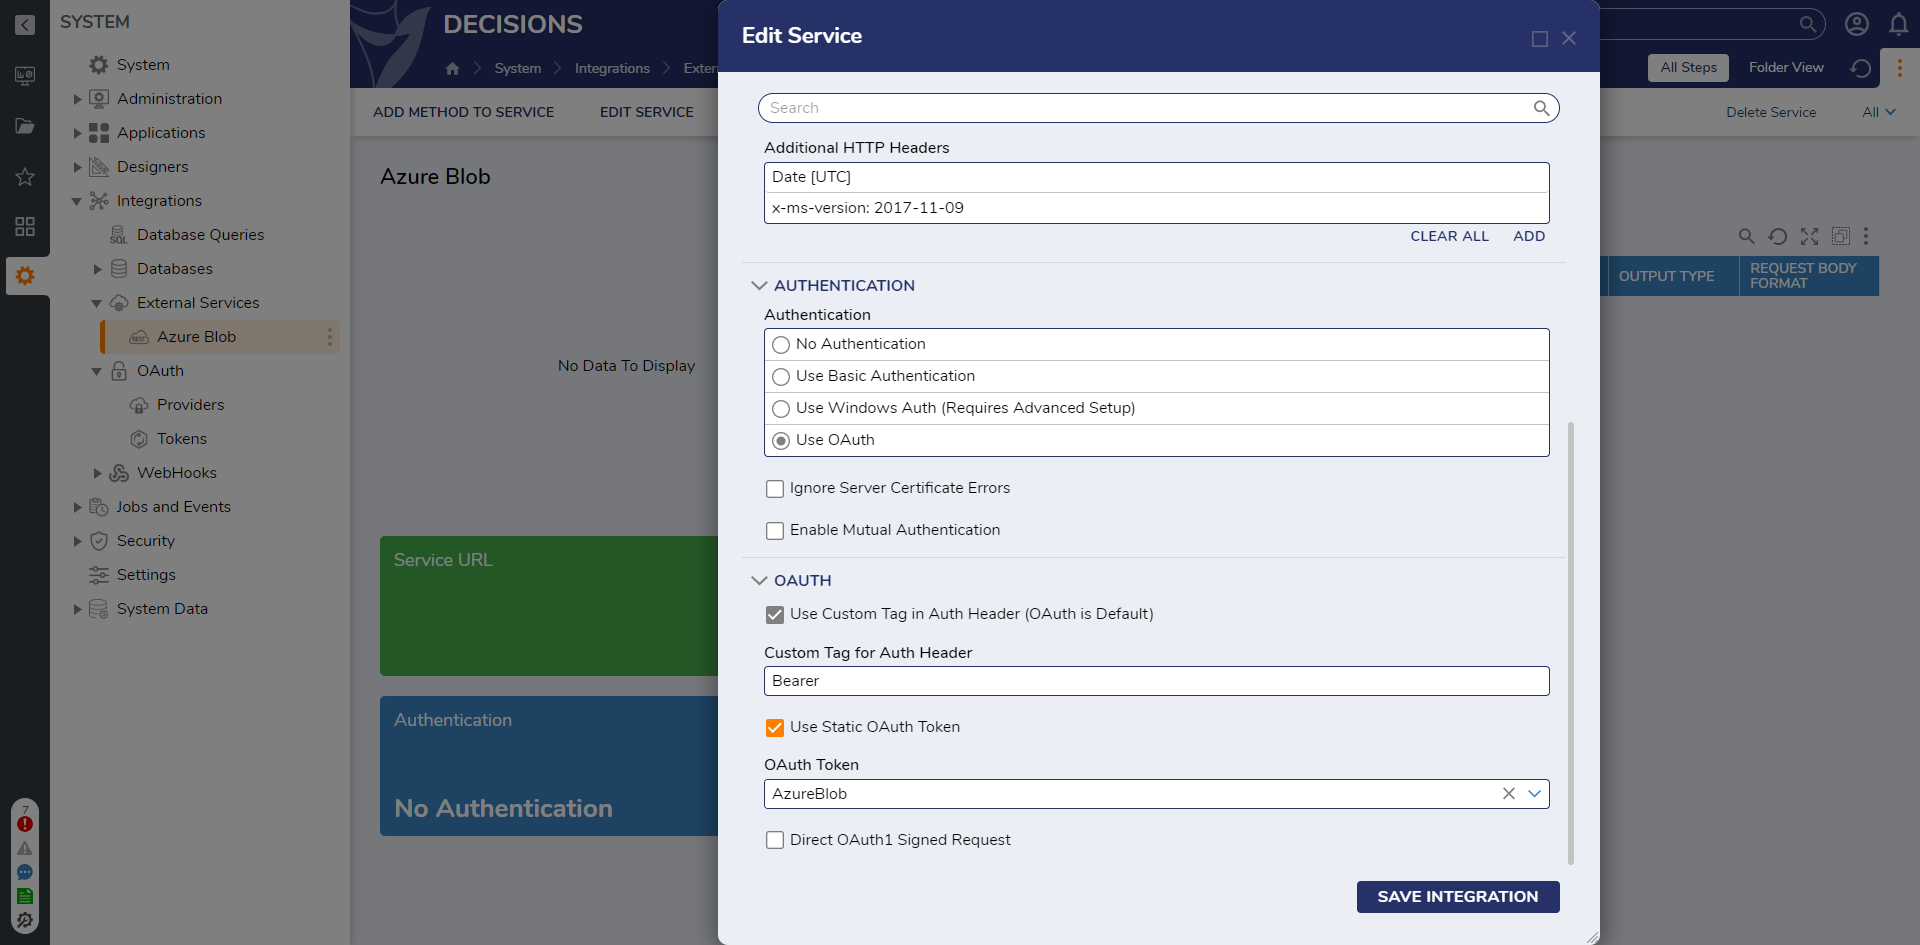
https://[myaccount].blob.core.windows.netthe Service URL. Under the AUTHENTICATION category, select Use OAuth.This example configuration uses OAuth as the Authentication method. Please note that if the Azure Blob Container is set to allow public access, choose "No Authentication" as the Authentication type. - Select Show Advanced Options to set up Additional HTTP Headers; this configuration required a Date and x-ms-version for the REST service to connect. In the Add Additional HTTP Headers dialog, provide the Header Key, like "Date", then choose to provide a Constant variable or to allow the variable to be provided within a Flow.
- Date: Specify the Coordinated Universal Time (UTC) for the request.
- x-ms-version: Required for all authorized requests, optional for anonymous requests. Specifies the version of the operation to use for this request.
- Choose Use Custom Tag for Auth Header and type
Bearerin the Custom Tag for Auth Header textbox. - Then, select Use Static Oauth Token to select the Token Value as the authorization header on the API call.

Setting up the REST Method
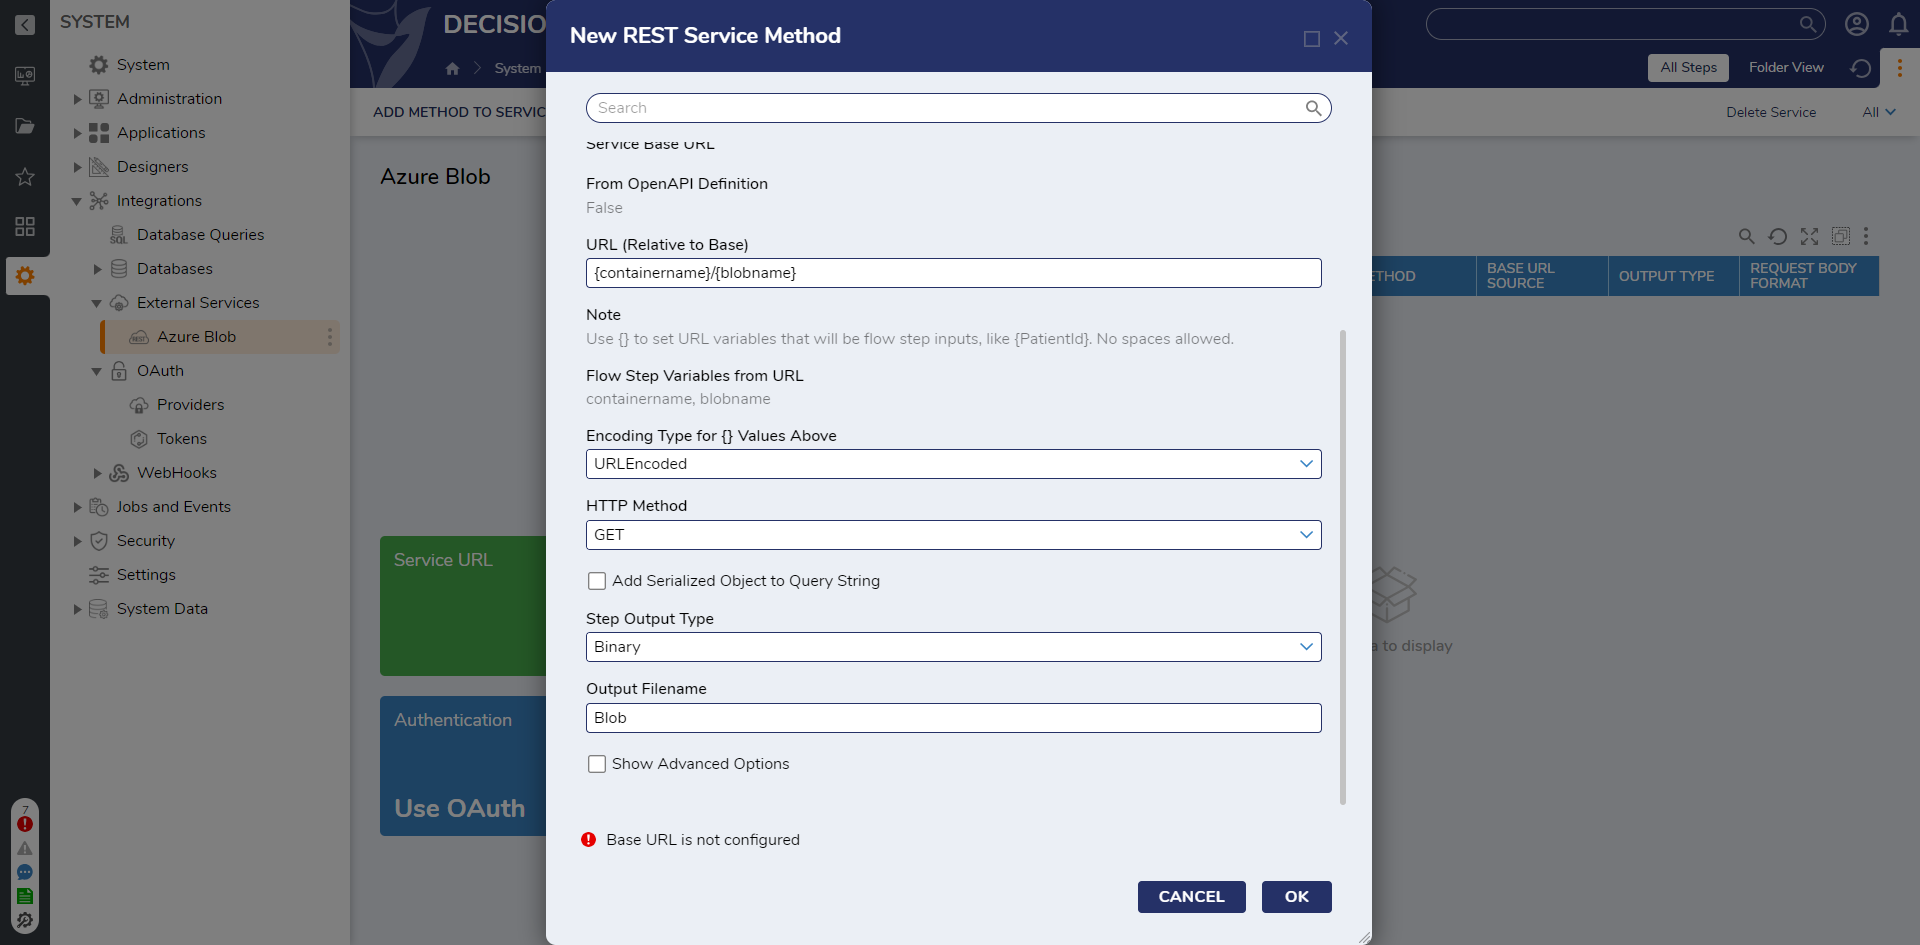
- From the newly created REST Service's Folder, select All > Add Method to Service. In the New REST Service Method window, under URL (Relative to Base), enter the desired endpoint with parameters. This example method uses the Get Blob Properties parameters:
{mycontainer}/{myblob}. While creating methods, provide curly braces around variables to make them available as Flow Step inputs. - This REST method returns a Blob File; ensure the HTTP Method is set to GET.
- Change the Step Output Type to Binary, and provide an Output Filename.
- Select OK to save and close.

Using Azure Blob Integration Steps
- In a Designer Project, create a new Flow.
- The Azure Blob Methods require the Date in UTC as an HTTP Header. To get the proper UTC time and format add the Convert Server Time to UTC step to the workspace and set the Input as Current Date Time.
- The UTC time needs to be converted to the proper format that Azure is expecting, for example:
Fri, 07 Apr 2023 20:13:40 GMT. Add a Get Formatted Date step to the outcome path of the Convert Server Time to UTC step, and set the output from the previous step as the input to this step. Set the Format as "R". Learn more about Standard Date and Time Format Strings. - Navigate to INTEGRATION > REST SERVICES > [REST SERVICE NAME], and attach the REST Service method step.
- Provide the Inputs with the required information, then connect both the Done and Error paths to the End step. This example uses a Form step solely to display the Blob that is being pulled from Azure to further show the connection is working.
Debug
Select Debug in the Top Action Bar to test the Flow. Right-click the steps to view the Inputs and Outputs.
For further information on Integrations, visit the Decisions Forum.