Configuring CICD Process Using Azure DevOps
- 22 Nov 2023
- 5 Minutes to read
- Print
- DarkLight
Configuring CICD Process Using Azure DevOps
- Updated on 22 Nov 2023
- 5 Minutes to read
- Print
- DarkLight
Article Summary
Share feedback
Thanks for sharing your feedback!
Overview
The Decisions platform can leverage Azure DevOps using a Decisions Repository server to automate Project checkouts into other Decisions environments. The following document provides an example of integrating an Azure DevOps Pipeline with a Decisions Repository server.
Prerequisites
- Azure DevOps account. To learn more, see https://dev.azure.com/
- Two Decisions environments, at least one being Non-production, must be already configured
- A Decisions Repository previously configured
- The Powershell module must be installed on the Decisions Repository.
- A GitHub account and a repository.
- An Azure DevOps organization. To learn more, visit Microsoft's documentation for Sign up for Azure Pipelines.
The following project containing the automated checkout process must be imported on the Decisions server, that is the target of the release pipeline, before attempting to run the API call. Attempting to run the API call before importing the Automated Checkout Process will result in an "API call has been made with invalid parameters" error. This error is due to the URL in the POST call pointing to a Flow within the Automated Checkout Process.
Example
In this example, a Flow will be run in the Decisions Repository server after each Check-in that calls the Azure DevOps Release Pipeline via Powershell and runs a POST call from the release pipeline that triggers a Checkout from the Decisions Repository to other Decisions environments.
An artifact must be generated to create a release pipeline in Azure DevOps. This will also create the BuidId value that will be used later to reference the release pipeline from the Powershell script.
When triggering the release pipeline API, an artifact BuildId is required.
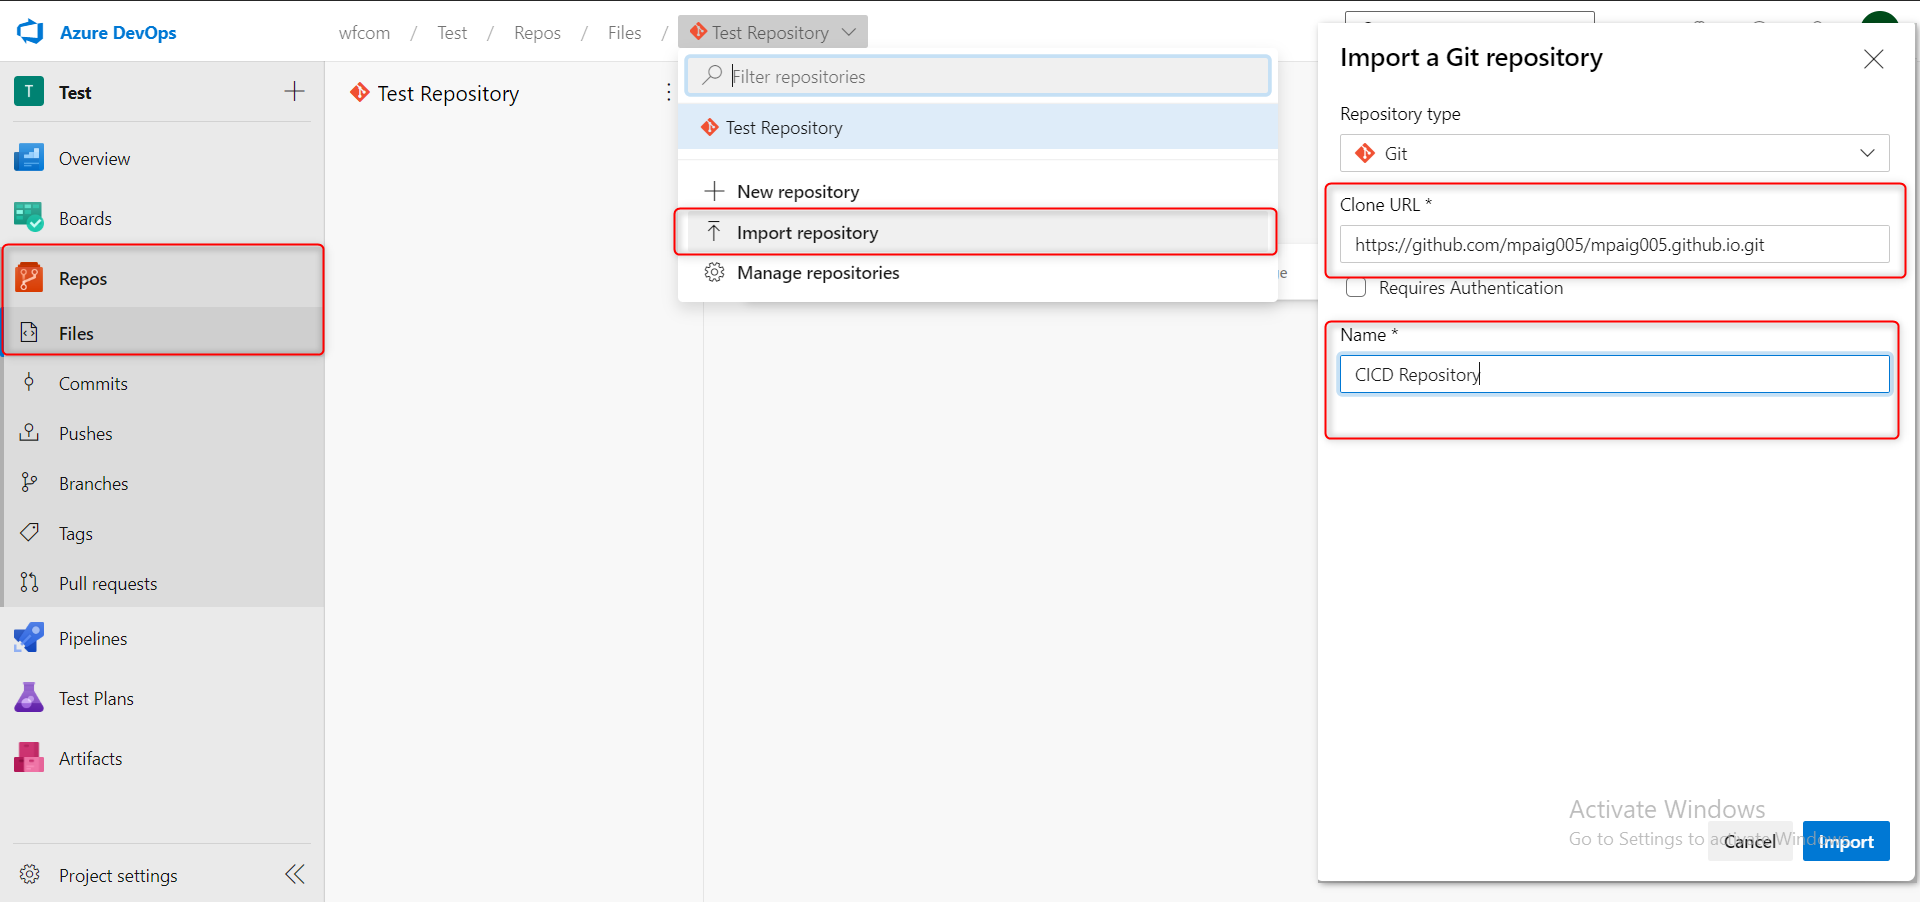
- Navigate to the Repos > Files tab in Azure DevOps and select the Import repository action.
- In the Import a Git repository window, paste the Clone URL from the GitHub repository in the Clone URL field. Enter a Name and select Import.For more information on the Clone URL, see GitHub Clone URL.
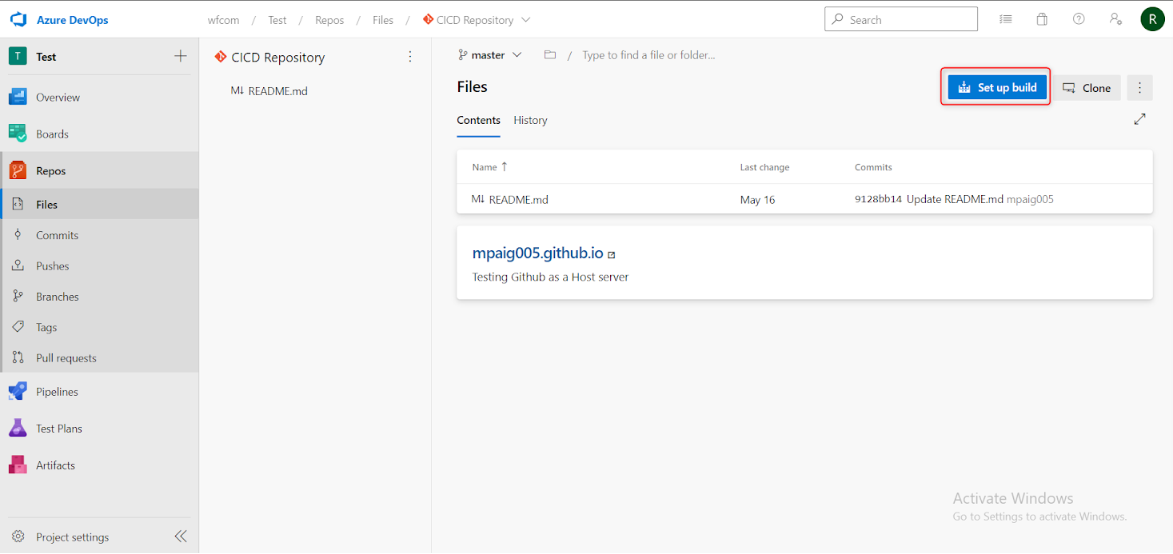
- Configure a build pipeline by clicking Set up build in the repository and configure a Starter Pipeline. Running the build pipeline will generate the BuildId needed for the PowerShell script.
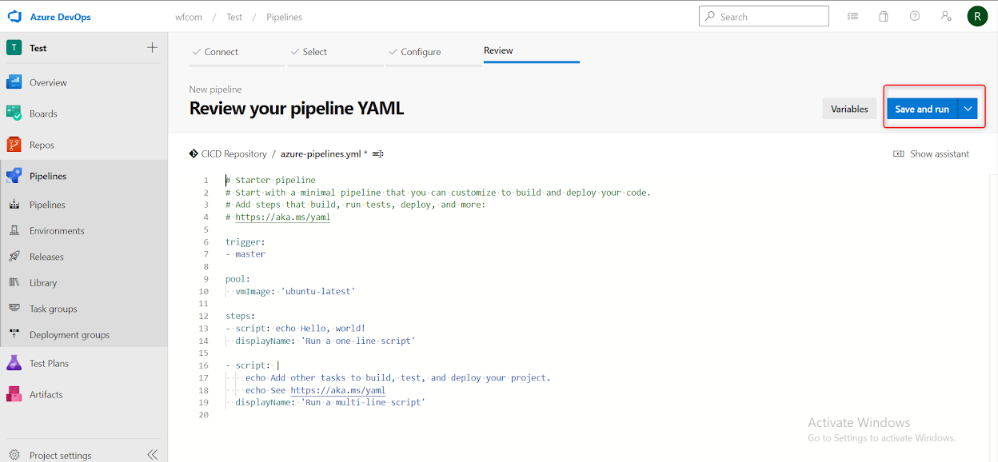
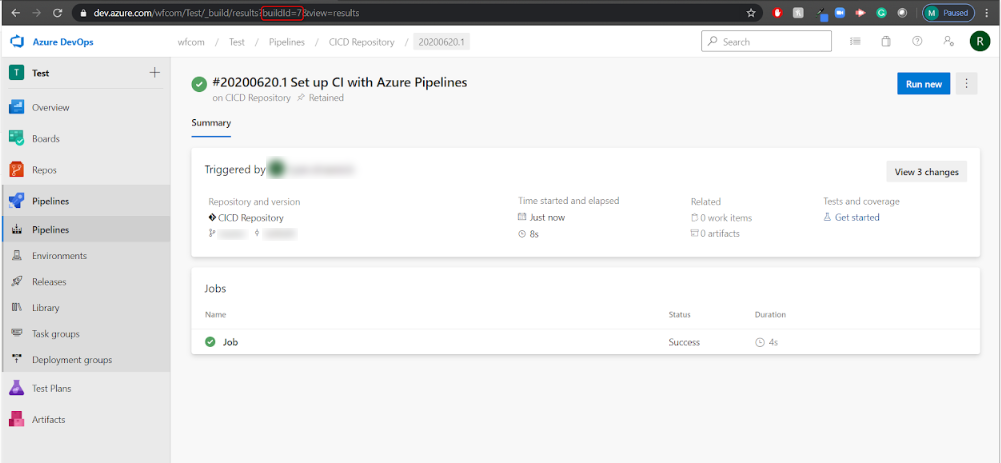
- Select Save and run to generate an artifact with a BuildId. The BuildId value will be present in the URL.
- Create a service connection. by opening the Service Connections page in Azure DevOps from the Project Settings page, selecting New service connection, and setting the type of service connection as Generic. Fill in the necessary parameters for the service connection.
This example will be the integration link for the main Flow of the checkout process. This can be configured using the example URL below.
Server URL:
http://server.domain.com/decisions/Primary/?FlowAlias=AutoCheckoutFlow&Action=apiService Connection Name:
name for the service Connection.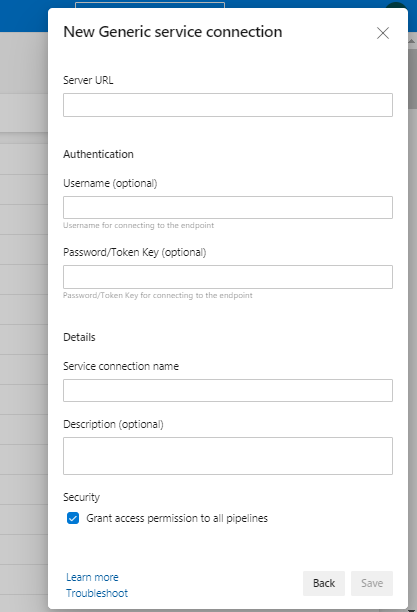
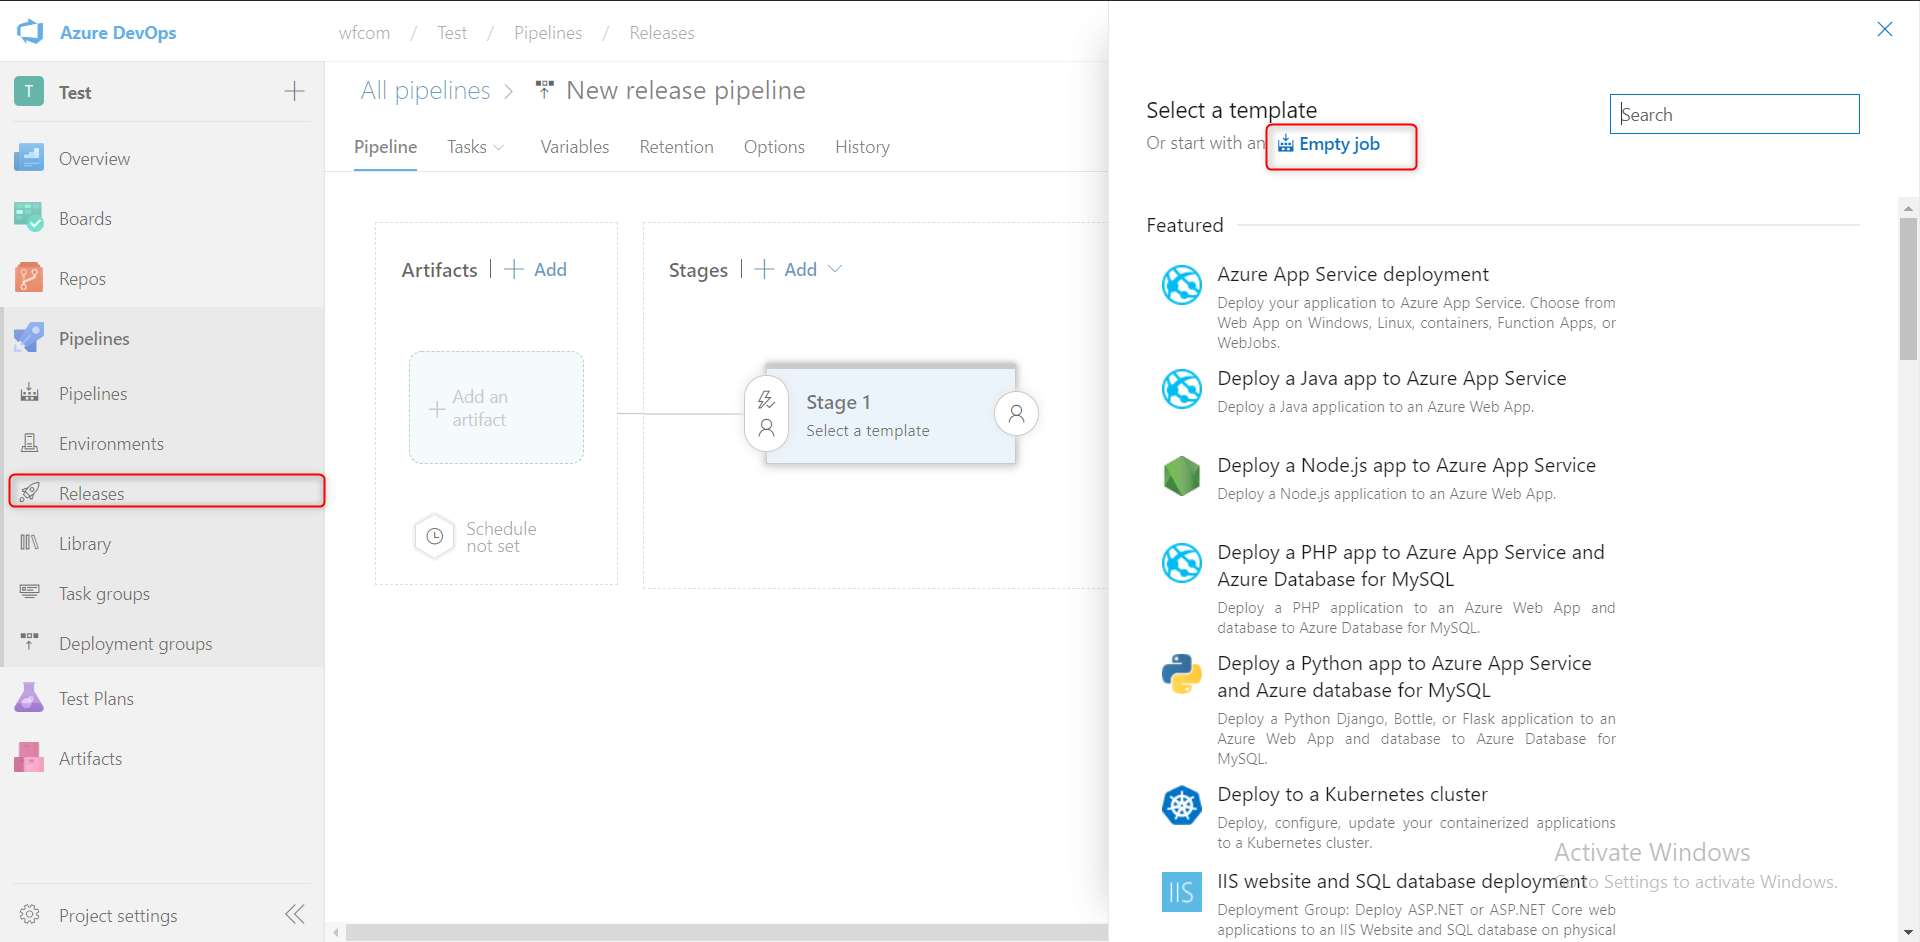
- Create a Release Pipeline; select the Pipelines > Releases tab and Empty job as the template.
- On the Release Pipeline, take note of the definitionid in the URL, as this will be used in the Powershell script to refer to this release pipeline.

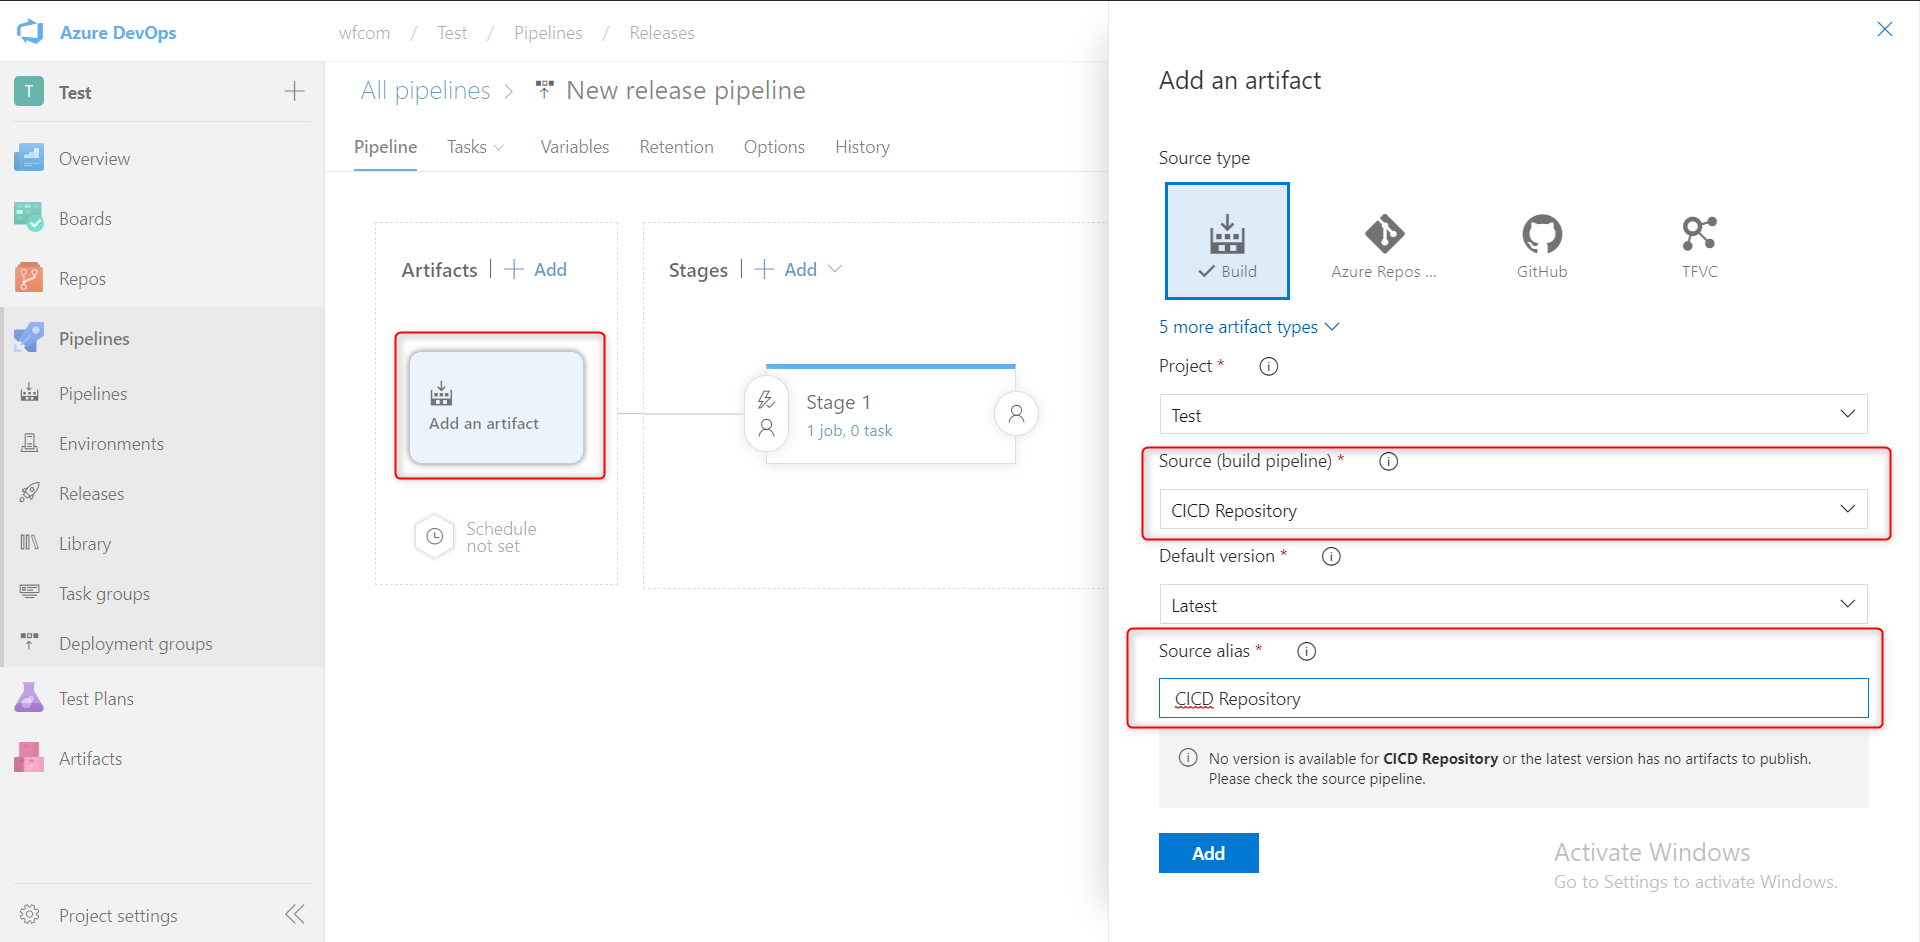
- Select Add an Artifact and specify the Git repository name as the ‘Source(Build Pipeline)’ and a recognizable name for the Source Alias, then select Add.
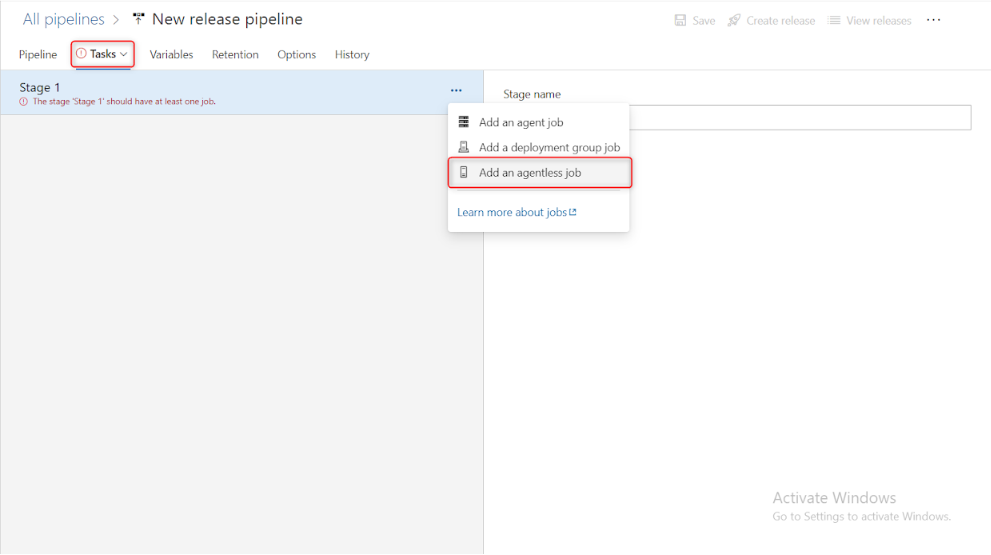
- Navigate to Tasks > Stage 1. Click the ellipses and select Add an agentless job.
- Select the + sign on the agentless job and click Add under the task Invoke REST API. Invoke REST API will invoke the REST call that calls the checkout process in target environments.

- Configure the POST call as follows. Once configured, click Save.Connection type: Required. Select Generic
Generic service connection: Required. Select the Generic service connection that has already been created
Method: Required. The HTTP method to be selected in POST
Headers: Optional.
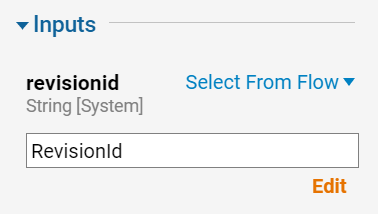
Body:{ "outputtype": "Json", "parentFolderId": "Destination Folder ID for Items without root folders(Default IDis for the MyApps folder)", "moduleName": "ProjectName flow input", "branchName": "BranchName flow input", "Username": "Repository User Name here", "UserPassword": "Repository Password here", "RevisionId":"$(RevisionId)" } - Add a variable for RevisionID, as this value will be passed dynamically from the Powershell script into the release pipeline and be used in the POST call. This variable should be configured with the following credentials: "RevisionId: dummy".
- Generate a Personal Access Token (PAT). The PAT will be used by the PowerShell script to authenticate into Azure DevOps.


Configure Decisions Repository to Trigger the Release Pipeline
After Azure DevOps is configured, move on to configuring the Decisions Repository.
- Create a Powershell Script. The script is called the Azure DevOps Release Pipeline and Passes Revision ID dynamically to the pipeline.
- Once in the script editor, add the following. Select OK to create the script.
Inputs:
RevisionIdScript:
$AzureDevOpsPAT = "AzureDevOpsPersonalAccessToken"
$AzureDevOpsAuthenicationHeader = @{Authorization = 'Basic ' + [Convert]::ToBase64String([Text.Encoding]::ASCII.GetBytes(":$($AzureDevOpsPAT)")) }
$releaseUrl=https://vsrm.dev.azure.com/{organization}/{project}/_apis/release/definitions?api-version=5.1
$body = "{
 `"definitionId`": DefinitionID,
 `"description`": `"Creating Decisions Release`",
 `"artifacts`": [   {
   `"alias`": `"ArtifactAlias`",
   `"instanceReference`": {
    `"id`": `"BuildID`",
    `"name`": null
   }  }  ],
 `"isDraft`": false,
 `"reason`": `"none`",
  `"variables`": {
  `"RevisionId`": {
  `"value`": `"$($revisionid)`"
  }  },
 `"manualEnvironments`": null }"
Invoke-RestMethod -Uri $releaseUrl -Headers $AzureDevOpsAuthenicationHeader -Method post -Body $body -ContentType "application/json"
Using the Script Step
- Navigate to System > Administration > Repository Action Flow in the Repository environment.
- Click FLOW and select Create After Checkin Flow from the Global Action Bar. Provide a Name and click CREATE.

- From the Flow Designer, add a Script Name step from the INTEGRATION > POWERSHELL > SCRIPT PROJECT NAME category of the Toolbox tab. Drag the step into the Flow workspace. Notice the inputs match the Script input as stated above. Running this Flow in the Debugger will trigger the release pipeline. Checking in Flows to the repository will also trigger the release pipeline.


Proposed Method For Version Control When Integrating With Azure DevOps
Prerequisites
- Import the following project on the Repository:
Repository Checkin Configuration-01072020-113614.zip
Dev will be pointed at Trunk on the repository at all times unless a bug fix is needed
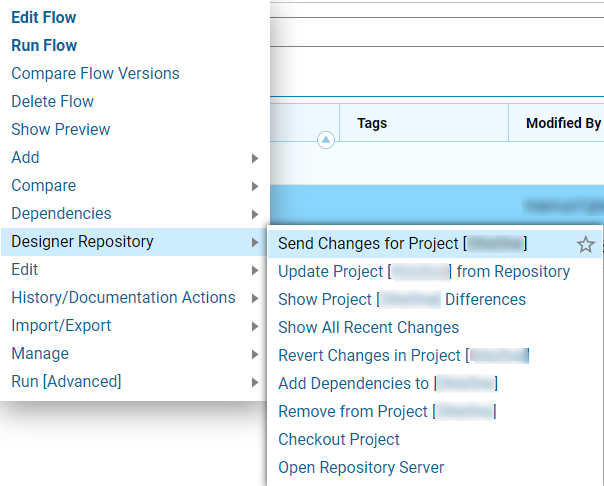
- Once the Project is ready to be pushed to the target environment, push the Project to the Repository by navigating to Designer Repository and selecting Send Changes for Project. This will trigger the 'After Check In Flow' that calls the Azure DevOps Pipeline and sends the trunk version of the project to the environment specified in the pipeline.
- When a new version of the Project is ready to be implemented, login to the Repository and locate the Project.
- Right-click Trunk and select the Create Branch action. Name the Branch by a Branch naming strategy.
.png)
- On the revision in the Branch being pushed to the target environment, select Mark For Release. This action will send the branchName and revision id to the Azure DevOps pipeline, which can then be approved to be pushed to the target environment. Rollbacks can be done using the redeploy action available on releases in the Azure DevOps pipeline.
.png)

.png)
.png)
Bug Fixes:
- Ensure that development is stopped on Dev.
- Push the most recent version of the Project on Dev to the Trunk Branch in the Repository. This ensures any work on Dev is not lost.
- Navigate to System > Designers > Repository in the Dev environment, locate the Project, and select the Change Branch.

- Select the branch representing the release candidate at issue and follow the Change Branch prompts to import this project version onto Dev. Make the necessary bugfix, then send changes to the Repository using the Send Changes for Project action.
- Navigate to System > Designers > Repository in the Dev environment and use the Change Branch to change the Branch back to Trunk.
- Navigate to System > Designers > Designer Repository, locate the updated Branch, and create a new branch via the Create Branch action.
- Right-click the most recent revision and select Mark For Release to send the branchName and the selected revision id to the Azure DevOps pipeline, which can then be approved to be pushed to the target environment.


Was this article helpful?