Installation Guide
- 07 Oct 2022
- 6 Minutes to read
- Print
- DarkLight
Installation Guide
- Updated on 07 Oct 2022
- 6 Minutes to read
- Print
- DarkLight
Article Summary
Share feedback
Thanks for sharing your feedback!
Upgrading from v6 to v7?
Please review the Upgrading Decisions (v6 to v7) article for IMPORTANT CONSIDERATIONS.
Version 7.x .NET Architecture Change:
Versions 7.0.1 - 7.1 require .NET Core 3.1
Versions 7.2 - 7.9 require .NET 5
Versions 7.10+ require .NET 6
Versions 7.0.1 - 7.1 require .NET Core 3.1
Versions 7.2 - 7.9 require .NET 5
Versions 7.10+ require .NET 6
Impact on Upgrades:
- ALL custom libraries will need to be recompiled for the new .NET architecture.
- Custom assemblies will need to be re-written.
- Modules may require reinstallation or design refactoring.
This article serves as a guide on how to install the Decisions platform on an App Server or PC.
While this example installs a self-hosted instance with an MS SQL database connection, configuration for the other supported databases: AWS, Azure, and Postgres, are also detailed.
Prerequisites
- Download and install the latest .NET 6 Runtime (x64).
- Download and install the latest .NET 6 Hosting Bundle.
- Select the desired version from the Download Decisions webpage.
Selecting Installation Type
- Right-click the downloaded DecisionsServerInstaller.exe and select Run as administrator.
- Click INSTALL to begin.
.png)
- Review the terms, check the I accept the terms of the License Agreement box, then click Next.
.png)
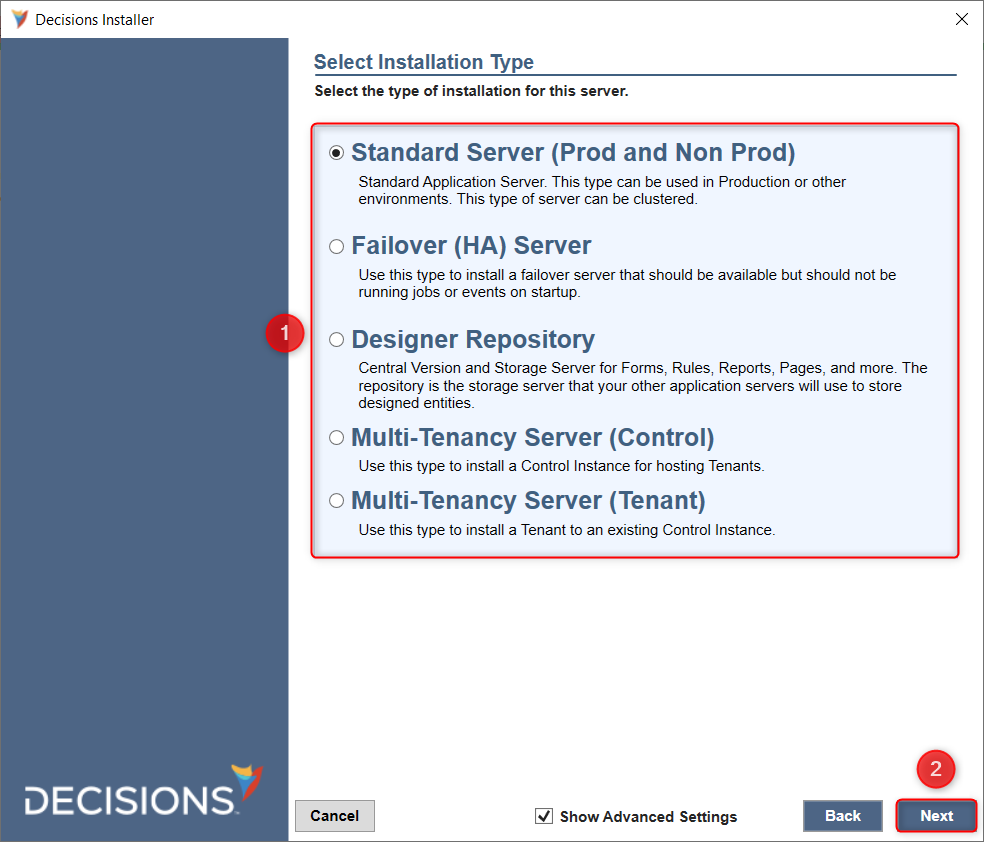
- In the Select Installation Type window, choose the appropriate type. If necessary, enable Show Advanced Settings then click Next.
Refer to the chart below for further information on each installation type:Type Description Free Trial Installation This Server type allows prospective customers to install a 14 day free cloud trail with an Enterprise license. Users experiment with all Decisions features with that timeframe.
An extension can be requested by contacting a sales representative.Standard Server The most common Server installation type.
Installs an instance for both Production i.e live and Non-Production i.e. development purposes. Allow other machines to access the server.Personal Server This Server type is strictly a local installation. Use this Server Type to build and test Flows, Forms, Rules, Reports, and Pages that need to be published.
This Server type blocks other machines from accessing the environment.Failover (HA) Server Installs an instance that only lives once triggered after the primary instance shuts down.
Once installed, it will be available but will not run jobs or events on startup.Designer Repository Installs an instance for storing entities and managing version builds and releases.
It does not run live applications.Expand the Advanced Settings box to view all advanced settings and their functions.
Advanced Settings
Setting Description Use Settings File Enables a field to select a previously saved Settings file. Install Emergency Password Reset Tool Installs a command prompt tool for resetting user passwords. Change Default System Administrator, Username and Password Changes the default administrator email and/or password (admin@decisions.com / admin). Change Destination Folder for Installation Changes the default installation location from C:\Program Files\Decisions. Pick Alternate Source Select an alternate installation file source via URL or file directory. Show the Service Settings Customizes the Service account username and password. Allow Dynamic Resource Loading (Local Module) Allows the system to store and load sources from local modules. Skip DB Connection Testing - Not Recommended Skips the database connection test at the end of the installation wizard. .png)
.png)
.png)

.png)
Database Setup
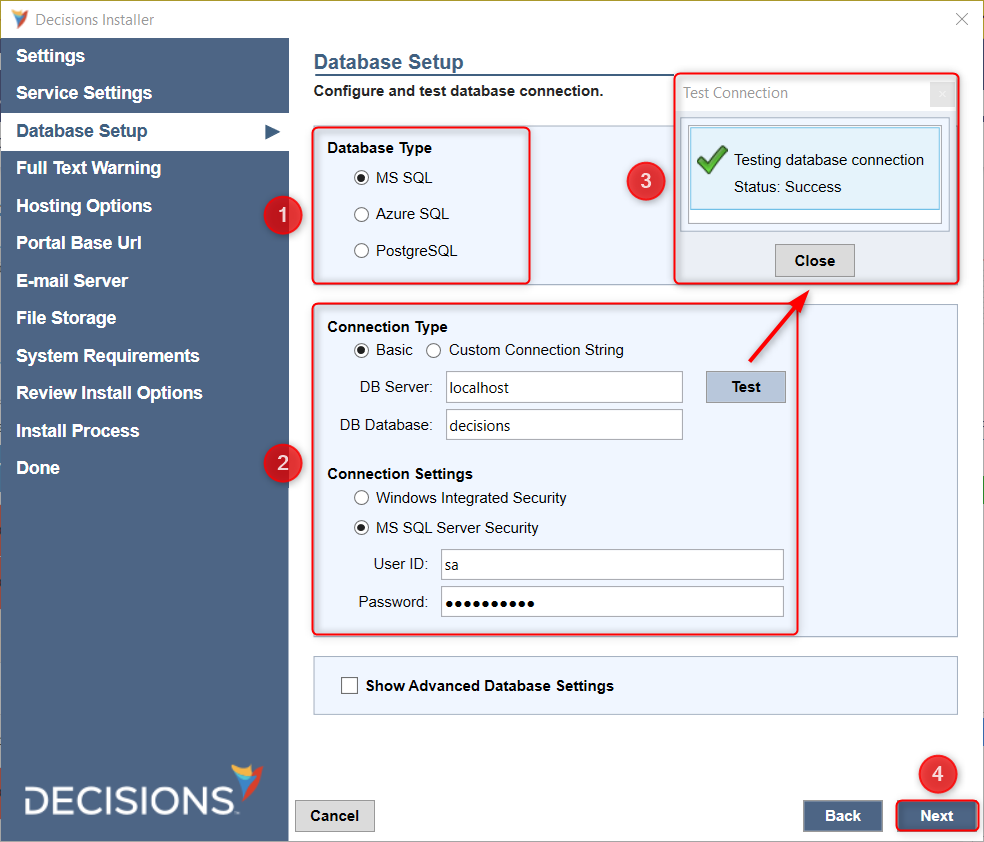
The Application Server and Database Server need to be set to the same Time-Zone.MSSQL Connection
- Select MS SQL for Database Type.
- Under Connection Type, select Basic and enter the corresponding database server and name in DB Server and DB Database respectively.
If the database server does not exist, the platform installer will attempt to create it for MSSQL connections. - Under Connection Settings, select MS SQL Server Security and enter the appropriate User ID and Password. Click Test to verify a successful database connection.
Alternatively, MSSQL installations may optionally use Windows Integrated Security for added security. - Click Next to proceed.

AWS Connection
Prerequisites
- Create an AWS RDS Database for Microsoft SQL Server. Select either a SQL Server SE or SQL Server EE engine. Refer to Installation Requirements for specifications.
- Launch an EC2 instance.
- Configure the RDS Security Groups and/or VPC to allow SQL connections from the internal IP address of the EC2 application server. Add an inbound rule for the security group to allow MSSQL from EC2 instance's internal IP address.
Setup
- Select MS SQL for Database Type.
- Under Connection Type, select Basic. For DB Server, enter the endpoint address of the RDS instance. and DB Database respectively. For DB Database, enter the desired name e.g. "decisions".
- Under Connection Settings, select MS SQL Server Security. Enter the specified master Username and Password for the created RDS database in UserID and Password respectively.
- Click Next to proceed.


Azure Connection
Prerequisites
- Create and Configure a SQL Database. The SQL that Decisions generates/executes does not make use of any recent additions to T-SQL or any of the SQL Server-only functionality.
- Create an Azure VM (any version). Refer to Installation Requirements for specifications.
- After provisioning the Azure VM, install IIS and .NET Core 6.0.
Setup
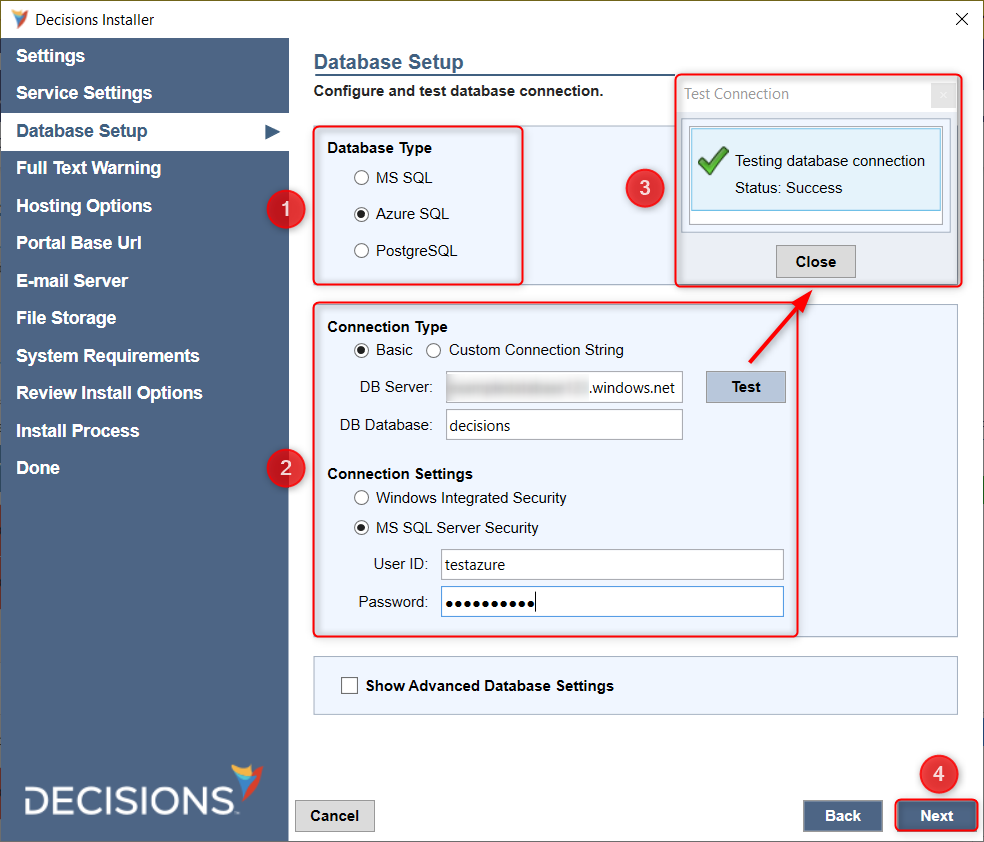
- Select Azure SQL for Database Type.
- Under Connection Type, select Basic and then provide the Azure DB Server's Public Address and the database server's name in DB Server and DB Database respectively.
- Under Connection Settings, select MS SQL Server Security, then provide the appropriate User ID and Password for the Azure Admin. Click Test to verify a successful connection.
- Click Next to proceed.

Postgres Connection
Prerequisites
- Download Postgres v12 or 13. Keep the default UserID/Username aka "postgres" for Decisions to properly query Postgres.
- In Postgres, create a new database for Decisions. Upgrading from SQL is not supported, so a new database is required.
Setup
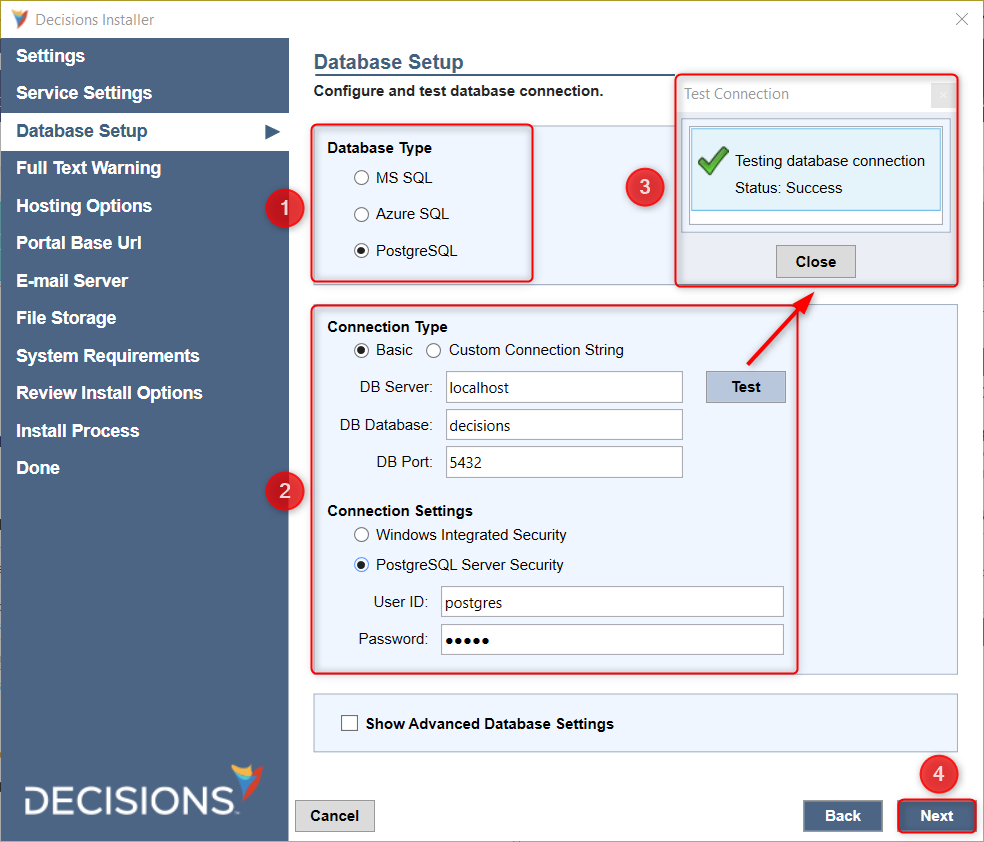
- Select PostgreSQL for Database Type.
- Under Connection Type, choose Basic and then enter "localhost" for the DB server, the created Postgres database for DB Database, and "5432" for DB Port. This is the default port number for Postgres databases.
- Under Connection Settings, select PostgreSQL Server Security.
Enter the default Postgres user credentials aka "postgres" and its respective password.
Click Test to verify a successful connection. - Click Next to proceed.

Hosting Options
- Review the Full Text Warning, then click Next.
- From the Hosting Options window, select either Self Hosting or IIS Hosting, then click Next.


Self Hosting Setup
- From the Portal Base URL screen, provide a Domain Name, and if applicable, select the desired HTTP/HTTPS configuration with Certificate path and Password.
This example keeps the default values ("http://localhost: 80"). Different ports must be opened via Windows Firewall first. Click Next.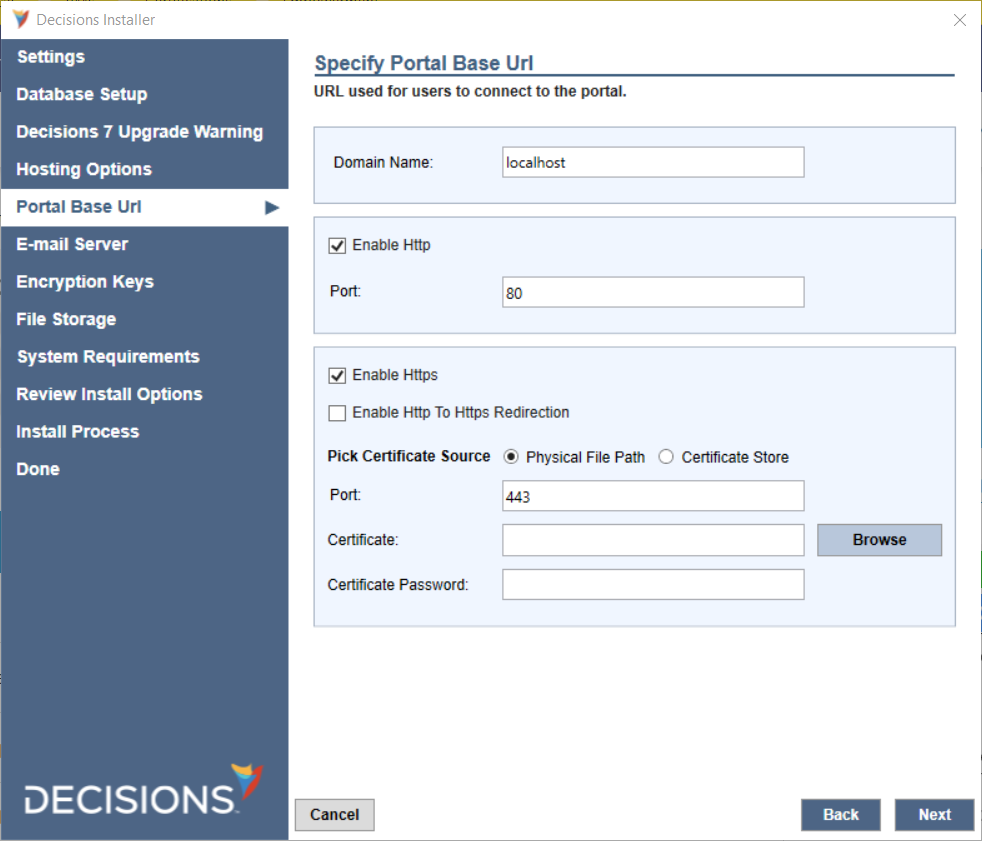

IIS Hosting Setup
- Provide the Portal Base URL, then click Next.
.png)
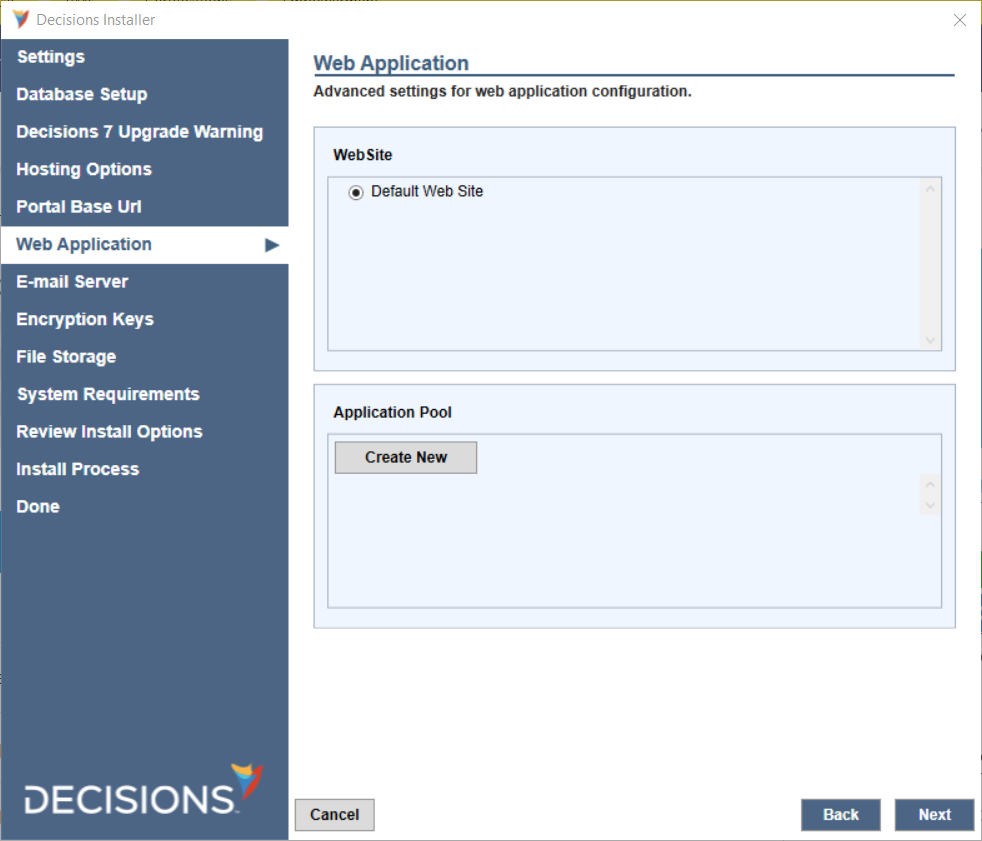
- In the Web Application window, select Create New under Application Pool. This automatically creates the Decisions Application Pool then click Next.
.png)

Preexisting Application Pool Error Handling
In the occurrence of the Application Pool Error, follow the brief guide below:
- Open IIS Manager and select Application Pools within the Connections panel.
- In the Application Pools panel, right-click Decisions, then select Basic Settings.
- Change .NET CLR version to No Managed Code.
- Click the Back button in the Decisions Installer, then click Next to refresh the AppPools list.
- In the WebApplication window, then click Next to proceed. Verify that that installation can continue.
Email Server, Encryption Keys, and File Storage
- Select an Outbound Email Server option.
For local installs, select SMTP Direct Server. To specify a mail server address, select SMTP Server. Click Next once done.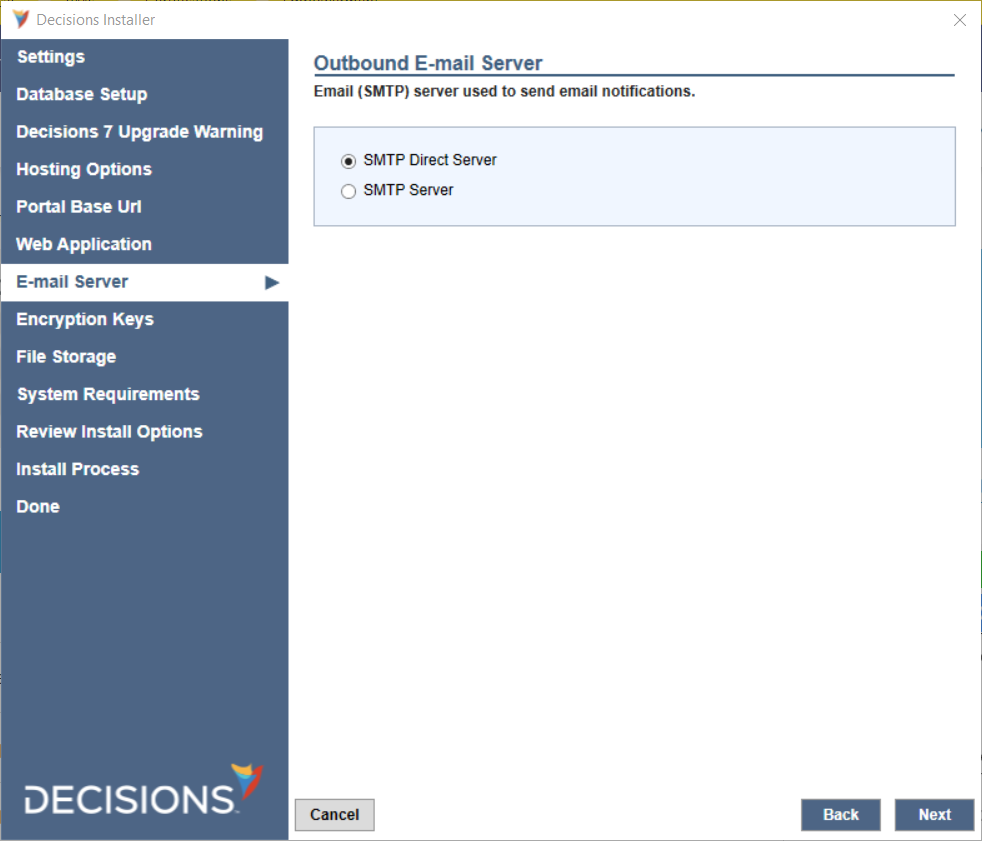
- In the Encryption Keys window, the installer will detect any existing encryption keys on the connected database. A prior key and its data can be restored via the Restore Key File by entering its key value.
For a fresh installation and if not wishing to restore any existing keys, select Next to continue. Even if keys are found, restoring is optional.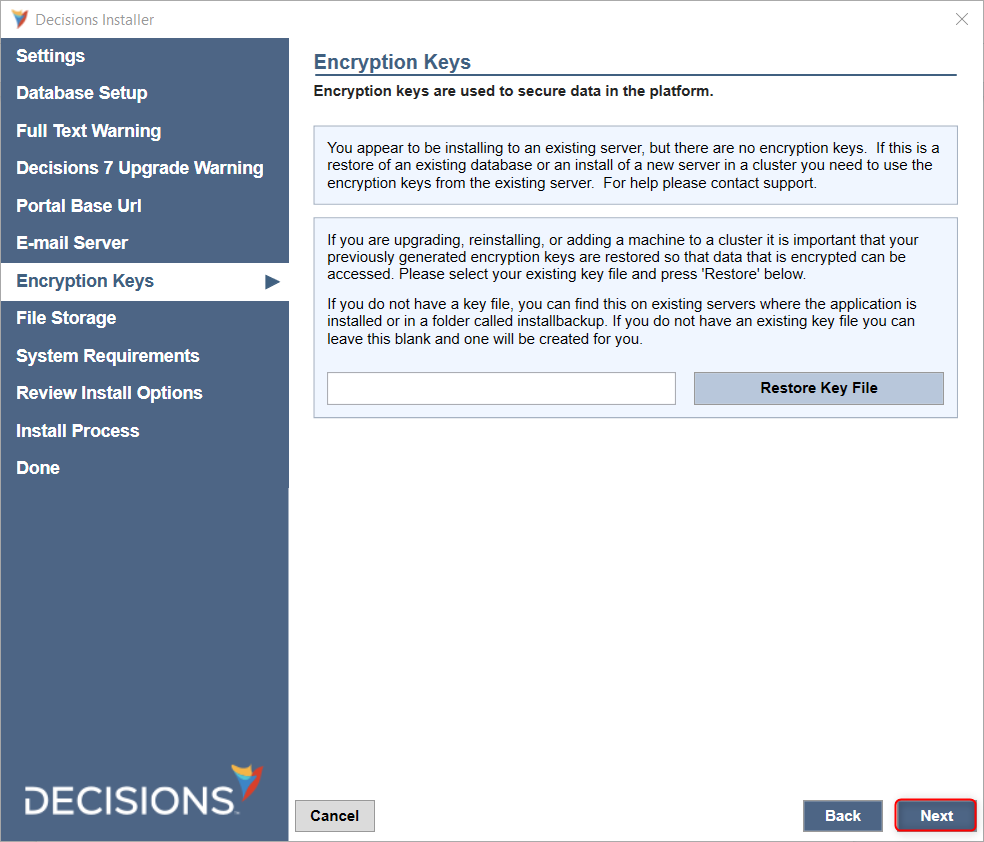
- In the File Storage window, specify where Decisions will store files such as logs, documents, etc for the server. Assuming the default installation location was not changed earlier via the Advanced Settings, the default file storage location is C:\Program Files\Decisions\FileStorage.
Confirm the location and then select Next once done.
- Review/correct any warnings in the System Requirements Check before clicking Next to proceed.
Local PC installations may run into an OS warning, but this does not prevent a successful installation. Production environments need Windows Server OS.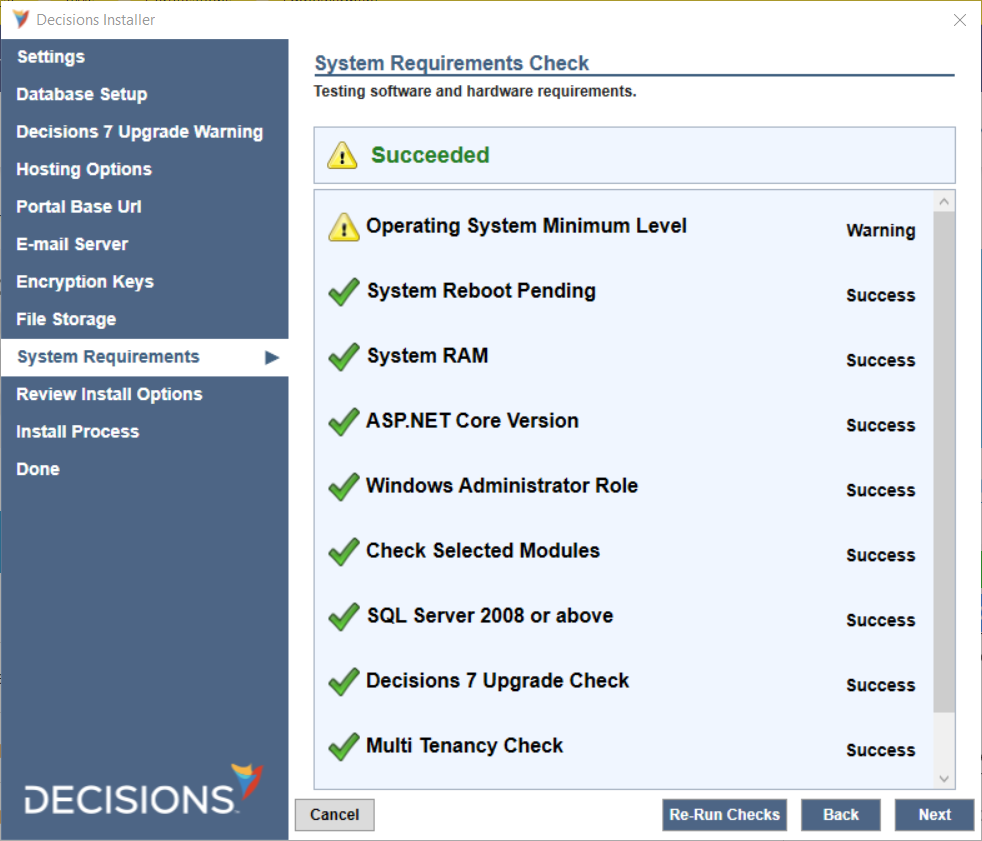
- The Review Install Options panel summarizes the install selections. To save these settings for future reference or recovery, click the Save Install Settings To File checkbox before clicking Next.
.png)
- As installation continues, click Show Details to see the installation progress.
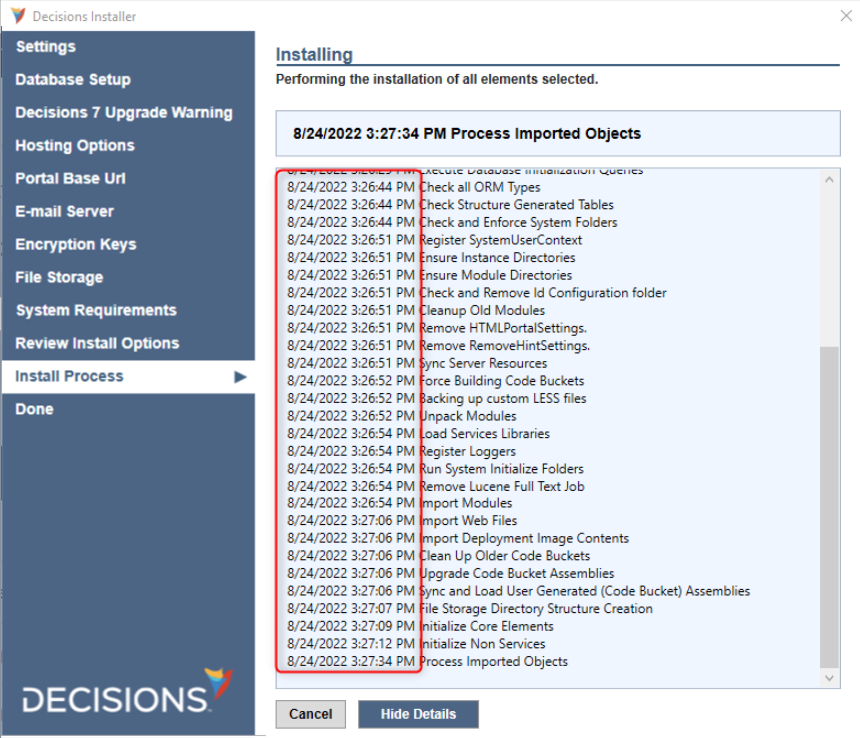
- When the installation completes, click Finish to close the Installation Finished window.

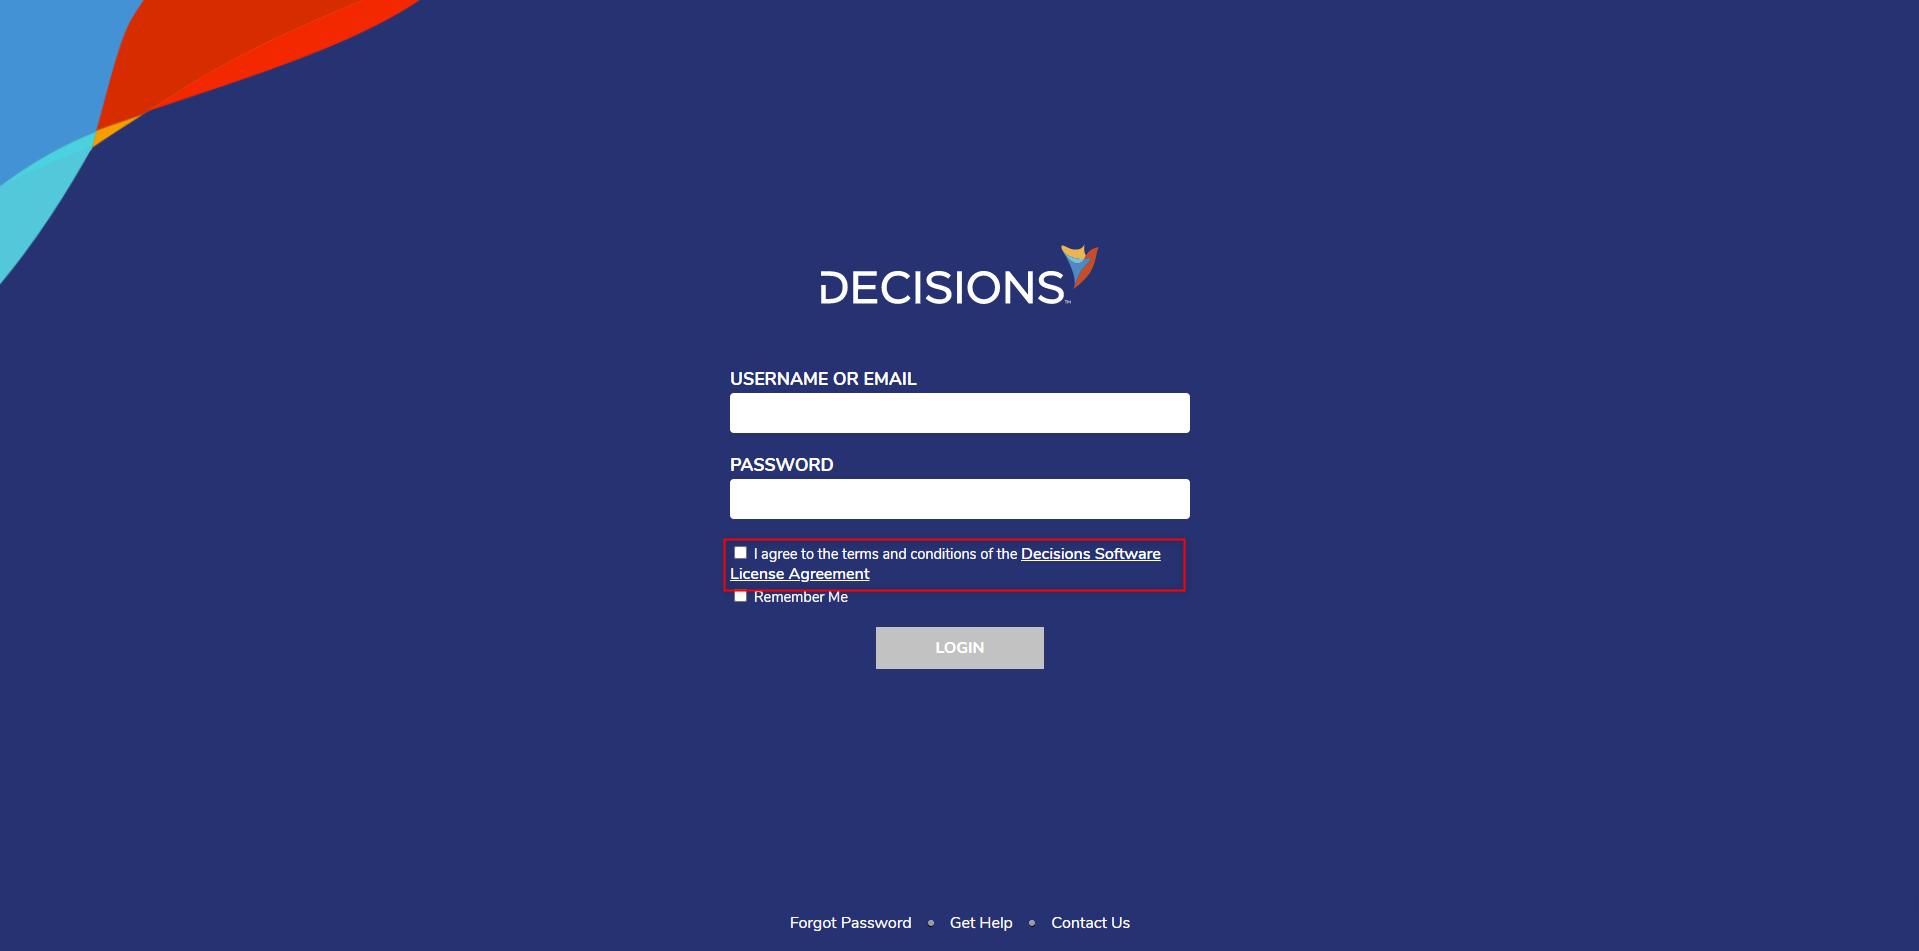
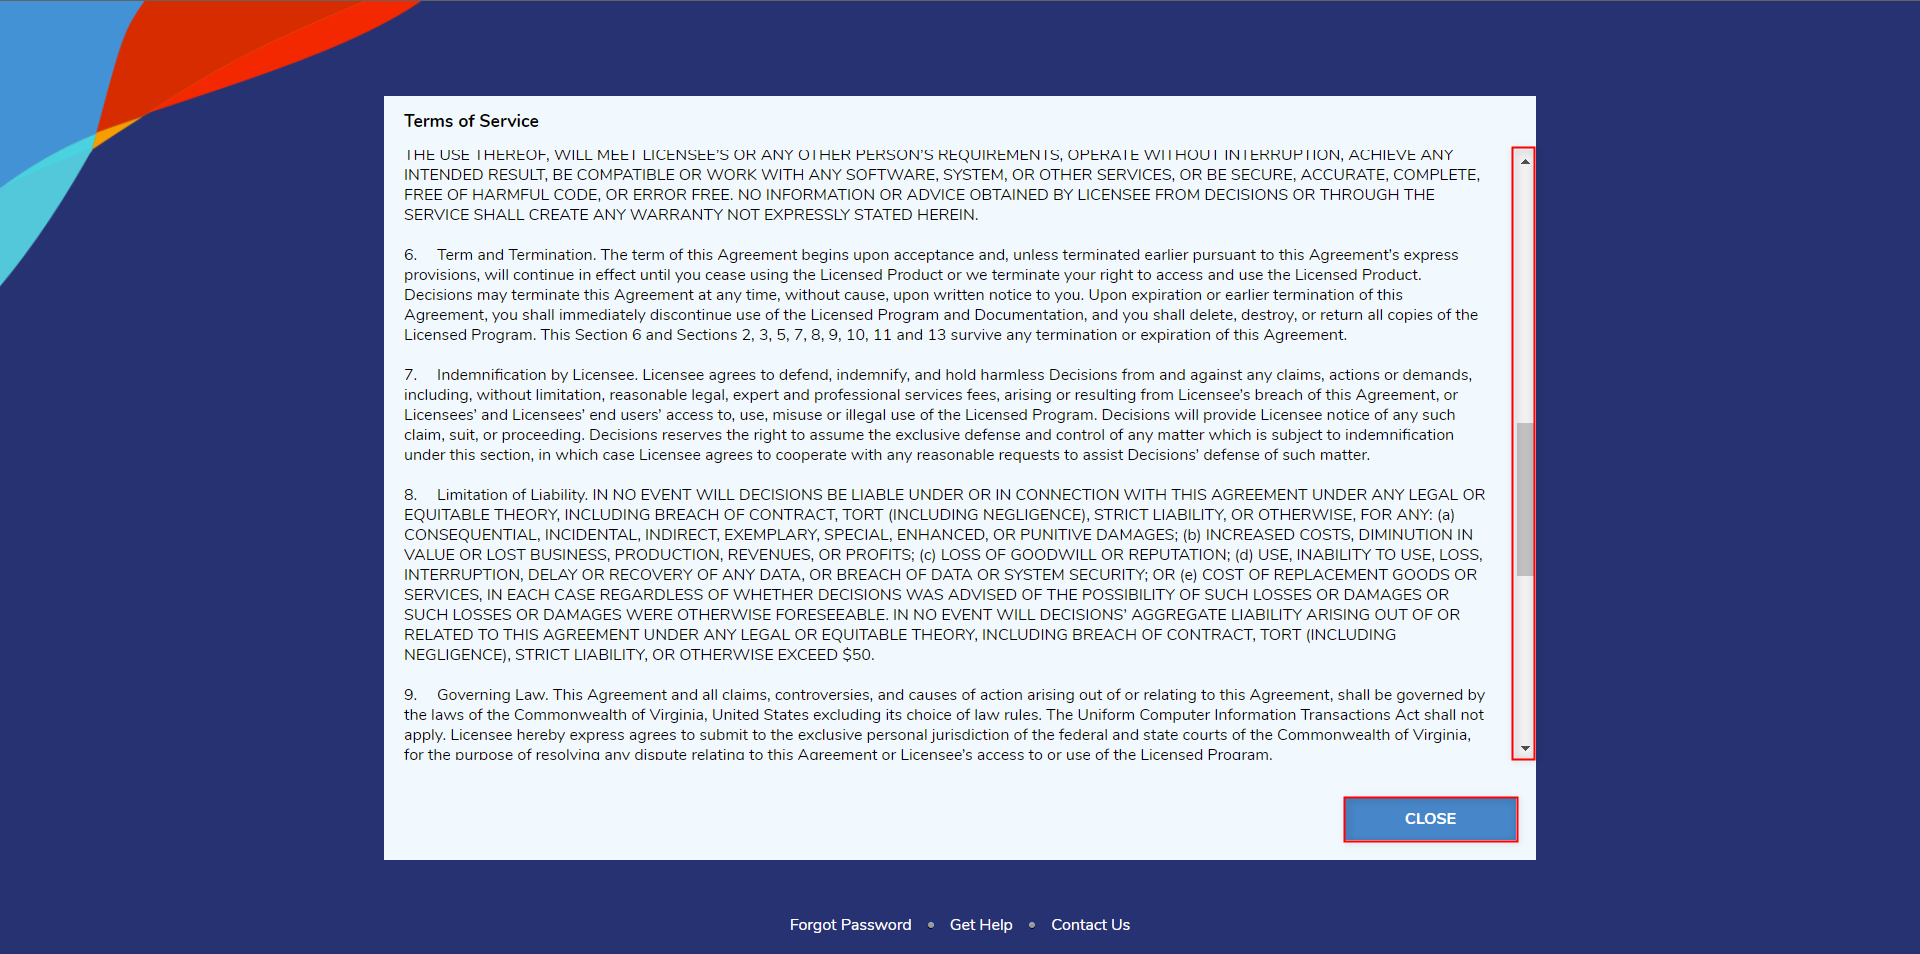
- When Decisions launches, from the Login screen, click on the Decisions Software License Agreement link.
- Review the Terms of Service, then click CLOSE.
- Click the I agree to the terms and conditions... checkbox, then log in to the platform by providing the admin Username and Password, and clicking the LOGIN button. By default, these values are "admin@decisions.com" and "admin"
This can be changed during installation via the Change Default System Administrator, Username and Password setting shown in step 4's Advanced Settings table..png)


.png)


.png)
Updating the License
Upon the first login, a popup may appear in the top-right corner informing the user of the date of license expiration.
In the event of this message, contact support@decisions.com and request the appropriate license for the corresponding Server Type.
Administrators can check when the license expiration date at any time by viewing the System Information Page in the System folder.
For more information on how to obtain and apply a license key, please reference the Self Servicing License Guide.
For further information on Installation, visit the Decisions Forum.
Was this article helpful?