Convert requirements template to requirements and settings
Download the requirements template. It contains data collection configuration requirements for common desktop applications for which settings have already been defined. For this tutorial, a few additional applications have been added. Use the command below to convert the requirements template, a CSV file, and the default settings into requirements and settings JSON files.
Unset
csv_tools.exe requirements_template_initial.csv --extend-on-rules default_settings.json
Running this command produces two files: requirements_template_initial_requirements.json and requirements_template_initial_settings.json.
Fix rules
The CSV tool generates a placeholder rule for each tag that does not yet exist in the default settings file. Usually, some of them must be finalized manually before testing. Go through the requirements_template_initial_settings.json file, find all settings with the <REPLACE THIS WITH AN APPROPRIATE VALUE> text, and make the appropriate changes.
Rule 1
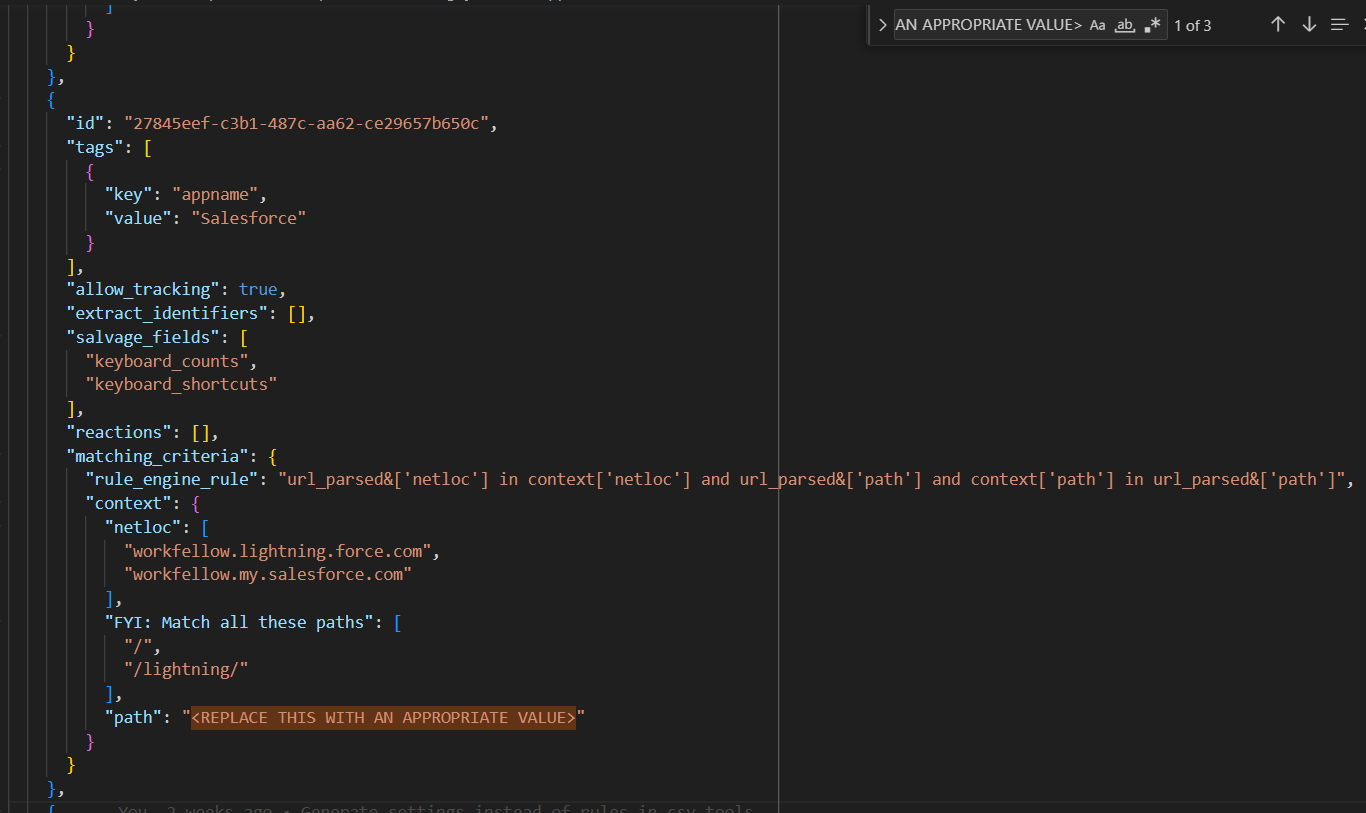
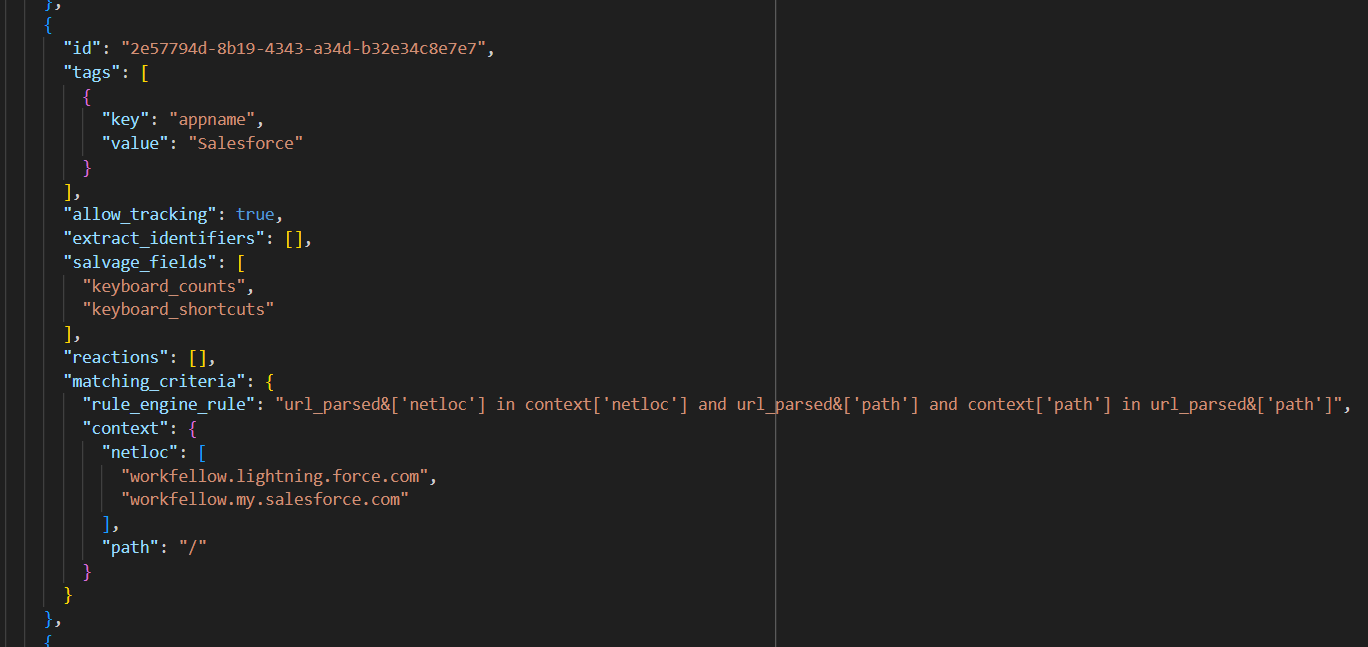
The “FYI: Match all these paths” field indicates that, according to the requirements, two different paths need to be matched. The empty path “/” is common to both, so use that to replace the placeholder path. Remove the “FYI: Match all these paths” field. The fixed rule should look like this:
Rule 2
The next setting that needs to be manually fixed looks like this:
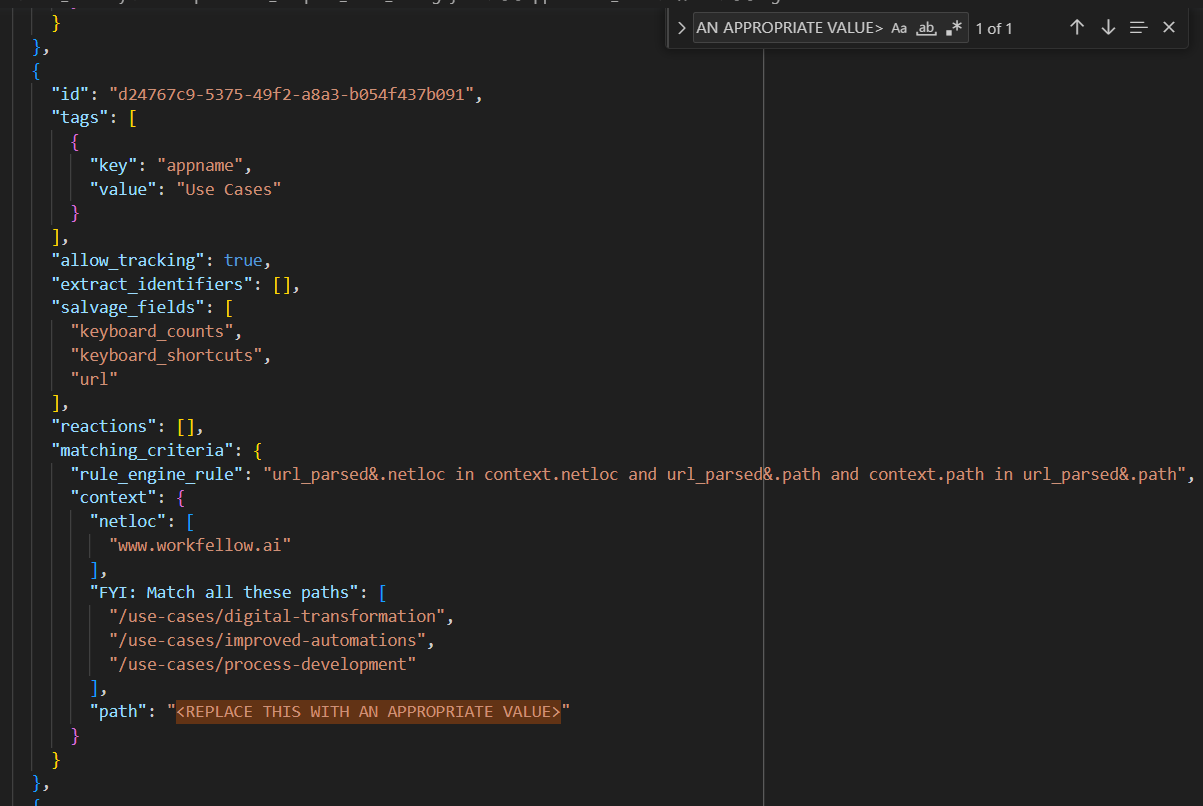
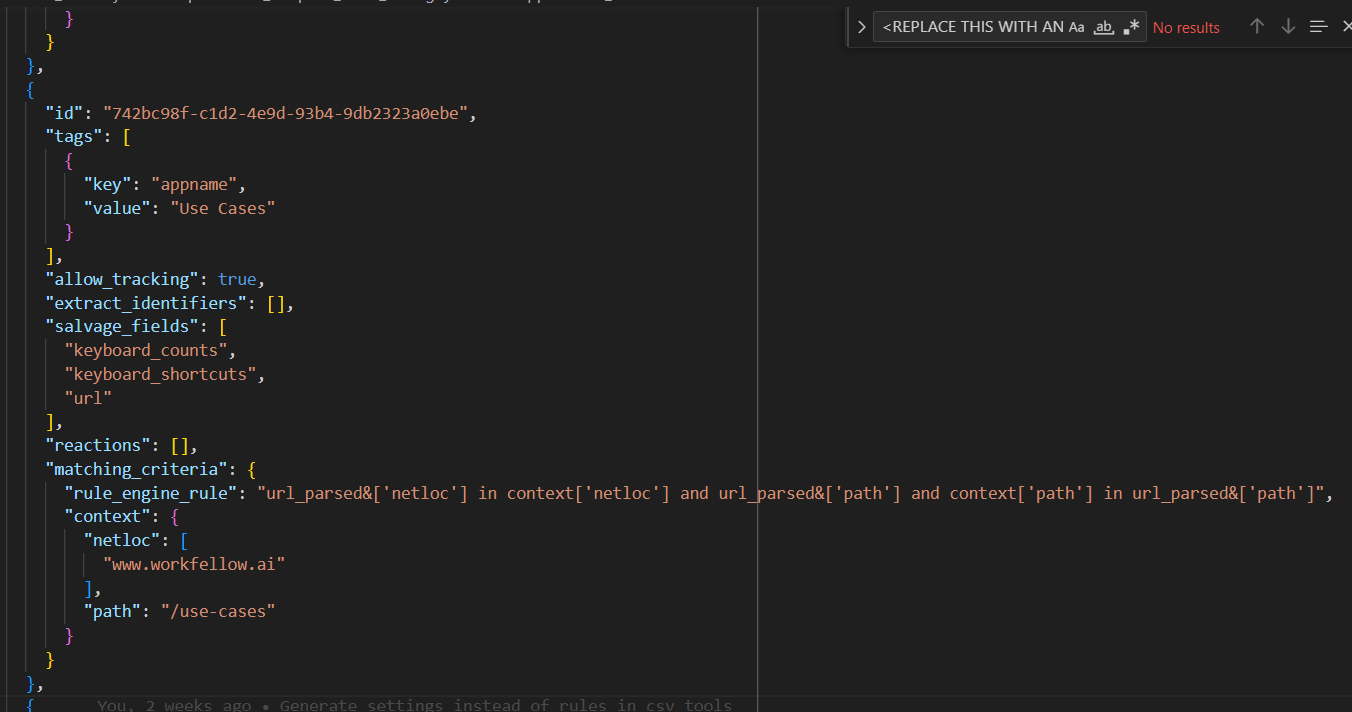
The “FYI: Match all these paths” field indicates that, according to the requirements, three different paths need to be matched. “/use-cases” is common to all the paths, so use that to replace the placeholder path. Remove the “FYI: Match all these paths” field. The fixed rule should look like this:
Rule 3
The final rule to be fixed looks like this:
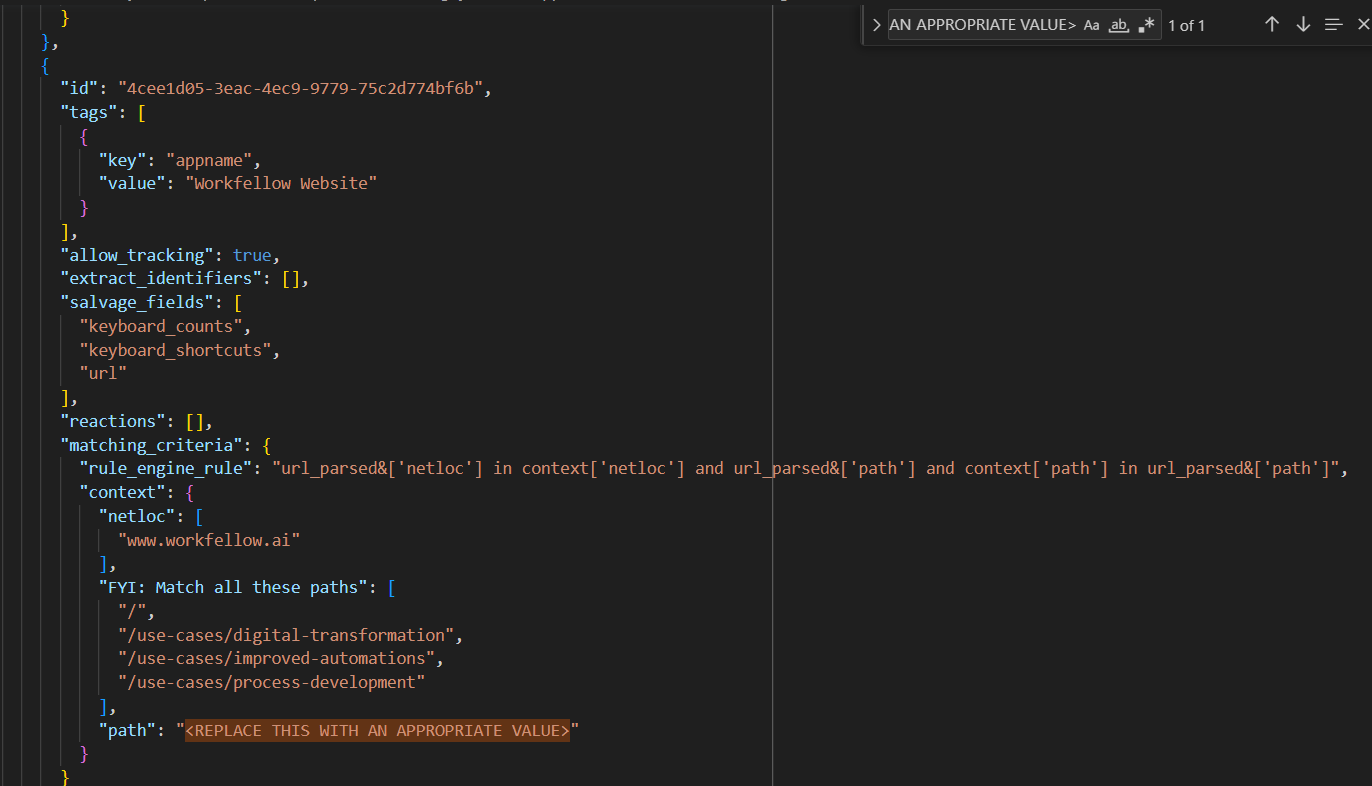
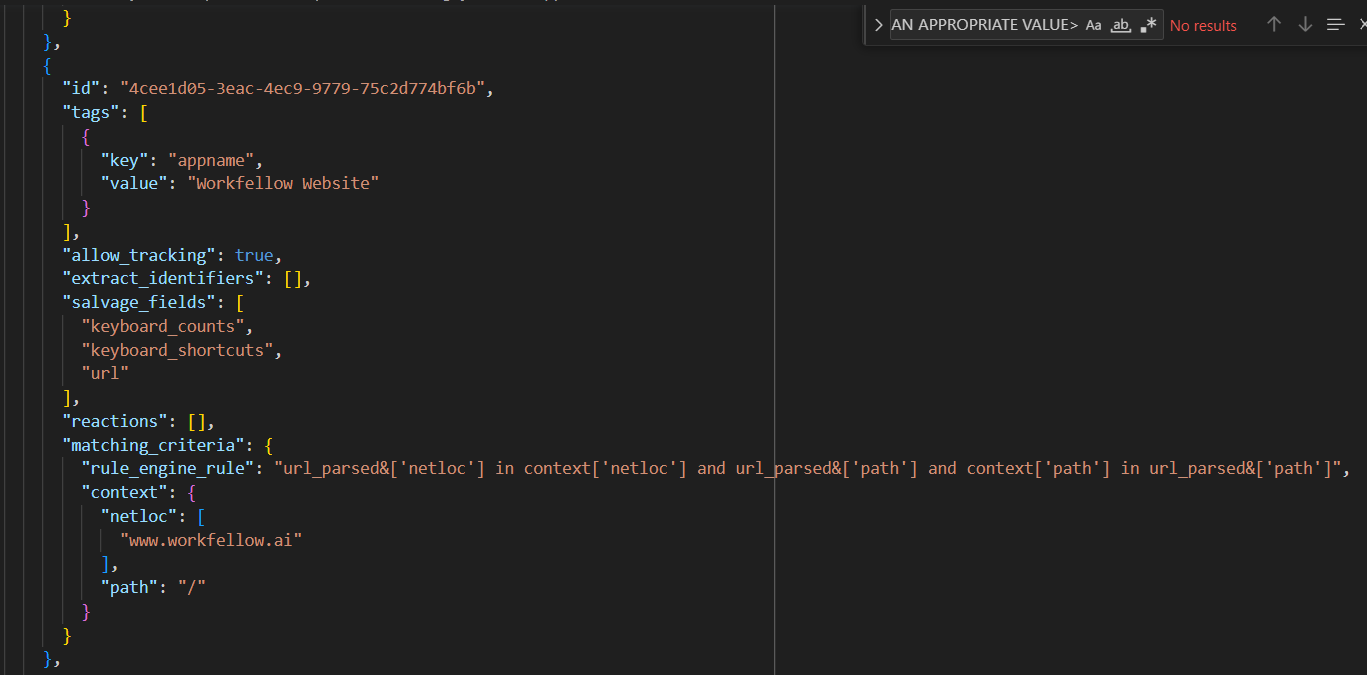
The “FYI: Match all these paths” field again indicates that the empty path “/” is common to all paths that need to be matched, so use that to replace the placeholder path. Remove the “FYI: Match all these paths” field. The fixed rule should look like this:
Test rules against the requirements
Once the rules have been fixed, they can be tested against the requirements. Use the Configuration Tester:
Unset
configuration_tester.exe requirements_template_initial_requirements.json requirements_template_initial_settings.json
The output shows that 3 requirements are not fulfilled. Hit Enter to run the failing tests again and get more detailed information about the errors.

Use the first test ID to find the first failing requirement in the requirements_template_initial_requirements.json file. Notice that the test IDs are randomly generated, so they do not match the IDs in this tutorial’s screenshots.
Fix error 1
The error message says that the “GitHub” tag was added to the tags, while the requirement states that only “Workfellow GitHub” is needed (1). The rule for the “GitHub” tag should not match the URL “https.github.com/workfellow” (2).
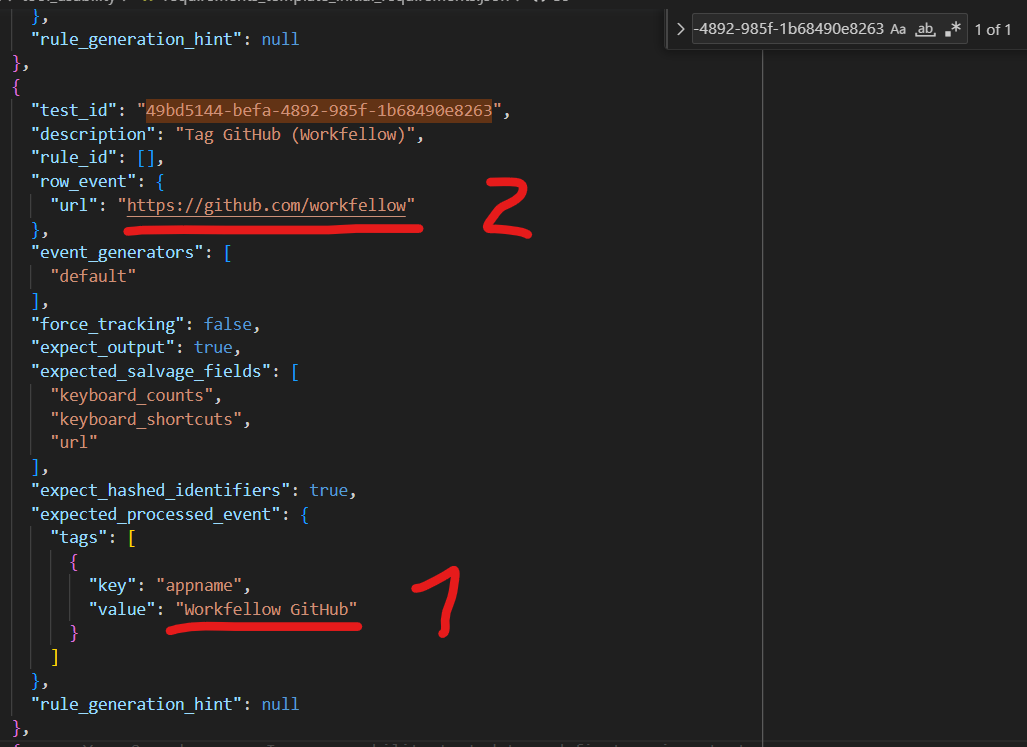
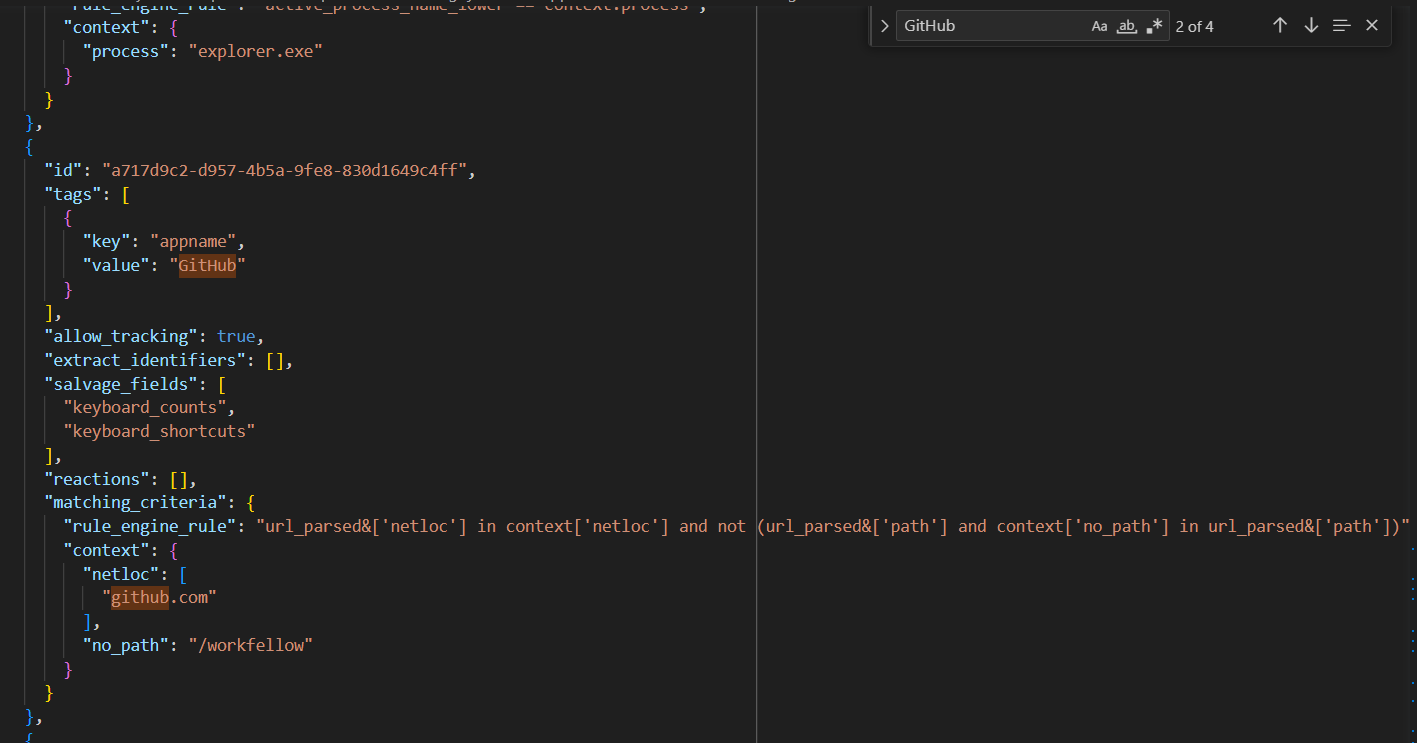
Search for “GitHub” in the requirements_template_initial_settings.json file. Add the “no_path” field to matching_criteria’s context with the value “/workfellow” and change the “rule_engine_rule” to "url_parsed&.netloc in context.netloc and not (url_parsed&.path and context.no_path in url_parsed&.path)". The fixed rule should look like this:
Fix error 2
Hit Enter on the command line to re-run the failing tests.

Use the first test ID to find the first failing requirement in the requirements_template_initial_requirements.json file. The error message says that the test event was unexpectedly tracked. The requirement shows that the URL “workfellow.lightning.force.com/” (1) should not be tracked (2). Notice the empty path at the end of the URL, “/”.
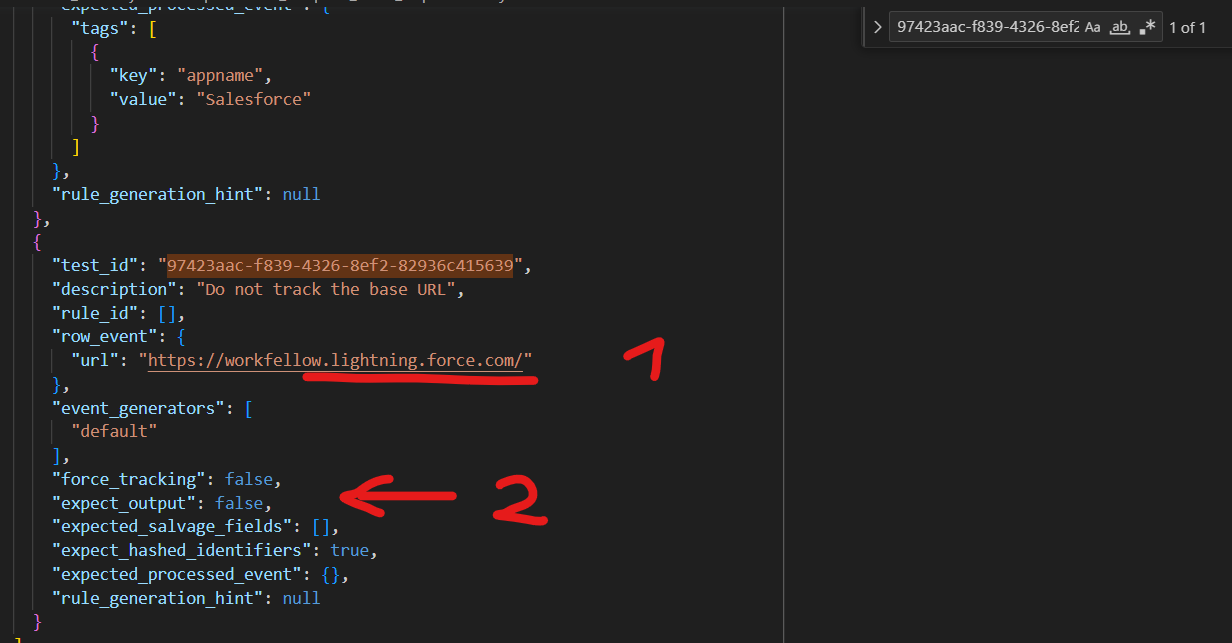
Search for “Salesforce” in the requirements_template_initial_settings.json file. The rule matches any URL whose netloc is either “workfellow.lightning.force.com” or “workfellow.my.salesforce.com”, and whose path is “/”. This issue is easiest to fix by creating a separate rule for each netloc. Make a copy of the rule in the settings file. Remove netloc “workfellow.my.salesforce.com” from the original rule and replace the empty path, “/”, with the correct path, “/lightning”. The fixed original rule should look like this:
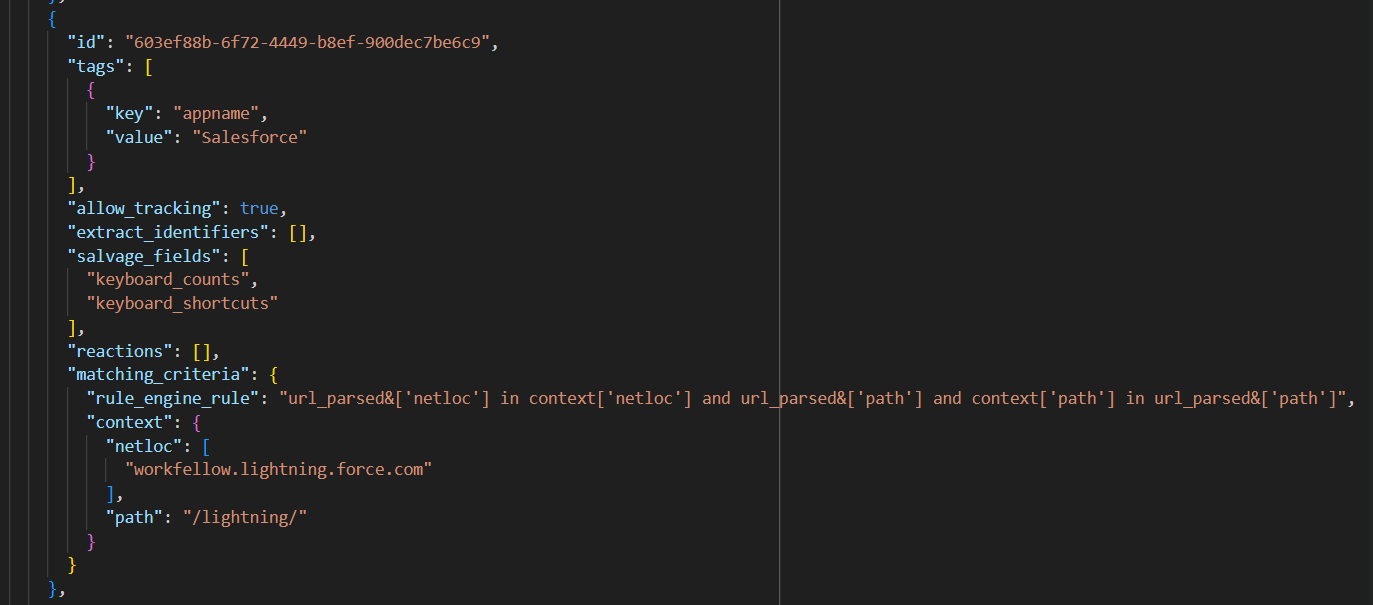
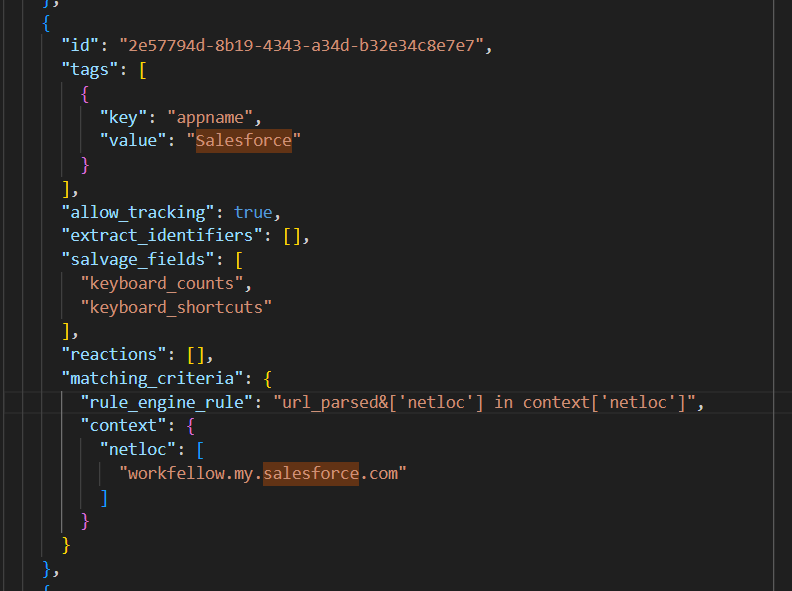
Remove the “workfellow.lightning.force.com” and “path” fields from the new rule. Then remove the parts that reference the path from the new rule’s rule_engine_rule field. The new rule should look like this:
Fix error 3
On the command line, hit Enter to run the failing tests again. The tester produces a ValueError due to a duplicate rule ID. Each rule in a settings file must have a unique ID. Use, for example, Online UUID Generator Tool to generate a new UUID4 for the new test.
Fix error 4
Run the tester again with the command.
configuration_tester.exe requirements_template_initial_requirements.json requirements_template_initial_settings.json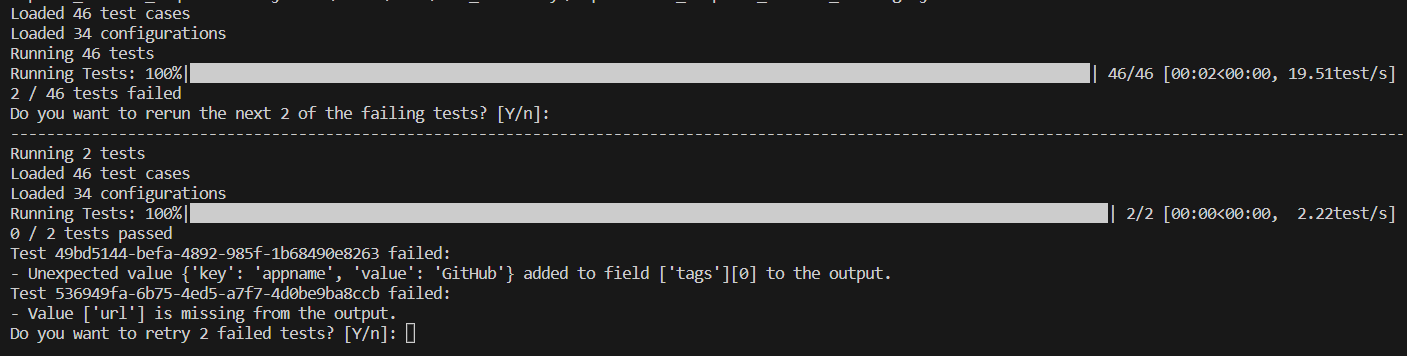
Use the first test ID to find the first failing requirement in the requirements_template_initial_requirements.json file. The error message says that the value “url” is missing from the output. This refers to the expected_salvaged_fields field. The rule matching the URL workfellow.lightning.force.com (1) is required to collect the URL (2).
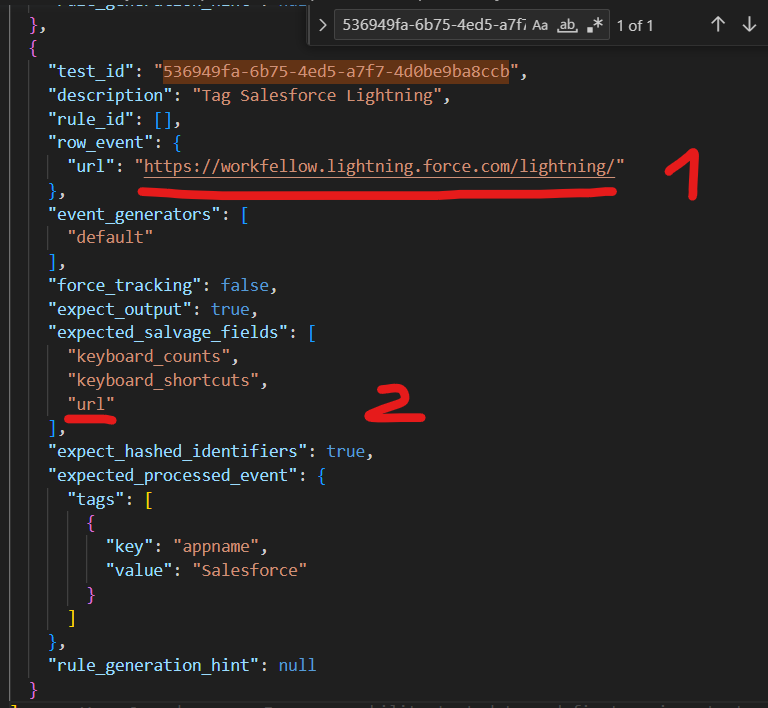
Search for “workfellow.lightning.force.com” in the requirements_template_initial_settings.json file. Add “url” to the “salvage_fields” list. The fixed rule should look like this:
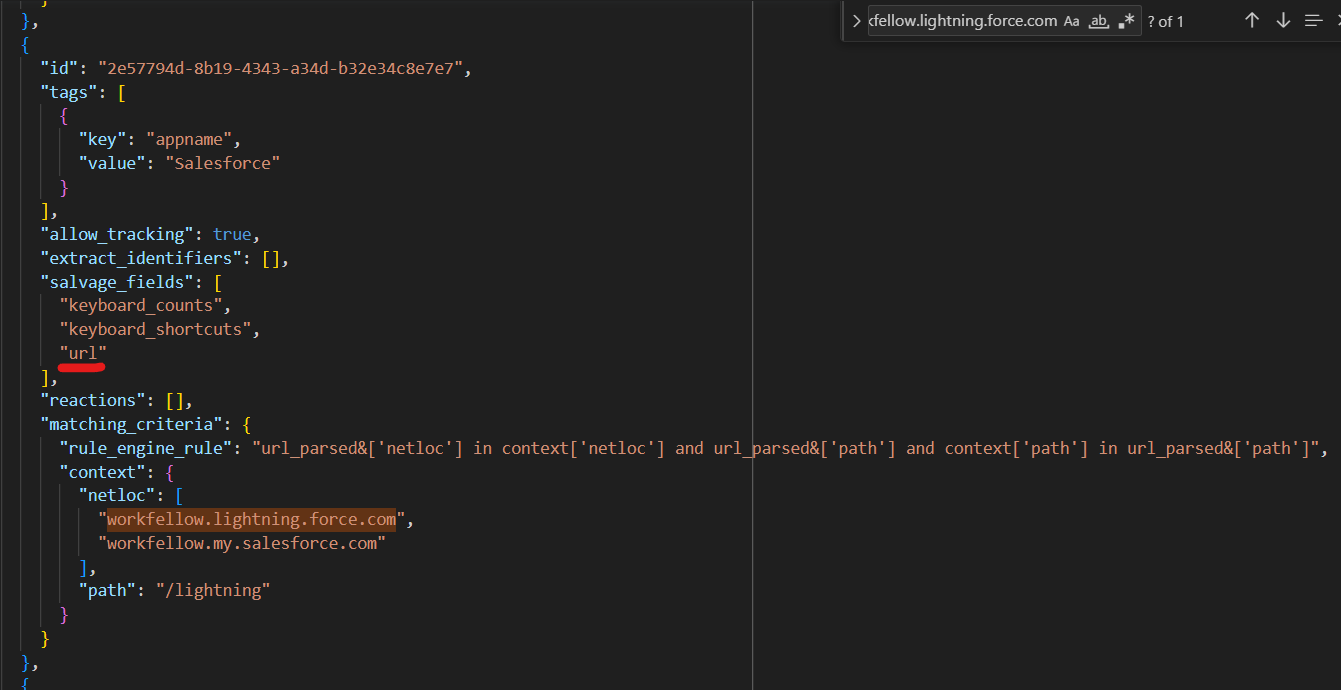
Hit Enter on the command line to re-run the failing test. There should be no more failing tests.

Remove unnecessary rules
Hit Enter on the command line again to re-run all tests and ensure that no new errors were introduced while fixing the rules. All tests should now pass.

The tester still warns that the settings contain several unnecessary rules. Use the listed rule IDs to find unnecessary rules in the requirements_template_initial_settings.json file and remove them. Run the tests again.
configuration_tester.exe requirements_template_initial_requirements.json requirements_template_initial_settings.jsonAll tests should now pass without warnings.

Advanced features
Reactions
The Reaction Format is a structured configuration format used to define reactions or actions that are triggered by specific events.
Reaction Structure
A reaction is defined by the following structure:
{
"on": ["EventTrigger"],
"react": [
{ "ActionType": { ... } },
{ "ActionType": { ... } },
...
]
}"on": This field specifies the event trigger that activates the reaction. It is an array of strings, where each string represents an event trigger. Possible values:
"on": ["SwitchWindow", "LeftClick", "RightClick", "DoubleClick", "MiddleClick", "Write", "Copy", "Paste", "Cut"]"react": This field contains a list of actions that are performed in response to the specified event. Each action is represented as a JSON object.
Action Types
Within the "react" field, you can specify various types of actions, each denoted by an "ActionType". These action types define the specific tasks or operations that are carried out when the reaction is triggered.
Go
This action type is used to navigate within the UIAutomation tree.
{ "Go": "Foreground" },
{ "Go": { "Child": 2 } },
{ "Go": { "Child": 0 } },
..."Foreground": Navigates to the foreground element in the UIAutomation tree.
"Focus": Navigates to the focus element within the UIAutomation tree.
"CursorLocation": Navigates to the element within the UIAutomation under the cursor.
"Child": Navigates to a specific child element within the UIAutomation tree. The numerical value specifies the index of the child element.
"Parent": Navigates to the parent element within the UIAutomation tree.
Extract
This action type is used to extract specific properties or values from the current element.
{
"Extract": {
"Property": "Name",
"As": "jira_parent_issue"
}
}"Property": The property to extract from the current element. Possible values:
"Property": ["Value", "Name", "Selection", "HelpText", "Debug"]"As": A name to assign to the extracted property or value.
"MatchingRe": A regular expression pattern used to match the extracted text. Returns only the first match.
ExtractTextFromApplicationZone
This action type is used to extract text from a designated area in an application window by using OCR.
"X": The horizontal coordinate from the origin.
"Y": The vertical coordinate from the origin.
"Width": The width of the extracted zone.
"Height": The height of the extracted zone.
"As": A name to assign to the extracted property or value.
"Origin": The starting point for the extraction. Possible values:
"Origin": ["LeftTop", "LeftBottom", "RightTop", "RightBottom"]"MatchingRe": A regular expression pattern used to match the extracted text. It returns only the first match.
LabelInteractedZone (NOT YET IMPLEMENTED ON THE PLUGIN)
This action type is used to set a label based on the cursor location on the screen.
"X": The horizontal coordinate from the origin.
"Y": The vertical coordinate from the origin.
"Width": The width of the extracted zone.
"Height": The height of the extracted zone.
"Label": The label to assign to the interacted zone.
"Origin": The starting point for the extraction.
Generating reaction patterns
Example Usage
"reactions": [
{
"on": ["SwitchWindow"],
"react": [
{ "Go": "Foreground" },
{ "Go": { "Child": 2 } },
{ "Go": { "Child": 0 } },
{
"Extract": {
"Property": "Name",
"As": "jira_parent_issue"
}
}
]
},
{
"on": ["SwitchWindow"],
"react": [
{
"ExtractTextFromApplicationZone": {
"X": 60,
"Y": 0,
"Width": 200,
"Height": 21,
"As": "vs_code_branch_name",
"Origin": "LeftBottom",
"MatchingRe": ".*"
}
}
]
},
{
"on": ["LeftClick"],
"react": [
{
"LabelInteractedZone": [
{
"X": 0,
"Y": 0,
"Width": 100,
"Height": 100,
"Label": "RightBottomZone",
"Origin": "RightBottom"
}
]
}
]
}
]
Work API features are constantly evolving. The latest advanced feature tutorials are updated here.