Overview
This document walks you through converting a Repository Server to a Deployment Server in Decisions, including configuration of the associated Dev Server. It includes upgrade instructions, migration steps, and all necessary configurations.
Prerequisites
Before starting the conversion process, ensure the following requirements are met:
- Supported Version: Only servers on Decisions version 9 are supported for this process.
- Commit All Changes: All uncommitted changes from connected Dev Servers must be committed to the Repository Server before beginning the upgrade.
- Database Connection Details: Note down the Database Connection String of the Repository Server.
Upgrade the Servers
Upgrade both the Repository Server and the Dev Server connected to it to the latest MVP build of Decisions v9.
Post-Upgrade Configuration
- Repository Server Configuration
- Update Settings.xml
- Navigate to: C:\Program Files\Decisions\Decisions Server\Settings.xml
- Change the ServerType to Deployment:

- Restart Decisions Service
- Restart the Decisions Windows Service to apply changes.
- Verify UI Update
- After restart, verify that the "All Organizations" folder appears in the folder tree. This confirms Deployment Server mode is active.

- After restart, verify that the "All Organizations" folder appears in the folder tree. This confirms Deployment Server mode is active.
- Create a New Organization
- Right-click inside the "All Organizations" tree to create a new Organization.
- Obtain Organization ID
- Right-click the newly created Organization and select Copy Org ID.
- Alternatively, retrieve the folder ID of the Organization from the folder structure if the context menu doesn't work.
- Prepare Migration Tool
- Navigate to: C:\Program Files\Decisions\Decisions Server\Tools
- Extract the RepositoryMigrationTool.zip archive.
- Configure Migration Settings
- Open the extracted migration-config.json in a text editor (e.g., Notepad).
- Provide the following:
- DB Connection String
- Organization ID
- Database Type
- Save the file.
- Run Migration Tool
- Launch RepositoryMigrationTool.exe.
- The tool will begin migrating all Repository Projects to the selected Organization.
- Wait for Migration Summary
- Once the migration completes, a summary will be displayed.
- Review the output to confirm successful project transfers.
- Restart Decisions Service (Again)
- After migration completes, restart the Decisions Service to finalize setup.
- Update Settings.xml
- Dev Server Configuration
- Install Deployment Client Module
- Use the Module Installer to add the Deployment Client module after the MVP upgrade is complete.
- Restart the Decisions Service
- After module installation, restart the service to activate the module.
- This step is required for proper initialization.
- Disable Designer Repository Service
- Navigate to: System > Designers > Designer Repository Service
- Disable the service.
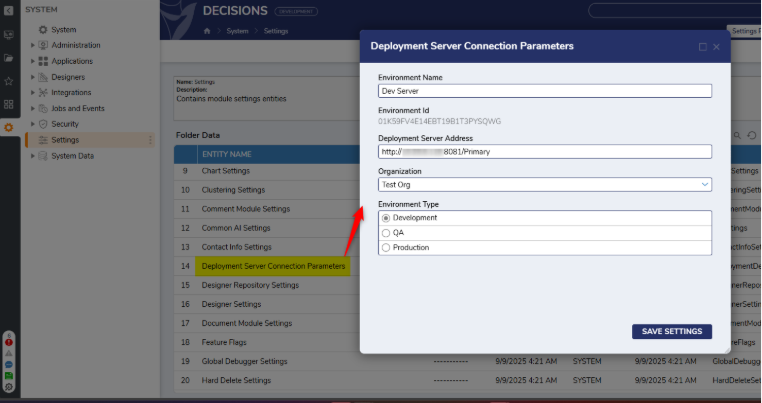
- Configure Deployment Server Connection
- Go to: System > Administration > Deployment Server Connection Parameter
- Fill in the following settings:
- Environment Name (e.g., Dev)
- Deployment Server URL
- Environment Type: Dev
- Save the configuration.
- Completion
- The Development Server is now ready for Check-in and Check-out operations with the Deployment Server.
- Install Deployment Client Module
Important Notes
- A restart of the Decisions Service is required:
- After modifying the server type.
- After installing the Deployment Server or Deployment Client modules.
- After completing the migration process.
Support
For any technical issues or troubleshooting, contact the system administrator or the official Decisions support team.