Overview
The Mixed Type Repeater control creates a data repeater capable of dynamically displaying multiple data types based on Users' inputs. Users can also display different custom data types or primitive data types.
A common use case for the Mixed Type Repeater may involve creating dynamic surveys. When creating a survey, Users can use the Mixed Type Repeater to populate different survey questions like a radio button list, true or false question, or multiple-choice question.
Example
The following example allows End Users to select a custom drop-down list repeater or a text data repeater by selecting a Button. These data repeaters will be hosted within a Mixed Type Data Repeater.
An Add to List event button adds elements to the drop-down list.
Please refer to our Creating a Mixed Type Data Repeater Example Lab to review and download the project.
For help importing the file, refer to our Importing and Exporting Projects article.
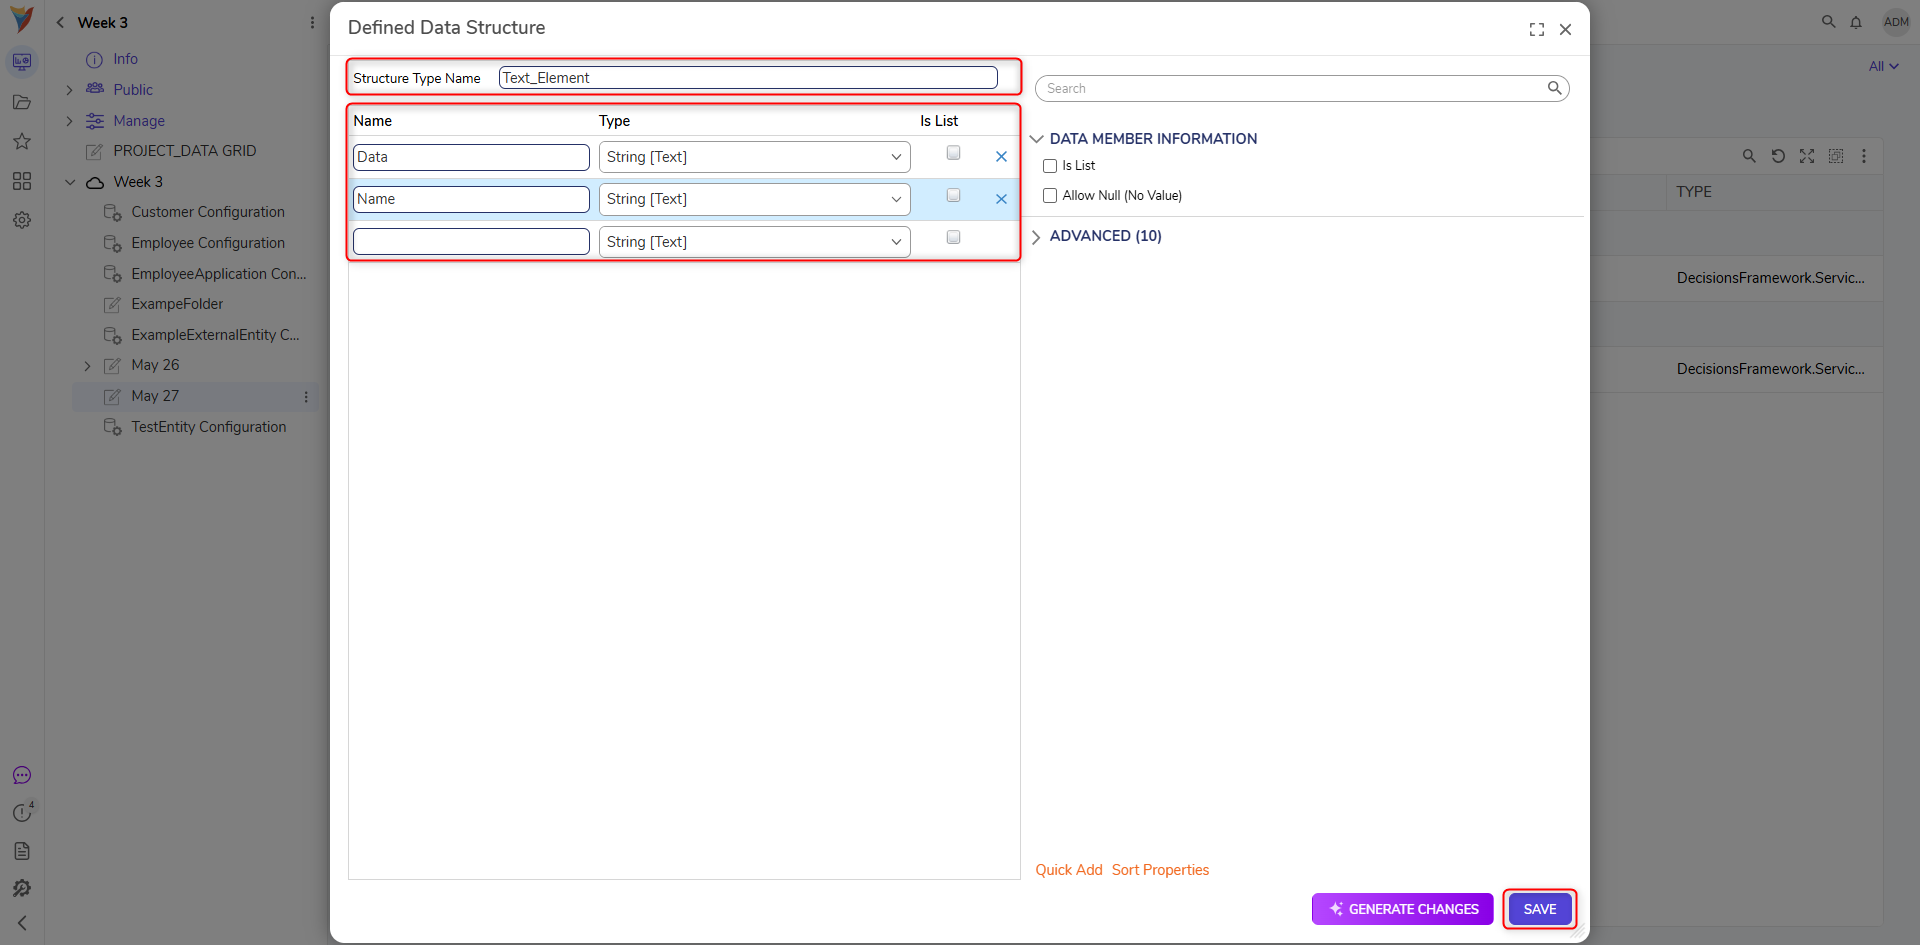
- In the Project, create a Defined Data Structure named 'Text_Element' with the following data fields: Data (String) and Name (String). Save the Data Structure.
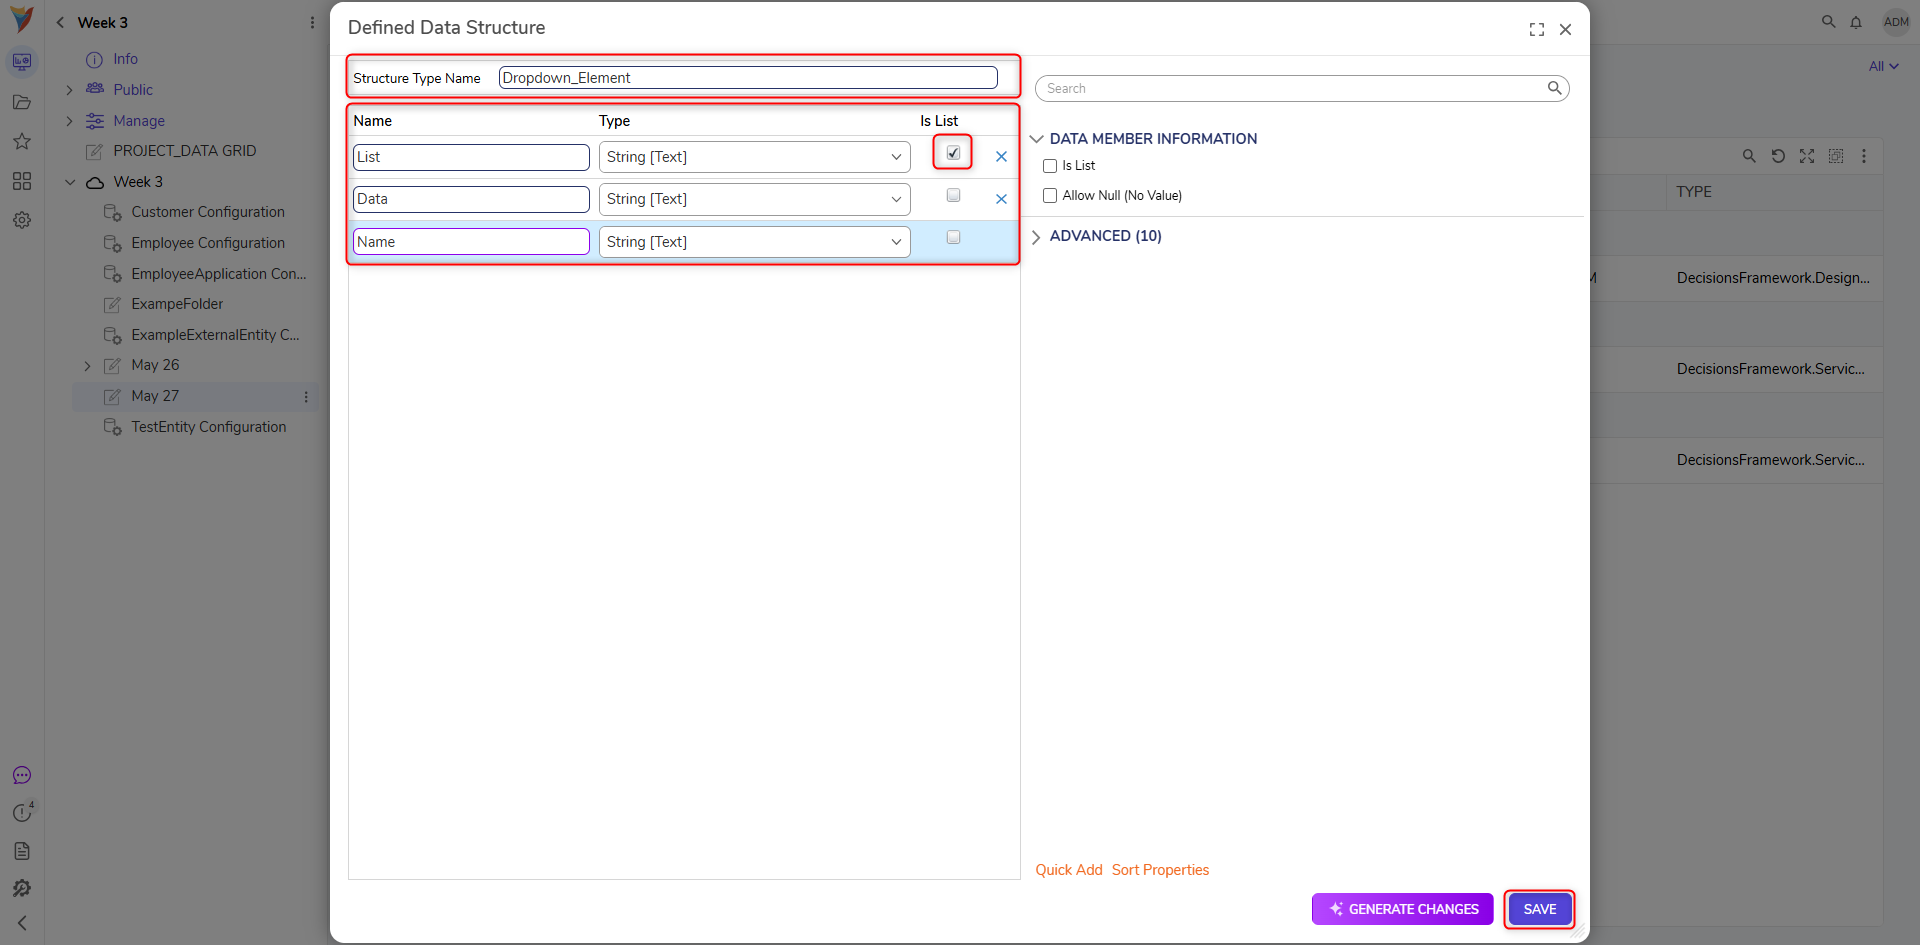
- Create a second Defined Data Structure named 'Dropdown_Element' with the following String data fields: List, Data, Name. Click the Is List checkbox next to the List data member. Then, click SAVE.
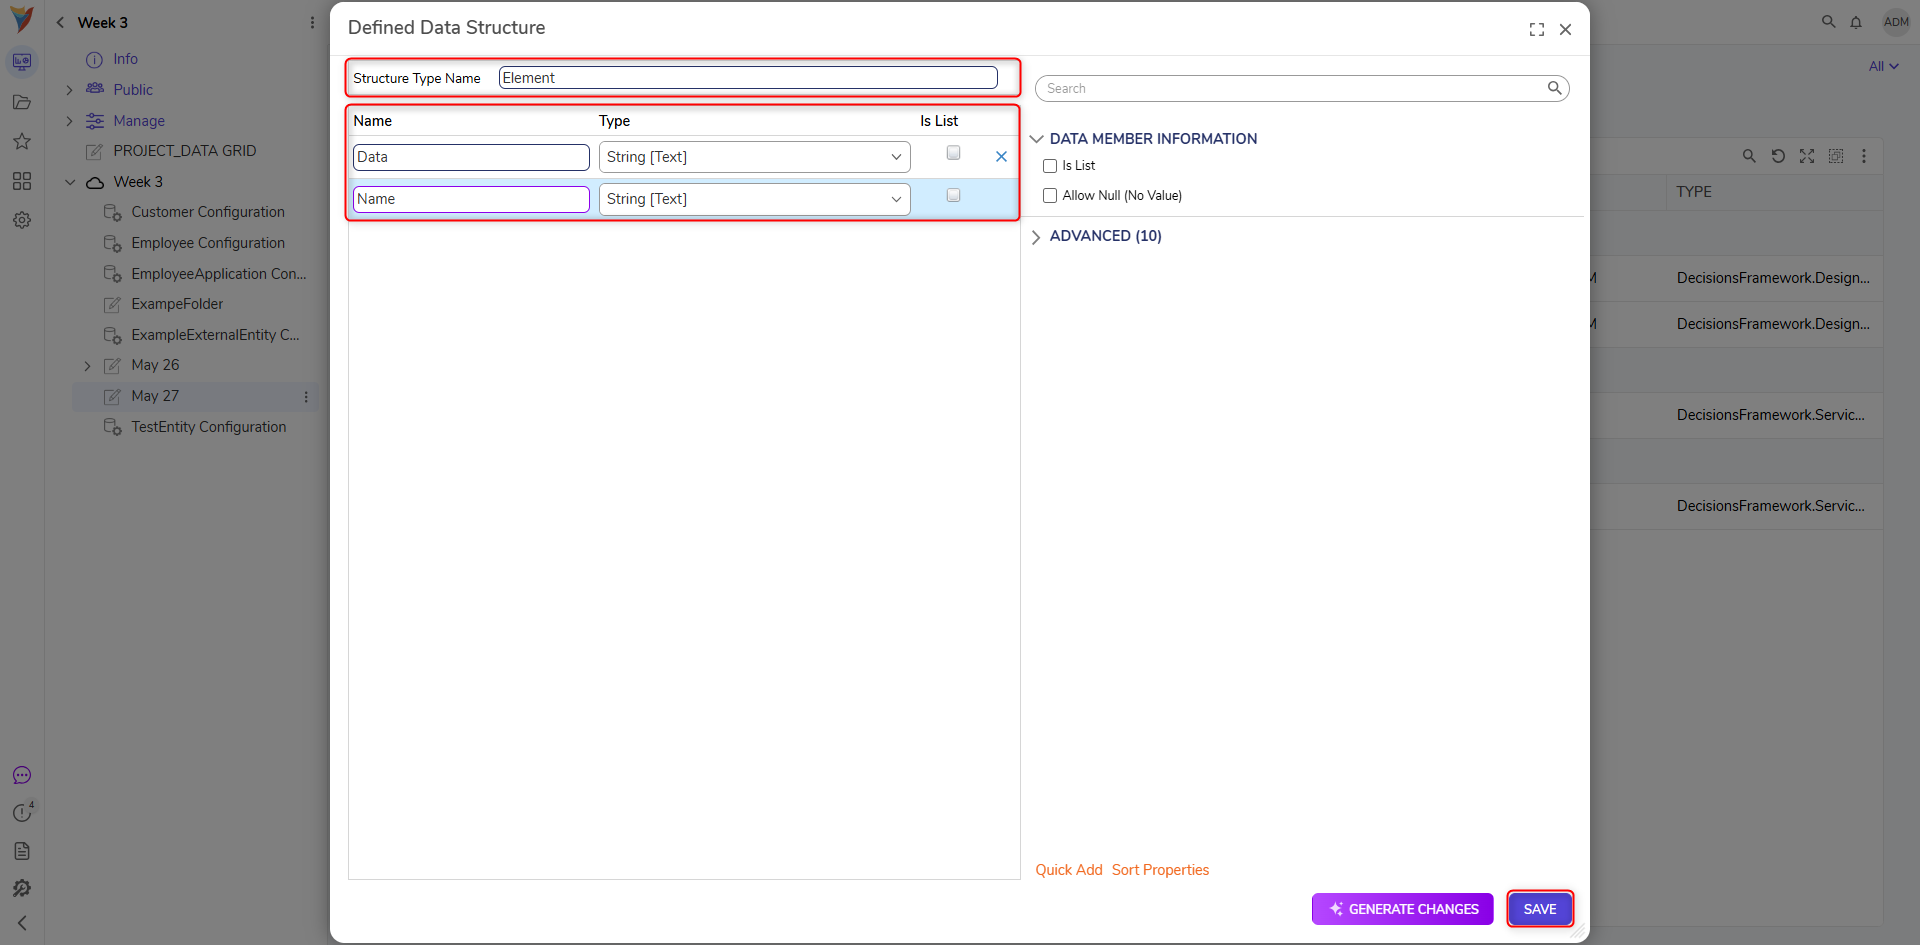
- Create a third and final Defined Data Structure, and name it 'Element'. Configure the Structure to have two String data fields: Data and Name. Save and exit.
- Create a Flow and open it in the Flow Designer. Add a Show Form step to the Flow Designer to create a new Form.
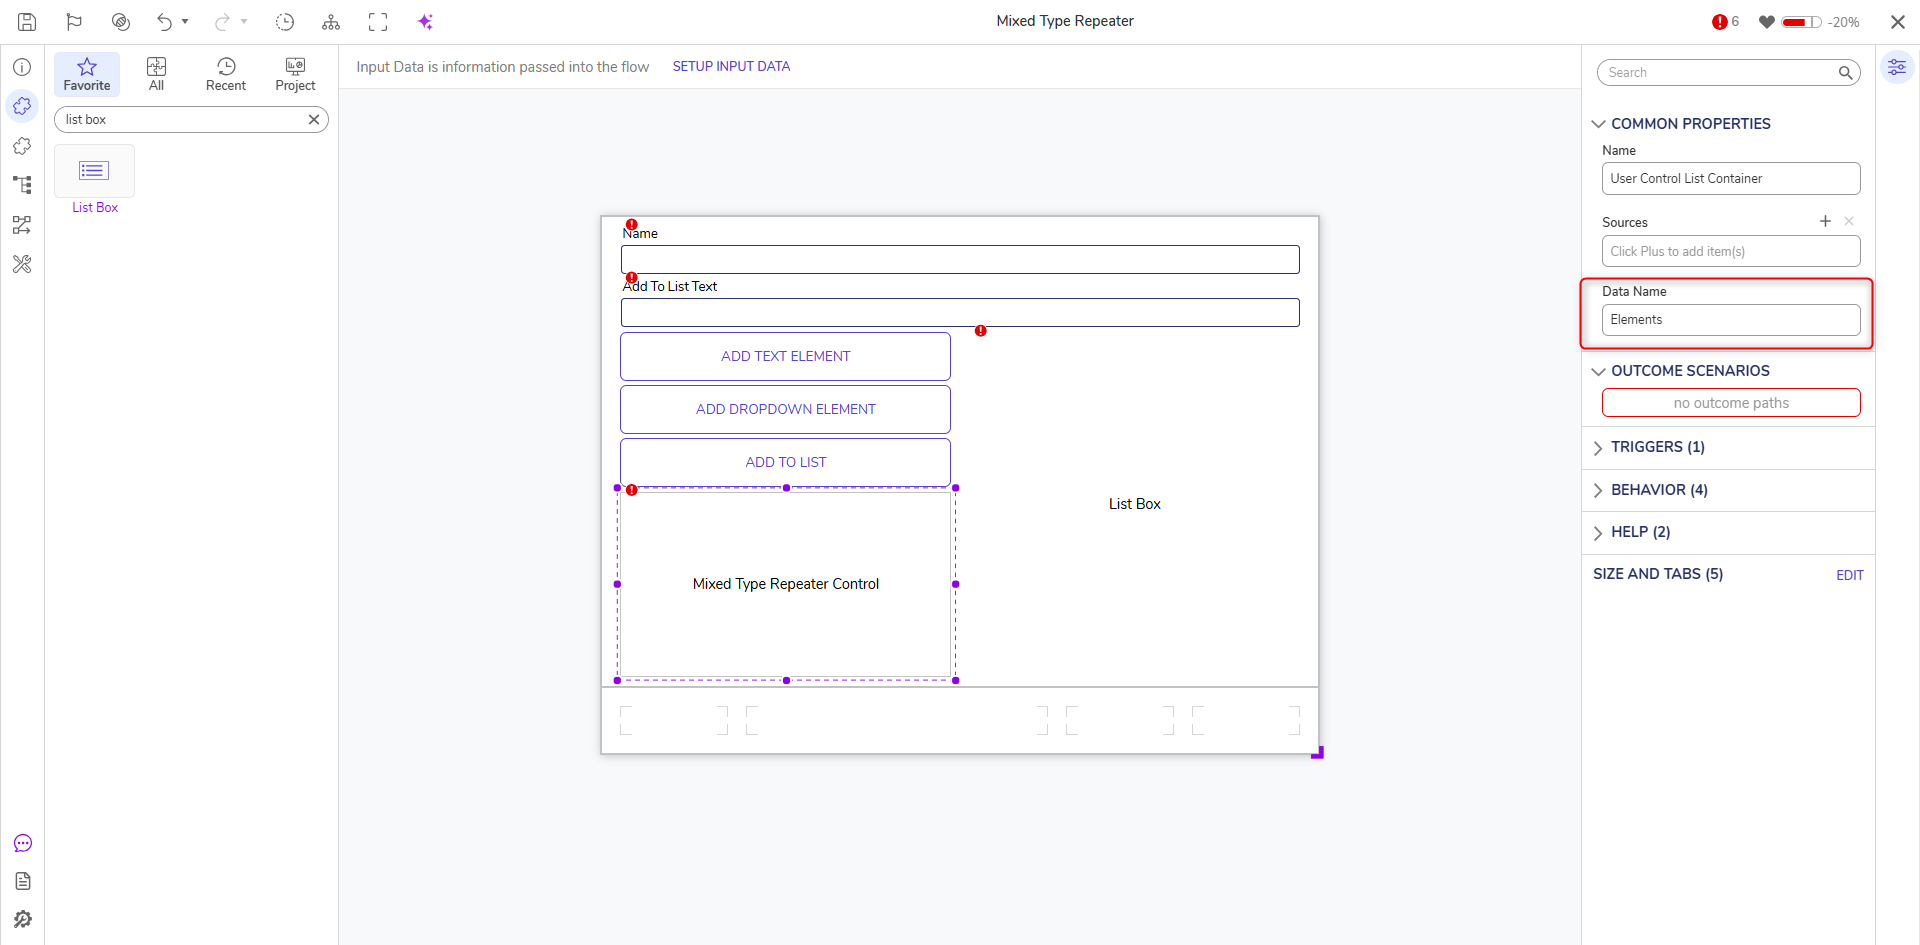
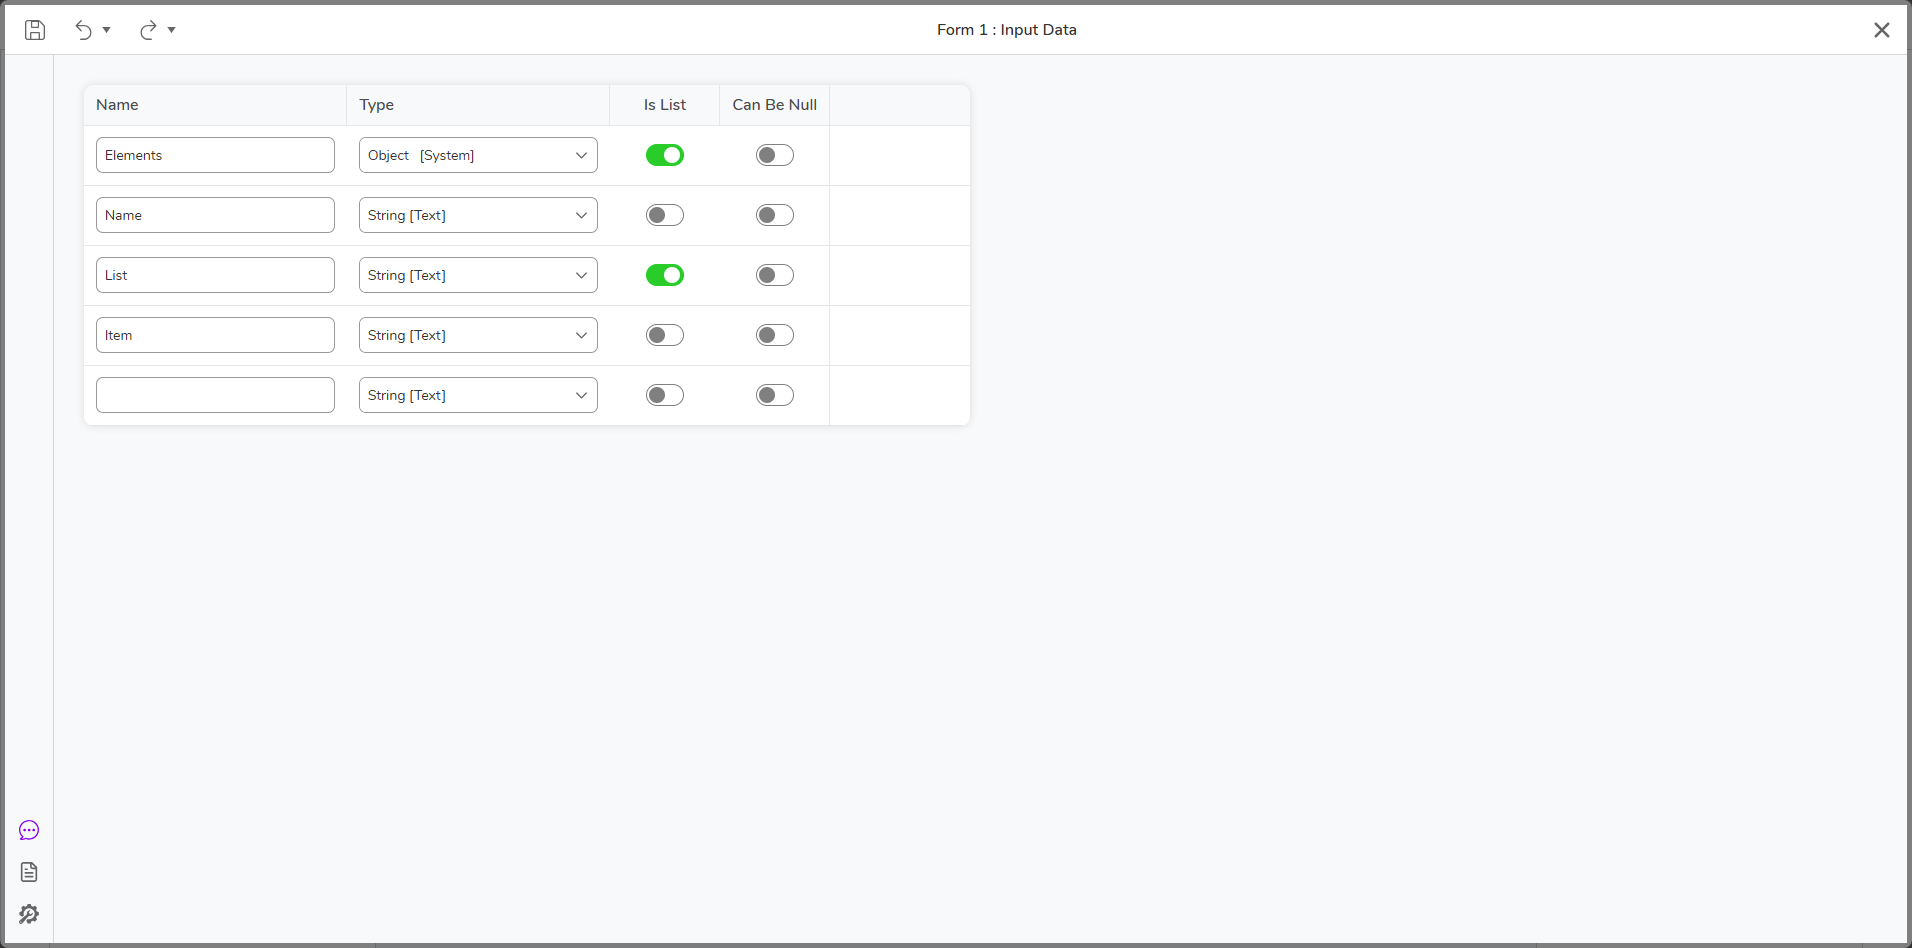
- Configure the Form to have the following controls and Data Names provided below:
Form Control Location in Toolbox Data Name Button Actions Done Text Box Data Name Event Button Actions > Events Add Text Element Event Button Actions > Events Add Dropdown Element Text Box Data Add To List Text Event Button Actions > Events Add To List List Box Data List Mixed Type Repeater User Controls Elements - Select the Mixed Type Repeater Control. In the Data Name text box under COMMON PROPERTIES, type "Elements".
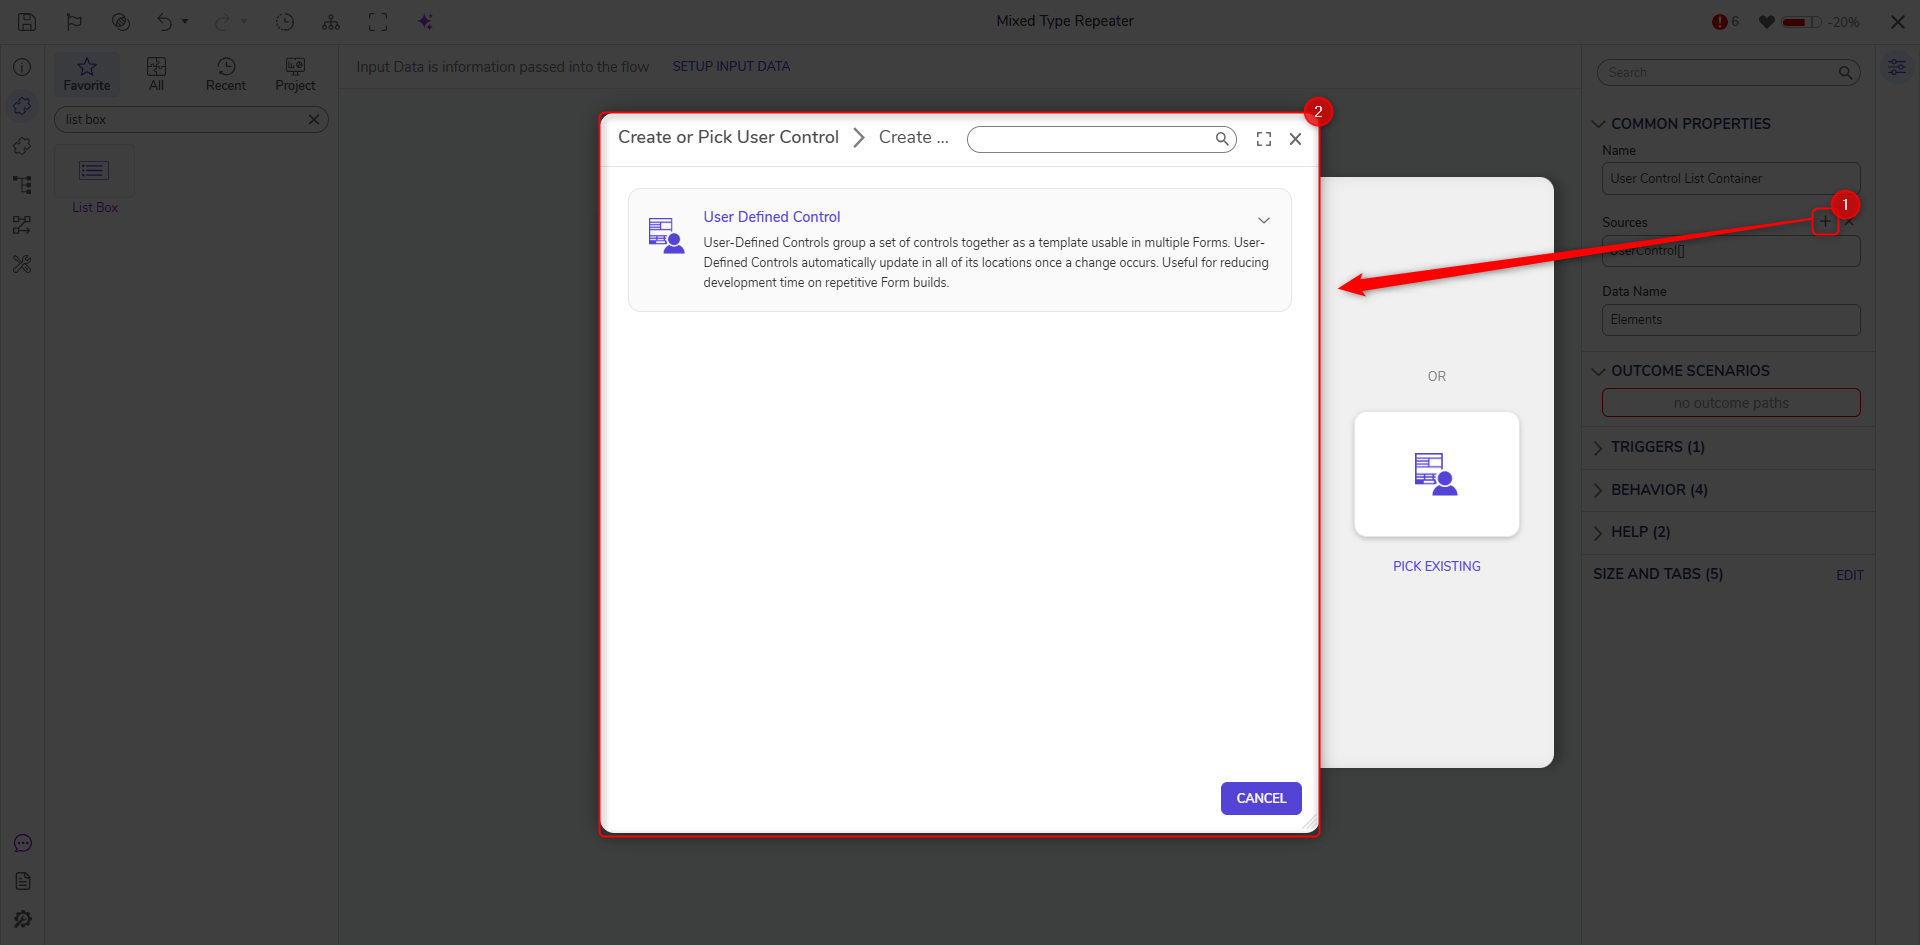
- Click ADD under Sources and select PICK OR CREATE SOURCE to create a new User Defined Control.
- When the Form Designer opens, select SETUP INPUT DATA. In the Name field, enter 'Dropdown_Element'. Click the Type field drop-down list, navigate to User Defined Types > Defined Data Structures, and select Dropdown_Element.
Click Save and then close the window. - On the Data panel, expand DROPDOWN_ELEMENT. Click and drag the Name field to the Form and select Label of Data Value on the pop-up menu. Then, press Enter to save control.
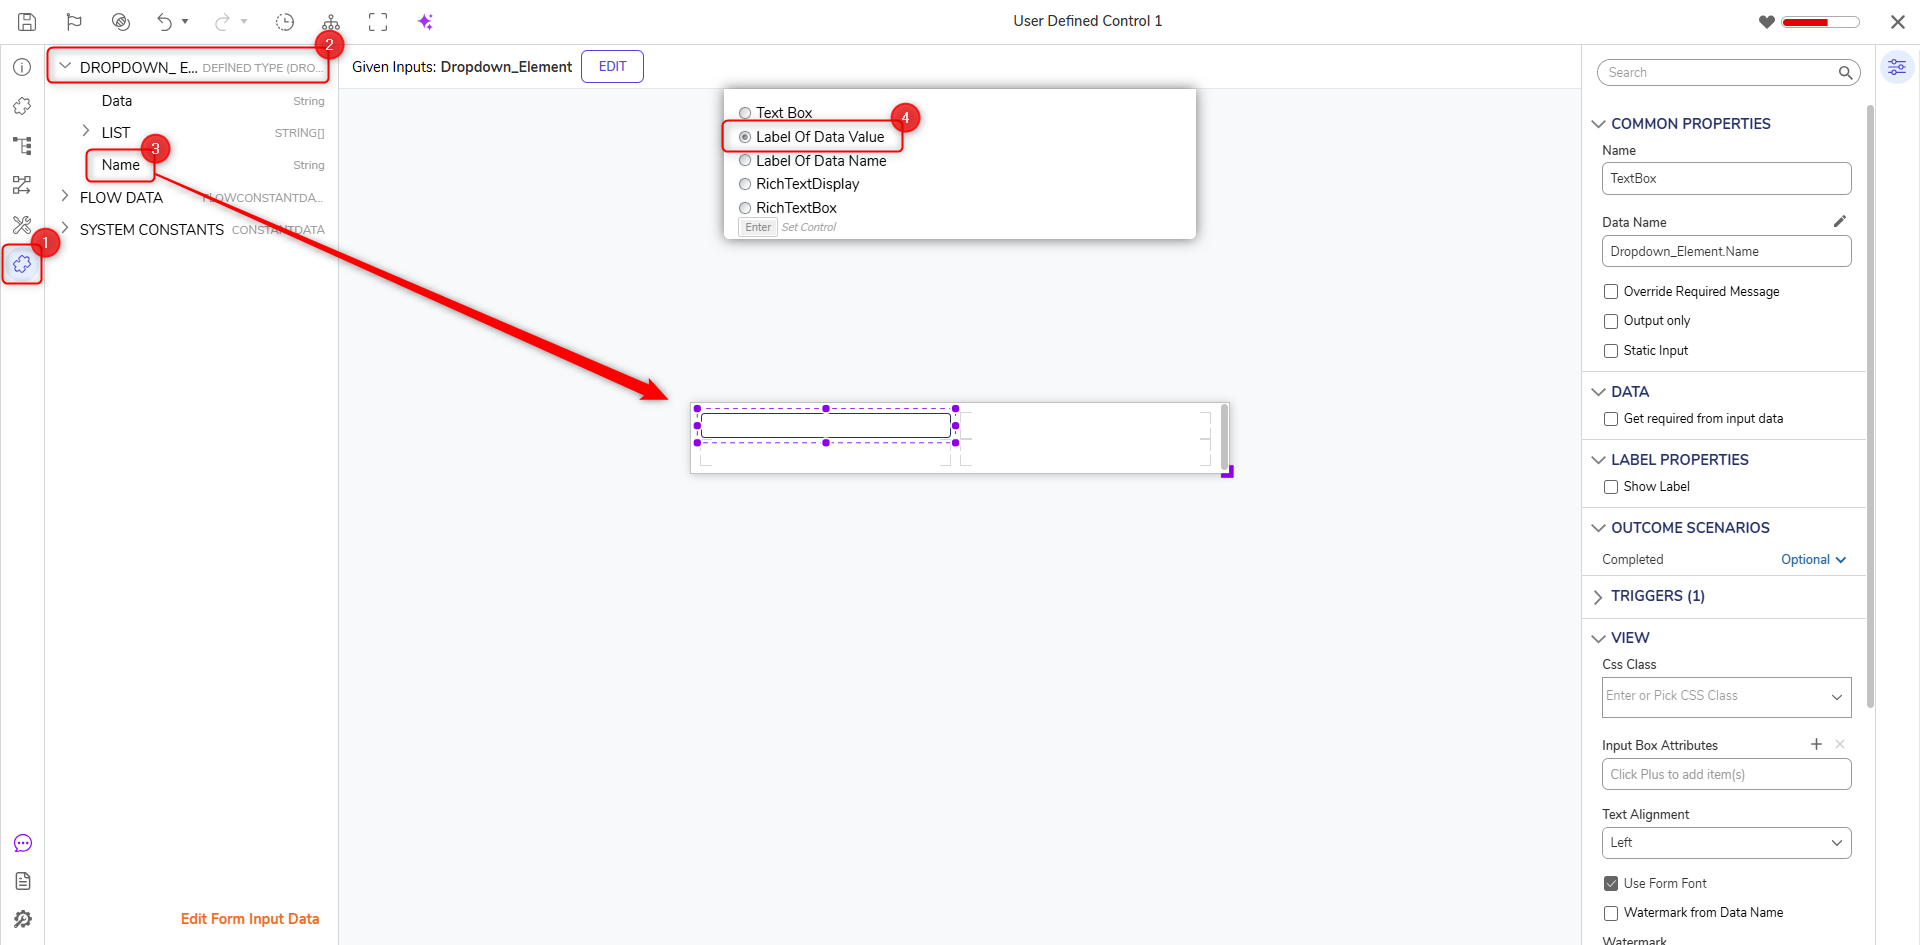
- Drag and drop a Drop Down List control to the Form under the Label in the Toolbox panel. Under its Properties panel, change Type to String [Text].
Expand the List Input Source drop-down and select DataName. Under List Items DataName field, click PICK FROM DATA. Select Dropdown_Element.List.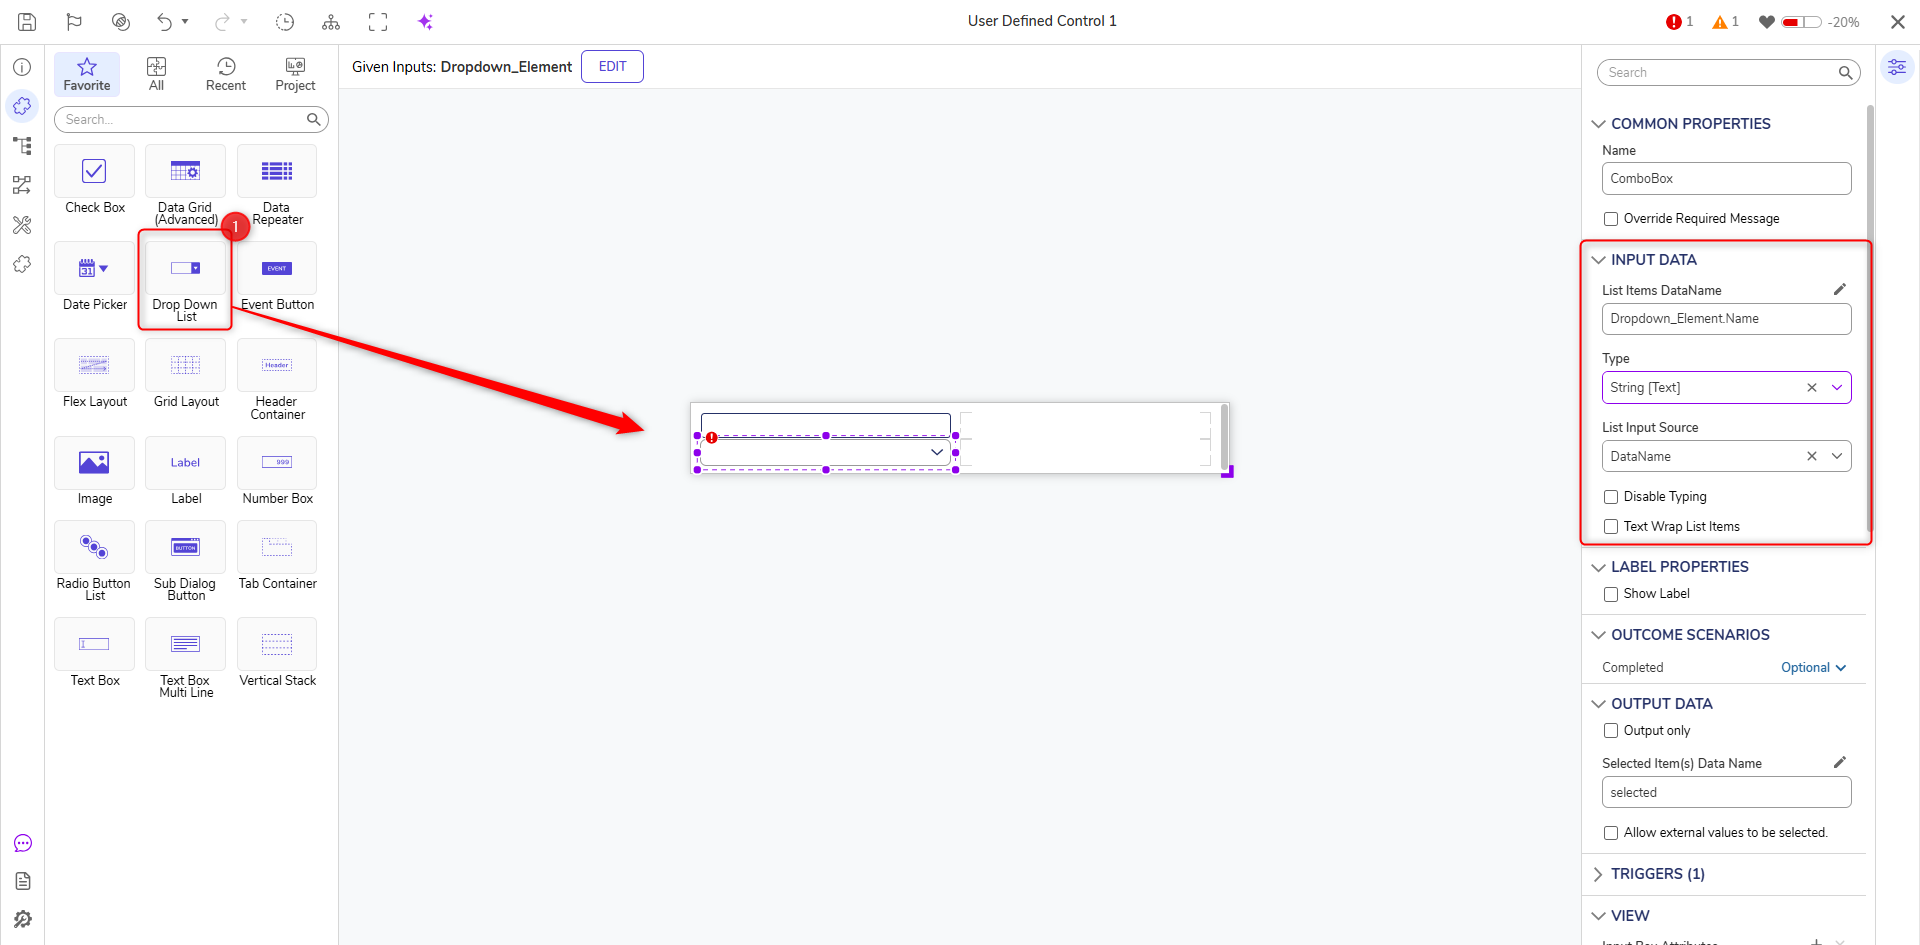
- Save and close Source Form Designer. Then, select OK on the Add Sources dialog window.
- Add a new Source named 'Text User Control List'. It will automatically open in the Source Form Designer.
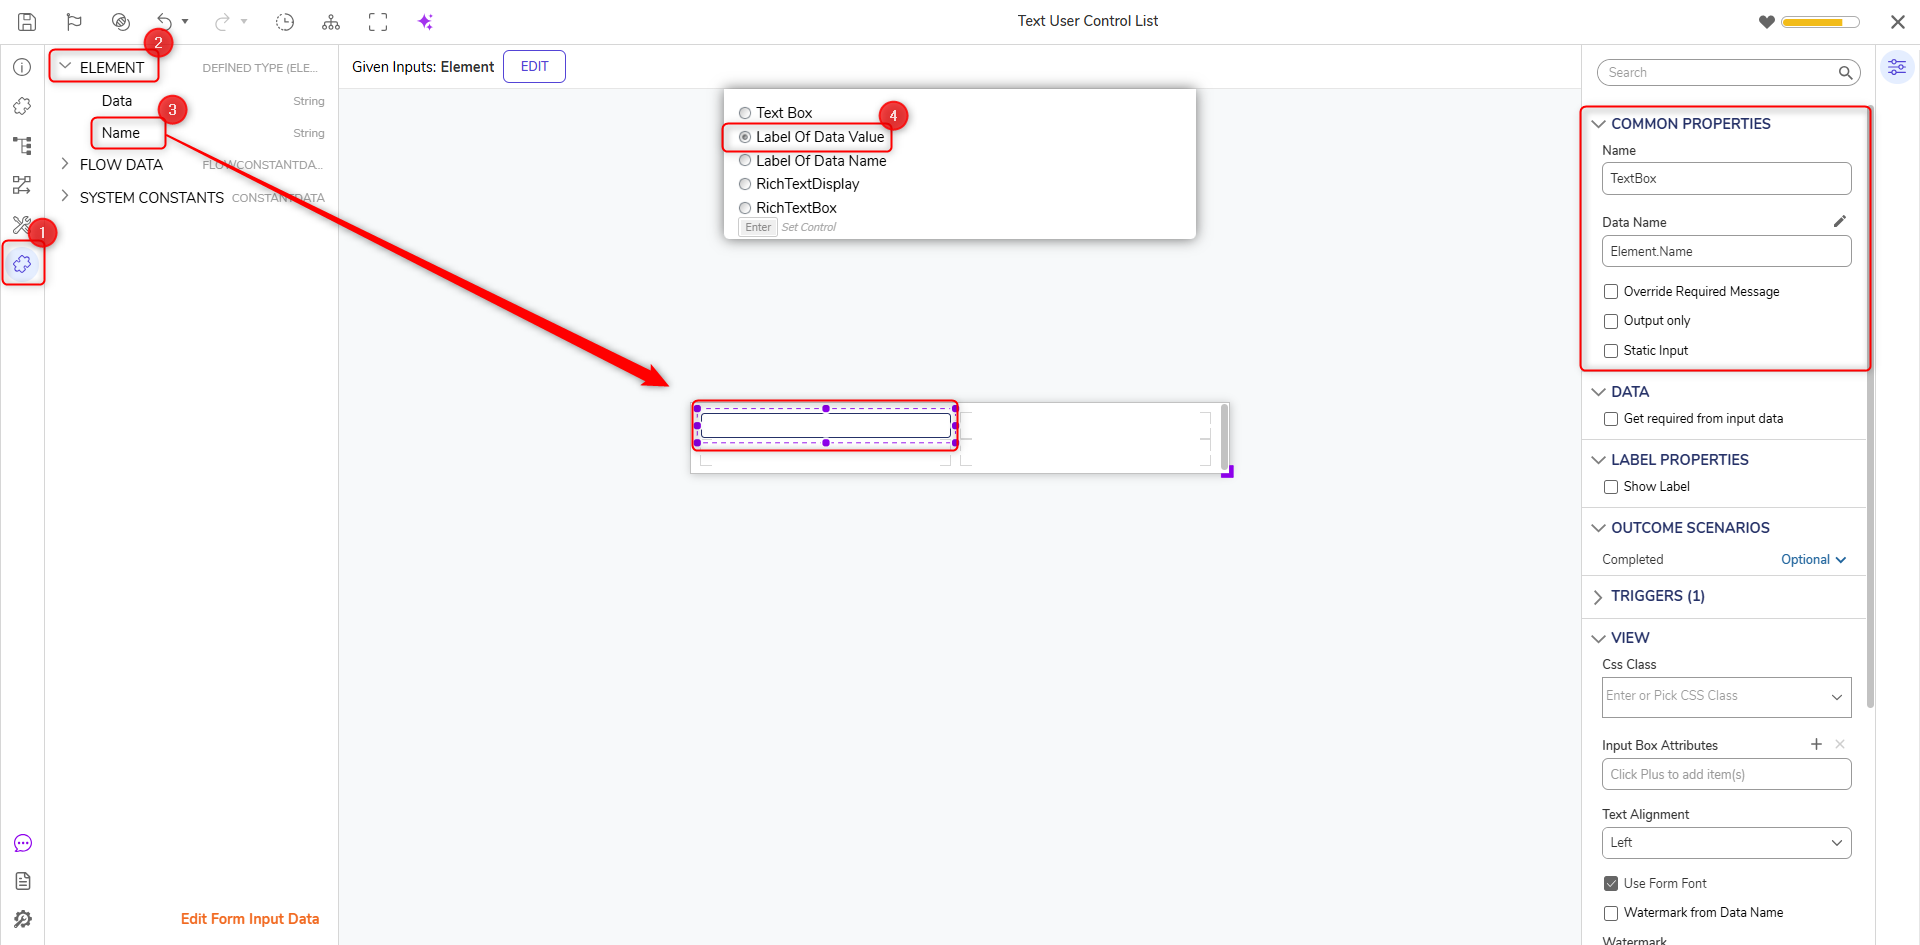
- When the Form Designer opens, select SETUP INPUT DATA. Enter a field named "Element" with a Type matching the Element Defined Data Structure. Click Save and then close the window.
- On the Data panel, expand ELEMENT. Click and drag the Name field to the Form and select Label Of Data Value on the pop-up menu. Then, press Enter to save control.
- In the Toolbox panel, drag a Text Box control to the Form under the Label. Change its Data Name by selecting PICK FROM DATA. Select Element.Data.
- Users should note that both Elements (Dropdown or Text) cannot have an Outcome Scenario of Not Used, otherwise the Form will throw a Validation Error.
- Click Save and close Form Designer. Then, click OK on the Add Sources dialog window.
- Select SETUP INPUT DATA on the Form, add Elements (Object-List), Name (String), List (String-List), and Item (String).
Drop Down Active Form Flow
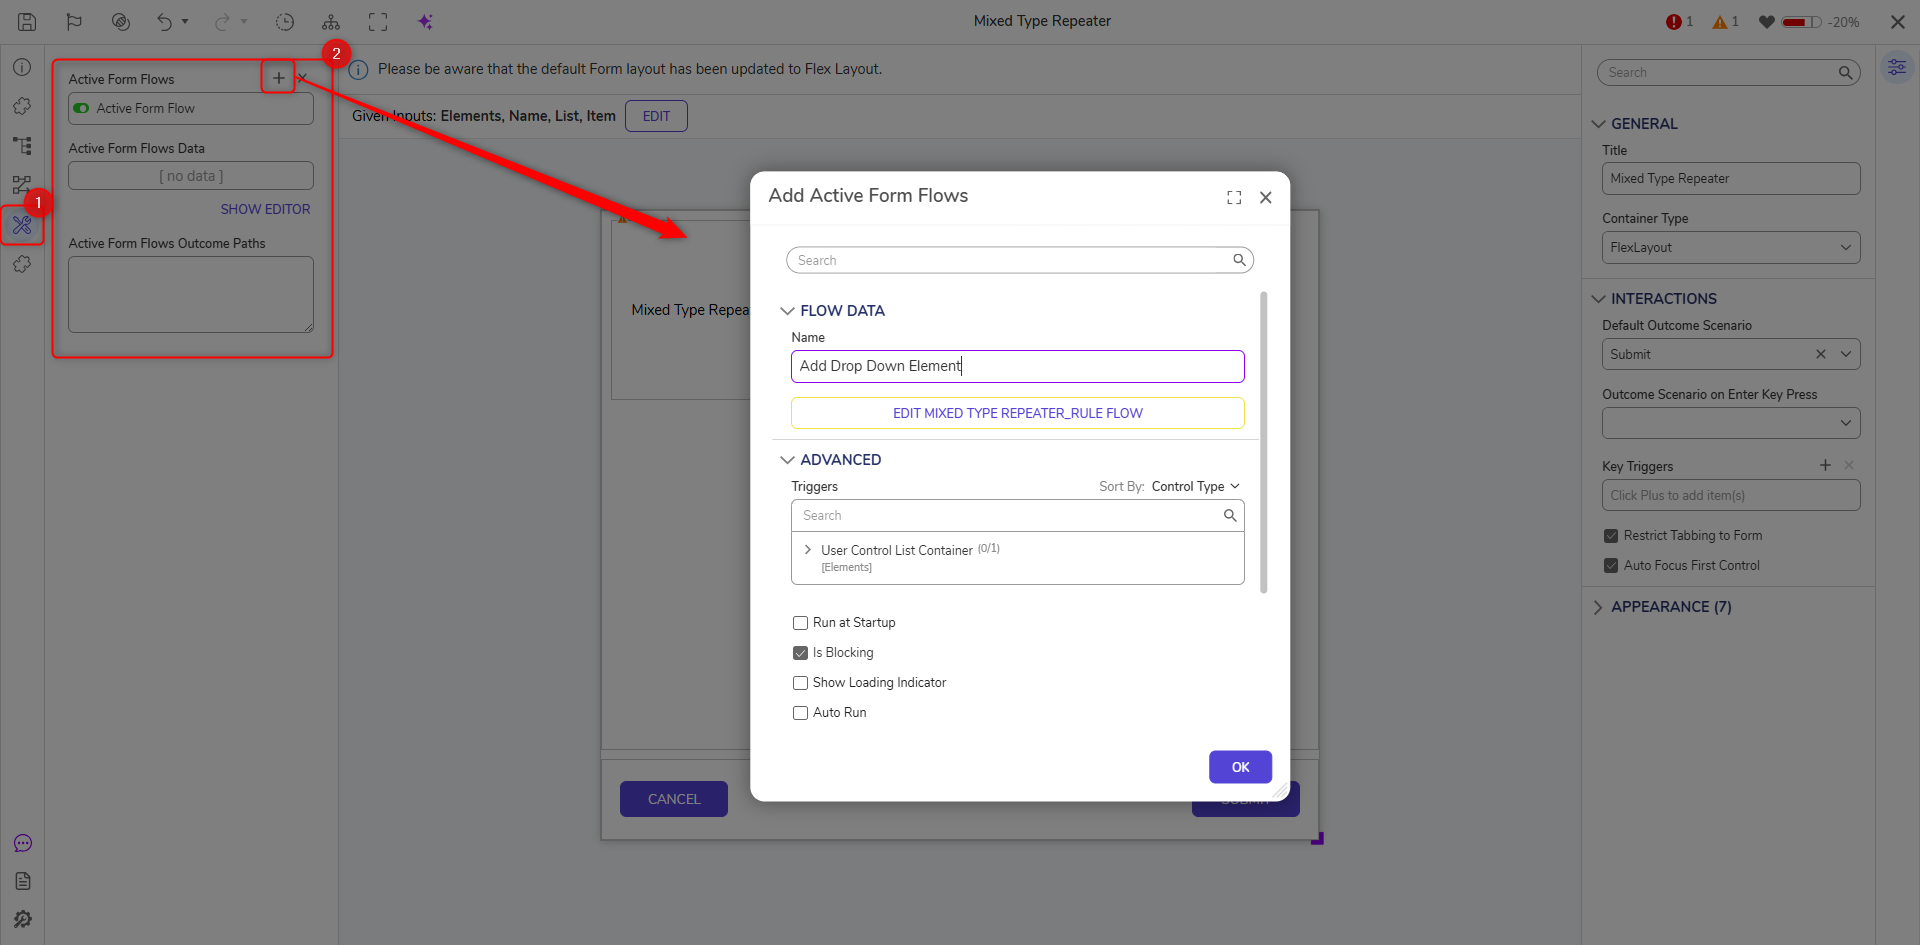
- Click the tools icon to open the Logic menu on the left side panel. In the Logic menu, beside the Active Form Flows, select +.
- Name the Flow "Add Drop Down Element" and Select EDIT RULE FLOW.
- Add a Create Data step on the Start step's outcome path. In the properties of the Create Data step, navigate to DATA > Data to Create, select Show Editor.
- Name this DropdownItem with the data type Dropdown_Element.
- Choose Build Data as the mapping type on the Create Data step Inputs. For List, select Form Input Data > List. For Name, select Form Input Data > Name.
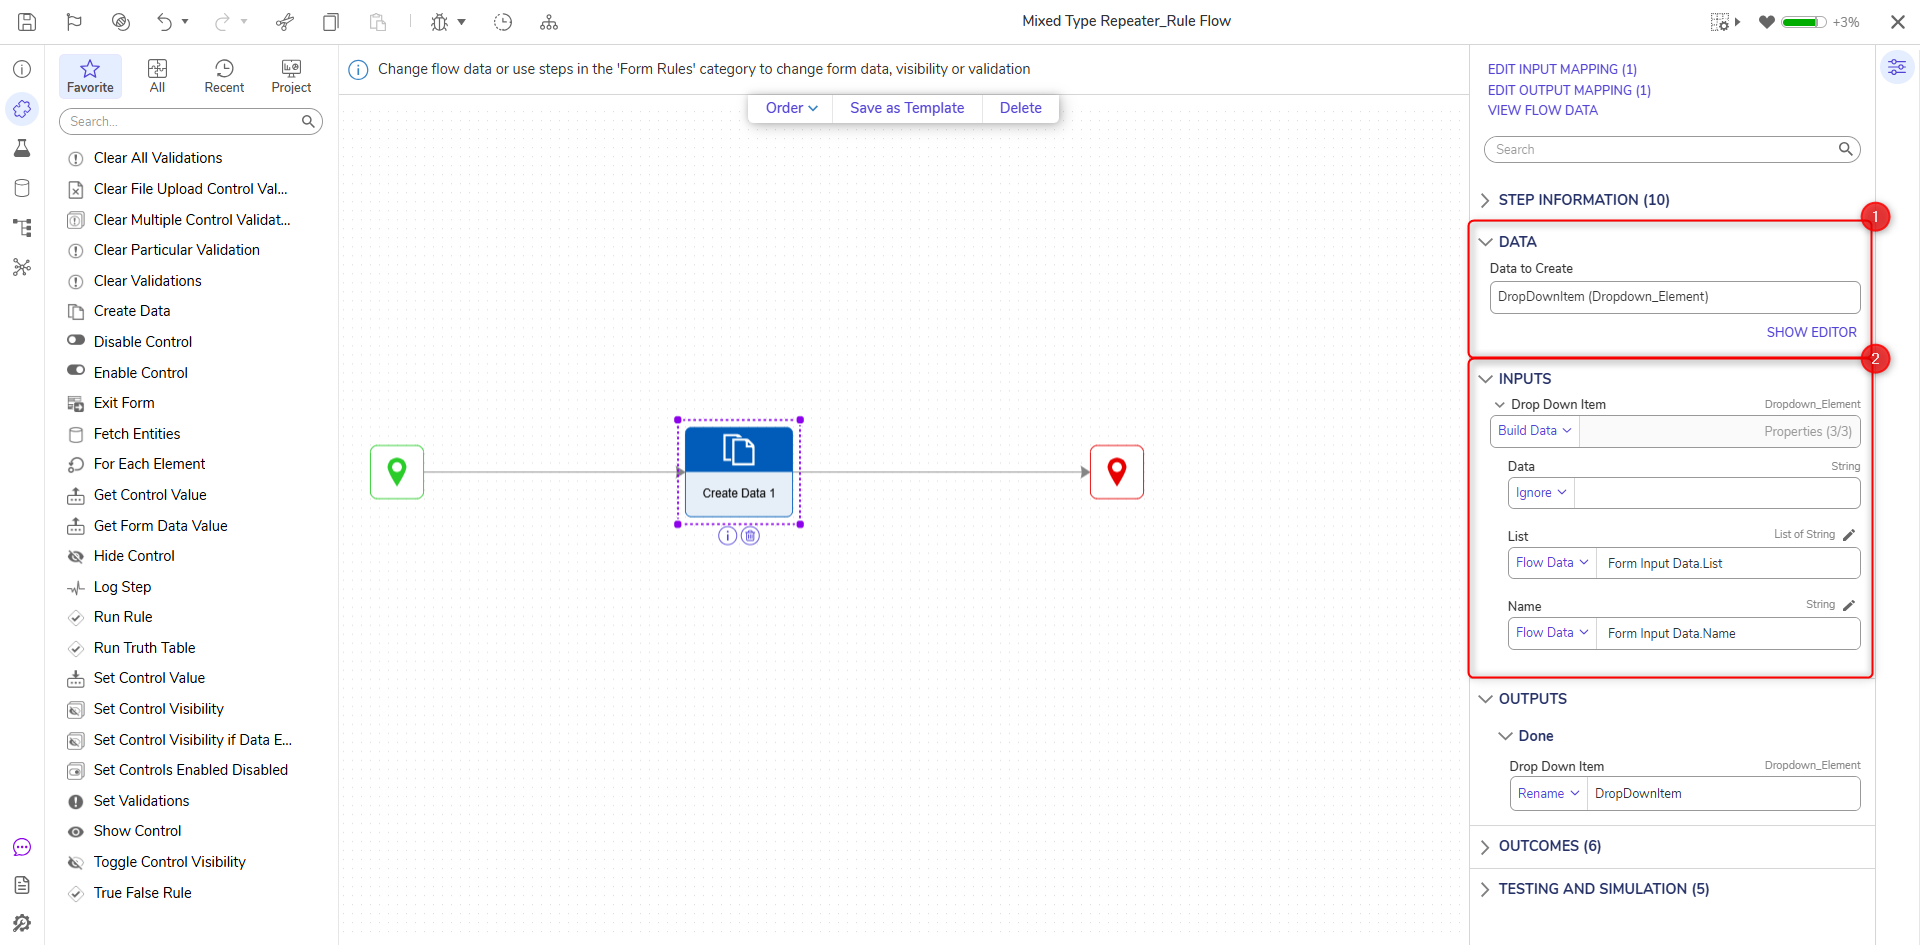
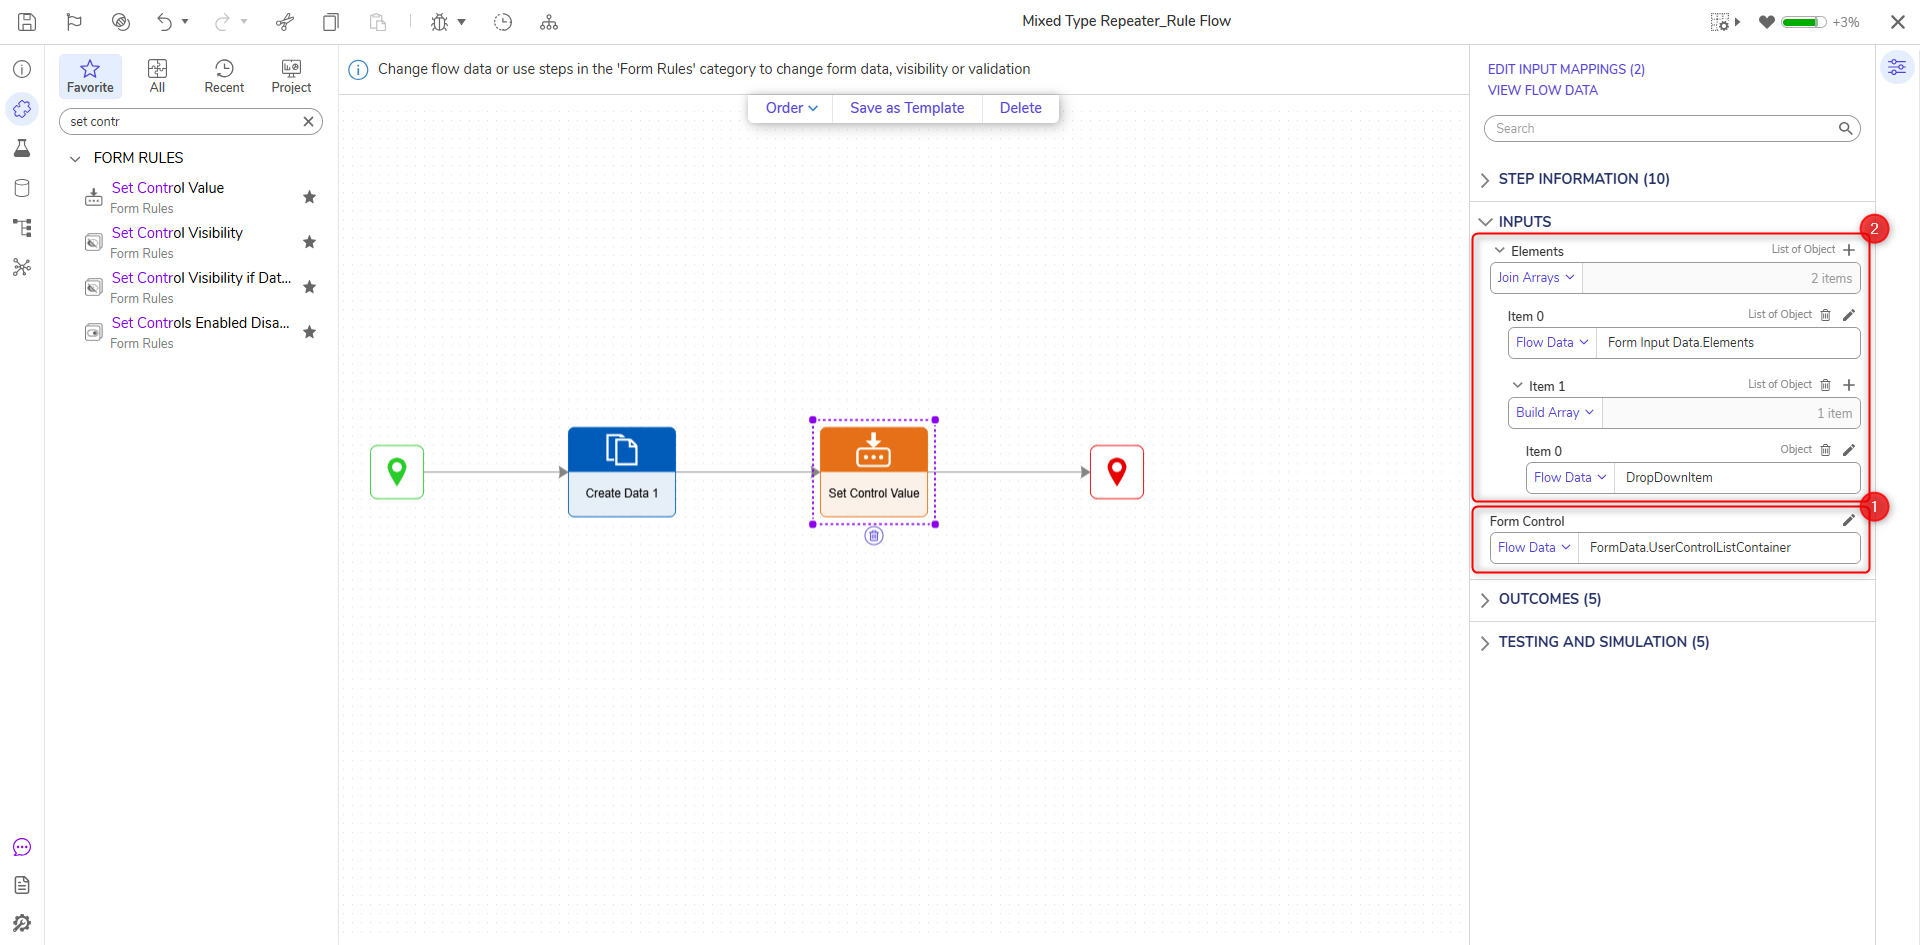
- Add a Set Control Value step on the Create Data step's outcome path.
- In the Set Control Value step Properties, navigate to Inputs, and select Form Data > User Control List Container for Form Control.
- Under Elements, select Join Arrays as the mapping type.
- For Item 0, select Form Input Data > List; for Item 1, select Build Array as the mapping type; then, for Item 0, choose DropdownItem.
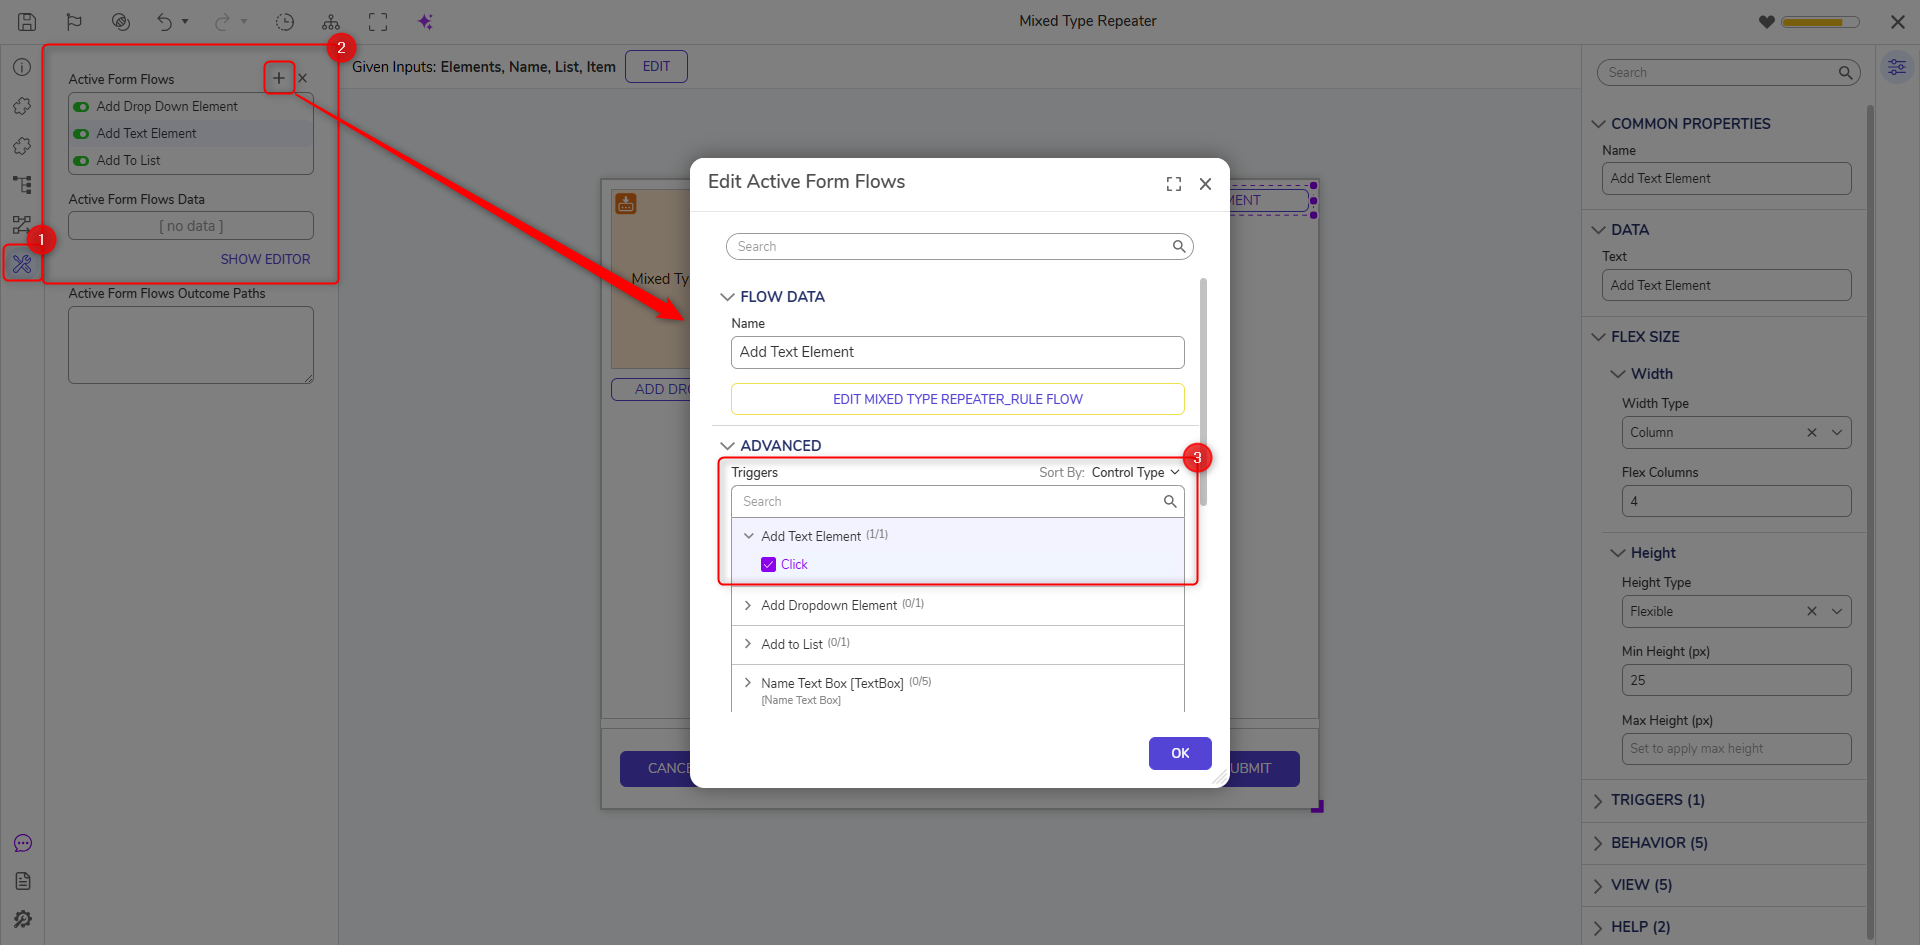
- Save and close the Flow. In the Edit Active Form Flows dialog, under ADVANCED > Triggers, choose EventButton_Dropdown: Click.
- Select OK to save.
Text Element Active Form Flow
- Click the workspace around the Form. In the Properties panel, scroll down to the FORM RULES > Active Form Flows, and select ADD NEW.
- Name the Flow "Add Text Element". Under ADVANCED > Triggers, choose EventButton_Text: Click. Select EDIT RULE FLOW.
- Add a Create Data step on the Start step's outcome path.
- In the properties of the Create Data step, navigate to DATA > Data to Create, and select Show Editor. Name this TextElement with the data type Text_Element.
- Choose Build Data as the mapping type on the Create Data step Inputs. For Name, select Form Data > Name Textbox > Value.

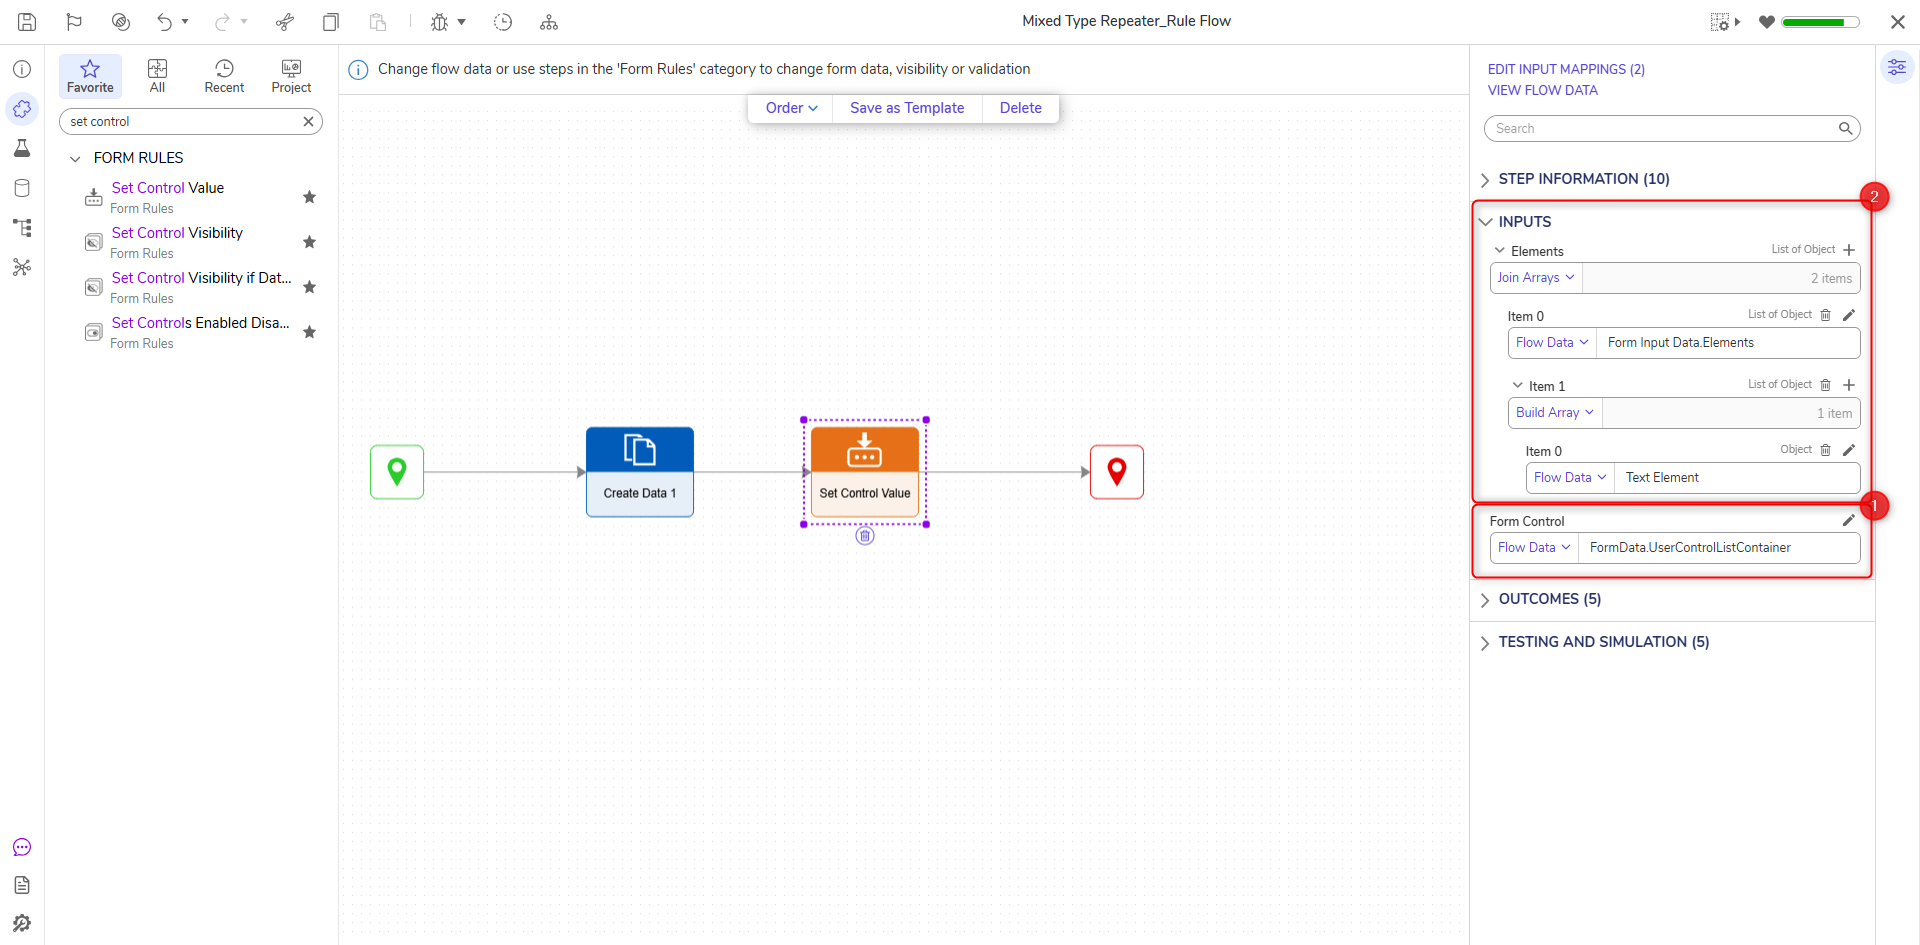
- Add a Set Control Value step on the Create Data step's outcome path.
- In the Set Control Value step Properties, navigate to Inputs, select Form Data > User Control List Container for the Form Control.
- Under Elements, select Join Arrays as the mapping type.
For Item 0, select Form Input Data > Elements; for Item 1, select Build Array as the mapping type; then, for Item 0, choose TextElement. - Save and close the Flow. Select Ok back in the Active Form Flows window to confirm creation.
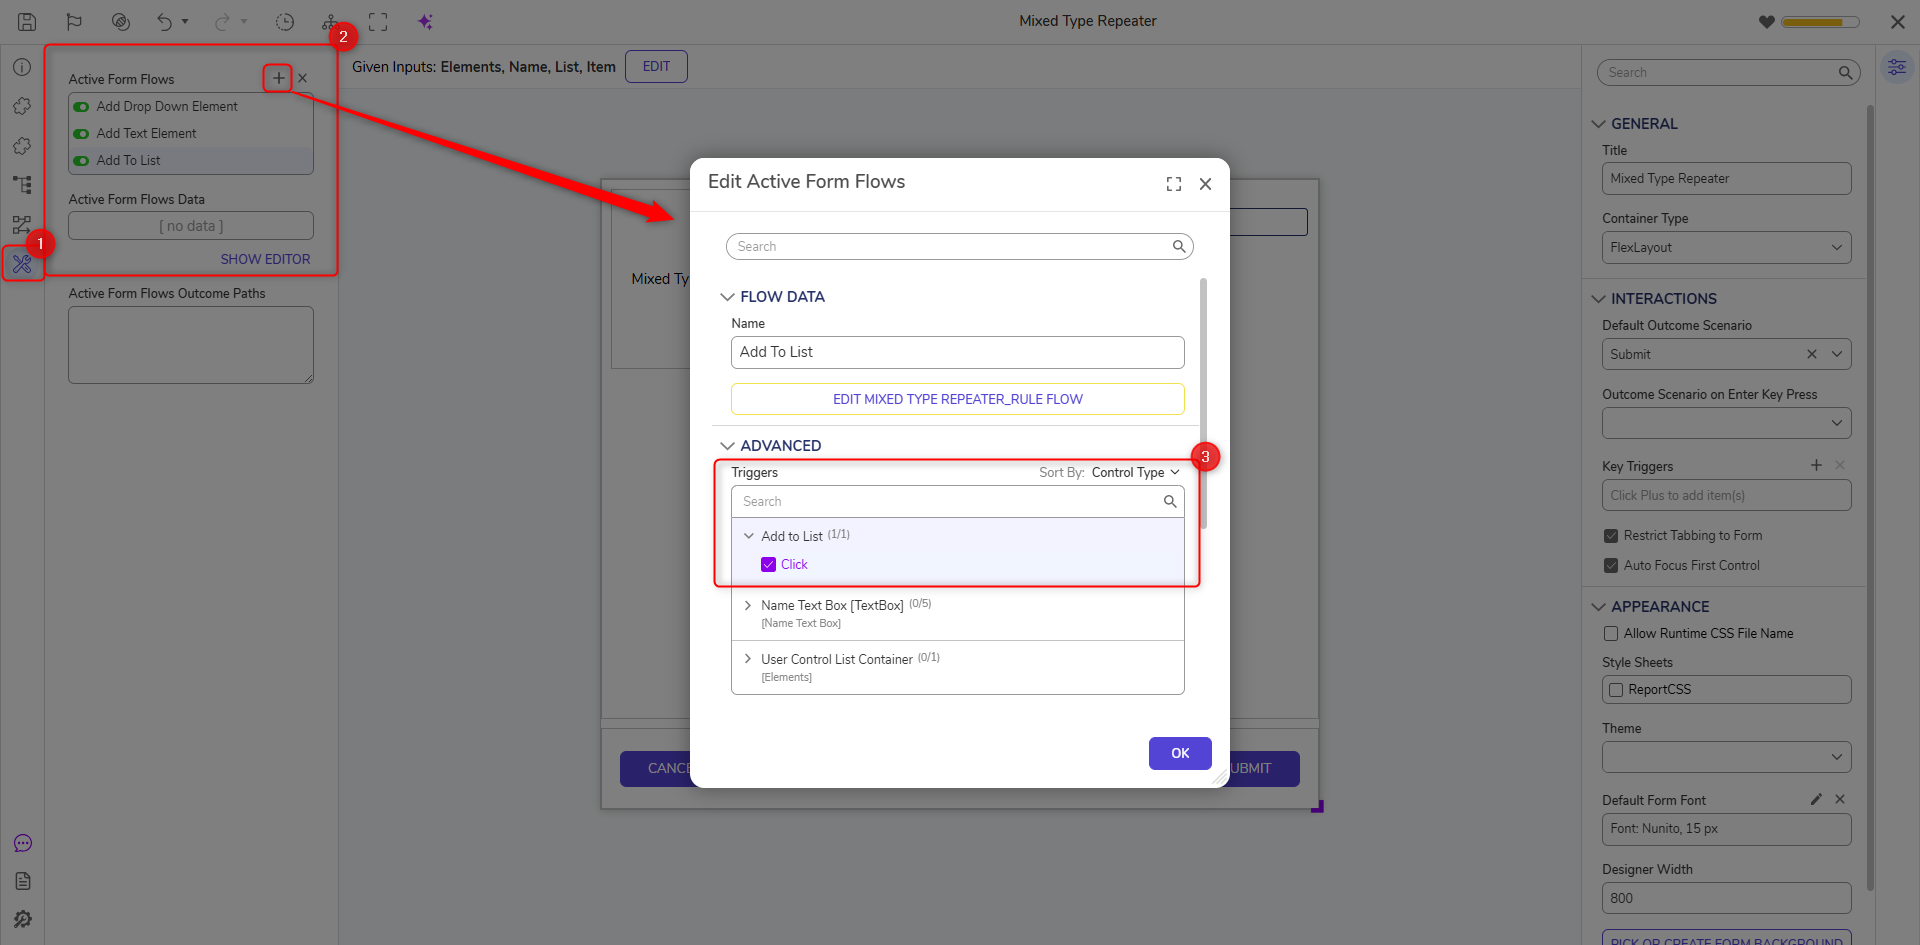
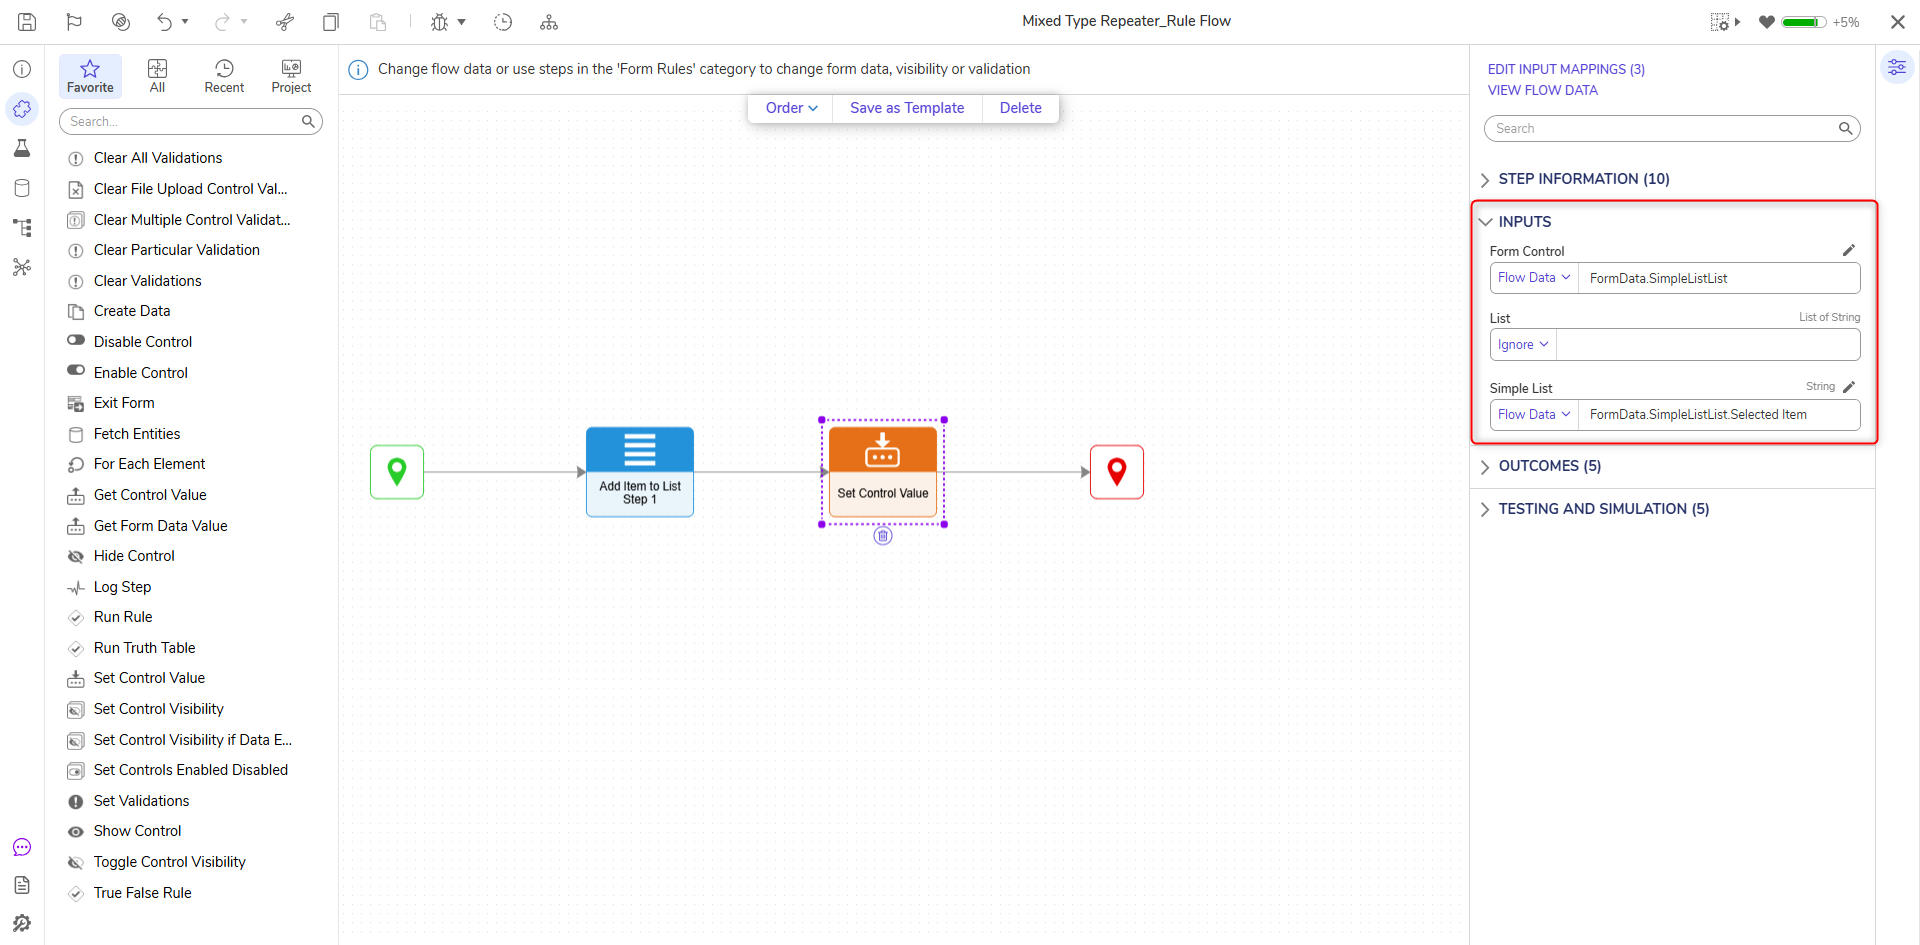
Add to List Active Form Flow
- Click the tools icon to open the Logic menu on the left side panel. In the Logic menu, beside the Active Form Flows, select +.
- Name the Flow "Add to List". Under Advanced > Triggers, expand EventButton_Add_List and enable Click. Select EDIT RULE FLOW.
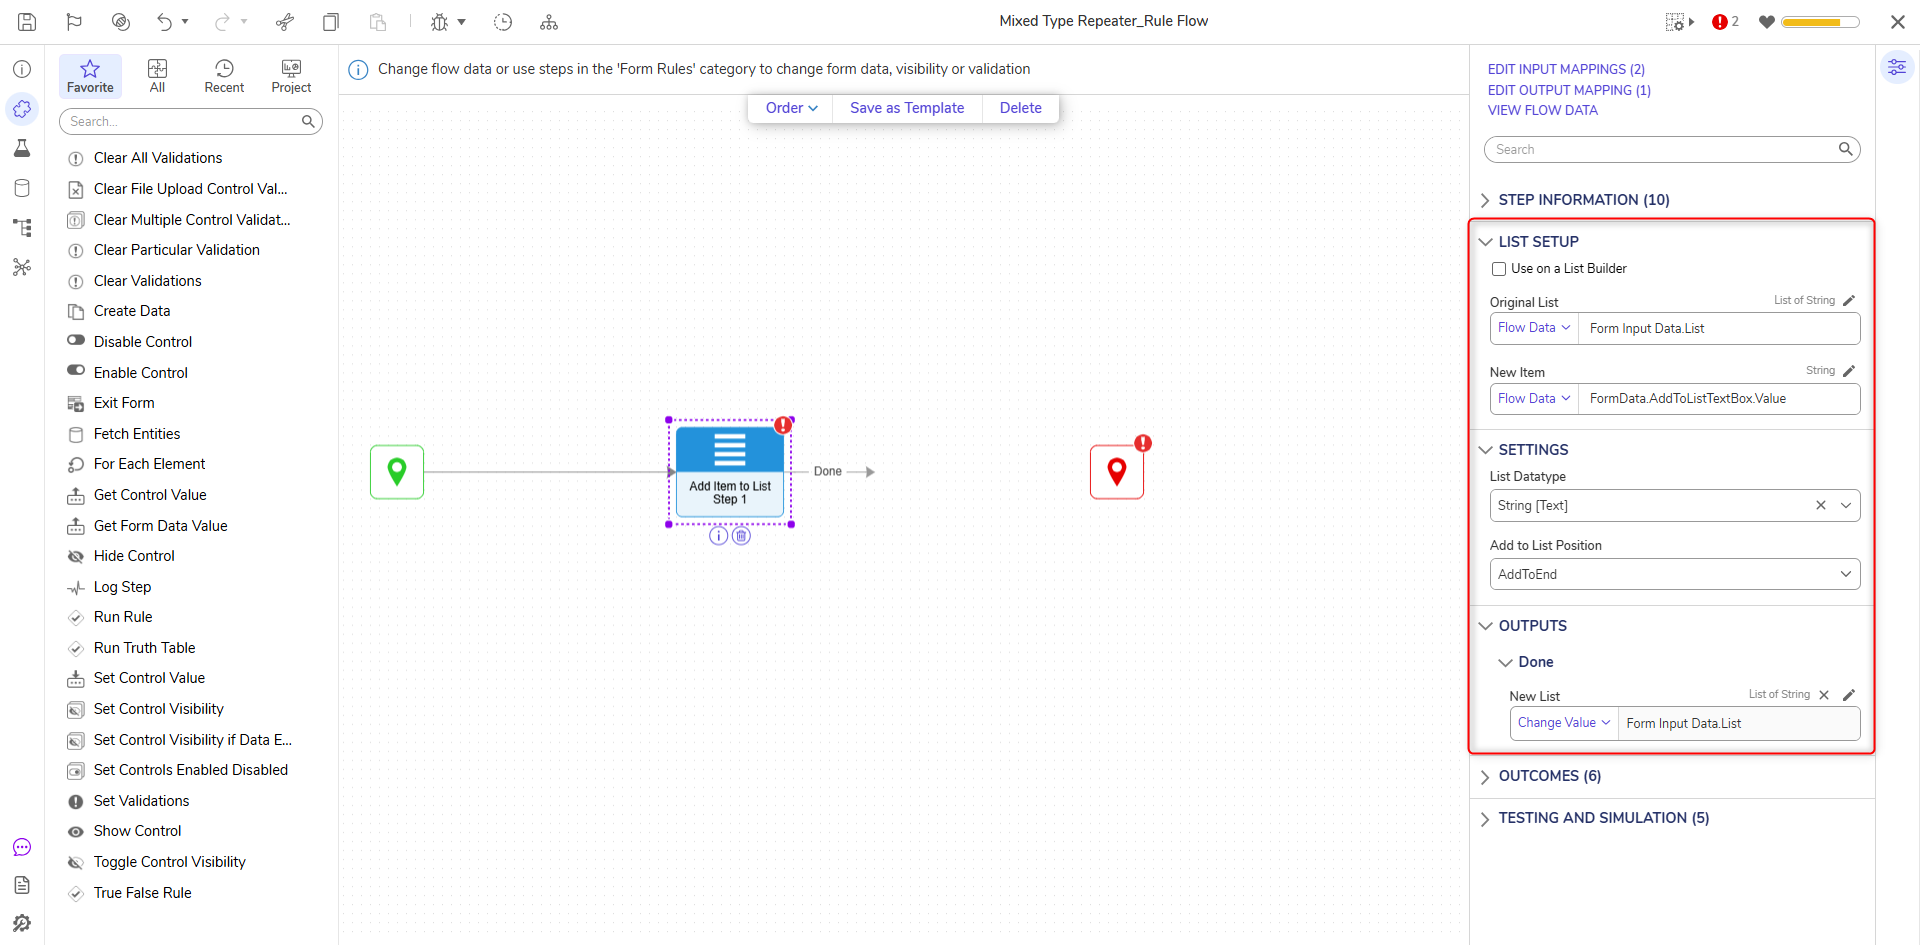
- Add an Add Item to List step on the Start step's outcome path.
- In the Add Item to List step properties, navigate to Inputs; under New Item, choose Select From Flow as the mapping type and select Form Data > Add to List Text Box > Value.
- Select Form Input Data > List from the Select from Flow option for Original List. Under Outputs, change the value of New List to Form Input Data > List.
- On the outcome path of the Add Item to List step, add a Set Control Value step.
- In the Set Control Value Step Properties, navigate to Inputs, select Form Data > Simple List for the Form Control.
- Under List, select Ignore.
- Under selected List, select FormData.SimpleList.Selected Item.
- Save and close the Flow. Select OK to save the Active Form Flow.
Debug
- Save and close the Form Designer. Set all Form inputs from the Flow Designer to Ignore.
- Connect the Show Form step to the End step in the Main Flow.
- Select Debug and verify that the Flow works properly.