Overview
The Azure Application Gateway (AAG) combines WAF and Layer 7 Load-Balancing technology within the Microsoft Azure technology stack. The AAG contains many features for implementing a secure load-balancing technology, including WAF implementation. There are several configurations that need to be made. The configurations are not specific to AAG but to cookie-based session affinity. This document will discuss the necessary Virtual Machine configuration that will be hosting Decisions and how Clustering relates to the setup within an AAG environment.
When being used alongside Decisions, the AAG’s primary function is to handle incoming requests and route them to the appropriate cluster node, while maintaining cookie-based session affinity. The AAG is also capable of terminating SSL, which is then offloaded to the Backend Pool VMs. This offload can be in the form of HTTP or HTTPS - generally, to increase performance, HTTP traffic is maintained between the AAG and Backend Pool. As clients will never view any traffic outside of the AAG - securing HTTP traffic internally between the AAG comes in the form of Network Security Groups that maintain network traffic access controls.
It is important to note that the AAG offers better session affinity that is not available via the Azure Load Balancer configurations; specifically, Cookie Based Session Affinity. The Azure Load Balancer can only support IP Hash configurations, which are easy to utilize and a common load balancing session affinity, but may not provide the desired results for certain application use cases.
The following article demonstrates configuring Azure Application Gateway as a load balancer for the Decisions cluster environment.
Prerequisites
An Azure account with an active subscription is required.
Create an application gateway
Log in to the Azure Portal
Search for Application gateways in the search bar
From the search results, open the Application gateways. The Load Balancing | Application Gateway dashboard opens
Click on Create to create a new application gateway
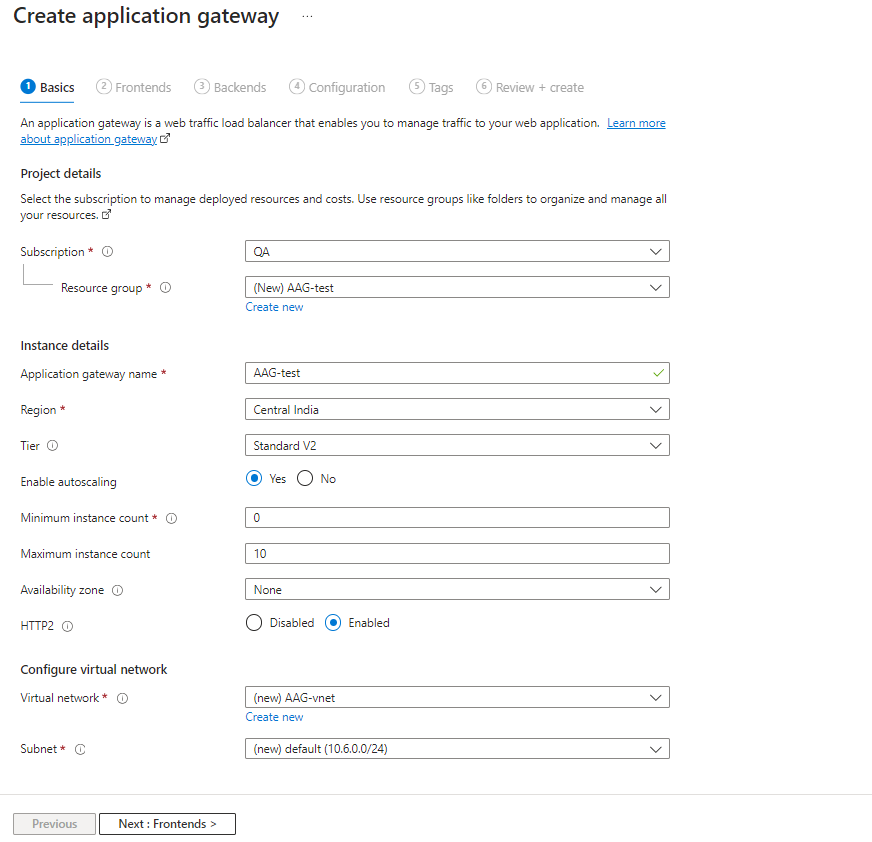
Basics
Choose the Subscription
Set the Resource Group
Give an Application gateway name
Select the desired Region
Set the Tier to Standard V2
Set the Minimum instance count to 0
Set the Maximum instance count to 10
Enable HTTP2
Choose a Virtual network or Create a new one
Choose a subnet or create a new one
Click Next
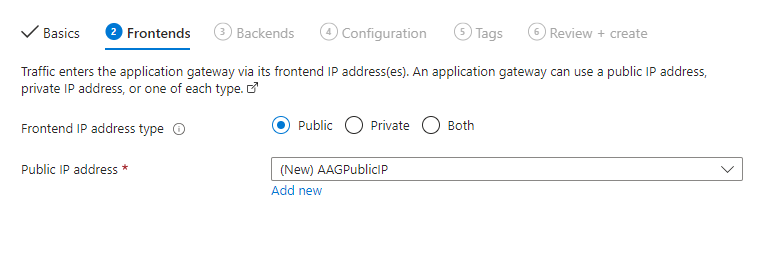
Configure Frontends
Select a Public IP address name or give a new one
Click Next
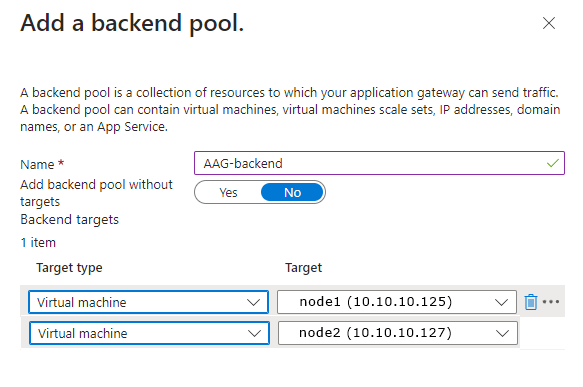
Configure Backends
This allows the users to configure the type of servers and their target IP/Name hosted in a clustered environment.
Click on Add a backend pool
Set the Target Type and target address of the backend servers in the cluster
Click Next
Rule Configuration
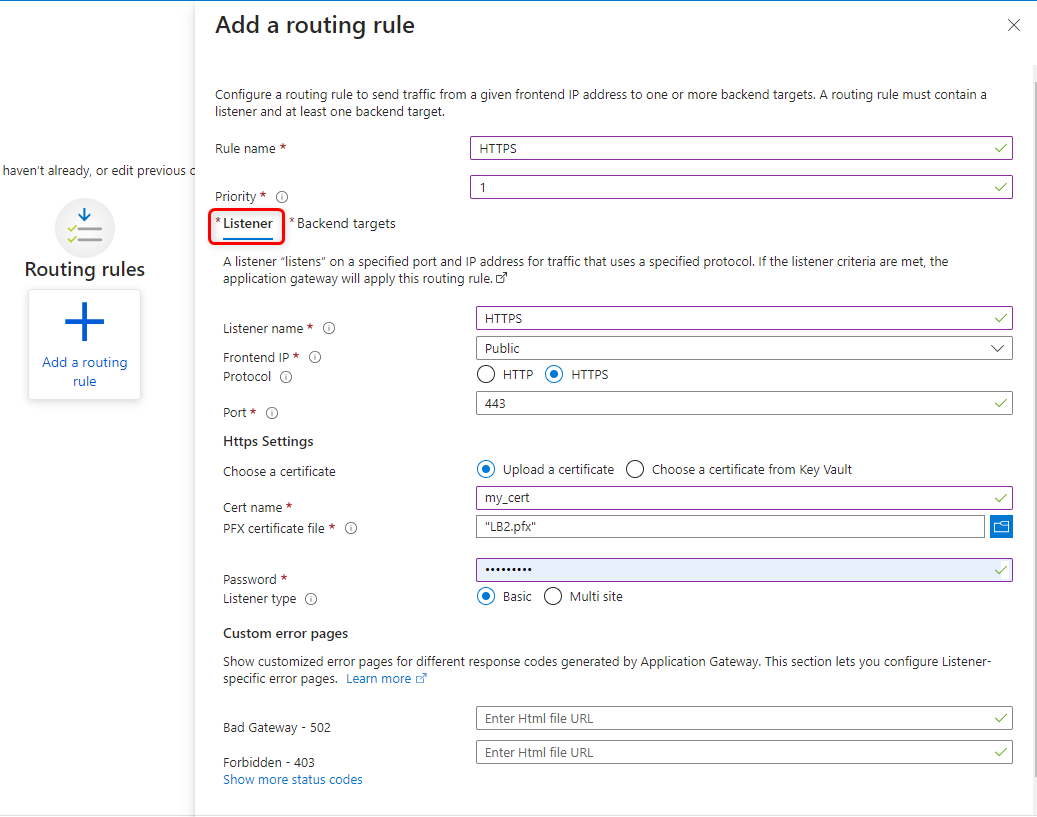
Configure HTTPS routing rule
Click on Add a routing rule
Set the Rule name to HTTPS
Adding SSL at the Listener:
Set the Listener name as HTTPS
Set the Protocol to HTTPS
Set the Port to 443
Upload a .pfx certificate file and add the cert password if required.
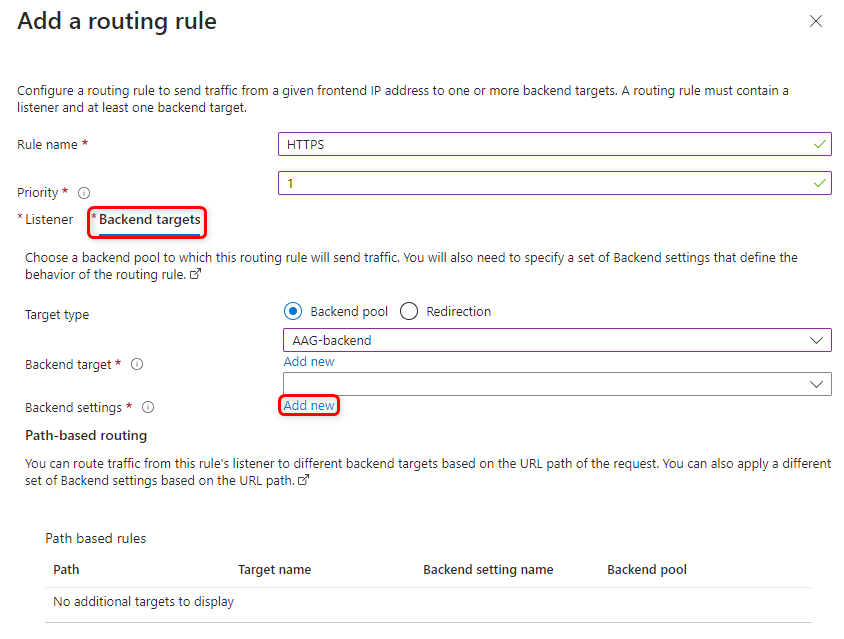
Configure Backend targets of the Listener:
Click on the Backend targets tab located next to Listener
Choose the Already created backend target
For the Backend Settings, Click on Add new
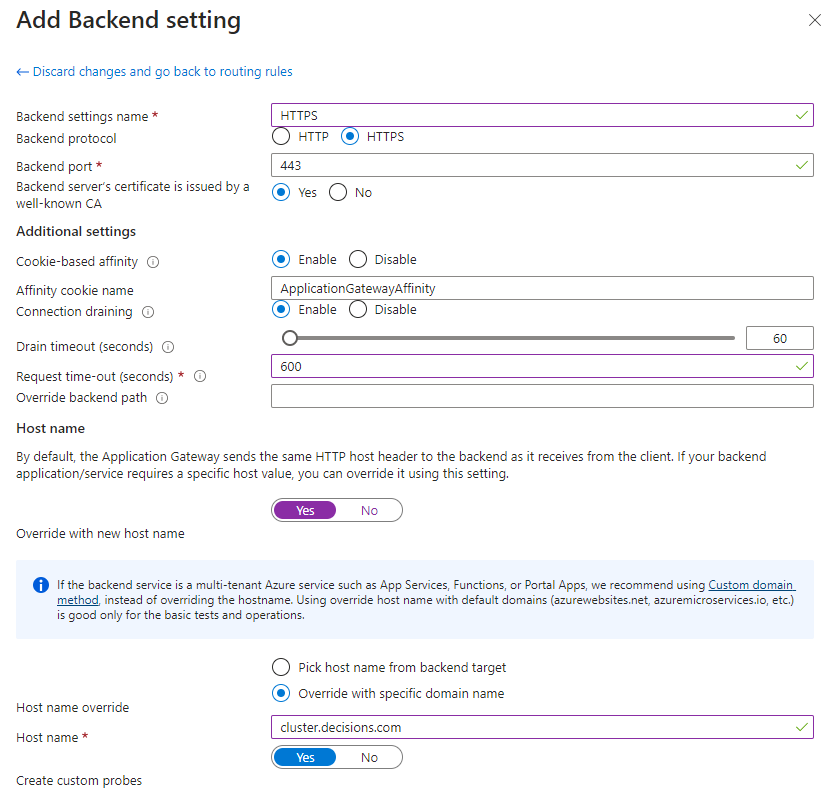
Set a Backend settings name
Set the Backend Protocol to HTTPS
Set the Backend Port to 443
Set “Backend servers’s certificate is issued by a well-known CA” to Yes
Enable the Cookie-based affinity
Enable Connection draining
Set the Drain timeout to 60 seconds
Set the Request timeout to 600 seconds
Enable Override with new host name
Give the portal base URL of the server in the Host Name
Configure HTTP to HTTPS Redirection rule
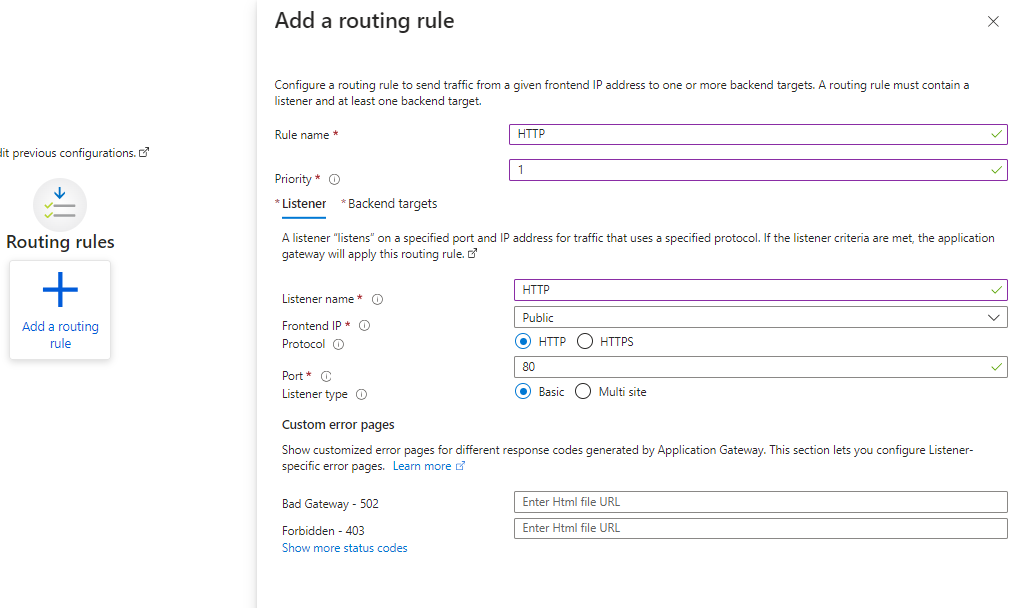
Configuring Listener:
Click on Add a routing rule
Set a Rule name to HTTP
Set Listenre name as HTTP
Set the Protocol to HTTP
Set the Port to 80
Configuring Backend targets:
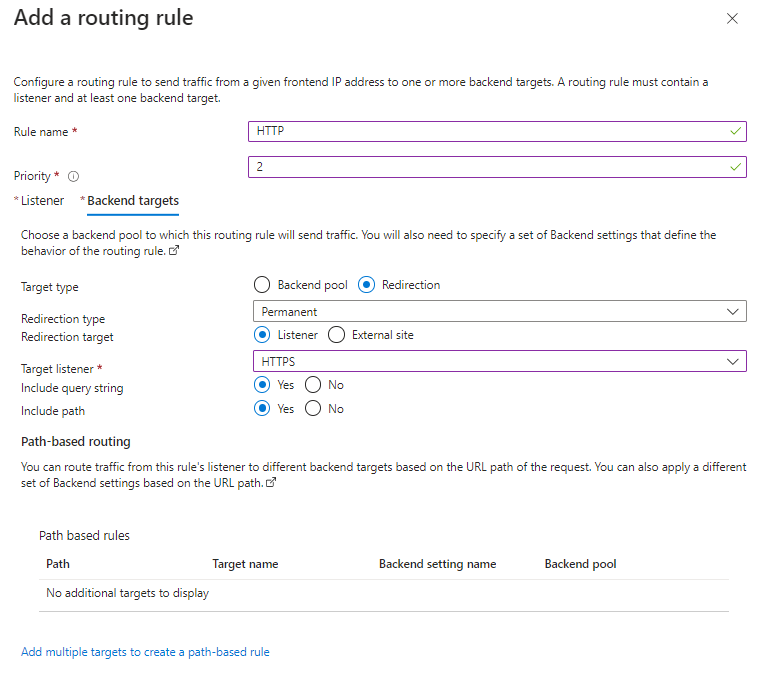
Click on the Backend targets tab located next to Listener
Change the Target Type to Redirection
Set the Target listener to HTTPS
Select Next: Tags and then Next: Review + Create.
Adding Health Probes
Load balancers monitor the status of application servers with a health probe. The health probe adds or removes servers/VMs from the load balancer based on their response to health checks.
If a server were to fail its health check, the load balancer then redirects traffic away from that server until it passes the next health check.
Open the newly created AAG (Azure Application Gateway)
From the left panel, click on Health Probes
Give a Name
Set the protocol to HTTPS
Set the “Pick host name from backend settings” to No and enter the Host Name
Set the “Pick port from backend settings” to Yes
Set the path to
/home/healthcheckSet the Interval to 30 seconds
Set the Timeout to 30 seconds
Set the Unhealthy threshold to 3 seconds.
Set “Use probe matching conditions to Yes
Select the already created Backend settings
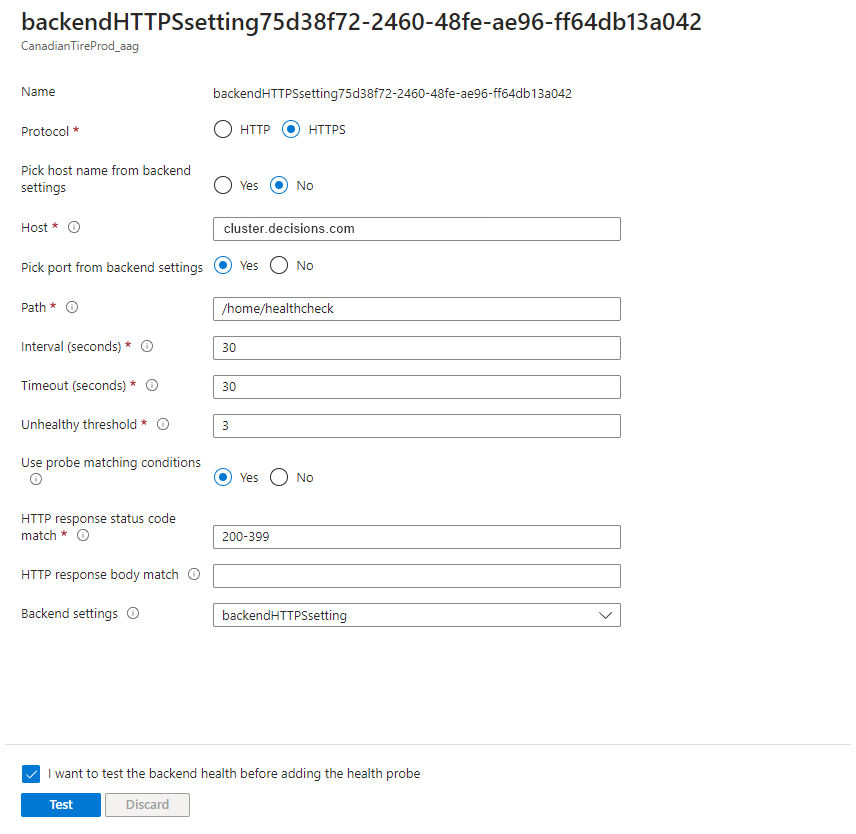
Once the health probe is added, it will test the health of the servers, and it should be a green check for all the backend servers, denoting that the servers are healthy.

Test the Application Gateway
As the SSL is added at the front end of the LB, users should be able to hit the configured Fully Qualified Domain Address of the server. e.g., https://cluster.decisions.com.