Overview
Administrators manage Accounts and creation in the System > Security > Accounts folder. Accounts contain login credentials, user-related personal information, and the groups to which the account belongs. This data can be used in a process in various Designer Elements.
Permissions are granted at the account or group level. Account permissions override group permissions since they are a higher priority. Administrators may optionally install the Active Directory (AD) module to authenticate accounts. This can be complemented with Single-Sign-On (SSO) to secure server logins.
Default Accounts
There are four pre-built accounts; these accounts are found by navigating to System > Security > Accounts.
| Account Name | Account Purpose | Safely Removeable? |
|---|---|---|
| Admin | This account is the default admin account set up during installation. | No, the email and password are configurable to be used by an Administrator. |
| GUEST | Must be enabled to be used. Useful for exposing Designer Elements to be consumed without authentication. Provides limited Portal access to engage with Designer Elements. | It can be activated and deactivated; deleting this account is not recommended. |
| SYSTEM | Runs all back-end processes. | No, do not delete this account and do not move it from the Administrators group. |
| ExternalSystem | Manages assignments for the Wait on External System step and External Forms. | It can be activated and deactivated; deleting this account is not recommended. |
Create Account
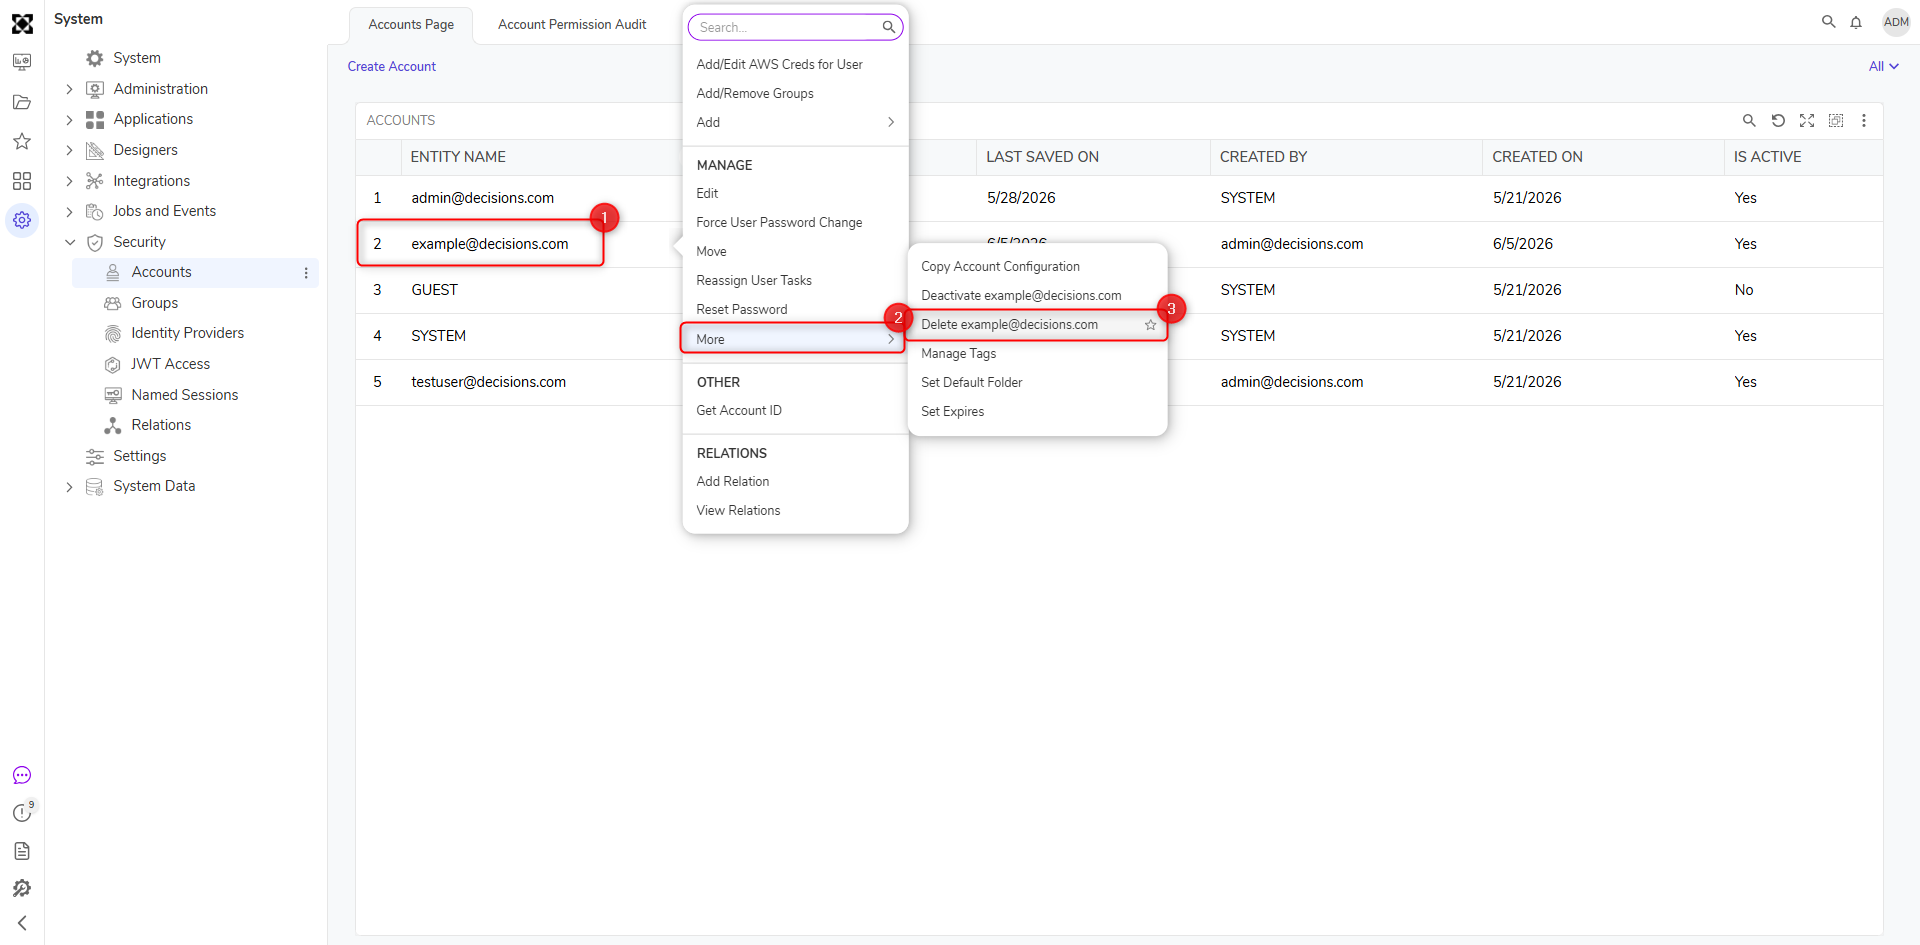
Create and manage Accounts by navigating to System > Security > Accounts. To create an Account, select CREATE ACCOUNT. To edit an account, right-click any account to show the action menu. Once all necessary fields are filled out, select CREATE ACCOUNT.
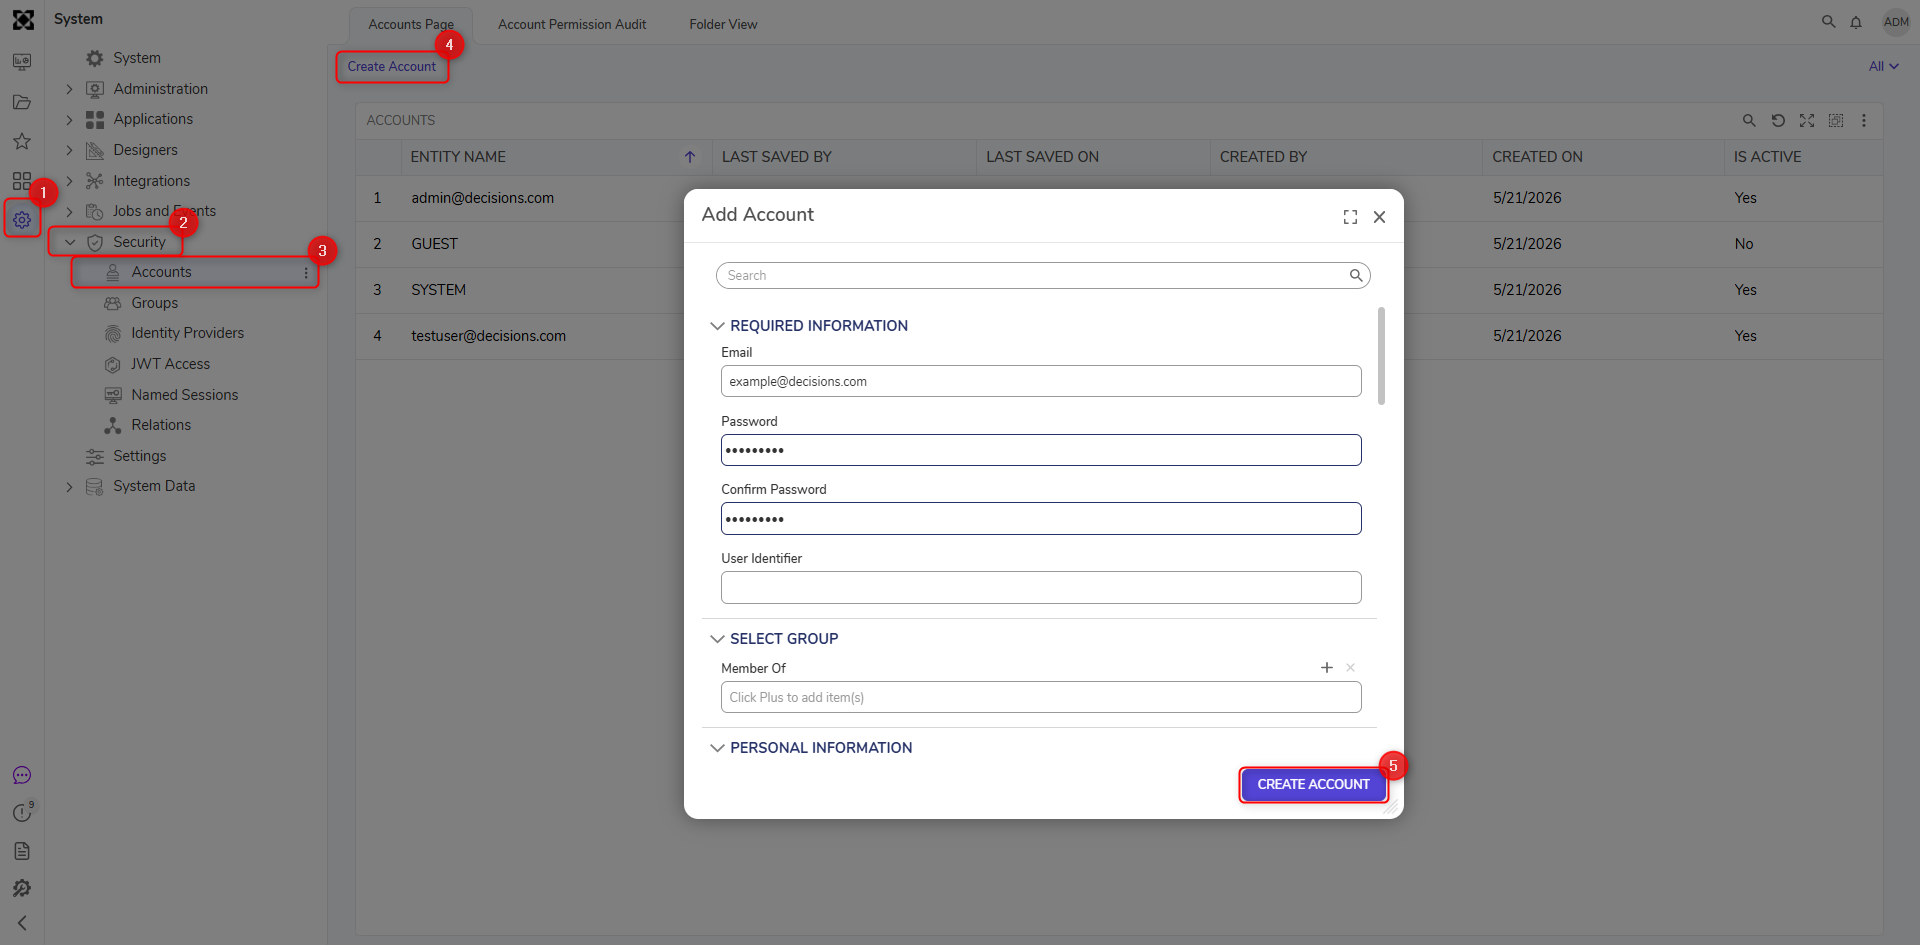
Required Account information
The following fields must be filled to create a new account in the instance:
| Setting Name | Description |
|---|---|
| Prompts for the email of the account to create. Either the email or the user identifier value can be used during login. | |
| Password | Prompts for the password for the email account. |
| Confirm Password | Prompts to reenter the password again to confirm accuracy. |
| User Identifier | Prompts for a username attached to the user account. If left blank, then the user may log in with only their email address. |
Optional Account information
Further identifying information may be specified in the optional account creation fields. Fields marked with an asterisk * are only available after initial Account creation.
| Property Name | Description |
|---|---|
| Employee ID | Prompts for the employee ID of the account user. |
| First Name | Prompts for the account user's first name. |
| Middle Name | Prompts for the account user's middle name. |
| Last Name | Prompts for the account user's last name. |
| Initials | Prompts for the account user's initials. |
| Department | Prompts for the account user's department. |
| Job Title | Prompts for the account user's job title. |
| Company | Prompts for the account user's employer. |
| Manager | Allows selection of which groups this account will manage. |
| Location | Allows selection of the default login location in the instance for the account. |
| Is Active | Toggles setting the account as active in the instance. |
| Is Confirmed | This setting marks the account as a valid and authenticated account. If unchecked, the account will not be allowed to log into the portal. |
| Can Use Portal | Toggles permission to access the Portal. |
| Language | Allows selection of which language the account uses. Options are populated based on the language added under System > System Data > Languages. |
| Timezone | Allows selection of which time zone the account exists under. |
| User Culture | Allows selection of the account's user culture. |
| Phone | Prompts for the phone number(s) associated with the user account. |
| Member Of | Allow selection of which group(s) the new account will belong to upon creation. The account will automatically adopt the same permissions of the group(s) it joins. |
| Address | Prompts for the address(es) associated with the account's user. |
| Allowed Impersonations | Allows selection of which accounts the new account is allowed to impersonate. |
| Email Addresses | Prompts for additional email address(es) associated with the user account. |
| Instant Messenger | Prompts for instant messenger information associated with the user account. |
| Other Contact | Prompts for other additional contact details associated with the account. |
| * User Type | Provides drop down to select Machine or Person as a User Type. |
| * Default Folder | If configured, this Folder will serve as a "Landing Page" for the Account. |
| * Entity Description | Provide a description of the Account. |
| * Allowed IP Addresses | Access to the platform can be restricted based on allowed IP Addresses. |
Deleting an Account
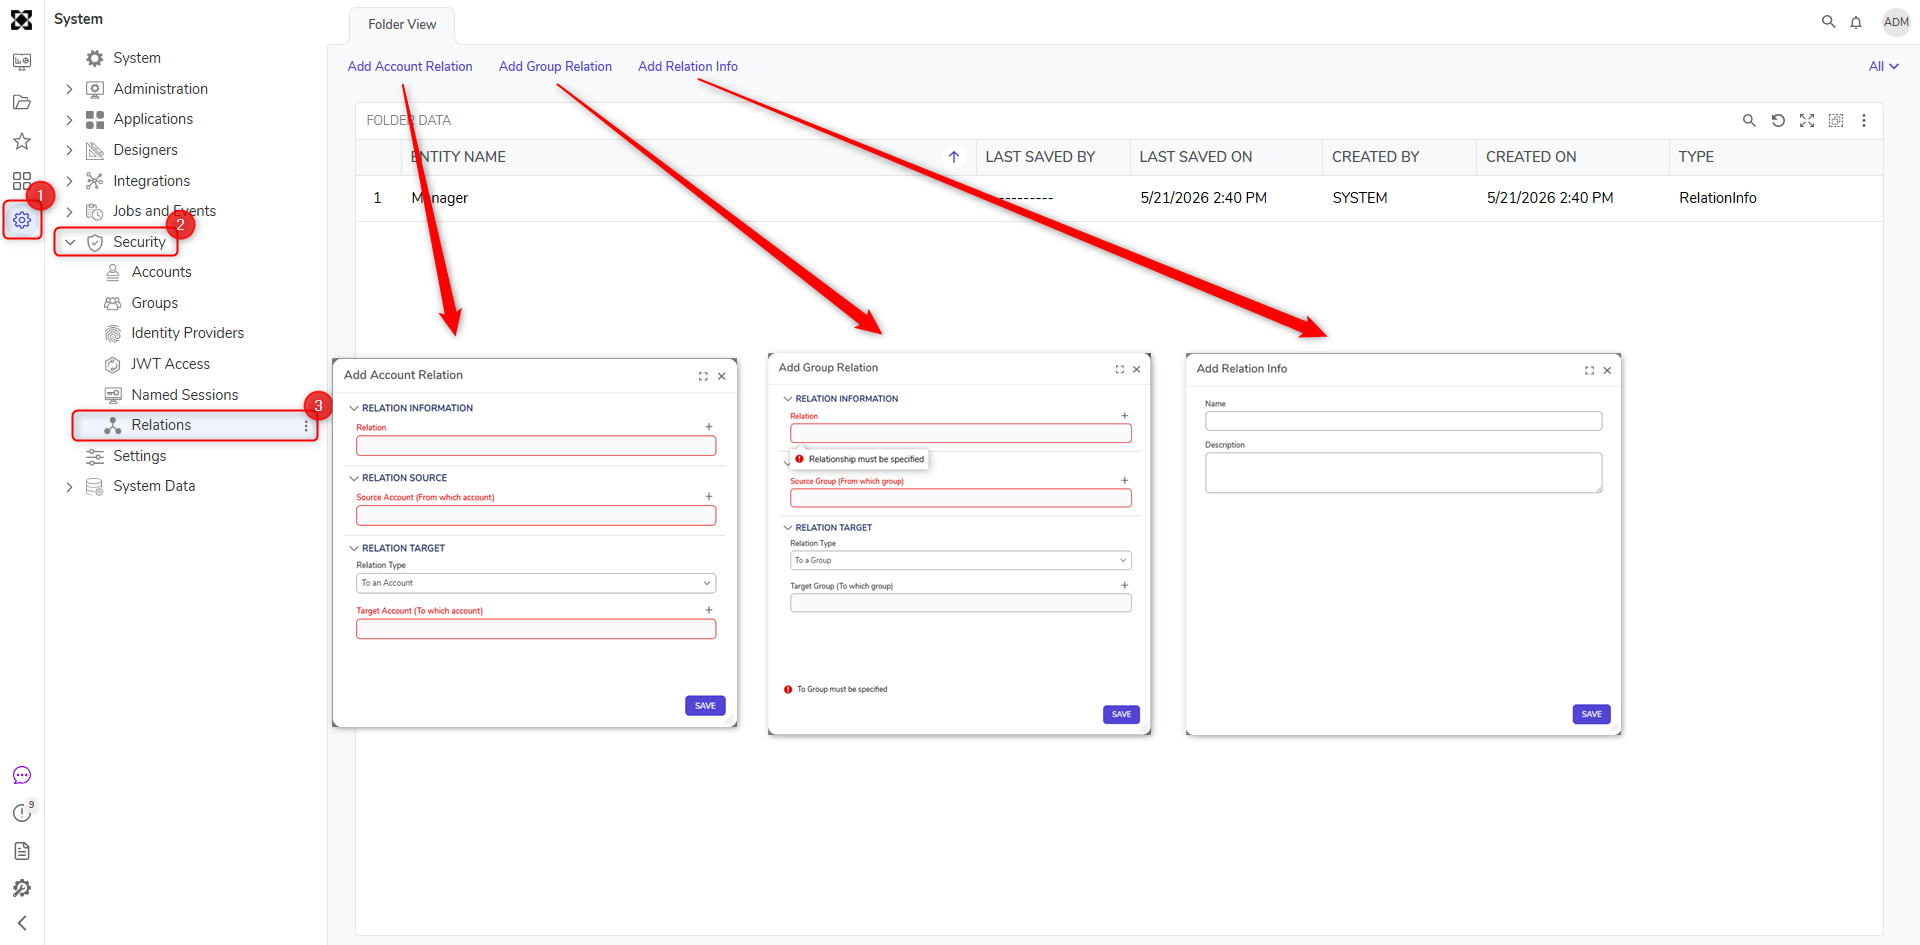
Account Relations
Relations are designated relationships Administrators can create that dictate how Accounts and Groups interact with each other. Within the platform, navigate to System > Security > Relations to locate the Relations Dashboard. The three user actions that are available on the Relations Dashboard are ADD ACCOUNT RELATION, ADD GROUP RELATION, and ADD RELATION INFO. Administrators can add any of the three options by selecting the type of Relation they would like to create from the Action Bar, Inputting the required information, and clicking SAVE.
Feature Changes
| Description | Version | Release Date | Developer Task |
|---|---|---|---|
| The ProcessMining account only appears once Process Mining has been enabled, and not by default. | 9.12 | June 2025 | [DT-044670] |
| Reorganized the properties of the Add Account menu. | 9.14 | August 2025 | [DT-044402] |